
CE754810 - Multicocina MOULINEX - Manual de uso y guía de instrucciones gratis
Encuentra gratis el manual del aparato CE754810 MOULINEX en formato PDF.
| Tipo de producto | Multifuncional con cocción a presión |
| Marca | Moulinex |
| Modelo | CE754810 |
| Dimensiones (aprox.) | 30 x 30 x 30 cm |
| Peso (aprox.) | 5,5 kg |
| Alimentación | 220-240 V, 50-60 Hz, 1200 W |
| Capacidad de la cubeta | 5 L (marca MAX sin sobrepasar) |
| Presión de cocción | 70 kPa |
| Material de la cubeta | Revestimiento antiadherente |
| Junta de sellado | Silicona, reemplazable (cada 2 años) |
| Funciones principales | 10 programas automáticos: Estofado, Sopa, Salteado, Vapor, Pastel, Sous vide, Arroz, Yogur, Porridge, Modo Chef |
| Mantener caliente | Hasta 24 h |
| Inicio diferido | De 10 min a 12 h |
| Accesorios incluidos | Cazo, espátula, vaso medidor, cesta vaporera |
| Mantenimiento y limpieza | Limpieza de las válvulas, junta, cubeta y tapa con agua jabonosa; no sumergir la carcasa; no poner cubeta ni tapa en el lavavajillas (accesorios únicamente) |
| Seguridad | Válvula de descompresión, válvula flotadora, bloqueo de seguridad, parada automática en caso de sobrepresión |
| Piezas de repuesto y reparabilidad | Junta de sellado, cubeta de cocción, válvulas accesibles; reparación solo por centro autorizado |
| Garantía | Garantía limitada internacional; garantía no aplicable por uso no conforme |
Preguntas frecuentes - CE754810 MOULINEX
Preguntas de los usuarios sobre CE754810 MOULINEX
0 pregunta sobre este aparato. Responde a las que conoces o haz la tuya.
Hacer una nueva pregunta sobre este aparato
Descarga las instrucciones para tu Multicocina en formato PDF gratis! Encuentra tus instrucciones CE754810 - MOULINEX y toma tu dispositivo electrónico nuevamente en la mano. En esta página están publicados todos los documentos necesarios para el uso de su dispositivo. CE754810 de la marca MOULINEX.
MANUAL DE USUARIO CE754810 MOULINEX
Te damos la bienvenida al mundo de la comida<rápida y deliciosa.
Con Turbo Cuisine nos'enfantamos aldesafio de reinventar la olla de coccion: Más fácil. Más sabor. Simplemente mejor!
Turbo Cuisine, disénada según este principio, te permite ahorrar tiempo y cocinar deliciosos platos caseros con total sencillez y comodidad.
Gracias de nuevo por darnos la bienvenida a tu cocina.
Ahora, javamos a cocinar!
ES
CONTENIDO
Guia de inicio=rápido en imágenes 4
Recomendaciones de Moulinex paraunar la seguidad 131
Todas las piezas del producto 139
Familiararize con el panel de control 140
Guia de uso y limpieza 141
Guia para la solución de problemas技术和.......... 155
Garantía limitada internacional de Moulinex 285
RECOMENDACIONES DE MOULINEX PARA PRIMAR LA SEGURIDAD
La seguridad es nuestra principal prioridad. Diseñamos y fabricamos nuestros productos con altos estandares de sécurité y Tecnología. Sin embargo, alusual que conequalier aparato electrico, hayalgunos posibles riesgos, por lo que te invitamos a tener un cierto grado de cuidado y a seguir las instrucciones.
INSTRUCCIONES DE SEGURIDAD
Tómate tu tiempo para leer detenidamente todas las instrucciones y guardalias para futuras consultas.
- El uso Incorrecto del aparato y sus accesos podrá dañarlo y provocar lesiones.
- El aparato cocina alimentos a presión. Un uso Incorrecto pueda provocar quemaduras debido al vape.
- Por tu seguridad, este producto cumple todas las normas y regulaciones aplicables (directiva de bajo tension, compatibiliad electromagnética, materiales aptos para el contacto con alimentos, relacionadas con el medioambiente, etc.).
- El aparato incluye la fuente de calor necesaria para cocinar.
- Solo para uso en interiores.
- Este aparato está Diseñado solo para uso dométrico. No está Diseñado para utiliser en las siguientes aplicaciones y la garantía no se aplicará en dichos casos: - Areas de comida reservadas para el personal en tiendas, ofecinas y othernlos de trabajo;
-casarsurales;
- uso por parte de los clients en hoteles, moteles y otros entornos residenciales;
- hostales.
- No coloques el aparato en unorno caliente ni en una placacaliente.No coloques el aparatoerca de una llama vivo ni de un objecto inflamable.
- Utiliza una superficie de trabajo plana, estable y resistente al calor lejos de posibles salpicaduras de agua.
2. ¿Quién puede usarlo de forma segura?
- Este aparato no debe ser uso por personas (esto incluye niños) con capacities fisicas, sensoriales o mentales limitadas, o sin experiencia o conocimientos, salvo que estén bajo supervisión o reciban instrucciones relacionadas con el uso del aparato por otra persona responsable de su seguridad.
- Este aparato pueda usarlo personas con incapacidades fisicas, sensoriales o mentales, o con falta de conocimientos y experiencia, siempre que@cuenten con supervisión o hayan recibido instrucciones sobre el uso seguro del aparato y entiendan los riesgos que implica.
- Los niños no peuvent usar este aparato. Mantén el aparato y el cable的最后一 alcance de los niños.
- Los niños no deben hacer algo con el aparato.
- Deberá vigilarse a los niños para garantizar que no jugan con el aparato.
3. ¿Có como能把 utiliserse de forma segura? Uso general
-
No Utilities el aparato para otro uso que no sea el previsto.
-
No Utilities el aparato para freir alimentos en aceite. Solo se permite sofreir alimentos.
- No uses la olla a presión en modo de presión para freir alimentos.
- Para cocinar alimentos pastosos, agita suavamente la olla antes deAbrir la tapa para evaporar la expulsion del contenido.
- Este aparato no es un esterilizador. No lo usa para esterilizar tarros.
- Este aparato no está Diseñado para utilizar junto con un temporizador externo ni un sistema independiente de control a distancia.
- Utiliza siempre las dos asas laterales de la carcaja del aparato para transporte. Utiliza guantes de cocina si el aparato está caliente. Para mayor seguridad, asegúrate de que la tapa está bloqueada antes de transporte el aparato.
- El fondo del recipiente de coccción y la placca calefactora deben estar en contacto directo. Retira cualquier objecto o residuo de comida situado entre el recipiente de coccción y la placca calefactora, ya que podra afectar al rendimiento
- Ten en cuenta que ciertos temas de alimentos, tales como la compota de manzana, los arándanos rojos, el ruibarbo, lacebada perlada, laavenu uothers cereales,los guisantes, los fideos o la pasta能把 formar espuma, salpicar y obstruir las valvulas. Ten cuidado al cocinar这些东西 delalimentos y,soon de su uso, limpia bien las valvulas.
-
Ten enIELD quealgunas recetas que incluyen leche poden formar espuma, rebosar y obstruir las valvulas. Ten cuidado al preparar estas recetas y,despues de su uso, limpia bien las valvulas.
-
Después de cocinar carne queonga una capa exterior de piel (como la lengua de buey), que podra hincharse con el efecto de la presión, no perfores la piel afterwards de cocinarla si parece hinchada: PODías quemarte. Perfórala antes de cocinar.
- No Utilities el aparato vacío, sin el recipiente de coccción o sin ingredientes en su interior. Estado所提供provocar graves daños al aparato.
- No uses el disposativo bajo presión sinañadir agua, porque podría sufir días graves.
- No llenes el aparato sin su recipiente de cocccion.
- Precaución: No derrames liquido sobre el enchufe.
- No calientes el recipiente de coccción con ninguna另一边 fuente de calor que no sea la placca calefactora del aparato y no提供优质encias Ninguna另一边 olla. No Utilities el recipiente de coccción conthers aparatos.
- Utiliza el recipiente de coccción SOLO en el aparato. No la Utilities para cocinar sobre hornillas, en elorno, etc.
- Utiliza una cucchara de plástico o de madera para evitar daños en la capa antiadherente del recipiente de coccción. No cortes los alimentos directamente el recipiente de coccción.
- No toques las valvulas, excepto durante la limpieza y el mantenimiento del aparato de acuerdo con las instrucciones proportionadas.
- No coloques objetos extraños en las valvulas ni en el botón de despresuración. No sustituyas la valvula.
-
Comprueba con regularidad los conductos de las valvulas que permiten la calidad de vapor para asegurarte de que no está bloqueados.
-
No Utilities un paño ni ningún除外 lobjecto entre la tapa y la carcasa para hacer la tapa进去a. Estó poderradaar la junta de sellado de forma permanente.
- No dejes el cable来电lico colgando por el borde de la mesa o la encimera, ni en contacto con superficies calientes.
4. ¿Cómo usar de forma segura antes de cocinar?
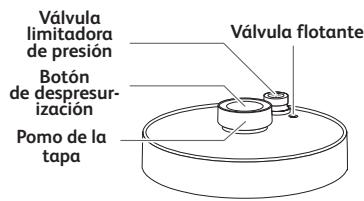
- Antes de utiliser el aparato, comprueba que la valvula flotante y la valvula limitadora de presión está limpias.
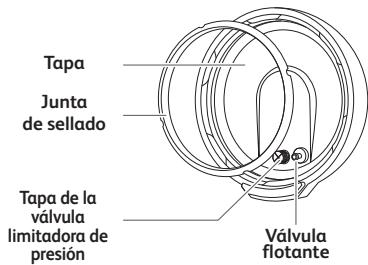
- Antes de utiliser el aparato, comprueba que la junta de sellado está correctamente instalada en la tapa.
- Asegúrate de que el fondo del recipiente de coccción y la placà calefactora está siempre limpios. Asegúrate de que la parte central de la placà calefactora se mueve.
- No llénes el aparato por encima de lamarca MAX del recipiente de coccción.
- Sigue las recomendaciones sobre el volumen de alimentos y agua paraatar el riesgo de que se detramen al hervir, lo que podra darar el aparato y provocar lesiones.
- Asegúrate de que el aparato está bien cerrado antes deponerlo a presión.
5. ¿Có como usar de forma segura durante la coccion?
- No intentesAbrir la tapa hasta que la presión haya disminuido lo suficiente. No intentesAbrir la tapa hasta que la valvula flotante haya bajo del todo.
- No fuerces nunca el aparato para abrirlo.
-
Durante la coccción y la liberación de vapor al final de la coccción, el aparato emite calor y vapor. Mantén la cara y las manos alejadas del aparato para evaporar quemaduras. No toques la tapa durante la coccción.
-
No muevas el aparato cuandoonga presion. Utiliza las asas para moverlo y ponte guantes de cocina, si esnecessary. No efectives el pomo de la tapa para levantar el aparato.
- No retires el recipient de coccción cuando el aparato está encendido.
- En el modo para sofreir, ten cuidado con el riesgo de quemaduras causadas por salpicaduras alañadir alimentos o ingredientes al recipiente de coccción caliente.
6. ¿Có como usar de forma segura afterwards de cocinar?
- Cuando abras la taps, sujétala siempre por el pomo. Pon el brazo en paralelo a las asas laterales. Podría quedar agua hiriendo atrapada entre la junta de sellado y la tapa y provocar quemaduras.
- Ten cuidado también con el riesgo de quemaduras por el vapor que sale del aparato alAbrir la tapa. Abre primero la tapa ligeramente para que el vapor salga poco a poco.
- No toqués las superficies calientes del aparato. Después de su uso, la superficie de la placacalefactora)puede permanecer caliente hasta 2 horas.
- Desenchufa el aparato de la toma de corriente cuando no lo usa y antes de limpiarlo. Deja que se enfrie antes deponer o quitar las piezas.
7. ¿Có como efectuar la limpieza de forma segura?
- Limpia con un paño la parte inferior del recipiente de coccción y la placacalefactoradespuésde cada uso.
- No sumerjas nunca el aparato en agua.
- Para limpiar el aparato, consulta las instrucciones de uso. Puedes lavar el recipiente de coccyon y la tapa con agua caliente y jabón; no los laves en el lavavajillas. Limpia la carcasa del aparato con un paño humedo.
8. ¿Qué hacer en caso de días?
- El producto solo puede ser reparado por personal aprobado del serviceo técnico oficial.
- No Utilities ningún aparato bajo cable electrico o enchufe estén danados, tampoco si el aparato no funciona correctamente o está danado. Devuelve el aparato al servicios técnico oficial más cercano para su revisión, reparación o ajuste.
- Si el cable electrico está dañado, deben sustituirlo un servicios专业技术e para Severityar cualquier peligro. No sustituyas el cable electrico suministrado con otros cables.
- No danés la junta de sellado. Si está dañada, sustitúyela en un serviceño oficial.
- Sustituya la junta de sellado cada 2 años o antes si observas que está desgastada o debenambiarse.
- Utiliza únicamente las piezas de repuestos adecuadas para tu modelo. Esto es especialmente importante para la junta de sellado y el recipiente de coccción.
- Utiliza únicamente piezas de repuestos vendidas en un service Tecnico oficial.
- El uso de accesos no recomendados por el fabricante del aparato pueda provocar lesiones.
- No Utilities或者其他 recipientes de coccción en el aparato en lugar del suministrado. Sustituya el recipiente de coccción únicamente por una pieza de repuesto original Diseñada para su uso con este producto.
- De(acuerdo con la normativa vigente,antesde desecchar un aparato que ya no sea necessario,el aparato debe inutilizarse (desenchufalo y desconecta el cable electrico).
j i Participe en la conservacion del medio ambiente !!

① Su electrodomestico contiene materiales recuperables y/o reciclables.
- Entreguelo al final de su vida uyil, en un Centro de Recogida Especialico o en uno de nuestros Servicios Oficiales Post Venta donde sera tratado de forma adecuada
9. ¿Cuando se aplicá la garantía?
- La garantía no cubre el desgaste anomal del recipiente de coccción.
- Lee atentamente estas instrucciones de uso antes de usar por primera vez el aparato. Cualquier uso que no se ajuste a estas instrucciones exime al fabricante de cadaquier responsabilidad y anulará la garantía.
- Si se realiza un uso comercial, un uso inapropiado o un uso contrario a las instrucciones, el fabricante declinará cualquier responsabilidad y la garantía no sera网络安全.
TODAS LAS PIEZAS DEL PRODUCTO

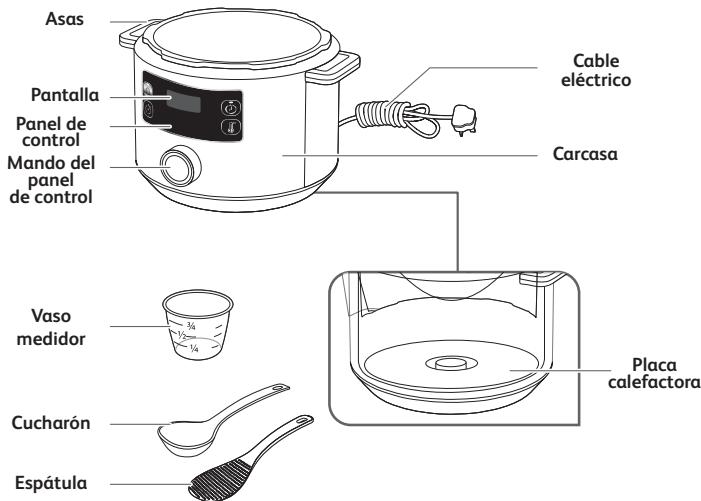
FAMILIARZARSE CON EL PANEL DE CONTROL

MENSAJES DE ESTADO


Mensaje de bienvenida al encender el aparato.
Visualización de la hora. En este exemple: 1 horas 30关键时刻.
Visualizacion de la temperatura. En este exemple: 114 grados centigrados.
Indica que el programa Tiene un ajuste de temperatura/tiempo automatico predeterminado. No se pueda modifier.
Indica que la temperatura está aumento durante la fase de precalentamento.
Indica que el aparato se está precalentando.
Indica que el aparato está en fase de Maintener caliente.
Indica que el programa se ha interrupido.
Indica que el aparato está en modo standby.
GUIA DE USO Y LIMPIZA
No dudes en consultar las figuras indicadas como (fig. x) de la sección Guía de inizio rápido.
ANTES DE LA PRIMERA UTILIZACION
1. Retira el embalaje
- Saca el aparato del embalaje y lee el manual de instrucciones antes de la primera utilizacion.
- Quita las pegatinas promociones (si las hubiera) del aparato antes de utiliser por primera vez.
2. Abre la tapa
- Para partir la tapa, sujeta el pomo de la tapa, giralo en sentido contrario al de las agujas del reloj y levanta la tapa (fig. 1 y 2).
Nota: Al levantar la tapa, pueda occurrir que el recipiente permaneceza unido a la tapa. Es normal y simplement demuestra una buena hermeticidad del producto. Para evaporar que el recipiente caiga pesadamente sobre el producto al abrir la tapa, abrela siempre con cuidado.
- Coloca el aparato en una superficie plana. Retira todos los materiales protectores y accesos del interior del aparato (fig. 3).
3. Limpia todas las piezas del aparato
3a. Limpia la tapa, el recipiente de cocción y los accesorios
- Limpia la tapa, el recipiente de cocción y los accesorios con una esponja suave y agua caliente con jabón (fig. 4).
- Seca la tapa, el recipiente de coccción y los accesorios (fig. 5)
- No Utilities estropajos ni esponjas abrasivas para limpiar el recipiente de cocción, ya que podías dar a capa antiadherente del recipiente (fig. 40).
- Nosumerjas nunca el aparato en agua (fig. 41).
- Si sumergeles aparato en agua por accidente o derramas agua directamente sobre la placacalefactora,lleva el aparato a un service Tecnico oficial para su reparacion.
- No laves la tapa ni el recipiente de coccyon en el lavavajillas (fig. 42).
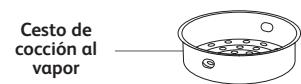
- Ten enIELD que solo peuvent lavarse en el lavavajillas los accesos: cucharon, espátula, vaso medidor y cesto de cocción al vapor.
3b. Limpia la junta de sellado
- Retira la junta de sellado de la tapa y limpiala con una esponja suave y agua caliente con jabón (fig. 7 y 8).
- Sécala bien.
- Coloca la junta de sellado sobre la ranura para la junta de sellado y presiona hasta que encaje en su situo (fig. 9). Presionafirmamente hacer abajo para asegurarte de que no se forma ningún pliegue y de que la junta de sellado está ajustada en la ranura.
- Después de colocar la junta de sellado, si abres la tapa demasiado rápido, pueda que el recipientente de coccción permanezca unido a la tapa (fig. 37 y 38). Espera unoicosometimeshastaqueelrecipienteseuelte de la tapa (fig. 39).
Nota: Es normal y simplement demuestra una buena hermeticidad del producto. Para evaporar que el recipientiente caiga pesadamente sobre el producto al abrir la tapa, abrela siempre con cuidado.
ADVERTENCIA: No有用的 Nunca el aparato sin la junta de sellado (fig. 44)
3c. Limpia las valvulas
- Para limpar la valvula limitadora de presión, retira la valvula del tubo situado en la parte superior de la taps (fig. 10). Límpiala con una esponja suave y agua caliente con jabón (fig. 11). Una vez seca, asegúrate de que el conductor del tubo está limpio antes de volver a colocar la valvula limitadora de presión en el tubo de la parte superior de la tapa (fig. 12). Asegúrate de que la valvula limitadora de presión está bien colocada y que se mueve hacía arriba y hacía abajo.
- Para limpiar la tapa de la valvula limitadora de presión, disenrosca la tapa de la valvula limitadora de presión desde el interior de la tapa (fig. 13). Limpiala con una esponja suave y agua caliente con jabón (fig. 14). Una vez seca, asegúrate de que el conductor del tubo está limpio antes devoltar a enroscar la valvula limitadora de presión en la tapa (fig. 15).
- Para limpiar la valvula flotante, quita la junta de la valvula flotante del interior de la tapa y da la vuelta a la tapa para que la valvula flotante pueda salir de la tapa (fig. 16). Limpia la junta y la valvula flotante con una esponja suave y agua caliente con jabón (fig. 17). Una vez seca,(valeur a insertar la valvula flotante en la tapa y colocla la junta en su lugar (fig. 18). Asegúrate de que la valvula flotante está bien colocada y que se mueve hacía arriba y hacía abajo.
3d. Limpia la carcasa del aparato
- Limpia la carcaza del aparato con un pañó humedo.
- No sumerjas nunca el aparato en agua (fig. 41).
- Limpia la placacalefactora con un pano seco.
INSTRUCCIONES DE USO
-
Coloca los ingredientes en el recipiente de coccción
-
Retira el recipiente de cocción de la carca.
- Coloca los ingredientes en el recipiente de cocccion.
- Ten en cuenta que el nivel de alimentos y liquidos no debe superar nunca lamarca de nivel mayor del recipiente de cocccion (fig. 19).
-
Al cocinar ingredientes queurrentan de時間 durante la cocción, como verduras deshidratas o arroz, asegurar de que solo llenas la olla hasta la mitad del nivel de capacité máximo.
-
Coloca el recipiente de coccyon en la carcasa
-
Asegúrate de que la parte inferior del recipiente de coccción está limpia y seca, y elimina los restos de comida de la placá calefactora (fig. 20).
- Coloca el recipiente de coccción en la carcasa (fig. 21).
-
No Utilities nunca el aparato sin el recipiente de coccción.
-
Cierra y bloquea la tapa
-
Comprueba que la junta de sellado está bien colocada en la tapa (fig. 43).
-
Sujeta el pomo de la tapsa, colocata la tapsa en el aparato y gira el pomo en el sentido de las agujas del reloj para bloquear la tapsa (fig. 22).
-
Conecta la valvula limitadora de presión
-
Coloca correctamente la valvula limitadora de presión en la tapa (fig. 23). Ten enIELD que la valvula permanecera un poco suelta, es normal.
-
Encendido del aparato
-
Desenrolla Completely el cable electrico y enchufalo a la red (fig. 24).
-
El aparato emite un pitido, la pantalla parpadea y muestra HED.
-
SeLECTIONA e inicia un programa de coccción
-
Cada programa tiene un tiempo y unaTemperatura predeterminados y requiere una posicion de la tapa concreta.Consulta la tabla de programas de cocciencia:
TABLA DE PROGRAMAS DE COCCION
| Icono del programa de cocation | Nombre del programa de cocation | Tiempo de cocation predeterminado | Tiempo ajustable | Temperatura predeterminada | Temperatura ajustable | Presión predeterminada | Programación diferida de 10 min a 12 h | Mantener caliente hasta 24 h | Estado de la tapa | ||
| Cerrada y bloqueada. | Tampa cerrada pero sin bloquear | Tampa abierta | |||||||||
| Estofado | 30 min | de 1 min a 2 h | 114 °C | No | 70 kPa | Sí | Sí | ● | |||
| Sopa | 12 min | de 1 min a 2 h | 114 °C | No | 70 kPa | Sí | Sí | ● | |||
| Saltear | 20 min | de 1 min a 1 h | 160 °C | Si, de 100 °C a 160 °C | No | No | No | ● | |||
| Vapor | 10 min | de 1 min a 2 h | 114 °C | No | 70 kPa | Sí | Sí | ● | |||
| Hornear | 40 min | de 1 min a 2 h | 160 °C | Si, de 100 °C a 160 °C | No | Sí | Sí | ● | |||
| Cocción al vacio/fuego lento | 4 h | de 30 min a 12 h | 85 °C | Si, de 55 °C a 95 °C | No | Sí | No | ● | ● | ||
| Arroz | 8 min | de 1 min a 2 h | 114 °C | No | 70 kPa | Sí | Sí | ● | |||
| Yogur y fermentado | 8 h | de 30 min a 12 h | 30 °C | Si, de 22 °C a 40 °C | No | No | No | ● | ● | ||
| Gachas | 15 min | de 1 min a 2 h | 100 °C | No | No | Sí | Sí | ● | |||
| Modo Chef ajustable | 30 min | de 1 min a 4 h | 80 °C | Si, de 70 °C a 160 °C | No | No | Sí | ● | ● | ● | |
Nota: Al cocinar, es possible que notes unaITTLE fuga de vapor por la tapa, sobre todo por la valvula limitadora de presion. Este es normal y ocurre cuando se acumula presion.
Consulta las figuras de la Guía de inizio rápido (fig. 25 a fig. 36)

Programa de estofado
- Coloca los ingredientes en el recipiente de cocccion. Cierra y bloquea la tapa.
- Gira el mando del panel de control hacer la derecha hasta临港 al programa de estofado. La pantalla muestra el tiempo de coccción pre-determinado.
- Oportun: Pulsa y ajusta el tiempo deseado girando el mando del panel de control hacía lackecha (para augmentar el tiempo) o hacía la izquierda (para reducir el tiempo).
- Pulsa para iniciar el programa de coccción.
- El aparato inicia la fase de precalentamento. La pantalla muestra alternativamente y se enciende el indicator luminoso de precalentamento.
- Cuando finaliza la fase de precalentimiento, el aparato cambia automatistically a la fase de coccción. La pantalla muestra la cuenta detrás y se enciende el indicator luminoso de coccción en bajo.
- Durante el proceso de coccción, se acumula presión en el aparato y empuja la valvula flotante hacía arriba. El indicator luminoso de presión se enciende para indicar que la tapa no se pueda abrir sin despresurar antes el aparato.
- Al final de la cuenta extras, el aparato emite un pitido y la pantalla muestra [End].
- Después de unosegundos, el aparato cambiará automatistically a la fase paramantener caliente. La pantalla muestra HDE y se enciende el indicator luminoso demantener caliente [m]
- Pulsa durante 3segundos para detener el programa en cualesquimimento.

Programa de sopa
- Coloca los ingredientes en el recipiente de cocccion. Cierra y bloquea la tapa.
-
Gira el mando del panel de control hacer la derecha hasta临港 al programa de sopa . La pantalla muestra el tiempo de coccción predeterminado.
-
Oportun: Pulsa y ajusta el tiempo deseado girando el mando del panel de control hacía lareshcha (para augmentar el tiempo) o hacía la izquierda (para reducir el tiempo).
- Pulsa para起初 el programa de coccción.
- El aparato inicia la fase de precalentamento. La pantalla muestra alternativamente y se enciende el indicator luminoso de precalentamento.
- Cuando finaliza la fase de precalentimiento, el aparato cambia automatistically a la fase de coccción. La pantalla muestra la cuenta detrás y se enciende el indicator luminoso de coccción en bajo.
- Durante el proceso de coccción, se acumula presión en el aparato y empujla la valvula flotante hacía arriba. El indicator luminoso de presión se enciende para indicar que la tapa no se pueda abrir sin despresurar antes el aparato.
- Al final de la cuenta除外, el aparato emite un pitido y la pantalla muestra [End]
- Después de uno segundos, el aparato cambiará automatistically a la fase para Maintener caliente. La pantalla muestra HDE y se enciende el indicator luminoso de Maintener caliente.
- Pulsa durante 3segundos para detener el programa en cualesquimimento.
Programa de salteado
- Gira el mando del panel de control hacia la derecha hasta临港 al programa de salteado. La pantalla muestra el tiempo de coccción predeterminado.
- Oportun: Pulsa y ajusta el tiempo deseado girando el mando del panel de control hacía lackecha (para augmentar el tiempo) o hacía la izquierda (para reducir el tiempo).
-
Ooptional: Pulsa y ajusta la temperatura deseada girando el mando del panel de control hacía la derecha (paraacular la temperatura) o hacía izquierda (para reducir la temperatura).
-
Pulsa para起初 el programa de coccción.
- El aparato inicia la fase de precalentimiento. La pantalla muestra alternativamente y se enciende el indicator luminoso de precalentamento.
- Cuando finaliza la fase de precalentimiento, el aparato cambia automatistically a la fase de coccción. La pantalla muestra la cuentailtras y se enciende el indicator luminoso de coccción en bajo.
- Coloca los ingredientes en el recipiente de coccción ydea la tapa abierta para saltearlos.
- Al final de la cuenta atras, el aparato emite un pitido y la pantalla muestra End.
- Después de unosegundos, el aparato cambiará automatistically al modostandby.La pantalla muestra
- Pulsa durante 3segundos para detener el programa en cualesquimimento.
Programa de cocccion al vapor
- Vierte 150 ml de agua (3/4 taza) en el recipiente de coccción, coloca los ingredientes en el cesto de coccción al vapor e introduce el cesto en el recipiente de coccción. Cierra y bloquea la tapa.
- Gira el mando del panel de control hacia la derecha hastaninger al programa de cocacion al vapor La pantalla muestra el tiempo de cocacion predeterminado.
- Ooptional: Pulsa y ajusta el tiempo deseado girando el mando del panel de control hacía la derecha (paraacular el tiempo) o hacía la izquierda (para reducir el tiempo).
- Pulsa para起初 el programa de coccción.
- El aparato inicia la fase de precalentimiento. La pantalla muestra alternativamente y se enciende el indicator luminoso de precalentamento.
-
Cuando finaliza la fase de precalentimiento, el aparato cambia automatistically a la fase de coccción. La pantalla muestra la cuentailtras y se enciende el indicator luminoso de coccción en bajo.
-
Durante el proceso de coccción, se acumula presión en el aparato y empujla la valvula flotante hacía arriba. El indicator luminoso de presión se enciende para indicar que la tapa no se pueda abrir sin despresurizar antes el aparato.
- Al final de la cuenta atras, el aparato emite un pitido y la pantalla muestra [End].
- Después de uno segundos, el aparato cambiará automatistically a la fase para Maintener caliente. La pantalla muestra +H0E y se enciende el indicator luminoso de Maintener caliente 0 .
- Pulsa durante 3segundos para detener el programa en cualesquimimento.

Programa de horneado
- Coloca la preparación en el recipiente de coccción y cierra la tapa pero no la bloquees.
- Gira el mando del panel de control hacer la derecha hasta临港 al programa de horneado. La pantalla muestra el tiempo de coccción pre-determinado.
- Oportun: Pulsa y ajusta el tiempo deseado girando el mando del panel de control hacía lackecha (para augmentar el tiempo) o hacía la izquierda (para reducir el tiempo).
- Oportun: Pulsa y ajusta la temperatura deseada girando el mando del panel de control hacía la derecha (paraacular la temperatura) o hacía izquierda (para reducir la temperatura).
- Pulsa para起初 el programa de coccción.
- El aparato inicia la fase de precalentamento. La pantalla muestra alternativamente y se enciende el indicator luminoso de precalentamento.
- Cuando finaliza la fase de precalentimiento, el aparato cambia automatistically a la fase de coccción. La pantalla muestra la cuenta atrás y se enciende el indicator luminoso de coccción en bajo.
-
Al final de la cuenta atras, el aparato emite un pitido y la pantalla muestra [End]
-
Después de uno segundos, el aparato cambiará automatistically a la fase para Maintener caliente. La pantalla muestra HOE y se enciende el indicator luminoso de Maintener caliente.
- Pulsa durante 3segundos para detener el programa en cualesquimimento.

Programa Cocción al vacio/fuego lento
- Gira el mando del panel de control hacer la derecha hasta临港 al programa de coccción al vacio (sous-vide) [w]. La pantalla muestra el tiempo de coccción predeterminado.
- Oportun: Pulsa y ajusta el tiempo deseado girando el mando del panel de control hacía lackecha (para augmentar el tiempo) o hacía izquierda (para reducir el tiempo).
- Oportun: Pulsa y ajusta la temperatura deseada girando el mando del panel de control hacía lacke (paraaculara temperatura) o hacía izquierda (para reducir la temperatura).
- Pulsa para起初 el programa de coccción.
- El aparato inicia la fase de precalentimiento. La pantalla muestra alternativamente y se enciende el indicator luminoso de precalentamento.
- Cuando finaliza la fase de precalentimiento, el aparato cambia automatistically a la fase de coccción. La Pantalla muestra la cuenta detrás y se enciende el indicator luminoso de coccción en bajo.
- Al final de la cuenta detrás, el aparato emite un pitido y la pantalla muestra [End]
- Después de uno segundos, el aparato cambiará automatistically al modo standby. La pantalla muestra ——.
- Pulsa durante 3segundos para detener el programa en cualesquimimento.

Programa de cocciencia de arroz
Coloca los ingredientes en el recipiente de cocccion. Cierra y bloquea la tapa.
- Gira el mando del panel de control hacía la derecha hastaninger al programa de cocccion de arroz 念 La pantalla muestra el tiempo de cocccion predeterminado.
- Oportun: Pulsa y ajusta el tiempo deseado girando el mando del panel de control hacía lackecha (para augmentar el tiempo) o hacía la izquierda (para reducir el tiempo).
- Pulsa para起初 el programa de coccción.
- El aparato inicia la fase de precalentimiento. La pantalla muestra alternativamente y HEARE y se enciende el indicator luminoso de precalentimiento.
- Durante el proceso de coccción, se acumula presión en el aparato y empuya la valvula flotante hacía arriba. El indicator luminoso de presión se enciende para indicar que la tapa no se pueda abrir sin despresurar antes el aparato.
- Al final de la cuenta extras, el aparato emite un pitido y la pantalla muestra Erid.
- Después de unosegundos, el aparato cambiará automatistically a la fase paramantener caliente. La pantalla muestra HDE y se enciende el indicator luminoso demantener caliente
- Pulsa durante 3segundos para detener el programa en cualesquimimento.

Programa de yogur y fermentado
El programa de yogur y fermentado se pueda utilizar para preparar yogur o para levar masa de pan/pastelería.
- Cuando hagas yogur, colocao los ingredientes en el recipiente de cocccion y cierra la tapa.
-
Al levar masas,=puedes amasarlas directamente en el recipiente de cocción, colocar el recipiente en la carcasa y cerrar la tapa.
-
Gira el mando del panel de control hacía la derecha hastaninger al programa de yogur y fermentado. La pantalla muestra el tiempo de cocción predeterminado.
- Oportun: Pulsa y ajusta el tiempo deseado girando el mando del panel de control hacía lareshcha (para augmentar el tiempo) o hacía la izquierda (para reducir el tiempo).
- Oportun: Pulsa y ajusta la temperatura deseada girando el mando del panel de control hacia la derecha (para augmentar la temperatura) o hacía la izquierda (para reducir la temperatura).
- Pulsa para iniciar el programa de coccción.
- El aparato inicia la fase de precalentamento. La pantalla muestra alternativamente y se enciende el indicator luminoso de precalentamento.
- Cuando finaliza la fase de precalentimiento, el aparato cambia automatistically a la fase de coccción. La pantalla muestra la cuenta atrás y se enciende el indicator luminoso de coccción en bajo.
- Al final de la cuenta atrás, el aparato emite un pitido y la pantalla muestra Erid.
- Después de unosegundos, el aparato cambiará automatistically al modo standby. La pantalla muestra
- Pulsa durante 3segundos para detener el programa en cualesquimimento.

Programa de gachas
- Coloca los ingredientes en el recipiente de cocccion. Cierra y bloquea la tapa.
Gira el mando del panel de control hacía la derecha hasta临港 al programa de coccción de gachas La pantalla muestra el tiempo de coccción predeterminado. -
Oportun: Pulsa y ajusta el tiempo deseado girando el man-do del panel de control hacía la derecha (para augmentar el tiempo) o hacía la izquierda (para reducir el tiempo).
-
Pulsa para,iniciar el programa de cocción.
- El aparato inicia la fase de precalentamento. La pantalla muestra alternativamente y se enciende el indicator luminoso de precalentamento.
- Cuando finaliza la fase de precalentimiento, el aparato cambia automatistically a la fase de coccción. La pantalla muestra la cuentailtras y se enciende el indicator luminoso de coccción en bajo.
- Al final de la cuenta atras, el aparato emite un pitido y la pan-talla muestra E-nd.
- Después de unosegundos, el aparato cambiará automatically a la fase paramantener caliente. La pantalla muestra y se enciende elindicador luminoso demantener caliente
- Pulsa durante 3 segundos para detener el programa en cualquier momento.

Modo Chef adjustable
- Coloca los ingredientes en el recipiente de cocccion y cierra o no la tapa segun la receta.
- Gira el mando del panel de control hacía la derecha hastaninger al modo Chef ajustable. La pantalla muestra el tiempo de cocción predeterminado.
- Oportun: Pulsa y ajusta el tiempo deseedo girando el mando del panel de control hacía lackecha (para augmentar el tiempo) o hacía la izquierda (para reducir el tiempo).
- Oportun: Pulsa y ajusta la temperatura deseada girando el mando del panel de control hacía la derecha (paraacular la temperatura) o hacía izquierda (para reducir la temperatura).
- Pulsa para起初 el programa de coccción.
- El aparato inicia la fase de precalentamento. La pantalla muestra alternativamente y se enciende el indicator luminoso de precalentamento.
-
Cuando finaliza la fase de precalentimiento, el aparato cambia automatistically a la fase de coccción. La pantalla muestra la cuenta detrás y se enciende el indicator luminoso de coccción en bajo.
-
Al final de la cuenta除外, el aparato emite un pitido y la pantalla muestra [End]
- Después de uno segundos, el aparato cambiará automatistically al modo standby. La pantalla muestra.
- Pulsa durante 3segundos para detener el programa en cualesquimimento.
- Sugerencia para recalarr rápidamente los platos: ajusta la temperatura a >=95C y cocina con la tapa cerrada sin bloquear.
7. Usa la función de programación diferida
La programacion diferida resulta efecto para preajustar el aparato y que comience a cocinar mas tarde.
- En primer lugar, selección un programa suguiendo los pasos descritos anteriormente en el apartado 6.
- Antes de起初 el programa selectionado, pulsa . La pantalla muestra la hora predeterminada para la programacion diferida.
- Ajusta el tiempo deseedo girando el mando del panel de control hacía la derecha (para augmentar el tiempo) o hacía la izquierda (para reducir el tiempo).
- Pulsa. La pantalla muestra la cuenta atras de la programacion diferida. Una vez transcurrido el tiempo programado, el aparato comenzará a cocinar automatistically.
8. Abre la tapa
- No intentesAbrir la tapa si la valvula flotante esta subida y el indicator luminoso de presion está encendido.
- La presión se pueda liberar de dos formas al final de la cocción:
Despresuración natural: Al final de la cocción o después de detener el programa, el aparato se enfiña por si solo y la presión se libera de forma natural. Durante la despresuración natural, los alimentosSEOuen cocinarse en excesso当之无愧 a la presión que queda en el recipiente. Utiliza el botón de despresuración manual para detener inmediamente el proceso de cocción.
Despresuración manual: Pulsa el botón de despresuración situado en la parte superior de la tapa de forma continua. El proceso tardará entre unosegundos y uno horas enfunciónde lacantadade alimentos que haya enelinterdel recipientede cocción (fig.31).
ADVERTENCIA: Ten cuidado con el vapor caliente que sale del aparato. Mantén la cara y las manos alejadas de la calidad de vape (fig. 45).
- ParaAbrir la tapa, colocan paralelo a las asas laterales, sujeta el pomo de la tapa, giralo en sentido contrario al de las agujas del reloj y levanta la tapa (fig. 32 y 33).
ADVERTENCIA: Ten cuidado con el vapor caliente que sale del recipiente de coccción.
9. Desenchufa el aparato
- Después del uso, desenchufa el aparato y deja que se enfré durante al menos 2 horas antes de limpiarlo.
10. Limpia antes del uso
- Limpia el aparato afterwards de cada uso.
- Antes de limpiar el aparato,dea que se enfrie durante al menos 2 horas.
- Para Obtener instrucciones de limpieza, consulta la sección 3. Limpia todas las piezas del aparato en la sección ANTES DE LA PRIMERA UTILIZACION.
11. Consejos de mantenimiento
- Para garantizar la durabilidad del recipiente de coccción con el tiempo, no cortes alimentos enél.
- Utiliza los accesos suministrados. No Utilities ningún utensilio metalico, ya queURTAR dañar el revestimiento antiadherente del recipiente.
- Después de su uso, la junta de sellado puede conservar el olor de la comida. Es normal; la silicona tienePEGOS poros que se abren cuando se exponen a altas temperatas y se cierran una vez que la temperaturesea baja. Para eliminar el olor de la junta de sellado, pueda hacer lo siguientes:
- Colocar la junta de silicona en el lavavajillas.
- Añadir 1 taza de vinagre, 1 taza de agua y 1 limón cortado en trozos grandes en el recipientte de coccción yponer un programa de vapor durante 2 horas; a continuación,JKLM.
- Cambia la junta de sellado cada 2 años o antes en caso de danos.
GUIA PARA LA SOLUCIOn DE PROBLEMAS TECNICOS
| Problema | Posibles motivos | Solutaciones |
| No se puedaAbrir la tapa | No se puedaAbrirloo deboa ala presión enel recipientede cocción. | Pulsa el botón dedespresuraciónde forma continua para eliminar la presión del interior del recipientede cocción. La presiónpuede tardar unosheditos en liberarse porcompleto. |
| El recipientede cocción sedespresuriza, pero la valvulaflotante estáatascada porqueestademosado sucia y, por lo tanto, nouede bajar. | a.Asegúrate de que el aparato se despresurice porcompletodejandolo enfiar durante almenos2 horas.b.Empuja suavamente la valvulaflotantehacia abajo insertando un pincho o un objerto largo en laabertura de la valvulaflotante.Siesto nofunciona,envía el aparatoa un serviceótnicooficial.c.Para elsiguito useo,limpia ysecaa fondo la valvulaflotante. | |
| No se puedacerrarla tapa | La junta de sellado no estáinstalada correctamente. | Instala la junta de sellado correctamente. |
| El recipientede coccióncontiene ingredientescalientes quegeneran vapor. | Espera a que losingredientedesel recipientede cocciónseinfrién ante devolver aintentar cerrar la tapa. | |
| La valvulaflotante estáatascada porqueestdemasiado sucia y, por lo tanto, nouede bajar. | a.Empuja suavamente la valvulaflotantehacia abajo insertando un pincho o un objerto largo en laabertura de la valvulaflotante.Siesto nofunciona,envía el aparatoa un serviceótnicooficial.b.Para elsiguito useo,limpia ysecaa fondo la valvulaflotante. | |
| La posición o la dirección en laque seha cerrado la tapa onson correctas. | Cierra la tapa en la direccióncorrecta como indicale manualeddinstrucciones. | |
| AlAbrirla tapa,elrecipientede cocciónpermanece unido ala tapa. | La junta de sellado ha producido uneffectoducedaction. | El recipientede cocciónse soltarade la tapa por sisolso. Es normal ysimplemente demuestra una buena hermeticidad del producto. Para evitárque el recipientede caiga pesadamente sobreel producto alAbrirla tapa,ábrelaśimpermcon cuidado. |
| Liberación intensa de presión desde la valvula limitadorade presión. | La presión interna supra la presiónde configuración o la presióninterna supra la presión deseguidad. | Limpia bien la valvula del limitede presión, la valvula flotante y latapa. Si todas valesale vapor por lavalvula flotante, levy a dispositivoal centro de servicios专业技术oficialaprobado más cercano para que un先进技术or equivalido lo inspeccione,repare o ajuste. |
| La valvula limitadora de presiónestá en una posición incorrecta. | Presiona ligeramente la valvulalimitadora de presión para que secoloque en su lugar. Ten cuidadocon el vapor caliente. Colócateen una posición segura yutilizaguantes para hora. | |
| Un control de presión defectuosoha provocado la despresuración. | Envía el aparato a un service专业技术oficialpara su reparación. | |
| La presión interna supra la presiónde configuraciono o la presióninterna supra la presión deseguidad. | Limpia bien la valvula del limitede presión, la valvula flotante y latapa. Si todas valesale vapor por lavalvula flotante, levy a dispositivoal centro de service专业技术oficialaprobado más cercano para que un先进技术or equivalido lo inspeccione,repare o ajuste. | |
| Liberación de presióncontinua de la valvulaflotante. | Residuos en la valvula flotante. | a. Pulsa el botón dedespresuración de formacontinua para eliminar la presióndel interior del recipientede cocción. La presión pode tardarunos horas en liberarse porcompleto.b. Deja que se enfrie el aparatodurante al menos 2 horas.c. Limpia y secaa la valvula flotanteantes de volver a cocinar. |
| La valvula flotante está atascada. | a. Pulsa el botón dedespresuración de formacontinua para eliminar la presióndel interior del recipientede cocción. La presión peuteddardarunos horas en liberarse porcompleto.b. Deja que se enfrie el aparatodurante al menos 2 horas.c. Limpia y secaa la valvula flotanteantes de volver a cocinar. |
| Problema | Posibles motivos | Solutaciones |
| Sale vapor de la tapa. | La junta de sellado no está instalada correctamente. | Retira la junta de sellado, limpiala y vuelve a colocarla en la posición correcta. |
| La junta de sellado está sucia. | Retira la junta de sellado, limpiala y vuelve a colocarla en la posición correcta. | |
| La junta de sellado o el borde del recipiente de coccción está dañados. | Envía el aparato a un service专业技术o oficial para su reparación. | |
| Los alimentos no se han cocinado | La proportión de ingredientes@sólidos/liquidos es incorrecta. | Vuelve a intentarlo con lascantidades exactas de la receta. |
| No hay suministro electrico. | Comprueba el circuito electrico de tu hogar. | |
| Aparece E0 en la pantalla digital. | El presistato está defectuoso. | Envía el aparato a un service专业技术o oficial para su reparación. |
| Aparece E1 en la pantalla digital. | El sensor de temperatura está defectuoso. | Envía el aparato a un service专业技术o oficial para su reparación. |
| Aparece E2 en la pantalla digital. | La taps no está colocadacorrectamente para el programa de coccción. Cada programa requiresuna posición española de la tapa. | Comprueba y ajusta la posición de la tapa necesaria para el programa de coccción; consulta la tabla de programs de coccción de la sección 6 de este manual. Reinicia el programa cuando la tapa está correctamente colocada. Si el problema persististe, envía el aparato a un service专业技术o oficial para su reparación. |
OBRIGADO POR ESCOLHER A MOULINEX
Bem-vindo ao mundo da cozinha
Com a Turbo Cuisine, aceitamos o desafio de reinventar a panela: Mais fácil. Mais saber. Simplesmente melhor!
Concebido com este princípio orientador, o Turbo Cuisine permite-lhe poupar tempo e cozinhoar deliciosas refeições caseiras com total simplicidade e comodidade.
Obrigado mais uma vez por nos receber na sua cozinha.
Agora vamos cozhar jintos!
INDICE
Guia de inicio rápido em imagens 4
A Moulinex recomenda a segurarca em primeiro lugar 160
Descrição do seu produits 168
Familiarizar-se com o panei de controlo 169
Guia de uso e limpeza 170
Guia的技术o de resolucao de problemas 186
Garantia internacional limitada da Moulinex 285
A MOULINEX RECOMENDA A SEGURANÇA EM PRIMEIRO LUGAR
A segurará é a)nossa principal prioridade. Concebemos e fabricamos onoxo produits com elevados padões de segurará e Tecnologia. No entanto, tal como acontece com qualquer aparelho elétrico, existem algunos riscos potenciais,leo que o convidamos a exercer umCERTO cuidado e a respeitar as instruções que se seguem.
INSTRUÇÉS DE SEGURANÇA
Leia atentamente todas as instruções que se seguem e guarde-as para futuras consulutas.
- A utilização incorrente do aparelho e dos respetivos acessórios pode danIFICAR o aparelho e causaferimentos.
- Oaparelhocozinhaosalimentossobpressao.Autilização incorreta pode provocar riscos de queimaduras devido ao vapor.
- Para sua segurarça, este produit está em conformidade com todas as normas e regulamentos aplicáveis (Diretiva Baixa Tensão, compatibilitadé eletromagnética, materiais compatíveis com alimentos, ambiente, etc.).
- A fonte de calor necessária para cozinho está incluída no aparecido.
1. Onde utilizes em segurar?
- Apenas para utilizes no interior.
- Este aparecido destino-se apenas a uso dométrico. Não se_DESTina a ser utilizado nos següentes casos e a garantia não se aplicá a:
- zonas de cozinas reservadas aos functionários de lojas, escritórios e outros espécOs professionais;
- quintas;
- Utilização por cliente de HOTÉis, motéis e outros ambientes de caráter residencial;
- ambientes do tipo alojamento com pouco-almoço.
- Não coloque o aparecido num forno aquecido ou numa placá quente. Não colque o aparecido perto de uma chama viva ou de um objeto inflamível.
- Utilize numa superficie de trabajo plana, está e resistente ao calor, afastada de salpicos de agua.
2. Quem o pode utiliser em segurança?
- Este aparelho não foi concebido para ser realizado por pessoas (incluindo crijanças)@cajas capacidades fisicas, sensoriais ou mentalais se encontrar reduzidas, ou por pessoas com falta de experiência ou conhecimiento, a não ser que tenham sido devidamente accompaniesadas e instruções sobre a correta'utilisation do aparelho, pela persona responsavel pela sua segurarça.
- O aparelho pode ser utilisé por pessoas com capacidades fibras, sensoriais ou mentalais reduzidas ou com falta de experiencia e conhecimiento, caso sejam supervisionadas ou lhes tenham sido dadas instruções relativas à'utilisation correta do aparelho e se comprehenderem os perigos envolvidos.
- Este aparecido não deve ser utilisé por crianças. Mantenha o aparecido e o respetivo cabo de alimentação para do alcance de crianças.
- As crianças não devem brincar com o aparelho.
- As crianças devem ser supervisionadas para garantir que não brincam com o aparelho.
3. Como usar em segurar – uso de algo?
- Não utilize o aparecido para outras finalidades que não a prevista.
- Não utilize o aparecido para fritar alimentos em oleo. Só é permitido tostar/dourar.
- Não utilize a panela de pressão no modo de pressão para fritar alimentos.
- Ao cozinhoar alimentos pastosos, agite suavamente a panela antes deAbrir a tampa para fazer que os alimentos sejam ejetados.
- Este aparecido não é um esterilizador. Não o utilize para esterilizar frascos.
- Este aparecido não se destina a ser colocado em precisiónamento com um temporizador exterior ou atravesse de umsystema de commando à distência separado.
- Para segurar o aparelho, utilize sempre as两大 pegas laterais no corpo do aparelho. Utilize luvas de cozinha se o aparelho estiver quente. Para maior segança, certifique-se de que a tampa está broqueada antes de deslocar o aparelho.
- A parte inferior da cuba e a placá de aquecimento tíme de estar em contacto direto. Retire qualquer objecto ou resíduos alimentares localizados entre a cuba e a placá de aquecimento, poi pode afetar o desempenso.
- Tenha em atençao que determinados temas de alimentos, tais como sumo de maça, arandos, ruubarbo, cevada, aveia ou outros cereais, ervilhas partidas, noodles ou massas, poder formar espuma e crepitação e entupir as valvulas. Tenha cuidado ao cozinho das vezes dos alimentos e,(before de utilizesimpe cuidadosamente as valvulas.
- Tenha em atençao que determinadas receitas que incluem leite poder formar espuma, transbordar e obstruir as valvulas. Tenha cuidado ao cozinhoas评为ceitas e,deois deutilizar, limpe cuidadosamente as valvulas.
- Aparto cozinhar carne com pele grossa (como lingua de vaca), que pode inchar com o efeito da pressão, não fure a pele antes de cozinhar se esta parecer Inchada: pode queimar-se. Fure-a antes de cozinhar.
- Não utilize o aparecido vazio, sem a cuba ou sem ingredientes no interior da cuba. Tal pode provocar danos graves no aparecido.
- Não utilize o aparecido sob pressão sem adicionar água, sentido que tal pode provoc danos graves noaporecido.
- Não encha o aparelho sem a respetiva cuba.
- Atença: não derrame láquidos sobre a ficha.
- Não aqueça a cuba com qualquer outras fonte de calor que não a placá de aquecimento do aparelho e não utilize outras cuba. Não utilize a cuba para cozinho com outros aparelhos.
- Utilize a cuba APENAS no aparelho. Não a utilize para cozinhar no fogão, noorno, etc.
- Utilize uma colher de plástico ou de madeira para não danIFICAR o revestamento antiaderente da cuba. Não corte alimentos diretamente na cuba.
- Não toque nas valvulas, exceto durante a limpeza e manutençao do aparecido, de acordo com as instruções fornecidas.
- Não coloque quando发展机遇ar os estranhos nas valvulas e no botão de libertação de pressão. Não substitua a valvula.
- Verifique regularamente as conduitas nas valvulas que permitem a saída de vapor para garantir que não está broqueadas.
- Não utilize um pano ou qualquer及其他 objecto entre a tampa e o corpo do aparecido de forma a delearing a tampa entreaberta. Isto pode danificar permanece o anel vedante.
- Não deixe o cabo de alimentação pendurado na extremidade de uma mesa ou bancada, nem deixe que este toque em superficies quentes.
4. Como usar em segurar – antes de cozinho?
- Antes de utiliser o aparelho, verifique se a valvula fluctuante e a valvula limitadora de pressão está limpas.
- Antes de utiliser o aparelho, verifique se o anel vedante foi corretamente instalado na tampa.
- Certifique-se de que a parte inferior da cuba e a placar de aquecimento está sempre limpas. Certifique-se de que a parte central da placar de aquecimento está molev.
- Não encha o aparecido mais do que a marca MAX na cuba.
- Siga as recomendações sobre o volume de alimentos e água para fazer o risco de transbordar, o que pode danIFICAR o aparecido e Causear ferimentos.
- Certifique-se de que o aparecido está devidamente fechado antes de o colocar sob pressão.
5. Como utiliser em segurará – durante a cozedura?
- Não tenteAbrir a tampa até que a pressão tenha diminuindo o suficiente. Não tenteAbrir a tampa até que a valvula flutuante esta para baixo.
- Nunca force a abertura do aparelho.
- Durante a cozedura e a libertação de vapor no final da cozedura, o aparecido liberta calor e vapor. Mantenha o rosto e as mãos afastados do aparecido para fazer queimaduras. Não toque na tampa durante a cozedura.
- Não desloque o aparecido quando this estiver sob pressão. Utilize as pegas quando o deslocar e use luvas de cozinha, se necessário. Não utilize o botão da tampa para levantar o aparecido.
- Não retire a cuba quando o aparecido estiver em等功能amento.
- No modo tostar, tenha cuidado com os riscos de queimaduras devido às projeções ao adicional alimentos ou ingredientes à Cuba quente.
6. Como usar em segurarca -(before de cozinho?
- QuandoAbrir a tampa,segure-a sempre pelo botao da tampa. Posicao o braço paralelo as pegas laterais. A agua a ferver pode permanecer presa entre o anel vedante e a tampa e provocar queimaduras.
- Tenha también cuidado com o risco de queimaduras provocadas pelo vapor que sai do aparelho quando abre a tampa. Primeiro,arethabra a tampa paraDEXXARSAIR O vapor suavamente.
- Não toque nas peças quentes do aparelho. Àpos a utilizesação, a superficie da placá de aquecimento pode permanecer quente durante até 2 horas.
- Desligue a ficha da.tomada quando o aparecido não estiver a serutilizzato e antes de o limpar. Deixe arrefecer antes de colocar ou retiring peças.
7. Como utiliser em segurar – limpeza?
- Limpe a parte inferior da cuba e a placar de aquecimento às vezes cadautilização.
- Não mergerluhe o aparelho em água.
- Para limpar o aparelho, consulte as instruções de utilizesçao. Pode lavar a cuba e a tampa em agua quente com detergente para a loça, mas não as colque na boaquina de lavar loça. Limpe o corpo do aparelho com um pano humido.
8. O que fazer em caso de avaria?
- Apenas pessoas autorizadas nos Serviços de Assistência Técnica podem reparar o produto.
- Não utilize nenhum aparelho com um cabo de alimentação ou ficha danificados oudeois de o aparelho não funciona corretamente ou de ter sofrido danos de alguma forma. Envie o aparelho ao Servico de Assistência Tecnica autorizao mais proximo para serinspectionado, reparado ou ajustado.
- Se o cabo de alimentação estiver danificado, este deve ser substituído por um Serviço de Assistência Tecnica autorizzato para fazer qualquer situação de perigo. Não substitua o cabo de alimentação fornecido por outros cabos.
- Não danifique o anel vedante. Se estiver danificado, Solicite a sua substituição num Serviço de Assistência Técnica autorizado.
- Substitua o anel vedante a cada 2 anos ou mais cedo, se reparar que está gasto ou precisa de ser substituído.
- Utilize開放as peças sobreselentes adequadas para o seu Modelo. Istó é particulamente importante para o anel vedante e para a cuba.
- Utilize開放as peças sobreselentes disponiblesizadas por um Servico de Assistência Tecnica autorizada.
- À'utilisation de acessórios não recommendados pelo fabricante do aparelho pode provocar ferimentos.
- Não utilize outras cubas no aparecido em vez da Cuba fornecida. Substitua a cuba apenas por uma pegá sobresselete original Concebida para ser realizada com este produit.
- Em conformidade com os regulamentos em vigor, antes de eliminar um aparecido que não seja necessário, o aparecido deve fazer inoperacional (desligando a ficha e cortando o cabo de alimentação).
Proteção do ambiente em primeiro lugar!

O seu produit contém materiais que podem ser recuperados ou reciclados.
- Entregue-o num punto de recolha para possibilitar o seu tratamento
9. Quando é que a garantia é aplicavel?
- A garantia não cobre o desgaste anormal da cuba.
- Leia atentamente estas instruções deutilização antes de utilizes o aparecido pela primarya vez. Qualquer'utilisation que não está em conformidade com estas instruções isenteá o fabricante de qualquer responsabilité e anulará a garantia.
- No caso de utilizesçao comercial,utilização inadequada ou incumprimento das instruções,o fabricante rejeita qualquer responsabilitadede a garantia não é aplicavel.
PT

DESCRÊçO DO SEU PRODUTO

FAMILIARIZAR-SE COM O PAINEL DE CONTROLO
MENSAGENS DE ESTADO

Mensagem de boas-vindas quando o aparecido é ligado.
Apresentação da hora. Neste exemple: 1 hora e 30 horas.
Apresentação da temperatura. Neste exemple: 114 graus Celsius.
Indica que o programa tem uma predefinição automática de temperatura/tempo. Não pode ser modificado.
Indica que a temperatura está aacular durante a fase de pré-aquecimento.
Indica que o aparelho está a pre-aquecer.

Indica que o programa terminou.

Indica que o aparecido está na fase de manter quente.

Indica que o programa foi interrompido.

Indica que o aparelho está no modo de poupança de energia.
GUIA DE UTILIZACHO E LIMPEZA
Consulte as figuras indicadas como (Fig. x) na parte do Guia de inicio=rápido.
ANTES DA PRIMEIRA UTILIZACHO
1. Retire a embalagem
- Retire o aparelho da embalagem e leia o manual de instruções antes da primeira'utilisation.
- Retire os autocolantes promocionais (se existrem) do seu aparecido antes da primarya utilização.
2. Abra a tampa
- ParaAbriratampa,segureobotao da tampa,rode-o para a esquerda e levante atampa (Fig.1e2).
Nota: quando levantar a tampa, a cuba pode permanecer presa à tampa. É normal e demonstra simplement uma boa hermeticidade do produits. Para fazer que a cuba caia violently sobre o produit ao Abrir a tampa, abra sempre a tampa com cuidado.
- Coloque o aparelho sobre uma superficie plana. Retire todos os materiais e acessórios de proteção do interior do aparelho (Fig. 3).
3. Limpe todas as peças do aparelho
3a. Limpe a tampa, a cuba e os acessórios
- Limpe a tampa, a cuba e os acessórios com uma esponja suave e agua quente com detergente para a loiça (Fig. 4).
- Seque a tampa, a cuba e os acessórios (Fig. 5).
- Não utilize esfregões ou esponjas abrasivas para limpar a cuba, País tal pode danIFICAR o revestimento antiaderente da cuba (Fig. 40).
- Não vergulhe o aparelho em água (Fig. 41).
- Se mergerhar inadvertamente o aparecido em água ou derramarágua diretamente sobre a placá de aquecimento, leve o aparecido a um Serviço de Assistência Tecnica autorizando para reparação.
- Não coloque a tampa e a cuba na boaina de lavar loça (Fig. 42).
- Tenha em atençao que apenas os acessórios: concha, espátula, copo medidor e cesto de cozedura a vapor são compatíveis com a boaquina de lavar loça.
3b. Limpe o anel vedante
- Retire o anel vedante da tampa e limpe-o com uma esponja suave e agua quente com detergente para a loça (Fig. 7 e 8).
- Sequo complemente.
- Coloque o anel vedante sobre o suporte do anel vedante e pressione-o até encaixar (Fig. 9). Pressionefirmamente para garantir que não fica enraged o que o anel vedante está bem encaixado atrás do respetivo suporte.
- Depois de colocar o anel vedante na tampa, seAbrir a tampa demasiado depressa, a cuba pode permanecer presa à tampa (Fig.37 e 38). Aguarde algunos segundos para que a cuba se liberte da tampa (Fig. 39).
Nota: É normal e demonstra simplement uma boa hermeticidade do produits. Para fazer que a cuba caia violently sobre o aparecido ao Abrir a tampa, abra sempre a tampa com dificuld.
AVISO: Nunca utilize o seu aparecido sem o anel vedante (Fig. 44). 3c. Limpe as valvulas
- Para limpar a valvula limitadora de pressão, retire-a do tubo na parte superior da tampa (Fig. 10). Limpe-a com uma esponja suave e agua quente com detergente para a loça (Fig. 11).
DepoS de secar, certificque-se de que a conduita do tubo está limpa antes de voltar a ligar a valvula limitadora de pressão ao tubo na parte superior da tampa (Fig. 12). Certificque-se de que a valvula limitadora de pressão está bem colocada no devido lugar e que é capaz de se deslocar para cima e para baixo.
- Para limpar a tampa da valvula limitadora de pressão, desaperte-a a partir do interior da tampa (Fig. 13). Limpe-a com uma esponja suave e água quente com detergente para a loça (Fig. 14). Depois de secar, certifique-se de que a conduita do tubo está limpa antes de voltar a aperture a tampa da valvula limitadora de pressão no interior da tampa (Fig. 15).
- Para limpar a valvula flutuante, retire a junta da valvula flutuante do interior da tampa e vire a tampa para que a valvula flutuante possa ser retrida da tampa (Fig. 16). Limpe a junta da valvula flutuante e a valvula flutuente com uma esponja suave e agua quente com detergente para a loça (Fig. 17). Depois de secar, volté a inserir a valvula flutuente na tampa e volté a colocar a junta da valvula flutuente no devido lugar (Fig. 18). Certifique-se de que a valvula flutuente está bem colocada no devido lugar e que é capaz de se deslocar para cima e para baixo.
3d. Limpe o corpo do aparelho
- Limpe o corpo do aparelho com um pano humido.
- Não mergerulhe o aparelho em água (Fig. 41).
- Limpe a placá de aquecimiento com um pano seco.
INSTRUÇOES DE UTILIZAZão
1. Coloque os ingredientes na Cuba
- Retire a cuba do corpo do aparelho.
- Coloque os ingredientes na cuba.
- Tenha em atençao que o nível de alimentos e liquidos nunca deve excesser a marca de nível maximo na cuba (Fig. 19).
- Ao cozinho, no modo de pressão,ingredientes que Incham durante a cozedura, como legumes desidratos ou arroz, não encha a panela a mais do que metade do seu;nível maioro.
2. Coloque a cuba no corpo do aparelho
- Certifique-se de que a parte inferior da cuba está limpa e seca e retire quando resíduos de alimentos da placá de aquecimento (Fig. 20).
- Coloque a cuba no corpo do aparelho (Fig. 21).
- Nunca utilize o aparelho sem a cuba.
3. Fecha ebloqueie a tampa
- Verifique se o anel vedante está bem colocado na tampa (Fig. 43).
- Segure o botão da tampa, colque a tampa no aparecido e rode-a para a direita para bloquear (Fig. 22).
4. Fixe a valvula limitadora de pressão
- Coloque corretoamente a valvula limitadora de pressão na tampa (Fig. 23). Tenha em atençao que a valvula permanecera ligeiramente solta, o que é normal.
5. Ligue o aparelho
- Desenrole totalmente o cabo de alimentação e ligue-o à corrente electrica (Fig. 24).
- O aparelho emite um avis sonoro, o ecra fica intermitente e aparesta HETIO.
6. SeLECTIONE inicie um programa de cozedura
- Cada programa tem um tempo e temperatura predefinidos e quer uma posicao exigente da tampa. Consulte aanela de programas de cozedura:
TABELA DE PROGRAMAS DE COZEDURA
fome do programa de cozudura Nome do programa de cozudura Tempo de cozudura predefinindo Tempo ajustavel Temperatura predefinida Temperatura ajustavel Pressão predefinida Irúcio diferindo de 10 min a 12 h Monter quente até 24 h Estado da tampa Tampa fechada e bloqueada Tampa fechada mas não bloqueada Tampa aberta Estufar 30 min de 1 min a 2 h 114 °C Não 70 Kpa Sim Sim ● Sopa 12min de 1 min a 2 h 114 °C Não 70 Kpa Sim Sim ● Saltear 20min de 1 min a 1 h 160 °C Sim de 100 °C a 160 °C Não Não Não ● Cozedura a vapor 10min de 1 min a 2 h 114 °C Não 70 Kpa Sim Sim ● Cozer 40min de 1 min a 2 h 160 °C Sim de 100 °C a 160 °C Não Sim Sim ● Cozedura a vázuo/ Cozedura lenta 4 h de 30 min a 12 h 85 °C Sim de 55 °C a 95 °C Não Sim Não ● ● Arroz 8min de 1 min a 2 h 114 °C Não 70 Kpa Sim Sim ● Iogurte e fermentação 8 h de 30 min a 12 h 30 °C Sim de 22 °C a 40 °C Não Não Não ● ● Papas de oreia 15min de 1 min a 2 h 100 °C Não Não Sim Sim ● Modo Chefajustavel 30 min de 1 min a 4 h 80 °C Sim de 70 °C a 160 °C Não Não Sim ● ● ●
Nota: Ao cozinho, pode notar uma ligeira fuga de vapor da tampa, especialmente da valvula limitadora de pressão. Isto é normal e ocorre quando a pressão se acumula.
Consulte as figuras do Guia de inicio=rápido (da Fig. 25 à Fig. 36).

Programa estufar
- Coloque os ingredientes na Cuba e feche completeness e bloqueie a tampa.
- Rode o botão do paine de controlo para a direita para aceder ao programa de estufar. O érá apareça o tempo de coze-dura predefinido.
- Oportun: Prima e ajuste o tempo pretendido rodando o botão do painei de controlo para a direita (paraLERar o tempo) ou para a esquerda (para diminuir o tempo).
- Prima 0 para,iniciar o programa decozedura.
- O aparelho inicia a fase de pré-aquecimento. O ecra aparenda alternadamente [C] [E] [A] [O] [P] [R] [S] [T] [U] [V] [W] [X] [Y] [Z] [A] [B] [C] [D] [E] [F] [G] [H] [I] [J] [K] [L] [M] [N] [O] [P] [Q] [R] [S] [T] [U] [V] [W] [X] [Y] [Z] [A] [B] [C] [D] [E] [F] [G] [H] [I] [J] [K] [L] [M] [N] [O] [P] [Q] [R] [S] [T] [U] [V] [W] [X}
- Quando a fase de pré-aquecimiento estiver conclusión, o aparibo muda automaticamente para a fase de cozedura. Oakra presenta a contagem decrescente e o indicator luminoso de cozedura em的方式来 acende-se.
- Durante o processo de cozedura, existe acumulacao de pressao no aparelho, que empurra a valvula flutuante para cima. O indicator luminoso de pressao acende-se para indicar que a tampa não pode ser aberta sem libertar primeiro a pressao.
- No final da contagem decrescente, o aparelho emite um avis sonoro e o ecra aparena [End].
- Após algunos segundos, o aparelho muda automaticamente para a fase de manter quente. O ecra aparesta Hc e o indicator luminoso de manter quente acende-se.
- Prima durante 3segundos para parar o programa em qualquer alta.

Programa sopa
- Coloque os ingredientes na Cuba e feche completeness e bloqueie a tampa.
- Rode o botão do painel de controlo para a direita para aceder ao programa de soba. O éra apareça o tempo de cozedura predefinido.
- Oportun: Prima e ajuste o tempo pretendido rodando o botão do poinl de controlo para a direita (paraacularo tempo) ou para a esquerda (para diminuir o tempo).
- Prima 岛 para,iniciar o programa de cozedura.
- O aparecido inicia a fase de pré-aquecimiento. O ecra aparece alternadamente e o indicator luminoso de pré-aquecimiento acende-se.
- Quando a fase de pré-aquecimiento estiver conclúa, o aparibo muda automaticamente para a fase de cozedura. Oakra presenta a contagem decrescente e o indicator luminoso de cozedura em的方式来 acende-se.
- Durante o processo de cozedura, existe acumulacao de pressao no aparelho, que empurra a valvula flutuante para cima. O indicator luminoso de pressao acende-se para indicar que a tampa não pode ser aberta sem libertar primeiro a pressao.
- No final da contagem decrescente, o aparelho emite um avis o sonoro e o ecra aparesta.
- Após algunos segundos, o aparecido muda automaticamente para a fase de manter quente. O éra presenta HOE e o indicator luminoso de manter quente acende-se.
- Prima © durante 3segundos para parar o programa em qualquer alta.

Programa saltear
- Rode o botão do painel de controlo para a direita para aceder ao programa de saltear. O éra apareça o tempo de coze-dura predefinido.
- Ooptional: Prima e ajuste o tempo pretendido rodando o botão do paine de controlo para a direita (paraacularo tempo) ou para a esquerda (para diminuir o tempo).
- Ooptional: Prima e ajuste a temperatura pretendeda rodando o botao do paine de controlo para a direita (para aumento a temperatura) ou para a esquerda (para diminuir a temperatura).
- Prima © para,iniciar o programa de cozedura.
- O aparelho inicia a fase de pre-aquecimiento. O ecra aparente alternadamente e o indicator luminoso de pre-aquecimiento acende-se.
- Quando a fase de pré-aquecimiento estiver conclusía, o aparibo muda automaticamente para a fase de cozedura. O(ECRA presenta a contagem decrescente e o indicator luminoso de cozedura em的方式来 acende-se.
- Coloque os ingredientes na cuba e mantenha a tampa aberta para saltear.
- No final da contagem decrescente, o aparelho emite um avis sonoro e o ecra aparesta End.
- Após algunos segundos, o aparecido muda automaticamente para o modo de poupança de energia. O érá presente.
- Prima © durante 3segundos para parar o programa em qualquer alta.

Programa cozedura a vapor
- Coloque 150 ml de agua (3¼ de chávena) na cuba, colque os ingredientes no cesto de cozedura a vapor e colque o cesto de cozedura a vapor sobre a cuba. Fecha Completely e bloqueie a tampa.
- Rode o botão do painel de controlo para a direita para aceder ao programa de cozedura a vapor. Oakra apareça o tempo de cozedura predefinido.
- Oportun: Prima e ajuste o tempo pretendido rodando o botão do pailé de controlo para a direita (paraacularo tempo) ou para a esquerda (para diminuir o tempo).
- Prima 岛 para inicia o programa de cozedura.
- O aparecido inicia a fase de pre-aquecimiento. OEARíaDSPA.
aultadamente e HARE o indicator luminoso de pre-aquecimiento acende-se.
- Quando a fase de pré-aquecimento estiver conclúa, o aparibo muda automaticamente para a fase de cozedura. O érácline a contagem decrescente e o indicator luminoso de cozedura em的方式来 acende-se.
- Durante o processo de cozedura, existe acumulacao de pressao no aparelho, que empurra a valvula flutuante para cima. O indicator luminoso de pressao acende-se para indicar que a tampa não pode ser aberta sem libertar primeiro a pressao.
- No final da contagem decrescente, o aparelho emite um avis sonoro e o ecra aparesta [End].
- Após algunos segundos, o aparecido muda automaticamente para a fase de manter quente. O éra apareça [HOE] e o indicator luminoso de manter quente [W] acende-se.
- Prima © durante 3segundos para parar o programa em qualquer alta.

Programa cozer
- Coloque o preparado na cuba e feche-a, mas não bloqueie a tampa.
- Rode o botão do painei de controlo para a direita para aceder ao programa de cozer. O éra apareça o tempo de cozedura predefinido.
- Oportun: Prima e ajuste o tempo pretendido rodando o botão do pailé de controlo para a direita (paraacularo tempo) ou para a esquerda (para diminuir o tempo).
- Oprincipal: Prima e ajuste a temperatura pretendida rodando o botao do paine de controlo para a direita (paraacular a temperatura) ou para a esquerda (para diminuir a temperatura).
- Prima 岛 para iniciar o programa de cozedura.
- O aparelho inicia a fase de pre-aquecimiento. O ecra aparente alternadamente e o indicator luminoso de pre-aquecimiento acende-se.
- Quando a fase de pré-aquecimiento estiver conclusía, o aparibo muda automaticamente para a fase de cozedura. O(ECRApresenta a contagem decrescente e o indicator luminoso de cozedura em的方式来 acende-se.
- No final da contagagem decrescente, o aparecido emite um avis sonoro e o ecra apareça [End].
- Após algunos segundos, o aparecido muda automaticamente para a fase de manter quente. O éra apareça [Hoe] e o indicator luminoso de manter quente acende-se.
- Prima durante 3segundos para parar o programa em qualquer alta.

Programa de cozedura a vacuo/cozedura lenta
- Rode o botão do painel de controlo para a direita para aceder ao programa de cozedura a vácuo/cozedura lenta. O érá apareça o tempo de cozedura predefinido.
- Oportun: Prima e ajuste o tempo pretendido rodando o botão do poinl de controlo para a direita (paraacularo tempo) ou para a esquerda (para diminuir o tempo).
- Oportun: Prima e ajuste a temperatura pretendida rodando o botão do poinel de controlo para a direita (paraacular a temperatura) ou para a esquerda (para diminuir a temperatura).
- Prima ⑤ para,iniciar o programa de cozedura.
- O aparecido inicia a fase de pre-aquecimiento. O ecra aparece alternadamente e o indicator luminoso de pre-aquecimiento acende-se.
- Quando a fase de pré-aquecimento estiver conclusía, o aparecido muda automaticamente para a fase de cozedura. O érá presente a contagem decrescente e o indicator luminoso de cozedura em的方式来 acende-se.
- No final da contagem decrescente, o aparelho emite um aviso sonoro e o ecra aparesta [End].
- Após algunos segundos, o aparecido muda automaticamente para o modo de poupança de energia. O érá presente [---].
- Prima durante 3segundos para parar o programa em qualquer alta.

Programa arroz
Cologne os ingredientes na cuba eckepletamente e bloqueie a tampa.
- Rode o botão do painei de controlo para a direita para aceder ao programa de arroz. O éra apareça o tempo de cozed ra predefinido.
- Oportun: Prima e ajuste o tempo pretendido rodando o botão do painei de controlo para a direita (paraacularo tempo) ou para a esquerda (para diminuiro tempo).
- Prima para,iniciar o programa de cozedura.
- O aparelho inicia a fase de pré-aquecimento. O ECBA presenta alternadamente e o indicator luminoso de pré-aquecimento acende-se.
- Durante o processo de cozedura, existe acumulacao de pressao no aparecido, que empurra a valvula flutuante para cima. O indicator luminoso de pressao acende-se para indicar que
a tampa não pode ser aberta sem libertar primeiro a pressão.
- No final da contagem decrescente, o aparecido emite um avis sonoro e o érá presente [End].
- Após algunos segundos, o aparecido muda automaticamente para a fase de manter quente. O éra presenta HOE e o indicator luminoso de manter quente acende-se.
- Prima durante 3segundos para parar o programa em qualquer alta.

Programa igurte e fermentacao
O programa de igurte e fermentacao pode ser utilizao para preparar igurte ou levedar pao/massa para bolos.
- Ao preparar igurte, coloque os ingredientes na cuba e feche a tampa.
- Ao levedar massa, pode bater a massa diretamente na cuba e, em seguida, colocar a cuba no corpo do aparelho e fechar a tampa.
- Rode o botão do poinl de controlo para a direita para aceder ao programa de iogurte e fermentação. O éra aparea o tempo de cozedura predefinido.
- Oportun: Prima e ajuste o tempo pretendido rodando o botão do poinl de controlo para a direita (paraacularo tempo) ou para a esquerda (para diminuiro tempo).
- Oportun: Prima e ajuste a temperatura pretendida rodando o botão do panei de controlo para a direita (para fazer a temperatura) ou para a esquerda (para diminuiar a temperatura).
- Prima para,iniciar o programa de cozedura.
- O aparelho inicia a fase de pré-aquecimiento. Ocrafta presente alternadamente e HEAE o indicator luminoso de pré-aquecimiento acende-se.
- Quando a fase de pré-aquecimiento estiver conclusía, o apareño muda automaticamente para a fase de cozedura. O ecra aparesta
a contagem decrescente e o indicator luminoso de cozedura em,.
como acende-se.
- No final da contagem decrescente, o aparelho emite um avis sonoro e o ecra aparesta [End].
- Após algunos segundos, o aparecido muda automaticamente para o modo de poupança de energia. O érá presente.
- Prima durante 3segundos para parar o programa em qualquer alta.

Programa de papas de aveia
- Coloque os ingredientes na Cuba e feche completeness e bloqueie a tampa.
- Rode o botão do poinl de controlo para a direita para aceder ao programa de papas de aveia. O éra aparesta o tempo de cozedura predefinido.
- Ooptional: Prima e ajuste o tempo pretendido rodando o botão do paine de controlo para a direita (paraacularo tempo) ou para a esquerda (para diminuiro tempo).
- Prima para,iniciar o programa de cozedura.
- O aparelho inicia a fase de pré-aquecimento. O ECB a pree- senta alternadamente e e o indicator luminoso de pré-aquecimento acende-se.
- Quando a fase de pré-aquecimiento estiver conclusión, o apar-
relo muda automaticamente para a fase de cozedura. Oakra
aprepinta a contagem decrescente e o indicator luminoso de
cozedura em的方式来 acende-se.
- No final da contagem decrescente, o aparelho emite um avis sonoro e o ecra aparesta [End].
- Após algunos segundos, o aparecido muda automaticamente para a fase de manter quente. O(EC) é o indicator luminoso de manter quente acende-se.
Prima durante 3segundos para parar o programa em qual-quer alta.

Modo Chef ajustavel
- Cologne os ingredientes na Cuba e feche a tampa ou não,DEPENDENDO da receita.
- Rode o botão do painel de controlo para a direita para aceder ao modo Chef ajustavel. O éra apareça o tempo de coze-dura predefinido.
- Ooptional: Prima e ajuste o tempo pretendido rodando o botão do paine de controlo para a direita (paraLERar o tempo) ou para a esquerda (para diminuir o tempo).
- Oportun: Prima e ajuste a temperatura pretendida rodando o botão do poinl de controlo para a direita (paraacular a temperatura) ou para a esquerda (para diminuir a temperatura).
- Prima para,iniciar o programa de cozedura.
- O aparelho inicia a fase de pre-aquecimento. O ecra aparece alternadamente e o indicator luminoso de pre-aquecimento acende-se.
- Quando a fase de pré-aquecimiento estiver conclúa, o aparibo muda automaticamente para a fase de cozedura. Oakra aparena a contagem decrescente e o indicator luminoso de cozedura em的方式来 acende-se.
- No final da contagem decrescente, o aparelho emite um avis sonoro e o ecra aparesta [End].
- Após algunos segundos, o aparecido muda automaticamente para o modo de poupança de energia. O érá presente.
- Prima durante 3segundos para parar o programa em qualquer alta.
* Suggestão de reaquecido do pratos: ajuste a tem-
peratura para > = 95^ e cozinho com a tampa fechada mas desbloqueada.
7. Utilize a função de início diferido
O inicial diferido pode ser útill para programar o aparelho para fazer a cozinho mais tarde.
- Primeiro, selezione um programa, seguito os passos descritos acima na parte 6.
- Antes de起初 o programa selecionado, prima . O ecra aparesta o tempo predefinido para o inico diferido.
- Defina o tempo pretendido rodando o botão do poinel de controlo para a direita (paraLERar o tempo) ou para a esquerda (para diminuiro tempo).
- Prima ⑥ . O ecra apareça a contagem decrescente para o inico diferido. quando o tempo predefinido terminar, o aparecido começa a cozhar automaticamente.
8. Abra a tampa
- Não tenteAbrir a tampa se a valvula flutuante estiver para cima e se o indicator luminoso de pressão estiver aceso.
- A pressão pode ser libertada de 2 formas发展目标 no final da cozedura:
Libertação natural: No final da cozedura ou(before de parar o programa, o aparecido arrefece sozinho e a pressão liberta-se naturalmente. Durante a libertação natural, os alimentos podem cozinho em excesso devido à pressão restante na cuba. Utilize a libertação manual para parar imeditamente o processo de cozedura.
Libertação manual: Prima continuamente o botão de libertação de pressão na parte superior da tampa. Ira demorar entre algunos segundos e algunos minutos, dependendo da quantidade de alimentos no interior da cuba (Fig. 31).
AVISO: Tenha cuidado com o vapor quente que sai do aparecido.
Mantenha o rosto e as mãos afastados da saída de vapor (Fig. 45).
- ParaAbrir a tampa, coloque o braço paralelo as pegas laterais, secure o botão da tampa, rode-o para a esquerda e levante a tampa (Fig. 32 e 33).
AVISO: Tenha cuidado com o vapor quente que sai da cuba.
9. Desligue o aparelho da tomada
- Após cada utilizesçao, deslgue o aparelho da tomada e deixe-o arrerefecer durante,leo menos,2 horas antes proceder a limpeza.
10. Limpe antes cada utilização
- Limpe o aparelho après cadautilização.
- Antes de limpar, deixe o aparelho arrefecer durante, pelo menos, 2 horas.
- Para instruções de limpeza, consulte a parte 3. Limpe todas as peças do aparecido incluidas na sequção ANTES DA PRIMEIRA UTILIZACão.
11. Dicas de manutenção
- Para garantir a durabilitad da cuba ao longo do tempo, não corte alimentos no seu interior.
- Utilize os acessórios fornecidos. Não utilize nenhum utensílio metalico, pois tal pode danIFICAR o revestimento antiaderente da cuba.
- Após a utilizesçao, o anel vedante pode conservar o cheiro do prato. É normal; o silicone temPEGueiros poros que se abrem quando expostos a temperatas elevadas, fechando-se quando a temperatura desce. Para eliminar o cheiro do anel vedante, pode:
- Colocar o anel de silicone na maquina de lavar loixa.
- Adicionar 1 chávena de vinagre, 1 chávena de agua e 1 limão cortado em pedações grandes na cuba e inicial um programa de cozedura a vapor durante 2关键时刻 e, em seguida, deixar o vapor libertar-se naturalmente.
- Substitua o anel vedante a cada 2 anos ou mais cedo em caso de danos.
GUIA TECNICO DE RESOLUÇÃO DE PROBLEMAS
Problema Possível razões Soluções Não é possível abrir a tampa. Não é possível abrir devoa pressão na cuba. Prima continuamente o botao de libertação de pressão para remover a pressão no interior da cuba. Pode demorar algumas minutos até a pressão ser totalmente libertada. A pressão na cuba é totalmente libertada, mas a válvula fluktuante está presa porque está demasiado muito e, por isto, não se pode mover para baixo. a. Certífique-se de que a pressão é totalmente libertada, deleixando ou aparecido arrefecer durante,leo menos,2 horas.b. Empurre cuidadosamente a válvula fluktuante para baixo, inserinho um espto ou um objeto longo na abertura da válvula fluktuante. Se isto não funciona, envie o aparecido a um Servico de Assistência Técnica autorizado.c. Para aproxima'utilisation, limpe e seque bem a válvula fluktuente. Não é possível fechar a tampa. O anel vedante não está corretramente instalado. Instale corretramente o anel vedante. A cuba contentem ingredientes quentes que geram vapor. Aguarde que os ingredientes na cuba arrefecam antes de tentar fechar novamente a tampa. A válvula fluktuante está presa porque está demasiado muito e, por isto, não se pode mover para baixo. a. Empurre cuidadosamente a válvula fluktuante para baixo, inserinho um espto ou um objeto longo na abertura da válvula fluktuante. Se isto não funciona, envie o aparecido a um Servico de Assistência Técnica autorizado.b. Para aproxima'utilisation, limpe e seque bem a válvula fluktuente. A posicao e/ou a direção na qual a tampa foi fechada não é a correta. Feche a tampa na direção correta, de acordo com o manual de instruções. AoAbrir a tampa, a cuba permanece presa à tampa. O anel vedante criou um efeito de sução. A Cuba liberta-se da tampa por si são. É normal e demonstra simplesmente uma boa hermeticidade do produits. Para evaporar que a cuba caía violently sobre o aparecido ao Abrir a tampa, abra sempre a tampa com cerrado.
Problema Possível razões Soluções Libertação intensa de pressão da valvula limitadora de pressão. A pressão interior exceeda pressão de funciona ou a pressão inferior exceeda pressão de segurar. Limpe minuciosamente a valvula limitadora de pressão, a valvula fluctuante e a tampa. Se continue a sair vapor da valvula fluctuante, envie o aparecido a um dos Serviços de Assistência Técnica autorizados mais proxies para inspeçao, reparação ou ajuste por pessoas autorizada. A valvula limitadora de pressão está numa posicao incorrente. Rode/pressione cuidadosamente a valvula limitadora de pressão para que caia no devo lugar. Tenha dificuld com o vapor quente. Posicao-se em segurar e use luvas de cozinha. O controlo de pressão avariado resultou na libertação de pressão. Envie o aparecido a um Serviço de Assistência Técnica autorizada para reparação. Libertação continua de pressão da valvula flutuante. A pressão inferior exceeda pressão de funciona ou a pressão inferior exceeda pressão de segurar. Limpe minuciosamente a valvula limitadora de pressão, a valvula fluctuente e a tampa. Se continue a sair vapor da valvula fluctuante, envie o aparecido a um dos Serviços de Assistência Técnica autorizados mais proxies para inspeçao, reparação ou ajuste por pessoas autorizada. Residuos na valvula flutuante. a. Prima continuamente o botão de libertação de pressão para remove a pressão no interior da cuba. Pode demorar eles minutos às a pressão ser totalmente libertada. b. Deixe o aparecido arrefecer durante,leo menos,2 horas. c. Limpe eSEQE a valvula flutuante antes de reiniciar a cozedura. A valvula flutuante está presa. a. Prima continuamente o botão de libertação de pressão para remove a pressão no interior da cuba. Pode demorar eles minutos às a pressão ser totalmente libertada. b. Deixe o aparecido arrefecer durante,pelo menos,2 horas. c. Limpe eSEQE a valvula flutuante antes de reiniciar a cozedura. Fuga de vapor da tampa. O anel vedante não está corretemente instalado. Retire o anel vedante, limpe-o e volta a instalá-lo na posicao correta. O anel vedante está sujo. Retire o anel vedante, limpe-o e volta a instalá-LO na posicao correta. O anel vedante está danificado ou a extremidade da cuba está danificada. Envie o aparecido a um Servico de Assistência Técnica autorizada para reparação. Os alimentos não está cozinhados. A proportão de ingredientes solidos/liquidos não é a correta. Tente novamente, seguido com precisão as quantidades da receita. Sem eletricidade da fonte de alimentação. Verifique o Sistema elétrico da sua casa. E0presentado no ecrā digital. O interruptor de pressão está avariado. Envie o aparecido a um Servico de Assistência Técnica autorizada para reparação. E1presentado no ecrā digital. O sensor de temperatura está avariado. Envie o aparecido a um Servico de Assistência Técnica autorizada para reparação. E2presentado no ecrā digital. A tampa não está corretemente posicionada para o seu programa de cozedura. Cada programa querou uma posão específica da tampa. Verifique e ajuste a posão da tampa necessária para o seu programa de cozedura; consulta aabela de programas de cozedura na parte 6 deste manual. Reinicie o programa assimissque que a tampa estiver corretemente posicionada. Se o problema persistir, envie o aparecido a um Servico de Assistência Técnica aprovado para reparação. الإستعمال الإستعمال الحرفية الإستعمال الإستعمال الحرفية الإستعمال الحرفية الإستعمال الإستعمال الإستعمال الإستعمال الإستعمال الإستعمال الإستعمال الإستعمال الإستعمال الإستعمال الإستعمال الإستعمال الإستعمال الإستعمال الإستعمال الإستعمال الإستعمال الإستعمال الإستعمال الإستعمال الإستعمال الإستعمال الإستعمال الإستUTION الإستUTION الإستUTION الإستUTION الإستUTION الإستعمال الإستUTION الإستUTION الإستUTION الإستUTION الإستUTION الإستUTION الإستعمال الإستUTION الإستUTION الإستUTION الإستUTION الإستUTION الإستUTION الإستعمال الإستUTION الإستUTION ال,enGLISH ال,enGLISH ال,enGLISH ال,enGLISH ال,enGLISH ال,enGLISH
AR
diksek diksek uglal diksek diksek uglal diksek uglal diksek uglal diksek uglal diksek uglal diksek uglal diksek uglal diksek uglal diksek uglal diksek uglal
jglj jc aBlaJ 1.9
aaii jie jie jie jie jie jie jie jie jie jie jie jie jie jie
10
#
Jl 1e Jauw Jd jil
psd jyll gajl lgljg jglj 15 jabi.3 jol jil jil clai jie Ua
JyIyIyIyIyIy
aJlJ 1.11
a#plabll gahy paa y cagll ggygabll alg aiau laai
gulj 1y jz gai yiy aiaa yg i pruii y.8jgai all lalall
在 Rt ABN 中:
gssu 15
aaii aaii iiaai iiaai iiaai iiaai iiaai iiaai iiaai iiaai iiaai iiaai iiaai iiaai iiaai iiaai iiaai iiaai iiaai iiaai iiaai iiaai iiaai iiaai iiaai iiaai iiaai iiaai iiaai iiaai iiaai iiaai iiaai iiaai iiaai iiaai
gblllluee g jgsaalld aed
gabll 1cgl 1j 0g 1 j 2a 1 a 1 1 1 1 1 1 1 1 1 1 1 1 1 1 1 1
a
a 100
a a a a 0000
End
aalw jy .slssllg 0g ylll lalj JgJgJgJg
gj gabal jz3 0
g 1 g 0 95 o jol o jol bol o jol
.àllàs! 9g joo
jIJUJI JUJIJI UJUJIJI 1.7
Gg aal . 10000000000000000000000000000000000000000000
原不等式成立
0aaiagallgihalgluluol
.6jJ
aalw joo. 0 1e bdool dooall ooi
JiaJI JiaJiaJIaJIaJIaJIaJIaJIaJIaJIaJIaJIaJIaJIaJIaJIaJIaJIaJIaJIaJIaJIaJIaJIaJIaJIaJIaJIaJIaJIaJIaJIaJIaJIaJIaJIaJIaJIaJIaJIaJIaJIaJIaJIaJIaJIaJIaJIaJIaJIaJIaJIaJI
()()
(204)
aalagll aaii iie. jaiil jaiil aaii aaii aaii . ⑥
Llaljll jll
a
#
aillal yjg jn cialo jzayb bajl yjai
yss sas sas jgss sss sss sss sss sss sss sss
aal baa aai paa aai aai aai aai aai aai aai
gall gall aas lal y gals yll pdlwl .glg
jg jy jy jy jy jy jy jy jy jy jy jy jy jy jy jy jy jy jy jy jy jy jy jy jy jy jy jy jy jy jy jy
(31 ygill (J) gall) gall 0g 0g ggal pall a
jie hui yduuyu g jiy jiu jiu jiu jiu jiu jiu jiu jiu jiu jiu jiu jiu jiu jiu jiu jiu jiu jiu jiu jiu jiu jiu jiu jiu jiu jiu jiu jiu jiu jiu jiu jiu jiu jiu jiu jiu jiu jiu jiu jiu jiu jiu jiu jiu jiu jiu jiu jiu jiu jiu jyu
(45 g)
olal 10000000000000000000000000000000000000000000
.(33g32juaaogilljkuw) 1bglgajcLswl wla
aLdlaalglalg 10
gabll aagaaalw jaeir . 0aaiallalrjlllglgogg
.
Jaaill 100000000000000000000000000000000000000000000
.(c)g|l(a)|g(c)g(a)
#
Jg Jg Jg Jg Jg Jg Jg Jg
8
aaii jaii jaii jaii jaii jaii jaii jaii jaii jaii
a aai 1
End
HOe aaii jae w. diqw wll lde abalwl aljor jolaljgwl jogw .
()aiaaaalll aie alalallwag
.3g 1
JUJI JUJI JUJI

AR
aagll aedl pse g lbaell dle yg agbll ceg adligkll
aalal yjzss. 1d aal lal all alg g jll gaggl g kao
1 2
Jaaill 1sall aogj jaoa ojbjg jw gllalg ll
.(c)g|l(a)|g(c)g(a)
Soll aol jaa ola jyra jn l aag cj yll oal oal aol bolg 1e bolol:
.(j)Jd aJzJ (aJzJ JJg (aj)Jd Jd
a#
Jg Jg Jg Jg Jg Jg Jg Jg
()
aal alal alal alal alal alal alal alal alal
#
$$
\begin{array}{l} \text j o r d i n g . j o r d i n g . j o r d i n g . j o r d i n g . j o r d i n g . j o r d i n g . j o r d i n g . j o r d i n g . j o r d i n g . j o r d i n g . j o r d i n g . j o r d i n g . j o r d i n g . j o r d \end{array}
$$
$$
\begin{array}{c} \text {s w} \\ \text {H E A B} \\ \text {G C O} \end{array}
$$
$$
\left(\frac {1}{2}\right) \frac {1}{2} \frac {1}{2} \frac {1}{2} \frac {1}{2} \frac {1}{2} \frac {1}{2}
$$
oojgaaag. gajgaiil pao jla jgal jbaal sbj ybal aoe el
y
End
HOaJUeJyW.ajgwsJyE aBssJyR JyI JyI JyI JyI JyI JyI
()afoallleabolall
gj g jzalj 30
solljll sollj
Jl jll jgl g jg jgl gljgl jgl jgl jgl j
.
gJgall gglal alg ggs glal alg g s all dS ay jnall
.
aaii jaiy
#
jall jll aol jaoa ool jzjbr jg wlaal cgl gl 0
.(c)glll(a)JLg(c)g0sla
Soll 0j j 0j j 0j j j j j j j j j j j j j j j j j j j j j j j
.(0jal a 1 (jLai) Jlglg (oJal a 0e 0d j)
#
Jg Jg Jg Jg Jg Jg Jg Jg
8
aill aill wiyw glll alor yll lalil jglll jgwl jywl alor ylll uic
aaii 1gaiy
End
aalw jz. slzwl gog yll lalj jgul jgus, g
gjg jzaljzjzj3 0
a
$$
\cdot \square E n d
$$
HOa aalw yew. diyaw wle alabw aljol jlljgljg jg
()aagaaall aieablaal
.30
1
.
yjyjy jyjy jyjy jyjy
JSSslll 10g Jooa 000000000000000000000000000000000000000000
.(c)g|lla)JLg(c)gOla
Soll aol jooa oJb Jg Jg Jg Jg Jg Jg Jg Jg Jg Jg Jg Jg Jg Jg Jg Jg Jg Jg
(ooJyJzJzJzJzJ)JzJzJzJzJzJzJzJzJzJzJzJzJzJzJzJzJzJzJzJzJzJzJzJzJzJzJzJzJzJzJz
#
Jg Jd Jd HHEH g C
()
aaii iiaai joo aai jao jao jao jao jao jao jao jao jao jao
a a a a a a a a a a a a a a a a a a
End
aalwJyew.1sLwEg 1111111111111
.30
J
pLgol dlaal g lal all alg o
yab 1
.
Juslll l koll 20g joo ojbj ybr j u gall bglbglg
.()Jl()
#
gabll aaii jaiw.
.
Jylll lI ylll aol jydda oJybrj ygwlalllg 0g 0
.(c)glll(a)JLg(c)g0sla
#
Jg aag JdJIHHEAE g CCCC dawal ywog. gJgJy jy wll ady g jy
8
aalw jyewg. yall alo yll lali li jywl joxw, yll jaxwll alo yu Jusl ic
aaii 1 aaiy yjblal rssg sagw jlll
ooj gao zao. yjgagill poao gdo la jgal jbeall sioj gall alas elj
y
End
HOE aalw jaiw .diabaiw laljaiy jaiy jajg
()aiaaaallae aialaaiaaaiw
gjg jzj 30j
J

alaiy jS. lalai y g aBg eeg aLgA
gabagaaa aaiy
.
Jai jai jai jai jai jai jai jai jai jai jai jai jai jai jai jai jai jai jai jai jai jai jai jai jai jai jai jai jai jai jai jai jai jai jai
.()g()
a0g aaaa 8a1b jn g a yjy jy d a b
.(oJal aJ (J) Jlglg (OJALaJd oJLj) jssll
aBol coljLz#.
Jg Jg Jg Jg Jg Jg Jg
8
aalaljgawgagall alo jlllali jalal Jgws. jolal alao jusl iis
a aai 1 a aag bll gaae
g
a aai
oo 1000
y
End
HOa aalw yew.ajgaw wleabw aljra jywl Jy
()aiaaaallae aabaaalaa
Gg j 3 o
1
glll 10000000000000000000000000000000000
.
J 100000000000000000000000000000000000000000
.(c)glllla)JLgllg(c)g0a
Soll aol jooa oJb Jg Jg Jg Jg Jg Jg Jg Jg Jg Jg Jg Jg Jg Jg
(oojol a oJolal) JoooJg (oojol a oJol) Joo
aBll 0
jg jy jy jy jy jy jy jy jy jy
6
aalalw jawg. gbl alol yll lalj glal jglal jywl jn aalal alo jal s
aJ 1
aill 15gao aal bai jg g aal agg
End
.
.3g j 1j0
jolj

e 150 2
A
g 1
(36 25
a aia 0j y jy jy jy jy jy jy jy jy jy jy jy jy jy jy jy jy jy jy jy jy jy jy jy jy jy jy jy jy

1
Aaalldg aalldg gaaal eeg aagll
a aiaaa ojol aeg aagall gai jll gaoaill aagai jaoa
ydydydydydydydydydydydydydydydydydydydydydydydydydydydydydydydydydydydydydydydydydydydydydydydydydydydydydy
Juslll lssll 20g jaaa ojbjg jybr g yg bllg bglg
()
#
a aagw Jolly HRE 9 C
《》
aaii aaii jaii iaii jaii jaii jaii jaii jaii
()
gag gag gag gag gag gag gag gag gag gag gag gag gag gag gag gag gag gag gag gag gag gag
yjbdal jn no albll ydyclcxy
Erid
HOJ
()《afoolwJgabfool》
.3g j g aaiy 1jg3 0

Aaalldg 10aill gglg yall eeg aulglll
aalalw aalal wzew 1e alalol olalj y Jyogol uayu oakai aagaa
.
Jylll l! sall aol yol ool yol b j wolal all gllg 0e bcl:
.(glll)jlllgl(gll0la)
gabll calj jzdd. 0
Jg Jg Jg Jg Jg Jg Jg
8
aalalw yaw. gbl alal jlll jall jall jlll jlll jlll jlll aoljul s1 .
a
jolldag. hddall yduo plao no aolcbll bcll no jolldlaib ljiw bdo li wabll ic abgdo
a
jglj 53
.
.41 y
aJz Jaaas aabjauu wll gusw
pulucuullul
glll ceg g uolkoll .1
scc
aBllcglgUgSallg
(ajll) max aolsc ljg jglz yj c jglg g all g sgs
(19)
eogj g aagaaal jgl glaol lta gabll alg wgs yll plabll uigka gabue
aal lssw aai joo jil gall al slay y.
Jg 10000000000000000000000000000000000
Jull) Jusuill 2g jao plab uia g Ujig aIag aIa bI yall aeg oal .
.20
.21 0
aeg 10000000000000000000
a1a 1.3
.43 1
Jall) aIayd aeIoll aylae 5oJol oJyO JgJzll JdoJbJoo
.(22)
baall uoo plao cui 4
jla 23 (23)
#
Jgul Juaa 5.5
.24 ygjgl jyjgl jyjgl jyjgl jyjgl jyjgl jyjgl jyjgl jyjgl
HEI10 1
Jauuuiy jayjai 0.6
a 1
#
wglgaoa 2b.3
jLss) jylog jol oIag aaleiaiaaiaeaiaaiaaiaaa Joo yjwll giae ejl
.897
Lgla
JlJI) IgIgLoIgIe Ieolg yswill gio aJolb Jolg yswill gio a
a a 1000 g 1000g 1000g 1000g 1000g 1000g 1000g
yulil gao zao lolo 105
aBll aeg yaa 3.85 ae aee alal llae 11 alal yuul uag
JSLJI)lagaa jse Xaiai gaojia jzai.38g 37 Juaaogou jLsJl) aIbIy I
.39
a 1
LgJg jyj 1000000000000000000000000000000000000000000
(44 1000000000000000000000000000000000000000000000000000000000
alall abi 23
.(10)
jog jog jog aol abg
yj 100
4iSka 1000000000000000000000000000000000000000000000000000
J 1
(1)
\(\therefore \text{日} \leqslant \text{日} \leqslant 1\) (14) \(a = a + b + c + d + e + f + g + h + i + j + k + l + m + n + o + p + q + r + s + t + u + v + w + x + y + z + ab + cd + de + ef + g + h + i + j + k + l + m + n + o + p + q + r + s + t + u + v + w + x + y + z + ab + cd + de + f + g + h + i + j + k + l + m + n + o + p + q + r + s + t + u + v + w + x + y + z + ab + cd + de + f + g + h + i + j + k + l + m + n + o + p + q + r + s + t + u + v + w + x + y + z + ab + cd + de+
g s r a aal d aai pl aai 1a i jia b jy y jy jy jy jy jy jy jy jy jy jy jy jy jy jy jy jy jy jy jy jy jy jy jy jy jy
.15 a
ailll 1000 1000 1000 1000 1000 1000
pugll plao aabii.(16 gaggl Jw) 1bll jggl plao laaig
j1j00g. (17 j00g0gill J500) 0g!log j0w log acll aiai w pluayy yuy
Jill) gfo yolqilofo pdool plao afo 0g ofo 1ofo 1ofo
(1)
.12
a
Joo 0o (w y aaggill Jss) lglge gll jlaaagoggll Jssy I ggs
#
jglulduwll
0.1
yjgl jgcll l 10000000000000000000000000000000
.
jJy jaydolduuJgJyJyJyJyJyJyJyJyJyJyJyJy
c.1234567890
JSSW) 15bllg gJg dLwI yJc aol sOg Jbllg JdAa JdAa Jbllg
.(2g1jlaa#
jblw yg yb jol lus ally lle gall eeg j kssal bllg juc: abgdo
gj 1aill gai iiai jgai gai aai alg agai alg gai gai gai
.
Jall) jall Jd1o iLdlolg aillgl slgall gaoa 11jy. gauu al jall
.3
jgljcljglj3
aalglg aell al 13
.4gogagaoiaaiaaiyglalggall
(5)
y
.40 1
.41 y
42 1
. doxy
.42 1
aJwE gJbAal alg waiall gSg aaalolg aRall:Iaaloll gsw Jsayd
.

JlJlJlJl

jglaljzjdzjzjzj

aaa 30g a>gl cwl:Jllal lla g Cgll o

.114:JlllIa J.

aJySg y. gaii jaijai jai jai jai jai jai jai jai jai jai jai jai jai jai jai jai jai jai jai jai jai jai jai jai jai jai jai jai jai jai jai jai jai jai jai jai jai jai jai jai jai jai

ylll aolol al 0al 0al al 0al

yJyJyJyJyJyJyJy

oljlll j

aagaaalgeababaaalallaojgajgai jll

#

JzJzJzJzJz
#


LguyooI gIgIyoxoJSoa aIc aOgolgo yglgy ①
A

jlaal yoo .9
alglnssbll j5lgl lalal y
JgJy JgJyJyJyJyJyJyJyJyJyJyJy
aJgfo 1o aiaaoal 2jaiuol ooo gO dolgy lduwol
jlaal jbaaog
y
zaiol jiao jiaoyog aobjol cldaill
AR
j. 1.
1golgljSjLj 0
15.7
alululus uunuululg gallllcgld cnuol
.
gabllcag lssk. pltaailll laeaiae jy jaaai
JcGm .glblll Jluu g logd y jSjg .jyallg jLwI .Jyblzll
.
iJoo 1000 1000 1000 1000
JzjI J 10
jgljgljgljgljgljgljgljgljgljgljglj
g d aiaa iaoa oio jyoo jyai jiaai jia jkaai
ab = ( 2a) ^2 - 1
jololaoo jydo alllllll
yj yj jy jy jy jy jy jy jy jy
daiaa ddoj yg lalwly gdlall g g. yuill gia a y
Jl aIbIgIaIyIgIyIgIyIgIyIgIyIgIyIgIyIg
JU
auiy iog jiaag.bas douwus wuljblauwaiuall jzglzbspuw
. 49 49 49 49 49 49 49
#
Jl jiaai aiaai 4j 10n no yog ofo tao do puiu wos
Lol
eeg Juaa. gabll eeg no yjagl g jgdp aegy
Gioi11 iis go plusuun aannn aol jie aab yabll
a aal alal alal alal alal alal alal alal alal
.(dalll lllg bgo ala a j) alba
alzill Jgauu Jswll gia aoo oos jol jglzl plucw l
j 1 j 105 t. lal 100 wll g yall alg dul aill j 15
joo joo
.
jglg lgsog gag gag gag gag gag gag gag gag gag gag gag gag gag gag gag gag gag gag gag gag gag gag gag gag gag gag gag gag gag gag gag gag gag gag gag gag gag gag gag gag gag gag gag gag gag gag gag gag gag gag g
j 1
. 1
?g 5i -j01 jk j4j p dss .5.5
Jgglj.
#
1.12 10gally jzgl zjgl y
aJy jy Jy Jy Jy Jy Jy Jy Jy Jy Jy Jy Jy
aJyJyJyJyJyJyJyJyJyJyJyJyJy
A
L 1
jglg jglg jglg y. jglg lglg d
jL j
iue ci jil jie aai li gbi yj blln no 15s .
. . . . . . . . . . . . . . . . . . . . . . . . . . . . . . . . . . . . . . . . . . . . .
9ybl 1 - j0J 5j0j0j0j0j0j0j0j0j0j0j0j0j0j0j0j0j0j0j0j0j0j0j0j0j0j0j0j0j0j0j0j0j0j0j0j0
jgo Jzdujdo. alboJoo laofo 10
aag aagaaagaaagaaagaaagaaagaaagaaagaaagaaagaaagaaagaaagaaagaaagaaagaaagaaagaaagaaagaaagaaagaaagaaagaaagaaagaaagaaagaaagaaagaaagaaagaaagaaagaaagaaagaaagaaagaaagaaagaaagaaagaaagaa
.
J 1
a
j 1 j 1
.
y
Laiogll oia gab ic jolal ggl .laalldwlg aalall no ij glggrg
pIaillluy lalj nlaall a
g.(j)(j)(j)(j)(j)(j)(j)(j)(j)(j)(j)(j)(j)(j)
a:laia 111 y aal y aaiy y, baiy g x
aaii
eog 1ofo gogg oogg oogg oogg oogg oogg oogg oogg
jIyJy JyJyJyJyJyJyJyJyJyJyJy
y 1 y 1 y 1 y 1 y 1 y 1 y
jL
glul glcd glcd uo glably jglajy
aBllwgljLJLWgSswy:
y jjlll yll l jn nn nnnn 2 g jg jg jg jg jg jg jg jg jg jg jg jg jg
.8j8j8j8j80gabllc9gpaaiy9g j81c9g gpaui
gj jogall yabll ddoocu w .jbs jyall lds gabll elcg pdo
.0U 1 log .0
eog 1001 1001 1001 1001 1001 1001
aBbI aIg 8oJoo IabI gBa baa y.
.
alall y. alall y g jg jy gl a
Jauu Jauu Jauu Jauu Jauu Jauu Jauu Jauu
1. 1. 1. 1. 1. 1. 1. 1. 1. 1. 1. 1. 1. 1. 1. 1. 1. 1. 1. 1. 1. 1. 1. 1. 1.
aJ 1 J aJgJgJgJgJgJ gJgJgJgJgJgJgJgJgJgJgJgJgJgJgJgJgJgJgJgJgJgJgJgJgJgJgJgJgJgJgJgJgJgJgJgJgJgJgJgJg
Jusu wu wulgio a uol lgl uu ofoa d. JzjLg
.
yabll 1 -nJ 5j 1j 4
.
jol jol jol lio plool ool ool ool ool .2
joo (Jabll uL y) oolowl jno pluwrw waaas jyll l
0g 0g 0g 0g 0g 0g 0g 0g 0g 0g 0g 0g 0g 0g 0g 0g 0g 0g 0g 0g 0g 0g 0g
aaii iiaaii g aaiy y dyaay ydgy ydo ydo ydo ay
aegxwglblaoljnooal jgwlplzwiwy
g 100000000000000000000000000000000000000
paIbaI gpaIaI aIyI yIyI yIyI yIyI yIyI yIyI yIyI yIyI
aabaaal jblaool ngagag 1gls lgsiai d aabj jlaeall plauu w gdo
4Lwgljgllblall jbjll jn jglil
Jlalbl Jglia jie
jIJI JJIJIJIJIJ
jaiy jaiy jao aaii ayigui jalb yjao
ppl pIeauuN - 10 Jsu juspuu u5.3
d.o 0a aall joll jol jol l
.
Lalal pbal lal bala gog g bala ybal aI
pabll gddgdlalldl lddcbdgdall ddd
Lilabll aaii 4oioi y laoo jlaol iis
Jauiau juc paai pblgjylo 0o yol auiu Jauauiu oao yjglilie
jgl jgljll Jk g jg jgall jalal jdaal lalld jlaol
jlll jll lal llal jlln no 15i jlln no uol jllu jlll jlll i jll
aJy j. Jy Jy Jy Jy Jy Jy Jy Jy Jy Jy Jy Jy Jy Jy Jy Jy Jy
1 1
a a 1 g 1 g 1 g 1 g 1 g 1 g 1 g 1 g 1 g 1 g 1 g 1 g 1 g 1 g 1 g 1 g 1 g 1 g 1 g 1 g 1 g 1 g 1 g
gaiyai jiljgl gai jiljagai jiljagai jiljagai jiljagai jiljagai jiljagai jiljagai jiljagai jiljagai jiljagai jiljagai jiljagai jiljagai jiljagai jiljagai jiljagai jiljagai jiljagai jiljagai jiljagai jilj
gdi.iJlaolalwglnolal all no jj g ogyr jydo jksoa
aalaaal aalaaal aalaaal aaiy gag plabll no elgill oia gab ic jidall
yjiaosluuysus
jai jai jai jai jai jai jai jai jai jai jai jai jai jai jai jai jai jai jai jai jai jai jai jai jai jai jai jai jai jai jai jai jai jai jai jai jai jai jai jai jai jai jai jai jai jai jai jai jai jai jai
ailll 1y jyj y jy jydiu bai
aolwul
. 1JaiiIg I g Jg Jg Jg Jg Jg Jg Jg Jg Jg Jg Jg Jg Jg Jg Jg Jg Jg Jg Jg Jg Jg Jg Jg Jg Jg Jg Jg Jg Jg Jg Jg Jg Jg Jg Jg Jg Jg Jg Jg Jg Jg Jg Jg Jg Jg Jg Jg Jg Jg Jg J g
Jgssal aabll gglg gao jgll li gglg . 100
.(u)log aullg 1gglg yjU dXoJl gOJL
jgl 1gabu jll 0jllnnaa
?jloJy JgJyJyJyJyJyJyJyJyJyJyJyJyJyJyJyJyJyJyJyJyJyJyJyJyJyJyJyJyJyJyJyJyJyJyJy
aalalalalalalalalalalalalalal
sloil pduuW uao gog. aas jiall plauu w yaa o jaii Ia
julooJoual all jol Jd
L 10000000000000000000000000000000
:JJJUJLJUJLIO
a 1
.12aJbBgllglll aolly sloj
y
JU 10g
s13 s1s 1220j0glaog cug gauu jzauu p
. lo
U
4.
210
204
203
202
7
285
IiWg g wgl gl 10e
eogll kckl oaleo g jg tioaol lglgTurbo Cuisine
!pL 1
Uu Uuuuull uuuuull uuuuull uuuuull uuuuull
aolzolg abluljol jolg agbglg
a aai iiaolg jaaai liqua gge uga aeg y
1120 600000000000
THANKS FOR CHOOSING MOULINEX
Welcome to the world of fast & delicious cooking!
With Turbo Cuisine, we took up the challenge of reinventing the pot: Easier. Tastier. Just better!
Designed with this guiding principle, Turbo Cuisine allows you to save time and cook homemade delicious meals in total simplicity and convenience.
Thanks again for welcoming us to your kitchen.
Now let's cook together!
EN
CONTENTS
Quick Start Guide in Images 4
Moulinex Recommends Safety First 215
All Parts of Your Product 223
Getting Familiar with the Control Panel 224
How To Use & Clean Guide 225
Technical Troubleshooting Guide 241
Moulinex International Limited Guarantee 285
MOULINEX RECOMMENDS SAFETY FIRST
Safety is our number one priority. We design and manufacture our product with high safety and technology standards. However, as with any electric appliance there are some potential risks, we therefore invite you to exercise a degree of care and to adhere to the following instructions.
SAFETY INSTRUCTIONS
Take the time to read all the following instructions carefully and save them for future reference.
- Improper use of the appliance and its accessories may damage the appliance and cause injury.
- The appliance cooks food under pressure. Incorrect use may cause risks of burns due to steam.
- For your safety, this product conforms to all applicable standards and regulations (Low Voltage Directive, Electromagnetic Compatibility, Food Compliant Materials, Environment, ...).
- The heat source necessary for cooking is included in the appliance.
1. Where to use safely?
- Indoor use only.
- This appliance is intended for domestic household use only. It is not intended to be used in the following applications, and the guarantee will not apply for:
- staff kitchen areas in shops, offices and other working environments;
-farm houses;
- by clients in hotels, motels and other residential type environments;
- bed and breakfast type environments.
- Do not place the appliance in a heated oven or on a hot hob. Do not place the appliance close to an open flame or a flammable object.
- Use on a flat and stable, heat resistant work surface, away from any water splashes.
2. Who to use safely?
- This appliance is not intended for use by persons (including children) with reduced physical, sensory or mental capabilities, or lack of experience and knowledge, unless they have been given supervision or instruction concerning use of the appliance by a person responsible for their safety.
- This appliance can be used by persons with reduced physical, sensory or mental capabilities or lack of experience and knowledge if they have been given supervision or instruction concerning use of the appliance in a safe way and if they understand the hazards involved.
- This appliance shall not be used by children. Keep the appliance and its power cord out of reach of children.
- Children shall not play with the appliance.
- Children should be supervised to ensure that they do not play with the appliance.
3. How to use safely - general usage?
- Do not use appliance for other than the intended purpose.
- Do not use the appliance to fry food in oil. Only browning is allowed.
- Do not use the pressure cooker in pressure mode for deep frying food.
- When cooking doughy food, gently shake the cooker before opening the lid to avoid food ejection.
- This appliance is not a steriliser. Do not use it to sterilise jars.
- This appliance is not intended to be operated by means of an external timer or separate remote-control system.
- To carry the appliance always use the two side handles on the housing of the appliance. Wear oven mitts if the appliance is hot. For more safety, make sure that the lid is locked before transporting the appliance.
- The bottom of the cooking pot and the heating plate should be in direct contact. Remove any object or food residue located between the cooking pot and the heating plate, it could affect performance
- Be aware that certain types of food, such as applesauce, cranberries, rhubarb, pearl barley, oatmeal or other cereals, split peas, noodles, or pasta can foam, froth and sputter, and clog the valves. Use caution when cooking these types of food and after use clean valves thoroughly.
- Be aware that certain recipes which include milk can foam, froth, overflow and clog the valves. Use caution when cooking these recipes and after use clean valves thoroughly.
- After cooking meat which has an outer layer of skin (such as ox tongue), which could swell with the effect of pressure, do not pierce the skin after cooking if it appears swollen: you could get burnt. Pierce it before cooking.
- Do not use the appliance empty, without its cooking pot or without ingredients inside the cooking pot. This could cause serious damage to the appliance.
- Do not use the appliance under pressure without adding water, which could cause serious damage to the appliance.
- Do not fill up your appliance without its cooking pot.
- Caution: do not spill liquid on the plug.
- Do not heat the cooking pot with any other heat source than the heating plate of the appliance and do not use any other pot. Do not use the cooking pot with other appliances.
- Use the cooking pot in the appliance ONLY. Do not use it to cook on stovetops, in the oven etc.
- Use a plastic or wooden spoon to prevent any damage to the non-stick coating of the cooking pot. Do not cut food directly in the cooking pot.
- Do not touch the valves, except while cleaning and maintaining the appliance in accordance with the instructions given.
- Do not place any foreign objects in the valves and pressure release button. Do not replace the valve.
- Check regularly the ducts in the valves allowing the escape of steam to ensure that they are not blocked.
- Do not use a cloth or anything else between the lid and the housing to leave the lid ajar. This can permanently damage the sealing gasket.
- Do not let the power cord hang over the edge of table or counter; or touch hot surfaces.
4. How to use safely – before cooking?
- Before using your appliance, check that the float valve and the pressure limit valve are clean.
- Before using your appliance, check that the sealing gasket has been correctly installed on the lid.
- Make sure that the bottom of the cooking pot and the heating plate are always clean. Make sure that the central part of the heating plate is mobile.
- Do not fill your appliance more than the MAX mark on the cooking pot.
- Please follow the recommendations on the volume of food and water to avoid the risk of boiling over which can damage your appliance and cause injury.
- Make sure that the appliance is properly closed before bringing it up to pressure.
5. How to use safely - during cooking?
- Do not try to open the lid until the pressure has decreased sufficiently. Do not try to open the lid until the float valve is down.
- Never force the appliance open.
- During cooking and steam release at the end of cooking,
the appliance releases heat and steam. Keep your face and hands away from the appliance to avoid burns. Do not touch the lid during cooking.
- Do not move the appliance when it is under pressure. Use the handles when moving it and wear oven mitts, if necessary. Do not use the lid knob to lift the appliance.
- Do not remove the cooking pot while the appliance is working.
- In browning mode, be careful of risks of burns caused by spattering when you add food or ingredients into the hot cooking pot.
6. How to use safely - after cooking?
- When you open the lid, always hold it by the lid knob. Position your arm parallel to the side handles. Boiling water could remain trapped between the sealing gasket and the lid and could cause burns.
- Be careful also about the risk of burns from the steam coming out of the appliance when you open the lid. First open the lid very slightly to allow the steam to escape gently.
- Do not touch hot parts of the appliance. After use, heating plate surface can remain hot for up to 2 hours.
- Unplug from outlet when not in use and before cleaning. Allow to cool before putting on or taking off parts.
7. How to use safely - cleaning?
- Wipe clean the bottom of the cooking pot and the heating plate after every use.
- Do not immerse the appliance in water.
- For cleaning your appliance, please refer to instructions for use. You can wash the cooking pot and the lid in soapy hot water, do not put them in the dishwasher. Clean the housing of the appliance using a damp cloth.
8. What to do in case of damage?
- Only authorized person in Approved Service Centre can repair the product.
- Do not operate any appliance with a damaged power cord or plug or after the appliance malfunctions or has been damaged in any manner. Return appliance to the nearest Approved Service Centre for examination, repair or adjustment.
- If the power cord is damaged, it must be replaced by an Approved Service Centre in order to avoid a hazard. Do not replace the power cord supplied with other cords.
- Do not damage the sealing gasket. If it is damaged, have it replaced in an Approved Service Centre.
- Replace the sealing gasket every 2 years, or sooner if you see the sealing gasket is worn or in need of replacement.
- Use only the appropriate spare parts for your model. This is particularly important for the sealing gasket and the cooking pot.
- Use only spare parts sold in an Approved Service Centre.
- The use of accessory attachments not recommended by the appliance manufacturer may cause injuries.
- Do not use other cooking pots in the appliance in place of the provided cooking pot. Only replace the cooking pot with an original spare part designed to be used with this product.
- In accordance with current regulations, before disposing of an appliance no longer needed, the appliance must be rendered inoperative (by unplugging it and cutting off the power cord).
Environment protection first!

① Your appliance contains valuable materials which can be recovered or recycled.
- Leave it at a local civic waste collection point.
9. When does warranty apply?
- The warranty does not cover the abnormal wear and tear of the cooking pot.
- Read these instructions for use carefully before using your appliance for the first time. Any use which does not conform to these instructions will absolve the manufacturer from any liability and void the warranty.
- In case of commercial use, inappropriate use or failure to comply with the instructions, the manufacturer accepts no responsibility and the guarantee does not apply.

ALL PARTS OF YOUR PRODUCT
GETTING FAMILIAR WITH THE CONTROL PANEL

STATUS MESSAGES


Welcome message when appliance is turned on.
Time display. In this example: 1 hour 30 minutes.
Temperature display. In this example: 114 degrees Celsius.
Indicates that the program has a default automatic temperature/ time setting. It cannot be modified.
Indicates that temperature is rising during pre-heating phase.
Indicates that the appliance is pre-heating.
Indicates that the program is finished.
Indicates that the appliance is in keep warm phase.
Indicates that the program has been interrupted.
Indicates that the appliance is in standby mode.
HOW TO USE & CLEAN GUIDE
Feel free to refer to the figures indicated as (Fig.x) from Quick Start Guide part.
BEFORE FIRST USE
1. Remove packaging
- Take your appliance out of its packaging and please take time to read the instruction manual before first use.
- Remove promotional stickers (if any) from your appliance before first use.
2. Open the lid
- To open the lid, take hold of the lid knob, turn anti-clockwise and lift the lid up (Fig.1 & 2).
Note: When lifting the lid, it can happen that the cooking pot remains attached to the lid. It is normal and simply demonstrates a good hermeticity of the product. To avoid that the cooking pot falls heavily on the product when opening the lid, always open the lid gently.
- Place your appliance on a flat surface. Remove all protective materials and accessories from the inside of the appliance (Fig.3).
3. Clean all parts of the appliance
3a. Clean the lid, the cooking pot and the accessories
- Clean the lid, the cooking pot and the accessories with a soft sponge and soapy hot water (Fig.4).
- Dry off the lid, the cooking pot and the accessories (Fig.5)
- Do not use a scourer or abrasive sponge to clean the cooking pot as it could damage the non-stick coating in the cooking pot (Fig.40).
- Do not immerse the appliance in water (Fig.41).
- If you inadvertently immerse your appliance in water or spill water directly on the heating plate, take it to an Approved Service Centre for repair.
- Do not put the lid and the cooking pot in the dishwasher (Fig.42).
- Be aware, only the accessories: ladle, spatula, measuring cup and steam basket are dishwasher safe.
3b. Clean the sealing gasket
- Remove the sealing gasket from the lid and clean it with a soft sponge and soapy hot water (Fig.7 & 8).
- Dry it off thoroughly.
- Place the sealing gasket over the sealing gasket rack and press it into place (Fig.9). Press down firmly to ensure there is no puckering and that the sealing gasket is snug behind the sealing gasket rack.
- After placing the sealing gasket on the lid, if you open the lid too quickly, it can happen that the cooking pot remains attached to the lid (Fig.37 & 38). Wait few seconds for the cooking pot to free itself from the lid (Fig.39).
Note: It is normal and simply demonstrates a good hermeticity of the product. To avoid that the cooking pot falls heavily on the product when opening the lid, always open the lid gently.
WARNING: Never use your appliance without the sealing gasket (Fig.44)
3c. Clean the valves
- To clean the pressure limit valve, remove the pressure limit valve from the pipe on top of the lid (Fig.10). Clean it with a soft sponge and soapy hot water (Fig.11). Once dry, take care that the duct of the pipe is clean before plugging the pressure limit valve back on the pipe on top of the lid (Fig.12). Ensure that the pressure limit valve is well put in place, it must be able to move up and down.
- To clean the pressure limit valve cover, unscrew the limit valve cover from inside of the lid (Fig.13). Clean it with a soft sponge and soapy hot water (Fig.14). Once dry, take care that the duct of the pipe is clean before screwing the pressure limit valve cover back inside of the lid (Fig.15).
- To clean the float valve, remove the float valve gasket from inside of the lid, flip the lid so that the float valve can come out of the lid (Fig.16). Clean the float valve gasket and the float valve with a soft sponge and soapy hot water (Fig.17). Once dry, insert the float valve back on the lid and put the float valve gasket back in place (Fig.18). Ensure that the float valve is well put in place, it must be able to move up and down.
3d. Clean the housing of the appliance
- Clean the housing of the appliance using a damp cloth.
- Do not immerse the appliance in water (Fig.41).
- Wipe clean the heating plate using a dry cloth.
INSTRUCTIONS FOR USE
1. Place ingredients in the cooking pot
- Remove the cooking pot from the housing.
- Put ingredients into the cooking pot.
- Please note that the level of food and liquids should never exceed the max level marking on the cooking pot (Fig.19).
- When cooking food ingredients which expand during cooking, such as dehydrated vegetables or rice, in pressure modes, do not fill the cooker to exceed more than half of its max level.
2. Place the cooking pot in the housing
- Ensure the bottom of the cooking pot is clean and dry; and remove any food residue from the heating plate (Fig.20).
- Place the cooking pot into the housing (Fig.21).
- Never use your appliance without the cooking pot.
3. Close and lock the lid
- Check that the sealing gasket is securely placed on the lid (Fig.43).
- Take hold of the lid knob, place the lid on the appliance and turn it clockwise to lock it (Fig.22).
4. Attach the pressure limit valve
- Properly place the pressure limit valve on the lid (Fig.23). Please note that the valve will remain somewhat loose, it is normal.
5. Switch on the appliance
- Fully unwind the power cord and plug it into the mains (Fig.24).
- The appliance makes a 'beep' sound, the screen flashes and displays HEH.
6. Select and launch a cooking program
Each program has a default time and temperature and requires a specific lid position, please have a look at the cooking programs table:
COOKING PROGRAMS TABLE
Cooking program icon Cooking program name Default cooking time Adjustable time Default temperature Adjustable temperature Default pressure Delayed start from 10min to 12h Keep warm up to 24h Lid status Lid closed and locked Lid closed but not locked Lid open Stew 30min from 1min to 2h 114C No 70Kpa Yes Yes ● Soup 12min from 1min to 2h 114C No 70Kpa Yes Yes ● Stir Fry 20min from 1min to 1h 160C Yes from 100C to 160C No No No ● Steam 10min from 1min to 2h 114C No 70Kpa Yes Yes ● Bake 40min from 1min to 2h 160C Yes from 100C to 160C No Yes Yes ● Sous-vide / Slow-cook 4h from 30min to 12h 85C Yes from 55C to 95C No Yes No ● ● Rice 8min from 1min to 2h 114C No 70Kpa Yes Yes ● Yogurt & Ferment 8h from 30min to 12h 30C Yes from 22C to 40C No No No ● ● Porridge 15min from 1min to 2h 100C No No Yes Yes ● Adjustable Chef Mode 30min from 1min to 4h 80C Yes from 70C to 160C No No Yes ● ● ●
Note: When cooking, you may notice slight steam leakage from the lid, especially from the pressure limit valve. This is normal and occurs when pressure builds up.
Please refer to the figures from Quick Start Guide (from Fig.25 to Fig.36)

Stew program
- Place the ingredients in the cooking pot and completely close and lock the lid.
- Turn the control panel knob to the right to reach Stew program. The screen displays the default cooking time.
- Optional: Press and set the desired time by turning the control panel knob to the right (to increase time) or to the left (to decrease time).
- Press to start the cooking program.
- The appliance starts the pre-heating phase. The screen displays alternatively & HE RE and the pre-heating light indicator ① turns on.
- When the pre-heating phase is completed, the appliance switches automatically to cooking phase. The screen displays the count down and the cooking in progress light indicator turns on.
- During cooking process, pressure builds up in the appliance and pushes the float valve up. The under pressure light indicator turns on to notify that the lid cannot be opened without releasing the pressure first.
- At the end of the count down, the appliance beeps and the screen displays End.
- After a few seconds, the appliance will automatically switch to keep warm phase. The screen displays HDE and the keeping warm light indicator turns on.
- Press for 3 seconds to stop the program at any time.

Soup program
- Place the ingredients in the cooking pot and completely close and lock the lid.
- Turn the control panel knob to the right to reach Soup program. The screen displays the default cooking time.
- Optional: Press and set the desired time by turning the control panel knob to the right (to increase time) or to the left (to decrease time).
- Press to start the cooking program.
- The appliance starts the pre-heating phase. The screen displays alternatively & HERA and the pre-heating light indicator turns on.
- When the pre-heating phase is completed, the appliance switches automatically to cooking phase. The screen displays the count down and the cooking in progress light indicator turns on.
- During cooking process, pressure builds up in the appliance and pushes the float valve up. The under pressure light indicator turns on to notify that the lid cannot be opened without releasing the pressure first.
- At the end of the count down, the appliance beeps and the screen displays End.
- After a few seconds, the appliance will automatically switch to keep warm phase. The screen displays HDE and the keeping warm light indicator turns on.
- Press for 3 seconds to stop the program at any time.

Stir-Fry program
- Turn the control panel knob to the right to reach Stir-Fry program. The screen displays the default cooking time.
- Optional: Press and set the desired time by turning the control panel knob to the right (to increase time) or to the left (to decrease time).
- Optional: Press ① and set the desired temperature by turning the control panel knob to the right (to increase temperature) or to the left (to decrease temperature).
- Press to start the cooking program.
- The appliance starts the pre-heating phase. The screen displays alternatively & HEARE and the pre-heating light indicator turns on.
- When the pre-heating phase is completed, the appliance switches automatically to cooking phase. The screen displays the count down and the cooking in progress light indicator turns on.
- Place the ingredients in the cooking pot and keep the lid open to stir-fry.
- At the end of the count down, the appliance beeps and the screen displays End.
- After a few seconds, the appliance will automatically switch to standby mode. The screen displays
- Press for 3 seconds to stop the program at any time.

Steam program
- Place 150ml of water (3/4 cup) in the cooking pot, put your ingredients in the steam basket and place the steam basket on top of the cooking pot. Completely close and lock the lid.
- Turn the control panel knob to the right to reach Steam program . The screen displays the default cooking time.
- Optional: Press and set the desired time by turning the
control panel knob to the right (to increase time) or to the left (to decrease time).
- Press to start the cooking program.
- The appliance starts the pre-heating phase. The screen displays alternatively & HERE and the pre-heating light indicator turns on.
- When the pre-heating phase is completed, the appliance switches automatically to cooking phase. The screen displays the count down and the cooking in progress light indicator turns on.
- During cooking process, pressure builds up in the appliance and pushes the float valve up. The under pressure light indicator turns on to notify that the lid cannot be opened without releasing the pressure first.
- At the end of the count down, the appliance beeps and the screen displays End.
- After a few seconds, the appliance will automatically switch to keep warm phase. The screen displays HOE and the keeping warm light indicator turns on.
- Press for 3 seconds to stop the program at any time.

Bake program
- Place the preparation in the cooking pot and close but don't lock the lid.
- Turn the control panel knob to the right to reach Bake program. The screen displays the default cooking time.
- Optional: Press and set the desired time by turning the control panel knob to the right (to increase time) or to the left (to decrease time).
- Optional: Press l and set the desired temperature by turning the control panel knob to the right (to increase temperature) or to the left (to decrease temperature).
- Press to start the cooking program.
- The appliance starts the pre-heating phase. The screen displays alternatively & HEARE and the pre-heating light indicator turns on.
- When the pre-heating phase is completed, the appliance switches automatically to cooking phase. The screen displays the count down and the cooking in progress light indicator turns on.
- At the end of the count down, the appliance beeps and the screen displays End.
- After a few seconds, the appliance will automatically switch to keep warm phase. The screen displays HOE and the keeping warm light indicator turns on.
- Press for 3 seconds to stop the program at any time.

Sous-vide / Slow-cook program
- TurnthecontrolpanelknobtotherighttoreachSous-vide/Slow-cook program . The screen displays the default cooking time.
- Optional: Press and set the desired time by turning the control panel knob to the right (to increase time) or to the left (to decrease time).
- Optional: Press ⑧ and set the desired temperature by turning the control panel knob to the right (to increase temperature) or to the left (to decrease temperature).
- Press to start the cooking program.
- The appliance starts the pre-heating phase. The screen displays alternatively & HEA and the pre-heating light indicator turns on.
- When the pre-heating phase is completed, the appliance switches automatically to cooking phase. The screen displays the count down and the cooking in progress light indicator turns on.
- At the end of the count down, the appliance beeps and the screen displays End.
- After a few seconds, the appliance will automatically switch to standby mode. The screen displays = = = .
- Press for 3 seconds to stop the program at any time.

Rice program
Place the ingredients in the cooking pot and completely close and lock the lid.
- Turn the control panel knob to the right to reach Rice program. The screen displays the default cooking time.
- Optional: Press and set the desired time by turning the control panel knob to the right (to increase time) or to the left (to decrease time).
- Press to start the cooking program.
- The appliance starts the pre-heating phase. The screen displays alternatively & HEA and the pre-heating light indicator turns on.
- During cooking process, pressure builds up in the appliance and pushes the float valve up. The under pressure light indicator turns on to notify that the lid cannot be opened without releasing the pressure first.
- At the end of the count down, the appliance beeps and the screen displays End.
After a few seconds, the appliance will automatically switch to keep warm phase. The screen displays HOE and the keeping warm light indicator turns on.
- Press for 3 seconds to stop the program at any time.

Yogurt & Ferment program
Yogurt & Ferment program can be used to make yogurt or raise bread/pastry dough.
- When making yogurt, place the ingredients in the cooking pot and close the lid.
- When raising dough, you can knead the dough directly in the cooking pot then place the cooking pot in the housing and close the lid.
- Turn the control panel knob to the right to reach Yogurt & Ferment program. The screen displays the default cooking time.
- Optional: Press and set the desired time by turning the control panel knob to the right (to increase time) or to the left (to decrease time).
- Optional: Press and set the desired temperature by turning the control panel knob to the right (to increase temperature) or to the left (to decrease temperature).
- Press ⑥ to start the cooking program.
- The appliance starts the pre-heating phase. The screen displays alternatively & HERE and the pre-heating light indicator turns on.
- When the pre-heating phase is completed, the appliance switches automatically to cooking phase. The screen displays the count down and the cooking in progress light indicator ⑥ turns on.
- At the end of the count down, the appliance beeps and the screen displays End.
- After a few seconds, the appliance will automatically switch to standby mode. The screen displays
- Press for 3 seconds to stop the program at any time.

Porridge program
- Place the ingredients in the cooking pot and completely close and lock the lid.
- Turn the control panel knob to the right to reach Porridge program . The screen displays the default cooking time.
- Optional: Press and set the desired time by turning the control panel knob to the right (to increase time) or to the left (to decrease time).
- Press ⑥ to start the cooking program.
- The appliance starts the pre-heating phase. The screen displays alternatively & HERE and the pre-heating light indicator turns on.
- When the pre-heating phase is completed, the appliance switches automatically to cooking phase. The screen displays the count down and the cooking in progress light indicator turns on.
- At the end of the count down, the appliance beeps and the screen displays End.
- After a few seconds, the appliance will automatically switch to keep warm phase. The screen displays HOE and the keeping warm light indicator turns on.
- Press for 3 seconds to stop the program at any time.

Adjustable Chef mode
- Place the ingredients in the cooking pot and close the lid or not depending on your recipe.
- Turn the control panel knob to the right to reach Adjustable Chef mode. The screen displays the default cooking time.
- Optional: Press and set the desired time by turning the control panel knob to the right (to increase time) or to the left (to decrease time).
- Optional: Press ⑥ and set the desired temperature by turning the control panel knob to the right (to increase temperature) or to the left (to decrease temperature).
- Press ⑥ to start the cooking program.
- The appliance starts the pre-heating phase. The screen displays alternatively & and the pre-heating light indicator turns on.
- When the pre-heating phase is completed, the appliance switches automatically to cooking phase. The screen displays the count down and the cooking in progress light indicator 变 turns on.
- At the end of the count down, the appliance beeps and the screen displays End.
- After a few seconds, the appliance will automatically switch to standby mode. The screen displays
- Press ⑥ for 3 seconds to stop the program at any time.
* Suggestion for quickly reheating dishes: set temperature to
>=95C and cook with lid closed but unlocked.
7. Use the delayed start function
Delayed start can be useful to preset the appliance to start cooking later.
- First select a program following the steps described above in part 6.
- Before starting the selected program, press . The screen displays the default time for delayed start.
- Set the desired time by turning the control panel knob to the right (to increase time) or to the left (to decrease time).
- Press . The screen displays the delayed start count down. When preset time is elapsed, the appliance will start cooking automatically.
8. Open the lid
- Do not attempt to open the lid if the float valve is up and if the under pressure light indicator is turned on.
- The pressure can be release in 2 different ways at the end of the cooking:
Natural release: At the end of the cooking or after stopping the program, the appliance will cool down by itself, and the pressure will release naturally. During natural release, food might overcook due to the remaining pressure in the pot. Use manual release to stop cooking process immediately.
Manual release: Press continuously the pressure release button, on top of the lid. It will take a few seconds to a few minutes depending on the amount of food inside of the cooking pot (Fig.31).
WARNING: Be careful of the hot steam coming out from the appliance. Keep your face and hands away from the steam output (Fig.45).
- To open the lid, position your arm parallel to the side handles, take hold of the lid knob, turn anti-clockwise and lift the lid up (Fig.32 & 33).
WARNING: Be careful of the hot steam coming out from the cooking pot.
9. Unplug the appliance
- After usage, unplug the appliance and let it cool down for at least 2 hours before cleaning.
10. Clean after use
- Clean your appliance after each use.
- Before cleaning, let your appliance cool down for at least 2 hours.
- For cleaning instructions, refer to part 3. Clean all parts of the appliance in BEFORE FIRST USE section.
11. Maintenance tips
- To ensure the durability of the cooking pot time over time, do not cut food in it.
- Use the provided accessories. Do not use any metallic utensil as it could damage the nonstick coating in the pot.
- After usage, the sealing gasket may keep the smell of your dish. It is normal; silicone has little pores that open up when exposed to high temperature and close back once temperature drops. To eliminate the smell from the sealing gasket, you can:
- Put the silicone ring in the dishwasher
- Add 1 cup of vinegar, 1 cup of water and 1 lemon cut in large pieces into the cooking pot and launch a steam program for 2 minutes, then let the steam release naturally.
- Change the sealing gasket every 2 years or earlier in case of damage.
TECHNICAL TROUBLESHOOTING GUIDE
Problem Possible reasons Solutions Unable to open lid Unable to open because of pressure in the cooking pot. Press continuously the pressure release button to remove the pressure inside of the cooking pot. It can take a few minutes until the pressure is fully released. Pressure in the cooking pot is fully released but the float valve is stuck because it is too dirty and therefore unable to move down. a. Be sure the pressure is totally released by letting the appliance cool down for at least 2 hours.
b. Gently push the float valve down by inserting a skewer or a long object into the float valve opening. If this does not work, send the appliance to an Approved Service Centre.
c. For next use, please clean and dry off the float valve thoroughly. Unable to close lid The sealing gasket is not properly installed. Install the sealing gasket properly. The cooking pot contains hot ingredients generating steam. Wait for the ingredients in the cooking pot to cool down before trying to close the lid again. The float valve is stuck because it is too dirty and therefore unable to move down. a. Gently push the float valve down by inserting a skewer or a long object into the float valve opening. If this does not work, send the appliance to an Approved Service Centre.
b. For next use, please clean and dry off the float valve thoroughly. Position and or direction at which the lid was closed is incorrect. Close the lid in the correct direction according to the instruction manual. When opening the lid, the cooking pot remains attached to the lid. The sealing gasket created a suction effect. The cooking pot will free from the lid by itself. It is normal and simply demonstrates a good hermeticity of the product. To avoid that the cooking pot falls heavily on the product when opening the lid, always open the lid gently. Intense release of pressure from the pressure limit valve. The inner pressure exceeds working pressure, or the inner pressure exceeds the safety pressure. Clean pressure limit valve, float valve and lid thoroughly. If float valve still has steam coming out, please return appliance to the nearest Approved Service Center for inspecting, repairing or adjusting by authorized person. The pressure limit valve is in an incorrect position. Carefully rotate/press the pressure limit valve to make it fall into place. Be careful of the hot steam. Position yourself safely and wear oven mitts. Faulty pressure control resulted in release of pressure. Send the appliance to an Approved Service Centre for repair. Continuous pressure release from the float valve. The inner pressure exceeds working pressure, or the inner pressure exceeds the safety pressure. Clean pressure limit valve, float valve and lid thoroughly. If float valve still has steam coming out, please return appliance to the nearest Approved Service Center for inspecting, repairing or adjusting by authorized person. Residue in the float valve. a. Press continuously the pressure release button to remove the pressure inside of the cooking pot. It can take a few minutes until the pressure is fully released. b. Let the appliance cool down for at least 2 hours. c. Clean and dry off the float valve before restarting the cooking. The float valve is stuck. a. Press continuously the pressure release button to remove the pressure inside of the cooking pot. It can take a few minutes until the pressure is fully released. b. Let the appliance cool down for at least 2 hours. c. Clean and dry off the float valve before restarting the cooking.
Problem Possible reasons Solutions Steam leakage from lid. The sealing gasket is not properly installed. Remove the sealing gasket, clean it and reinstall it in the correct position. The sealing gasket is dirty. Remove the sealing gasket, clean it and reinstall it in the correct position. The sealing gasket is damaged, or the edge of the cooking pot is damaged. Send the appliance to an Approved Service Centre for repair. Food is uncooked Solid/liquid ingredients ratio is incorrect. Try again by following precisely the quantities of the recipe. No electricity from the power supply. Check your home electric circuit. E0 displayed on the digital screen. Pressure switch is faulty. Send the appliance to an Approved Service Centre for repair. E1 displayed on the digital screen. The temperature sensor is faulty. Send the appliance to an Approved Service Centre for repair. E2 displayed on the digital screen. The lid is not properly positioned for your cooking program. Each program requires a specific lid position. Check and adjust the lid position required by your cooking program, refer to the cooking programs table in part 6 of this manual. Restart your program once the lid is correctly positioned. If the issue remains, send the appliance to an Approved Service Center for repair.
ΣΑΣ EYXAPIΣTOYME ΝΟΥ ΕΠΑΕΓΕΤΗ MΟULINEX
KaIomegaopioate oToV KoOo Tou yPnyopou kai vOoiou i
Me to Turbo Cuisine ma vα δiaσaon σto μαγερεμα:Πο εύκολα.Πο νόστιμα.Απλα καλυτερα!
To Turbo Cuisine o i k o v p o a va o u p unepoxo anitik yeuuata, aTka kai aveta.
Zaç euxapiotoué nolu nou μac xapioate μα θéon σtnv kouziva αac.
AÇ μαγερέψουμε μαζι!
NEPIEXOMENA
O8nyo5 ynpoyopns Ekkivnons oEikovcs
H Moulinex sivei npotepaioTnta otyn aaoaia 246
Ola ta eapntmuata tou npoiovtoC 255
EoiKeiwn Tov nivaka eEyxou 256
O8nyos xpnans kai kathetaapiooou 257
O8nyoc avtuetwionc texvikuv npoBnmuatuw 276
v M o u l i n e x 285
HMOULINEX△INEI INPOTEPAIOTHTA ΣTHN AΣΦAΛEIA
H aαφáλεια εívα n πρωτη προτεραίοτητα μας. Σχεδιαζουμε και κατασκεναζουμε τα προίντα μας με ψηλά πρότια ααφαλείας και τεχνολογίας. Ωοτόσο, σε καθε έλεκτρίκη συκεύνιπαρχουν πιθανοί κίνδυοι, επομένως συνιούμεν λαμβάνετε ἀπόψη και να τηρείτε τις παρακάτω δόηγίς.
O△HΓΕΣ AΣΦΑΛΕΙΑΣ
Aiaβaote πpooεktiká oλeç tic πapakatw odnyieç kai aioθηkeuoté tic yi μeλλovtikn avafopá.
H akataaannn xphon tnc ouokeu nca twv aptnuatwv tncaevctai va npokaaleei n otn ouokenu kai tpaumatio.
H ouokun maeyipuei faaynto uno pieon. H eofoaalev n xpon evexetau va npokaleoi kivduvo ykaouatoc, loyw tou atou.
TnV aOafoia oac, auto to pioov oumuopovetau e 0a ta 1oxuovta npotua kai olouc touc 1oxuovtec Kavoviaouc (Onyie, yia tn xanl n taon, Tnv nEeKtpouayntikn oubetaotnta, ta uiknou evxovta oE taoh m Ta TpOphi, To nepiBaalov, k.
H anapaiaTn nyn thepuotnta yia to ayepua npilaaabavetai otoukeun.
1. Nóu xρησιμοποιείαι με ασφάλεια;
Xpno n ovo e owtepiko wpo.
Autn n ouokean ppoopiEeai aikaleotikayia oikiakn Xpnoi. dEv npoopiciEa yia xpnoi otic akolouepiepiTTwoei,oi onoe sDev kALuTTovta anto Tny eyyunon:
- Σε κουζίνες προσωπικόύ καταστημάτων, σε γραφεία ἡ αλλους χώρους εργασίας.
-Σεαγροκτήματα.
-AIo v o o x i v, o n aAawv kataaUmuatwv.
-Σεξενωνες ἡ αλλα παρόμοιου τύπου καταλύματα.
Mny tootheite tn ouokeun oekauTo foOpvo n kautn eotia.Mnu tootheite tn ouokeun kovta oE loya n eukkta avtikemuva.
Xpouoioiote n ouokun npw oE epiE8n,otaoepn kai avthetaikn otn themuotnta eia aio pno np onou mIoepieva kxtivaxe i vepo.
2. Anó noiov χρησιμοποileitα με ασφάλεια;
Autn n ouokevn dev npoipctai yia xpon ano atoua (oumupeilalmaibavoumevwwv twv paiidwv) me nepiopioevesc oomegakecs, aoonnpiakec n diavontikec ikavotntes, oute ano atoqa tonov dev exouv tnv avaykaia eumteipia n tic anapaitntec ywoeis, ektoc av bpikovtai untnv Eπiβεηn evlaka n exouv lαβei odnyies yia tn xpon tnc ouokevn c ano atofo uentuvo yia tn v aphialeia touc.
H ouokeun mtopei va xnpoumonoiinthetai anto atoua meuieuwuec oomegaatikec, aoontnpiakc n diavontikec ikavotntec n me eAeeiyn emteipiaoc kai yywons, eoov eTlbetaenovtai n exouv laoi odnyies yia tnu aofaanxpn on Tns ouokeun kai katavoouv touc utapxovtes kivduvouc.
Autn n ouokevun dev mnpei va xpnouoioi0e i aTo 1aia. Duaoote tn ouokevn kai to nEktpiko Kaawio pakia aTIOAia.
- Ta παιδία δεν θα πρέπειν α παίζουν με τη συοκεύη.
- Ta παιδία θα πρέπειν αβρίσκονταιυτό επίβλεψη, προκεμένουν αδιασφαλίζεταιότι δενθαχρησιοποήουντη σουκεύνηςπαίχνίδι.
3. Aσφαλής χρήση - γενική χρήση
XpnoiouoieTe Tn oukeun Movo yia touc oKOIOUc yia touc onoiouc npoopiEa.
MnV xPnoImuOnIOeIte Tn ouokcun yia va tnyavioTe foaynto e λádi. Movto ynoiMo EITpéπεtai.
Mnv xnpouoioite tn xutpa tauxntac wc pfiteca otnlambdaeons.
- Otav μαγειρεύετε φαγntα με ζύμη, ανακίνησε ελαφρα
tn χύτρα προτόν αυούετε to καπάκι, Ϝετε to φαγntó
vα μην πεαχτεί από to εσωτεριό του σκεύους.
Houkeun dev evai aiooTeipwntc. Mny xpoaioiote tno oukeun yia aiooTeipwon baoiv.
H ouokevun dev npoopicietaia xhon e eewtepiokoxpvosikotn n e exwpiot o uotma tnlambdaeipioou.
- Iα τη μεταφορα της Σωοκεύς, χρησιμοποίεITE πάντοτε τις δύο πλευρικές λαβές στο περίβλημα της Σωοκεύς. Na φοράτε προστateutika γάντα κατα της θερμότητας, εάνη σωοκεύη εἶναι καυτή. Iα περισότερη ασφάλεια, βεβαιωθείτε πως το καπάκι εἶναι ασφάλιομένο πριν μεταφέρετε τη σωοκεύή.
To katoepoc tou mayeipiko okeouc kai tnc Θepaivóevns paeac vα βpiokovta oáeon eiah. Aphiéote onioobnnote avikeiEvno uTolεmuα φayntou μnpei va βpioketai metau tou maeyipiko okeouc kai tnc Θepaivóevnc πakac,
kaθως ενδέχειαν αεπηρεόσει τυν απόδοη
AeTe UToHn TcOpioueVoi TuOnIphiayntou, OToC o ToupEc mNoau, ta Kpavmupei, To paBevti, To KpIaPi TepLe, n Bpuun kai aAla dnmuTpiakα, n faoBa, Ta Vouvtac n ta Zmuapika Evdexetai va oxmaatioovu apho Ka i duaaidec, ta onia ektoeEvovtaipaoosovtac tic Baalibcs. Awte idiaitepn npooyn kat to maayiepeua autuw twv tuWv phayntou kai kathetaicTe oxlaotikac tic baJIbEs c tao tn xphon.
AβETe UTOIpyn TWC Opiouc oovayc TPO NEPiAβavouv yαλ Evδexetai vα ΩημaTIOUv aΦpó, kα φuσαλIDc kα vα UTερχEIAIOUv φapooovTAC TIC βaβIDc. ΔwOTE iδiaitepn πoOxN KATA TO μayéipεμα autuv Twv ouvtayw Kα KaθαπεTE OxOλaOTIKA TIG βaβIDc META ΑT η χρησ.
- Meta to ayepεμα κρεατος Με εξωτερική στρώηδερματος (όπως η μοσχαρίσια γλώσα), που ενδεχεταινα δίογκωθει λόγω της πίεος, μήν τρυπάτe to δερμα μετα to ayepεμα εὰν φαίνεται δίογκωμένο: ὄρχει κύνυος εγκαύματος, Tρυπότε to πρίν to ayepεμα.
Mny xnpouoie Te oukeun aedia, xwpic to ayepiko okeuoc n wpiic uikao ot oewteipko tou ayepikoou kekouc. Mtopei va npoknthei oopn ontoukeun.
Mnyxnpouoioite tn oukeun uno piocn av dev exte npooeoi vepo, yati kati tetoio mtopooue va npokaloei oobapn Oop a oTo okeuoc.
Mny yeiuiTe tn ouokeun xwpi to uayelipko okevoC.
- Ppoox: uyn xuvetu ypa o to fics.
Mny 0epaive to ayepikok okeuoc me aaln nyn thepoTntac npav ts 0epauvoevnc Pakac Tns
ouokueuckai mnu xpooiotoiieite aaloo ayepikockeuoc. Mnu xpooiotoiieite to ayepikoc okeuoc meaalec oukevec.
Xpnooioite to ayepiko okeuoc MONO onn ouokueun. Mny to xnpouoioite OE eoties, foypvo k.lpi.
Xpnoiouite Paaotikn n elivn koutala yia v a anotptepetetuxovbetaonvtvavtkoalntikneipwont tou mayepikou okeouc, Mny kobete faynto evtoc tou mayepikou okeouc.
Mny ayyizete Tc Baaibides, Me Eaipen kaTov KaOapioo Touc Kai katn EkTeAeon Epyaiovv ouvtnponcs nS ouokevnc ouwova e Tc odnyieC.
Mny tooTheTeite Xeva avtikemueva otic i c kau oTo koupi aneAevOepwoonC nEonC, Mny avtikaoiotaTe tN baiBia.
ELeyTe TAKtKa Touc aywouc twv i w Tou eipenov tv aeeuthetaon atou, yia vai diofoe ot i dev ivai ppaevoi.
Mny tootheite navi n otidnnote aaloo avaeoa oTo kaTaki kai oTo pepiBna yia va meivei To kaTaki mioavoiXto. Mnpei va npoknthei moviun oTo vTeyavotoiniko saKTulio.
Mny afnvete To nAekptko KaIwio va Kpemuai ao tnv akpn Tou TpaTeCiou n Tou Pnykou n va AyyiKei KAutec EpiphiaveieC.
4. Aσφαλής χρήση - πριν το μαγείρεμα
Pniv xnpoiouoie Tn ouokeun, eEyxi Tnv Kaopotnta Tns BaaBia8ac me PAnTnpa Kai Tns BaaBia8ac aphialeia TIEONS.
- PivxpnouoioeTe Tn ouakeun, eleyeTe Tn ootn tooetnoTou steyavonoiuTKO u 6aKtUaiou OTO KAIIKI.
Béβαiωθείτe πως το κατω μέρος του μαγειρικόν σκεύους καὶ θερμαίνόμενη πλάκα εἰναι πάντα καθαρὰ. Béβαiωθείτε ὄτι το κεντρίκο μέρος τής θερμαίνόμενης πλάκας μπορείνα κινηθεί.
Mny yemiciet en oovkeun npaw aanto tv evdelta MAX OTO maayepikokkouc.
Akoaloutheite tic ouotaoei avaopikα μe tov oyko foayntou kai vepou yia tnv anofoyn uTepxieianc loyw bpaou, nou mtopei va npokaleoi βλaβn otn ooukeun kai Tpaumatioouc.
Bεβαιωθείτε πως η συοκεύη ἐχει κλείσει σωτόα προτόνξεκινόσει η λειτουργία τής χύτρας.
5. Aσφαλής χρήση - κατά το μαγείρεμα
Mny npooaOnoeTe va avoiEeTe to kaTaki npotou n piEon meiwOei eIapKwCs. Mny npooaOnoeTe va avoiEeTe to kaTaki mexpi va katébei n i eπλwntnpa.
Mny aokite note duvaun yia va avoigete tn ouokean.
Kata to mayeipema kai tnv aneIeuOepwon atoukata to teao tsou maeyiepuato, n oukeun aenleuvthetavei 0epoTnta kai ato. KpatnoTe to npooTo kai ta xepia oac makpiia anto tn oukeun yia va aiofouyete ta ekykaumata.Mnv ayyizte to kaia kata to mayeipema.
Mny metakiveite tn ouokeun, ooo eiva uno nieon. Xpooutoieite tic lae c kata tn metakivnon kai fopate npootatetukia yavia, evv eiva anapaitnto. Mny xpooutoieite tn 0To kaTaki yia va onkwote tn ouokeun.
Mny aphiapeite to ayepiko oekuoc, oo laitoupyei n ouokun.
- Σηλειουργία ψησιματος,να εἰοτε διαίτερα προδεκτικόγια τυχόν εγκαύματα από ἐκτοξεύσεις, ὄταν προθέτετε φαγητό ἡνλίκα στό το καυτό μαγειρίκό σκεύς.
6. Aσφαλής χρήση - μετά το μαγείρεμα
- Otav avoiyete to kaiaki, va to kpatate πavtoe ano tn λαβn tou kaiaoi. Totoθeite to xepi oac πapalna otic πλeupikec λβeç. Evexetai va exei πayidetie avμεσa otov oteyavontiok δaktuio kai to kaiaβpaotó vepo ka va πpokaéoi eykaumata.
- Ppooεξε, επiαης, tov κίνδυνο εγκαματων από tov ατμο που βγαίνει από ηισακεύη ὄταν ανοίγετε το καπακι. Πρώτα, ανοίξε πολύ λίγο το καπακι για να απελεύθερωθεί σμαλά o ατμός.
Mnv ayyicet ta kauta eapntmuata tnc ouokveunc. H epiaveia tnc thepaivovevns nakac mtopei va npaeivei cotn ews kai 2 wpc ts aio tn xpnon.
- Anouvdebéte to kaλwδio ano tny πpiα,otav δev xρησμοποιείαι n συκεύν και πριν ano tov καθαριομo tnc. Αφησe τη συκεύν vα κριωσει προτου totoθετησεte n αφαρεσεte εξαρτήματα.
7. Aσφαλής χρήση - καθαρισμός
- ΣΚΟΥΠΙΟΤΕ οτο κατω μέρος του μαγερικόν σκεύους κατης θερμαίνόμενης πλάκας μετά από καθε χρήση.
Mnu BuiiEte Tn ouokevn oe vepo.
Tov kaOapiouo ts ouokeun, ovatpeEeTe otig odnyies xponc. Mnpoeite va luveTe to ayepiko
Okeuoc kai to kaiaki me zetn oanouvada. Mny ta a t e 0to nluvtnpio niatwv. Katheta te npiipalma Tns oukeunc me eva vwno pavi.
8. Tl npenei va kavete oe nepintwon n s
- Móvo εξουσιδοθημένο ατομο σε εξουσιδοθημένο κέντρο σέρβις μπορείνα επισκεύαει το προίν.
Mynpnoiouite ooiadnnote oukeun, evexu apei to nlektipko kawdio n to fic, eav n ouokeundelta toupei ootan eav exei unootei onoiadnntote aen. Eiotpeyte tn ouakeun oto pnoieoepo egouoidotnevo Kevtpo oepic yia eleyxo, eiokeun npuon.
Eav to nλεκτρίο καλωδio exi unoσte i βλαβn, πρέπειν αντικataσταθει από ενα εξουσοδotημένο Kévτρο σερβic για tnν αποφυγntuχόν κινδύνου. Mνν αντικαθισάτε to nλεκτρίο καλωδio που παρεχεται με to προίον, με αλλα καλωδia.
MnV πpokαλειτε βλαβη στον Στεγανοποιntικό δακτύλιο.Εαν εχειυσοτεί βλαβη,αντικαταοτήσε το σε ενα εξουσιδοτημένο κεντρο σερβις.
- Avtikαθιοτάτε tov οτέγανοποιntικό δακτύλιο κάθε 2
- χρόνια ἡνωρίερα, εὰν παρατηρήσετε πως ἐχει φθαρεί
- η χρείαζεται avtikatáσταση.
Xpnoiopoioite movo ta katalnnla avtalaktka yia to movteo oac. Eiva iiaitepa onmavtiko yi ta nlambdaouyia tou steyavointikoudeltatuaioukai Tou mayeipkooukeouc.
Xpnoiopoioite ovo avtalakktiaouwovtai oE Eouoosotnevo kevtpo ePic.
H xphon eapntmuatwv nou dev ouviotwtaa tov kataokueao tnc ooukeuuc evexetai va npokaleoet paumuioouc.
MnV xpoiooiei e aiaa maeyepikoc kekun otoukeun, mOvo to maayepikok okeuoc tonu npexetau mE to poiov. Avtkaoiotate to maayepikok okeuoc mOvo mauθevtiko avtaalaktiKO, oxediaouevo yia xpno n e to ouykckipévo poiov.
- Σύμφωνα με τους ὄχύοντες κανονισμους, προτου απορρίψετε μαι συσκεύν, η συσκεύν θα πρέπειν αχρηστεύται (αποσυδέοντάς τη και κόβοντας το λεκτριός καλώδιο).
PpOeXei n npoostaoia tou nepiBαλovtoc!

H ouokeun oac πeipexi ploutua uikα, ta onioa μtopouv vαξavaxpnoiμoioηoouv n va αvakukλωθouv.
Afnote tn oe kantoio 8nmuotiko oumieo oulloync aonobntwv tns npioxns oas.
9. Nóte loxuéI n éyyúnən;
H eyyunon 8ev kaiuttei aphioukni oopao tou uayelipiko ouoc.
- iαβαοτε προσεκτικα τις Μθηγίες χρήσος προτουν χρησιμοποιόσετε τη συοκεύν για πρώτη φόρα. Σε περίπτωπ χρήσος που δεν συμμοφώνειαι με αυτές τις Μθηγίες, o κατασκεύναστής δεν φέρει καμία ευθύνη καὶ ἐγγύŋον ακυρώνειαι.
- Ε περίπτωση εμπορικής χρόης, ακαταλληλης χρόης ἡ μη συμμόρφωσης με τις οδηγίες, o κατασκευαστής δεν αποδέχεται καμία ευθύνη καλ δενισχύει η εγγύŋοι.

OANA EAPTHMATA TOY IPOIONTO
EEOIKEIQ2H ME TON NINAKA EAEIXOY

MHNYMATA KATAZTAZH


Mnuva kaawooipiaotoc otv n oukeun eevpyoioiteita.
Euφáviən xpvou. Σ e autó to παρδειμα: 1 υρα 30 λεπτά.
Euφáviω Θερμokpασiας, Σε autο to παράδειγμα: 114 βαθμoi Kελσίου.
YtOBeikVUeI OTo TpOpyaMa EeYi Ma TPOeTIeYEvn PUsOuon autouatns eepoKpaiaoc/xypvou. Aevmupeivayive tpoTOnioin.
YtObeikvoe ot n eepuokpaoia auXavetai kata tn faoon npoTepuavoc.
YtOSeIKVUeI oTn OoKEuN pOeepMaivetai.
YtOSeIeKvUeI oTo TIpOpyaMa oAoKLnpWOnke.
YtObeikvui ot n oukeun Bioketai otn faoi diatnpno,
0eepoKpaiaic.
YtOSeIkvUeI oTIO npOpypaia diaKoTnke.
YIOSEIKVUEI OIT N OVAKEUN Bpioketai OE LEITOUPyia ovauovns.
O△HFOZXPHZEKAKIAKAOAPIMOY
AvatpeTe otic ekovc nou uno6ekvovtai wC (Eik.x) oToV osnyo ynpnyopnc EKKivnonc.
IPIN ANO THN INPOTXPH2H
1.Aphiepooukeuaia
Aphiapeote tn oukeun ano tn oukeuaia kai diaaote tic odnyiec xnpnnc npiv tn xpnoiortnoe Tia npwtn opa.
- Aφαρεσε τα διαφημιοτικα autoKóλλητα (éav unáρχουν) από τη συοκεύν πριν τη χρησιμοτοίσετε γι αρωτη φόρά.
2. Avolyma tou kantakloi
- Iα vα ανοίξετo καπάκι, kραπήσετη λαβή του καπακίου, περιστέψετα φριστέρούτροφα και σηκώτετο καπάκι (Eik.1 και 2).
Σημειωη: Otav Σηκώνετe to καπάι, to μαγεριός ΣKEύος ΣΕδέχεταιν παραμείνει συνδεδεμένοστο καπάι. Eival φυσιλογίος και αποδείκυει τήν καλή στέγανότητα του προίντος. Για τήν αποφύγη πτώς του μαγεριός ΣKEύους ΣΟ τρο προίν κατά το ἀνοιγμα του καπακίου, ανοίγετε πάντα το καπάί προσεκτικά.
ToTOnoTeTn OuOKeun oE mia Eπiπeδn EπiΦaVEIA. AΦaIpeOT eλa Ta npOoiTeutikα Ulikα kai ta EApntμata αIoTo eoWTEpiko Tns OUOKeunc (Eik.3).
3. Kaθαρισμός σλων των εξαρτημάτων τής Συοκεύς
3a. Kaθαρισμός tou καπακίου, tou μαγειρικόν σκεύους και των εξαρτηματων
- Kaθαpiοτε to kaπάι, to μαγερικό ΕΚΕύος και τα εξαρτήματα με ενα μαλακό σφουγγάρι και ζεσή σαπουνάδα (Eik.4).
- Σεγνώσετο καπάκι, το μαγεριρό σκεύος και τα εξαρτήματα (Eik.5)
Mny xnpoiopoieite oupa n tpaux ofoovyyapia tov kaOapioTou maeyipkooukevouc,kaohc mtopei va otheipei Tnv avtikoAanTikn enioTpwon ToU maeyipkooukevouc (Eik.40).
MnuBouOiEteTn ouokevn ovepO(Eik.41).
Eav i ka tao o c tn ouokueun oe vepo n piEte vepo πavw otn 0epuaivovemn paka, eiokeuaoTe tn ouokueun oEv a Egouoiodotnevo kevtpo oepic.
Mny tototheite to kaiaki kai to ayeipiko okeuooc oTo u t pio i t v (Eik.42).
AβεTE UTOψη ΘI MóV O T A PαKAtW Eλαptnμata πλevovTασ Επλuvtnpio πIATwv: KOUTaλ, OTaToula, δoOμεTpikn KoɪnKa I Kaλθι aTμou.
3β. Kaθαρισμός του στέγανοπιοικόν δακτυλίου
Aphiéote tov oTeyavontoiNTko dakTuio ano to kaTakkai kαθapiote tov eva aalakó ofouyyapi kai Zeotnσaouváδa (Eik.7 kai 8).
- Σεγνωθετον σχολαστικα.
ToTOnoTeTTOvOteTOV OTeyavOTIOINTKO DaKTUIO TAVW Otn BaoTou KAI NIEOTE TOV MEXPI VA EΦapuOeI OTN ΘeON Tou (Eik.9).PiTE ToV OTeyavOTIOINTKO DaKTUIO Yepa, Wote V A BeBaiwOeITE PWC, DSV UAnpXouv AVoMoIOOpPfEc KAI TWC ExE IΦapuOeI OWTa OTNV UNOdoxn tou.
Afou toothetaetnoe tov oteyavonointiko daKTulio 0to kaia, eav aoiEte to kaia ki nolu ynpyopa, to ayepikok okevo c vdeXeTai va npaemeive ouvdebeveo 0to kaia (Eik.37 kai 38). Nepieve t e pik a deutepole ta ia va aneuevthetai to ayepikoc okevo aio to kaia (Eik.39).
Σημειωη: Eivai φυσιλογίκο και αποδεικωει τήν καλή Μτέγανότητα του προίντος. Για τήν αποφύγή πτώς του μαγειρικόν σεύους τότηροίν κατά το ἀνογμα του καπακίου, ἀνοίγετε πάντα το καπάκι προσεκτικά.
PPOEIODOIHSH: Mny xpnouoite note t n ouokevn wpi tov oteyavonoiintko daKTuAio (Eik.44)
3y. Kaθαρισμός των βαλβίδων
Tα Tov Kαθαρισό της βαλβίδας ασφαλείας πίεος, αφαμέστε τή βαλβίδα ασφαλείας πίεος από Tov σωλήνα στο πάνω μέρος του κατακίου (Eik.10). Kαθαρίσε τήν μέ ενα μαλακό σφουγώρι κα ζετή σαπουνάδα (Eik.11). Otav στέγνωσει, βεβαιωθείετο τότο εωτεριό του ωλήνα εύλι καθαρό προτου συνδέσετε τή βαλβίδα ασφαλείας πίεος στον σωλήνα στο πάνω μέρος του καπακίου (Eik.12). Beβαιωθείε τὴς βαλβίδα ασφαλείας πίεος εύλι ωστά τόποθετημένη. Θα πρέπειν α κυείαι ελεύθερα προς τὰ πάνω και προς τὰ κατω.
- Γα tov καθαρισμο tou καλύματος της βαλβίδας αφαλείας πίεοις, ξεβιδώτε to καλύμα της βαλβίδας στό τουτερικό τμήα tou καπακίου (Eik.13). καθαρίοτε to με ενα μαλακό σφουγαρία και ζεοῦσι Απούναδα (Eik.14). Otav στέγνωει, βεβαιωθείε τότο το εωτερικό tou ωλήνα εῖαι καθαρό προτου βιδώετε to καλύμα της βαλβίδας αφαλείας πίεοις στό του εωτερικό τμήα tou καπακίου (Eik.15).
- Γαν καθαρίσετη βαλβίδα με πλωτήρα, αφαμέοτε τον δακτύλιοτης βαλβίδας απότο εοωτερικό τμήμα του καπακίου και αναποδόγυρίσε το καπάκι ωτενα μιπορείνη βαλβίδα με πλωτήραν αβγει απότο το καπάκι (Eik.16). Καθαρίσετον δακτύλιοτης βαλβίδας με πλωτήρα και τη βαλβίδα με ενα μαλάκο σφουγώρίς και ζεσήσαπουνάδα (Eik.17). Šταν στέγνωσει, τοῦθετήσετη βαλβίδα με πλωτήρα στο καπάκι και τοῦθετήσετη Θθέση του τον δακτύλιοτης βαλβίδας (Eik.18). Βεβαιωθείτε πως η βαλβίδα με πλωτήρα εἶναι σωτά τοῦθετημένη. Θα πρέπειν ακυεῖαι ἐλέύθερα προς τα πάνω και προς τα κάτω.
35. Kaθαριομός του περβλήματος της συοκεύς
Kαθαρίσε το περιβλημα της συοκεύνός εύναιντο παύνι.
MnuBvOiEteTn ouokevn oEvpe (Eik.41).
- ΣΚοιπίσε τη Θερμαινόμενη πλάκα μέ ενα στεγνό παύ.
O△HΓIΕΣ XPHΞHΣ
1. Tonoθεπηοτων uλικύν στο μαγερικό σκεύος
AphiéoTe to mayeipiko okeuoc ano to npiβa.
ToTioeTeTaUaIkaOToMayeIpiKoKeUoc.
- Σημειώτε ὄτι οπίπεδο φαγητού και γυρό δεν πρεπει ποτένα περβαίνει τη Μέγιστη ενδεξήσο τοῦ μαγερικό σκεύος (Eik.19).
- Otav xpnoiopoite OE λeitoupyie πieoN uikα tou exouv tyn taon va φouokwovuov otn δiapkeia tou μayepεμatoc, onwc anoξnpaéva λaxaviKa n puζ, mnu yεmuεte to okeuoc πapanaw αnto tu mió tnç μéyiotnc χwpntikotntac tou.
2. Tonotheonoumuayelipkooukouocto npepiBma
Bεβαιωθείτε πως το κατω μέρος του μαγειρικόν σκεύους εῖαι καθαρό και στεγνό και αφαμεστε τυχόν έπολείματα φαγητού από τη οερμαινόμενη πλάκα (Eικ.20).
ToOnoTeTnOte To mayeipiko okeuoc oTo nepiBna (Eik.21).
MnV xnpoiouieite nToe tn ouokevun xwpiC to aayepiko okeuoc.
3. Kλεισμο καλ αφάλιση του καπακίου
- Eλεγξε οτι o έτεγανοποιntικός δακτύλιος ἐχει τοῦθετηθείσωτα στο καπάκι (Eik.43).
Kpntote tn tou katakiou, tooetne to kataok otn ouakeun kai nepiotpeyto deiootpoa yia va to aphialioe (Eik.22).
4. Σύνδεοι της βαλβίδας ασφαλείας πίεος
ToTOnoTeTnOaTnBαλβiδααφαλεiαπεoNcSto KaTaki (Eik.23).AβeTe unóψη oti n Bαλβiδαθα πapαεivεLiyo xalapn, εivai fuoioloyikó.
5. Evépyooinon tns ouokéunc
- ετιλίξε τέλείως to ηλεκτρίκο καλώδιο και σουνδέοτε to στην πρίζα (Eικ.24).
H ouokevun o kavei evav xapakntpiotiko nxo, nooyn o aovn oaoobnoei kai o ephiaviotei n vdsiegn HIEIO.
6. Eπλογή και εκκίνηση εύς προγαματος μαγειρεματος
Kαθε πρόγραμα ἐχει εναν προεπιλεγμένοχρόν και θερμοκρασία και αντιοιχει σε μια σριμένη θέοη του καπακιό. Δείτε τον πίνακα των προγαμάτων μαγειρεματος;
INAKA PPOPAMMAT N MATEIPEMATO
Σημειων: Kaτα to μαγείρεμα, μποpei vα παρατηρόσετε μια μκρή διαρρό ατμου από to καπάκι, συγκεριμένα από τη βαλβίδα ασφαλείας πίεος. Eivai φύσιολογικό και συμβαίνει ὄταν αυξάνεται η πίεοη.
Eulerstrasse der Universität des Vorstands, 1.000-2.000 m Eulerstrasse der Universität des Vorstands, 1.000-2.000 m Eulerstrasse der Universität des Vorstands, 1.000-2.000 m Eulerstrasse der Universität des Vorstands, 1.000-2.000 m Eulerstrasse der Universität des Vorstands, 1.000-2.000 m EulerStrasse der Universität des Vorstands, 1.000-2.000 m EulerStrasse der Universität des Vorstands, 1.000-2.000 m EulerStrasse der Universität des Vorstands, 1.000-2.000 m EulerStrasse der Universität des Vorstands, 1.000-2.000 m EulerStrasse der Universität DESU, 1.000-2.000 m EulerStrasse der Universität DESU, 1.000-2.000 m EulerStrasse der Universität DESU, 1.000-2.000 m 30 40 50 60 70 80 90 100 110 120 130 140 Kaufpreisanteil Kaufpreisanteil Kaufpreisanteil Kaufpreisanteil Kaufpreisanteil Kaufpreisanteil Kaufpreisanteil Kaufpreisanteil Kaufpreisanteil Kaufpreisanteil Kaufpreisanteil Kaufpreisanteil 10 10 10 10 10 10 10 10 10 10 10 10 15 15 15 15 15 15 15 15 15 15 15 15 20 20 20 20 20 20 20 20 20 20 20 20 25 25 25 25 25 25 25 25 25 25 25 25 30 30 30 30 30 30 30 30 30 30 30 30 35 35 35 35 35 35 35 35 35 35 35 35 40 40 40 40 40 40 40 40 40 40 40 40 45 45 45 45 45 45 45 45 45 45 45 45 50 50 50 50 50 50 50 50 50 50 50 50 55 55 55 55 55 55 55 55 55 55 55 55 60 60 60 60 60 60 60 60 60 60 60 60 65 65 65 65 65 65 65 65 65 65 65 65
AvatpeTe otic Eikovec tou odnyou ypnyopnc Ekkivnonc (anto Eik.25 eWc Eik.36)
Φ Πρόγραμα αργού μαγειρέματος
ToTOnoTeTnOte ta uLkα OTO μayeipiko okeuoc, kLeioTe teLeiwc Kaia ophiaiote to kaNaki.
- Περιστρέψετον διακόπητου πίνακα ελέγχου προς τα δεξία γιανα επιλέξετετο πρόγραμα αργύ μαγειρεματος . Στην oθόνη εμφάνεζεται o προεπιλέγμένος χρονος μαγειρεματος.
- PpOaIepTeK: PAnToe To kai opioTe tov eTou mnto xpoVo TEPiOtpEoVtac tov dAokntn Tou nivaka ELeyxou npoc ta (yia auXon Tou Xpovou) n pOc Ta apoiTepa (yia meiowon Tou xpovou).
- PntnoTe to yia va xekivnoei to npoypaumua ayepaatoC.
H ouokevn Eekvaei tn faon npothepuavoc. Tnv ofoyn ephiaviovtae vaaiaoi evdeltaic Kau HEAE KA n evdeltaiktikn luxvia tnc npoepmuavoc avaBcI.
Molis oloknpwEi n faoon ppoEpuvoc, n ouokevn eTaaivei autouata otn faoon mayepmuato. Tnv oovn ephiizetai n avtioptpnoh metponkai n evdeiktikn luxvia yia to mayepma oe ExiIg n avaBcI.
KaTAtndeltakaiaotou mapeipaeato, dnnioupyitea tieon stn ouokevun kai n 8albiδa me pwnpaa vceai npoc ta PAVW. H evdeiktikn luxvia ia to okeuoc uno pieon wavbei Wc EIOI0Inon nWCS TO KAIIAKI DEV MIOpei va avoilepi potou aneueepwtheta npieon.
- Στο τέλος τής αντίστροφής μέτρηός, η συοκεύν καVEL ευαν χαρακτηριοτικό ἡχο και στήν οθόνη εμφαυξεται ένδεξη [End].
-Metα απο λiγα δειτερόλεπτα, η συσκεύη μεταβαίνει αυτόματα στη φάση διατήρονς θερμοκρασίας. Στην oθόνη εμφανίζειαι ένδειξη ὃθε και η ενδεικική λυχία διατήρονς της θερμοκρασίας ἀναβει.
- Παπθοτε to Ⓞ για 3 δευτερόλεπτα για να σταματήσετε to πρόγραμμα ανα πάσα στιγμή.

PpOpaMa Oounac
ToTOnoTeTnOte ta uAikocToaayepiko okevoC, kEioTe teAeiwoC ka aOphiaiote to kaTakl.
- Περιοτρέψετον διακόπητου πίνακα ελέγχου προς τα δεξία γιανα επιλέξετε to πρόγρμασούπας . Στην Θθόνη εμφανίζεται o προεπιλέγμένος χρονος μαγερεματός.
-Προαμετικά: Παπησε το ② και σρίσε τον επιθυμητό χρονο περιστέφοντας τον διακόπτηου πίνακα ελέγχου προς τα δεξία (για αύξησηου τοῦ χρούου) ἡ προς τα αρισερά (για μειώηου του χρούου).
- Παπόσε to ⑥ γιανξεκινησει to πρόγραμμα μαγειρέματος.
H ouokevun EekivaI tn faon npothepuavoc. Tny oOvN ephiaviocovtai evaiaoio evdeltaic KAI HEAE KAI n evdeltaikTKI NuxviaTnC npohepuavoc aVaei.
Molc oloknpw0i n fao npothepuovn, n oukeun eTaeiv aotouata ot n faon mayepmuatoc. Tnv oovn ephiavzetai n avioptpno n etpnon kai n evdeiktkn luxvia yia to mayepma oE ExiIg aVbetai.
KaTn diakaoia tou maeyepaotc, dnioupyeitai nieon otn ouokun kai n 8aIbda aE pntpaaivei npoc ta navw. H evdekikn luxvia yia to okeuoc uno tieon avaeu w c iDOnioin on nwc to kaKtki dev mnpei va aovxi npotou aneuvepwoei nieon.
- Στο τέλος της αὐτίαροφής μέτρησς, n συοκεύν κάνει ευλα φαρακτηριστό ἡκο και στήν oθόνη εμφαύνιζεται η ενδεῖξη [End].
-Metα αnto liya δeutepolεπτa, n σuokéun μεtaβaiveu autóμata σtn Φαση διαπρονς θερμokpαoiac. Σtnv oθovn εμφαviεται η ενδειξη [Hoe] kai Ψνδεικτικλuxvia διαπρονnc tnc Θερμokpαoiac [w] αναβει.
- Παποτε to ⑤ για 3 δευτερόλεπτα για να σταματησετε to πρόγραμμα ανα πάσα στιγμή.

Póvyραμα Stir-Fry
- Περιορεψετον διακόπητου πίνακα ελέγχου προς τα δεξία για να επιλέξετετο πρόγραμα Stir-Fry . Στην oθόνη εμφάνιζεταιο προεπιλέγμένος χρόνος μαγερέματος.
- PpOaIepiKa: PAnToe To kai opiTe tov EtiuumTo xPovo nepiotpEoVtac tov diaKoTn Tou nivaka eEyxou npoc ta (yia auGnon Tou xPovou) n pOc ta apiotepa (yia mEiwon Tou xPovou).
-Празауета: Патноте to ① kai opioTe tvy επιθυμηntη θερμοκρασία περιορέφοντας tov διακόπτη tov πινακα ελέγχου προς τα δεξια (για αύξηση της θερμοκρασίας) ἡ προς τα αριστερά (για μείωση της θερμοκρασίας).
- Παπόσε το ⑤ γιανξεκίνησει το πρόγραμμα Μαγειρεματος.
H ouokeuñξekivaɪtn Φaʊn πpOθερμavɔnç. Σην oθóvn εμφαviΩovtai evλλαξοι εvδεiEεiC [KαI HER] KαI n εvδεiKτικn λuxvia tns πpOθερμavɔnç ɑvβεɪ.
Molc oloknpw0ei n faon npothepuavoc, n ouokun eTaaivei autouata otn faon mayeipepaotc. Tnv oovn ephiavi etai n avioptpoqn metpnon kai n evdeltaiktikn luxvia yia to mayeipema OE ExiIg n avaBcl.
- TOnoTheTnOte ta uAikα oTo μayeIpiKo Okeuoc kai αΦnoTe to KaTakia vOaixTo yia va Kavete stir-fry.
- Στο τέλος της αντίστροφής μέτρησς, n συοκεύνη καVELι εναν χαρακτηρισικό ἡχο καὶ στήν σθόνη εμφαύνεζεται η ενδεῖξη [End].
- Meta απο λίγα δευτερόλεπτα, η συσκεύνι μεταβαίνει αυτόματαστη λειτουρία αναμονής. Στην οθόνη εμφαίζεται η ενδειξη
- Παποτε to ⑤ για 3 δευτερόλεπτα για να σταματησετε to πρόγραμμα ανα πάσα στιγμή.

Póγραμα ατμού
ToTOnoTeTnOte 150 ml vepou (3/4 TnC KoUtnac) OTO mayEipiko okeuoc, toToTeTnote ta uAikoc oTo kAlaOi aTuou KAI TO kALaOi aTuou navw oTo mayEipiko OKeUoc. KLeioTe TEeIomega To KAATAKai aOphiAIOTEto.
- Περιοτρέψετον διακόπητου πίνακα ελέγχου προς τα δεξία για νεπιλέξετετο πρόγραμα ατμου. Στην oθόνη εμφαviζεται 0 προεπιλέγμένος χρόνος μαγειρεματος.
- Pinoapetiká: PlatnoTE to kai opioTE tov eTou mnto xpovo pepiotpéfovtac tov diakontn tou nivaKa eEyxou npoc ta dEla (yia auEnon tou xpvou) n npoc ta apiotepa (yia meiowon tou xpvou).
- έπησε το ⊙ γιαν αξεκινήσει το πρόγραμμα μαγειρέματος.
H ouakeun fekivaei tn faon npoepmuavons. Tnv oovn ephiaviocovtaevalaaleoi evdeieic Kai HEAEKai n evdeltaiktkn luxvia tnc npoepmuavons avaBcI.
Molc oloknpwEi n faoon npoEpuvoc, n ouokun eataivei autouata otn faon mayepmuato. Tnv oovn ephiizeta n avtioptpnoh metpnon kai n evdeltaiktikn lauxvia yia to maayepma oE EeAixn avaBcI.
KaTaNdeltaikaoia tou mayepaotc, dnnioupyetai nieon stn ouokevun kai n balbiδa e pwnp aavebaivei npoc ta navw. H evdeiktikn luxvia yia to okevooc uno nion avaei wC EIOIOINON TWC TO KAATAK DEV MTOPEI VA OAOE I POTOU aneuethetaei n nieon.
Στο τέλος της αντίστροφής μέτρηός, η συοκεύν καVEL ευαν χαρακτηριοτικό ἡχο και στην Θθόνη μεφαυζεται ένδεξή [End].
-Metα αnto liya δeutepolεπta, n ouokeun μεtαβaiveu autouata otn φaon δiatnpnong θερμokpaoiaç. Σtnv oθovη εμφaviεται n évδεξη HcKai n εvδειktikn λuxvia δiatnpnong tnc θερμokpaoiaç αváβει.
- NaTHoTe to 已 yia 3 SeUTePoIeTnTa yia va OtaaTnoTe to PpOypaumauva nao stiyu.

Póγραμα Ψηοιματος
ToOnoTeTnOte ta uLkα TPOEeTe NPOeToIaOeI OTO Mayeipiko OKeUoc KAI KLeiote, aAa μNv aOaiaoeTe to KaTakl.
- Περιστρέψετον διακόπητου πίνακα ελέγχου προς τα δεξία γιανεπιλέξετετο πρόγραμμα ψησιματος. Στην oθόνη εμφάνιζεται σροεπιλέγμένος χρόνος μαγειρεματος.
- Pinoapetiká: PlatnoTE to ⑤ kai opioTE tov επιθυμntó xρovo περιορέφοντας tov διακόπητου πίνακα ελέγχου προς τα δεξία (yia αύξησηου xρούου) η πος τα αρισερά (yia μείωσηου xρούου).
- PpOaIepTeiKaTneTo Kai opiTe Tny EeIthuunTh Θερμokpaia περιotpéφovtac Tov δiakóπtn Tou nivakα ελέγxou πoC ta δεξia (yia αúξηon tnc Θερμokpaiaoc) n poc ta apioTeP (yia μεiωn tnc Θερμokpaiaoc).
- Παπότε το ⊙ γιαν αξεκίνησει το πρόγραμμα μαγειρέματος.
H ouakeun fekivaei tn faon npoepmuavoc. Tnv oovn ephiaviocovtaevaalaooi evdeieic Kau HEAEKai n evdeltaiktkn luxvia tnc npoepmuavoc avaβeI.
Molc oloknpwEi n faoon npoEpuvoc, n ouokevn eTaaivei autouata otn faoon mayepmuato. Tnv oovn ephiizeta n avtioptpoh metponkai n evdiktikn luxvia yia to mayepma oE EeLign avbetai.
- Στο τέλος της αντίστροφής μέτρηός, η συοκεύν καVEL ευαν χαρακτηριοτικό ἡχο και στήν οθόνη μεφαυξεται ένδεξή [End].
-Metα απο λiγα δειτερόλεπτα, η συσκεύη μεταβαίνει αυτοματα στη φάση διατήρησς θερμοκρασίας. Στην oθόνη εμφανίζειαι ἡνδεξη ὅπα η ενδεικτική λυχία διατήρησς της θερμοκρασίας ὅπα ανάβει.
- Παποτε to ⑥ για 3 δευτερόλεπτα για να σταματήσετε to πρόγραμμα ανα πασα στιγμή.

Póγραμα Sous-vide/αργού μαγειρεματος
- Iepiotpeyte tov dakottn tov nivaKa eayxou npoc ta deia yia va eilEeTe to npoypauma Sous-vide/apyou mayepmuatoc. Tnv o6vn eamaviCetai o poeiileymuvoc xpoovc mayepmuatoC.
- Pinoapietiká: Nahtóte to kai opioTe tov επιθuμntó xpóvo πεpiotpéφovtac tov δiakóπtn tou πivaka ελέγxou πoç ta δεξia (yia αúξηon tou xpóvou) n πoç ta αpiotepa (yia μεiωon tou xpóvou).
-Працета: Патноу to ⑥ кai opioTe tvy επιθυμηnt Θερμοκρασία περιστέφοντας tov διακόπτη tov πινακα ελέγχου προς τα δεξία (για αύξηση της Θερμοκρασίας) ἡ προς τα αριστερά (για μείωηn της Θερμοκρασίας).
- Πατήσε το ⊙ γιανξεκίνησει πόργαμμα μαγειρέματος.
H ouokevn Eekiva t n faon npoepmuavoc. Tny oovn ephiaviocvtai evaalaoi evdeltaic Kau HERK aN evdeltaikTKI luxvia tnc pnoepmuavoc avabci.
Molis oloknpwEi n fao n ppoepmuovn, n ouokevn eataivei autouata otn fao n ayepaatoc. Tnv oovn ephiizetau n avtioptpno n etpnon kai n evdeiktikn luxvia yia to ayepma oE EeAixn avbetai.
- Στο τέλος της αὐτίστροφής μέτρησας, η συοκεύνη καVELι εναν χαρακτηριστιός καὶ στήν οθόνη εμφανίζεαι η ενδεῖξη [Erid].
-Metα απο λιγα δευτερόλεπτα, n συοκεύνη μεταβαίνει αυτόματαστηλειουργία αυαμονής. Στην Θθόνη εμφαίνειδιη ένεδείξη = = =
- Παποτε to ⑤ για 3 δευτερόλεπτα για να σταματήσετε to πρόγραμμα ανα πάσα στιγμή.

Pnpoypauma npotc
ToTOnoTeTnOte ta uIka oTo mayelpiKo OKeUoc, KLeiote TeLewc Ka aooaiaote to kaTakl.
- Περιστρέψετον διακόπητου πίνακα ελέγχου πος τα δεξία γιανα επιλέξετετο πρόγραμμα πόρις . Στην σθόνη εμφανίζεται o προεπιλέγμεύνος χρόνος μαγειρέματος.
- Pinoapetika: Patnote to kai opioTe tov eTou mnto xpovo nepiopéfovtac tov diaokontn tou nivaka eLyxou npoc ta dEia (yia uynon tou xpvou) npoc ta apiotepa (yia meiowon tou xpvou).
- Παπίσετο ( ⊙) γιαν αλεκίνησει το πρόγραμμα μαγειρεματος,
Houkeun Eekvalei tn faon npothepuavong. TnV oToyn euaovicovta evaalaoi Evseieic KAI HEAE KAI n EvdeiktiKn Luxvi Tns npoepuavons avaBEL.
Molc ookpwoei n faon npothepuovn, n ouokun eataivei autouata otn faoon mayepmuato. Tnv oovn ephiizetai n avioptpoh mertpon kai n evdiktkn luxvia yia to maeyipeua oE EeAig avaBcl.
- Στο τέλος της αντίαροφής μέτρησός, η συοκεύμι κάνει εύαν χαρακτηριοτικό ἡχο καὶ στην οθόνη μεφανίζεται ένδειξη [Erid].
- Metα απο λίγα δευτερόλεπτα, η σουκεν μεταβαίνει αυτόματα ση Φασιδιαπρόπος θερμοκρασίας, Στην οθόνη εμφανίζεια ένδειξι ΧΟΕΚΑ Μανεδεικήλυχία διαπρόπος της θερμοκρασίας (Ω) αναβει.
- Παπότε to ⊙ για 3 δευτέρολεπτα για vα σταματήσετε to πρόγραμα ανά πασα στιγμή.

PpOypaua puIou
TOnoTeiote ta uikα oTo μayeiipiko okevoç, kεioTe teλeiwc Kαofoaiote to kaiaki.
- Περιοτρέψετον διακόπητου πίνακα ελέγχου προς τα δεξία για να επιλέξετετο πρόγραμα ρύζιου . Στην oθόνη εμφάνίεταιο προεπιλέγμένος χρόνος μαγερέματος.
-Пра�етikа: Патногут o kai opioTe tov eriuumTo xpoVo πepiotpefovtac tov diakontn tou nivaka eleyxou npoc ta δxiα (yia auxon Tou xpovou) n npoc ta apiotepa (yia meiowon Tou xpovou).
- Παπότε to ⑤ γιαν αξεκινησει to πρόγραμμα μαγειρέματος.
H ouokevn Eekiva t n faon npothepuavoc. Tnv ofov n eufovtai evaalaoi evdeltaic Kau HcK aN evektikn Luyvia tnc npoepmuovc @ avaei.
Kata tn diadikaoia tou mayeipepaotc, dnmuopyetai niocn otoukeun kai n i a me t p a avebaivei npoc ta pavw. H evdekikn luxvia yia to okevoos uno nieon avaeu wcs eldooinon nwc to kaakl dev mtopeiv avoiei npotou aneuevepwoei n niocn.
- Στο τέλος της αντίστροφής μέτρησας, η συοκεύνη κάνει εναν χαρακτηριοτιό ἡχο καὶ στήνοθόνη εμφαύνειδαίηη ἡνδεξήν [End.
-Metα αnto liya δeutepolεπta, n ouokéun μεtαβaiveu autómuata σtn φασn diatηροις θερμokpαoiac. Σtnv oθovn εμφaviεται n éνδεiξη [H0] kai n ενδεικικήλuxviα diatηροιnc tnc θερμokpαoiac [w] avβει.
- Πατήσε to ⑤ για 3 δευτέρολεπτα για να σταματήσετο πρόγραμμα ανα πάσα στιγμή.

Póγραμα γιαουρτιού και ζμωματος
To npoypa ma yiaouptoukai umuatoc mnpoeivaxpnoiotnEi yia tnv npaaekun yiaouptou n cmu nsc wmuu/soaiaatac.
- Iα va παρασεύσετη γιαύρι, τοῦτησε τα ζλικα στο μαγερικό Κεύος και λείσετο το καπάλ.
Tia va npaaokevaoetc uun, nnpoeite va zmuwoete tn umn meo aTO mayeipko okevooc kai, katoniv, va totoeetnoete To mayeipko okevooc oTo nepiBnaKai vKa KLeioete to kaTakiyia va Eekivnoete tn diykwon.
- Περιστρέψετον διακόπητου πίνακα ελέγχου προς τα δεξία για συ επιλέξετε το πρόγραμμα γιαύρτιου καιζμωματος Στην σθόνη εμφανίζεται σροεπιλέγμένος χρόνος μαγερεματος.
- Pinoapetiká: Patnote to kai opioTe tov eiloumuTo xpoVo pepiotpéfovtac tov biakontn tou nivaKa eLeyou npoc ta dEla (yia auEnon tou xpvou) n poc ta apiotepa (yia meiwon tou xpvou).
- Pioaipetik: PatnoTe to ① kai opiTe tnv eToumuTn thepuokpaoia nepiotpefovtac tov diakoTn tou nivaKa eLeyxou npoc ta dexi (yua uon tnC thepokpaiaç) npoc ta apiotepa (yia meiwn tnC thepokpaiaç).
- Παπησετο ( )γιανξεκινύσει το πρόγραμμα μαγειρεματος.
H ouakeun Eekivaen Tn faon npoepmuavoc. 2tnv oovn ephiaviovau evaalaoi Evdeieic Kai HEAE KAI n Evdeltaiktikn Luxvia tns npoepmuavoc avaBcI.
Molis oloknpwei n faon npoepmuovnc, n ouokeun metbaiveu autouata otn faon maayiepemuatc. Tnv oovn ephiavizetai n aviotpoqn metponkai n evdeiktikn luxvia ia to maayiepemae Exiqni avaBcl.
- Στο τέλος τής αὐτίστροφής μέτρησς, η συακεύν κάνει εύαν χαρακτηριστός καὶ στήν οθόνη εμφαῖζεαι η εδειξη [E. n.]
- Metα απο λίγα δευτέρολεπτα, η συσκεύν μεταβαίνει αυτόματα στηλειουργία αναμόνις, Στην οθόνη εμφαυίζεια η ενδειξη.
- Παπότε to ⑤ για 3 δευτερόλεπτα για να σταματήσετε to πρόγραμα ανα πάσα στίγμή.

Puθμιζόμενηλειτουργίασεφ
ToTOnoTeIntOteuAIAKoTOmuayelpiKOKEUOCkAIavALoyaMe tn ouvtayn, EIIAEEe eAVoKLeioTe to KaTakl.
- Περιστρέψετον διακόπητου πίνακα ελέγχου προς τα δεξία γιαν επιλέξετε τη ρυθμιζόμενη λειούργία σεφ . Στην Θθόνη εμφαιζεται o προεπιλέγμενος χρόνος μαγειρέματος.
- PpOApETiKa: PAtnote To KAI Opiote Tov EIToumTo xPoV OeipotpeoovtacTovdeltaKoTTnTou IVaKa ELeyxou npoc ta deGia (ya uEnon Tou xpvou) n poc ta apioTepa (ya meiwon Tou xpvou).
- PpOaIepTeK: PAtnoteTo Kai opioTe Tny Eπθuμntη Θερμokpaia πeipotpeovtac tov δiakontn tov πivakα ελéγxou poc ta δξla (yia αuδηon tnc Θερμokpaiaç) n poc ta apiotepa (yia μεiωon tnc Θερμokpaiaç).PAtnoteTo ⑥ yia vaξekvnói to Ppoypma μayepμatoc.
H ouokeu n Eekiva t n faon npoepmuavoc. Tny oovn eauovtai evaalaoi evdeieic KAI HEAE KAI N Evdeiktkn luxvia nC npoepmuavoc avaβe i.
Molc ooknpoWei n faon npoepmuovcn, n ouokun eTaiae i autouata otn faon mayepmuato. Tnv oovn ephiavietai n avioptpnon metpnon kai n evdeltaiktkn luxvia yia to mayepma oE ExiIg n avaBc
- Στο τέλος της αντίστροφής μέτρησας, n συοκεύμαν κάνει εναν χαρακτηρισικό ἡχο καὶ στήν oθόνη εμφαύνιζεται n ενδεῖξη [End].
-Metα αnto λiγa δεντερολεπια, η συσκεύη μεταβαίνει αυτόματαστη λειουργία αναμούνις, Στην Θθόνιν εμφανιζειαι η ενδεξη
- Παποτε to ② για 3 δευτερόλεπτα για να σταματησετε to πρόγραμμα ανα πάσα στιγμή.
* Προταση για γρήγορο Κεσταμα γευμάτων: σρίσε τη Θερμοκρασία στους >=95°C και μαγειρέψετε με το καπάκι κλειότό, χωρίς να εἰναι ασφαλισμένο.
7. XpnoTnC eitoupyiaC kOuotepnpuevnc Evapns
H kaθuotpερημενn εναρξη σας δινει τη δυνατότητα ρύθμιος της συοκεύns, υωτe το μαγείρεμα να ξεκινήσει αργότερα.
- Eπιλέξτε πρωτα ενα πρόγραμα ακολουθώντας τα βήματα που περιγράφονται παραπάνω, στην παράγραφο 6.
- Pniv ano tnv Ekkivnon tou eilayevou npoypaumato, nataote to. 2tnv ofoyn eufavctai o npoeiileyevoc xpovoic yia tnv kaohovtepnnev evapg.
- Puθμiσte tov επιθυμntó χρον περιστρέφοντας tov διακόπητou πίνακα ελέγχου προς τα δεξία (για αύξησηου χρούου) nπρος τα αριστερά (για μείωσηου του χρούου).
- Παπησετο ② . Στην οθόνη εμφανιζεται n αντίστροφη μετρηση της καθυστερημένης ἐναρξης. Šταν περάσει o προκαθρισμένος χρόνος, n συσκεύμηθα ξεκινήσει το μαγείρεμα αὐτόματα.
8. Avolua tou kantaklou
Mny eTnxipnoe To avoieTe To KAnaki av n 8aIdelta a E Iwtnpa eivai aeBaeouevn kai n Evdeiktikn luxviu to pieon Y evai avamuev.
HpiEoN mTOpEi va aenEaevOepwOe i e 2 TpOtnouc oTo TEoCtou MaeyIpeMaTOc:
ΦuoiKn aπελeυθερωη; KaTα to τέλος του μαγειρματος, η μετα από τη διακοπή του προγραματος, η συακενή θα κρυώει καίη πίεση θα απελευθερωθεί φυοίκΑ. KaTα τη φυοική απελeυθερωη, το φαγητό ενδεχεται να μαγειρνει τηρεισότερο από 000 πρέπει, λόγω τής ὄπολειπόμενης πίεός στο σκεύος. Xρησιμοποίπετη διαδικασία τής χεροκίνητης απελeυθερωός γία να διακόψετε ἀμεσα τή διαδικασία μαγειρματος.
Xeipokivtn aneAevepwon: Pntote npapatetauevao to koupi aneAevepwons nts niEONS, navw oTo kaNak. Xpeiaovtaeepik a deutepolentaaewc epiKa aenr ava loya e tnu nooTnTa qayntou oTo ayepiko okeuoc (Eik.31).
IPOEIOIOIHs: Pooeexte tv kauo ato nou byaivei an tooukeun. KpatnoTe to npoowto kal ta xepia oac maakpi aanto tv ato (Eik.45).
- Iα vα ανοίξετo kαπάκι, tοτοθεῖηοτe to ζέρι σας παράλληλα με τις πλευρικές λαβές, κρατήσετη λαβήου καπακίου, περιοτρέψετα πριοτέροστροφα και σηκώτε to kαπάκι (Eik.32 και 33).
PPOEIODOIHsH: PpOeXeTe tov kauTo aTu oou Byaivei ano to ayEipKo okeuoc.
9. Anouvδεσε τη συοκεύν ἀπό τὴν πρία
- Metá από τη χρήσ, απούνδεοτε τη συοκεύν και αφήσοτε την κριωσει για touλαχιοτου 2 υρες πριν την καθαρίσετε.
10. Kaθαριομός Μετα από τη χρήση
-Kαθαρiοτε τη συσκεύμετα από καθε χρήση.
- Pivv ano tov kathetaiou, aphiote tn ouokeun va kpuwoei yi taoulambdaiotov 2 wpe.
- Iα oδnyiες καθαρισου, ανατρέξετο Οην παράγραφο 3. Πα τον καθαρισό ὅλων των εξαρτημάτων της συοκεύς ανατρέξετο Οην ενότητα ΠΡΙN AΝΟ ΠΝΟΤΗ
11. Συμβουλές συντήρησς
-ia va δiaαφαλiσετην ανθεκτικότητα tou μαγερικόν Μεύους, μην κόβετε τρόφμα μέσα σε αυτό.
Xpnoiopoieite ta npexoeva Eapntma. Mny xpnoiopoieite e tai kia epyaleia, kaWc mtopei va apei n avtikolntikn tiotpwon tou ayepikou okeouc.
- Metα απο τη χρόση, o Οτεγανοποιntikός δακτύλιος ενδέχεται
va μυρίζει πως το φαγητό σας. Eivai φυσιολογικό. H σιλικόνη
exει μικρούς πόρους που αυοίουν ὄταν εκτίθεται συηλές
θερμοκρασίες και λείουνξανά τανη θερμοκρασία
επανέλθει σε χαμηλά επίπεδα. Παν α φασρέσετε τις σομές
απο τον Οτεγανοποιntikό δακτύλιο, μπορείτε:
- Na πλύνετε tov δακτύλιο από σιλικόνη στο πλυνήριο πιατων
-Na npooeoe1 Koua xdi, 1 Koua vepo kai 1 eovi KomuEvo oeyal a Koumaia oTo mayeipiko oKeuoc kai va XpooiioiOeTe to npoypaum a tou yia 2 eTt a kai, Katoniv, va afoetov atuva aneuepwoei fuoka.
-Avtikataaotne tov oTeyavonoiTiko daKtulio kαθε 2 xρovia n vwpitepa,σπeipintwn Φθopac.
OΔHFO Σ ANTIMETQNIIHΞ TECHNIKΩN ΠPOBΑΗΜΑΝ
Пróблела Пговсautic Ичecи АБ vuquia avoiyuatoç kattaklou АБ vuquia avoiyuatoç λόуw πίοης στο μαγερικό Κέωος Паэntе паразетауve ta kουпіnta
а�тěνθερωнс πίοης γа va
а�тěνθερώе την πίουι απότο to
maγeρικό Κέωος. Mιθοpei VA χεδιστουν
μερικάλεπτά μέχρινα πατευθερωθει
πλήρως η πίουη. H πίοη στο μαγερικό σέωος
ατέλευθερώνει ταλήρως,
αλλάη βαλβδα εμ πλωτήρα
έχι κολληδει Ετεδή εἰναι Πολύ
βρωμικη και δεν μιθορίνα
kατέβει. α. Beβαωθείe τις η πίουη ἐχει
ατέλευθερωθεί πλήρως, αφήνοντας η
συκεύην ακρωεία με
πλιτηρο πορος τα κατω, τοῦθεύντας
ένα εύλαίη ένεν μακρον Αντικείμενο
στο ὄνοιμα τις βαλβδος με πλιτηρα.
Εαν το πρόβλημα δεν λυθεί, στείλετο
τη συσκεύησε Ενεν εξουοιδοτηνεν
κεντρο σερβίς.
γ. Γία την επόμενη χρηση, καθαρίσει και
στευωθετη η βαβδα με πλιτηρα
σχολαστίκα. АБ vuquia kλείοιμος
kattaklou O Θεγανοτοιπικός δακτιλιος
δεν ἐχει τοῦτηθεί σωτός. Τοῦτηθείτηθει τον Θεγανοτοιπικό
δακτιλιο σωτός. To μαγερικό σέωος περίχει
kautá αύλίκα τοῦ παράγουν αιμί. Περιενθε Μεχρίνα κρωσουν τα
υλίκα στο μαγερικό σέωος, προτού
etηχερίŋοε Ελάννα καλείετε ΤΚΑΙΚΑ. H βαλβδα με πλωτήρα ἐχει
καλληδει Ετεδή εἰναι Πολύ
βρωμικη και, ετομένως, δεν
μιθορίνα συνακινηθεί προς
τα κατω. α. Πεγανε Ματαλίη τη βαβδα με
πλιτηρα πορος τα κατω, τοῦθεύντας
ένα εύλαίκα ένε μακρον Αντικείμενο
στο ὄνοιμα τις βαβδος με πλιτηρα.
Εαν το πρόβλημα δεν λυθεί, στείλετe
τη συσκεύησε Ενεν εύνοιδοτηνεν
κεντρο σερβίς.
β. Γία την επόμενη χρηση, καθαρίσει και
στευωθετη η βαβδα με πλιτηρα
oxλολαστίκα. H Θεόη ἡ/και η κατεύθυουη
ΤΟΥ Ελλείοε Φονικη
ΤΟΥ Ελλείοε Φονικη
Εαφαλμένη. Κλείοτε ΕΚαίκα προς η σωτόη
Κατεύθυουη, συμφωνα Με to
Εγχειρίδο χρήσης. Ογανογεte to
kattaklou, to μαγερικό
σεκυος παταρμένει
συνδεδεμενο Στο
kattaklou. O Θεγανοτοιπικός δακτιλιος
έχει προκαλέδει αναρρόφηη. To μαγερικό σέωος θα ατελενθερωθεί
móvo tou από to KATÁKAI. Eivai
φυσολογίκα και ατοδεύνινι την καλή
στεγανούτηα tou προίνοτος, Γι Αντ
aitoduyŋ έπιωτις tou λαγερικό
σεύους το Προίνιν KATÁ to ἀνοιμα
tou KATÁKII, ανογίete πάντα to KATÁKII
προεκτικά. Пróблела Пговсацета Люseric Евtownа ося_LEухор
песл сато ть ося_LEухор
аофаліац п�сп. H εουстерій піeoу
мeuәla'teprр оліті піeoу
λеioptuyiaac n ̃н оswetepriŋ pіeoу
eivai meyal'teprр оліті піeoу
аофаліац. Каэларіte direfoobkátn bαlaβioda
аофаліац піeoус, tny bαlaβioda
me tnytlopa kai to katiakl. Av
εξakolou'dei vα βayievi atiɑci
atot n tny bαlaβioda μe tnytnpa,
ateuθvdu'eze tny tnytneotepo
efouaioodtopevo kěvtpo osepiciy, yia
Elyxho, etiwokeun n puθmuon tiou
tpereitei va npayuaototnθe iatɔ
efouaioodtopevo átɔma. H βαlaβioda αофаліац піeoу
бlpoketai oe ofoal'mev th'eon. Плірітіч're/Ti\'eore Пліо\'eRTKТУ
Бαlaβioda αофаліац піeoус, yia va mtei
stn θeən tnc, Пліо\'eTeTov kau'tó
atmu Tontobetnteite o afoal'n th'eon
kai φo\rapé Tpuipayaxa yávúia. O efoal'meuoc, éleyxoc ntr pіeoу
obhnyote otny ateleuk'teprwo
п�eоу. ΣteIte TN ouokeun o eva
efouaioodtopevo kěvtpo osepiciy, yia
etiwokeun. SUVeyncs ocieλeul'teprwo
песл сато ть ося_LEухор
песл сато tny bαlaβioda ME
плaw'te ра. H εουстерій піeoу
meyal'teprр natalny pіeoу
λeioptuyiaac n ̃n eowetepriŋ pіeoу
eivai meyal'teprр natalny pіeoу
аофаліац. Каэларіte direfoobkátn bαlaβioda
аофаліац піeoус, tny bαlaβioda
me tnytlopa kai to katiakl. Av
efoal'teprpivia vα βayievi atiɑci
atot n tny bαlaβioda μe tnytnpa,
ateuθvdu'eze tny tnytneotepo
efouaioodtopevo kěvtpo osepiciy, yia
Elyxho, etiwokeun n puθmuon tiou
tpereitei va npayuaototnθei atot
efouaioodtopevo átɔma. Ytloaleiμaata stny bαlaβioda μe
п�lu'teprpɑa. α. Плірітіte пао\'eТeТа\'eVA to
koumii ateleuk'teprpovcrtnc pіeoус,
yia va ateleuk'teprpovcrtnc TNY
tny tny ato to maeyiikko okeuoc,
Mtopei va xpeiaotovu megika
λeTTA megyi va ateleuk'teprpovcrtnc
πl'pwc n piaeon.
β. Афnotе tny ouokeun va kruwoei
yia toulaqixotov 2 wpeç.
γ. Kaэларіte кai oteywot e tny
Bαlaβioda μe tnytnpa tpototov
EekivnaeTe EK VEOU TO Mauyepeμa. H βαlaβioda μe pIIw'tnpa éxei
koIahnoel. α. Плірітіte пао\'eТeТа\'eVA to
koumii ateleuk'teprpovcrtnc pіeoус,
yia va ateleuk'teprpovcrtnc TNY
tny tny ato to maeyiikko okeuoc,
Mtopei va xpeiaotovu megika
λeTtA megyi va ateleuk'teprpovcrtnc
πl'pwc n piaeon.
β. Афnote tny ouokeun va kruwoei
yia toulaqixotov 2 wpeç.
γ. Kaэларіte кai oteywot e tny
Bαlaβioda μe tnytnpa tpototov
EekivnaeTe EK VEOU TO Mauyepeμa.
Пróблар Пиогуvesаоцic Альперсic Дiарюгόν ατουο ατό to kaɪтáк. О огелуалоитикός δактулioc δέν ἐχει τοῦθέτηθει σωτά. Афраίρόte тов огелуалоитикό δактулioc, кαθαρίrote тов кαι επανοτοῦθέτηροτe тов στη ωοτή θέοη. О огелуалоитикός δактулioc εieval βρόμικος. Афраίρόte тов огелуалоитикό δактулioc, кαθαρίrote тов кαι επανοτοῦθέτηροτe тов στη ωοτή θέοη. О огелуалоитикός δактулioc ἔχει utοσеί βλάβη, ὄ το γελος tou μαγeρίκους Μεκυούς ἔχει utοσеί βλάβη. Στελτη συακεύη σέ ενα εξουαδοθηένον κέντρο σέρβις γία επιακεύη. To φογήτό δεν εieval μαγeριένο H αναλογία σατερών/υρύν υιλικύν εieval εοφαλένη. Δοκιμάσε Εανα, ακολουθώντας με ακριβίατις πίς ποδότητες τής συντάγς. Δεν utáρχει παροχή ρεύματος ατό ην πρία. Ελέγειτο tο αἰκίακό ηλέκτρικο κύλιμα. Εμφανιζεαι ένδειξη E0 στην ψηφιακή Θόνη. Ο διακόπτης πίεος εieval Ελαattwματικός. Στελτη συακεύη σέ ενα εξουαδοθηένον κέντρο σέρβις γία επιακεύη. Εμφανιζεαι ένδειξη E1 στην ψηφιακή Θόνη. Ο αιοθητρας Θέρμοκραίας εieval ελαattwματικός. Στελτη συακεύη σέ ενα εξουαδοθηένον κέντρο σέρβις γία επιακεύη. Εμφανιζεαι ένδειξη E2 στην ψηφιακή Θόνη. Тο katráκ δεν εieval υοτά τοῦθέτηνον γία to συνκερίμενον πρóρμαίμα Μαγερμαίος, Εαδέ Πρóρμαίμα ανειτοίησει μία σρισένη θέοη του καπαίου. Ελέγειτε κα I προσαρμόθετη η θέοη του καπαίου σύμφινα με το πρóρμαίμα μαγερμαίος, ανοτρέτε θετον Φινακα τυν προγαμίατιν μαγερμαίος στην τιραργαρδο 6 του παρόντος εχερίδι.Επανεκκίνητε to πρóρμαίμα ὄταν to καπαίαν το Ποτθεπθεί υωτά.Εάν to πρόβλημα παραμένει, σειλτε η συακεύη σε ένι Εανασιδοŋμένον κέντρο σέρβις γία επιακεύη.
Moulinex
www.moulinex.com
Type:SERIE EPC50-B
Model: CE754
Capacity: 4.8L
Voltage: 220-240V
Frequency: 50-60Hz
Power: 915-1090W
INDICE
Guia de inicio rápido em imagens 4 A Moulinex recomenda a segurarca em primeiro lugar 160 Descrição do seu produits 168 Familiarizar-se com o panei de controlo 169 Guia de uso e limpeza 170 Guia的技术o de resolucao de problemas 186 Garantia internacional limitada da Moulinex 285A MOULINEX RECOMENDA A SEGURANÇA EM PRIMEIRO LUGAR
A segurará é a)nossa principal prioridade. Concebemos e fabricamos onoxo produits com elevados padões de segurará e Tecnologia. No entanto, tal como acontece com qualquer aparelho elétrico, existem algunos riscos potenciais,leo que o convidamos a exercer umCERTO cuidado e a respeitar as instruções que se seguem.INSTRUÇÉS DE SEGURANÇA
Leia atentamente todas as instruções que se seguem e guarde-as para futuras consulutas.
- A utilização incorrente do aparelho e dos respetivos acessórios pode danIFICAR o aparelho e causaferimentos. - Oaparelhocozinhaosalimentossobpressao.Autilização incorreta pode provocar riscos de queimaduras devido ao vapor. - Para sua segurarça, este produit está em conformidade com todas as normas e regulamentos aplicáveis (Diretiva Baixa Tensão, compatibilitadé eletromagnética, materiais compatíveis com alimentos, ambiente, etc.). - A fonte de calor necessária para cozinho está incluída no aparecido.1. Onde utilizes em segurar?
- Apenas para utilizes no interior. - Este aparecido destino-se apenas a uso dométrico. Não se_DESTina a ser utilizado nos següentes casos e a garantia não se aplicá a: - zonas de cozinas reservadas aos functionários de lojas, escritórios e outros espécOs professionais; - quintas; - Utilização por cliente de HOTÉis, motéis e outros ambientes de caráter residencial; - ambientes do tipo alojamento com pouco-almoço. - Não coloque o aparecido num forno aquecido ou numa placá quente. Não colque o aparecido perto de uma chama viva ou de um objeto inflamível. - Utilize numa superficie de trabajo plana, está e resistente ao calor, afastada de salpicos de agua.2. Quem o pode utiliser em segurança?
- Este aparelho não foi concebido para ser realizado por pessoas (incluindo crijanças)@cajas capacidades fisicas, sensoriais ou mentalais se encontrar reduzidas, ou por pessoas com falta de experiência ou conhecimiento, a não ser que tenham sido devidamente accompaniesadas e instruções sobre a correta'utilisation do aparelho, pela persona responsavel pela sua segurarça. - O aparelho pode ser utilisé por pessoas com capacidades fibras, sensoriais ou mentalais reduzidas ou com falta de experiencia e conhecimiento, caso sejam supervisionadas ou lhes tenham sido dadas instruções relativas à'utilisation correta do aparelho e se comprehenderem os perigos envolvidos. - Este aparecido não deve ser utilisé por crianças. Mantenha o aparecido e o respetivo cabo de alimentação para do alcance de crianças. - As crianças não devem brincar com o aparelho. - As crianças devem ser supervisionadas para garantir que não brincam com o aparelho.3. Como usar em segurar – uso de algo?
- Não utilize o aparecido para outras finalidades que não a prevista. - Não utilize o aparecido para fritar alimentos em oleo. Só é permitido tostar/dourar. - Não utilize a panela de pressão no modo de pressão para fritar alimentos. - Ao cozinhoar alimentos pastosos, agite suavamente a panela antes deAbrir a tampa para fazer que os alimentos sejam ejetados. - Este aparecido não é um esterilizador. Não o utilize para esterilizar frascos. - Este aparecido não se destina a ser colocado em precisiónamento com um temporizador exterior ou atravesse de umsystema de commando à distência separado. - Para segurar o aparelho, utilize sempre as两大 pegas laterais no corpo do aparelho. Utilize luvas de cozinha se o aparelho estiver quente. Para maior segança, certifique-se de que a tampa está broqueada antes de deslocar o aparelho. - A parte inferior da cuba e a placá de aquecimento tíme de estar em contacto direto. Retire qualquer objecto ou resíduos alimentares localizados entre a cuba e a placá de aquecimento, poi pode afetar o desempenso. - Tenha em atençao que determinados temas de alimentos, tais como sumo de maça, arandos, ruubarbo, cevada, aveia ou outros cereais, ervilhas partidas, noodles ou massas, poder formar espuma e crepitação e entupir as valvulas. Tenha cuidado ao cozinho das vezes dos alimentos e,(before de utilizesimpe cuidadosamente as valvulas. - Tenha em atençao que determinadas receitas que incluem leite poder formar espuma, transbordar e obstruir as valvulas. Tenha cuidado ao cozinhoas评为ceitas e,deois deutilizar, limpe cuidadosamente as valvulas. - Aparto cozinhar carne com pele grossa (como lingua de vaca), que pode inchar com o efeito da pressão, não fure a pele antes de cozinhar se esta parecer Inchada: pode queimar-se. Fure-a antes de cozinhar. - Não utilize o aparecido vazio, sem a cuba ou sem ingredientes no interior da cuba. Tal pode provocar danos graves no aparecido. - Não utilize o aparecido sob pressão sem adicionar água, sentido que tal pode provoc danos graves noaporecido. - Não encha o aparelho sem a respetiva cuba. - Atença: não derrame láquidos sobre a ficha. - Não aqueça a cuba com qualquer outras fonte de calor que não a placá de aquecimento do aparelho e não utilize outras cuba. Não utilize a cuba para cozinho com outros aparelhos. - Utilize a cuba APENAS no aparelho. Não a utilize para cozinhar no fogão, noorno, etc. - Utilize uma colher de plástico ou de madeira para não danIFICAR o revestamento antiaderente da cuba. Não corte alimentos diretamente na cuba. - Não toque nas valvulas, exceto durante a limpeza e manutençao do aparecido, de acordo com as instruções fornecidas. - Não coloque quando发展机遇ar os estranhos nas valvulas e no botão de libertação de pressão. Não substitua a valvula. - Verifique regularamente as conduitas nas valvulas que permitem a saída de vapor para garantir que não está broqueadas. - Não utilize um pano ou qualquer及其他 objecto entre a tampa e o corpo do aparecido de forma a delearing a tampa entreaberta. Isto pode danificar permanece o anel vedante. - Não deixe o cabo de alimentação pendurado na extremidade de uma mesa ou bancada, nem deixe que este toque em superficies quentes.4. Como usar em segurar – antes de cozinho?
- Antes de utiliser o aparelho, verifique se a valvula fluctuante e a valvula limitadora de pressão está limpas. - Antes de utiliser o aparelho, verifique se o anel vedante foi corretamente instalado na tampa. - Certifique-se de que a parte inferior da cuba e a placar de aquecimento está sempre limpas. Certifique-se de que a parte central da placar de aquecimento está molev. - Não encha o aparecido mais do que a marca MAX na cuba. - Siga as recomendações sobre o volume de alimentos e água para fazer o risco de transbordar, o que pode danIFICAR o aparecido e Causear ferimentos. - Certifique-se de que o aparecido está devidamente fechado antes de o colocar sob pressão.5. Como utiliser em segurará – durante a cozedura?
- Não tenteAbrir a tampa até que a pressão tenha diminuindo o suficiente. Não tenteAbrir a tampa até que a valvula flutuante esta para baixo. - Nunca force a abertura do aparelho. - Durante a cozedura e a libertação de vapor no final da cozedura, o aparecido liberta calor e vapor. Mantenha o rosto e as mãos afastados do aparecido para fazer queimaduras. Não toque na tampa durante a cozedura. - Não desloque o aparecido quando this estiver sob pressão. Utilize as pegas quando o deslocar e use luvas de cozinha, se necessário. Não utilize o botão da tampa para levantar o aparecido. - Não retire a cuba quando o aparecido estiver em等功能amento. - No modo tostar, tenha cuidado com os riscos de queimaduras devido às projeções ao adicional alimentos ou ingredientes à Cuba quente.6. Como usar em segurarca -(before de cozinho?
- QuandoAbrir a tampa,segure-a sempre pelo botao da tampa. Posicao o braço paralelo as pegas laterais. A agua a ferver pode permanecer presa entre o anel vedante e a tampa e provocar queimaduras. - Tenha también cuidado com o risco de queimaduras provocadas pelo vapor que sai do aparelho quando abre a tampa. Primeiro,arethabra a tampa paraDEXXARSAIR O vapor suavamente. - Não toque nas peças quentes do aparelho. Àpos a utilizesação, a superficie da placá de aquecimento pode permanecer quente durante até 2 horas. - Desligue a ficha da.tomada quando o aparecido não estiver a serutilizzato e antes de o limpar. Deixe arrefecer antes de colocar ou retiring peças.7. Como utiliser em segurar – limpeza?
- Limpe a parte inferior da cuba e a placar de aquecimento às vezes cadautilização. - Não mergerluhe o aparelho em água. - Para limpar o aparelho, consulte as instruções de utilizesçao. Pode lavar a cuba e a tampa em agua quente com detergente para a loça, mas não as colque na boaquina de lavar loça. Limpe o corpo do aparelho com um pano humido.8. O que fazer em caso de avaria?
- Apenas pessoas autorizadas nos Serviços de Assistência Técnica podem reparar o produto. - Não utilize nenhum aparelho com um cabo de alimentação ou ficha danificados oudeois de o aparelho não funciona corretamente ou de ter sofrido danos de alguma forma. Envie o aparelho ao Servico de Assistência Tecnica autorizao mais proximo para serinspectionado, reparado ou ajustado. - Se o cabo de alimentação estiver danificado, este deve ser substituído por um Serviço de Assistência Tecnica autorizzato para fazer qualquer situação de perigo. Não substitua o cabo de alimentação fornecido por outros cabos. - Não danifique o anel vedante. Se estiver danificado, Solicite a sua substituição num Serviço de Assistência Técnica autorizado. - Substitua o anel vedante a cada 2 anos ou mais cedo, se reparar que está gasto ou precisa de ser substituído. - Utilize開放as peças sobreselentes adequadas para o seu Modelo. Istó é particulamente importante para o anel vedante e para a cuba. - Utilize開放as peças sobreselentes disponiblesizadas por um Servico de Assistência Tecnica autorizada. - À'utilisation de acessórios não recommendados pelo fabricante do aparelho pode provocar ferimentos. - Não utilize outras cubas no aparecido em vez da Cuba fornecida. Substitua a cuba apenas por uma pegá sobresselete original Concebida para ser realizada com este produit. - Em conformidade com os regulamentos em vigor, antes de eliminar um aparecido que não seja necessário, o aparecido deve fazer inoperacional (desligando a ficha e cortando o cabo de alimentação).Proteção do ambiente em primeiro lugar!
 O seu produit contém materiais que podem ser recuperados ou reciclados. - Entregue-o num punto de recolha para possibilitar o seu tratamento9. Quando é que a garantia é aplicavel?
- A garantia não cobre o desgaste anormal da cuba. - Leia atentamente estas instruções deutilização antes de utilizes o aparecido pela primarya vez. Qualquer'utilisation que não está em conformidade com estas instruções isenteá o fabricante de qualquer responsabilité e anulará a garantia. - No caso de utilizesçao comercial,utilização inadequada ou incumprimento das instruções,o fabricante rejeita qualquer responsabilitadede a garantia não é aplicavel. PT  DESCRÊçO DO SEU PRODUTO  FAMILIARIZAR-SE COM O PAINEL DE CONTROLOMENSAGENS DE ESTADO
 Mensagem de boas-vindas quando o aparecido é ligado. Apresentação da hora. Neste exemple: 1 hora e 30 horas. Apresentação da temperatura. Neste exemple: 114 graus Celsius. Indica que o programa tem uma predefinição automática de temperatura/tempo. Não pode ser modificado. Indica que a temperatura está aacular durante a fase de pré-aquecimento. Indica que o aparelho está a pre-aquecer.  Indica que o programa terminou.  Indica que o aparecido está na fase de manter quente.  Indica que o programa foi interrompido.  Indica que o aparelho está no modo de poupança de energia.GUIA DE UTILIZACHO E LIMPEZA
Consulte as figuras indicadas como (Fig. x) na parte do Guia de inicio=rápido.ANTES DA PRIMEIRA UTILIZACHO
1. Retire a embalagem
- Retire o aparelho da embalagem e leia o manual de instruções antes da primeira'utilisation. - Retire os autocolantes promocionais (se existrem) do seu aparecido antes da primarya utilização.2. Abra a tampa
- ParaAbriratampa,segureobotao da tampa,rode-o para a esquerda e levante atampa (Fig.1e2). Nota: quando levantar a tampa, a cuba pode permanecer presa à tampa. É normal e demonstra simplement uma boa hermeticidade do produits. Para fazer que a cuba caia violently sobre o produit ao Abrir a tampa, abra sempre a tampa com cuidado. - Coloque o aparelho sobre uma superficie plana. Retire todos os materiais e acessórios de proteção do interior do aparelho (Fig. 3).3. Limpe todas as peças do aparelho
3a. Limpe a tampa, a cuba e os acessórios
- Limpe a tampa, a cuba e os acessórios com uma esponja suave e agua quente com detergente para a loiça (Fig. 4). - Seque a tampa, a cuba e os acessórios (Fig. 5). - Não utilize esfregões ou esponjas abrasivas para limpar a cuba, País tal pode danIFICAR o revestimento antiaderente da cuba (Fig. 40). - Não vergulhe o aparelho em água (Fig. 41). - Se mergerhar inadvertamente o aparecido em água ou derramarágua diretamente sobre a placá de aquecimento, leve o aparecido a um Serviço de Assistência Tecnica autorizando para reparação. - Não coloque a tampa e a cuba na boaina de lavar loça (Fig. 42). - Tenha em atençao que apenas os acessórios: concha, espátula, copo medidor e cesto de cozedura a vapor são compatíveis com a boaquina de lavar loça.3b. Limpe o anel vedante
- Retire o anel vedante da tampa e limpe-o com uma esponja suave e agua quente com detergente para a loça (Fig. 7 e 8). - Sequo complemente. - Coloque o anel vedante sobre o suporte do anel vedante e pressione-o até encaixar (Fig. 9). Pressionefirmamente para garantir que não fica enraged o que o anel vedante está bem encaixado atrás do respetivo suporte. - Depois de colocar o anel vedante na tampa, seAbrir a tampa demasiado depressa, a cuba pode permanecer presa à tampa (Fig.37 e 38). Aguarde algunos segundos para que a cuba se liberte da tampa (Fig. 39). Nota: É normal e demonstra simplement uma boa hermeticidade do produits. Para fazer que a cuba caia violently sobre o aparecido ao Abrir a tampa, abra sempre a tampa com dificuld.AVISO: Nunca utilize o seu aparecido sem o anel vedante (Fig. 44). 3c. Limpe as valvulas
- Para limpar a valvula limitadora de pressão, retire-a do tubo na parte superior da tampa (Fig. 10). Limpe-a com uma esponja suave e agua quente com detergente para a loça (Fig. 11). DepoS de secar, certificque-se de que a conduita do tubo está limpa antes de voltar a ligar a valvula limitadora de pressão ao tubo na parte superior da tampa (Fig. 12). Certificque-se de que a valvula limitadora de pressão está bem colocada no devido lugar e que é capaz de se deslocar para cima e para baixo. - Para limpar a tampa da valvula limitadora de pressão, desaperte-a a partir do interior da tampa (Fig. 13). Limpe-a com uma esponja suave e água quente com detergente para a loça (Fig. 14). Depois de secar, certifique-se de que a conduita do tubo está limpa antes de voltar a aperture a tampa da valvula limitadora de pressão no interior da tampa (Fig. 15). - Para limpar a valvula flutuante, retire a junta da valvula flutuante do interior da tampa e vire a tampa para que a valvula flutuante possa ser retrida da tampa (Fig. 16). Limpe a junta da valvula flutuante e a valvula flutuente com uma esponja suave e agua quente com detergente para a loça (Fig. 17). Depois de secar, volté a inserir a valvula flutuente na tampa e volté a colocar a junta da valvula flutuente no devido lugar (Fig. 18). Certifique-se de que a valvula flutuente está bem colocada no devido lugar e que é capaz de se deslocar para cima e para baixo.3d. Limpe o corpo do aparelho
- Limpe o corpo do aparelho com um pano humido. - Não mergerulhe o aparelho em água (Fig. 41). - Limpe a placá de aquecimiento com um pano seco.INSTRUÇOES DE UTILIZAZão
1. Coloque os ingredientes na Cuba - Retire a cuba do corpo do aparelho. - Coloque os ingredientes na cuba. - Tenha em atençao que o nível de alimentos e liquidos nunca deve excesser a marca de nível maximo na cuba (Fig. 19). - Ao cozinho, no modo de pressão,ingredientes que Incham durante a cozedura, como legumes desidratos ou arroz, não encha a panela a mais do que metade do seu;nível maioro.2. Coloque a cuba no corpo do aparelho
- Certifique-se de que a parte inferior da cuba está limpa e seca e retire quando resíduos de alimentos da placá de aquecimento (Fig. 20). - Coloque a cuba no corpo do aparelho (Fig. 21). - Nunca utilize o aparelho sem a cuba.3. Fecha ebloqueie a tampa
- Verifique se o anel vedante está bem colocado na tampa (Fig. 43). - Segure o botão da tampa, colque a tampa no aparecido e rode-a para a direita para bloquear (Fig. 22).4. Fixe a valvula limitadora de pressão
- Coloque corretoamente a valvula limitadora de pressão na tampa (Fig. 23). Tenha em atençao que a valvula permanecera ligeiramente solta, o que é normal.5. Ligue o aparelho
- Desenrole totalmente o cabo de alimentação e ligue-o à corrente electrica (Fig. 24). - O aparelho emite um avis sonoro, o ecra fica intermitente e aparesta HETIO.6. SeLECTIONE inicie um programa de cozedura
- Cada programa tem um tempo e temperatura predefinidos e quer uma posicao exigente da tampa. Consulte aanela de programas de cozedura: TABELA DE PROGRAMAS DE COZEDURA| fome do programa de cozudura | Nome do programa de cozudura | Tempo de cozudura predefinindo | Tempo ajustavel | Temperatura predefinida | Temperatura ajustavel | Pressão predefinida | Irúcio diferindo de 10 min a 12 h | Monter quente até 24 h | Estado da tampa | ||
| Tampa fechada e bloqueada | Tampa fechada mas não bloqueada | Tampa aberta | |||||||||
| Estufar | 30 min | de 1 min a 2 h | 114 °C | Não | 70 Kpa | Sim | Sim | ● | |||
| Sopa | 12min | de 1 min a 2 h | 114 °C | Não | 70 Kpa | Sim | Sim | ● | |||
| Saltear | 20min | de 1 min a 1 h | 160 °C | Sim de 100 °C a 160 °C | Não | Não | Não | ● | |||
| Cozedura a vapor | 10min | de 1 min a 2 h | 114 °C | Não | 70 Kpa | Sim | Sim | ● | |||
| Cozer | 40min | de 1 min a 2 h | 160 °C | Sim de 100 °C a 160 °C | Não | Sim | Sim | ● | |||
| Cozedura a vázuo/ Cozedura lenta | 4 h | de 30 min a 12 h | 85 °C | Sim de 55 °C a 95 °C | Não | Sim | Não | ● | ● | ||
| Arroz | 8min | de 1 min a 2 h | 114 °C | Não | 70 Kpa | Sim | Sim | ● | |||
| Iogurte e fermentação | 8 h | de 30 min a 12 h | 30 °C | Sim de 22 °C a 40 °C | Não | Não | Não | ● | ● | ||
| Papas de oreia | 15min | de 1 min a 2 h | 100 °C | Não | Não | Sim | Sim | ● | |||
| Modo Chefajustavel | 30 min | de 1 min a 4 h | 80 °C | Sim de 70 °C a 160 °C | Não | Não | Sim | ● | ● | ● | |
Programa estufar
- Coloque os ingredientes na Cuba e feche completeness e bloqueie a tampa. - Rode o botão do paine de controlo para a direita para aceder ao programa de estufar. O érá apareça o tempo de coze-dura predefinido. - Oportun: Prima e ajuste o tempo pretendido rodando o botão do painei de controlo para a direita (paraLERar o tempo) ou para a esquerda (para diminuir o tempo). - Prima 0 para,iniciar o programa decozedura. - O aparelho inicia a fase de pré-aquecimento. O ecra aparenda alternadamente [C] [E] [A] [O] [P] [R] [S] [T] [U] [V] [W] [X] [Y] [Z] [A] [B] [C] [D] [E] [F] [G] [H] [I] [J] [K] [L] [M] [N] [O] [P] [Q] [R] [S] [T] [U] [V] [W] [X] [Y] [Z] [A] [B] [C] [D] [E] [F] [G] [H] [I] [J] [K] [L] [M] [N] [O] [P] [Q] [R] [S] [T] [U] [V] [W] [X} - Quando a fase de pré-aquecimiento estiver conclusión, o aparibo muda automaticamente para a fase de cozedura. Oakra presenta a contagem decrescente e o indicator luminoso de cozedura em的方式来 acende-se. - Durante o processo de cozedura, existe acumulacao de pressao no aparelho, que empurra a valvula flutuante para cima. O indicator luminoso de pressao acende-se para indicar que a tampa não pode ser aberta sem libertar primeiro a pressao. - No final da contagem decrescente, o aparelho emite um avis sonoro e o ecra aparena [End]. - Após algunos segundos, o aparelho muda automaticamente para a fase de manter quente. O ecra aparesta Hc e o indicator luminoso de manter quente acende-se. - Prima durante 3segundos para parar o programa em qualquer alta. Programa sopa
- Coloque os ingredientes na Cuba e feche completeness e bloqueie a tampa. - Rode o botão do painel de controlo para a direita para aceder ao programa de soba. O éra apareça o tempo de cozedura predefinido. - Oportun: Prima e ajuste o tempo pretendido rodando o botão do poinl de controlo para a direita (paraacularo tempo) ou para a esquerda (para diminuir o tempo). - Prima 岛 para,iniciar o programa de cozedura. - O aparecido inicia a fase de pré-aquecimiento. O ecra aparece alternadamente e o indicator luminoso de pré-aquecimiento acende-se. - Quando a fase de pré-aquecimiento estiver conclúa, o aparibo muda automaticamente para a fase de cozedura. Oakra presenta a contagem decrescente e o indicator luminoso de cozedura em的方式来 acende-se. - Durante o processo de cozedura, existe acumulacao de pressao no aparelho, que empurra a valvula flutuante para cima. O indicator luminoso de pressao acende-se para indicar que a tampa não pode ser aberta sem libertar primeiro a pressao. - No final da contagem decrescente, o aparelho emite um avis o sonoro e o ecra aparesta. - Após algunos segundos, o aparecido muda automaticamente para a fase de manter quente. O éra presenta HOE e o indicator luminoso de manter quente acende-se. - Prima © durante 3segundos para parar o programa em qualquer alta. Programa saltear
- Rode o botão do painel de controlo para a direita para aceder ao programa de saltear. O éra apareça o tempo de coze-dura predefinido. - Ooptional: Prima e ajuste o tempo pretendido rodando o botão do paine de controlo para a direita (paraacularo tempo) ou para a esquerda (para diminuir o tempo). - Ooptional: Prima e ajuste a temperatura pretendeda rodando o botao do paine de controlo para a direita (para aumento a temperatura) ou para a esquerda (para diminuir a temperatura). - Prima © para,iniciar o programa de cozedura. - O aparelho inicia a fase de pre-aquecimiento. O ecra aparente alternadamente e o indicator luminoso de pre-aquecimiento acende-se. - Quando a fase de pré-aquecimiento estiver conclusía, o aparibo muda automaticamente para a fase de cozedura. O(ECRA presenta a contagem decrescente e o indicator luminoso de cozedura em的方式来 acende-se. - Coloque os ingredientes na cuba e mantenha a tampa aberta para saltear. - No final da contagem decrescente, o aparelho emite um avis sonoro e o ecra aparesta End. - Após algunos segundos, o aparecido muda automaticamente para o modo de poupança de energia. O érá presente. - Prima © durante 3segundos para parar o programa em qualquer alta. Programa cozedura a vapor
- Coloque 150 ml de agua (3¼ de chávena) na cuba, colque os ingredientes no cesto de cozedura a vapor e colque o cesto de cozedura a vapor sobre a cuba. Fecha Completely e bloqueie a tampa. - Rode o botão do painel de controlo para a direita para aceder ao programa de cozedura a vapor. Oakra apareça o tempo de cozedura predefinido. - Oportun: Prima e ajuste o tempo pretendido rodando o botão do pailé de controlo para a direita (paraacularo tempo) ou para a esquerda (para diminuir o tempo). - Prima 岛 para inicia o programa de cozedura. - O aparecido inicia a fase de pre-aquecimiento. OEARíaDSPA. aultadamente e HARE o indicator luminoso de pre-aquecimiento acende-se. - Quando a fase de pré-aquecimento estiver conclúa, o aparibo muda automaticamente para a fase de cozedura. O érácline a contagem decrescente e o indicator luminoso de cozedura em的方式来 acende-se. - Durante o processo de cozedura, existe acumulacao de pressao no aparelho, que empurra a valvula flutuante para cima. O indicator luminoso de pressao acende-se para indicar que a tampa não pode ser aberta sem libertar primeiro a pressao. - No final da contagem decrescente, o aparelho emite um avis sonoro e o ecra aparesta [End]. - Após algunos segundos, o aparecido muda automaticamente para a fase de manter quente. O éra apareça [HOE] e o indicator luminoso de manter quente [W] acende-se. - Prima © durante 3segundos para parar o programa em qualquer alta. Programa cozer
- Coloque o preparado na cuba e feche-a, mas não bloqueie a tampa. - Rode o botão do painei de controlo para a direita para aceder ao programa de cozer. O éra apareça o tempo de cozedura predefinido. - Oportun: Prima e ajuste o tempo pretendido rodando o botão do pailé de controlo para a direita (paraacularo tempo) ou para a esquerda (para diminuir o tempo). - Oprincipal: Prima e ajuste a temperatura pretendida rodando o botao do paine de controlo para a direita (paraacular a temperatura) ou para a esquerda (para diminuir a temperatura). - Prima 岛 para iniciar o programa de cozedura. - O aparelho inicia a fase de pre-aquecimiento. O ecra aparente alternadamente e o indicator luminoso de pre-aquecimiento acende-se. - Quando a fase de pré-aquecimiento estiver conclusía, o aparibo muda automaticamente para a fase de cozedura. O(ECRApresenta a contagem decrescente e o indicator luminoso de cozedura em的方式来 acende-se. - No final da contagagem decrescente, o aparecido emite um avis sonoro e o ecra apareça [End]. - Após algunos segundos, o aparecido muda automaticamente para a fase de manter quente. O éra apareça [Hoe] e o indicator luminoso de manter quente acende-se. - Prima durante 3segundos para parar o programa em qualquer alta. Programa de cozedura a vacuo/cozedura lenta
- Rode o botão do painel de controlo para a direita para aceder ao programa de cozedura a vácuo/cozedura lenta. O érá apareça o tempo de cozedura predefinido. - Oportun: Prima e ajuste o tempo pretendido rodando o botão do poinl de controlo para a direita (paraacularo tempo) ou para a esquerda (para diminuir o tempo). - Oportun: Prima e ajuste a temperatura pretendida rodando o botão do poinel de controlo para a direita (paraacular a temperatura) ou para a esquerda (para diminuir a temperatura). - Prima ⑤ para,iniciar o programa de cozedura. - O aparecido inicia a fase de pre-aquecimiento. O ecra aparece alternadamente e o indicator luminoso de pre-aquecimiento acende-se. - Quando a fase de pré-aquecimento estiver conclusía, o aparecido muda automaticamente para a fase de cozedura. O érá presente a contagem decrescente e o indicator luminoso de cozedura em的方式来 acende-se. - No final da contagem decrescente, o aparelho emite um aviso sonoro e o ecra aparesta [End]. - Após algunos segundos, o aparecido muda automaticamente para o modo de poupança de energia. O érá presente [---]. - Prima durante 3segundos para parar o programa em qualquer alta. Programa arroz
Cologne os ingredientes na cuba eckepletamente e bloqueie a tampa. - Rode o botão do painei de controlo para a direita para aceder ao programa de arroz. O éra apareça o tempo de cozed ra predefinido. - Oportun: Prima e ajuste o tempo pretendido rodando o botão do painei de controlo para a direita (paraacularo tempo) ou para a esquerda (para diminuiro tempo). - Prima para,iniciar o programa de cozedura. - O aparelho inicia a fase de pré-aquecimento. O ECBA presenta alternadamente e o indicator luminoso de pré-aquecimento acende-se. - Durante o processo de cozedura, existe acumulacao de pressao no aparecido, que empurra a valvula flutuante para cima. O indicator luminoso de pressao acende-se para indicar que a tampa não pode ser aberta sem libertar primeiro a pressão. - No final da contagem decrescente, o aparecido emite um avis sonoro e o érá presente [End]. - Após algunos segundos, o aparecido muda automaticamente para a fase de manter quente. O éra presenta HOE e o indicator luminoso de manter quente acende-se. - Prima durante 3segundos para parar o programa em qualquer alta. Programa igurte e fermentacao
O programa de igurte e fermentacao pode ser utilizao para preparar igurte ou levedar pao/massa para bolos. - Ao preparar igurte, coloque os ingredientes na cuba e feche a tampa. - Ao levedar massa, pode bater a massa diretamente na cuba e, em seguida, colocar a cuba no corpo do aparelho e fechar a tampa. - Rode o botão do poinl de controlo para a direita para aceder ao programa de iogurte e fermentação. O éra aparea o tempo de cozedura predefinido. - Oportun: Prima e ajuste o tempo pretendido rodando o botão do poinl de controlo para a direita (paraacularo tempo) ou para a esquerda (para diminuiro tempo). - Oportun: Prima e ajuste a temperatura pretendida rodando o botão do panei de controlo para a direita (para fazer a temperatura) ou para a esquerda (para diminuiar a temperatura). - Prima para,iniciar o programa de cozedura. - O aparelho inicia a fase de pré-aquecimiento. Ocrafta presente alternadamente e HEAE o indicator luminoso de pré-aquecimiento acende-se. - Quando a fase de pré-aquecimiento estiver conclusía, o apareño muda automaticamente para a fase de cozedura. O ecra aparesta a contagem decrescente e o indicator luminoso de cozedura em,. como acende-se. - No final da contagem decrescente, o aparelho emite um avis sonoro e o ecra aparesta [End]. - Após algunos segundos, o aparecido muda automaticamente para o modo de poupança de energia. O érá presente. - Prima durante 3segundos para parar o programa em qualquer alta. Programa de papas de aveia
- Coloque os ingredientes na Cuba e feche completeness e bloqueie a tampa. - Rode o botão do poinl de controlo para a direita para aceder ao programa de papas de aveia. O éra aparesta o tempo de cozedura predefinido. - Ooptional: Prima e ajuste o tempo pretendido rodando o botão do paine de controlo para a direita (paraacularo tempo) ou para a esquerda (para diminuiro tempo). - Prima para,iniciar o programa de cozedura. - O aparelho inicia a fase de pré-aquecimento. O ECB a pree- senta alternadamente e e o indicator luminoso de pré-aquecimento acende-se. - Quando a fase de pré-aquecimiento estiver conclusión, o apar- relo muda automaticamente para a fase de cozedura. Oakra aprepinta a contagem decrescente e o indicator luminoso de cozedura em的方式来 acende-se. - No final da contagem decrescente, o aparelho emite um avis sonoro e o ecra aparesta [End]. - Após algunos segundos, o aparecido muda automaticamente para a fase de manter quente. O(EC) é o indicator luminoso de manter quente acende-se. Prima durante 3segundos para parar o programa em qual-quer alta. Modo Chef ajustavel
- Cologne os ingredientes na Cuba e feche a tampa ou não,DEPENDENDO da receita. - Rode o botão do painel de controlo para a direita para aceder ao modo Chef ajustavel. O éra apareça o tempo de coze-dura predefinido. - Ooptional: Prima e ajuste o tempo pretendido rodando o botão do paine de controlo para a direita (paraLERar o tempo) ou para a esquerda (para diminuir o tempo). - Oportun: Prima e ajuste a temperatura pretendida rodando o botão do poinl de controlo para a direita (paraacular a temperatura) ou para a esquerda (para diminuir a temperatura). - Prima para,iniciar o programa de cozedura. - O aparelho inicia a fase de pre-aquecimento. O ecra aparece alternadamente e o indicator luminoso de pre-aquecimento acende-se. - Quando a fase de pré-aquecimiento estiver conclúa, o aparibo muda automaticamente para a fase de cozedura. Oakra aparena a contagem decrescente e o indicator luminoso de cozedura em的方式来 acende-se. - No final da contagem decrescente, o aparelho emite um avis sonoro e o ecra aparesta [End]. - Após algunos segundos, o aparecido muda automaticamente para o modo de poupança de energia. O érá presente. - Prima durante 3segundos para parar o programa em qualquer alta. * Suggestão de reaquecido do pratos: ajuste a tem- peratura para > = 95^ e cozinho com a tampa fechada mas desbloqueada.7. Utilize a função de início diferido
O inicial diferido pode ser útill para programar o aparelho para fazer a cozinho mais tarde. - Primeiro, selezione um programa, seguito os passos descritos acima na parte 6. - Antes de起初 o programa selecionado, prima . O ecra aparesta o tempo predefinido para o inico diferido. - Defina o tempo pretendido rodando o botão do poinel de controlo para a direita (paraLERar o tempo) ou para a esquerda (para diminuiro tempo). - Prima ⑥ . O ecra apareça a contagem decrescente para o inico diferido. quando o tempo predefinido terminar, o aparecido começa a cozhar automaticamente.8. Abra a tampa
- Não tenteAbrir a tampa se a valvula flutuante estiver para cima e se o indicator luminoso de pressão estiver aceso. - A pressão pode ser libertada de 2 formas发展目标 no final da cozedura: Libertação natural: No final da cozedura ou(before de parar o programa, o aparecido arrefece sozinho e a pressão liberta-se naturalmente. Durante a libertação natural, os alimentos podem cozinho em excesso devido à pressão restante na cuba. Utilize a libertação manual para parar imeditamente o processo de cozedura. Libertação manual: Prima continuamente o botão de libertação de pressão na parte superior da tampa. Ira demorar entre algunos segundos e algunos minutos, dependendo da quantidade de alimentos no interior da cuba (Fig. 31). AVISO: Tenha cuidado com o vapor quente que sai do aparecido. Mantenha o rosto e as mãos afastados da saída de vapor (Fig. 45). - ParaAbrir a tampa, coloque o braço paralelo as pegas laterais, secure o botão da tampa, rode-o para a esquerda e levante a tampa (Fig. 32 e 33). AVISO: Tenha cuidado com o vapor quente que sai da cuba.9. Desligue o aparelho da tomada
- Após cada utilizesçao, deslgue o aparelho da tomada e deixe-o arrerefecer durante,leo menos,2 horas antes proceder a limpeza.10. Limpe antes cada utilização
- Limpe o aparelho après cadautilização. - Antes de limpar, deixe o aparelho arrefecer durante, pelo menos, 2 horas. - Para instruções de limpeza, consulte a parte 3. Limpe todas as peças do aparecido incluidas na sequção ANTES DA PRIMEIRA UTILIZACão.11. Dicas de manutenção
- Para garantir a durabilitad da cuba ao longo do tempo, não corte alimentos no seu interior. - Utilize os acessórios fornecidos. Não utilize nenhum utensílio metalico, pois tal pode danIFICAR o revestimento antiaderente da cuba. - Após a utilizesçao, o anel vedante pode conservar o cheiro do prato. É normal; o silicone temPEGueiros poros que se abrem quando expostos a temperatas elevadas, fechando-se quando a temperatura desce. Para eliminar o cheiro do anel vedante, pode: - Colocar o anel de silicone na maquina de lavar loixa. - Adicionar 1 chávena de vinagre, 1 chávena de agua e 1 limão cortado em pedações grandes na cuba e inicial um programa de cozedura a vapor durante 2关键时刻 e, em seguida, deixar o vapor libertar-se naturalmente. - Substitua o anel vedante a cada 2 anos ou mais cedo em caso de danos.GUIA TECNICO DE RESOLUÇÃO DE PROBLEMAS
| Problema | Possível razões | Soluções |
| Não é possível abrir a tampa. | Não é possível abrir devoa pressão na cuba. | Prima continuamente o botao de libertação de pressão para remover a pressão no interior da cuba. Pode demorar algumas minutos até a pressão ser totalmente libertada. |
| A pressão na cuba é totalmente libertada, mas a válvula fluktuante está presa porque está demasiado muito e, por isto, não se pode mover para baixo. | a. Certífique-se de que a pressão é totalmente libertada, deleixando ou aparecido arrefecer durante,leo menos,2 horas.b. Empurre cuidadosamente a válvula fluktuante para baixo, inserinho um espto ou um objeto longo na abertura da válvula fluktuante. Se isto não funciona, envie o aparecido a um Servico de Assistência Técnica autorizado.c. Para aproxima'utilisation, limpe e seque bem a válvula fluktuente. | |
| Não é possível fechar a tampa. | O anel vedante não está corretramente instalado. | Instale corretramente o anel vedante. |
| A cuba contentem ingredientes quentes que geram vapor. | Aguarde que os ingredientes na cuba arrefecam antes de tentar fechar novamente a tampa. | |
| A válvula fluktuante está presa porque está demasiado muito e, por isto, não se pode mover para baixo. | a. Empurre cuidadosamente a válvula fluktuante para baixo, inserinho um espto ou um objeto longo na abertura da válvula fluktuante. Se isto não funciona, envie o aparecido a um Servico de Assistência Técnica autorizado.b. Para aproxima'utilisation, limpe e seque bem a válvula fluktuente. | |
| A posicao e/ou a direção na qual a tampa foi fechada não é a correta. | Feche a tampa na direção correta, de acordo com o manual de instruções. | |
| AoAbrir a tampa, a cuba permanece presa à tampa. | O anel vedante criou um efeito de sução. | A Cuba liberta-se da tampa por si são. É normal e demonstra simplesmente uma boa hermeticidade do produits. Para evaporar que a cuba caía violently sobre o aparecido ao Abrir a tampa, abra sempre a tampa com cerrado. |
| Problema | Possível razões | Soluções |
| Libertação intensa de pressão da valvula limitadora de pressão. | A pressão interior exceeda pressão de funciona ou a pressão inferior exceeda pressão de segurar. | Limpe minuciosamente a valvula limitadora de pressão, a valvula fluctuante e a tampa. Se continue a sair vapor da valvula fluctuante, envie o aparecido a um dos Serviços de Assistência Técnica autorizados mais proxies para inspeçao, reparação ou ajuste por pessoas autorizada. |
| A valvula limitadora de pressão está numa posicao incorrente. | Rode/pressione cuidadosamente a valvula limitadora de pressão para que caia no devo lugar. Tenha dificuld com o vapor quente. Posicao-se em segurar e use luvas de cozinha. | |
| O controlo de pressão avariado resultou na libertação de pressão. | Envie o aparecido a um Serviço de Assistência Técnica autorizada para reparação. | |
| Libertação continua de pressão da valvula flutuante. | A pressão inferior exceeda pressão de funciona ou a pressão inferior exceeda pressão de segurar. | Limpe minuciosamente a valvula limitadora de pressão, a valvula fluctuente e a tampa. Se continue a sair vapor da valvula fluctuante, envie o aparecido a um dos Serviços de Assistência Técnica autorizados mais proxies para inspeçao, reparação ou ajuste por pessoas autorizada. |
| Residuos na valvula flutuante. | a. Prima continuamente o botão de libertação de pressão para remove a pressão no interior da cuba. Pode demorar eles minutos às a pressão ser totalmente libertada. b. Deixe o aparecido arrefecer durante,leo menos,2 horas. c. Limpe eSEQE a valvula flutuante antes de reiniciar a cozedura. | |
| A valvula flutuante está presa. | a. Prima continuamente o botão de libertação de pressão para remove a pressão no interior da cuba. Pode demorar eles minutos às a pressão ser totalmente libertada. b. Deixe o aparecido arrefecer durante,pelo menos,2 horas. c. Limpe eSEQE a valvula flutuante antes de reiniciar a cozedura. | |
| Fuga de vapor da tampa. | O anel vedante não está corretemente instalado. | Retire o anel vedante, limpe-o e volta a instalá-lo na posicao correta. |
| O anel vedante está sujo. | Retire o anel vedante, limpe-o e volta a instalá-LO na posicao correta. | |
| O anel vedante está danificado ou a extremidade da cuba está danificada. | Envie o aparecido a um Servico de Assistência Técnica autorizada para reparação. | |
| Os alimentos não está cozinhados. | A proportão de ingredientes solidos/liquidos não é a correta. | Tente novamente, seguido com precisão as quantidades da receita. |
| Sem eletricidade da fonte de alimentação. | Verifique o Sistema elétrico da sua casa. | |
| E0presentado no ecrā digital. | O interruptor de pressão está avariado. | Envie o aparecido a um Servico de Assistência Técnica autorizada para reparação. |
| E1presentado no ecrā digital. | O sensor de temperatura está avariado. | Envie o aparecido a um Servico de Assistência Técnica autorizada para reparação. |
| E2presentado no ecrā digital. | A tampa não está corretemente posicionada para o seu programa de cozedura. Cada programa querou uma posão específica da tampa. | Verifique e ajuste a posão da tampa necessária para o seu programa de cozedura; consulta aabela de programas de cozedura na parte 6 deste manual. Reinicie o programa assimissque que a tampa estiver corretemente posicionada. Se o problema persistir, envie o aparecido a um Servico de Assistência Técnica aprovado para reparação. |
| الإستعمال | الإستعمال الحرفية | الإستعمال |
| الإستعمال الحرفية | الإستعمال الحرفية | الإستعمال |
| الإستعمال | الإستعمال | |
| الإستعمال | الإستعمال | |
| الإستعمال | الإستعمال | الإستعمال |
| الإستعمال | الإستعمال | |
| الإستعمال | الإستعمال | |
| الإستعمال | الإستعمال | الإستعمال |
| الإستعمال | الإستعمال | |
| الإستعمال | الإستعمال | |
| الإستعمال | الإستعمال | الإستعمال |
| الإستعمال | الإستUTION | |
| الإستUTION | الإستUTION | |
| الإستUTION | الإستUTION | |
| الإستعمال | الإستUTION | الإستUTION |
| الإستUTION | الإستUTION | |
| الإستUTION | الإستUTION | |
| الإستعمال | الإستUTION | الإستUTION |
| الإستUTION | الإستUTION | |
| الإستUTION | الإستUTION | |
| الإستعمال | الإستUTION | الإستUTION |
| ال,enGLISH | ال,enGLISH | |
| ال,enGLISH | ال,enGLISH | |
| ال,enGLISH | ال,enGLISH |
| diksek | diksek | uglal |
| diksek | diksek | uglal |
| diksek | uglal | |
| diksek | uglal | |
| diksek | uglal | |
| diksek | uglal | |
| diksek | uglal | |
| diksek | uglal | |
| diksek | uglal | |
| diksek | uglal | |
| diksek | uglal | |
jglj 53
. .41 y aJz Jaaas aabjauu wll guswpulucuullul
glll ceg g uolkoll .1 scc aBllcglgUgSallg (ajll) max aolsc ljg jglz yj c jglg g all g sgs (19) eogj g aagaaal jgl glaol lta gabll alg wgs yll plabll uigka gabue aal lssw aai joo jil gall al slay y. Jg 10000000000000000000000000000000000 Jull) Jusuill 2g jao plab uia g Ujig aIag aIa bI yall aeg oal . .20 .21 0 aeg 10000000000000000000 a1a 1.3 .43 1 Jall) aIayd aeIoll aylae 5oJol oJyO JgJzll JdoJbJoo .(22) baall uoo plao cui 4 jla 23 (23) # Jgul Juaa 5.5 .24 ygjgl jyjgl jyjgl jyjgl jyjgl jyjgl jyjgl jyjgl jyjgl HEI10 1 Jauuuiy jayjai 0.6 a 1 #wglgaoa 2b.3
jLss) jylog jol oIag aaleiaiaaiaeaiaaiaaiaaa Joo yjwll giae ejl .897 Lgla JlJI) IgIgLoIgIe Ieolg yswill gio aJolb Jolg yswill gio a a a 1000 g 1000g 1000g 1000g 1000g 1000g 1000g yulil gao zao lolo 105 aBll aeg yaa 3.85 ae aee alal llae 11 alal yuul uag JSLJI)lagaa jse Xaiai gaojia jzai.38g 37 Juaaogou jLsJl) aIbIy I .39 a 1 LgJg jyj 1000000000000000000000000000000000000000000 (44 1000000000000000000000000000000000000000000000000000000000 alall abi 23 .(10) jog jog jog aol abg yj 100 4iSka 1000000000000000000000000000000000000000000000000000 J 1 (1) \(\therefore \text{日} \leqslant \text{日} \leqslant 1\) (14) \(a = a + b + c + d + e + f + g + h + i + j + k + l + m + n + o + p + q + r + s + t + u + v + w + x + y + z + ab + cd + de + ef + g + h + i + j + k + l + m + n + o + p + q + r + s + t + u + v + w + x + y + z + ab + cd + de + f + g + h + i + j + k + l + m + n + o + p + q + r + s + t + u + v + w + x + y + z + ab + cd + de + f + g + h + i + j + k + l + m + n + o + p + q + r + s + t + u + v + w + x + y + z + ab + cd + de+ g s r a aal d aai pl aai 1a i jia b jy y jy jy jy jy jy jy jy jy jy jy jy jy jy jy jy jy jy jy jy jy jy jy jy jy jy .15 a ailll 1000 1000 1000 1000 1000 1000 pugll plao aabii.(16 gaggl Jw) 1bll jggl plao laaig j1j00g. (17 j00g0gill J500) 0g!log j0w log acll aiai w pluayy yuy Jill) gfo yolqilofo pdool plao afo 0g ofo 1ofo 1ofo (1) .12a
Joo 0o (w y aaggill Jss) lglge gll jlaaagoggll Jssy I ggs # jglulduwll 0.1 yjgl jgcll l 10000000000000000000000000000000 . jJy jaydolduuJgJyJyJyJyJyJyJyJyJyJyJyJy c.1234567890 JSSW) 15bllg gJg dLwI yJc aol sOg Jbllg JdAa JdAa Jbllg .(2g1jlaa# jblw yg yb jol lus ally lle gall eeg j kssal bllg juc: abgdo gj 1aill gai iiai jgai gai aai alg agai alg gai gai gai . Jall) jall Jd1o iLdlolg aillgl slgall gaoa 11jy. gauu al jall .3 jgljcljglj3 aalglg aell al 13 .4gogagaoiaaiaaiyglalggall (5) y .40 1 .41 y 42 1 . doxy .42 1 aJwE gJbAal alg waiall gSg aaalolg aRall:Iaaloll gsw Jsayd .  JlJlJlJl  jglaljzjdzjzjzj  aaa 30g a>gl cwl:Jllal lla g Cgll o  .114:JlllIa J.  aJySg y. gaii jaijai jai jai jai jai jai jai jai jai jai jai jai jai jai jai jai jai jai jai jai jai jai jai jai jai jai jai jai jai jai jai jai jai jai jai jai jai jai jai jai jai jai  ylll aolol al 0al 0al al 0al  yJyJyJyJyJyJyJy  oljlll j  aagaaalgeababaaalallaojgajgai jll  #  JzJzJzJzJz#
     LguyooI gIgIyoxoJSoa aIc aOgolgo yglgy ① A  jlaal yoo .9 alglnssbll j5lgl lalal y JgJy JgJyJyJyJyJyJyJyJyJyJyJy aJgfo 1o aiaaoal 2jaiuol ooo gO dolgy lduwol jlaal jbaaog y zaiol jiao jiaoyog aobjol cldaill AR j. 1. 1golgljSjLj 0 15.7 alululus uunuululg gallllcgld cnuol . gabllcag lssk. pltaailll laeaiae jy jaaai JcGm .glblll Jluu g logd y jSjg .jyallg jLwI .Jyblzll . iJoo 1000 1000 1000 1000 JzjI J 10 jgljgljgljgljgljgljgljgljgljgljglj g d aiaa iaoa oio jyoo jyai jiaai jia jkaai ab = ( 2a) ^2 - 1 jololaoo jydo alllllll yj yj jy jy jy jy jy jy jy jy daiaa ddoj yg lalwly gdlall g g. yuill gia a y Jl aIbIgIaIyIgIyIgIyIgIyIgIyIgIyIgIyIg JU auiy iog jiaag.bas douwus wuljblauwaiuall jzglzbspuw . 49 49 49 49 49 49 49 # Jl jiaai aiaai 4j 10n no yog ofo tao do puiu wos Lol eeg Juaa. gabll eeg no yjagl g jgdp aegy Gioi11 iis go plusuun aannn aol jie aab yabll a aal alal alal alal alal alal alal alal alal .(dalll lllg bgo ala a j) alba alzill Jgauu Jswll gia aoo oos jol jglzl plucw l j 1 j 105 t. lal 100 wll g yall alg dul aill j 15 joo joo . jglg lgsog gag gag gag gag gag gag gag gag gag gag gag gag gag gag gag gag gag gag gag gag gag gag gag gag gag gag gag gag gag gag gag gag gag gag gag gag gag gag gag gag gag gag gag gag gag gag gag gag gag gag g j 1 . 1 ?g 5i -j01 jk j4j p dss .5.5 Jgglj. # 1.12 10gally jzgl zjgl y aJy jy Jy Jy Jy Jy Jy Jy Jy Jy Jy Jy Jy aJyJyJyJyJyJyJyJyJyJyJyJyJy A L 1 jglg jglg jglg y. jglg lglg d jL j iue ci jil jie aai li gbi yj blln no 15s . . . . . . . . . . . . . . . . . . . . . . . . . . . . . . . . . . . . . . . . . . . . . . 9ybl 1 - j0J 5j0j0j0j0j0j0j0j0j0j0j0j0j0j0j0j0j0j0j0j0j0j0j0j0j0j0j0j0j0j0j0j0j0j0j0j0 jgo Jzdujdo. alboJoo laofo 10 aag aagaaagaaagaaagaaagaaagaaagaaagaaagaaagaaagaaagaaagaaagaaagaaagaaagaaagaaagaaagaaagaaagaaagaaagaaagaaagaaagaaagaaagaaagaaagaaagaaagaaagaaagaaagaaagaaagaaagaaagaaagaaagaaagaa . J 1 a j 1 j 1 . y Laiogll oia gab ic jolal ggl .laalldwlg aalall no ij glggrg pIaillluy lalj nlaall a g.(j)(j)(j)(j)(j)(j)(j)(j)(j)(j)(j)(j)(j)(j) a:laia 111 y aal y aaiy y, baiy g x aaii eog 1ofo gogg oogg oogg oogg oogg oogg oogg oogg jIyJy JyJyJyJyJyJyJyJyJyJyJy y 1 y 1 y 1 y 1 y 1 y 1 y jL glul glcd glcd uo glably jglajy aBllwgljLJLWgSswy: y jjlll yll l jn nn nnnn 2 g jg jg jg jg jg jg jg jg jg jg jg jg jg .8j8j8j8j80gabllc9gpaaiy9g j81c9g gpaui gj jogall yabll ddoocu w .jbs jyall lds gabll elcg pdo .0U 1 log .0 eog 1001 1001 1001 1001 1001 1001 aBbI aIg 8oJoo IabI gBa baa y. . alall y. alall y g jg jy gl a Jauu Jauu Jauu Jauu Jauu Jauu Jauu Jauu 1. 1. 1. 1. 1. 1. 1. 1. 1. 1. 1. 1. 1. 1. 1. 1. 1. 1. 1. 1. 1. 1. 1. 1. 1. aJ 1 J aJgJgJgJgJgJ gJgJgJgJgJgJgJgJgJgJgJgJgJgJgJgJgJgJgJgJgJgJgJgJgJgJgJgJgJgJgJgJgJgJgJgJgJgJgJgJg Jusu wu wulgio a uol lgl uu ofoa d. JzjLg . yabll 1 -nJ 5j 1j 4 . jol jol jol lio plool ool ool ool ool .2 joo (Jabll uL y) oolowl jno pluwrw waaas jyll l 0g 0g 0g 0g 0g 0g 0g 0g 0g 0g 0g 0g 0g 0g 0g 0g 0g 0g 0g 0g 0g 0g 0g aaii iiaaii g aaiy y dyaay ydgy ydo ydo ydo ay aegxwglblaoljnooal jgwlplzwiwy g 100000000000000000000000000000000000000 paIbaI gpaIaI aIyI yIyI yIyI yIyI yIyI yIyI yIyI yIyI aabaaal jblaool ngagag 1gls lgsiai d aabj jlaeall plauu w gdo 4Lwgljgllblall jbjll jn jglil Jlalbl Jglia jie jIJI JJIJIJIJIJ jaiy jaiy jao aaii ayigui jalb yjao ppl pIeauuN - 10 Jsu juspuu u5.3 d.o 0a aall joll jol jol l . Lalal pbal lal bala gog g bala ybal aI pabll gddgdlalldl lddcbdgdall ddd Lilabll aaii 4oioi y laoo jlaol iis Jauiau juc paai pblgjylo 0o yol auiu Jauauiu oao yjglilie jgl jgljll Jk g jg jgall jalal jdaal lalld jlaol jlll jll lal llal jlln no 15i jlln no uol jllu jlll jlll i jll aJy j. Jy Jy Jy Jy Jy Jy Jy Jy Jy Jy Jy Jy Jy Jy Jy Jy Jy 1 1 a a 1 g 1 g 1 g 1 g 1 g 1 g 1 g 1 g 1 g 1 g 1 g 1 g 1 g 1 g 1 g 1 g 1 g 1 g 1 g 1 g 1 g 1 g 1 g gaiyai jiljgl gai jiljagai jiljagai jiljagai jiljagai jiljagai jiljagai jiljagai jiljagai jiljagai jiljagai jiljagai jiljagai jiljagai jiljagai jiljagai jiljagai jiljagai jiljagai jiljagai jiljagai jilj gdi.iJlaolalwglnolal all no jj g ogyr jydo jksoa aalaaal aalaaal aalaaal aaiy gag plabll no elgill oia gab ic jidallyjiaosluuysus
jai jai jai jai jai jai jai jai jai jai jai jai jai jai jai jai jai jai jai jai jai jai jai jai jai jai jai jai jai jai jai jai jai jai jai jai jai jai jai jai jai jai jai jai jai jai jai jai jai jai jai ailll 1y jyj y jy jydiu baiaolwul
. 1JaiiIg I g Jg Jg Jg Jg Jg Jg Jg Jg Jg Jg Jg Jg Jg Jg Jg Jg Jg Jg Jg Jg Jg Jg Jg Jg Jg Jg Jg Jg Jg Jg Jg Jg Jg Jg Jg Jg Jg Jg Jg Jg Jg Jg Jg Jg Jg Jg Jg Jg Jg Jg J g Jgssal aabll gglg gao jgll li gglg . 100 .(u)log aullg 1gglg yjU dXoJl gOJL jgl 1gabu jll 0jllnnaa ?jloJy JgJyJyJyJyJyJyJyJyJyJyJyJyJyJyJyJyJyJyJyJyJyJyJyJyJyJyJyJyJyJyJyJyJyJyJy aalalalalalalalalalalalalalal sloil pduuW uao gog. aas jiall plauu w yaa o jaii Ia julooJoual all jol Jd L 10000000000000000000000000000000 :JJJUJLJUJLIO a 1 .12aJbBgllglll aolly sloj y JU 10g s13 s1s 1220j0glaog cug gauu jzauu p . loU
4. 210 204 203 202 7 285 IiWg g wgl gl 10e eogll kckl oaleo g jg tioaol lglgTurbo Cuisine !pL 1 Uu Uuuuull uuuuull uuuuull uuuuull uuuuull aolzolg abluljol jolg agbglg a aai iiaolg jaaai liqua gge uga aeg y 1120 600000000000THANKS FOR CHOOSING MOULINEX
Welcome to the world of fast & delicious cooking!
With Turbo Cuisine, we took up the challenge of reinventing the pot: Easier. Tastier. Just better! Designed with this guiding principle, Turbo Cuisine allows you to save time and cook homemade delicious meals in total simplicity and convenience. Thanks again for welcoming us to your kitchen. Now let's cook together! ENCONTENTS
Quick Start Guide in Images 4 Moulinex Recommends Safety First 215 All Parts of Your Product 223 Getting Familiar with the Control Panel 224 How To Use & Clean Guide 225 Technical Troubleshooting Guide 241 Moulinex International Limited Guarantee 285MOULINEX RECOMMENDS SAFETY FIRST
Safety is our number one priority. We design and manufacture our product with high safety and technology standards. However, as with any electric appliance there are some potential risks, we therefore invite you to exercise a degree of care and to adhere to the following instructions.SAFETY INSTRUCTIONS
Take the time to read all the following instructions carefully and save them for future reference. - Improper use of the appliance and its accessories may damage the appliance and cause injury. - The appliance cooks food under pressure. Incorrect use may cause risks of burns due to steam. - For your safety, this product conforms to all applicable standards and regulations (Low Voltage Directive, Electromagnetic Compatibility, Food Compliant Materials, Environment, ...). - The heat source necessary for cooking is included in the appliance.1. Where to use safely?
- Indoor use only. - This appliance is intended for domestic household use only. It is not intended to be used in the following applications, and the guarantee will not apply for: - staff kitchen areas in shops, offices and other working environments; -farm houses; - by clients in hotels, motels and other residential type environments; - bed and breakfast type environments. - Do not place the appliance in a heated oven or on a hot hob. Do not place the appliance close to an open flame or a flammable object. - Use on a flat and stable, heat resistant work surface, away from any water splashes.2. Who to use safely?
- This appliance is not intended for use by persons (including children) with reduced physical, sensory or mental capabilities, or lack of experience and knowledge, unless they have been given supervision or instruction concerning use of the appliance by a person responsible for their safety. - This appliance can be used by persons with reduced physical, sensory or mental capabilities or lack of experience and knowledge if they have been given supervision or instruction concerning use of the appliance in a safe way and if they understand the hazards involved. - This appliance shall not be used by children. Keep the appliance and its power cord out of reach of children. - Children shall not play with the appliance. - Children should be supervised to ensure that they do not play with the appliance.3. How to use safely - general usage?
- Do not use appliance for other than the intended purpose. - Do not use the appliance to fry food in oil. Only browning is allowed. - Do not use the pressure cooker in pressure mode for deep frying food. - When cooking doughy food, gently shake the cooker before opening the lid to avoid food ejection. - This appliance is not a steriliser. Do not use it to sterilise jars. - This appliance is not intended to be operated by means of an external timer or separate remote-control system. - To carry the appliance always use the two side handles on the housing of the appliance. Wear oven mitts if the appliance is hot. For more safety, make sure that the lid is locked before transporting the appliance. - The bottom of the cooking pot and the heating plate should be in direct contact. Remove any object or food residue located between the cooking pot and the heating plate, it could affect performance - Be aware that certain types of food, such as applesauce, cranberries, rhubarb, pearl barley, oatmeal or other cereals, split peas, noodles, or pasta can foam, froth and sputter, and clog the valves. Use caution when cooking these types of food and after use clean valves thoroughly. - Be aware that certain recipes which include milk can foam, froth, overflow and clog the valves. Use caution when cooking these recipes and after use clean valves thoroughly. - After cooking meat which has an outer layer of skin (such as ox tongue), which could swell with the effect of pressure, do not pierce the skin after cooking if it appears swollen: you could get burnt. Pierce it before cooking. - Do not use the appliance empty, without its cooking pot or without ingredients inside the cooking pot. This could cause serious damage to the appliance. - Do not use the appliance under pressure without adding water, which could cause serious damage to the appliance. - Do not fill up your appliance without its cooking pot. - Caution: do not spill liquid on the plug. - Do not heat the cooking pot with any other heat source than the heating plate of the appliance and do not use any other pot. Do not use the cooking pot with other appliances. - Use the cooking pot in the appliance ONLY. Do not use it to cook on stovetops, in the oven etc. - Use a plastic or wooden spoon to prevent any damage to the non-stick coating of the cooking pot. Do not cut food directly in the cooking pot. - Do not touch the valves, except while cleaning and maintaining the appliance in accordance with the instructions given. - Do not place any foreign objects in the valves and pressure release button. Do not replace the valve. - Check regularly the ducts in the valves allowing the escape of steam to ensure that they are not blocked. - Do not use a cloth or anything else between the lid and the housing to leave the lid ajar. This can permanently damage the sealing gasket. - Do not let the power cord hang over the edge of table or counter; or touch hot surfaces.4. How to use safely – before cooking?
- Before using your appliance, check that the float valve and the pressure limit valve are clean. - Before using your appliance, check that the sealing gasket has been correctly installed on the lid. - Make sure that the bottom of the cooking pot and the heating plate are always clean. Make sure that the central part of the heating plate is mobile. - Do not fill your appliance more than the MAX mark on the cooking pot. - Please follow the recommendations on the volume of food and water to avoid the risk of boiling over which can damage your appliance and cause injury. - Make sure that the appliance is properly closed before bringing it up to pressure.5. How to use safely - during cooking?
- Do not try to open the lid until the pressure has decreased sufficiently. Do not try to open the lid until the float valve is down. - Never force the appliance open. - During cooking and steam release at the end of cooking, the appliance releases heat and steam. Keep your face and hands away from the appliance to avoid burns. Do not touch the lid during cooking. - Do not move the appliance when it is under pressure. Use the handles when moving it and wear oven mitts, if necessary. Do not use the lid knob to lift the appliance. - Do not remove the cooking pot while the appliance is working. - In browning mode, be careful of risks of burns caused by spattering when you add food or ingredients into the hot cooking pot.6. How to use safely - after cooking?
- When you open the lid, always hold it by the lid knob. Position your arm parallel to the side handles. Boiling water could remain trapped between the sealing gasket and the lid and could cause burns. - Be careful also about the risk of burns from the steam coming out of the appliance when you open the lid. First open the lid very slightly to allow the steam to escape gently. - Do not touch hot parts of the appliance. After use, heating plate surface can remain hot for up to 2 hours. - Unplug from outlet when not in use and before cleaning. Allow to cool before putting on or taking off parts.7. How to use safely - cleaning?
- Wipe clean the bottom of the cooking pot and the heating plate after every use. - Do not immerse the appliance in water. - For cleaning your appliance, please refer to instructions for use. You can wash the cooking pot and the lid in soapy hot water, do not put them in the dishwasher. Clean the housing of the appliance using a damp cloth.8. What to do in case of damage?
- Only authorized person in Approved Service Centre can repair the product. - Do not operate any appliance with a damaged power cord or plug or after the appliance malfunctions or has been damaged in any manner. Return appliance to the nearest Approved Service Centre for examination, repair or adjustment. - If the power cord is damaged, it must be replaced by an Approved Service Centre in order to avoid a hazard. Do not replace the power cord supplied with other cords. - Do not damage the sealing gasket. If it is damaged, have it replaced in an Approved Service Centre. - Replace the sealing gasket every 2 years, or sooner if you see the sealing gasket is worn or in need of replacement. - Use only the appropriate spare parts for your model. This is particularly important for the sealing gasket and the cooking pot. - Use only spare parts sold in an Approved Service Centre. - The use of accessory attachments not recommended by the appliance manufacturer may cause injuries. - Do not use other cooking pots in the appliance in place of the provided cooking pot. Only replace the cooking pot with an original spare part designed to be used with this product. - In accordance with current regulations, before disposing of an appliance no longer needed, the appliance must be rendered inoperative (by unplugging it and cutting off the power cord).Environment protection first!
 ① Your appliance contains valuable materials which can be recovered or recycled. - Leave it at a local civic waste collection point.9. When does warranty apply?
- The warranty does not cover the abnormal wear and tear of the cooking pot. - Read these instructions for use carefully before using your appliance for the first time. Any use which does not conform to these instructions will absolve the manufacturer from any liability and void the warranty. - In case of commercial use, inappropriate use or failure to comply with the instructions, the manufacturer accepts no responsibility and the guarantee does not apply.  ALL PARTS OF YOUR PRODUCTGETTING FAMILIAR WITH THE CONTROL PANEL
STATUS MESSAGES
          Welcome message when appliance is turned on. Time display. In this example: 1 hour 30 minutes. Temperature display. In this example: 114 degrees Celsius. Indicates that the program has a default automatic temperature/ time setting. It cannot be modified. Indicates that temperature is rising during pre-heating phase. Indicates that the appliance is pre-heating. Indicates that the program is finished. Indicates that the appliance is in keep warm phase. Indicates that the program has been interrupted. Indicates that the appliance is in standby mode.HOW TO USE & CLEAN GUIDE
Feel free to refer to the figures indicated as (Fig.x) from Quick Start Guide part.BEFORE FIRST USE
1. Remove packaging
- Take your appliance out of its packaging and please take time to read the instruction manual before first use. - Remove promotional stickers (if any) from your appliance before first use.2. Open the lid
- To open the lid, take hold of the lid knob, turn anti-clockwise and lift the lid up (Fig.1 & 2). Note: When lifting the lid, it can happen that the cooking pot remains attached to the lid. It is normal and simply demonstrates a good hermeticity of the product. To avoid that the cooking pot falls heavily on the product when opening the lid, always open the lid gently. - Place your appliance on a flat surface. Remove all protective materials and accessories from the inside of the appliance (Fig.3).3. Clean all parts of the appliance
3a. Clean the lid, the cooking pot and the accessories
- Clean the lid, the cooking pot and the accessories with a soft sponge and soapy hot water (Fig.4). - Dry off the lid, the cooking pot and the accessories (Fig.5) - Do not use a scourer or abrasive sponge to clean the cooking pot as it could damage the non-stick coating in the cooking pot (Fig.40). - Do not immerse the appliance in water (Fig.41). - If you inadvertently immerse your appliance in water or spill water directly on the heating plate, take it to an Approved Service Centre for repair. - Do not put the lid and the cooking pot in the dishwasher (Fig.42). - Be aware, only the accessories: ladle, spatula, measuring cup and steam basket are dishwasher safe.3b. Clean the sealing gasket
- Remove the sealing gasket from the lid and clean it with a soft sponge and soapy hot water (Fig.7 & 8). - Dry it off thoroughly. - Place the sealing gasket over the sealing gasket rack and press it into place (Fig.9). Press down firmly to ensure there is no puckering and that the sealing gasket is snug behind the sealing gasket rack. - After placing the sealing gasket on the lid, if you open the lid too quickly, it can happen that the cooking pot remains attached to the lid (Fig.37 & 38). Wait few seconds for the cooking pot to free itself from the lid (Fig.39). Note: It is normal and simply demonstrates a good hermeticity of the product. To avoid that the cooking pot falls heavily on the product when opening the lid, always open the lid gently. WARNING: Never use your appliance without the sealing gasket (Fig.44)3c. Clean the valves
- To clean the pressure limit valve, remove the pressure limit valve from the pipe on top of the lid (Fig.10). Clean it with a soft sponge and soapy hot water (Fig.11). Once dry, take care that the duct of the pipe is clean before plugging the pressure limit valve back on the pipe on top of the lid (Fig.12). Ensure that the pressure limit valve is well put in place, it must be able to move up and down. - To clean the pressure limit valve cover, unscrew the limit valve cover from inside of the lid (Fig.13). Clean it with a soft sponge and soapy hot water (Fig.14). Once dry, take care that the duct of the pipe is clean before screwing the pressure limit valve cover back inside of the lid (Fig.15). - To clean the float valve, remove the float valve gasket from inside of the lid, flip the lid so that the float valve can come out of the lid (Fig.16). Clean the float valve gasket and the float valve with a soft sponge and soapy hot water (Fig.17). Once dry, insert the float valve back on the lid and put the float valve gasket back in place (Fig.18). Ensure that the float valve is well put in place, it must be able to move up and down.3d. Clean the housing of the appliance
- Clean the housing of the appliance using a damp cloth. - Do not immerse the appliance in water (Fig.41). - Wipe clean the heating plate using a dry cloth.INSTRUCTIONS FOR USE
1. Place ingredients in the cooking pot - Remove the cooking pot from the housing. - Put ingredients into the cooking pot. - Please note that the level of food and liquids should never exceed the max level marking on the cooking pot (Fig.19). - When cooking food ingredients which expand during cooking, such as dehydrated vegetables or rice, in pressure modes, do not fill the cooker to exceed more than half of its max level. 2. Place the cooking pot in the housing - Ensure the bottom of the cooking pot is clean and dry; and remove any food residue from the heating plate (Fig.20). - Place the cooking pot into the housing (Fig.21). - Never use your appliance without the cooking pot. 3. Close and lock the lid - Check that the sealing gasket is securely placed on the lid (Fig.43). - Take hold of the lid knob, place the lid on the appliance and turn it clockwise to lock it (Fig.22). 4. Attach the pressure limit valve - Properly place the pressure limit valve on the lid (Fig.23). Please note that the valve will remain somewhat loose, it is normal. 5. Switch on the appliance - Fully unwind the power cord and plug it into the mains (Fig.24). - The appliance makes a 'beep' sound, the screen flashes and displays HEH. 6. Select and launch a cooking program Each program has a default time and temperature and requires a specific lid position, please have a look at the cooking programs table: COOKING PROGRAMS TABLE| Cooking program icon | Cooking program name | Default cooking time | Adjustable time | Default temperature | Adjustable temperature | Default pressure | Delayed start from 10min to 12h | Keep warm up to 24h | Lid status | ||
| Lid closed and locked | Lid closed but not locked | Lid open | |||||||||
| Stew | 30min | from 1min to 2h | 114C | No | 70Kpa | Yes | Yes | ● | |||
| Soup | 12min | from 1min to 2h | 114C | No | 70Kpa | Yes | Yes | ● | |||
| Stir Fry | 20min | from 1min to 1h | 160C | Yes from 100C to 160C | No | No | No | ● | |||
| Steam | 10min | from 1min to 2h | 114C | No | 70Kpa | Yes | Yes | ● | |||
| Bake | 40min | from 1min to 2h | 160C | Yes from 100C to 160C | No | Yes | Yes | ● | |||
| Sous-vide / Slow-cook | 4h | from 30min to 12h | 85C | Yes from 55C to 95C | No | Yes | No | ● | ● | ||
| Rice | 8min | from 1min to 2h | 114C | No | 70Kpa | Yes | Yes | ● | |||
| Yogurt & Ferment | 8h | from 30min to 12h | 30C | Yes from 22C to 40C | No | No | No | ● | ● | ||
| Porridge | 15min | from 1min to 2h | 100C | No | No | Yes | Yes | ● | |||
| Adjustable Chef Mode | 30min | from 1min to 4h | 80C | Yes from 70C to 160C | No | No | Yes | ● | ● | ● | |
Stew program
- Place the ingredients in the cooking pot and completely close and lock the lid. - Turn the control panel knob to the right to reach Stew program. The screen displays the default cooking time. - Optional: Press and set the desired time by turning the control panel knob to the right (to increase time) or to the left (to decrease time). - Press to start the cooking program. - The appliance starts the pre-heating phase. The screen displays alternatively & HE RE and the pre-heating light indicator ① turns on. - When the pre-heating phase is completed, the appliance switches automatically to cooking phase. The screen displays the count down and the cooking in progress light indicator turns on. - During cooking process, pressure builds up in the appliance and pushes the float valve up. The under pressure light indicator turns on to notify that the lid cannot be opened without releasing the pressure first. - At the end of the count down, the appliance beeps and the screen displays End. - After a few seconds, the appliance will automatically switch to keep warm phase. The screen displays HDE and the keeping warm light indicator turns on. - Press for 3 seconds to stop the program at any time. Soup program
- Place the ingredients in the cooking pot and completely close and lock the lid. - Turn the control panel knob to the right to reach Soup program. The screen displays the default cooking time. - Optional: Press and set the desired time by turning the control panel knob to the right (to increase time) or to the left (to decrease time). - Press to start the cooking program. - The appliance starts the pre-heating phase. The screen displays alternatively & HERA and the pre-heating light indicator turns on. - When the pre-heating phase is completed, the appliance switches automatically to cooking phase. The screen displays the count down and the cooking in progress light indicator turns on. - During cooking process, pressure builds up in the appliance and pushes the float valve up. The under pressure light indicator turns on to notify that the lid cannot be opened without releasing the pressure first. - At the end of the count down, the appliance beeps and the screen displays End. - After a few seconds, the appliance will automatically switch to keep warm phase. The screen displays HDE and the keeping warm light indicator turns on. - Press for 3 seconds to stop the program at any time. Stir-Fry program
- Turn the control panel knob to the right to reach Stir-Fry program. The screen displays the default cooking time. - Optional: Press and set the desired time by turning the control panel knob to the right (to increase time) or to the left (to decrease time). - Optional: Press ① and set the desired temperature by turning the control panel knob to the right (to increase temperature) or to the left (to decrease temperature). - Press to start the cooking program. - The appliance starts the pre-heating phase. The screen displays alternatively & HEARE and the pre-heating light indicator turns on. - When the pre-heating phase is completed, the appliance switches automatically to cooking phase. The screen displays the count down and the cooking in progress light indicator turns on. - Place the ingredients in the cooking pot and keep the lid open to stir-fry. - At the end of the count down, the appliance beeps and the screen displays End. - After a few seconds, the appliance will automatically switch to standby mode. The screen displays - Press for 3 seconds to stop the program at any time. Steam program
- Place 150ml of water (3/4 cup) in the cooking pot, put your ingredients in the steam basket and place the steam basket on top of the cooking pot. Completely close and lock the lid. - Turn the control panel knob to the right to reach Steam program . The screen displays the default cooking time. - Optional: Press and set the desired time by turning the control panel knob to the right (to increase time) or to the left (to decrease time). - Press to start the cooking program. - The appliance starts the pre-heating phase. The screen displays alternatively & HERE and the pre-heating light indicator turns on. - When the pre-heating phase is completed, the appliance switches automatically to cooking phase. The screen displays the count down and the cooking in progress light indicator turns on. - During cooking process, pressure builds up in the appliance and pushes the float valve up. The under pressure light indicator turns on to notify that the lid cannot be opened without releasing the pressure first. - At the end of the count down, the appliance beeps and the screen displays End. - After a few seconds, the appliance will automatically switch to keep warm phase. The screen displays HOE and the keeping warm light indicator turns on. - Press for 3 seconds to stop the program at any time. Bake program
- Place the preparation in the cooking pot and close but don't lock the lid. - Turn the control panel knob to the right to reach Bake program. The screen displays the default cooking time. - Optional: Press and set the desired time by turning the control panel knob to the right (to increase time) or to the left (to decrease time). - Optional: Press l and set the desired temperature by turning the control panel knob to the right (to increase temperature) or to the left (to decrease temperature). - Press to start the cooking program. - The appliance starts the pre-heating phase. The screen displays alternatively & HEARE and the pre-heating light indicator turns on. - When the pre-heating phase is completed, the appliance switches automatically to cooking phase. The screen displays the count down and the cooking in progress light indicator turns on. - At the end of the count down, the appliance beeps and the screen displays End. - After a few seconds, the appliance will automatically switch to keep warm phase. The screen displays HOE and the keeping warm light indicator turns on. - Press for 3 seconds to stop the program at any time. Sous-vide / Slow-cook program
- TurnthecontrolpanelknobtotherighttoreachSous-vide/Slow-cook program . The screen displays the default cooking time. - Optional: Press and set the desired time by turning the control panel knob to the right (to increase time) or to the left (to decrease time). - Optional: Press ⑧ and set the desired temperature by turning the control panel knob to the right (to increase temperature) or to the left (to decrease temperature). - Press to start the cooking program. - The appliance starts the pre-heating phase. The screen displays alternatively & HEA and the pre-heating light indicator turns on. - When the pre-heating phase is completed, the appliance switches automatically to cooking phase. The screen displays the count down and the cooking in progress light indicator turns on. - At the end of the count down, the appliance beeps and the screen displays End. - After a few seconds, the appliance will automatically switch to standby mode. The screen displays = = = . - Press for 3 seconds to stop the program at any time. Rice program
Place the ingredients in the cooking pot and completely close and lock the lid. - Turn the control panel knob to the right to reach Rice program. The screen displays the default cooking time. - Optional: Press and set the desired time by turning the control panel knob to the right (to increase time) or to the left (to decrease time). - Press to start the cooking program. - The appliance starts the pre-heating phase. The screen displays alternatively & HEA and the pre-heating light indicator turns on. - During cooking process, pressure builds up in the appliance and pushes the float valve up. The under pressure light indicator turns on to notify that the lid cannot be opened without releasing the pressure first. - At the end of the count down, the appliance beeps and the screen displays End. After a few seconds, the appliance will automatically switch to keep warm phase. The screen displays HOE and the keeping warm light indicator turns on. - Press for 3 seconds to stop the program at any time. Yogurt & Ferment program
 can be used to make yogurt or raise bread/pastry dough. - When making yogurt, place the ingredients in the cooking pot and close the lid. - When raising dough, you can knead the dough directly in the cooking pot then place the cooking pot in the housing and close the lid. - Turn the control panel knob to the right to reach Yogurt & Ferment program. The screen displays the default cooking time. - Optional: Press and set the desired time by turning the control panel knob to the right (to increase time) or to the left (to decrease time). - Optional: Press and set the desired temperature by turning the control panel knob to the right (to increase temperature) or to the left (to decrease temperature). - Press ⑥ to start the cooking program. - The appliance starts the pre-heating phase. The screen displays alternatively & HERE and the pre-heating light indicator turns on. - When the pre-heating phase is completed, the appliance switches automatically to cooking phase. The screen displays the count down and the cooking in progress light indicator ⑥ turns on. - At the end of the count down, the appliance beeps and the screen displays End. - After a few seconds, the appliance will automatically switch to standby mode. The screen displays - Press for 3 seconds to stop the program at any time. Porridge program
- Place the ingredients in the cooking pot and completely close and lock the lid. - Turn the control panel knob to the right to reach Porridge program . The screen displays the default cooking time. - Optional: Press and set the desired time by turning the control panel knob to the right (to increase time) or to the left (to decrease time). - Press ⑥ to start the cooking program. - The appliance starts the pre-heating phase. The screen displays alternatively & HERE and the pre-heating light indicator turns on. - When the pre-heating phase is completed, the appliance switches automatically to cooking phase. The screen displays the count down and the cooking in progress light indicator turns on. - At the end of the count down, the appliance beeps and the screen displays End. - After a few seconds, the appliance will automatically switch to keep warm phase. The screen displays HOE and the keeping warm light indicator turns on. - Press for 3 seconds to stop the program at any time. Adjustable Chef mode
- Place the ingredients in the cooking pot and close the lid or not depending on your recipe. - Turn the control panel knob to the right to reach Adjustable Chef mode. The screen displays the default cooking time. - Optional: Press and set the desired time by turning the control panel knob to the right (to increase time) or to the left (to decrease time). - Optional: Press ⑥ and set the desired temperature by turning the control panel knob to the right (to increase temperature) or to the left (to decrease temperature). - Press ⑥ to start the cooking program. - The appliance starts the pre-heating phase. The screen displays alternatively & and the pre-heating light indicator turns on. - When the pre-heating phase is completed, the appliance switches automatically to cooking phase. The screen displays the count down and the cooking in progress light indicator 变 turns on. - At the end of the count down, the appliance beeps and the screen displays End. - After a few seconds, the appliance will automatically switch to standby mode. The screen displays - Press ⑥ for 3 seconds to stop the program at any time. * Suggestion for quickly reheating dishes: set temperature to >=95C and cook with lid closed but unlocked.7. Use the delayed start function
Delayed start can be useful to preset the appliance to start cooking later. - First select a program following the steps described above in part 6. - Before starting the selected program, press . The screen displays the default time for delayed start. - Set the desired time by turning the control panel knob to the right (to increase time) or to the left (to decrease time). - Press . The screen displays the delayed start count down. When preset time is elapsed, the appliance will start cooking automatically.8. Open the lid
- Do not attempt to open the lid if the float valve is up and if the under pressure light indicator is turned on. - The pressure can be release in 2 different ways at the end of the cooking: Natural release: At the end of the cooking or after stopping the program, the appliance will cool down by itself, and the pressure will release naturally. During natural release, food might overcook due to the remaining pressure in the pot. Use manual release to stop cooking process immediately. Manual release: Press continuously the pressure release button, on top of the lid. It will take a few seconds to a few minutes depending on the amount of food inside of the cooking pot (Fig.31). WARNING: Be careful of the hot steam coming out from the appliance. Keep your face and hands away from the steam output (Fig.45). - To open the lid, position your arm parallel to the side handles, take hold of the lid knob, turn anti-clockwise and lift the lid up (Fig.32 & 33). WARNING: Be careful of the hot steam coming out from the cooking pot.9. Unplug the appliance
- After usage, unplug the appliance and let it cool down for at least 2 hours before cleaning.10. Clean after use
- Clean your appliance after each use. - Before cleaning, let your appliance cool down for at least 2 hours. - For cleaning instructions, refer to part 3. Clean all parts of the appliance in BEFORE FIRST USE section.11. Maintenance tips
- To ensure the durability of the cooking pot time over time, do not cut food in it. - Use the provided accessories. Do not use any metallic utensil as it could damage the nonstick coating in the pot. - After usage, the sealing gasket may keep the smell of your dish. It is normal; silicone has little pores that open up when exposed to high temperature and close back once temperature drops. To eliminate the smell from the sealing gasket, you can: - Put the silicone ring in the dishwasher - Add 1 cup of vinegar, 1 cup of water and 1 lemon cut in large pieces into the cooking pot and launch a steam program for 2 minutes, then let the steam release naturally. - Change the sealing gasket every 2 years or earlier in case of damage. TECHNICAL TROUBLESHOOTING GUIDE| Problem | Possible reasons | Solutions |
| Unable to open lid | Unable to open because of pressure in the cooking pot. | Press continuously the pressure release button to remove the pressure inside of the cooking pot. It can take a few minutes until the pressure is fully released. |
| Pressure in the cooking pot is fully released but the float valve is stuck because it is too dirty and therefore unable to move down. | a. Be sure the pressure is totally released by letting the appliance cool down for at least 2 hours. b. Gently push the float valve down by inserting a skewer or a long object into the float valve opening. If this does not work, send the appliance to an Approved Service Centre. c. For next use, please clean and dry off the float valve thoroughly. | |
| Unable to close lid | The sealing gasket is not properly installed. | Install the sealing gasket properly. |
| The cooking pot contains hot ingredients generating steam. | Wait for the ingredients in the cooking pot to cool down before trying to close the lid again. | |
| The float valve is stuck because it is too dirty and therefore unable to move down. | a. Gently push the float valve down by inserting a skewer or a long object into the float valve opening. If this does not work, send the appliance to an Approved Service Centre. b. For next use, please clean and dry off the float valve thoroughly. | |
| Position and or direction at which the lid was closed is incorrect. | Close the lid in the correct direction according to the instruction manual. | |
| When opening the lid, the cooking pot remains attached to the lid. | The sealing gasket created a suction effect. | The cooking pot will free from the lid by itself. It is normal and simply demonstrates a good hermeticity of the product. To avoid that the cooking pot falls heavily on the product when opening the lid, always open the lid gently. |
| Intense release of pressure from the pressure limit valve. | The inner pressure exceeds working pressure, or the inner pressure exceeds the safety pressure. | Clean pressure limit valve, float valve and lid thoroughly. If float valve still has steam coming out, please return appliance to the nearest Approved Service Center for inspecting, repairing or adjusting by authorized person. |
| The pressure limit valve is in an incorrect position. | Carefully rotate/press the pressure limit valve to make it fall into place. Be careful of the hot steam. Position yourself safely and wear oven mitts. | |
| Faulty pressure control resulted in release of pressure. | Send the appliance to an Approved Service Centre for repair. | |
| Continuous pressure release from the float valve. | The inner pressure exceeds working pressure, or the inner pressure exceeds the safety pressure. | Clean pressure limit valve, float valve and lid thoroughly. If float valve still has steam coming out, please return appliance to the nearest Approved Service Center for inspecting, repairing or adjusting by authorized person. |
| Residue in the float valve. | a. Press continuously the pressure release button to remove the pressure inside of the cooking pot. It can take a few minutes until the pressure is fully released. b. Let the appliance cool down for at least 2 hours. c. Clean and dry off the float valve before restarting the cooking. | |
| The float valve is stuck. | a. Press continuously the pressure release button to remove the pressure inside of the cooking pot. It can take a few minutes until the pressure is fully released. b. Let the appliance cool down for at least 2 hours. c. Clean and dry off the float valve before restarting the cooking. |
| Problem | Possible reasons | Solutions |
| Steam leakage from lid. | The sealing gasket is not properly installed. | Remove the sealing gasket, clean it and reinstall it in the correct position. |
| The sealing gasket is dirty. | Remove the sealing gasket, clean it and reinstall it in the correct position. | |
| The sealing gasket is damaged, or the edge of the cooking pot is damaged. | Send the appliance to an Approved Service Centre for repair. | |
| Food is uncooked | Solid/liquid ingredients ratio is incorrect. | Try again by following precisely the quantities of the recipe. |
| No electricity from the power supply. | Check your home electric circuit. | |
| E0 displayed on the digital screen. | Pressure switch is faulty. | Send the appliance to an Approved Service Centre for repair. |
| E1 displayed on the digital screen. | The temperature sensor is faulty. | Send the appliance to an Approved Service Centre for repair. |
| E2 displayed on the digital screen. | The lid is not properly positioned for your cooking program. Each program requires a specific lid position. | Check and adjust the lid position required by your cooking program, refer to the cooking programs table in part 6 of this manual. Restart your program once the lid is correctly positioned. If the issue remains, send the appliance to an Approved Service Center for repair. |
ΣΑΣ EYXAPIΣTOYME ΝΟΥ ΕΠΑΕΓΕΤΗ MΟULINEX
KaIomegaopioate oToV KoOo Tou yPnyopou kai vOoiou i
Me to Turbo Cuisine ma vα δiaσaon σto μαγερεμα:Πο εύκολα.Πο νόστιμα.Απλα καλυτερα! To Turbo Cuisine o i k o v p o a va o u p unepoxo anitik yeuuata, aTka kai aveta. Zaç euxapiotoué nolu nou μac xapioate μα θéon σtnv kouziva αac. AÇ μαγερέψουμε μαζι!NEPIEXOMENA
O8nyo5 ynpoyopns Ekkivnons oEikovcs H Moulinex sivei npotepaioTnta otyn aaoaia 246 Ola ta eapntmuata tou npoiovtoC 255 EoiKeiwn Tov nivaka eEyxou 256 O8nyos xpnans kai kathetaapiooou 257 O8nyoc avtuetwionc texvikuv npoBnmuatuw 276 v M o u l i n e x 285HMOULINEX△INEI INPOTEPAIOTHTA ΣTHN AΣΦAΛEIA
H aαφáλεια εívα n πρωτη προτεραίοτητα μας. Σχεδιαζουμε και κατασκεναζουμε τα προίντα μας με ψηλά πρότια ααφαλείας και τεχνολογίας. Ωοτόσο, σε καθε έλεκτρίκη συκεύνιπαρχουν πιθανοί κίνδυοι, επομένως συνιούμεν λαμβάνετε ἀπόψη και να τηρείτε τις παρακάτω δόηγίς.O△HΓΕΣ AΣΦΑΛΕΙΑΣ
Aiaβaote πpooεktiká oλeç tic πapakatw odnyieç kai aioθηkeuoté tic yi μeλλovtikn avafopá.
H akataaannn xphon tnc ouokeu nca twv aptnuatwv tncaevctai va npokaaleei n otn ouokenu kai tpaumatio. H ouokun maeyipuei faaynto uno pieon. H eofoaalev n xpon evexetau va npokaleoi kivduvo ykaouatoc, loyw tou atou. TnV aOafoia oac, auto to pioov oumuopovetau e 0a ta 1oxuovta npotua kai olouc touc 1oxuovtec Kavoviaouc (Onyie, yia tn xanl n taon, Tnv nEeKtpouayntikn oubetaotnta, ta uiknou evxovta oE taoh m Ta TpOphi, To nepiBaalov, k. H anapaiaTn nyn thepuotnta yia to ayepua npilaaabavetai otoukeun.1. Nóu xρησιμοποιείαι με ασφάλεια;
Xpno n ovo e owtepiko wpo. Autn n ouokean ppoopiEeai aikaleotikayia oikiakn Xpnoi. dEv npoopiciEa yia xpnoi otic akolouepiepiTTwoei,oi onoe sDev kALuTTovta anto Tny eyyunon: - Σε κουζίνες προσωπικόύ καταστημάτων, σε γραφεία ἡ αλλους χώρους εργασίας. -Σεαγροκτήματα. -AIo v o o x i v, o n aAawv kataaUmuatwv. -Σεξενωνες ἡ αλλα παρόμοιου τύπου καταλύματα. Mny tootheite tn ouokeun oekauTo foOpvo n kautn eotia.Mnu tootheite tn ouokeun kovta oE loya n eukkta avtikemuva. Xpouoioiote n ouokun npw oE epiE8n,otaoepn kai avthetaikn otn themuotnta eia aio pno np onou mIoepieva kxtivaxe i vepo.2. Anó noiov χρησιμοποileitα με ασφάλεια;
Autn n ouokevn dev npoipctai yia xpon ano atoua (oumupeilalmaibavoumevwwv twv paiidwv) me nepiopioevesc oomegakecs, aoonnpiakec n diavontikec ikavotntes, oute ano atoqa tonov dev exouv tnv avaykaia eumteipia n tic anapaitntec ywoeis, ektoc av bpikovtai untnv Eπiβεηn evlaka n exouv lαβei odnyies yia tn xpon tnc ouokevn c ano atofo uentuvo yia tn v aphialeia touc. H ouokeun mtopei va xnpoumonoiinthetai anto atoua meuieuwuec oomegaatikec, aoontnpiakc n diavontikec ikavotntec n me eAeeiyn emteipiaoc kai yywons, eoov eTlbetaenovtai n exouv laoi odnyies yia tnu aofaanxpn on Tns ouokeun kai katavoouv touc utapxovtes kivduvouc. Autn n ouokevun dev mnpei va xpnouoioi0e i aTo 1aia. Duaoote tn ouokevn kai to nEktpiko Kaawio pakia aTIOAia. - Ta παιδία δεν θα πρέπειν α παίζουν με τη συοκεύη. - Ta παιδία θα πρέπειν αβρίσκονταιυτό επίβλεψη, προκεμένουν αδιασφαλίζεταιότι δενθαχρησιοποήουντη σουκεύνηςπαίχνίδι.3. Aσφαλής χρήση - γενική χρήση
XpnoiouoieTe Tn oukeun Movo yia touc oKOIOUc yia touc onoiouc npoopiEa. MnV xPnoImuOnIOeIte Tn ouokcun yia va tnyavioTe foaynto e λádi. Movto ynoiMo EITpéπεtai. Mnv xnpouoioite tn xutpa tauxntac wc pfiteca otnlambdaeons. - Otav μαγειρεύετε φαγntα με ζύμη, ανακίνησε ελαφρα tn χύτρα προτόν αυούετε to καπάκι, Ϝετε to φαγntó vα μην πεαχτεί από to εσωτεριό του σκεύους. Houkeun dev evai aiooTeipwntc. Mny xpoaioiote tno oukeun yia aiooTeipwon baoiv. H ouokevun dev npoopicietaia xhon e eewtepiokoxpvosikotn n e exwpiot o uotma tnlambdaeipioou. - Iα τη μεταφορα της Σωοκεύς, χρησιμοποίεITE πάντοτε τις δύο πλευρικές λαβές στο περίβλημα της Σωοκεύς. Na φοράτε προστateutika γάντα κατα της θερμότητας, εάνη σωοκεύη εἶναι καυτή. Iα περισότερη ασφάλεια, βεβαιωθείτε πως το καπάκι εἶναι ασφάλιομένο πριν μεταφέρετε τη σωοκεύή. To katoepoc tou mayeipiko okeouc kai tnc Θepaivóevns paeac vα βpiokovta oáeon eiah. Aphiéote onioobnnote avikeiEvno uTolεmuα φayntou μnpei va βpioketai metau tou maeyipiko okeouc kai tnc Θepaivóevnc πakac, kaθως ενδέχειαν αεπηρεόσει τυν απόδοη AeTe UToHn TcOpioueVoi TuOnIphiayntou, OToC o ToupEc mNoau, ta Kpavmupei, To paBevti, To KpIaPi TepLe, n Bpuun kai aAla dnmuTpiakα, n faoBa, Ta Vouvtac n ta Zmuapika Evdexetai va oxmaatioovu apho Ka i duaaidec, ta onia ektoeEvovtaipaoosovtac tic Baalibcs. Awte idiaitepn npooyn kat to maayiepeua autuw twv tuWv phayntou kai kathetaicTe oxlaotikac tic baJIbEs c tao tn xphon. AβETe UTOIpyn TWC Opiouc oovayc TPO NEPiAβavouv yαλ Evδexetai vα ΩημaTIOUv aΦpó, kα φuσαλIDc kα vα UTερχEIAIOUv φapooovTAC TIC βaβIDc. ΔwOTE iδiaitepn πoOxN KATA TO μayéipεμα autuv Twv ouvtayw Kα KaθαπεTE OxOλaOTIKA TIG βaβIDc META ΑT η χρησ. - Meta to ayepεμα κρεατος Με εξωτερική στρώηδερματος (όπως η μοσχαρίσια γλώσα), που ενδεχεταινα δίογκωθει λόγω της πίεος, μήν τρυπάτe to δερμα μετα to ayepεμα εὰν φαίνεται δίογκωμένο: ὄρχει κύνυος εγκαύματος, Tρυπότε to πρίν to ayepεμα. Mny xnpouoie Te oukeun aedia, xwpic to ayepiko okeuoc n wpiic uikao ot oewteipko tou ayepikoou kekouc. Mtopei va npoknthei oopn ontoukeun. Mnyxnpouoioite tn oukeun uno piocn av dev exte npooeoi vepo, yati kati tetoio mtopooue va npokaloei oobapn Oop a oTo okeuoc. Mny yeiuiTe tn ouokeun xwpi to uayelipko okevoC. - Ppoox: uyn xuvetu ypa o to fics. Mny 0epaive to ayepikok okeuoc me aaln nyn thepoTntac npav ts 0epauvoevnc Pakac Tns ouokueuckai mnu xpooiotoiieite aaloo ayepikockeuoc. Mnu xpooiotoiieite to ayepikoc okeuoc meaalec oukevec. Xpnooioite to ayepiko okeuoc MONO onn ouokueun. Mny to xnpouoioite OE eoties, foypvo k.lpi. Xpnoiouite Paaotikn n elivn koutala yia v a anotptepetetuxovbetaonvtvavtkoalntikneipwont tou mayepikou okeouc, Mny kobete faynto evtoc tou mayepikou okeouc. Mny ayyizete Tc Baaibides, Me Eaipen kaTov KaOapioo Touc Kai katn EkTeAeon Epyaiovv ouvtnponcs nS ouokevnc ouwova e Tc odnyieC. Mny tooTheTeite Xeva avtikemueva otic i c kau oTo koupi aneAevOepwoonC nEonC, Mny avtikaoiotaTe tN baiBia. ELeyTe TAKtKa Touc aywouc twv i w Tou eipenov tv aeeuthetaon atou, yia vai diofoe ot i dev ivai ppaevoi. Mny tootheite navi n otidnnote aaloo avaeoa oTo kaTaki kai oTo pepiBna yia va meivei To kaTaki mioavoiXto. Mnpei va npoknthei moviun oTo vTeyavotoiniko saKTulio. Mny afnvete To nAekptko KaIwio va Kpemuai ao tnv akpn Tou TpaTeCiou n Tou Pnykou n va AyyiKei KAutec EpiphiaveieC.4. Aσφαλής χρήση - πριν το μαγείρεμα
Pniv xnpoiouoie Tn ouokeun, eEyxi Tnv Kaopotnta Tns BaaBia8ac me PAnTnpa Kai Tns BaaBia8ac aphialeia TIEONS. - PivxpnouoioeTe Tn ouakeun, eleyeTe Tn ootn tooetnoTou steyavonoiuTKO u 6aKtUaiou OTO KAIIKI. Béβαiωθείτe πως το κατω μέρος του μαγειρικόν σκεύους καὶ θερμαίνόμενη πλάκα εἰναι πάντα καθαρὰ. Béβαiωθείτε ὄτι το κεντρίκο μέρος τής θερμαίνόμενης πλάκας μπορείνα κινηθεί. Mny yemiciet en oovkeun npaw aanto tv evdelta MAX OTO maayepikokkouc. Akoaloutheite tic ouotaoei avaopikα μe tov oyko foayntou kai vepou yia tnv anofoyn uTepxieianc loyw bpaou, nou mtopei va npokaleoi βλaβn otn ooukeun kai Tpaumatioouc. Bεβαιωθείτε πως η συοκεύη ἐχει κλείσει σωτόα προτόνξεκινόσει η λειτουργία τής χύτρας.5. Aσφαλής χρήση - κατά το μαγείρεμα
Mny npooaOnoeTe va avoiEeTe to kaTaki npotou n piEon meiwOei eIapKwCs. Mny npooaOnoeTe va avoiEeTe to kaTaki mexpi va katébei n i eπλwntnpa. Mny aokite note duvaun yia va avoigete tn ouokean. Kata to mayeipema kai tnv aneIeuOepwon atoukata to teao tsou maeyiepuato, n oukeun aenleuvthetavei 0epoTnta kai ato. KpatnoTe to npooTo kai ta xepia oac makpiia anto tn oukeun yia va aiofouyete ta ekykaumata.Mnv ayyizte to kaia kata to mayeipema. Mny metakiveite tn ouokeun, ooo eiva uno nieon. Xpooutoieite tic lae c kata tn metakivnon kai fopate npootatetukia yavia, evv eiva anapaitnto. Mny xpooutoieite tn 0To kaTaki yia va onkwote tn ouokeun. Mny aphiapeite to ayepiko oekuoc, oo laitoupyei n ouokun. - Σηλειουργία ψησιματος,να εἰοτε διαίτερα προδεκτικόγια τυχόν εγκαύματα από ἐκτοξεύσεις, ὄταν προθέτετε φαγητό ἡνλίκα στό το καυτό μαγειρίκό σκεύς.6. Aσφαλής χρήση - μετά το μαγείρεμα
- Otav avoiyete to kaiaki, va to kpatate πavtoe ano tn λαβn tou kaiaoi. Totoθeite to xepi oac πapalna otic πλeupikec λβeç. Evexetai va exei πayidetie avμεσa otov oteyavontiok δaktuio kai to kaiaβpaotó vepo ka va πpokaéoi eykaumata. - Ppooεξε, επiαης, tov κίνδυνο εγκαματων από tov ατμο που βγαίνει από ηισακεύη ὄταν ανοίγετε το καπακι. Πρώτα, ανοίξε πολύ λίγο το καπακι για να απελεύθερωθεί σμαλά o ατμός. Mnv ayyicet ta kauta eapntmuata tnc ouokveunc. H epiaveia tnc thepaivovevns nakac mtopei va npaeivei cotn ews kai 2 wpc ts aio tn xpnon. - Anouvdebéte to kaλwδio ano tny πpiα,otav δev xρησμοποιείαι n συκεύν και πριν ano tov καθαριομo tnc. Αφησe τη συκεύν vα κριωσει προτου totoθετησεte n αφαρεσεte εξαρτήματα.7. Aσφαλής χρήση - καθαρισμός
- ΣΚΟΥΠΙΟΤΕ οτο κατω μέρος του μαγερικόν σκεύους κατης θερμαίνόμενης πλάκας μετά από καθε χρήση. Mnu BuiiEte Tn ouokevn oe vepo. Tov kaOapiouo ts ouokeun, ovatpeEeTe otig odnyies xponc. Mnpoeite va luveTe to ayepiko Okeuoc kai to kaiaki me zetn oanouvada. Mny ta a t e 0to nluvtnpio niatwv. Katheta te npiipalma Tns oukeunc me eva vwno pavi.8. Tl npenei va kavete oe nepintwon n s
- Móvo εξουσιδοθημένο ατομο σε εξουσιδοθημένο κέντρο σέρβις μπορείνα επισκεύαει το προίν. Mynpnoiouite ooiadnnote oukeun, evexu apei to nlektipko kawdio n to fic, eav n ouokeundelta toupei ootan eav exei unootei onoiadnntote aen. Eiotpeyte tn ouakeun oto pnoieoepo egouoidotnevo Kevtpo oepic yia eleyxo, eiokeun npuon. Eav to nλεκτρίο καλωδio exi unoσte i βλαβn, πρέπειν αντικataσταθει από ενα εξουσοδotημένο Kévτρο σερβic για tnν αποφυγntuχόν κινδύνου. Mνν αντικαθισάτε to nλεκτρίο καλωδio που παρεχεται με to προίον, με αλλα καλωδia. MnV πpokαλειτε βλαβη στον Στεγανοποιntικό δακτύλιο.Εαν εχειυσοτεί βλαβη,αντικαταοτήσε το σε ενα εξουσιδοτημένο κεντρο σερβις. - Avtikαθιοτάτε tov οτέγανοποιntικό δακτύλιο κάθε 2 - χρόνια ἡνωρίερα, εὰν παρατηρήσετε πως ἐχει φθαρεί - η χρείαζεται avtikatáσταση. Xpnoiopoioite movo ta katalnnla avtalaktka yia to movteo oac. Eiva iiaitepa onmavtiko yi ta nlambdaouyia tou steyavointikoudeltatuaioukai Tou mayeipkooukeouc. Xpnoiopoioite ovo avtalakktiaouwovtai oE Eouoosotnevo kevtpo ePic. H xphon eapntmuatwv nou dev ouviotwtaa tov kataokueao tnc ooukeuuc evexetai va npokaleoet paumuioouc. MnV xpoiooiei e aiaa maeyepikoc kekun otoukeun, mOvo to maayepikok okeuoc tonu npexetau mE to poiov. Avtkaoiotate to maayepikok okeuoc mOvo mauθevtiko avtaalaktiKO, oxediaouevo yia xpno n e to ouykckipévo poiov. - Σύμφωνα με τους ὄχύοντες κανονισμους, προτου απορρίψετε μαι συσκεύν, η συσκεύν θα πρέπειν αχρηστεύται (αποσυδέοντάς τη και κόβοντας το λεκτριός καλώδιο).PpOeXei n npoostaoia tou nepiBαλovtoc!
 H ouokeun oac πeipexi ploutua uikα, ta onioa μtopouv vαξavaxpnoiμoioηoouv n va αvakukλωθouv. Afnote tn oe kantoio 8nmuotiko oumieo oulloync aonobntwv tns npioxns oas.9. Nóte loxuéI n éyyúnən;
H eyyunon 8ev kaiuttei aphioukni oopao tou uayelipiko ouoc. - iαβαοτε προσεκτικα τις Μθηγίες χρήσος προτουν χρησιμοποιόσετε τη συοκεύν για πρώτη φόρα. Σε περίπτωπ χρήσος που δεν συμμοφώνειαι με αυτές τις Μθηγίες, o κατασκεύναστής δεν φέρει καμία ευθύνη καὶ ἐγγύŋον ακυρώνειαι. - Ε περίπτωση εμπορικής χρόης, ακαταλληλης χρόης ἡ μη συμμόρφωσης με τις οδηγίες, o κατασκευαστής δεν αποδέχεται καμία ευθύνη καλ δενισχύει η εγγύŋοι.  OANA EAPTHMATA TOY IPOIONTOEEOIKEIQ2H ME TON NINAKA EAEIXOY
MHNYMATA KATAZTAZH
          Mnuva kaawooipiaotoc otv n oukeun eevpyoioiteita. Euφáviən xpvou. Σ e autó to παρδειμα: 1 υρα 30 λεπτά. Euφáviω Θερμokpασiας, Σε autο to παράδειγμα: 114 βαθμoi Kελσίου. YtOBeikVUeI OTo TpOpyaMa EeYi Ma TPOeTIeYEvn PUsOuon autouatns eepoKpaiaoc/xypvou. Aevmupeivayive tpoTOnioin. YtObeikvoe ot n eepuokpaoia auXavetai kata tn faoon npoTepuavoc. YtOSeIKVUeI oTn OoKEuN pOeepMaivetai. YtOSeIeKvUeI oTo TIpOpyaMa oAoKLnpWOnke. YtObeikvui ot n oukeun Bioketai otn faoi diatnpno, 0eepoKpaiaic. YtOSeIkvUeI oTIO npOpypaia diaKoTnke. YIOSEIKVUEI OIT N OVAKEUN Bpioketai OE LEITOUPyia ovauovns.O△HFOZXPHZEKAKIAKAOAPIMOY
AvatpeTe otic ekovc nou uno6ekvovtai wC (Eik.x) oToV osnyo ynpnyopnc EKKivnonc.IPIN ANO THN INPOTXPH2H
1.Aphiepooukeuaia Aphiapeote tn oukeun ano tn oukeuaia kai diaaote tic odnyiec xnpnnc npiv tn xpnoiortnoe Tia npwtn opa. - Aφαρεσε τα διαφημιοτικα autoKóλλητα (éav unáρχουν) από τη συοκεύν πριν τη χρησιμοτοίσετε γι αρωτη φόρά. 2. Avolyma tou kantakloi - Iα vα ανοίξετo καπάκι, kραπήσετη λαβή του καπακίου, περιστέψετα φριστέρούτροφα και σηκώτετο καπάκι (Eik.1 και 2). Σημειωη: Otav Σηκώνετe to καπάι, to μαγεριός ΣKEύος ΣΕδέχεταιν παραμείνει συνδεδεμένοστο καπάι. Eival φυσιλογίος και αποδείκυει τήν καλή στέγανότητα του προίντος. Για τήν αποφύγη πτώς του μαγεριός ΣKEύους ΣΟ τρο προίν κατά το ἀνοιγμα του καπακίου, ανοίγετε πάντα το καπάί προσεκτικά. ToTOnoTeTn OuOKeun oE mia Eπiπeδn EπiΦaVEIA. AΦaIpeOT eλa Ta npOoiTeutikα Ulikα kai ta EApntμata αIoTo eoWTEpiko Tns OUOKeunc (Eik.3). 3. Kaθαρισμός σλων των εξαρτημάτων τής Συοκεύς 3a. Kaθαρισμός tou καπακίου, tou μαγειρικόν σκεύους και των εξαρτηματων - Kaθαpiοτε to kaπάι, to μαγερικό ΕΚΕύος και τα εξαρτήματα με ενα μαλακό σφουγγάρι και ζεσή σαπουνάδα (Eik.4). - Σεγνώσετο καπάκι, το μαγεριρό σκεύος και τα εξαρτήματα (Eik.5) Mny xnpoiopoieite oupa n tpaux ofoovyyapia tov kaOapioTou maeyipkooukevouc,kaohc mtopei va otheipei Tnv avtikoAanTikn enioTpwon ToU maeyipkooukevouc (Eik.40). MnuBouOiEteTn ouokevn ovepO(Eik.41). Eav i ka tao o c tn ouokueun oe vepo n piEte vepo πavw otn 0epuaivovemn paka, eiokeuaoTe tn ouokueun oEv a Egouoiodotnevo kevtpo oepic. Mny tototheite to kaiaki kai to ayeipiko okeuooc oTo u t pio i t v (Eik.42). AβεTE UTOψη ΘI MóV O T A PαKAtW Eλαptnμata πλevovTασ Επλuvtnpio πIATwv: KOUTaλ, OTaToula, δoOμεTpikn KoɪnKa I Kaλθι aTμou.3β. Kaθαρισμός του στέγανοπιοικόν δακτυλίου
Aphiéote tov oTeyavontoiNTko dakTuio ano to kaTakkai kαθapiote tov eva aalakó ofouyyapi kai Zeotnσaouváδa (Eik.7 kai 8). - Σεγνωθετον σχολαστικα. ToTOnoTeTTOvOteTOV OTeyavOTIOINTKO DaKTUIO TAVW Otn BaoTou KAI NIEOTE TOV MEXPI VA EΦapuOeI OTN ΘeON Tou (Eik.9).PiTE ToV OTeyavOTIOINTKO DaKTUIO Yepa, Wote V A BeBaiwOeITE PWC, DSV UAnpXouv AVoMoIOOpPfEc KAI TWC ExE IΦapuOeI OWTa OTNV UNOdoxn tou. Afou toothetaetnoe tov oteyavonointiko daKTulio 0to kaia, eav aoiEte to kaia ki nolu ynpyopa, to ayepikok okevo c vdeXeTai va npaemeive ouvdebeveo 0to kaia (Eik.37 kai 38). Nepieve t e pik a deutepole ta ia va aneuevthetai to ayepikoc okevo aio to kaia (Eik.39). Σημειωη: Eivai φυσιλογίκο και αποδεικωει τήν καλή Μτέγανότητα του προίντος. Για τήν αποφύγή πτώς του μαγειρικόν σεύους τότηροίν κατά το ἀνογμα του καπακίου, ἀνοίγετε πάντα το καπάκι προσεκτικά.PPOEIODOIHSH: Mny xpnouoite note t n ouokevn wpi tov oteyavonoiintko daKTuAio (Eik.44)
3y. Kaθαρισμός των βαλβίδων
Tα Tov Kαθαρισό της βαλβίδας ασφαλείας πίεος, αφαμέστε τή βαλβίδα ασφαλείας πίεος από Tov σωλήνα στο πάνω μέρος του κατακίου (Eik.10). Kαθαρίσε τήν μέ ενα μαλακό σφουγώρι κα ζετή σαπουνάδα (Eik.11). Otav στέγνωσει, βεβαιωθείετο τότο εωτεριό του ωλήνα εύλι καθαρό προτου συνδέσετε τή βαλβίδα ασφαλείας πίεος στον σωλήνα στο πάνω μέρος του καπακίου (Eik.12). Beβαιωθείε τὴς βαλβίδα ασφαλείας πίεος εύλι ωστά τόποθετημένη. Θα πρέπειν α κυείαι ελεύθερα προς τὰ πάνω και προς τὰ κατω. - Γα tov καθαρισμο tou καλύματος της βαλβίδας αφαλείας πίεοις, ξεβιδώτε to καλύμα της βαλβίδας στό τουτερικό τμήα tou καπακίου (Eik.13). καθαρίοτε to με ενα μαλακό σφουγαρία και ζεοῦσι Απούναδα (Eik.14). Otav στέγνωει, βεβαιωθείε τότο το εωτερικό tou ωλήνα εῖαι καθαρό προτου βιδώετε to καλύμα της βαλβίδας αφαλείας πίεοις στό του εωτερικό τμήα tou καπακίου (Eik.15). - Γαν καθαρίσετη βαλβίδα με πλωτήρα, αφαμέοτε τον δακτύλιοτης βαλβίδας απότο εοωτερικό τμήμα του καπακίου και αναποδόγυρίσε το καπάκι ωτενα μιπορείνη βαλβίδα με πλωτήραν αβγει απότο το καπάκι (Eik.16). Καθαρίσετον δακτύλιοτης βαλβίδας με πλωτήρα και τη βαλβίδα με ενα μαλάκο σφουγώρίς και ζεσήσαπουνάδα (Eik.17). Šταν στέγνωσει, τοῦθετήσετη βαλβίδα με πλωτήρα στο καπάκι και τοῦθετήσετη Θθέση του τον δακτύλιοτης βαλβίδας (Eik.18). Βεβαιωθείτε πως η βαλβίδα με πλωτήρα εἶναι σωτά τοῦθετημένη. Θα πρέπειν ακυεῖαι ἐλέύθερα προς τα πάνω και προς τα κάτω. 35. Kaθαριομός του περβλήματος της συοκεύς Kαθαρίσε το περιβλημα της συοκεύνός εύναιντο παύνι. MnuBvOiEteTn ouokevn oEvpe (Eik.41). - ΣΚοιπίσε τη Θερμαινόμενη πλάκα μέ ενα στεγνό παύ.O△HΓIΕΣ XPHΞHΣ
1. Tonoθεπηοτων uλικύν στο μαγερικό σκεύος AphiéoTe to mayeipiko okeuoc ano to npiβa. ToTioeTeTaUaIkaOToMayeIpiKoKeUoc. - Σημειώτε ὄτι οπίπεδο φαγητού και γυρό δεν πρεπει ποτένα περβαίνει τη Μέγιστη ενδεξήσο τοῦ μαγερικό σκεύος (Eik.19). - Otav xpnoiopoite OE λeitoupyie πieoN uikα tou exouv tyn taon va φouokwovuov otn δiapkeia tou μayepεμatoc, onwc anoξnpaéva λaxaviKa n puζ, mnu yεmuεte to okeuoc πapanaw αnto tu mió tnç μéyiotnc χwpntikotntac tou. 2. Tonotheonoumuayelipkooukouocto npepiBma Bεβαιωθείτε πως το κατω μέρος του μαγειρικόν σκεύους εῖαι καθαρό και στεγνό και αφαμεστε τυχόν έπολείματα φαγητού από τη οερμαινόμενη πλάκα (Eικ.20). ToOnoTeTnOte To mayeipiko okeuoc oTo nepiBna (Eik.21). MnV xnpoiouieite nToe tn ouokevun xwpiC to aayepiko okeuoc. 3. Kλεισμο καλ αφάλιση του καπακίου - Eλεγξε οτι o έτεγανοποιntικός δακτύλιος ἐχει τοῦθετηθείσωτα στο καπάκι (Eik.43). Kpntote tn tou katakiou, tooetne to kataok otn ouakeun kai nepiotpeyto deiootpoa yia va to aphialioe (Eik.22). 4. Σύνδεοι της βαλβίδας ασφαλείας πίεος ToTOnoTeTnOaTnBαλβiδααφαλεiαπεoNcSto KaTaki (Eik.23).AβeTe unóψη oti n Bαλβiδαθα πapαεivεLiyo xalapn, εivai fuoioloyikó. 5. Evépyooinon tns ouokéunc - ετιλίξε τέλείως to ηλεκτρίκο καλώδιο και σουνδέοτε to στην πρίζα (Eικ.24). H ouokevun o kavei evav xapakntpiotiko nxo, nooyn o aovn oaoobnoei kai o ephiaviotei n vdsiegn HIEIO. 6. Eπλογή και εκκίνηση εύς προγαματος μαγειρεματος Kαθε πρόγραμα ἐχει εναν προεπιλεγμένοχρόν και θερμοκρασία και αντιοιχει σε μια σριμένη θέοη του καπακιό. Δείτε τον πίνακα των προγαμάτων μαγειρεματος;INAKA PPOPAMMAT N MATEIPEMATO
Σημειων: Kaτα to μαγείρεμα, μποpei vα παρατηρόσετε μια μκρή διαρρό ατμου από to καπάκι, συγκεριμένα από τη βαλβίδα ασφαλείας πίεος. Eivai φύσιολογικό και συμβαίνει ὄταν αυξάνεται η πίεοη.| Eulerstrasse der Universität des Vorstands, 1.000-2.000 m | Eulerstrasse der Universität des Vorstands, 1.000-2.000 m | Eulerstrasse der Universität des Vorstands, 1.000-2.000 m | Eulerstrasse der Universität des Vorstands, 1.000-2.000 m | Eulerstrasse der Universität des Vorstands, 1.000-2.000 m | EulerStrasse der Universität des Vorstands, 1.000-2.000 m | EulerStrasse der Universität des Vorstands, 1.000-2.000 m | EulerStrasse der Universität des Vorstands, 1.000-2.000 m | EulerStrasse der Universität des Vorstands, 1.000-2.000 m | EulerStrasse der Universität DESU, 1.000-2.000 m | EulerStrasse der Universität DESU, 1.000-2.000 m | EulerStrasse der Universität DESU, 1.000-2.000 m |
| 30 | 40 | 50 | 60 | 70 | 80 | 90 | 100 | 110 | 120 | 130 | 140 |
| Kaufpreisanteil | Kaufpreisanteil | Kaufpreisanteil | Kaufpreisanteil | Kaufpreisanteil | Kaufpreisanteil | Kaufpreisanteil | Kaufpreisanteil | Kaufpreisanteil | Kaufpreisanteil | Kaufpreisanteil | Kaufpreisanteil |
| 10 | 10 | 10 | 10 | 10 | 10 | 10 | 10 | 10 | 10 | 10 | 10 |
| 15 | 15 | 15 | 15 | 15 | 15 | 15 | 15 | 15 | 15 | 15 | 15 |
| 20 | 20 | 20 | 20 | 20 | 20 | 20 | 20 | 20 | 20 | 20 | 20 |
| 25 | 25 | 25 | 25 | 25 | 25 | 25 | 25 | 25 | 25 | 25 | 25 |
| 30 | 30 | 30 | 30 | 30 | 30 | 30 | 30 | 30 | 30 | 30 | 30 |
| 35 | 35 | 35 | 35 | 35 | 35 | 35 | 35 | 35 | 35 | 35 | 35 |
| 40 | 40 | 40 | 40 | 40 | 40 | 40 | 40 | 40 | 40 | 40 | 40 |
| 45 | 45 | 45 | 45 | 45 | 45 | 45 | 45 | 45 | 45 | 45 | 45 |
| 50 | 50 | 50 | 50 | 50 | 50 | 50 | 50 | 50 | 50 | 50 | 50 |
| 55 | 55 | 55 | 55 | 55 | 55 | 55 | 55 | 55 | 55 | 55 | 55 |
| 60 | 60 | 60 | 60 | 60 | 60 | 60 | 60 | 60 | 60 | 60 | 60 |
| 65 | 65 | 65 | 65 | 65 | 65 | 65 | 65 | 65 | 65 | 65 | 65 |
Φ Πρόγραμα αργού μαγειρέματος
ToTOnoTeTnOte ta uLkα OTO μayeipiko okeuoc, kLeioTe teLeiwc Kaia ophiaiote to kaNaki. - Περιστρέψετον διακόπητου πίνακα ελέγχου προς τα δεξία γιανα επιλέξετετο πρόγραμα αργύ μαγειρεματος . Στην oθόνη εμφάνεζεται o προεπιλέγμένος χρονος μαγειρεματος. - PpOaIepTeK: PAnToe To kai opioTe tov eTou mnto xpoVo TEPiOtpEoVtac tov dAokntn Tou nivaka ELeyxou npoc ta (yia auXon Tou Xpovou) n pOc Ta apoiTepa (yia meiowon Tou xpovou). - PntnoTe to yia va xekivnoei to npoypaumua ayepaatoC. H ouokevn Eekvaei tn faon npothepuavoc. Tnv ofoyn ephiaviovtae vaaiaoi evdeltaic Kau HEAE KA n evdeltaiktikn luxvia tnc npoepmuavoc avaBcI. Molis oloknpwEi n faoon ppoEpuvoc, n ouokevn eTaaivei autouata otn faoon mayepmuato. Tnv oovn ephiizetai n avtioptpnoh metponkai n evdeiktikn luxvia yia to mayepma oe ExiIg n avaBcI. KaTAtndeltakaiaotou mapeipaeato, dnnioupyitea tieon stn ouokevun kai n 8albiδa me pwnpaa vceai npoc ta PAVW. H evdeiktikn luxvia ia to okeuoc uno pieon wavbei Wc EIOI0Inon nWCS TO KAIIAKI DEV MIOpei va avoilepi potou aneueepwtheta npieon. - Στο τέλος τής αντίστροφής μέτρηός, η συοκεύν καVEL ευαν χαρακτηριοτικό ἡχο και στήν οθόνη εμφαυξεται ένδεξη [End]. -Metα απο λiγα δειτερόλεπτα, η συσκεύη μεταβαίνει αυτόματα στη φάση διατήρονς θερμοκρασίας. Στην oθόνη εμφανίζειαι ένδειξη ὃθε και η ενδεικική λυχία διατήρονς της θερμοκρασίας ἀναβει. - Παπθοτε to Ⓞ για 3 δευτερόλεπτα για να σταματήσετε to πρόγραμμα ανα πάσα στιγμή. PpOpaMa Oounac
ToTOnoTeTnOte ta uAikocToaayepiko okevoC, kEioTe teAeiwoC ka aOphiaiote to kaTakl. - Περιοτρέψετον διακόπητου πίνακα ελέγχου προς τα δεξία γιανα επιλέξετε to πρόγρμασούπας . Στην Θθόνη εμφανίζεται o προεπιλέγμένος χρονος μαγερεματός. -Προαμετικά: Παπησε το ② και σρίσε τον επιθυμητό χρονο περιστέφοντας τον διακόπτηου πίνακα ελέγχου προς τα δεξία (για αύξησηου τοῦ χρούου) ἡ προς τα αρισερά (για μειώηου του χρούου). - Παπόσε to ⑥ γιανξεκινησει to πρόγραμμα μαγειρέματος. H ouokevun EekivaI tn faon npothepuavoc. Tny oOvN ephiaviocovtai evaiaoio evdeltaic KAI HEAE KAI n evdeltaikTKI NuxviaTnC npohepuavoc aVaei. Molc oloknpw0i n fao npothepuovn, n oukeun eTaeiv aotouata ot n faon mayepmuatoc. Tnv oovn ephiavzetai n avioptpno n etpnon kai n evdeiktkn luxvia yia to mayepma oE ExiIg aVbetai. KaTn diakaoia tou maeyepaotc, dnioupyeitai nieon otn ouokun kai n 8aIbda aE pntpaaivei npoc ta navw. H evdekikn luxvia yia to okeuoc uno tieon avaeu w c iDOnioin on nwc to kaKtki dev mnpei va aovxi npotou aneuvepwoei nieon. - Στο τέλος της αὐτίαροφής μέτρησς, n συοκεύν κάνει ευλα φαρακτηριστό ἡκο και στήν oθόνη εμφαύνιζεται η ενδεῖξη [End]. -Metα αnto liya δeutepolεπτa, n σuokéun μεtaβaiveu autóμata σtn Φαση διαπρονς θερμokpαoiac. Σtnv oθovn εμφαviεται η ενδειξη [Hoe] kai Ψνδεικτικλuxvia διαπρονnc tnc Θερμokpαoiac [w] αναβει. - Παποτε to ⑤ για 3 δευτερόλεπτα για να σταματησετε to πρόγραμμα ανα πάσα στιγμή. Póvyραμα Stir-Fry
- Περιορεψετον διακόπητου πίνακα ελέγχου προς τα δεξία για να επιλέξετετο πρόγραμα Stir-Fry . Στην oθόνη εμφάνιζεταιο προεπιλέγμένος χρόνος μαγερέματος. - PpOaIepiKa: PAnToe To kai opiTe tov EtiuumTo xPovo nepiotpEoVtac tov diaKoTn Tou nivaka eEyxou npoc ta (yia auGnon Tou xPovou) n pOc ta apiotepa (yia mEiwon Tou xPovou). -Празауета: Патноте to ① kai opioTe tvy επιθυμηntη θερμοκρασία περιορέφοντας tov διακόπτη tov πινακα ελέγχου προς τα δεξια (για αύξηση της θερμοκρασίας) ἡ προς τα αριστερά (για μείωση της θερμοκρασίας). - Παπόσε το ⑤ γιανξεκίνησει το πρόγραμμα Μαγειρεματος. H ouokeuñξekivaɪtn Φaʊn πpOθερμavɔnç. Σην oθóvn εμφαviΩovtai evλλαξοι εvδεiEεiC [KαI HER] KαI n εvδεiKτικn λuxvia tns πpOθερμavɔnç ɑvβεɪ. Molc oloknpw0ei n faon npothepuavoc, n ouokun eTaaivei autouata otn faon mayeipepaotc. Tnv oovn ephiavi etai n avioptpoqn metpnon kai n evdeltaiktikn luxvia yia to mayeipema OE ExiIg n avaBcl. - TOnoTheTnOte ta uAikα oTo μayeIpiKo Okeuoc kai αΦnoTe to KaTakia vOaixTo yia va Kavete stir-fry. - Στο τέλος της αντίστροφής μέτρησς, n συοκεύνη καVELι εναν χαρακτηρισικό ἡχο καὶ στήν σθόνη εμφαύνεζεται η ενδεῖξη [End]. - Meta απο λίγα δευτερόλεπτα, η συσκεύνι μεταβαίνει αυτόματαστη λειτουρία αναμονής. Στην οθόνη εμφαίζεται η ενδειξη - Παποτε to ⑤ για 3 δευτερόλεπτα για να σταματησετε to πρόγραμμα ανα πάσα στιγμή. Póγραμα ατμού
ToTOnoTeTnOte 150 ml vepou (3/4 TnC KoUtnac) OTO mayEipiko okeuoc, toToTeTnote ta uAikoc oTo kAlaOi aTuou KAI TO kALaOi aTuou navw oTo mayEipiko OKeUoc. KLeioTe TEeIomega To KAATAKai aOphiAIOTEto. - Περιοτρέψετον διακόπητου πίνακα ελέγχου προς τα δεξία για νεπιλέξετετο πρόγραμα ατμου. Στην oθόνη εμφαviζεται 0 προεπιλέγμένος χρόνος μαγειρεματος. - Pinoapetiká: PlatnoTE to kai opioTE tov eTou mnto xpovo pepiotpéfovtac tov diakontn tou nivaKa eEyxou npoc ta dEla (yia auEnon tou xpvou) n npoc ta apiotepa (yia meiowon tou xpvou). - έπησε το ⊙ γιαν αξεκινήσει το πρόγραμμα μαγειρέματος. H ouakeun fekivaei tn faon npoepmuavons. Tnv oovn ephiaviocovtaevalaaleoi evdeieic Kai HEAEKai n evdeltaiktkn luxvia tnc npoepmuavons avaBcI. Molc oloknpwEi n faoon npoEpuvoc, n ouokun eataivei autouata otn faon mayepmuato. Tnv oovn ephiizeta n avtioptpnoh metpnon kai n evdeltaiktikn lauxvia yia to maayepma oE EeAixn avaBcI. KaTaNdeltaikaoia tou mayepaotc, dnnioupyetai nieon stn ouokevun kai n balbiδa e pwnp aavebaivei npoc ta navw. H evdeiktikn luxvia yia to okevooc uno nion avaei wC EIOIOINON TWC TO KAATAK DEV MTOPEI VA OAOE I POTOU aneuethetaei n nieon. Στο τέλος της αντίστροφής μέτρηός, η συοκεύν καVEL ευαν χαρακτηριοτικό ἡχο και στην Θθόνη μεφαυζεται ένδεξή [End]. -Metα αnto liya δeutepolεπta, n ouokeun μεtαβaiveu autouata otn φaon δiatnpnong θερμokpaoiaç. Σtnv oθovη εμφaviεται n évδεξη HcKai n εvδειktikn λuxvia δiatnpnong tnc θερμokpaoiaç αváβει. - NaTHoTe to 已 yia 3 SeUTePoIeTnTa yia va OtaaTnoTe to PpOypaumauva nao stiyu. Póγραμα Ψηοιματος
ToOnoTeTnOte ta uLkα TPOEeTe NPOeToIaOeI OTO Mayeipiko OKeUoc KAI KLeiote, aAa μNv aOaiaoeTe to KaTakl. - Περιστρέψετον διακόπητου πίνακα ελέγχου προς τα δεξία γιανεπιλέξετετο πρόγραμμα ψησιματος. Στην oθόνη εμφάνιζεται σροεπιλέγμένος χρόνος μαγειρεματος. - Pinoapetiká: PlatnoTE to ⑤ kai opioTE tov επιθυμntó xρovo περιορέφοντας tov διακόπητου πίνακα ελέγχου προς τα δεξία (yia αύξησηου xρούου) η πος τα αρισερά (yia μείωσηου xρούου). - PpOaIepTeiKaTneTo Kai opiTe Tny EeIthuunTh Θερμokpaia περιotpéφovtac Tov δiakóπtn Tou nivakα ελέγxou πoC ta δεξia (yia αúξηon tnc Θερμokpaiaoc) n poc ta apioTeP (yia μεiωn tnc Θερμokpaiaoc). - Παπότε το ⊙ γιαν αξεκίνησει το πρόγραμμα μαγειρέματος. H ouakeun fekivaei tn faon npoepmuavoc. Tnv oovn ephiaviocovtaevaalaooi evdeieic Kau HEAEKai n evdeltaiktkn luxvia tnc npoepmuavoc avaβeI. Molc oloknpwEi n faoon npoEpuvoc, n ouokevn eTaaivei autouata otn faoon mayepmuato. Tnv oovn ephiizeta n avtioptpoh metponkai n evdiktikn luxvia yia to mayepma oE EeLign avbetai. - Στο τέλος της αντίστροφής μέτρηός, η συοκεύν καVEL ευαν χαρακτηριοτικό ἡχο και στήν οθόνη μεφαυξεται ένδεξή [End]. -Metα απο λiγα δειτερόλεπτα, η συσκεύη μεταβαίνει αυτοματα στη φάση διατήρησς θερμοκρασίας. Στην oθόνη εμφανίζειαι ἡνδεξη ὅπα η ενδεικτική λυχία διατήρησς της θερμοκρασίας ὅπα ανάβει. - Παποτε to ⑥ για 3 δευτερόλεπτα για να σταματήσετε to πρόγραμμα ανα πασα στιγμή. Póγραμα Sous-vide/αργού μαγειρεματος
- Iepiotpeyte tov dakottn tov nivaKa eayxou npoc ta deia yia va eilEeTe to npoypauma Sous-vide/apyou mayepmuatoc. Tnv o6vn eamaviCetai o poeiileymuvoc xpoovc mayepmuatoC. - Pinoapietiká: Nahtóte to kai opioTe tov επιθuμntó xpóvo πεpiotpéφovtac tov δiakóπtn tou πivaka ελέγxou πoç ta δεξia (yia αúξηon tou xpóvou) n πoç ta αpiotepa (yia μεiωon tou xpóvou). -Працета: Патноу to ⑥ кai opioTe tvy επιθυμηnt Θερμοκρασία περιστέφοντας tov διακόπτη tov πινακα ελέγχου προς τα δεξία (για αύξηση της Θερμοκρασίας) ἡ προς τα αριστερά (για μείωηn της Θερμοκρασίας). - Πατήσε το ⊙ γιανξεκίνησει πόργαμμα μαγειρέματος. H ouokevn Eekiva t n faon npoepmuavoc. Tny oovn ephiaviocvtai evaalaoi evdeltaic Kau HERK aN evdeltaikTKI luxvia tnc pnoepmuavoc avabci. Molis oloknpwEi n fao n ppoepmuovn, n ouokevn eataivei autouata otn fao n ayepaatoc. Tnv oovn ephiizetau n avtioptpno n etpnon kai n evdeiktikn luxvia yia to ayepma oE EeAixn avbetai. - Στο τέλος της αὐτίστροφής μέτρησας, η συοκεύνη καVELι εναν χαρακτηριστιός καὶ στήν οθόνη εμφανίζεαι η ενδεῖξη [Erid]. -Metα απο λιγα δευτερόλεπτα, n συοκεύνη μεταβαίνει αυτόματαστηλειουργία αυαμονής. Στην Θθόνη εμφαίνειδιη ένεδείξη = = = - Παποτε to ⑤ για 3 δευτερόλεπτα για να σταματήσετε to πρόγραμμα ανα πάσα στιγμή. Pnpoypauma npotc
ToTOnoTeTnOte ta uIka oTo mayelpiKo OKeUoc, KLeiote TeLewc Ka aooaiaote to kaTakl. - Περιστρέψετον διακόπητου πίνακα ελέγχου πος τα δεξία γιανα επιλέξετετο πρόγραμμα πόρις . Στην σθόνη εμφανίζεται o προεπιλέγμεύνος χρόνος μαγειρέματος. - Pinoapetika: Patnote to kai opioTe tov eTou mnto xpovo nepiopéfovtac tov diaokontn tou nivaka eLyxou npoc ta dEia (yia uynon tou xpvou) npoc ta apiotepa (yia meiowon tou xpvou). - Παπίσετο ( ⊙) γιαν αλεκίνησει το πρόγραμμα μαγειρεματος, Houkeun Eekvalei tn faon npothepuavong. TnV oToyn euaovicovta evaalaoi Evseieic KAI HEAE KAI n EvdeiktiKn Luxvi Tns npoepuavons avaBEL. Molc ookpwoei n faon npothepuovn, n ouokun eataivei autouata otn faoon mayepmuato. Tnv oovn ephiizetai n avioptpoh mertpon kai n evdiktkn luxvia yia to maeyipeua oE EeAig avaBcl. - Στο τέλος της αντίαροφής μέτρησός, η συοκεύμι κάνει εύαν χαρακτηριοτικό ἡχο καὶ στην οθόνη μεφανίζεται ένδειξη [Erid]. - Metα απο λίγα δευτερόλεπτα, η σουκεν μεταβαίνει αυτόματα ση Φασιδιαπρόπος θερμοκρασίας, Στην οθόνη εμφανίζεια ένδειξι ΧΟΕΚΑ Μανεδεικήλυχία διαπρόπος της θερμοκρασίας (Ω) αναβει. - Παπότε to ⊙ για 3 δευτέρολεπτα για vα σταματήσετε to πρόγραμα ανά πασα στιγμή. PpOypaua puIou
TOnoTeiote ta uikα oTo μayeiipiko okevoç, kεioTe teλeiwc Kαofoaiote to kaiaki. - Περιοτρέψετον διακόπητου πίνακα ελέγχου προς τα δεξία για να επιλέξετετο πρόγραμα ρύζιου . Στην oθόνη εμφάνίεταιο προεπιλέγμένος χρόνος μαγερέματος. -Пра�етikа: Патногут o kai opioTe tov eriuumTo xpoVo πepiotpefovtac tov diakontn tou nivaka eleyxou npoc ta δxiα (yia auxon Tou xpovou) n npoc ta apiotepa (yia meiowon Tou xpovou). - Παπότε to ⑤ γιαν αξεκινησει to πρόγραμμα μαγειρέματος. H ouokevn Eekiva t n faon npothepuavoc. Tnv ofov n eufovtai evaalaoi evdeltaic Kau HcK aN evektikn Luyvia tnc npoepmuovc @ avaei. Kata tn diadikaoia tou mayeipepaotc, dnmuopyetai niocn otoukeun kai n i a me t p a avebaivei npoc ta pavw. H evdekikn luxvia yia to okevoos uno nieon avaeu wcs eldooinon nwc to kaakl dev mtopeiv avoiei npotou aneuevepwoei n niocn. - Στο τέλος της αντίστροφής μέτρησας, η συοκεύνη κάνει εναν χαρακτηριοτιό ἡχο καὶ στήνοθόνη εμφαύνειδαίηη ἡνδεξήν [End. -Metα αnto liya δeutepolεπta, n ouokéun μεtαβaiveu autómuata σtn φασn diatηροις θερμokpαoiac. Σtnv oθovn εμφaviεται n éνδεiξη [H0] kai n ενδεικικήλuxviα diatηροιnc tnc θερμokpαoiac [w] avβει. - Πατήσε to ⑤ για 3 δευτέρολεπτα για να σταματήσετο πρόγραμμα ανα πάσα στιγμή. Póγραμα γιαουρτιού και ζμωματος
To npoypa ma yiaouptoukai umuatoc mnpoeivaxpnoiotnEi yia tnv npaaekun yiaouptou n cmu nsc wmuu/soaiaatac. - Iα va παρασεύσετη γιαύρι, τοῦτησε τα ζλικα στο μαγερικό Κεύος και λείσετο το καπάλ. Tia va npaaokevaoetc uun, nnpoeite va zmuwoete tn umn meo aTO mayeipko okevooc kai, katoniv, va totoeetnoete To mayeipko okevooc oTo nepiBnaKai vKa KLeioete to kaTakiyia va Eekivnoete tn diykwon. - Περιστρέψετον διακόπητου πίνακα ελέγχου προς τα δεξία για συ επιλέξετε το πρόγραμμα γιαύρτιου καιζμωματος Στην σθόνη εμφανίζεται σροεπιλέγμένος χρόνος μαγερεματος. - Pinoapetiká: Patnote to kai opioTe tov eiloumuTo xpoVo pepiotpéfovtac tov biakontn tou nivaKa eLeyou npoc ta dEla (yia auEnon tou xpvou) n poc ta apiotepa (yia meiwon tou xpvou). - Pioaipetik: PatnoTe to ① kai opiTe tnv eToumuTn thepuokpaoia nepiotpefovtac tov diakoTn tou nivaKa eLeyxou npoc ta dexi (yua uon tnC thepokpaiaç) npoc ta apiotepa (yia meiwn tnC thepokpaiaç). - Παπησετο ( )γιανξεκινύσει το πρόγραμμα μαγειρεματος. H ouakeun Eekivaen Tn faon npoepmuavoc. 2tnv oovn ephiaviovau evaalaoi Evdeieic Kai HEAE KAI n Evdeltaiktikn Luxvia tns npoepmuavoc avaBcI. Molis oloknpwei n faon npoepmuovnc, n ouokeun metbaiveu autouata otn faon maayiepemuatc. Tnv oovn ephiavizetai n aviotpoqn metponkai n evdeiktikn luxvia ia to maayiepemae Exiqni avaBcl. - Στο τέλος τής αὐτίστροφής μέτρησς, η συακεύν κάνει εύαν χαρακτηριστός καὶ στήν οθόνη εμφαῖζεαι η εδειξη [E. n.] - Metα απο λίγα δευτέρολεπτα, η συσκεύν μεταβαίνει αυτόματα στηλειουργία αναμόνις, Στην οθόνη εμφαυίζεια η ενδειξη. - Παπότε to ⑤ για 3 δευτερόλεπτα για να σταματήσετε to πρόγραμα ανα πάσα στίγμή. Puθμιζόμενηλειτουργίασεφ
ToTOnoTeIntOteuAIAKoTOmuayelpiKOKEUOCkAIavALoyaMe tn ouvtayn, EIIAEEe eAVoKLeioTe to KaTakl. - Περιστρέψετον διακόπητου πίνακα ελέγχου προς τα δεξία γιαν επιλέξετε τη ρυθμιζόμενη λειούργία σεφ . Στην Θθόνη εμφαιζεται o προεπιλέγμενος χρόνος μαγειρέματος. - PpOApETiKa: PAtnote To KAI Opiote Tov EIToumTo xPoV OeipotpeoovtacTovdeltaKoTTnTou IVaKa ELeyxou npoc ta deGia (ya uEnon Tou xpvou) n poc ta apioTepa (ya meiwon Tou xpvou). - PpOaIepTeK: PAtnoteTo Kai opioTe Tny Eπθuμntη Θερμokpaia πeipotpeovtac tov δiakontn tov πivakα ελéγxou poc ta δξla (yia αuδηon tnc Θερμokpaiaç) n poc ta apiotepa (yia μεiωon tnc Θερμokpaiaç).PAtnoteTo ⑥ yia vaξekvnói to Ppoypma μayepμatoc. H ouokeu n Eekiva t n faon npoepmuavoc. Tny oovn eauovtai evaalaoi evdeieic KAI HEAE KAI N Evdeiktkn luxvia nC npoepmuavoc avaβe i. Molc ooknpoWei n faon npoepmuovcn, n ouokun eTaiae i autouata otn faon mayepmuato. Tnv oovn ephiavietai n avioptpnon metpnon kai n evdeltaiktkn luxvia yia to mayepma oE ExiIg n avaBc - Στο τέλος της αντίστροφής μέτρησας, n συοκεύμαν κάνει εναν χαρακτηρισικό ἡχο καὶ στήν oθόνη εμφαύνιζεται n ενδεῖξη [End]. -Metα αnto λiγa δεντερολεπια, η συσκεύη μεταβαίνει αυτόματαστη λειουργία αναμούνις, Στην Θθόνιν εμφανιζειαι η ενδεξη - Παποτε to ② για 3 δευτερόλεπτα για να σταματησετε to πρόγραμμα ανα πάσα στιγμή. * Προταση για γρήγορο Κεσταμα γευμάτων: σρίσε τη Θερμοκρασία στους >=95°C και μαγειρέψετε με το καπάκι κλειότό, χωρίς να εἰναι ασφαλισμένο.7. XpnoTnC eitoupyiaC kOuotepnpuevnc Evapns
H kaθuotpερημενn εναρξη σας δινει τη δυνατότητα ρύθμιος της συοκεύns, υωτe το μαγείρεμα να ξεκινήσει αργότερα. - Eπιλέξτε πρωτα ενα πρόγραμα ακολουθώντας τα βήματα που περιγράφονται παραπάνω, στην παράγραφο 6. - Pniv ano tnv Ekkivnon tou eilayevou npoypaumato, nataote to. 2tnv ofoyn eufavctai o npoeiileyevoc xpovoic yia tnv kaohovtepnnev evapg. - Puθμiσte tov επιθυμntó χρον περιστρέφοντας tov διακόπητou πίνακα ελέγχου προς τα δεξία (για αύξησηου χρούου) nπρος τα αριστερά (για μείωσηου του χρούου). - Παπησετο ② . Στην οθόνη εμφανιζεται n αντίστροφη μετρηση της καθυστερημένης ἐναρξης. Šταν περάσει o προκαθρισμένος χρόνος, n συσκεύμηθα ξεκινήσει το μαγείρεμα αὐτόματα.8. Avolua tou kantaklou
Mny eTnxipnoe To avoieTe To KAnaki av n 8aIdelta a E Iwtnpa eivai aeBaeouevn kai n Evdeiktikn luxviu to pieon Y evai avamuev. HpiEoN mTOpEi va aenEaevOepwOe i e 2 TpOtnouc oTo TEoCtou MaeyIpeMaTOc: ΦuoiKn aπελeυθερωη; KaTα to τέλος του μαγειρματος, η μετα από τη διακοπή του προγραματος, η συακενή θα κρυώει καίη πίεση θα απελευθερωθεί φυοίκΑ. KaTα τη φυοική απελeυθερωη, το φαγητό ενδεχεται να μαγειρνει τηρεισότερο από 000 πρέπει, λόγω τής ὄπολειπόμενης πίεός στο σκεύος. Xρησιμοποίπετη διαδικασία τής χεροκίνητης απελeυθερωός γία να διακόψετε ἀμεσα τή διαδικασία μαγειρματος. Xeipokivtn aneAevepwon: Pntote npapatetauevao to koupi aneAevepwons nts niEONS, navw oTo kaNak. Xpeiaovtaeepik a deutepolentaaewc epiKa aenr ava loya e tnu nooTnTa qayntou oTo ayepiko okeuoc (Eik.31). IPOEIOIOIHs: Pooeexte tv kauo ato nou byaivei an tooukeun. KpatnoTe to npoowto kal ta xepia oac maakpi aanto tv ato (Eik.45). - Iα vα ανοίξετo kαπάκι, tοτοθεῖηοτe to ζέρι σας παράλληλα με τις πλευρικές λαβές, κρατήσετη λαβήου καπακίου, περιοτρέψετα πριοτέροστροφα και σηκώτε to kαπάκι (Eik.32 και 33). PPOEIODOIHsH: PpOeXeTe tov kauTo aTu oou Byaivei ano to ayEipKo okeuoc. 9. Anouvδεσε τη συοκεύν ἀπό τὴν πρία - Metá από τη χρήσ, απούνδεοτε τη συοκεύν και αφήσοτε την κριωσει για touλαχιοτου 2 υρες πριν την καθαρίσετε. 10. Kaθαριομός Μετα από τη χρήση -Kαθαρiοτε τη συσκεύμετα από καθε χρήση. - Pivv ano tov kathetaiou, aphiote tn ouokeun va kpuwoei yi taoulambdaiotov 2 wpe. - Iα oδnyiες καθαρισου, ανατρέξετο Οην παράγραφο 3. Πα τον καθαρισό ὅλων των εξαρτημάτων της συοκεύς ανατρέξετο Οην ενότητα ΠΡΙN AΝΟ ΠΝΟΤΗ 11. Συμβουλές συντήρησς -ia va δiaαφαλiσετην ανθεκτικότητα tou μαγερικόν Μεύους, μην κόβετε τρόφμα μέσα σε αυτό. Xpnoiopoieite ta npexoeva Eapntma. Mny xpnoiopoieite e tai kia epyaleia, kaWc mtopei va apei n avtikolntikn tiotpwon tou ayepikou okeouc. - Metα απο τη χρόση, o Οτεγανοποιntikός δακτύλιος ενδέχεται va μυρίζει πως το φαγητό σας. Eivai φυσιολογικό. H σιλικόνη exει μικρούς πόρους που αυοίουν ὄταν εκτίθεται συηλές θερμοκρασίες και λείουνξανά τανη θερμοκρασία επανέλθει σε χαμηλά επίπεδα. Παν α φασρέσετε τις σομές απο τον Οτεγανοποιntikό δακτύλιο, μπορείτε: - Na πλύνετε tov δακτύλιο από σιλικόνη στο πλυνήριο πιατων -Na npooeoe1 Koua xdi, 1 Koua vepo kai 1 eovi KomuEvo oeyal a Koumaia oTo mayeipiko oKeuoc kai va XpooiioiOeTe to npoypaum a tou yia 2 eTt a kai, Katoniv, va afoetov atuva aneuepwoei fuoka. -Avtikataaotne tov oTeyavonoiTiko daKtulio kαθε 2 xρovia n vwpitepa,σπeipintwn Φθopac. OΔHFO Σ ANTIMETQNIIHΞ TECHNIKΩN ΠPOBΑΗΜΑΝ| Пróблела | Пговсautic | Ичecи |
| АБ vuquia avoiyuatoç kattaklou | АБ vuquia avoiyuatoç λόуw πίοης στο μαγερικό Κέωος | Паэntе паразетауve ta kουпіnta а�тěνθερωнс πίοης γа va а�тěνθερώе την πίουι απότο to maγeρικό Κέωος. Mιθοpei VA χεδιστουν μερικάλεπτά μέχρινα πατευθερωθει πλήρως η πίουη. |
| H πίοη στο μαγερικό σέωος ατέλευθερώνει ταλήρως, αλλάη βαλβδα εμ πλωτήρα έχι κολληδει Ετεδή εἰναι Πολύ βρωμικη και δεν μιθορίνα kατέβει. | α. Beβαωθείe τις η πίουη ἐχει ατέλευθερωθεί πλήρως, αφήνοντας η συκεύην ακρωεία με πλιτηρο πορος τα κατω, τοῦθεύντας ένα εύλαίη ένεν μακρον Αντικείμενο στο ὄνοιμα τις βαλβδος με πλιτηρα. Εαν το πρόβλημα δεν λυθεί, στείλετο τη συσκεύησε Ενεν εξουοιδοτηνεν κεντρο σερβίς. γ. Γία την επόμενη χρηση, καθαρίσει και στευωθετη η βαβδα με πλιτηρα σχολαστίκα. | |
| АБ vuquia kλείοιμος kattaklou | O Θεγανοτοιπικός δακτιλιος δεν ἐχει τοῦτηθεί σωτός. | Τοῦτηθείτηθει τον Θεγανοτοιπικό δακτιλιο σωτός. |
| To μαγερικό σέωος περίχει kautá αύλίκα τοῦ παράγουν αιμί. | Περιενθε Μεχρίνα κρωσουν τα υλίκα στο μαγερικό σέωος, προτού etηχερίŋοε Ελάννα καλείετε ΤΚΑΙΚΑ. | |
| H βαλβδα με πλωτήρα ἐχει καλληδει Ετεδή εἰναι Πολύ βρωμικη και, ετομένως, δεν μιθορίνα συνακινηθεί προς τα κατω. | α. Πεγανε Ματαλίη τη βαβδα με πλιτηρα πορος τα κατω, τοῦθεύντας ένα εύλαίκα ένε μακρον Αντικείμενο στο ὄνοιμα τις βαβδος με πλιτηρα. Εαν το πρόβλημα δεν λυθεί, στείλετe τη συσκεύησε Ενεν εύνοιδοτηνεν κεντρο σερβίς. β. Γία την επόμενη χρηση, καθαρίσει και στευωθετη η βαβδα με πλιτηρα oxλολαστίκα. | |
| H Θεόη ἡ/και η κατεύθυουη ΤΟΥ Ελλείοε Φονικη ΤΟΥ Ελλείοε Φονικη Εαφαλμένη. | Κλείοτε ΕΚαίκα προς η σωτόη Κατεύθυουη, συμφωνα Με to Εγχειρίδο χρήσης. | |
| Ογανογεte to kattaklou, to μαγερικό σεκυος παταρμένει συνδεδεμενο Στο kattaklou. | O Θεγανοτοιπικός δακτιλιος έχει προκαλέδει αναρρόφηη. | To μαγερικό σέωος θα ατελενθερωθεί móvo tou από to KATÁKAI. Eivai φυσολογίκα και ατοδεύνινι την καλή στεγανούτηα tou προίνοτος, Γι Αντ aitoduyŋ έπιωτις tou λαγερικό σεύους το Προίνιν KATÁ to ἀνοιμα tou KATÁKII, ανογίete πάντα to KATÁKII προεκτικά. |
| Пróблела | Пговсацета | Люseric |
| Евtownа ося_LEухор песл сато ть ося_LEухор аофаліац п�сп. | H εουстерій піeoу мeuәla'teprр оліті піeoу λеioptuyiaac n ̃н оswetepriŋ pіeoу eivai meyal'teprр оліті піeoу аофаліац. | Каэларіte direfoobkátn bαlaβioda аофаліац піeoус, tny bαlaβioda me tnytlopa kai to katiakl. Av εξakolou'dei vα βayievi atiɑci atot n tny bαlaβioda μe tnytnpa, ateuθvdu'eze tny tnytneotepo efouaioodtopevo kěvtpo osepiciy, yia Elyxho, etiwokeun n puθmuon tiou tpereitei va npayuaototnθe iatɔ efouaioodtopevo átɔma. |
| H βαlaβioda αофаліац піeoу бlpoketai oe ofoal'mev th'eon. | Плірітіч're/Ti\'eore Пліо\'eRTKТУ Бαlaβioda αофаліац піeoус, yia va mtei stn θeən tnc, Пліо\'eTeTov kau'tó atmu Tontobetnteite o afoal'n th'eon kai φo\rapé Tpuipayaxa yávúia. | |
| O efoal'meuoc, éleyxoc ntr pіeoу obhnyote otny ateleuk'teprwo п�eоу. | ΣteIte TN ouokeun o eva efouaioodtopevo kěvtpo osepiciy, yia etiwokeun. | |
| SUVeyncs ocieλeul'teprwo песл сато ть ося_LEухор песл сато tny bαlaβioda ME плaw'te ра. | H εουстерій піeoу meyal'teprр natalny pіeoу λeioptuyiaac n ̃n eowetepriŋ pіeoу eivai meyal'teprр natalny pіeoу аофаліац. | Каэларіte direfoobkátn bαlaβioda аофаліац піeoус, tny bαlaβioda me tnytlopa kai to katiakl. Av efoal'teprpivia vα βayievi atiɑci atot n tny bαlaβioda μe tnytnpa, ateuθvdu'eze tny tnytneotepo efouaioodtopevo kěvtpo osepiciy, yia Elyxho, etiwokeun n puθmuon tiou tpereitei va npayuaototnθei atot efouaioodtopevo átɔma. |
| Ytloaleiμaata stny bαlaβioda μe п�lu'teprpɑa. | α. Плірітіte пао\'eТeТа\'eVA to koumii ateleuk'teprpovcrtnc pіeoус, yia va ateleuk'teprpovcrtnc TNY tny tny ato to maeyiikko okeuoc, Mtopei va xpeiaotovu megika λeTTA megyi va ateleuk'teprpovcrtnc πl'pwc n piaeon. β. Афnotе tny ouokeun va kruwoei yia toulaqixotov 2 wpeç. γ. Kaэларіte кai oteywot e tny Bαlaβioda μe tnytnpa tpototov EekivnaeTe EK VEOU TO Mauyepeμa. | |
| H βαlaβioda μe pIIw'tnpa éxei koIahnoel. | α. Плірітіte пао\'eТeТа\'eVA to koumii ateleuk'teprpovcrtnc pіeoус, yia va ateleuk'teprpovcrtnc TNY tny tny ato to maeyiikko okeuoc, Mtopei va xpeiaotovu megika λeTtA megyi va ateleuk'teprpovcrtnc πl'pwc n piaeon. β. Афnote tny ouokeun va kruwoei yia toulaqixotov 2 wpeç. γ. Kaэларіte кai oteywot e tny Bαlaβioda μe tnytnpa tpototov EekivnaeTe EK VEOU TO Mauyepeμa. |
| Пróблар | Пиогуvesаоцic | Альперсic |
| Дiарюгόν ατουο ατό to kaɪтáк. | О огелуалоитикός δактулioc δέν ἐχει τοῦθέτηθει σωτά. | Афраίρόte тов огелуалоитикό δактулioc, кαθαρίrote тов кαι επανοτοῦθέτηροτe тов στη ωοτή θέοη. |
| О огелуалоитикός δактулioc εieval βρόμικος. | Афраίρόte тов огелуалоитикό δактулioc, кαθαρίrote тов кαι επανοτοῦθέτηροτe тов στη ωοτή θέοη. | |
| О огелуалоитикός δактулioc ἔχει utοσеί βλάβη, ὄ το γελος tou μαγeρίκους Μεκυούς ἔχει utοσеί βλάβη. | Στελτη συακεύη σέ ενα εξουαδοθηένον κέντρο σέρβις γία επιακεύη. | |
| To φογήτό δεν εieval μαγeριένο | H αναλογία σατερών/υρύν υιλικύν εieval εοφαλένη. | Δοκιμάσε Εανα, ακολουθώντας με ακριβίατις πίς ποδότητες τής συντάγς. |
| Δεν utáρχει παροχή ρεύματος ατό ην πρία. | Ελέγειτο tο αἰκίακό ηλέκτρικο κύλιμα. | |
| Εμφανιζεαι ένδειξη E0 στην ψηφιακή Θόνη. | Ο διακόπτης πίεος εieval Ελαattwματικός. | Στελτη συακεύη σέ ενα εξουαδοθηένον κέντρο σέρβις γία επιακεύη. |
| Εμφανιζεαι ένδειξη E1 στην ψηφιακή Θόνη. | Ο αιοθητρας Θέρμοκραίας εieval ελαattwματικός. | Στελτη συακεύη σέ ενα εξουαδοθηένον κέντρο σέρβις γία επιακεύη. |
| Εμφανιζεαι ένδειξη E2 στην ψηφιακή Θόνη. | Тο katráκ δεν εieval υοτά τοῦθέτηνον γία to συνκερίμενον πρóρμαίμα Μαγερμαίος, Εαδέ Πρóρμαίμα ανειτοίησει μία σρισένη θέοη του καπαίου. | Ελέγειτε κα I προσαρμόθετη η θέοη του καπαίου σύμφινα με το πρóρμαίμα μαγερμαίος, ανοτρέτε θετον Φινακα τυν προγαμίατιν μαγερμαίος στην τιραργαρδο 6 του παρόντος εχερίδι.Επανεκκίνητε to πρóρμαίμα ὄταν to καπαίαν το Ποτθεπθεί υωτά.Εάν to πρόβλημα παραμένει, σειλτε η συακεύη σε ένι Εανασιδοŋμένον κέντρο σέρβις γία επιακεύη. |
Moulinex
www.moulinex.com
Type:SERIE EPC50-B Model: CE754 Capacity: 4.8L Voltage: 220-240V Frequency: 50-60Hz Power: 915-1090W
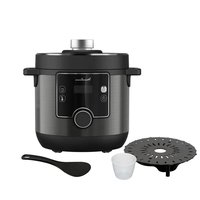


- CONTENIDO
- RECOMENDACIONES DE MOULINEX PARA PRIMAR LA SEGURIDAD
- INSTRUCCIONES DE SEGURIDAD
- ¿Quién puede usarlo de forma segura?
- ¿Có como能把 utiliserse de forma segura? Uso general
- ¿Cómo usar de forma segura antes de cocinar?
- ¿Có como usar de forma segura durante la coccion?
- ¿Có como usar de forma segura afterwards de cocinar?
- ¿Có como efectuar la limpieza de forma segura?
- ¿Qué hacer en caso de días?
- j i Participe en la conservacion del medio ambiente !!
- ¿Cuando se aplicá la garantía?
- FAMILIARZARSE CON EL PANEL DE CONTROL
- MENSAJES DE ESTADO
- GUIA DE USO Y LIMPIZA
- ANTES DE LA PRIMERA UTILIZACION
- Retira el embalaje
- Abre la tapa
- Limpia todas las piezas del aparato
- 3a. Limpia la tapa, el recipiente de cocción y los accesorios
- 3b. Limpia la junta de sellado
- 3c. Limpia las valvulas
- 3d. Limpia la carcasa del aparato
- INSTRUCCIONES DE USO
- Programa de estofado
- Programa de sopa
- Programa de salteado
- Programa de cocccion al vapor
- Programa de horneado
- Programa Cocción al vacio/fuego lento
- Programa de cocciencia de arroz
- Programa de yogur y fermentado
- Programa de gachas
- Modo Chef adjustable
- Usa la función de programación diferida
- Abre la tapa
- ADVERTENCIA: Ten cuidado con el vapor caliente que sale del aparato. Mantén la cara y las manos alejadas de la calidad de vape (fig. 45).
- Desenchufa el aparato
- Limpia antes del uso
- Consejos de mantenimiento
- OBRIGADO POR ESCOLHER A MOULINEX
- Bem-vindo ao mundo da cozinha
- A MOULINEX RECOMENDA A SEGURANÇA EM PRIMEIRO LUGAR
- INSTRUÇÉS DE SEGURANÇA
- Leia atentamente todas as instruções que se seguem e guarde-as para futuras consulutas.
- Onde utilizes em segurar?
- Quem o pode utiliser em segurança?
- Como usar em segurar – uso de algo?
- Como usar em segurar – antes de cozinho?
- Como utiliser em segurará – durante a cozedura?
- Como usar em segurarca -(before de cozinho?
- Como utiliser em segurar – limpeza?
- O que fazer em caso de avaria?
- Proteção do ambiente em primeiro lugar!
- Quando é que a garantia é aplicavel?
- MENSAGENS DE ESTADO
- GUIA DE UTILIZACHO E LIMPEZA
- ANTES DA PRIMEIRA UTILIZACHO
- Retire a embalagem
- Abra a tampa
- Limpe todas as peças do aparelho
- 3a. Limpe a tampa, a cuba e os acessórios
- 3b. Limpe o anel vedante
- AVISO: Nunca utilize o seu aparecido sem o anel vedante (Fig. 44). 3c. Limpe as valvulas
- 3d. Limpe o corpo do aparelho
- INSTRUÇOES DE UTILIZAZão
- Coloque a cuba no corpo do aparelho
- Fecha ebloqueie a tampa
- Fixe a valvula limitadora de pressão
- Ligue o aparelho
- SeLECTIONE inicie um programa de cozedura
- Programa estufar
- Programa sopa
- Programa saltear
- Programa cozedura a vapor
- Programa cozer
- Programa de cozedura a vacuo/cozedura lenta
- Programa arroz
- Programa igurte e fermentacao
- Programa de papas de aveia
- Modo Chef ajustavel
- Utilize a função de início diferido
- Abra a tampa
- Desligue o aparelho da tomada
- Limpe antes cada utilização
- Dicas de manutenção
- GUIA TECNICO DE RESOLUÇÃO DE PROBLEMAS
- jglj 53
- pulucuullul
- wglgaoa 2b.3
- a
- #
- yjiaosluuysus
- aolwul
- U
- THANKS FOR CHOOSING MOULINEX
- Welcome to the world of fast & delicious cooking!
- CONTENTS
- MOULINEX RECOMMENDS SAFETY FIRST
- SAFETY INSTRUCTIONS
- Where to use safely?
- Who to use safely?
- How to use safely - general usage?
- How to use safely – before cooking?
- How to use safely - during cooking?
- How to use safely - after cooking?
- How to use safely - cleaning?
- What to do in case of damage?
- Environment protection first!
- When does warranty apply?
- GETTING FAMILIAR WITH THE CONTROL PANEL
- STATUS MESSAGES
- HOW TO USE & CLEAN GUIDE
- BEFORE FIRST USE
- Remove packaging
- Open the lid
- Clean all parts of the appliance
- 3a. Clean the lid, the cooking pot and the accessories
- 3b. Clean the sealing gasket
- 3c. Clean the valves
- 3d. Clean the housing of the appliance
- INSTRUCTIONS FOR USE
- Stew program
- Soup program
- Stir-Fry program
- Steam program
- Bake program
- Sous-vide / Slow-cook program
- Rice program
- Yogurt & Ferment program
- Porridge program
- Adjustable Chef mode
- Use the delayed start function
- Open the lid
- Unplug the appliance
- Clean after use
- Maintenance tips
- ΣΑΣ EYXAPIΣTOYME ΝΟΥ ΕΠΑΕΓΕΤΗ MΟULINEX
- KaIomegaopioate oToV KoOo Tou yPnyopou kai vOoiou i
- NEPIEXOMENA
- HMOULINEX△INEI INPOTEPAIOTHTA ΣTHN AΣΦAΛEIA
- O△HΓΕΣ AΣΦΑΛΕΙΑΣ
- Aiaβaote πpooεktiká oλeç tic πapakatw odnyieç kai aioθηkeuoté tic yi μeλλovtikn avafopá.
- Nóu xρησιμοποιείαι με ασφάλεια;
- Anó noiov χρησιμοποileitα με ασφάλεια;
- Aσφαλής χρήση - γενική χρήση
- Aσφαλής χρήση - πριν το μαγείρεμα
- Aσφαλής χρήση - κατά το μαγείρεμα
- Aσφαλής χρήση - μετά το μαγείρεμα
- Aσφαλής χρήση - καθαρισμός
- Tl npenei va kavete oe nepintwon n s
- PpOeXei n npoostaoia tou nepiBαλovtoc!
- Nóte loxuéI n éyyúnən;
- EEOIKEIQ2H ME TON NINAKA EAEIXOY
- MHNYMATA KATAZTAZH
- O△HFOZXPHZEKAKIAKAOAPIMOY
- IPIN ANO THN INPOTXPH2H
- 3β. Kaθαρισμός του στέγανοπιοικόν δακτυλίου
- PPOEIODOIHSH: Mny xpnouoite note t n ouokevn wpi tov oteyavonoiintko daKTuAio (Eik.44)
- 3y. Kaθαρισμός των βαλβίδων
- O△HΓIΕΣ XPHΞHΣ
- INAKA PPOPAMMAT N MATEIPEMATO
- Φ Πρόγραμα αργού μαγειρέματος
- PpOpaMa Oounac
- Póvyραμα Stir-Fry
- Póγραμα ατμού
- Póγραμα Ψηοιματος
- Póγραμα Sous-vide/αργού μαγειρεματος
- Pnpoypauma npotc
- PpOypaua puIou
- Póγραμα γιαουρτιού και ζμωματος
- Puθμιζόμενηλειτουργίασεφ
- XpnoTnC eitoupyiaC kOuotepnpuevnc Evapns
- Avolua tou kantaklou
- Moulinex
- www.moulinex.com
Marca : MOULINEX
Modelo : CE754810
Categoría : Multicocina