EH3BS - Proyector Klarstein - Manual de uso y guía de instrucciones gratis
Encuentra gratis el manual del aparato EH3BS Klarstein en formato PDF.

Preguntas de los usuarios sobre EH3BS Klarstein
0 pregunta sobre este aparato. Responde a las que conoces o haz la tuya.
Hacer una nueva pregunta sobre este aparato
Descarga las instrucciones para tu Proyector en formato PDF gratis! Encuentra tus instrucciones EH3BS - Klarstein y toma tu dispositivo electrónico nuevamente en la mano. En esta página están publicados todos los documentos necesarios para el uso de su dispositivo. EH3BS de la marca Klarstein.
MANUAL DE USUARIO EH3BS Klarstein
chal-tec gmbh
elektronik

star

Beamer LCD-Projektor
10005060

natural_image
Line drawing of a projector with a circular lens and grid-patterned body (no text or symbols)Sehr geehrter Kunde,
zunächst möchten wir Ihnen zum Erwerb Ihres Gerätes gratulieren.
Bitte lesen Sie die folgenden Anschluss- und Anwendungshinweise sorgfältig durch und befolgen Sie diese um möglichen technischen Schäden vorzubeugen.
Hinweise
Warnung:
Schauen Sie nie direkt in die Projektor-Linse. Durch die sehr helle Lampe können Ihre Augen dauerhaft geschädigt werden.
Warnung:
Um einen elektrischen Schlag zu vermeiden, benutzen Sie das Gerät bitte nicht an feuchten Orten.
Warnung:
Wenn Sie den Projektor ausschalten, wird der Lüfter noch 90 Sekunden nachlaufen, um das Gerät und die Projektorlampe herunterzukühlen. Trennen Sie das Gerät nicht vor Ende dieses Kühlvorgangs, da die Lampe sonst beschädigt wird.
Projektor-Aufbau
Bitte beachten Sie diese Aufbauanleitung:
flowchart
graph TD
    A["Speaker L"] --> B["Screen"]
    C["Speaker R"] --> B
    D["Subwoofer"] --> B
    E["Speaker C"] --> B
    F["Projector"] --> B
    G["DVD Amplifier"] --> H["Amplifier"]
    I["Appreciate seats"] --> H
    J["Door"] --> K["Speaker Ls"]
    L["Speaker Rs"] --> M["Speaker Ls"]
    style A fill:#f9f,stroke:#333
    style C fill:#f9f,stroke:#333
    style D fill:#ccf,stroke:#333
    style E fill:#ccf,stroke:#333
    style F fill:#cfc,stroke:#333
    style G fill:#fcc,stroke:#333
    style H fill:#ffc,stroke:#333
    style I fill:#fff,stroke:#333
    style J fill:#fff,stroke:#333
    style K fill:#fff,stroke:#333
    style L fill:#fff,stroke:#333
    style M fill:#fff,stroke:#333
Um eine gute Bildqualität zu erreichen, darf keine direktes Tageslicht auf die Leinwand scheinen. Sollten Sie den Projektor am Tage nutzen wollen, schließen Sie Ihre Vorhänge bzw. Rollos.
Standard-Einstellung (Vorderprojektion)
Nutzen Sie folgende Tabelle, um Bildgröße und Entfernung einzustellen:
| Bildschirmgröße | 4:3 | 16:9 |
| 60" | 2.3 m | 2.5 m |
| 72" | 2.68 m | 2.88 m |
| 100" | 3.6 m | 3.9 m |
Die Daten haben einen Fehler von 3%. Das Bild kann verzerrt dargestellt werden, wenn der Abstand 2 m unter- bzw. 5 m überschreitet.
Anhand folgender Bilder erkennnen Sie die Ursache der Trapezbildung:
 |  |  |
| Falsche Montage: Bild von links nach rechts kleiner. | Richtige Montage: Bild ist rechteckig. | Falsche Montage: Bild von rechts nach links kleiner. |
Montagearten
Wenn Sie den Projektor an der Decke befestigen wollen, lassen Sie diese Arbeit von einem Fachbetrieb durchführen. Und halten Sie sich folgende Skizzen:
text_image
screen projector ① Front projection ceiling mount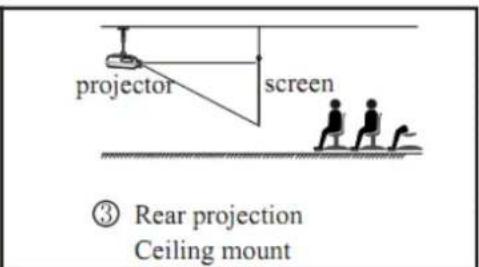
text_image
projector screen ③ Rear projection Ceiling mount-
Rückprojektion, Deckenmontage
-
Vorderprojektion, Deckenmontage

text_image
screen projector ② Front projection Table mount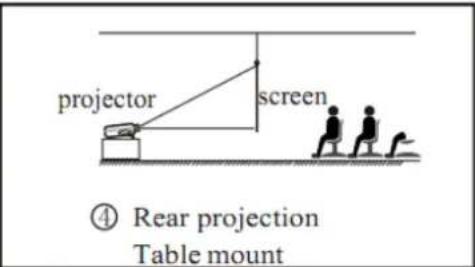
text_image
projector screen ④ Rear projection Table mount- Vorderprojektion, Tischmontage
- Rückprojektion, Tischmontage
Achtung, folgende Punkte sollte Sie bei allen Montagearten beachten:
- Stellen und befestigen Sie, um Beschädigungen und Verletzungen zu vermeiden, den Projektor nur auf bzw. an festen Untergründen und Decken.
- Der Temperaturbereich, in dem der Projektor betrieben werden darf, reicht von 0 bis 35°C.
- Die Schärfe des Bildes kann sich verringern, sollten Sie das Gerät an feuchten, staubigen oder mit Rauch gefüllten Räume nutzen. Feuchte bzw. nasse Umgebungen schaden den Gerät.
- Eine gute Belüftung verhindert das Überhitzen des Projektors.
Geräteübersicht
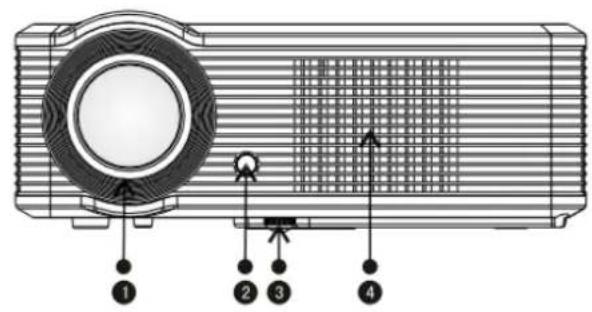
text_image
Diagram of a projector with labeled parts including front panel, screen, and indicator lights
text_image
Diagram of a projector front panel with labeled buttons and indicators
text_image
Technical diagram of a heat exchanger or fan with numbered components and ventilation slots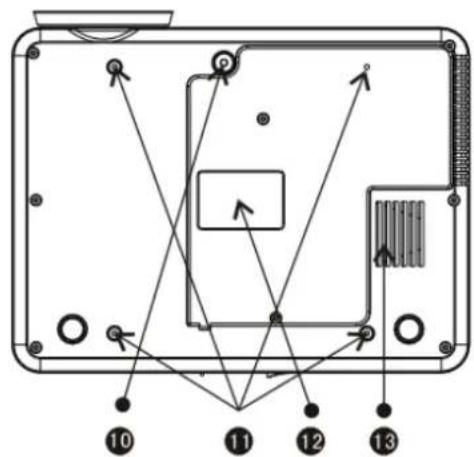
text_image
Technical diagram of a device with numbered components and directional arrows indicating assembly or connection points.- Fokus-Linse
- IR-Empfänger
- Höhenverstellbare Füße
- Kühlungslufteinlass
- Anschlüsse
- Ein-/Ausschalter
-
Keystone-Korrektur
-
Abwärmeöffnung
- Lautsprecher
- Höhenverstellbare Füße
- Projektorbefestigungslöcher
- Produktaufkleber
- Abwärmeöffnung
Anschlüsse am Gerät

text_image
L out L in Pr Y HDM1 R out R in Video Pb S video VGA IN HDM12 TV| Name | Beschreibung |
| Y/b/Pr | Component-Video-Anschluss |
| Video | AV-Eingang |
| L out R out | Audio-Ausgang links/rechts |
| L in R in | Audio-Eingang links/rechts |
| VGA IN | VGA-Eingang |
| Svideo | S-Video-Eingang |
| TV | Eingang für analoges TV-Signal |
| HDMI 1 | HDMI-Eingänge |
| HDMI 2 |
Achtung:
Schließen Sie zuerst alle Kabel an bevor Sie das Gerät einschalten, ansonsten kann es zu Schäden am Gerät kommen.
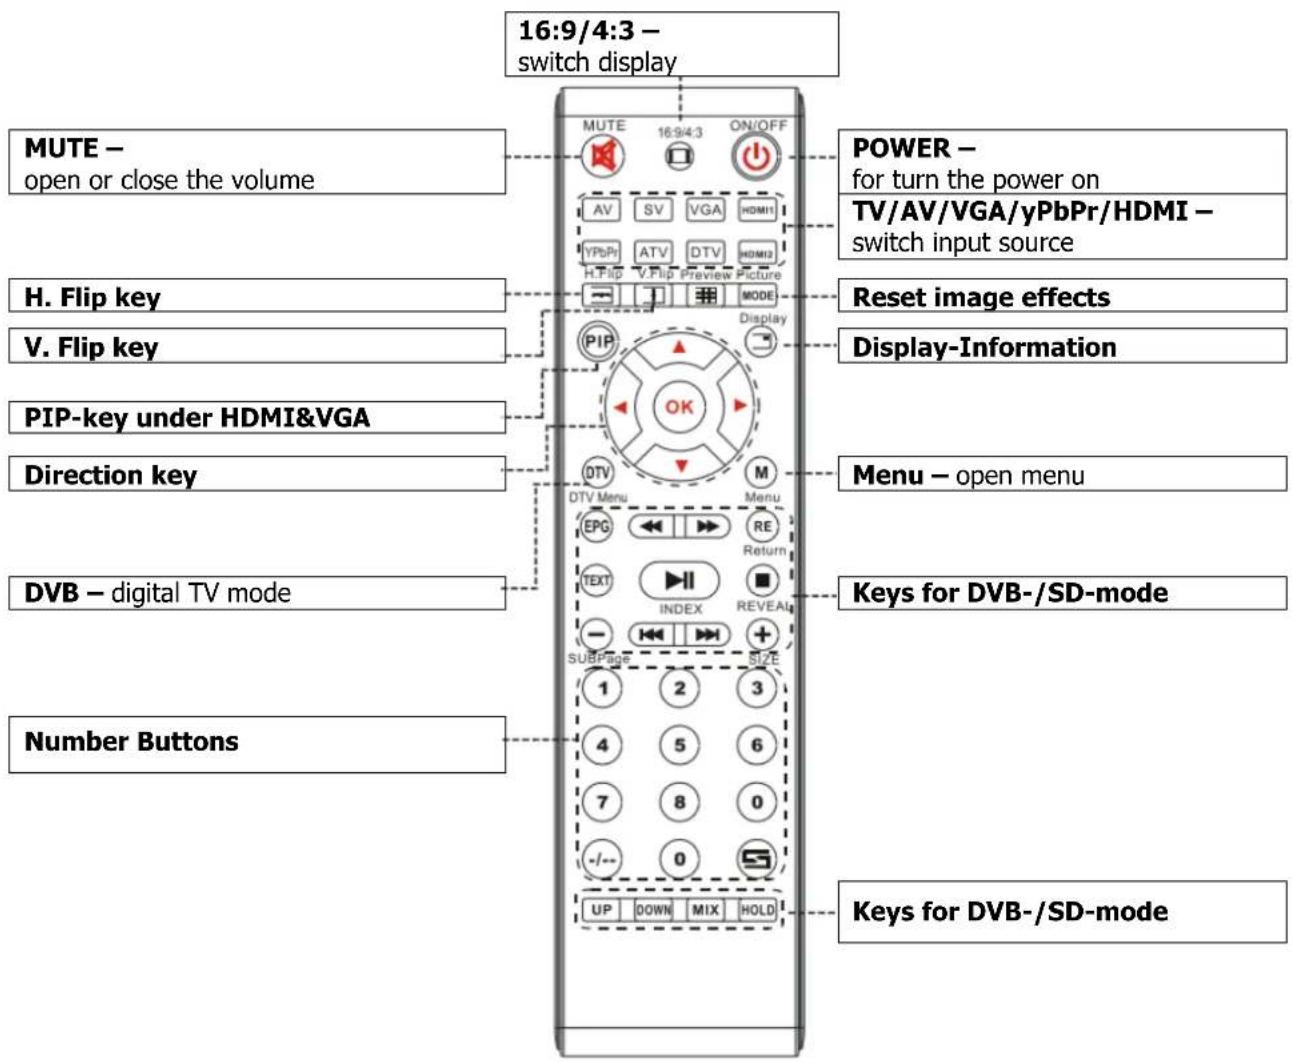
Fernbedienung
text_image
16:9/4:3 – Seitenverhältnis einstellen MUTE – Schalten zeitweise den Ton aus. Bild links/rechts rotieren Bild oben/unten rotieren PIP-Funktion unter HDMI&VGA Pfeil-/Richtungstasten DVB – Digitaler TV-Modus Nummerntasten POWER – Ein-/Ausschalten TV/AV/VGA/yPbPr/HDMI – Quelle wählen Bildeffekte zurücksetzen Display-Informationen Menu – Menu aufrufen Tasten für DVB-/SD-Modus Tasten für DVB-/SD-ModusBedienfeld am Gerät

text_image
Diagram showing a projector with labeled buttons and a circular control panel, alongside a 3D view of the device.- Ein-/Ausschalter
- Menü
-
Richtungstasten
-
Eingangsquelle wählen
- Betriebsanzeige: Rot-> StandBy ; Grün -> eingeschaltet
Vor dem Betrieb
Nachdem Sie den Projektor aufgebaut und angeschlossen haben, führen Sie folgende Schritte durch:
Einschalten
-
Setzen Sie 2 AAA-Batterien in die Fernbedienung ein.
-
Schalten Sie das Gerät (Hauptschalter am Gerät) ein. Die Betriebsanzeige blinkt.
-
Schalter Sie das Gerät mit der Fernbedienung oder am Bedienelement am Gerät ein.


-
Nach 2 Sek. schaltet sich die Lampe ein. Nach 2 Min. ist das Gerät betriebsbereit.
-
Beim ersten Einschaten kann das Bild unscharf oder verzerrt wirken. Folgen Sie den Anweisungen des Kapitels „Bildeinstellungen“.
-
Nachdem Sie die Bildeinstellungen vorgenommen haben, können Sie sich nun etwas anschauen.
Ausschalten
-
Drücken Sie während des Betriebes den Ein-/Ausschalter.
-
Nach dem Ausschalten befindet sich der Projektor im Abkühlmodus. In dieser Phase lässt sich das Gerät nicht abschalten. Warten Sie bis diese Phase beendet und danach können Sie das Gerät wieder einschalten.
Bildeinstellungen
Wenn Sie den Projekor zum ersten Mal benutzen, kann das Bild verschwommen, farblos und trapezförmig sein. Folgen Sie den unten stehenden Anweisungen um die Bildeinstellung vorzunehmen.
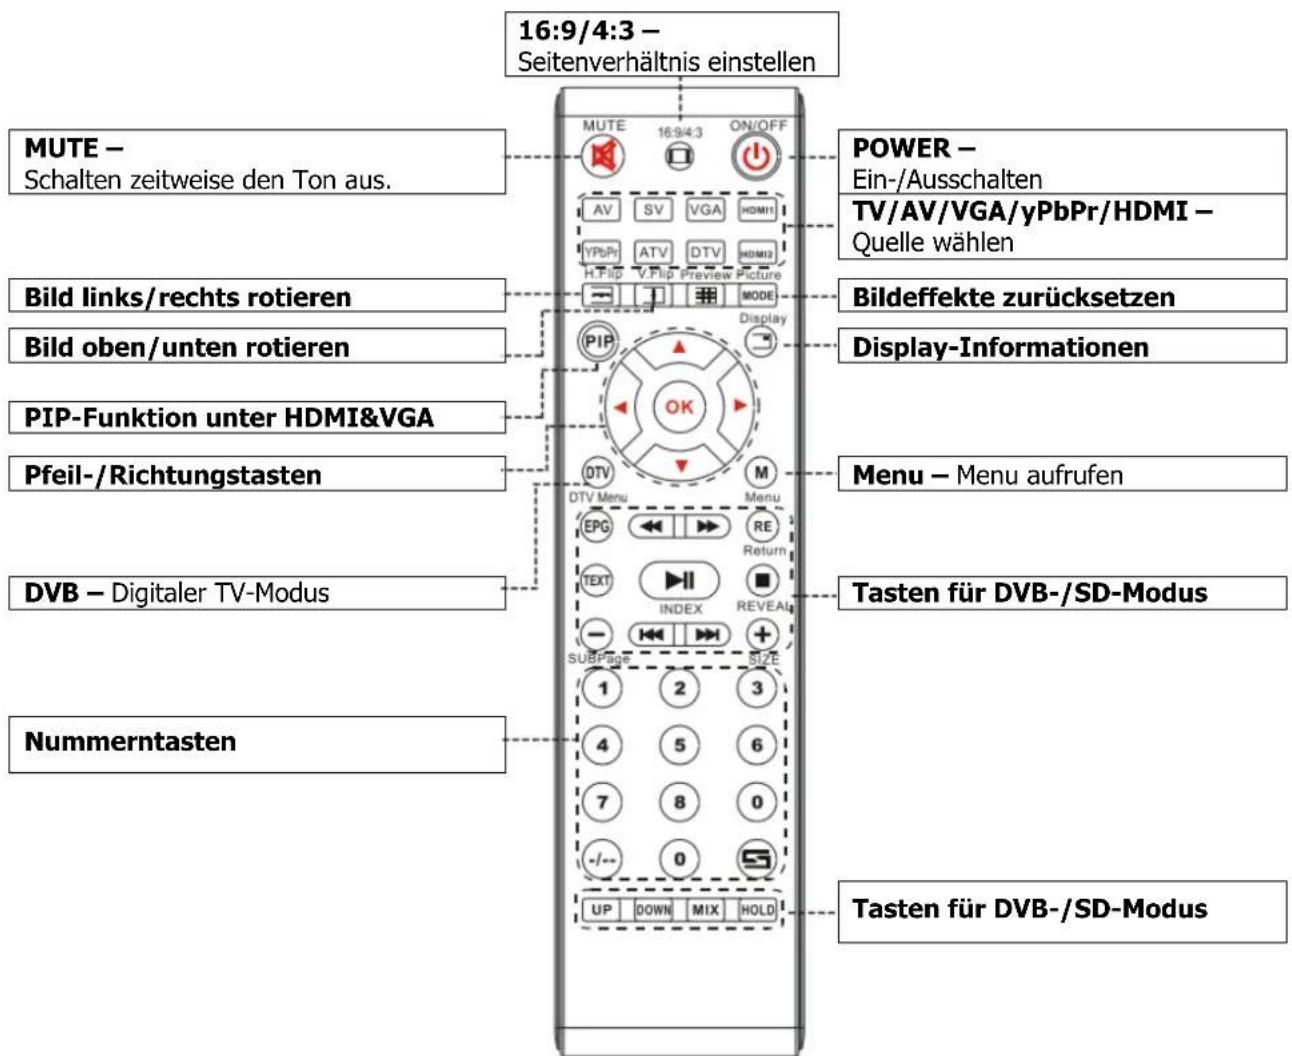
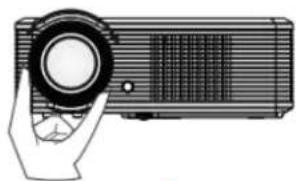
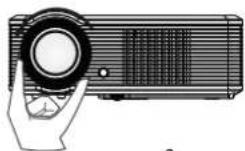
Fokus einstellen
Drehen Sie die Linse komplett hinein (1), nun drehen Sie diese wieder langsam heraus (2) bis die Mitte des Bildes die größte Schärfe aufweist. Dies ist die optimale Einstellung.
natural_image
Illustration of a hand holding a projector with a circular lens (no text or symbols)1
natural_image
Illustration of a hand holding a projector with a circular lens (no text or symbols visible)2
Notiz: Wenn das Gerät von einer kalten in eine warme Umgebung gebracht wird, kann das Gerät beschlagen. Warten Sie mit dem Einschalten bis sich das Gerät aklimatisiert hat.
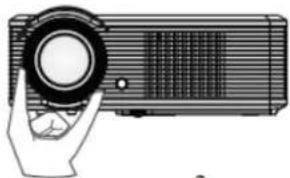
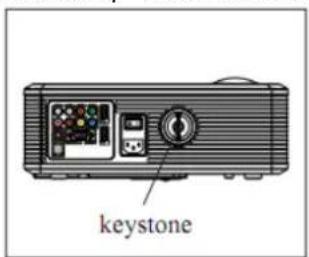
Keystone-Korrektur
Falls Ihr Bild eine Keystone-Verzerrung hat, beheben Sie diese mit den Keystone-Einstellungen. Ist der Projektor nicht eben ausgerichtet, kann sich das Bild auch trapezförmig verzerrt sein. Dann müssen Sie den projektor neu ausrichten. Außerdem kann der Rand des Bildes nicht fokussiert sein.
text_image
keystone
text_image
Hight Projector Screen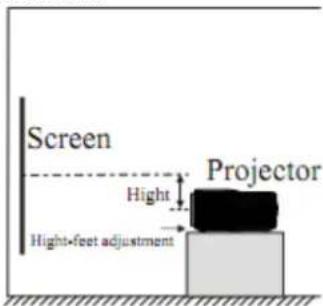
text_image
Screen Hight Projector Hight-feet adjustmentFalls dieses nicht hilft, müssen Sie den Projektor vertkal zur Leinwand zentrieren.
1) Einstellungen im Menü vornehmen
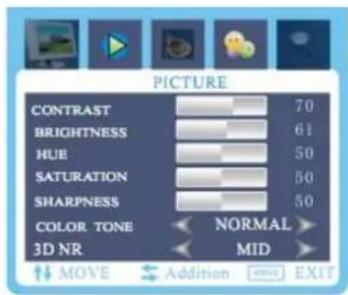
- Schalten Sie den Projektor ein, drücken Sie „menu“ und das Menü wird eingeblenden (Bild 1).
- Mit den Pfeiltasten links/rechts können Sie zwischen den Menüpunkten in folgender Reihenfolge wählen: picture (Bild) -> sound (Ton) -> system (System) -> PIP (PIP).
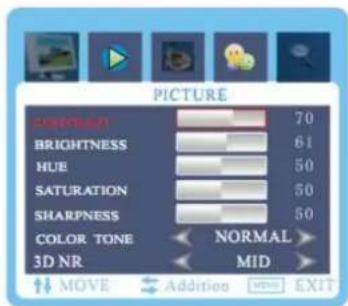
- Nachdem Sie das gewählte Menü bestätigt haben, können Sie mit den Pfeiltasten hoch/runter die Untermenüpunkte wechseln (Bild 2).
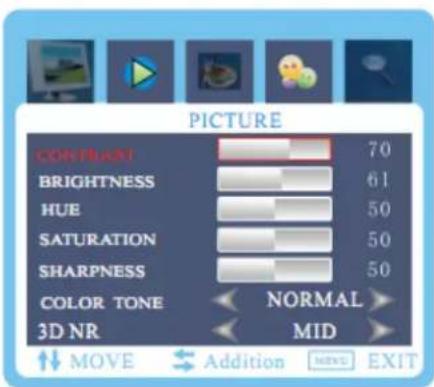
- Mit den Pfeiltasten links/rechts können Sie in Einstellung verändern (Bild 3).
- Nachdem Sie alle Einstellungen vorgenommen haben, drücken Sie „menu“, um das Untermenü zu verlassen.
- Nehmen Sie alle gewünschten Einstellungenvor und drücken dann „exit“ um das Menü zu schließen

text_image
PICTURE CONTRAST 70 BRIGHTNESS 61 HUE 50 SATURATION 50 SHARPNESS 50 COLOR TONE NORMAL 3D NR MID ↑↓ MOVE ↓ Addition ↓← EXITBild 1

text_image
PICTURE BORNATE 70 BRIGHTNESS 61 HUE 50 SATURATION 50 SHARPNESS 50 COLOR TONE NORMAL 3D NR MID ↑↓ MOVE ← Addition → EXITBild 2
2) Werte ändern
a. Drücken Sie „menu“ bis dieses Bild erscheint.
b. Drücken Sie die Pfeiltasten hoch/runter um die Untermenüpunkte wechseln.
c. Mit den Pfeiltasten links/rechts können Sie in Einstellung verändern.
d. Drücken Sie dann „exit“ um das Menü zu schließen.
Notiz:
zeigt feste Optionen an;
zeigt ein Untermenu am;
zeigt einen Regler an, es erscheint folgendes Reglermenü:
text_image
PICTURE CONTRAST 70 RHOFTNESS 61 HUE 50 SATURATION 50 SHARPNESS 50 COLOR TONE NORMAL 3D NR MID ↑↓ MOVE Addition MEXT EXIT RHOFTNESS 503) Bildmenü
text_image
PICTURE EMITRAFI 70 BRIGHTNESS 61 HUE 50 SATURATION 50 SHARPNESS 50 COLOR TONE NORMAL 3D NR MID ↑↓ MOVE ← Addition ⬤→ EXIT| Bildmenü | ||
| Contrast | 0~100 | Kontrasteinstellung |
| Brightness | 0~100 | Helligskeitseinstellung |
| Hue | 0~100 | Farbtoneisntellung |
| Saturation | 0~100 | Sättigungseinstellung |
| Sharpness | 0~100 | Schärfeeinstellung |
| Color tone | Standard | Hier können Sie den Farbton einstellen. |
| Cool (kalt) | ||
| Warm | ||
| 3D NR | High (hoch) | Hier könne Sie die 3D-Einstellungen vornehmen. |
| Mid (mittel) | ||
| Low (niedrig) | ||
| Close (aus) | ||
4) Tonmenü

text_image
SOUND BASS 50 TREBLE 51 BALANCE 50 SOUND MODE USER AVC OFF SOUND SOURCE NORMAL MOVE Addition MENU EXIT| Tonmenü | ||
| Bass | 0~100 | Basseinstellung |
| Treble (Höhen) | Standard | Standard |
| Movie | Filmeinstellung | |
| Music | Musikeinstellung | |
| Personal | Persönliche Einstellung | |
| Balance | On/Off (Ein/Aus) | Balanceeinstellung |
| Sound mode (Tonmodus) | Off (Aus) | S-XBS aus |
| Low (niedrig) | S-XBS niedrig | |
| Mid (mittel) | S-XBS mittel | |
| High (hoch) | S-XBS hoch | |
| AVC | On/Off (Ein/Aus) | Autom. Stimmkontrolle |
| Sound source (Tonquelle) | Normal | Line & Lautsprecher |
| Line | nur Line | |
| Speaker | nur Lautsprecher | |
5) Systemmenü

text_image
SYSTEM OSD-LANGUAGE 50 OSD-HPOSITION 51 OSD-VPOSITION 50 FLIP HORIZONTAL OFF FLIP VERTICAL OFF MEM-RECALL ↑↓ MOVE ← Addition MENU EXIT| Systemmenü | ||
| language | OSD-Sprache wählen | |
| H-position | 0~100 | horizontale Position |
| V-position | 0~100 | vertikale Position |
| Flip horizontal | On/Off (Ein/Aus | links/rechts-Drehung |
| Flip vertical | On/Off (Ein/Aus | oben/unten-Drehung |
| Mem-recall | Auf Werkseinstellungen zurücksetzen | |
6) PIP-Menü
text_image
PIP MILKIF WELDER SUB SOURCE SIZE PIP-POSITION BORDERCOLOR SOUND SOURCE SWAP PIP YCBCR LARGE TOP LEFT BLACK MAIN MOVE Addition MENU EXITNotiz:
Wenn als Hauptquelle HDMI 1, HDMI 2, YCBCR, VGA gewählt ist, kann als Unterquelle nur AV, TV oder S-Video genutzt werden.
| PIP-Menü | ||
| MULTI WINDOWS | OPEN | Mehrere Fenster |
| PIP | ||
| POP 4:3 | ||
| OFF | ||
| SUB SOURCE | TV | TV als Unterquelle |
| VIDEO | Video als Unterquelle | |
| YCBCR | YCBCR als Unterq. | |
| VGA | VGA als Unterquelle | |
| HDMI 1 | HDMI 1 als Unterq. | |
| HDMI 2 | HDMI 2 als Unterq. | |
| SIZE | S/M/L | Bildgröße |
| PIP POSITION | UpLeft | Oben links |
| DownLeft | Unten links | |
| UpRight | Oben rechts | |
| DownRight | Unten rechts | |
| Border Color | Black and blue | Umrandungsfarbe |
| SOUND SOURCE | Main picture | Hauptbild |
| Sub picture | Unterbild | |
| SWAP | Haupt-/Unterbild tauschen | |
7) TV-Kanal-Menü
text_image
TV AUTO SCAN FINE TUNING MANUAL SEARCH COLOR SYSTEM SOUND SYSTEM AUTO AUTO MOVE Addition MENU EXIT| TV-Menü | ||
| Auto scan | Automatische Sendersuche | |
| Fine | Manuelle Sender-Feineinstellung | |
| Manual search | Channel | Kanalnummer wählen |
| Search | Suche über Nummer | |
| Save | Kanalnummer speichern | |
| Color system | Auto | Farbsystem wählen, „Auto“ ist standard |
| PAL | ||
| SECAM | ||
| Sound system | Auto | Tonsystem wählen, „Auto“ ist standard |
| BG | ||
| I | ||
| DK | ||
| L | ||
| LL | ||
8) PC-Menü

text_image
PC CONTRAST 50 BRIGHTNESS 50 COLOR MODE > SCALE 4:3 > AUTO > PICTURE MODE USER > MOVE ADJUST MENG EXIT| PC-Menü | |||
| Contrast | 0~100 | Kontrasteinstellung | |
| Brightness | 0~100 | Helligskeitseinstellung | |
| COLOR MODE | COLOR TEMAP | Standard | Einstellung der Farben |
| Warm | |||
| Cool | |||
| S-RGB | |||
| Personal | |||
| USER-R | 0~100 | Persönliche Einstellung | |
| USER-G | 0~100 | ||
| USER-B | 0~100 | ||
| SCALE | Bildskalierung ändern | ||
| AUTO | Stellt PC-Bild und Frequenz autom. Ein. | ||
| PICTURE MODE | Persönliche Einstellung | ||

text_image
PC COLOR TEMP STANDARD USER-R 50 USER-G 50 USER-B 50 MOVE ADJUST MENU EXIT9) Geometriemenü
text_image
SYSTEM OSD-LANGUAGE 50 OSD-HPOSITION 51 OSD-VPOSITION 50 FLIP HORIZONTAL OFF FLIP VERTICAL OFF MEM-RECALL MOVE Addition RESET EXIT| Geometriemenü | ||
| H-position | 0~100 | Horizintale Ausrichtung |
| V-position | 0~100 | Vertikale Ausrichtung |
| CLOCK | 0~100 | Bildfrequenz |
| PHASE | 0~100 | Signal synchronisieren |
Notiz:
Dieses Menü ist nur im PC-Kanal verfügbar.
Fehlerbehebung
| Problem: | Mögliche Lösung(en): |
| Nach dem Einschalten leuchtet die Betriebsanzeige nicht. | Kontrollieren Sie das Stromkabel/Netzgerät.Sicherung defekt |
| Fernbedienung ohne Funktion; schaltet den Projektor nicht ein. | In der Hauptschalter an Gerät eingeschaltet.Kontrollieren Sie die Batterien; ggf. ersetzen.Zielen Sie mit der Fernbedienung genau auf den IR-Empfänger. |
| Kein Bild | Ist die Eingangsquelle richtig gewählt.Kontrollieren Sie das Eingangssignal.Kontrollieren Sie das Stromkabel/Netzgerät und die Bildquelle.Im PC-Modus: Ist die Bildfrequenz auf 50-60Hz eingestellt?Haben Sie den Projektor als Ausgabegerät gewählt? |
| Projektor schaltet sich manchmal automatisch ab | Ist eine Belüftungsöffnung verdeckt?Die Störversorgung ist instabil.Ist das Gerät heiß? Der Lüfter kann ausgefallen bzw.defekt sein. |
Datenblatt
| LCD | ModellNative AuflösungKontrastverhältnis | 5" TFT800 x 600 unterstützt 720p, 1080p1000 : 1 |
| Eingangssignal | VideoAudio | Component Video, VGA , HDMI 1&2,TV, S-Video Stereo |
| Ausgangssignal | Lautsprecher | 5W x 2 (wahlweise) |
| Linse | BlendeFokus | 3.8185mm |
| Lampe | LEDFarbtemperaturLebensdauer | 100W9300K~20000 Std. |
| Bild | GrößeHelligkeitTrapezkorrektur | 60-100"2000 Lumen± 15° |
| Eingangsstrom | VoltStromverbrauch | AC 110~240V/50-60Hz<140W |
| Betriebsbedingungen | TemperaturLuftfeuchtigkeit | 0°C ~ +70°C10% ~ 65% |
| Lagerbedingungen | TemperaturLuftfeuchtigkeit | -20°C ~ +70°C10% ~ 90% |
| Infrarot-Fernbedienung | Frequenz | 38KHz |
| Abmessungen | GrößeGewicht | 330 x 246 x 116 mm3 kg |
Lieferumfang
| Projektor | 1 Gerät |
| Fernbedienung | 1 Stück |
| Netzkabel | 1 Stück |
| AV-Kabel | 1 Stück |
| VGA-Kabel | 1 Stück |
| Bedienungsanleitung | 1 Stück |
| Ersatzsicherung | 1 Stück |
| Reinigungspapier | 1 Stück |
SICHERHEITSHINWEISE UND GEWÄHRLEISTUNG
- Diese Bedienungsanleitung dient dazu, Sie mit der Funktionsweise dieses Produktes vertraut zu machen. Bewahren Sie diese Anleitung daher stets gut auf, damit Sie jederzeit darauf zugreifen können.
- Sie erhalten bei Kauf dieses Produktes zwei Jahre Gewährleistung auf Defekt bei sachgemäßem Gebrauch.
- Bitte verwenden Sie das Produkt nur in seiner bestimmungsgemäßen Art und Weise. Eine anderweitige Verwendung führt eventuell zu Beschädigungen am Produkt oder in der Umgebung des Produktes.
- Ein Umbauen oder Verändern des Produktes beeinträchtigt die Produktsicherheit. Achtung Verletzungsgefahr!
- Öffnen Sie das Produkt niemals eigenmächtig und führen Sie Reparaturen nie selber aus!
- Behandeln Sie das Produkt sorgfältig. Es kann durch Stöße, Schläge oder den Fall aus bereits geringer Höhe beschädigt werden.
- Halten Sie das Produkt fern von Feuchtigkeit und extremer Hitze.
ACHTUNG:
Es wird keine Haftung für Folgeschäden übernommen. Technische Änderungen und Irrtümer vorbehalten!
Wichtige Hinweise zur Entsorgung
Dieses Elektrogerät gehört NICHT in den Hausmüll. Für die fachgerechte Entsorgung wenden Sie sich bitte an die öffentlichen Sammelstellen in Ihrer Gemeinde.
Einzelheiten zum Standort einer solchen Sammelstelle und über ggf. vorhandene Mengenbeschränkungen pro Tag/ Monat/ Jahr sowie über etwa anfallende Kosten bei Abholung entnehmen Sie bitte den Informationen der jeweiligen Gemeinde.
Hinweise zur Batterieentsorgung

natural_image
Simple line drawing of a trash bin with a 'X' symbol crossed out by a black X mark, no text or labels present.Batterien dürfen nicht in den Hausmüll gegeben werden. Als Endverbraucher sind Sie zur Rückgabe gebrauchter Batterien gesetzlich verpflichtet. Sie können Batterien nach Gebrauch in der Verkaufsstelle oder deren unmittelbarer Nähe (z.B. in kommunalen Sammelstellen oder im Handel) unentgeltlich zurückgeben. Sie können Batterien auch per Post an uns zurücksenden.
Batterien oder Akkus, die Schadstoffe enthalten, sind mit dem Symbol einer durchgekreuzten Mülltonne gekennzeichnet, wie das oben stehende Symbol.
In der Nähe zum Mülltonnensymbol befindet sich die chemische Bezeichnung des Schadstoffes. »Cd« steht für Cadmium, »Pb« für Blei und »Hg« für Quecksilber.
Viel Spaß mit unserem Produkt.
Warnhinweise
- Reparaturen am Gerät sollten nur von einer autorisierten Fachwerkstatt durchgeführt werden.
- Öffnen Sie in keinem Fall das Gerät.
- Falscher Zusammenbau führt möglicherweise zu Fehlfunktionen oder dem Totalausfall.
- Das Gerät sollte vor jeglichen Feuchtigkeit und direkter Sonneneinstrahlung geschützt werden.
- Das Gerät bitte nicht mit Reinigungsmitteln reinigen.
- Verwenden Sie zur Reinigung nur ein trockenes (Mikrofaser) Tuch.
- Schließen Sie das Gerät nur an die dafür vorgesehene Netzspannung.
- Schließen Sie das Gerät in keinem Fall an andere Spannungen als vorgesehen an.
Die Gewährleistung verfällt bei Fremdeingriffen in das Gerät.
Tips

Warning:
Do not stare directly into the light of the lens.
It is very bright lamp. It can cause damage to your eyes
Warning:
To avoid electrical shock, please do not place the projector under moist conditions.
Warning:
When turning of the projector, the fans will continue to run for 90 seconds. Before unplugging the power cable, please be sure the fans have stopped in order to avoid damage to the projector lamp.
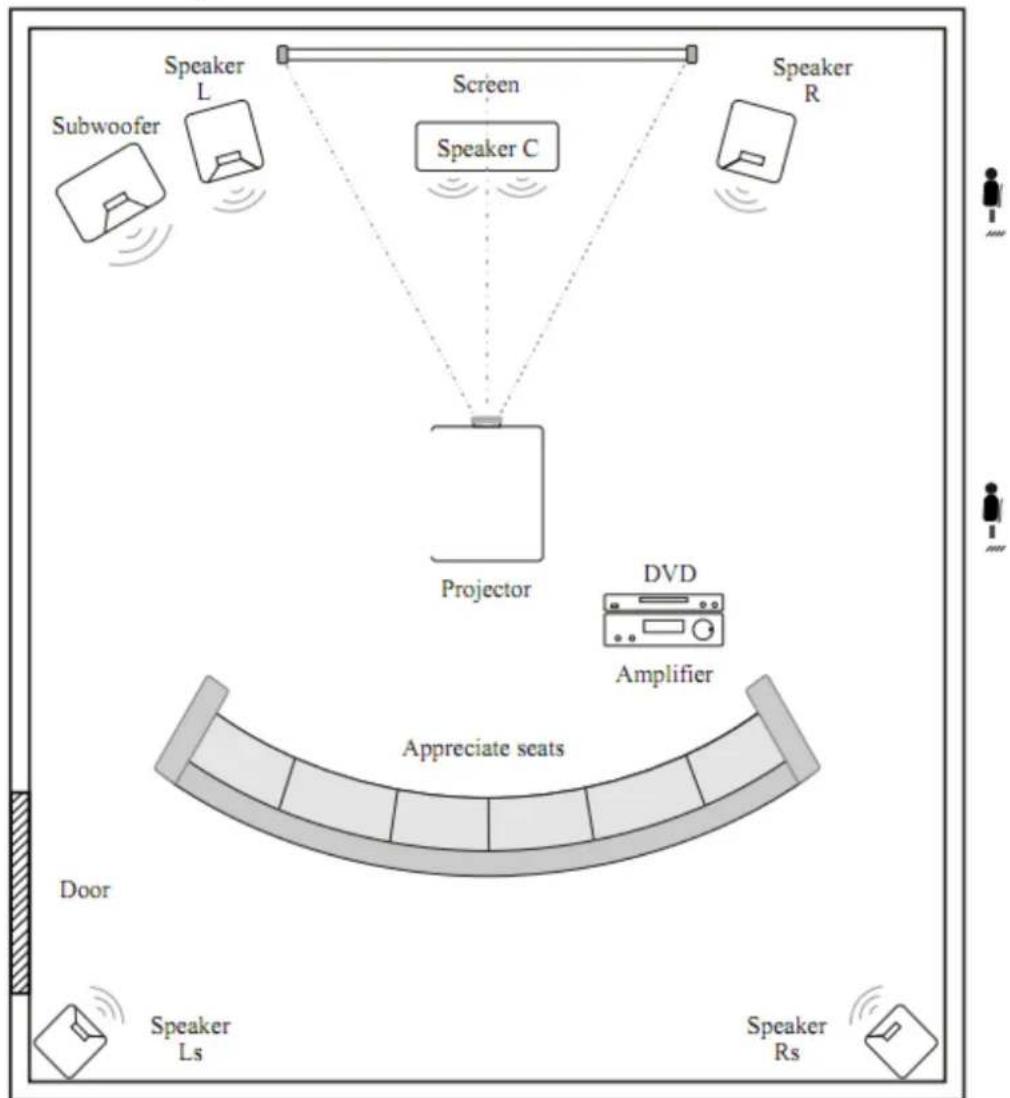
Projector Installation
Please use the setup instruction below:
flowchart
graph TD
    A["Speaker L"] --> B["Speaker C"]
    C["Speaker R"] --> D["Speaker C"]
    E["Subwoofer"] --> F["Speaker L"]
    G["Projector"] --> H["DVD Amplifier"]
    I["Speaker Rs"] --> J["Speaker Ls"]
    K["Appreciate seats"] --> L["Door"]
    style A fill:#f9f,stroke:#333
    style C fill:#f9f,stroke:#333
    style E fill:#f9f,stroke:#333
    style G fill:#f9f,stroke:#333
    style I fill:#f9f,stroke:#333
    style K fill:#f9f,stroke:#333
    style B fill:#ccf,stroke:#333
    style D fill:#ccf,stroke:#333
    style F fill:#ccf,stroke:#333
    style H fill:#ccf,stroke:#333
    style J fill:#ccf,stroke:#333
    style L fill:#ccf,stroke:#333
    style M fill:#ccf,stroke:#333
    style N fill:#ccf,stroke:#333
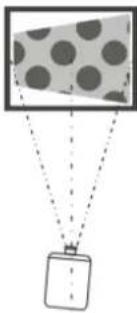
In order to get good image quality, do not let the sunlight shine the screen directly. If you use the projector in the day time, please close the curtain.
Standard setting (Front projection)
Please refer to the following sheet, adjust your picture size and distance (from the lens to screen):
| Screen Size | 4:3 | 16:9 |
| 60" | 2.3 m | 2.5 m |
| 72" | 2.68 m | 2.88 m |
| 100" | 3.6 m | 3.9 m |
The data maybe have 3% error, due to the image size according to the distance between projector and screen if the distance is less than 2 meters or over 5 meters, the image may be distorted.
Please check the following picture to show the trapezoid adjustment:
 |  |  |
| Incorrect installation, the images left-right small. | Installed correctly, the image is rectangular. | Incorrect installation, the images right-left small. |
Installation method:
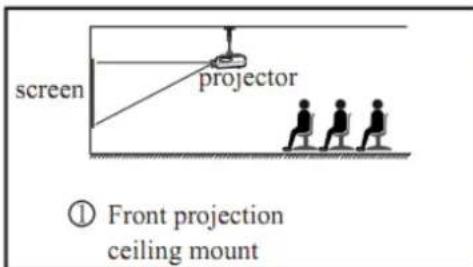
Contact a professional service technician to mount this projector to a ceiling. Follow the instructions below for the correct projector positions:
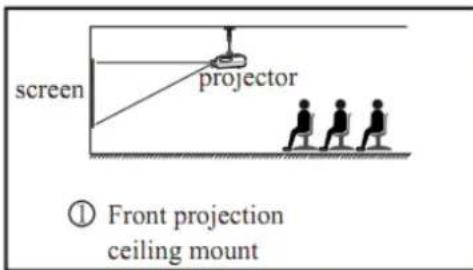
text_image
screen projector ① Front projection ceiling mount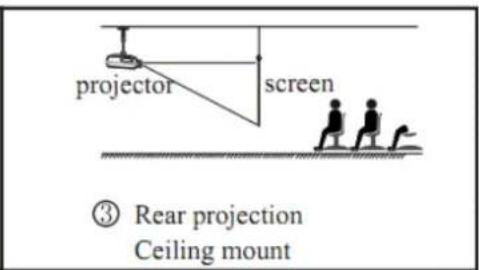
text_image
projector screen ③ Rear projection Ceiling mount
text_image
screen projector ② Front projection Table mount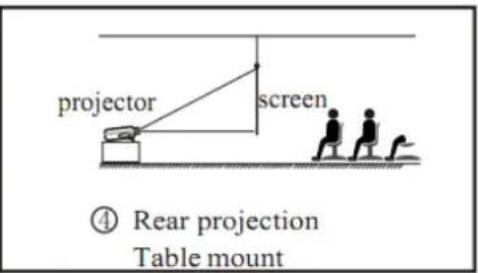
text_image
projector screen ④ Rear projection Table mountWarning:
- To avoid damage beyond repair or bodily injury, secure projector mounts firmly to the ceiling or a stable surface.
- This projector can only be used in an environment with a temperature not exceeding the range of 0\~35°C. The projector may malfunction if temperatures vary outside the normal operating range.
- The sharpness of the screen might be interrupted when the projector is being used in a dusty, wet, moist or smoke filled environment. The projector might malfunction in a moist or wet environment.
- Proper ventilation avoids overheating the projector.
Machine Instruction

text_image
Diagram of a projector with labeled parts including front panel, screen, and indicator lights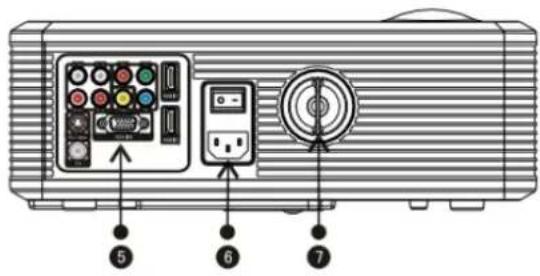
text_image
Diagram of a projector front panel with labeled buttons and indicators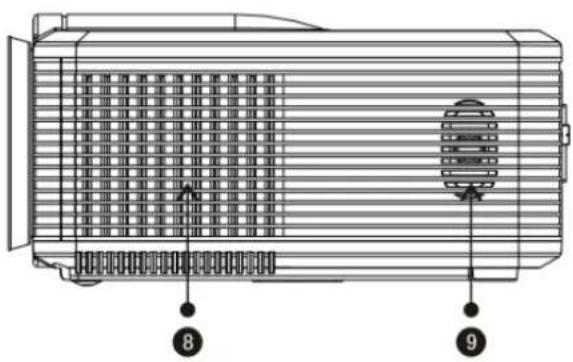
text_image
Technical diagram of a heat exchanger or fan with numbered components and ventilation slots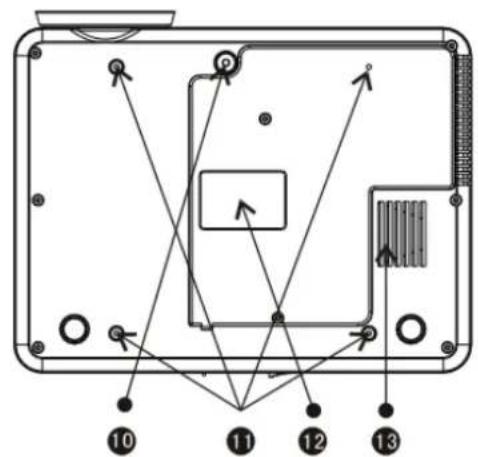
text_image
Technical diagram of a device with numbered components and directional arrows indicating assembly or connection points.- Focus lens
- IR receiver
- Hight-feet adjustment
- Cool winds input ventilation
- Input terminals
- Power switch
-
keystine
-
hot winds output ventilation
- speaker
- Hight-feet adjustment
- Projector mount hole
- Label
- Hot winds output ventilation
Input terminals
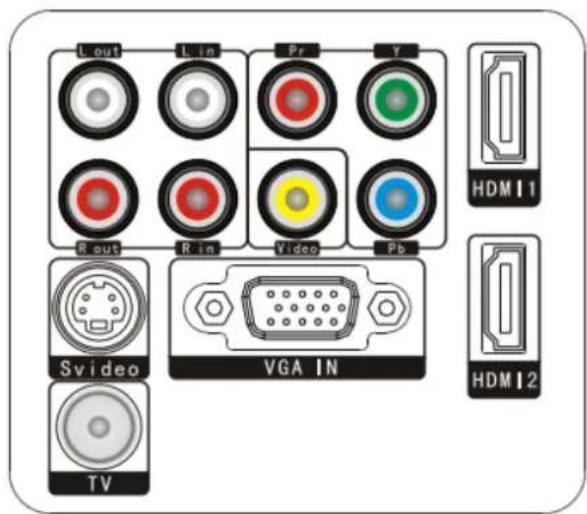
text_image
Lout L in Pr Y HDMI 1 R out R in Video Pb Svideo VGA IN HDMI 2 TV| Name | Instruction |
| Y/b/Pr | Component video input |
| Video | Av input |
| L out R out | Audio output |
| L in R in | Audio input |
| VGA IN | VGA input |
| Svideo | S-Video input |
| TV | Analog TV input |
| HDMI 1 | HDMI Signal input |
| HDMI 2 |
Caution:
Please connect the input signal cable well, then turn on the projector. Otherwise, it is easy to damage the projector.
Remote Control Instruction
text_image
16:9/4:3 – switch display MUTE – open or close the volume POWER – for turn the power on TV/AV/VGA/yPbPr/HDMI – switch input source H. Flip key Reset image effects V. Flip key Display-Information PIP-key under HDMI&VGA Menu – open menu Direction key DVB – digital TV mode Keys for DVB-/SD-mode Number Buttons UP DOWN MIX HOLD SUS/Page SIZE 1 2 3 4 5 6 7 8 0 -/- - - 0 5 Keys for DVB-/SD-modePanel Keystoke Instruction
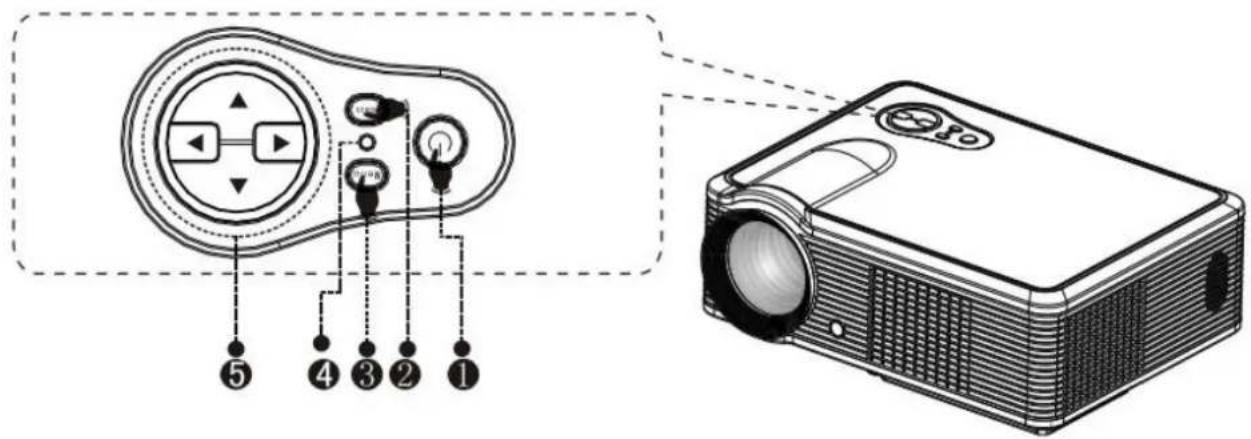
text_image
Diagram showing a projector with labeled buttons and a circular device, including numbered parts 1 to 5.- Power key
- Menu
-
Direction key
-
Source choose input signal
- Indicator light
red color:standby
green color:working
Open/close
If the projector is the new one. Please read "projector install" chapter. Placed the projector. Connect the powerwire and the signalwire. The operation as follow:
Open operation
-
Before use the remoter. Put in two 7 size battery in it.
-
Open the power switch on the backboard. The power light begin to flash.
-
Press the power key on the remote control or panel. The indicator light turn light.
-
Alter 2 second. the projector lamp begin work. began appear unclear white light on the screen. After 2 minute projector begin work ..
-
For the new projector. When the first time to use, maybe will appear image unclear or trapezoid distortion. please rend "image adjustment" chapter.
-
After the image is clear, then you can watch program. during watching. you also can setup the system parameter. please read "menu setting" chapter»
Close operation
-
During use the projector. press "power" key. can let the projector switch to situation.
-
After inter into stay situation. the projector under auto protect, auto release hot. the indicator light is flase situation. but here. the projector is under auto protect situation. not accept any order. if need to startup again . must wait for finished the release hot .
Image Adjustment
When you use the projector first time. It normally will appear image faintness or the image is trapezoid. It is the reason of lens focus or trapezoid correction. Please follow the step the correction:
Focus correction
Turn the lens into the projector (1), then turn it out slowly (2), at the same time looking at the resolution point care when the image is very clearly (take the middle area of the image), it is the best situation of the lens.
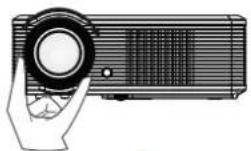
1
2
Note: When you replace the projector from a cold to a warm environment water vapour might occur. Don't turn the projector on when this occurs but wait until the vapour has disappeared.
Keystone correction
If a projected picture has keystone distortion, correct image with Keystone adjustment. The image becomes trapezoid shape when the screen or project is not level. Please reposition the projector to improve its angle to the screen. However, the circumference of the image may not be focused.
text_image
keystone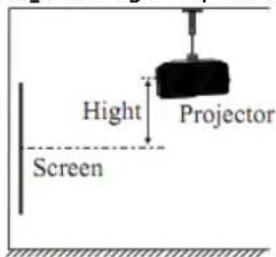
text_image
Hight Projector Screen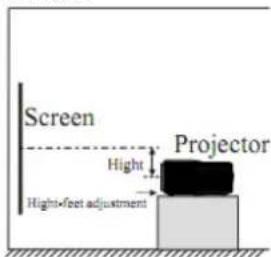
text_image
Screen Hight Projector High+feet adjustmentIf not able to use K. correction function to correct the trapezoid distortion. Please reduce of the projector to centre the screen vertically.
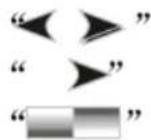
1) Menu setting methode
- Using the projector, press "menu" key, the picture display on screnn to adjust the menu(picture one);
-
press “◀/▶” key, the menu in turn circle into “picture” > “sound” > “system” > “PIP”;
-
Elect the adjust interface, use “▲/▼” key elect the item that need to adjust(picture two);
-
use “◀/▶” key to adjust the elect item paremeter;
- Finished the elect item parameter, press the "menu" key again, exit the page;
- Repeat operate the 2\~5step, till finished all the parameter's enactment, press "exit" key, exit the menu page, otherwise, the menu page will auto exit after a period time.
2) Parameter adjustment
a. Press "menu" key, untile display the above picture of the menu;
b. Press “▲/▼” key, elect the option that need to adjust;
c. Press “◀/▶” key, adjust parallelism elect parameter.
d. Press the "menu" key again exit the menu page parameter adjust station.
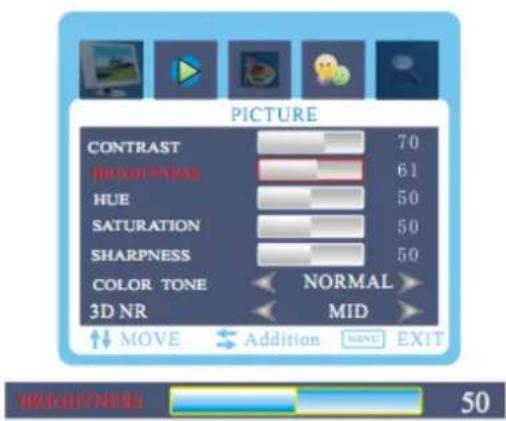
note:

” indicate fixed option;

indicate submenu option;

" indicate continue adjust
parameter, as adjust parameter will appear adjustment interface;
text_image
PICTURE CONTRAST 70 BRIGHTNESS 61 HUE 50 SATURATION 50 SHARPNESS 50 COLOR TONE NORMAL > 3D NR MID >(One)
text_image
PICTURE CLOTHING 70 BRIGHTNESS 61 HUE 50 SATURATION 50 SHARPNESS 50 COLOR TONE NORMAL 3D NR MID MOVE Addition EXIT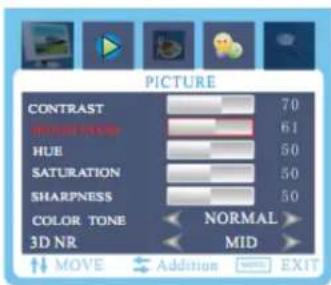
text_image
PICTURE CONTRAST 70 HUBE ZONE 61 HUE 50 SATURATION 50 SHARPNESS 50 COLOR TONE NORMAL 3D NR MID MOVE Addition EXIT1

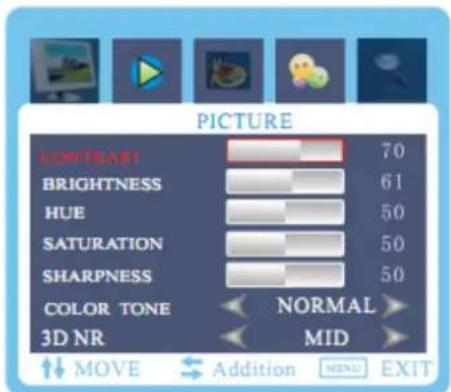
3) Picture Menu
text_image
PICTURE COLOR FLUSH 70 BRIGHTNESS 61 HUE 50 SATURATION 50 SHARPNESS 50 COLOR TONE NORMAL 3D NR MID ↑↓ MOVE ← Addition → EXIT| Picture menu | ||
| Contrast | 0-100 | Picture contrast adjustment |
| Brightness | 0-100 | Picture brightness adjustment |
| Hue | 0-100 | Picture hue adjustment |
| Saturation | 0-100 | Picture saturation adjustment |
| Sharpness | 0-100 | Picture sharpness adjustment |
| Color tone | Standard | The default is standard.you can set according to your personal. |
| Cool | ||
| Warm | ||
| 3D NR | High | The default is mid.you can set according to your personal. |
| Mid | ||
| Low | ||
| Close | ||
4) Sound Menu
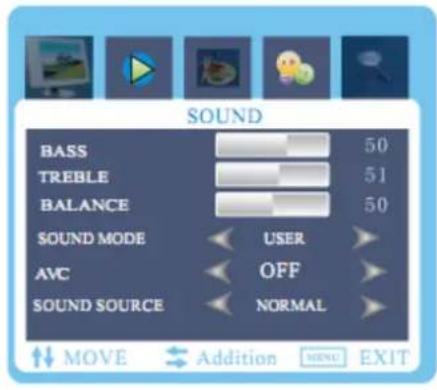
text_image
SOUND BASS 50 TREBLE 51 BALANCE 50 SOUND MODE USER AVC OFF SOUND SOURCE NORMAL MOVE Addition MENU EXIT| Sound menu | ||
| Bass | 0-100 | Adjust left-right sound channel |
| Treble | Standard | Default effects |
| Movie | Movie sound effects | |
| Music | Music sound effects | |
| Personal | Choose your personal sound effects | |
| Balance | Off/on | Balance off/on |
| Sound mode | Off | S-XBS off |
| Low | S-XBS low mode | |
| Mid | S-XBS middle mode | |
| High | S-XBS high mode | |
| AVC | Off/on | Auto voice control |
| SOUND SOURCE | Normal | Line and speaker both output |
| Line | Only line output | |
| Speaker | Only speaker output | |
5) System Menu
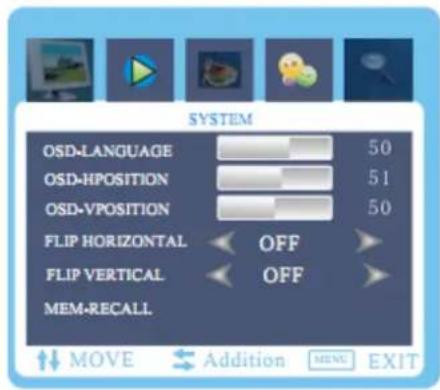
text_image
SYSTEM OSD-LANGUAGE 50 OSD-HPOSITION 51 OSD-VPOSITION 50 FLIP HORIZONTAL OFF FLIP VERTICAL OFF MEM-RECALL| System menu | ||
| Language | Adjust the OSD language | |
| H-position | 0-100 | Adjust OSD horizontal position |
| V-position | 0-100 | Adjust OSD vertical position |
| Flip horizontal | Off/on | Picture flip left to right |
| Flip vertical | Off/on | Picture flip up and down |
| Mem-recall | All setting return to system default | |
6) PIP-Menu

text_image
PIP SUB SOURCE SIZE PIP-POSITION BORDERCOLOR SOUND SOURCE SWAP PIP YCBCR LARGE TOP LEFT BLACK MAIN MOVE Addition MOVE EXIT| PIP MENU | ||
| MULITI WINDOWS | OPEN | |
| PIP | ||
| POP 4:3 | ||
| OFF | ||
| SUB SOURCE | TV | Choose TV as sub source |
| VIDEO | Choose AV as sub source | |
| SVIDEO | Choose svideo as sub source | |
| YCBCR | Choose ycbcr as sub source | |
| VGA | Choose VGA as sub source | |
| HDMI1 | Choose HDMI1 as sub source | |
| HDMI2 | Choose HDMI2 as sub source | |
| SIZE | S/M/L | Choose sub picture size |
| PIP POSITION | UpLeft | Move the sub picture to upleft |
| DownLeft | move the sub picture to downleft | |
| UpRight | Move the sub picture to upright | |
| DownRight | Move the sub picture to downright | |
| BORDER COLOR | Black and blue | Choose the border color |
| SOUND SOURCE | Main picture | Choose the sound for main picture |
| Sub picture | Choose the sound for sub picture | |
| SWAP | Alternate main picture and sub picture | |
NOTE:
when main source is HDMI1,HDMI2,YCBCR,VGA the sub source is only AV or TV or S-video.
7) TV-Channel Menu
text_image
TV AUTO SCAN > FINE TUNING > MANUAL SEARCH > COLOR SYSTEM SOUND SYSTEM AUTO AUTO MOVE Addition VIEW EXIT| TV menu | ||
| Auto scan | Scan the channel and save it | |
| Fine | Fine the channel by manual | |
| Manual search | Channel | Chose the channel number。 |
| Search | Search the channel by manual | |
| Save | Save the channel by manual | |
| Color system | Auto | Adjust the color system,"auto" is default |
| PAL | ||
| SECAM | ||
| Sound system | Auto | Adjust the sound system"auto"is default |
| BG | ||
| I | ||
| DK | ||
| L | ||
| LL | ||
8) PC Menu
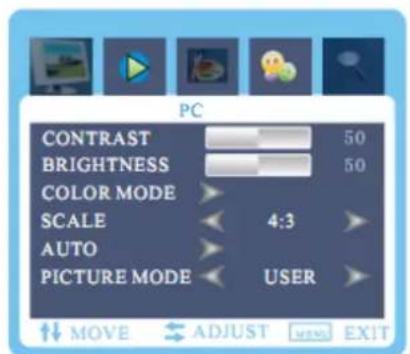
text_image
PC CONTRAST 50 BRIGHTNESS 50 COLOR MODE SCALE 4:3 AUTO PICTURE MODE USER MOVE ADJUST EXIT| PC MENU | |||
| CONTRAST | 0-100 | Adjust the picture contrast | |
| BRIGHTNESS | 0-100 | Adjust the picture brightness | |
| COLOR MODE | COLOR TEMAP | Standard | Make a setting according to your personal. |
| Warm | |||
| Cool | |||
| S-RGB | |||
| Personal | |||
| USER-R | 0-100 | Make a setting according to your personal. | |
| USER-G | 0-100 | ||
| USER-B | 0-100 | ||
| SCALE | Adjust the picture scale | ||
| AUTO | Adjust the PC picture frequency and phase | ||
| PICTURE MODE | Personal setting | ||
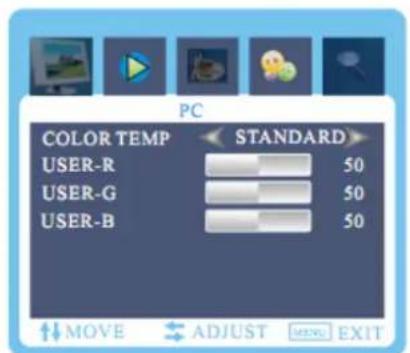
text_image
PC COLOR TEMP STANDARD USER-R 50 USER-G 50 USER-B 50 MOVE ADJUST MENU EXIT9) Geometry Menu
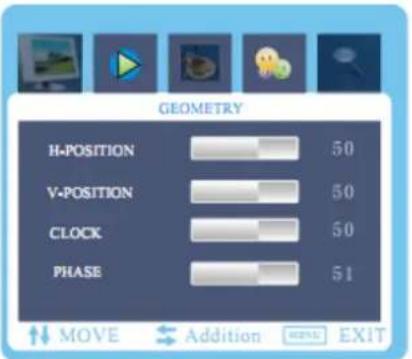
text_image
GEOMETRY H-POSITION 50 V-POSITION 50 CLOCK 50 PHASE 51 MOVE Addition EXIT| Geometry menu | ||
| H-position | 0-100 | Adjust Pc picture position in Horizontal |
| V-position | 0-100 | Adjust PC picture position in vertical |
| CLOCK | 0-100 | Adjust the scan frequency in horizontal |
| PHASE | 0-100 | Adjust the signal synchronization |

The geometry menu only exisit in PC channel
Troubleshooting
| Problem: | Possible solution(s): |
| 1) When turn on the power switch, the indicator light do not work | Power cable do not connect well.The power switch fuse is broken |
| 2) The remote control cannot turn on the projector | The power switch turn on or off?Remote control do not have battery.The remote control do not aim at the IR point. |
| 3) No image in the screen | The input source choice is correct?Is there a input signal?The input cable connect well or notUnder PC mode:The PC output frequency is 50-60Hz? |
| 4) Auto-off after use some times | The projector ventilation is block?The Voltage is not stable.The projector is so hot? Maybe the fan is broken. |
Specification
| LCD | modelnative resolutionsupport resolution | 5" TFT800 x 600 support 720p, 1080p1000 : 1 |
| Input signal | VideoAudio | Component Video, VGA , HDMI 1&2,TV, S-Video Stereo |
| Output signal | speaker | 5W x 2 (select) |
| Lens | ApertureFocus | 3.8185mm |
| Lamp | LEDColor temperatureLife | 100W9300K~20000 Std. |
| Image | sizeBrightnessTrapezoid correction | 60-100"2000 Lumens± 15° |
| Input Power | VoltagePower consumption | AC 110~240V/50-60Hz<140W |
| Working condition | TemperatureHumidity | 0°C ~ +70°C10% ~ 65% |
| Store condition | TemperatureHumidity | -20°C ~ +70°C10% ~ 90% |
| Infrared remote control | Frequency | 38KHz |
| Machine | SizeWeight | 330 x 246 x 116 mm3 kg |
Accessory list
| projector | 1 unit |
| remote control | 1 pc |
| power cable | 1 pc |
| AV cable | 1 pc |
| VGA cable | 1 pc |
| Manual | 1 pc |
| spare fuse | 1 pc |
| clear paper | 1 pc |