
1313 - Broom BISSELL - Free user manual and instructions
Find the device manual for free 1313 BISSELL in PDF.


| Product Type | Cordless Stick Vacuum (2-in-1) |
| Model | 1313, 1315 Series |
| Power Source | Rechargeable NiMH Battery |
| Charging Time | 8 hours for full charge |
| Charger | Included (model-specific adapter) |
| Battery Status Indication | LED: green (full), red (low) |
| Handle | 2-way folding handle with trigger release |
| Hand Vacuum | Detachable handheld unit |
| Dirt Cup Capacity | Marked with "FULL" line |
| Filter Type | Washable filter cup and cloth filter |
| Brush Roll | Motorized with on/off switch and reset function |
| Suction Control | Normal/High (1315 series only) |
| Accessories | Crevice tool with dusting brush |
| Weight | Approx. 5.5 lbs (2.5 kg) |
| Warranty | Limited 1-year (residential use) |
| Safety Certifications | UL listed (implied) |
Frequently Asked Questions - 1313 BISSELL
User questions about 1313 BISSELL
0 question about this device. Answer the ones you know or ask your own.
Ask a new question about this device
Download the instructions for your Broom in PDF format for free! Find your manual 1313 - BISSELL and take your electronic device back in hand. On this page are published all the documents necessary for the use of your device. 1313 by BISSELL.
USER MANUAL 1313 BISSELL
natural_image
Top-down view of a white cylindrical vacuum cleaner with black and white body, labeled 'BOLT' (no additional text or symbols visible)1313, 1315 SERIES
IMPORTANT SAFETY INSTRUCTIONS
READ ALL INSTRUCTIONS BEFORE USING YOUR VACUUM.
Unplug from outlet when not in use and before conducting maintenance. When using an electrical appliance, basic precautions should be observed, including the following:

WARNING
TO REDUCE THE RISK OF FIRE, ELECTRIC SHOCK, OR INJURY:
» Do not use outdoors or on wet surfaces.
» Do not allow to be used as a toy.
» Close attention is necessary when used by or near children.
» Do not use for any purpose other than described in this User's Guide.
» Use only manufacturer's recommended attachments.
» Do not use with damaged cord or plug.
» If appliance is not working as it should, has been dropped, damaged, left outdoors, or dropped into water, have it repaired at an authorized service center.
» Do not pull or carry by cord, use cord as a handle, close a door on cord, or pull cord around sharp edges or corners. Do not run appliance over cord. Keep cord away from heated surfaces.
» Do not unplug by pulling on cord. To unplug, grasp the plug, not the cord.
» Do not handle charging base, including plug and charging base terminal with wet hands.
» Do not charge the unit outdoors.
» Use only the charger supplied by the manufacturer to recharge.
» Do not incinerate the appliance even if it severely damaged. The batteries can explode in a fire.
» Do not put any object into opening.
» Do not use with any opening blocked.
» Keep openings free of dust, lint, hair and anything that may reduce airflow.
» Keep hair, loose clothing, fingers, and all parts of body away from openings and moving parts.
» Use extra care when cleaning stairs.
» Do not pick up flammable materials (lighter fluid, gasoline, kerosene, etc.) or use in the presence of explosive liquids or vapors.
» Always turn off this appliance before connecting or disconnecting the motorized nozzle.
» Do not pick up toxic material (chlorine bleach, ammonia, drain cleaner, etc.).
» Do not use vacuum cleaner in an enclosed space filled with vapors given off by oil base paint, paint thinner, some moth proofing substances, flammable dust, or other explosive or toxic vapors.
» Do not pick up hard or sharp objects such as glass, nails, screws, coins, etc.
» Do not pick up anything that is burning or smoking, such as cigarettes, matches, or hot ashes.
» Do not use without dust cup or filters in place.
» Use only on dry, indoor surfaces.
» Keep appliance on a level surface.
SAVE THESE INSTRUCTIONS FOR FUTURE USE
This model is for household use only.
Thanks for buying a BISSELL vacuum
We're glad you purchased a BISSELL vacuum. Everything we know about floor care went into the design and construction of this complete, high-tech home cleaning system.
Your BISSELL vacuum is well made, and we back it with a limited one-year warranty. We also stand behind it with a knowledgeable, dedicated Consumer Care department, so, should you ever have a problem, you'll receive fast, considerate assistance.
My great-grandfather invented the floor sweeper in 1876. Today, BISSELL is a global leader in the design, manufacture, and service of high quality homecare products like your BISSELL vacuum.
Thanks again, from all of us at BISSELL.
man 1.7 mmell
Mark J. Bissell Chairman & CEO
Safety Instructions.....2
Product View.....4
Assembly 5
Operations 5-6
Maintenance & Care ..... 7-9
Troubleshooting ..... 10
Warranty 11
Service 11
Consumer Care ....12
Product Registration ..... 12
Product View
1 Power/Brush Roll On/Off/Suction Power Control
2 2-Way Folding Handle Release
3 Hand Vacuum Power Button
4 Dirt Cup Release
5 Detachable Hand Vacuum
6 Dirt Cup
7 Washable Filter Cup
8 Swivel Head
9 Crevice Tool with Dusting Brush
10 Charging Adapter Plug
11 Charging Base (optional)
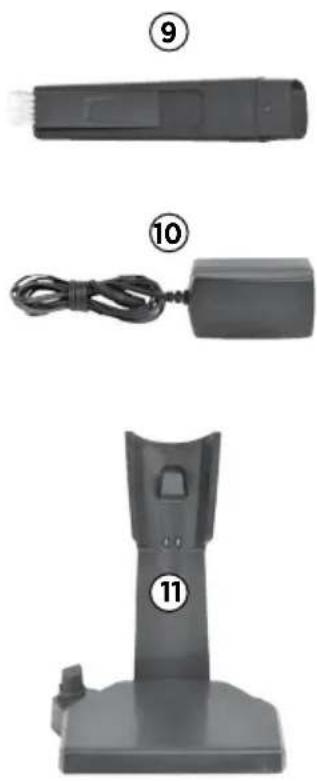
natural_image
Three black electronic devices with numbered labels: a USB flash unit, a cable, and a handheld device (no visible text or symbols on the devices themselves)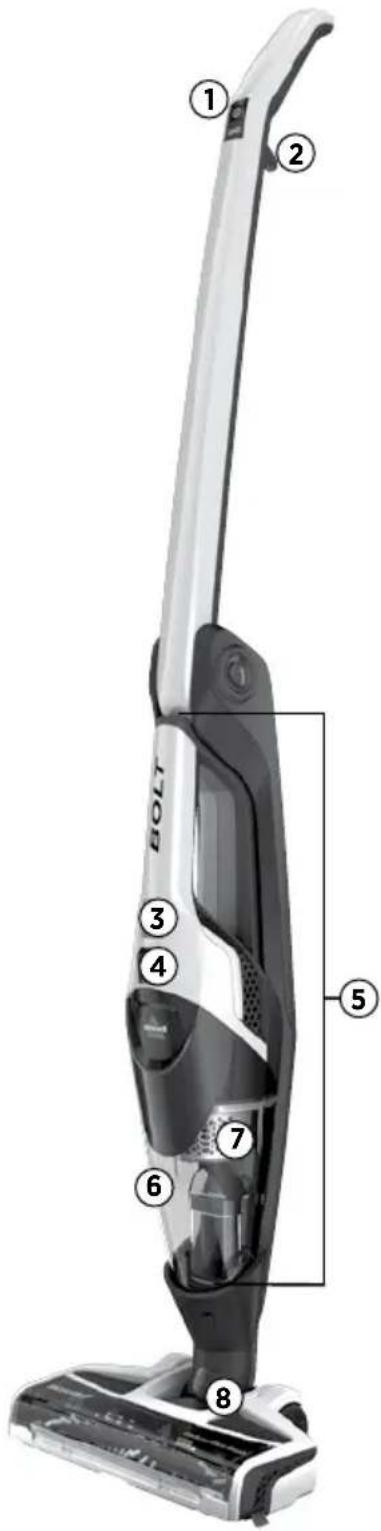
WARNING
Plastic film can be dangerous. To avoid danger of suffocation, keep away from babies and children.
WARNING
Do not plug in your vacuum cleaner until you are familiar with all instructions and operating procedures.
WARNING
To reduce the risk of electric shock, turn power switch off and disconnect plug from electrical outlet before performing maintenance or troubleshooting checks.
Assembly
No tools are required for assembly; simply insert foot into body of unit until you hear a click.
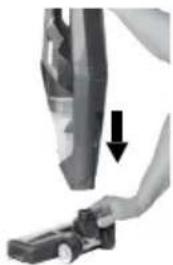
natural_image
Close-up of a hand holding a small mechanical device with a downward arrow indicating motion (no text or symbols visible)WARNING
Do not plug in your vacuum cleaner until you are familiar with all instructions and operating procedures.
Charging
- Insert the charging adapter plug into the charging port on the back of the unit or the bottom of the charging base (if applicable).
- Plug the adapter into the wall outlet. If using the charging base (optional), place unit onto base. The power LED lights will illuminate when charging. Charge the unit completely for 8 hours prior to first use.
NOTE: The adapter may become warm during charging – this is normal. The unit can remain plugged in even when the charge is complete.
- When the unit is fully discharged, approximately 8 hours of charging is required for the battery to regain full capacity.
| Charging | ||
| Battery Status LED Color LED Action | ||
| Full Green Green for 10 minutes then flashes green once per minute | ||
| Low Red Slow Blinking Red | ||
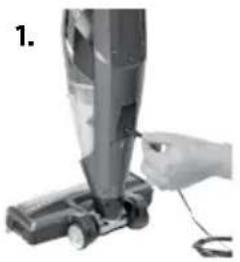
natural_image
Hand inserting a cable into a vacuum cleaner's airbag (no text or symbols visible)Operations
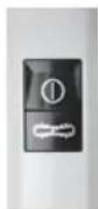
Control buttons
The power button is located on the top of the handle. Settings include:
a. Power Icon = On/Off
b. Brush Icon = Brush On/Off
c. Suction Icon = Normal/High (For 1315 Series only)
Using your cordless vacuum
- Push power button ON.
- Push brush button on to easily clean hard floors, low pile carpet, and area rugs.
- Use suction button to control power of suction.
a.

b. c.


1313 Series

1315 Series
Operations
2-way folding handle
This feature is great for cleaning under couches, beds and other hard to reach areas.
- To release, pull trigger located on the back of the handle to bend handle forward for cleaning under furniture.
- For space saving storage, pull trigger to bend handle backward.
WARNING
Do not operate cleaner with damp or wet filters or without vacuum bags and all filters in place.

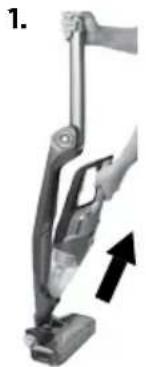
Cleaning with the removable hand vacuum
- Remove hand vacuum by pulling the hand vacuum directly out of the unit.
- The power button is located on top of the grip area. Push ON to start cleaning.
- Easily clean messes on furniture, stairs, and other hard to reach areas.
- To use hand vacuum accessories, insert the end of the tool into the end of the hand vacuum prior to turning hand vacuum ON.
- When done cleaning, turn power OFF and remove hand vacuum accessory and place back in unit.
natural_image
Mechanical device with lever and handle, showing a black arrow indicating motion (no text or symbols)

» Accessories can be combined together or used individually.
Maintenance & Care
To maintain maximum cleaning performance, the following maintenance steps must be performed:
Emptying the dirt cup
Dirt cup should be emptied before debris reaches the FULL line on cup.
- Turn power OFF and remove hand vacuum from unit by pulling the hand vacuum directly out of the unit.
- Hold hand vacuum vertically and depress the release button to release dirt cup.
- Grasp filter tabs and pull vertically to remove filter cup and empty dirt into waste container.
- Replace filter back into the dirt cup and attach dirt cup to hand vacuum until it snaps securely in place.
WARNING
To reduce the risk of electric shock, turn power switch off and disconnect plug from electrical outlet before performing maintenance or troubleshooting checks.
Release Button

natural_image
Close-up of a hand holding a metallic tool, with a numbered callout line and label '2.' (no text or symbols on the tool itself)
natural_image
Two-step illustration showing hands performing a medical procedure on a curved object, with a downward arrow indicating motion (no text or symbols present)Cleaning or replacing the filter
The key to maximum performance is having a clean filter. Cleaning the filter after each use will help your vacuum operate at peak efficiency.
Use only genuine BISSELL model number 1313 & 1315 replacement filters in your BISSELL vacuum. To purchase visit www.BISSELL.com or call 1-800-237-7691.
To clean filter:
- Turn power OFF.
- Remove the dirt cup from the hand vacuum, as directed in step 1 "Emptying the dirt cup".
- Remove filter cup assembly by pulling out of dirt cup. Then twist cloth filter out by twisting counterclockwise. Tap filters against waste basket removing any visible dirt.
- Replace filter back into the washable filter cup then turn clockwise to lock into place.
- Attach washable filter cup back into the dirt cup and attach to hand vacuum until it snaps securely in place.
NOTE: After heavy usage, you may clean the filter and filter cup by washing it gently by hand in warm water and mild dish detergent. Rinse thoroughly and make certain it is completely dry before replacing it.

natural_image
Two-panel image showing hands holding a small object and a mesh container, both without any visible text or symbols.Maintenance & Care
Brush roll maintenance
The brush roll may accumulate debris such as strings, hair and fibers. This type of debris can wrap around the brush and diminish its ability to clean effectively.
To remove brush roll for cleaning:
- Turn power OFF. Turn unit over to access the brush roll.
- Slide down the lock tab and pull up the brush roll gate.
- To remove brush roll, simply lift the brush out of the brush chamber. Clean off hair or other debris from brush roll.
- Place cleaned brush roll back into foot of unit by aligning the brush roll end to the brush driver.
- Lock the brush roll in place by closing the brush chamber gate and sliding the locking tab in place.
Brush roll reset:
If larger debris becomes lodged in the foot of the unit and the brush roll shuts off, turn the unit off and remove the obstruction. Wait approximately 15 seconds for the motor to cool down before turning back on. Brush will function again after allowing time to cool down.

Maintenance & Care
Disposal of batteries
If your Bolt 2-in-1 Cordless Vacuum is to be disposed of, the batteries should be removed and disposed of properly.
- IMPORTANT: Unplug Charger.
- Remove hand vac from unit and remove dirt cup from handle.
- Remove (2) Phillips head screws and remove the lens from the hand vacuum.
- Remove (2) Phillips head screws from the hand vacuum cover.
-
Lift off the hand vacuum cover.
-
Take out push rod.
-
Remove (5) Phillips head screws from the side of the hand vacuum.
-
Remove the entire battery assembly from the cover.
-
Cut wires from the PCB and wrap the wire ends with insulation tape.
-
Keep Battery Pack together - DO NOT separate individual batteries. For specific disposal instructions of batteries, please contact RBRC (Rechargeable Battery Recycling Corporation) 1-800-822-8837 or visit www.rbrc.com.
-
Discard remainder of product
CAUTION: Disconnecting the battery will destroy the appliance and invalidate the warranty.
WARNING
To reduce the risk of electric shock, turn power switch off and disconnect plug from electrical outlet before performing maintenance or troubleshooting checks.

WARNING
This product contains Nickel Metal Hydride (NiMH) rechargeable batteries. According to Federal and State regulations, removal and proper disposal of NiMH
batteries is required. For removal of the batteries in your Bolt see instructions on this page.
Troubleshooting
WARNING
To reduce the risk of electric shock, turn power switch off and disconnect plug from electrical outlet before performing maintenance or troubleshooting checks.
| Problem Possible causes Remedies | ||
| Vacuum won't turn on | Battery isn't fully charged Charge battery. Follow charging battery instructions on page 5 | |
| Wrong charger being used Be sure to use only the charger supplied with your product. The label on the detachable hand vacuum will list which charger can be used. | ||
| Brush roll not turning | Brush roll is jammed Remove obstruction.Follow instructions on page 8 | |
| Brush roll needs to be reset Follow instructions on page 8 | ||
| Broken brush roll belt Visit www.bissell.com or call 1-800-237-7691 to order replacement parts. | ||
| Vacuum cleaner has low suction | Dirt container is full Empty dirt container | |
| Dirt container is not installed properly | Position container correctly and snap firmly into place | |
| Foot is loose Make sure foot is fully inserted into body of unit | ||
| Filters need cleaning Follow filter instructions on page 7 | ||
| Filters need replacing Visit www.bissell.com or call 1-800-237-7691 to order replacement filters | ||
| Clog or obstruction in foot area | Detach foot from main body and examine and remove clog from ports | |
| Visible dirt escaping from cleaner | Dirt container is full of debris | Empty dirt container |
| Filter is missing or installed incorrectly | Check filter for correct installation | |
| Dirt container installed incorrectly | Position container correctly and snap firmly into place | |
| Vacuum won't charge | Not the correct charger | Use only the charger that comes with the machine |
Please do not return this product tothestore.
Other maintenance or service not included in the manual should be performed by an authorized service representative.
Thank you for selecting a BISSELL product.
For any questions or concerns, BISSELL is happy to be of service. Contact us directly at 1-800-237-7691.
Warranty Service
This warranty gives you specific legal rights, and you may also have other rights which may vary from state to state. If you need additional instruction regarding this warranty or have questions regarding what it may cover, please contact BISSELL Consumer Care by E-mail, telephone, or regular mail as described below.
Limited One-Year Warranty
Subject to the *EXCEPTIONS AND EXCLUSIONS identified below, upon receipt of the product BISSELL will repair or replace (with new or remanufactured components or products), at BISSELL's option, free of charge from the date of purchase by the original purchaser, for one year any defective or malfunctioning part.
See information below on "If your BISSELL product should require service".
This warranty applies to product used for personal, and not commercial or rental service. This warranty does not apply to fans or routine maintenance components such as filters, belts, or brushes. Damage or malfunction caused by negligence, abuse, neglect, unauthorized repair, or any other use not in accordance with the User's Guide is not covered.
BISSELL IS NOT LIABLE FOR INCIDENTAL OR CONSEQUENTIAL DAMAGES OF ANY NATURE ASSOCIATED WITH THE USE OF THIS PRODUCT. BISSELL'S LIABILITY WILL NOT EXCEED THE PURCHASE PRICE OF THE PRODUCT.
Some states do not allow the exclusion or limitation of incidental or consequential damages, so the above limitation or exclusion may not apply to you.
\*EXCEPTIONS AND EXCLUSIONS FROM THE TERMS OF THE LIMITED WARRANTY
THIS WARRANTY IS EXCLUSIVE AND IN LIEU OF ANY OTHER WARRANTIES EITHER ORAL OR WRITTEN. ANY IMPLIED WARRANTIES WHICH MAY ARISE BY OPERATION OF LAW, INCLUDING THE IMPLIED WARRANTIES OF MERCHANTABILITY AND FITNESS FOR A PARTICULAR PURPOSE, ARE LIMITED TO THE ONE YEAR DURATION FROM THE DATE OF PURCHASE AS DESCRIBED ABOVE.
Some states do not allow limitations on how long an implied warranty last so the above limitation may not apply to you.
NOTE: Please keep your original sales receipt. It provides proof of date of purchase in the event of a warranty claim.
If your BISSELL product should require service:
Visit BISSELL.com or contact BISSELL Consumer Care to locate a BISSELL Authorized Service Center in your area.
If you need information about repairs or replacement parts, or if you have questions about your warranty, contact BISSELL Consumer Care.
Website:
www.BISSELL.com
Or Call:
BISSELL Consumer Care
1-800-237-7691
Monday - Friday 8am - 10pm ET
Saturday 9am - 8pm ET
Sunday 10am - 7pm ET
Register your product today!
Registering is quick, easy and offers you benefits over the lifetime of your product.
You'll receive:
BISSELL Rewards Points
Automatically earn points for discounts and free shipping on future purchases.
Faster Service
Supplying your information now saves you time should you need to contact us with questions regarding your product.
Product Support Reminders and Alerts
We'll contact you with any important product maintenance reminders and alerts.
Special Promotions
Optional: Register your email to receive notice of offers, contests, cleaning tips and more!
Visit www.BISSELL.com/registration now!
BISSELL Consumer Care
For information about repairs or replacement parts, or questions about your warranty:
Call:
BISSELL Consumer Care 1-800-237-7691
Monday - Friday 8 am - 10 pm ET Saturday 9 am - 8 pm ET Sunday 10am - 7pm ET
Email:
www.BISSELL.com/email-us
Visit the BISSELL website: www.BISSELL.com
When contacting BISSELL, have model number of cleaner available.
Please record your Model Number: ____
Please record your Purchase Date: ____
NOTE: Please keep your original sales receipt. It provides proof of purchase date in the event of a warranty claim. See Warranty on page 11 for details.
Parts & Supplies
For Parts and Supplies, go to BISSELL.com and enter your model number in the search field.

©2015 BISSELL Homecare, Inc
Grand Rapids, Michigan
All rights reserved. Printed in China
Part Number 160-6814 Rev 05/15
Visit our website at: www.BISSELL.com


- IMPORTANT SAFETY INSTRUCTIONS
- READ ALL INSTRUCTIONS BEFORE USING YOUR VACUUM.
- WARNING
- TO REDUCE THE RISK OF FIRE, ELECTRIC SHOCK, OR INJURY:
- SAVE THESE INSTRUCTIONS FOR FUTURE USE
- Thanks for buying a BISSELL vacuum
- Product View
- Assembly
- Charging
- NOTE: The adapter may become warm during charging – this is normal. The unit can remain plugged in even when the charge is complete.
- Operations
- Control buttons
- Using your cordless vacuum
- 2-way folding handle
- Cleaning with the removable hand vacuum
- Maintenance & Care
- Emptying the dirt cup
- Cleaning or replacing the filter
- To clean filter:
- Brush roll maintenance
- To remove brush roll for cleaning:
- Brush roll reset:
- Disposal of batteries
- Troubleshooting
- Warranty Service
- Limited One-Year Warranty
- \*EXCEPTIONS AND EXCLUSIONS FROM THE TERMS OF THE LIMITED WARRANTY
- If your BISSELL product should require service:
- Website:
- Or Call:
- Register your product today!
- BISSELL Rewards Points
- Faster Service
- Product Support Reminders and Alerts
- Special Promotions
- Visit www.BISSELL.com/registration now!
- BISSELL Consumer Care
- Call:
- Email:
- Visit the BISSELL website: www.BISSELL.com
- Parts & Supplies
Brand : BISSELL
Model : 1313
Category : Broom