
75071TA2 - Clock AcuRite - Free user manual and instructions
Find the device manual for free 75071TA2 AcuRite in PDF.


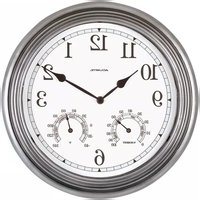
| Product Type | Digital Wall Clock with Indoor/Outdoor Temperature |
| Brand | AcuRite |
| Model | 75071TA2 |
| Dimensions (Clock) | 7.2 x 1.4 x 7.2 inches (18.3 x 3.6 x 18.3 cm) |
| Weight (Clock) | 0.5 lbs (227 g) |
| Power Source | 2 AA batteries (not included) for clock; optional AC adapter |
| Display Type | Large LCD with backlight |
| Time Synchronization | Atomic clock with automatic WWVB radio control |
| Clock Functions | Time, date, day of week, alarm with snooze |
| Temperature Measurement | Indoor temperature (displayed on clock) and outdoor temperature via wireless sensor (included) |
| Temperature Range | Indoor: 32°F to 122°F (0°C to 50°C); Outdoor: -40°F to 158°F (-40°C to 70°C) |
| Wireless Sensor Range | Up to 330 feet (100 meters) in open air |
| Mounting Options | Wall mountable or freestanding on flat surface |
| Cleaning and Maintenance | Wipe with a soft, dry cloth. Do not use abrasive cleaners or liquids. |
| Battery Safety | Use only fresh, recommended battery types. Remove old batteries promptly to avoid leakage. |
| Repairability | No user-serviceable parts. Refer to manual for battery replacement and troubleshooting. |
| Warranty | Limited 5-year warranty against defects in materials and workmanship |
| User Manual | Available for free PDF download on manufacturer's website |
Frequently Asked Questions - 75071TA2 AcuRite
User questions about 75071TA2 AcuRite
0 question about this device. Answer the ones you know or ask your own.
Ask a new question about this device
Download the instructions for your Clock in PDF format for free! Find your manual 75071TA2 - AcuRite and take your electronic device back in hand. On this page are published all the documents necessary for the use of your device. 75071TA2 by AcuRite.
USER MANUAL 75071TA2 AcuRite
Intelli-Time® Digital Clock
model 75071T

CONTENTS
Unpacking Instructions ...... 2
Package Contents ...... 2
Product Registration ...... 2
Features & Benefits......3
Clock Setup 4
Intelli-Time® Clock 4
Set the Time & Date .... 5
Using the Clock.... 5
Troubleshooting 5
Care & Maintenance......6
Replace Intelli-Time® Battery ... 6
Specifications......6
FCC Information 6
Customer Support......7
Warranty....7
Questions? Contact Customer Support at
(877) 221-1252 or visit www.AcuRite.com.
SAVE THIS MANUAL FOR FUTURE REFERENCE.
ACU▶RITE®
Congratulations on your new AcuRite product. To ensure the best possible product performance, please read this manual in its entirety and retain it for future reference.
Unpacking Instructions
Remove the protective film that is applied to the LCD screen prior to using this product. Locate the tab and peel off to remove.
Package Contents
- Digital clock
- Instruction Manual

Features & Benefits
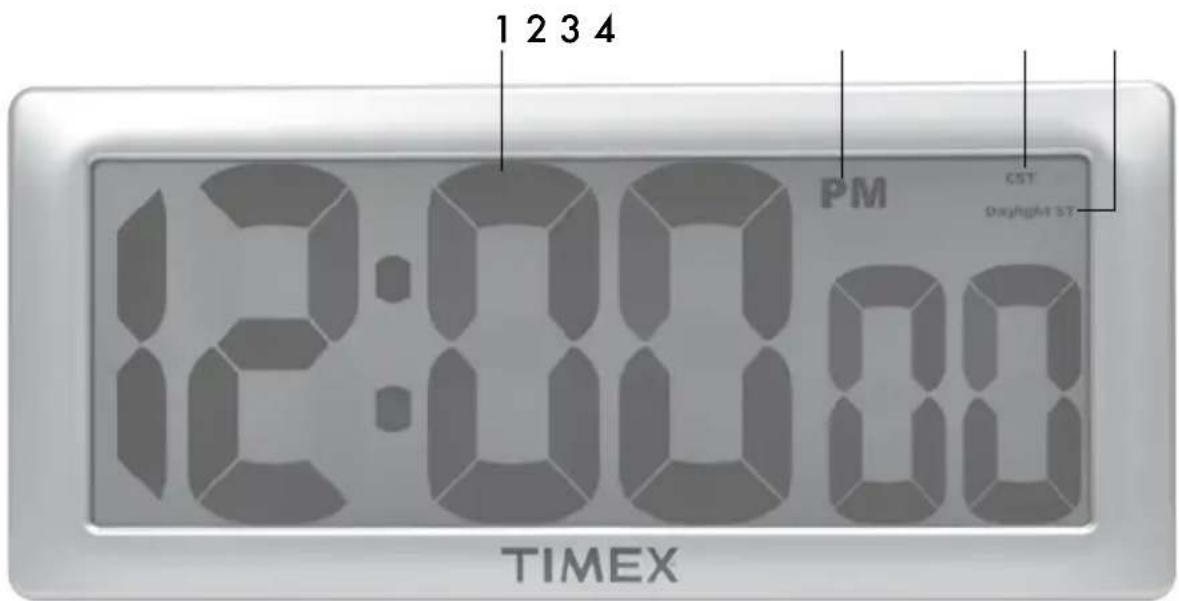
- Intelli-Time® Clock
- AM/PM Indicator
- Time Zone Indicator
- Daylight Saving Time Indicator
- Integrated Hang Hole For easy wall mounting.
- SET Button
- UP Button
-
DOWN Button
-
TIME ZONE Button
- RESET Button Full reset to factory defaults
- DST OLD/NEW/OFF Switch for DST setup preferences.
12.Battery Compartment - Intelli-Time® Battery Compartment
- Fold-Out Stands

Install or Replace Batteries
- Remove the battery compartment cover.
- Insert 4 x AA alkaline batteries into the battery compartment, as shown. Follow the polarity (+/-) diagram in the battery compartment.
- Replace the battery cover.
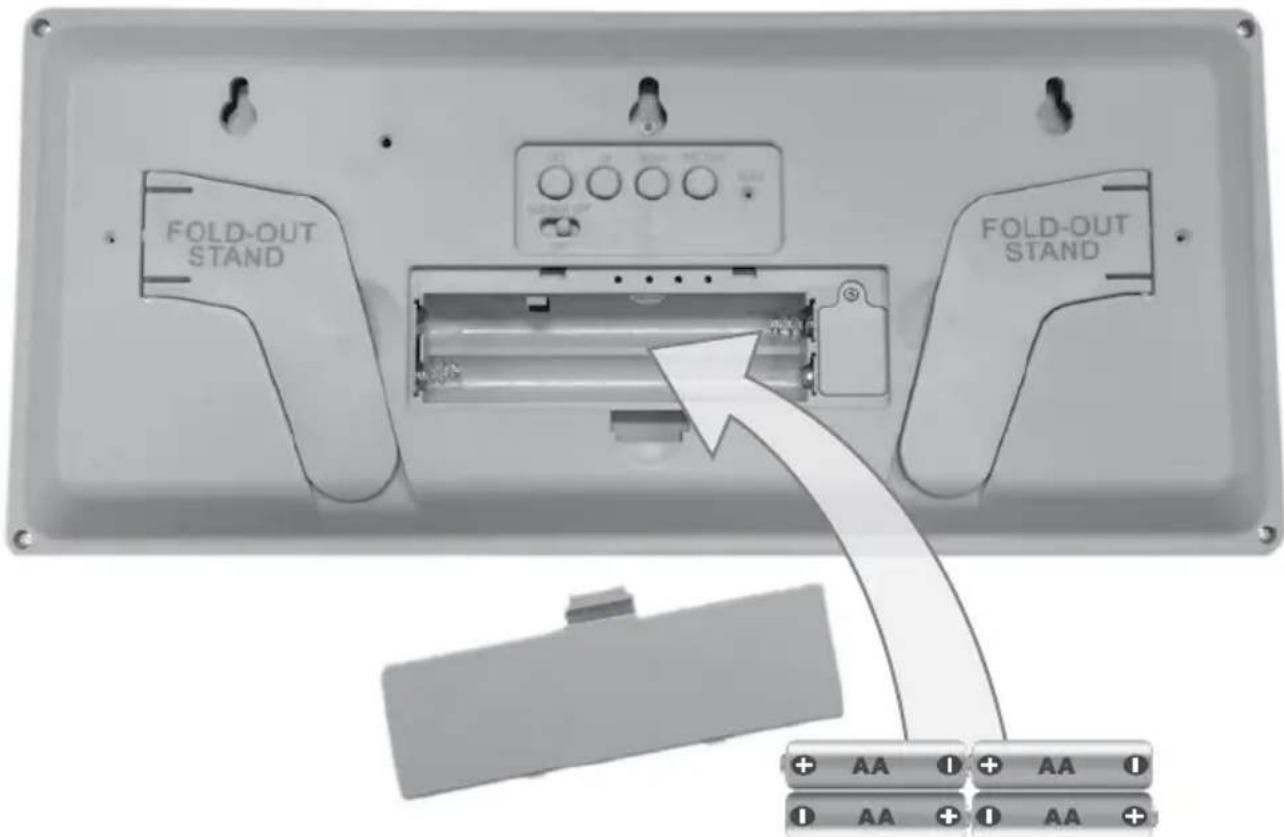
Install or Replace Batteries
4 AA alkaline batteries

PLEASE DISPOSE OF OLD OR DEFECTIVE BATTERIES IN AN ENVIRONMENTALLY SAFE WAY AND IN ACCORDANCE WITH YOUR LOCAL LAWS AND REGULATIONS.
BATTERY SAFETY: Clean the battery contacts and also those of the device prior to battery installation. Remove batteries from equipment which is not to be used for an extended period of time. Follow the polarity (+/-) diagram in the battery compartment. Promptly remove dead batteries from the device. Dispose of used batteries properly. Only batteries of the same or equivalent type as recommended are to be used. DO NOT incinerate used batteries. DO NOT dispose of batteries in fire, as batteries may explode or leak. DO NOT mix old and new batteries or types of batteries (alkaline/standard). DO NOT use rechargeable batteries. DO NOT recharge non-rechargeable batteries. DO NOT short-circuit the supply terminals.
Intelli-Time® Clock
Intelli-Time clock and calendar are pre-programmed to the correct time and date, and update automatically for Daylight Saving Time. All you need to do is select your time zone using the "TIME ZONE" button.
Set the Time & Date
Set the time zone (HAST, AKST, PST, MST, CST, EST, AST) by pressing the "TIME ZONE" button, located on the back of the clock. The Time Zone selected is indicated on the clock display.
Set the Daylight Saving Time preference (NEW, OLD, OFF) using the DST switch, located on the back of the clock. If you live in an area that observes Daylight Saving Time, DST should be set to "NEW", even if it is not currently Daylight Saving Time. While DST is being observed, "Daylight ST" is indicated on the clock display.
Press and hold the "SET" button for 3 seconds to enter SET MODE. Once in SET MODE the preference you are currently setting will blink on the clock.
To adjust the currently selected (flashing) item, press and release the "UP" or "DOWN" buttons (press and HOLD to fast adjust).
To save your adjustments, press and release the "SET" button to adjust the next preference. The preference order is as follows:
CLOCK HOUR (Please note AM/PM indicator)
CLOCK MINUTE
CALENDAR MONTH
CALENDAR DATE
CALENDAR YEAR
You will automatically exit SET MODE if no buttons are pressed for 15 seconds. Enter SET MODE any time by pressing and holding "SET" button for 3 seconds.
OPERATION
Using the Digital Clock
To view the MONTH/DATE/YEAR, press and release the "SET" button. Press "SET" button again to display time. If no buttons are pressed after 15 seconds the display will automatically display time again.
Troubleshooting
| Clock is too dark, hard to read or doesn't work | Reset the unit by pressing the reset button located on the back of the clock. This will reset the clock to the original factory settings. Time and date will need to be entered after a reset. |
| If your AcuRite product does not operate properly after trying the troubleshooting steps, visit www.AcuRite.com or call (877) 221-1252 for assistance. | |
Care & Maintenance
Clock Care
Clean with a soft, damp cloth. Do not use caustic cleaners or abrasives. Keep away from dust, dirt and moisture. Clean ventilation ports regularly with a gentle puff of air.
Replace Intelli-Time Clock Battery
Intelli-Time technology is powered by a pre-installed coin-cell battery that stores the time and date settings. The battery has a shelf life of several years. Time and date will need to be entered after replacing Intelli-Time battery. To replace the Intelli-Time battery:

-
Locate the coin cell battery compartment door inside the battery compartment of the clock. Unscrew and remove the compartment cover.
-
Insert 1 x CR2032 coin cell battery into the battery compartment, as shown. Install battery with "+" positive terminal facing right.
- Screw in the battery cover.

WARNING: THIS PRODUCT CONTAINS A BUTTON-CELL BATTERY. IF SWALLOWED, IT COULD CAUSE SEVERE INJURY OR DEATH IN JUST 2 HOURS. SEEK MEDICAL ATTENTION IMMEDIATELY IF INGESTED.

Specifications
| POWER | 4 X AA alkaline batteries |
FCC Information
This device complies with part 15 of FCC rules. Operation is subject to the following two conditions:
1- This device may NOT cause harmful interference, and 2- This device must accept any interference received, including interference that may cause undesired operation. WARNING: Changes or modifications to this unit not expressly approved by the party responsible for compliance could void the user's authority to operate the equipment.
NOTE: This equipment has been tested and found to comply with the limits for a Class B digital device, pursuant to Part 15 of the FCC rules. These limits are designed to provide reasonable protection against harmful interference in a residential installation. This equipment generates, uses and can radiate radio frequency energy and, if not installed and used in accordance with the instructions, may cause harmful interference to radio communications. However, there is no guarantee that interference will not occur in a particular installation.
NOTE: The manufacturer is not responsible for any radio or TV interference caused by unauthorized modifications to this equipment. Such modifications could void the user authority to operate the equipment. This device complies with Industry Canada licence-exempt RSS standard(s).
Customer Support
AcuRite customer support is committed to providing you with best-in-class service. For assistance, please have the model number of this product available and contact us in any of the following ways:

) 221-1252
info@chaney-inst.com
24/7 support at www.AcuRite.com
▶ Installation Videos ▶ Register your Product
▶ Instruction Manuals ▶ Support User Forum
▶ Replacement Parts ▶ Submit Feedback & Ideas
IMPORTANT
PRODUCT MUST BE REGISTERED TO RECEIVE WARRANTY SERVICE
PRODUCT REGISTRATION
Register online to receive 1 year warrantyprotection
www.AcuRite.com
SUPPORT
Support Forum
Archived Products
▶Register a Product
Limited One Year Warranty
At AcuRite, we proudly uphold our commitment to quality technology. Chaney Instrument Co. warrants that all products it manufactures to be of good material and workmanship, and to be free of defects when properly installed and operated for a period of one year from the date of purchase.
We recommend that you visit us at www.AcuRite.com for the fastest way to register your product. However, product registration does not eliminate the need to retain your original proof of purchase in order to obtain warranty benefits.
Chaney Instrument Co. warrants that all products it manufactures to be of good material and workmanship, and to be free of defects when properly installed and operated for a period of one year from the date of purchase. Remedy for breach of this warranty is limited to repair or replacement of the defective item(s). Any product which, under normal use and service, is proven to breach the warranty contained herein within ONE YEAR from date of sale will, upon examination by Chaney, and at its sole option, be repaired or replaced by Chaney. Transportation costs and charges for returned goods shall be paid for by the purchaser. Chaney hereby disclaims all responsibility for such transportation costs and charges. This
warranty will not be breached, and Chaney will give no credit for products it manufactures which have received normal wear and tear, been damaged (including by acts of nature), tampered, abused, improperly installed, damaged in shipping, or repaired or altered by others than authorized representatives of Chaney. The above-described warranty is expressly in lieu of all other warranties, express or implied, and all other warranties are hereby expressly disclaimed, including without limitation the implied warranty of merchantability and the implied warranty of fitness for a particular purpose. Chaney expressly disclaims all liability for special, consequential or incidental damages, whether arising in tort or by contract from any breach of this warranty. Some states do not allow the exclusion or limitation of incidental or consequential damages, so the above limitation or exclusion may not apply to you. Chaney further disclaims all liability from personal injury relating to its products to the extent permitted by law. By acceptance of any of Chaney's products, the purchaser assumes all liability for the consequences arising from their use or misuse. No person, firm or corporation is authorized to assume for Chaney any other liability in connection with the sale of its products. Furthermore, no person, firm or corporation is authorized to modify or waive the terms of this paragraph, and the preceding paragraph, unless done in writing and signed by a duly authorized agent of Chaney. This warranty gives you specific legal rights, and you may also have other rights which vary from state to state.
For in-warranty claims: Chaney Instrument Co. 965 Wells St., Lake Geneva, WI 53147
ACU▶RITE®
Weather Stations

Temperature & Humidity

Weather
Alert Radio
Kitchen
Thermometers
& Timers

Clocks
It's more than accurate, it's ACU-RITE.
AcuRite offers an extensive assortment of precision instruments, designed to provide you with information you can depend on to Plan your day with confidence™.
www.AcuRite.com

- Intelli-Time® Digital Clock
- CONTENTS
- ACU▶RITE®
- Unpacking Instructions
- Package Contents
- Features & Benefits
- Install or Replace Batteries
- PLEASE DISPOSE OF OLD OR DEFECTIVE BATTERIES IN AN ENVIRONMENTALLY SAFE WAY AND IN ACCORDANCE WITH YOUR LOCAL LAWS AND REGULATIONS.
- Intelli-Time® Clock
- Set the Time & Date
- OPERATION
- Using the Digital Clock
- Troubleshooting
- Care & Maintenance
- Clock Care
- Replace Intelli-Time Clock Battery
- Specifications
- FCC Information
- Customer Support
- 24/7 support at www.AcuRite.com
- IMPORTANT
- PRODUCT MUST BE REGISTERED TO RECEIVE WARRANTY SERVICE
- PRODUCT REGISTRATION
- SUPPORT
- Limited One Year Warranty
- It's more than accurate, it's ACU-RITE.
Brand : AcuRite
Model : 75071TA2
Category : Clock