
BD2BV01 - Dishwasher Fotile - Free user manual and instructions
Find the device manual for free BD2BV01 Fotile in PDF.


| Type | Built-in dishwasher |
| Brand | Fotile |
| Model | BD2BV01 |
| Overall dimensions (W×H×D) | 598 × 775 × 570 mm |
| Net weight | 41.6 kg |
| Power supply | 220-240 V ~ 50 Hz |
| Rated power | 1900 W |
| Water pressure range | 0.14–1 MPa |
| Heating method | Heating plate |
| Rinse method | Spray rinse |
| Sterilization rate | 99.99% (E. coli, Staphylococcus aureus) |
| Standard capacity | 15 place settings (Chinese tableware) |
| Number of programs | 6 main: Quick, Normal, Intensive, Glass, Auto, ECO; plus additional: Extra Dry, Storage, Half Load, Self-clean |
| Quick program time | 60 min (full load) / 45 min (half load) |
| Normal program time | 90 min (full) / 60 min (half) |
| Intensive program time | 130 min (full) / 100 min (half) |
| Glass program time | 90 min (full) / 70 min (half) |
| ECO program time | 255 min (full) |
| Auto program time | 95–160 min (full) / 65–120 min (half) |
| Water consumption (ECO) | 11 L (full) |
| Noise level | Not specified in manual (typical ~44–48 dB) |
| Energy efficiency class | Not specified in manual (assume A+ or similar) |
| Installation opening size (W×H×D) | 600–605 × 780–810 × 575 mm |
| Required amperage | 13 A (recommended socket) |
| Salt container capacity | 500 g |
| Rinse aid capacity | Not specified (typical ~110–150 ml) |
| Detergent dispenser | Main and pre-wash compartments |
| Control panel | Buttons with LED indicators |
| Display | Digital screen (time, codes) |
| Materials | Stainless steel interior, plastic exterior |
| Safety features | Child lock (not specified), overflow protection, dry burning protection, leakage alarm |
| Accessories included | Upper spray arm, main spray arm, rear lower spray arm, dish rack, cutlery basket, filter assembly, salt bucket, skirting board supports, mounting screws, water inlet hose, operation instructions |
| Repairability | User replaceable parts: spray arms, filters, salt, rinse aid; service by qualified technician for other issues |
| Warranty | Standard manufacturer warranty (details not in manual) |
Frequently Asked Questions - BD2BV01 Fotile
User questions about BD2BV01 Fotile
0 question about this device. Answer the ones you know or ask your own.
Ask a new question about this device
Download the instructions for your Dishwasher in PDF format for free! Find your manual BD2BV01 - Fotile and take your electronic device back in hand. On this page are published all the documents necessary for the use of your device. BD2BV01 by Fotile.
USER MANUAL BD2BV01 Fotile
Operation Instructions
Please keep it in a safe place for reference
Be sure to read this manual carefully before use
Built-in
Dishwasher
BD2BV01
Dear user, thank you for your choice of FOTILE products. Please read through the Instructions to be familiar with the correct operation norms and enjoy the cooking.
Contents
I. SAFETY PRECAUTIONS....2
DANGER 3
WARNING 3
CAUTION 4
SUGGESTION 5
PAY ATTENTION TO THE TYPE OF TABLEWARE 5
II. INSTALLATION INSTRUCTIONS 6
III. INSTALLATION OF MAIN ACCESSORIES....9
IV. PRODUCT INFORMATION....9
PACKING LIST 9
COMPONENT NAME 10
■ MAIN TECHNICAL PARAMETERS....10
■ CONTROL PANEL....11
V. OPERATING INSTRUCTIONS....12
■ INITIAL SETUP....12
■ PUT IN THE RINSING AGENT AND DISHWASHING POWDER. THE
STYLE OF THE DISPENSER IS SUBJECT TO THE REAL PRODUCT.. 13
■ ILLUSTRATION OF DISH RACK PLACEMENT .... 13
● DAILY TABLEWARE PLACEMENT 13
● VARIABLE AREA INSTRUCTIONS .... 15
VI. INTRODUCTION OF WASHING PROGRAM OPERATION 16
■ OPERATION STEP INTRODUCTIONS 16
■ PROGRAM DESCRIPTION .... 16
■ PERFORMANCE SPECIFICATIONS OF PROGRAMS.... 17
VII. CLEANING MAINTENANCE AND SERVICING 18
■ DAILY CLEANING 18
■ RECOMMENDATIONS ON SERVICING OF DISHWASHER....19
VIII. IDENTIFICATION AND TREATMENT OF COMMON FAULTS.... 19
■ COMMON FAULTS 19
■ FAULT CODE TREATMENT....20
IX. CUSTOMER SERVICE 21
I. Safety Precautions
In order to avoid harm and property damage to users and other personnel, the following distinctions and signs are made. All are important matters related to safety, and you are required to strictly abide by them and use them correctly on the basis of fully understanding the contents.
This appliance is not intended for use by persons (including children) with reduced physical, sensory or mental capabilities, or lack of experience and knowledge, unless they have been given supervision or instruction concerning use of the appliance by a person responsible for their safety. Children should be supervised to ensure that they do not play with the appliance.
the maximum number of place settings to be washed is fifteen.
The door should not be left in the open position since this could present a tripping
hazard.
Product installation must be carried out by qualified personnel, and please read the instructions carefully before installation and follow the instructions for correct operation.
How to load the dishwasher, Please read the relevant chapters at the back of the manual carefully. ⚠ WARNING: Knives and other utensils with sharp points must be loaded in the basket.
with their points down or placed in a horizontal position.
This appliance is intended to be used in household and similar applications such as:
– staff kitchen areas in shops, offices and other working environments;
-farm houses;
– by clients in hotels, motels and other residential type environments;
- bed and breakfast type environments.
If the supply cord is damaged, it must be replaced by the manufacturer, its service agent or similarly qualified persons in order to avoid a hazard.
The new hose-sets supplied with the appliance are to be used and that old hose-sets should not be reused.
■ Content distinguished based on the degree of harm and damage
| Danger | Ignorance of this sign and conduct of incorrect operations will be likely to cause personal damage, serious injury, or fire. |
| Warning | Ignorance of this sign and incorrect operation are highly likely to cause personal damage, serious injury or fire. |
| Caution | Ignorance of this sign and incorrect operation are highly likely to cause personal injury or property damage. |
| Suggestions | Contents we hope you to understand for safe and correct operation. |
■ Icon of cautions and prohibits
| Caution, scald | Caution, electric shock | Stringently execute | Grounding required | Prohibited | No open flames | No touch | Do not operate with wet hands | Disassembly prohibited |
* Special note: Please operate the product in strict accordance with the Instructions. The Company will not be liable for any property loss or personal injury caused by improper use of this product.
If the provisions of the Instructions are inconsistent with the mandatory provisions of national laws, the legal provisions shall prevail.
Danger
| ☐ Prohibited | Do not touch electrical compo- nents such as power plugs and connectors with water. If used with water, it may cause electric shock or other accidental injuries. | ☐ Prohibited | It is prohibited to restructure, stretch, buckle or squeeze the power cable with heavy objects. Otherwise, the power cable may be damaged causing accidents such as electric shock and fire. |
| ☐ Prohibited | Please do not allow children to use the product alone or near the bottom, otherwise it may cause electric shock or other accidental injury. | ☐ Do not operate with vct hands | Please do not touch power plugs or electrical components with wet hands, otherwise it is easy to be electroculed. |
| ☐ Caution electric shock | Before installation and repair services, the power must be cut off to avoid electric shock. | ☐ Prohibited | It is prohibited to use alcohol and other flammable solvents to clean the liner. |
| ☐ Stringently severe | When moving or disassembling products, pay attention to the corners of the box, and take care of protection to avoid cuts. | ☐ Caution cold | Please pay attention to safety when opening the door during the opera- tion of the machine. Hot water may spill and cause scalds. |
| ☐ Grounding required | The socket must be equipped with a reliable grounding wire for the sake of safety. Do not connect the grounding wire to any gas pipe, water pipe, lightning rod or telephone wire. Poor grounding may cause electric shock and other accidents. | ||
| Warning | |
| Non-professionals shall not disman- tle the machine to repair or replace parts without authorization. | |
| The dishwasher should only be turned on briefly when the table- ware is placed and taken out to avoid injury caused by tripping. | Do not put dish soap or foaming detergent in when washing table- ware. |
| Do not put the cutting edge of the knife in direct contact with the bowl basket. | The door should not be left in the open position all the time since it may cause the appliance to tip over. |
| Do not sit or stand on the open machine door. | Do not pour water directly into the dishwasher since it may cause the product to not work properly. |
| Do not clean the glass with a rough scrub or a sharp metal scraper, which will scratch the surface of the glass and cause the glass to break. | In case of any fault, power off immediately and stop using it, and handle it according to "Common Fault Identification and Handling". |
| Please power off the machine before regular cleaning and maintenance. | In case the product leaks during use, please stop using it and contact the manufacturer immedi- atoly. |
| Do not touch the heating device while the product is running, which may cause scalds. | Knives and other sharp utensils must be placed in a dish rack with the point facing down or horizontally. |
| Children and people with limited mobility are not allowed to use the product. Especially, keep the product out of reach of children. Otherwise, it may cause scalds, electric shocks and other accidental injuries. | Do not allow children to play with plastic films or packing boxes, which may cause suffocation accidents. Therefore, keep the packaging materials away from children, because the packaging materials are not toys. | |
| After the work is finished, hot air is ejected from the opened door. People should stand a little farther away from the door so as not to be scalded by the hot air. | Upon installation of the dishwasher, if the power plug cannot be touched, it shall be realized by the fixed wiring switch meeting wiring rules, in order to cut off the power through such switches during repair or emergency. | |
| Appliances should be connected to the water source with new hose assemblies and old hose assemblies should not be reused. | ||
stingently
Caution
| The product will be hot during use. Please avoid contacting the heating components and surrounding locations. | Do not use any multi-purpose socket with multiple plugs. | ||
| Keep the whole machine away from heat sources, gas, alcohol and other inflammable products. | Ensure that the sewer hose is smooth, and the blockage of the hose may cause the product not to work properly. | ||
| If a small amount of water is found in the liner after opening the package, it is caused by the factory qualification test, instead of the fault of the machine itself. | Please keep children away from detergents and rinsing agents. These detergents may cause burns or choking to the mouth, throat and eyes. | ||
| Please keep children away from the dishwasher with door opened. There may be small parts which are likely to be swallowed by children in the dishwasher, the water in the dishwasher is not potable, and there may be residual detergent. | Try not to leave large pieces of residue (such as bones) in the tableware to be cleaned, so as not to interfere with the rotation of the spray arm and affect the normal use of the machine and the cleaning effect. | ||
| Do not place articles to be cleaned with a large amount of sediment in the product, which may cause the product to tail. | Do not install in a place that may freeze (below 0°C). | ||
| Ensure the dish rack in place when the machine is running. | It is prohibited to pull or disassemble the connecting wire at the top of the machine. | ||
| The damaged power cable must be replaced by specialized personnel from the manufacturer, its repair department, or a similar department to avoid danger. | |||
execute
Suggestion
| After each washing, please clean up the food residue in the residue basket in time. | When placing tableware, avoid fragile objects such as goblets to touch other tableware. | ||
| Before washing tableware, it is recommended to add special dishwashing powder. | Please pre-clean the tableware in advance and dispose of large food residue before putting it in the dishwasher for washing. | ||
| If there are stains that are difficult to clean by hand or even steel wool on the tableware, they cannot be cleaned if the tableware is put into the dishwasher directly. It is recommended to pretreat the stains on the tableware and then put the tableware into the dishwasher for cleaning. | |||
Pay attention to the type of tableware
| Tableware and materials | Washable or not | Tableware and materials | Washable or not |
| Aluminum | No | Stainless steel | Yes |
| Bottles and cans | No. The label has glue, which will block the spray arm and is not conducive to washing | Fine silver | Yes |
| Cast iron | No. Easy to rust | Tin | No. Easy to corrode and rust |
| Ceramic | Yes Except for bone porcelain and utensils with surface pattern easy to fall off | Wood ivory | No. Untreated wood can be twisted and cracked |
| Crystal | Yes | ||
| Gold | No. Color will change | Hollow handle cutter | No. The adhesive in the cutter will loosen under the action of hot water |
| Glass | Yes | ||
| Single-use plastic | No. It cannot withstand hot water and detergent | Copper, bronze | No. It will deform and discolor under the action of hot water and detergent |
| Plastic | Yes |
II. Installation Instructions
■ Installation methods
● Product size and installation opening size
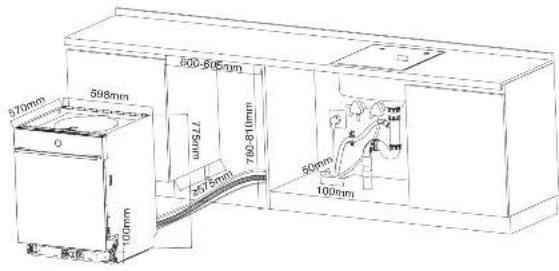

- The dishwasher is embedded in the cupboard. The recommended opening size of the cabinet is 600-605mm (W) X 780-810mm (H) X 575mm (D) (including the door).
- Water and electricity are available at the cabinet adjacent to the installation location, and the power socket is reliably grounded (positions for socket and water inlet and outlet shall not be reserved on the front and back of the dishwasher).
- The inlet water pressure is 0.14MPa-1MPa, the voltage is 220-240v-/50 Hz, and the power socket is triplex and of 13A.
- A reliable drain outlet shall be well reserved.
5.A 100mm × 50mm threading hole is reserved at the bottom of the cupboard next to the cistern for threading the power cable, water inlet hose and water drain hose.
6. The power cable of the product shall be plugged into a fixed socket, and no multi-purpose socket is allowed.
7. There is an air outlet at the bottom of the dishwasher. Close attention shall be paid to not blocking the outlet with foreign objects, so as avoid the impact on the operation of the dishwasher.
8. It is necessary to make sure that the dishwasher is installed by FOTILE professional service personnel, and the clearance between the top, left and right side of the dishwasher and the cupboard shall be < 5mm after installation. To guarantee the power safety of the dishwasher, ensure correct and reliable grounding of the dishwasher and correct and reliable grounding and connection of the household power grid, which is a basic safety requirement. The manufacturer of this product will not be liable for any damage caused by the problem of the household power grid.
- Connect the water inlet hose.
- Check the sealing ring of water inlet hose connector.
- The four-way connector of the water inlet hose is connected and tightened with the four-way connector of the tap water angle valve.
- The six-way connector of the water inlet hose is connected and tightened with the inlet valve connector of the dishwasher.
- Connect drain hose
- The end of the dishwasher drain hose can be inserted into the vertical sewer hose alone or together with the drain hose of water tank, and connected to the sewer hose through the drain tee. Take care not to insert the drain hose into the bottom of the sewer hose; otherwise, it may block the water hose.
- Before installation, ensure that the drain hose is free from bending, extrusion, or dents and that the sewer hose is unobstructed.
- The dishwasher drain hose shall be hung high, and the U-shaped installation is not allowed. The benchmark distance of the drain hose hook from the ground is 300mm-500mm.
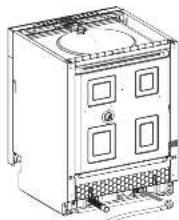
- Connect water inlet and drainage extension hose fittings.
natural_image
Technical line drawing of a four-panel industrial machine with mounting base (no text or symbols)
Note: Auxiliary materials outside the packaging box shall be purchased separately.
● Fix the dishwasher
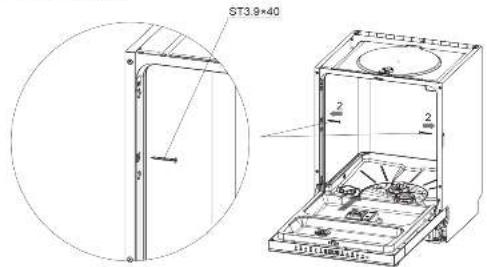
After the dishwasher is pushed into the cupboard, fix the dishwasher in the cupboard with two ST3.9 × 40 wood screws in the accessories as shown in the figure, and confirm that the dishwasher cannot be moved.
Install Baseboards
After the dishwasher is pushed into the cupboard and fixed, the skirting board is fixed on the bottom of the dishwasher through the embedded skirting board support, and then the dishwasher is installed completely.
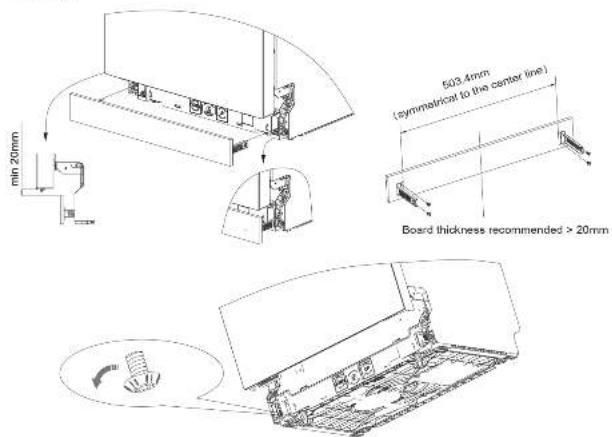
As shown above, rotate the bottom four knobs counterclockwise to adjust the height of the product, the height adjustment range: 0-30mm
| Table of Skirting Board Height and Opening Size Height | ||||
| Height of opening size (mm) | 780 | 790 | 800 | 810 |
| Height of skirting board (mm) | 80 | 90 | 100 | 110 |
Note: 1. The top of skirting board is not less than 20mm away from the bottom of the dishwasher door.
- It is necessary to meet the opening size degree (skirting board opening ≥ 700mm), to avoid skirting board interfering with the dishwasher door opening/closing.
III. Installation of main accessories
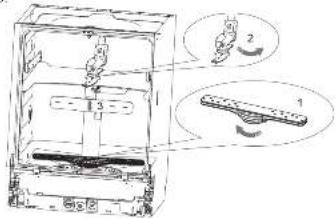
- The main spray arm shall be installed at the bottom of inner tank and screwed in place clockwise;
- The rear lower spray arm shall be installed on the back of inner tank and inserted into the waterway connecting pipe;
- The upper spray arm shall be installed at the spray port at the bottom of upper dish rack and screwed in place anti-clockwise.
IV. Product Information
Packing list
Please check the following products and accessories item by item for completeness when unpacking. In case of missing or damage:
Please contact the distributor to deal with it if the responsibility lies with the Company or the distributor.
■ Please contact FOTILE service hotline if the responsibility lies with the user itself.


| Whole machine | 1set | Upper spray arm | 1piece |
| Operation Instructions | 1piece | Main spray arm | 1piece |
| Water inlet | 1piece | Rear lower spray arm | 1piece |
| Dish rack | 1set | Assemblies of the filter board | 1set |
| Embedded skirting board support | 2pieces | Mounting screw ST3.9×40 | 2pieces |
| Cutlery Basket | 1set | Skirting board support screw ST4.2×16 | 6pieces |
| Salt bucket | 1piece |
Note: The pictures are for reference only and the product pictures are subject to the real product.
■ Component name
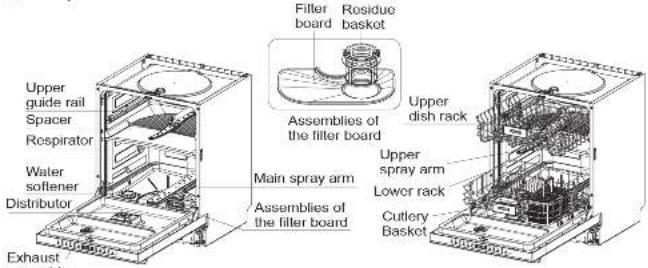
■ Main technical parameters
| Model | BD2BV01 |
| Power supply | 220-240V-/50Hz |
| Rated power of the whole machine | 1900W |
| Net weight | 41.6kg |
| Normal working water pressure | 0.14MPa-1MPa |
| Heating method | Heating with heating plate |
| Overall dimensions | Width 598mm×height 775mm×depth 570mm |
| Rinse method | Spray rinse |
| Bacterial eliminating rule | 99.99% |
| Standard storage capacity | 15 rice bowls, 8 shallow plates, 7 deep plates, 7 noodle bowls, 8 seasoning plates, 7 mugs, 8 glasses, 1 large soup bowl, 1 steamed fish plate, 1 rice spoon, 1 large spoon, 15 pairs of molds, 15 small spoons Note:The above are chinese tableware of national standard. |
| Notes: 1. The rated power of the whole machine is the maximum power measured during the complete operation cycle in "ultra clean wash" mode.2. Types of bacteria to be sterilized: Escherichia coli, Staphylococcus aureus; Sterilization rate test basis: QB/T 5133. |
Control panel
| Function description | |||
| Glass program is special-ized for fine tableware and glassware. | Super quick washing program for slightly stained tableware. | ||
| Normal | 70°C high temperature fast cleaning to remove common household food remnants lightly dried-on. | ||
| ECO | Low energy consumption and slow washing aims for water saving and electricity saving. | ||
| Storage | After cleaning, keep the tableware clean and dry for a period of time. | ||
| Extra Dry | Extending the drying time can achieve better drying effect. | ||
| Dishwasher salt | When this light is on, it is necessary to add softening salt special for the dishwasher. | ||
| On-off button | Control the power-on and power-off. | ||
Note: 1. The start/pause button can only control the start of the product. Open the door directly when it is necessary to pause the machine, and pay attention to the possibility of hot water splashing when opening the door.
- Only the lower dish rack is cleaned when using the lower quick washing function. If the upper rack has dirty tableware or the upper door panel is contaminated, this function is not recommended.
V. Operating Instructions
Initial setup
- Sel softening system
-
When the dishwasher is powered on and in off state, long press the start/pause button for 5 seconds, then the screen will display the preset value before delivery;
-
continue to press the start/pause button, the set value will jump by one level, jump to H7; and then jump back to HD; (the larger the number represents the stronger the softening capacity, the higher the hardness of the water, the faster the salt consumption)
-
Long press the power button to turn off or do not operate for 5 seconds, the dishwasher will remember the current set value.

- Add softening salt (please add softening salt special for the dishwasher)

Unscrew the water softening cover

Fill with 500g softening salt (it is prohibited to fill with detergent!)
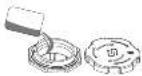
Fill the softening salt tank with water and stir thoroughly. Handle carefully to avoid overflow of the salt water

Screw the water softener cover tightly to complete the addition
Note:1. After adding softening salt, it is recommended to run the self-cleaning program once in a bid to prevent the overflow of salt water from corroding the liner.
-
The softening salts special for the dishwasher take a while to dissolve in water. After the softening salt is added, the lack of salt indicator light will not go off immediately, which will not affect the normal operation of the dishwasher.
-
It is only necessary to pour water into softening salt tank for the first time before adding softening salt.
● Set the amount of rinsing agents
-
When the dishwasher is powered on and in off state, long press the storage button for 5 seconds, then the screen will display the preset value before delivery;
-
Continue to press the storage button, the set value will jump by one level, jump to 6 and then jump back to 0 . (The larger the number, the higher the single adding amount of the rinsing agent, the faster the consumption, and the more conducive to drying)
-
Long press the power button to turn off or do not operate for 5 seconds, the dishwasher will remember the current set value.

Put in the rinsing agent and dishwashing powder. The style of the dispenser is subject to the real product

Open the cover of the rinsing agent cavity

Fill up with the rinsing agent

Close the cover and hear the click
Note: After adding the rinsing agent. In case of any rinsing agent overflow, please run the fast-clean washing program once.

Press the orange button to open the cover
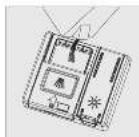
Pour the dishwashing powder/dishwashing blocks into the dry detergent bin

Push the cover in and press it down
■ Illustration of dish rack placement
● Daily tableware placement
Variable area: [yellow] cap can be folded, (please refer to the variable area instructions) which can be used to store seasoning plates, mugs, milk cups
Variable area: The middle rack can be folded, (please refer to the variable area instructions) which can be used to store rice bowls and noodle bowls

Upper dish rack
Placement instructions and precautions:
- Please pretreat before washing the tableware to remove the large residue;
2.Do not place the tableware upward, which will affect the normal operation of the whole machine; - Severely dirty tableware is recommended to be placed on the lower dish rack, which can effectively improve the cleaning effect;
- After placing the tableware, avoid stacking the tableware together, so as not to affect the cleaning effect; In the event of a few tableware, spacing tableware helps better cleaning;
- After the tableware is placed, please ensure that the spoons, chopsticks and other tableware will not affect the rotation of the upper and lower spray arms;
- When placing tableware, please pay attention to the direction of placing all kinds of tableware to achieve better washing effect.
Plate area:
Can store deep plates, shallow plates and steamed fish plates
Variable area: [Yellow] cap can
be folded. (please refer to variable area instructions).
which can store deep plates, shallow plates, bowls
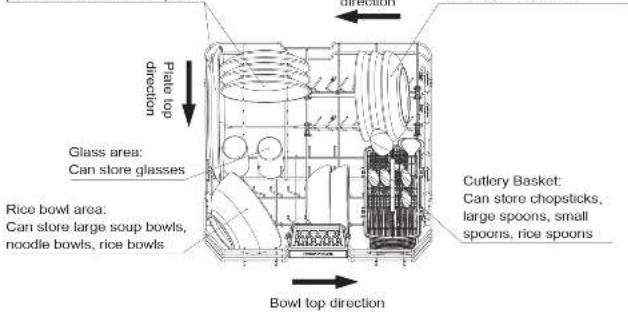
Cookers, large soup bowls, glasses, steamed fish plates, deep plates, and noodle bowls are placed as shown in the picture

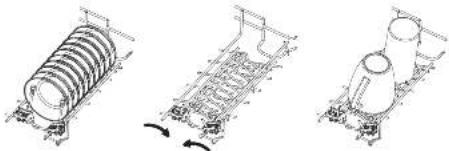
● Variable area instructions
Variable area instructions: Upper dish rack variable area: The yellow cap area can be folded down to store mugs and glasses.
natural_image
Three technical line drawings of mechanical components or assemblies, showing different assembly configurations (no text or symbols present)Upper dish rack variable area: The middle rack can be folded down to store noodle bowls.
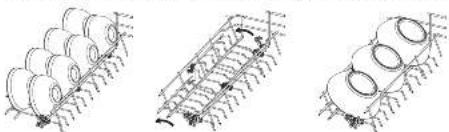
natural_image
Three technical diagrams showing cylindrical structures with hatching patterns, no text or symbols presentLower dish rack variable area: The yellow cap area can be folded down to store noodle bowls.

natural_image
Three technical line drawings of cylindrical components with internal channels and alignment indicators (no text or symbols)VI. Introduction of Washing Program Operation
■ Operation step introductions
- Open the door of the dishwasher and Place Detergent Dispenser, long press the on-off button to start the dishwasher;
- Click the button of the program you want to run, such as Normal ☐;
- If necessary, click the corresponding additional function button to select additional programs (such as Extra Dry);
- Press the start/pause button ▷ before closing the door of dishwasher and start cleaning program. At this time, the illuminated 'O' ring will starts to blink slowly.
| Quick | Now | Internal | Churn | Audio | HOLD | 0:45 | |||
| Sound Clean | Balance | Recovery | Hot Load | ||||||
Note: 1. In the process of cleaning, if it is necessary to add tableware, please directly open the door to add tableware, the machine automatically pauses, and pay attention in case of hot water splashing. After the placement is over, you can continue to run the dishwasher after closing the door.
- After cleaning, if you want to switch the cleaning program, please first long press the power button to shut down the machine, and then switch on the machine to choose another program.
- Please do not deliberately switch the cleaning program after the cleaning begins, because the added detergent has been consumed at this time, and the detergent needs to be added again after switching programs.
Program description
- Quick □ Glass ▽ Normal ⚙ Intensive 📊 ECO 🔒, and Auto 🔒 are main programs.
Extra Dry ☐, Storage ☐, Half Load ☐ are additional programs. Self-clean ☐ is a value-added program which is recommended to be combined with machine washing sheets for better effect;
2.ECO ⚠️, Only storage functions can be attached; - Click on the Half Load function to divide the dishwasher cavity and quickly wash the lower layer of the dish rack.
storage: The storage function will only work for 96 hours after cleaning is completed; After the program is finished, the system will automatically switch to the 72-hour low-frequency ventilation mode, during which the "storage" indicator on the display screen will always be on. If the storage function should be turned off in advance, please press and hold the ON-OFF button to cancel the operation; The tableware shall be transferred to a dry cupboard in case of the long-time idleness of the dishwasher.
Press and hold the storage button for 3 seconds, this function can be turned on separately, and then the screen countdown shows 60 minutes. After the program countdown ends, the system will be automatically switched to the storage stage and the "storage" indicator on the display screen will always be on.
Note: This function can be applied to "quick cleaning and drying of clean tableware of long-time idleness" and other cases.
Manual drain function: Press and hold the ON-OFF button to start the dishwasher, and then, within 5 seconds, press and hold the ON-OFF button to shut down the dishwasher so that the drainage pump can be turned on to drain water.
■ Performance specifications of programs
Standard program performance parameters
| Program | Applicable tableware | Time of washing | Recommended dosage of detergent | Water consumption | Maximum washing temperature |
| Quick | Breakfast dishes, preparation dishes, and other slightly stained tableware | 60 minutes | 23g | 19L | 65°C |
| Normal | Fairly stained tableware | 90 minutes | 27g | 19L | 70°C |
| Intensive | Severely stained tableware | 130 minutes | 33g | 23L | 75°C |
| Glass | Thin wine glass, goblet, and other delicate vessels | 90 minutes | 23g | 19L | 60°C |
| Auto | The cleaning program is subject to the dirty degree of tableware. | 95-160 minutes | 33g | 19-23L | 75°C |
| ECO | Water-saving and power-saving mode for fairly stained tableware | 255 minutes | 33g | 11L | 45°C |
Half Load performance parameters
| Program | Applicable tableware | Time of washing | Recommended dosage of detergent | Water consumption | Maximum washing temperature |
| Quick | Breakfast dishes, preparation dishes, and other slightly stained tableware | 45 minutes | 18g | 13L | 65°C |
| Normal | Fairly stained tableware | 60 minutes | 23g | 13L | 70°C |
| Intensive | Severely stained tableware | 100 minutes | 23g | 13L | 70°C |
| Glass | Thin wine glass, goblet, and other delicate vessels | 70 minutes | 18g | 13L | 60°C |
| Auto | The cleaning program is subject to the dirty degree of tableware. | 65-120 minutes | 23g | 13L | 70°C |
Note 1. The above data are standard program data. After the program is added, the cleaning data will be different due to the different programs.
- The actual washing time, water consumption, and washing temperature will vary slightly depending on the water temperature, water pressure, and room temperature in different regions, as well as the type and quantity of tableware.
- The countdown to 00 indicates that the washing program is over, and the dishwasher can be opened at any time to take out tableware. If the dishwasher fails to be opened in time, the display with "00" will automatically go out after a period of time, during which, the drying program will keep running.
- The above data were measured in FOTILE Laboratory.
VII. Cleaning Maintenance and Servicing
Daily cleaning
- Open the door and clean the residual dirt on the door;
- Clean the inner cavity walls, wall corners and partition assembly, and add detergent appropriately;
- Rotate the slag basket counterclockwise to remove the slag, dump the slag and clean the basket;
- Rotate to remove and clean the spray arm;
- Take off the filter plate and clean the plate;
- Clean the bottom of the cavity;
- Install all parts in their original positions after cleaning, and check the correctness of their installation.


- Dismantle & wash upper spray arm: Hold the fixing nut of the upper spray arm and rotate the fixing nut clockwise; take off the upper spray arm for cleaning after the nut is completely unscrewed.
- Dismantle & wash the main spray arm: Hold the two gray locking lab bumps under the spray arm, and rotate the bumps counterclockwise to remove the spray arm for cleaning.
- Unscrew the slag basket, lake out the filter screen, remove the residue, and then rinse the filter screen with water.
- Reinstall the filter screen, the slag basket, the upper spray arm, and the main spray arm in the reverse order. Toggle the spray arm after the installation is completed, to check whether the arm can be rotated smoothly without abnormal noise.
■ Recommendations on Servicing of Dishwasher
- Clean the panel and door glass manually with hot water and a small amount of detergent. Wipe with sponge cloth and dry with soft cloth after cleaning. Do not rub with scouring pad or metal wire articles to avoid scratching the surface.
- Apply a layer of oil to the liner for protection in case of long-time idleness of dishwasher.
- Use neutral detergent to clean the liner and inner door, and clean the both completely with clean water. Clean gently, avoid using steel brush or rough brush, and dry with sponge or cloth after cleaning.
- Do not place lemons, sauces, pickles, mustard or other salty or corrosive food on the inner parts such as the liner and inner door for a long time to prevent corrosion.
- Try to avoid long-term contact between the liner & the inner door and powerful bleaching powder, household chemicals and soap.
- Try to avoid sharp and hard utensils such as knives, forks, and cookers from hitting the liner and the inner door. Push the dish rack into the cavity to prevent scratches, scratches, or dents on surface.
- Do not put low-carbon steel or cast-iron cookware in the liner for a long time, and do not leave steel wool, rubber dishwashing sheets, wet dishwashing sponges, or other cleaning pads in the liner to avoid "floating rust" and "mildew spots" in the long run.
- If any "floating rust" or "mildew spots" are found on the liner, apply five-cleaning powder or toothpaste to the rust and spots, and then clean them with a rag. But do not clean the liner with scouring wire, polishing sheets, or polishing materials.
- When water scale is produced in the liner due to lack of softening salt, add the softening salt in time, and put a washing tablet or a small amount of sodium citrate in the dishwasher liner. Run any complete program before quick washing.
VIII. Identification and Treatment of Common Faults
■ Common faults
If you find anything unusual during use, please stop using it, cut off the power supply, and check the following items:
| Fault description | Potential cause | Solution |
| With abnormal sound | The spray arm is not installed in place or collides with other objects. | Disassemble and assemble the spray arm again and then check its conditions; rotate the spray arm manually to ensure that the spray arm can rotate smoothly without interference. |
| Tableware is not placed as specified, resulting in tableware collision. | Check whether the tableware placement is satisfactory. | |
| The display is not lit, and the buttons are unresponsive. | Power is not connected | Check whether the power plug is properly plugged in. |
| White water scale is found on the liner. | There is a lack of softening salt or softening system gear is set too low. | Clean the water scale with washing tablet or sodium citrate, and add salt or raise the soft water gear in time. |
After the above troubleshooting, if the dishwater still cannot work normally, please contact FOTILE service hotline.
Fault code treatment
| Display code | Fault display | Potential cause | Solutions |
| E2 | Small water flow | 1. The water supply valve in the customer's home is not open. 2. The water flow in the customer's home is too small. 3. The inlet valve is broken and not opened. 4. The filter screen at the inlet valve is blocked 5. Parts relating water inflow are damaged | 1. Check the water valve to make sure it is open 2. Check whether there is water supply shut off or the water pressure is too low. 3. Seek professional maintenance personnel for on-site repair. |
| E3 | Poor drainage | 1. There are excessive residues in the basket and the drain hole is blocked. 2. The sewer hose is blocked. | 1. Clean the slag basket and sewer hose. 2. Seek professional maintenance personnel for on-site repair. |
| E5 | Temperature sensor is of short circuit or open circuit. | Temperature sensor works anomaly. | Seek professional maintenance personnel for on-site repair. |
| E8 | Dry burning protection | 1. Poor sealing of drain valve results in water leakage. 2. Poor sealing of door results in water overflows. | 1. Close the door and make sure the door is closed tightly. 2. Check whether the tableware is placed correctly, and make sure that no tableware is placed with the bowl mouth facing upwards. 3. Seek professional maintenance personnel for on-site repair. |
| E0 | Motor communication failure | Motor failure | Seek professional maintenance personnel for on-site repair. |
| EC | Communication exception | Communication line is disconnected | Seek professional maintenance personnel for on-site repair. |
| F1 | Alarm for water leaking | Leakage protection | Seek professional maintenance personnel for on-site repair. |
| F3 | Alarm for water overflow | Inlet valve is broken | Seek professional maintenance personnel for on-site repair. |
| F4 | High-temperature warning | Water temperature is above 85°C | Seek professional maintenance personnel for on-site repair. |
| F5 | Motor is of overvoltage and undervoltage | Voltage is too high or too low | Seek professional maintenance personnel for on-site repair. |
| F6 | Motor has default phase | Short circuit or open circuit inside the coil | Seek professional maintenance personnel for on-site repair. |
| F7 | Motor software is of overcurrent Motor hardware is of overcurrent Motor stalling | Motor current is excessive | Seek professional maintenance personnel for on-site repair. |
| The lamp for the lack of salt lights up | Indication for the lack of salt | Lack of softening salt | 1.Follow the operating instructions to add the softening salt2.Seek professional maintenance personnel for on-site repair. |
| The lamp for the lack of rinsing agent lights up | Lack of rinsing agent | 1.Lack of rinsing agent2.Distributor is damaged | 1.Follow the operating instructions to add rinsing agent2.Seek professional maintenance personnel for on-site repair. |
Warning: After the above simple troubleshooting, if the dishwasher still cannot work normally, please contact FOTILE service hotline. In order to ensure safety and correct use, this product must be repaired by professionals appointed by the Company. If the product cannot be used in a good condition because the consumer entrusts personnel who are not appointed by the Company to carry out repair or the consumer carries out repair, even during the warranty period, it is not within the scope of free repair, and the Company will not bear any responsibility for the property loss and personal injury caused thereby.
IX. Customer Service
Please stop using and put out the plug, then contact service line in the condition of abnormal.
⚠ Warning: The product shall be not allowed to be repaired by any party other than Fotile's appointed technicians. Otherwise it may cause serious consequences and exempt the product from warranty.
The following circumstances do not fall into the scope of free warranty, and a fee will be charged for repair.
1. Damage resulting from improper handling, installation, use, maintenance and safekeeping conducted by customer.
2. Failure and damage caused by using the product beyond the normal operating conditions (damage caused in the case that the voltage is higher than 254V or lower than 208V.
3. The product installed, dismantled or repaired by customer or any party other than FOTILE's appointed service staff or agency.
4 Discrepancy between the information on the purchase voucher and the warranty card and the product
5 Product damage caused by force majeure (such as natural disaster and war, etc.
6. Product failure or damage arising from use not in conformity with the "instructions".
7. Scratches on the surface caused by the placement of other objects on the glass panel.

- Operation Instructions
- Contents
- Safety Precautions
- Danger
- Installation Instructions
- ■ Installation methods
- ● Fix the dishwasher
- Install Baseboards
- Installation of main accessories
- Product Information
- Operating Instructions
- Initial setup
- Introduction of Washing Program Operation
- ■ Operation step introductions
- Program description
- ■ Performance specifications of programs
- Cleaning Maintenance and Servicing
- Daily cleaning
- ■ Recommendations on Servicing of Dishwasher
- Identification and Treatment of Common Faults
- ■ Common faults
- Customer Service
Brand : Fotile
Model : BD2BV01
Category : Dishwasher