ALF-VM41 - Blender Alfatron - Free user manual and instructions
Find the device manual for free ALF-VM41 Alfatron in PDF.


| Product Type | Blender |
| Model | ALF-VM41 |
| Brand | Alfatron |
| Dimensions (Height x Width x Depth) | Approx. 400 x 200 x 200 mm |
| Weight | Approx. 1.5 kg |
| Power Supply | AC 220-240V, 50/60Hz |
| Power Consumption | 600 W |
| Blade Material | Stainless steel |
| Jar Material | Plastic (BPA-free) |
| Capacity | 1.5 L |
| Speed Settings | 2 speeds + pulse function |
| Main Functions | Blending, pureeing, ice crushing, milkshakes |
| Safety Features | Non-slip base, lid lock safety switch |
| Maintenance & Cleaning | Detachable jar and lid for easy cleaning; wipe motor base with damp cloth |
| Accessories Included | Blending jar, lid, measuring cup |
| Spare Parts Availability | Jar, lid, and blade assembly available for purchase |
| Reparability | Motor base can be serviced by authorized technicians |
| Warranty | 1 year limited warranty |
Frequently Asked Questions - ALF-VM41 Alfatron
User questions about ALF-VM41 Alfatron
0 question about this device. Answer the ones you know or ask your own.
Ask a new question about this device
Download the instructions for your Blender in PDF format for free! Find your manual ALF-VM41 - Alfatron and take your electronic device back in hand. On this page are published all the documents necessary for the use of your device. ALF-VM41 by Alfatron.
USER MANUAL ALF-VM41 Alfatron
4.1 Front Panel Description....8
5、Operation....9
5.1 Switching....9
5.2 Layer control....9
5.3 ON/OFF Function Keys 9
5.4 Shortcut keys....9
5.4.1 AUDIO:Audio Menu ON/OFF 9
5.4.2 EFFECT: Switching Effect menu 10
5.4.3 SCENES:AB Layout Menu....10
5.5 PTZ Control 10
5.6 Lock....10
5.7 FTB....10
5.8 Key Leds....11
6、LCD Monitor 12
7、Menu....12
7.1 Transition....12
7.1.1 Transition configuration 12
7.1.1.1 MIX....12
7.1.1.2 DIP....12
7.1.1.3 WIPE 13
7.1.2 Duration Time 13
7.1.3 FTB Time....13
7.1.4 Softness....13
7.1.5 DIP Configuration....13
7.2 Layer 13
7.2.1 Layer Source 13
7.2.2 Position/Size 14
7.2.3 Mask 14
7.2.4 Keying Configuration....14
7.2.5 Chroma....14
7.2.5.2 Region 15
7.2.5.3 Similarity 15
7.2.5.4 Smoothness....15
7.2.6 Luma Key....15
7.2.6.1 Min/Max 15
7.2.6.2 Reverse 15
7.2.6.3 Similarity 15
7.2.6.4 Smoothness....15
7.3 Audio 15
7.3.1 PGM Audio 15
7.3.2 HDMI Audio....16
7.3.2.1 Mix Mode 16
7.3.2.2 Volume....16
7.3.2.3 Audio Delay....16
7.3.3 Mic 1/Mic 2....16
7.3.3.1 Mix 16
7.3.3.2 Volume 16
7.3.3.3 Audio Delay 16
7.3.3.4 Mode....16
7.3.4 Headphone 16
7.4 Image....16
7.4.1 Pattern 17
7.4.1.1 Image Selection 17
7.4.1.2 Image Deletion....17
7.4.2 Add Image....17
7.4.3 LOGO 17
7.4.3.1 LOGO Select 17
7.4.3.2 LOGO Deletion....17
7.4.4 Add LOGO 17
7.4.5 LOGO Position....17
7.5 Multi Media 18
7.5.1 H.264 18
7.5.2 Stream....18
7.5.3 Record 18
7.6 Screen Monitor ....18
7.6.1 LevelMeter 18
7.6.2 Input Information 18
7.6.2.1 Visible 18
7.6.2.2 Opacity....19
7.6.2.3 Position/Size 19
7.6.2.4 Font Color 19
7.6.2.5 Background Color....19
7.6.3 UMD....19
7.6.3.1 Visible 19
7.6.3.2 Opacity....19
7.6.3.3 Position/Size 19
7.6.3.4 Font Color 19
7.6.3.5 Background Color....19
7.7 Output....19
7.7.1 Mode....19
7.7.2 Color 19
7.8 Camera....20
7.8.1 Camera Select 20
7.8.2 Camera IP 20
7.8.3 Search 20
7.8.4 Focus 20
7.8.5 Exposure....20
7.8.6 White Balance....21
7.9 Setting 21
7.9.1 System Setting....21
7.9.1.1 Language 21
7.9.1.2 Backlight....21
7.9.1.3 Fan....21
7.9.1.4 Reset....21
7.9.2 Time Setting 22
7.9.2.1 Date....22
7.9.2.2 Time 22
7.9.2.3 Time Format 22
7.9.3 Network....22
7.9.4 Firmware....22
7.9.5 Help 22
8、Upper Computer 23
8.1 Connect the upper computer ....23
8.1.2 Using PC....23
8.1.3 Using Phone 23
8.2 Switcher Setting....23
8.2.1 Front Panel 24
8.2.2 EFFECT 24
8.2.3 SCENES 24
8.3 Media Setting....24
8.3.1 Streaming Setting 25
8.3.1.1 Streaming Address 25
8.3.2 Picture Upload 25
8.3.3 LOGO Upload 25
8.4 Audio Setting....25
8.4.1 PGM/HP 26
8.4.2 Micphone Audio Setting 26
8.4.3 Quad HDMI Audio 26
8.5 Update....26
8.5.1 System Update 26
8.5.2 EDID Update....26
8.6 Transitions 27
8.7 Layer....27
8.7.1 Layer Position/Size 27
8.7.2 MASK....27
8.7.3 CHROMA Key 28
8.7.4 LUMA Key 28
8.8 Setting 28
8.8.1 SYSTEM Setting 28
8.8.2 TIME Setting 28
8.8.3 NETWORK Setting 28
1 Introduction
1.1 Brief
The switcher is a multi functional and professional quad HDMI video switcher with a 5.5"FHD LCD, and joystick. Users can easily monitor the sources and the PVW, conveniently control PTZ cameras. It is suitable for live broadcast and streaming.
The switcher is high performance and accelerated by FPGA, with digital video effects, chroma key, flexible PIP/PO, Logo and other functions for broadcasting. The switcher supports UVC streaming, multi network streaming and local video recording.
1.2 Features
● 5-inch full HD LCD display:
Built-in 5-inch HD screen, Integrates live streaming and monitoring functions.
● Support T-shaped fader switching video output control:
Damping feel fader, supports 30 switching effects.
● 4 HDMI input video sources, 2 PGM HDMI output:
Supports up to 4 video inputs and 1080P60 image input.
1 channel UVC video signal output.
● Supports RTMP streaming protocol, live broadcast at any time:
Supports RTMP streaming media protocols to implement streaming; supports stream size setting and simultaneous streaming from 2 addresses.
- Dual HDMI outputs:
Both channels can output PGM
- A variety of PIP layouts and transition effects, which can be freely converted according to needs:
Supports multiple PIP and POP layouts and multiple transition functions.
● MP4 video recording, retains wonderful works:
Supports MP4 format video recording and saving.
Supports USB mobile hard disk storage.
● Convenient and fast camera control functions:
4D joystick PTZ control; supports VISCA Over IP control protocol.
● Powerful WEB control background:
Supports remote control of broadcasting and parameter configuration through the WEB background, and supports WEB equipment upgrades.
2、Interfaces
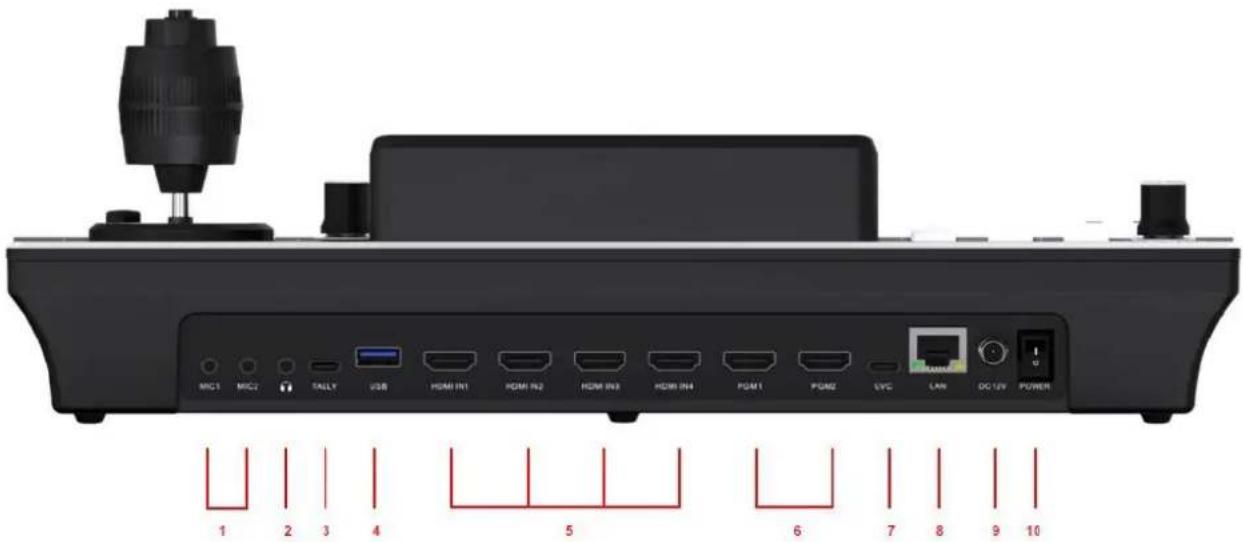
2.1 Description
| 1 | MIC/Line(3.5mm stereos) *2 (Audio input) |
| 2 | Line(3.5mm stereos) * 1 (Audio input) |
| 3 | TALLY extend port, support external TALLY box |
| 4 | USB-A (Record video with USB disk, logo/pictures import, Firmware update, USB to serial port control function ( need to use converter ) |
| 5 | HDMI IN x 4 |
| 6 | PGM Out x 2 |
| 7 | USB Type C (UVC streaming) |
| 8 | LAN ( Web control and network streaming) |
| 9 | DC 12V IN (Power supply) |
| 10 | Power switch |
3. Configuration
| parameters | |
| Video Source | HDMI IN x 4 |
| Video Output | PGM x 2UVC x 1 |
| Audio Input | MIC/Line level(3.5mm stereos)x2 |
| USB | USB x 1 |
| Lan | LAN x 1 |
| Power | DC 7~12V ≤12W |
| Function | |
| Switching | T-Bar/AUTO/ CUT |
| Effects | WIPE/MIX/DIP/PAT/STILL/MUTE/FTB |
| Layout | Multi Layout format (see 5.4.3) |
| Keying | Luma Key Chroma Key |
| Audio Sources | HDMI x 4 and MIC/ Line level x 2; |
| Audio Delay | 0-5s |
| Media | Importable pictures and logos |
| Video format | |
| HDMI Input | 1080p 60/59.94/50/30/29.97/25/24/23.981080i50/1080i60720p 60/59.94/50/30/29.97/25/24/23.98576i/480i/576p/480p |
| HDMI PGM output | 1080p 60/50/30/25/241080i50/1080i60 |
| HDMI color format | RGB/YUV |
| USB streaming | max 1080p60 |
| Stream media | H.264 encoder, supports video recording and 2 network streaming, with adjustable code rate |
| Others | |
| Power Supply | 7~24V |
| Size (LWD) | (W)354* (D)165* (H)121mm (Including rocker height) |
| Weight | 2kg |
| Temperature | Working: 0°C~50°C, Storage: -30°C~70°C |
| Accessory | Transformer (12V 2A) x1; |
4. Front Panel
4.1 Front Panel Description
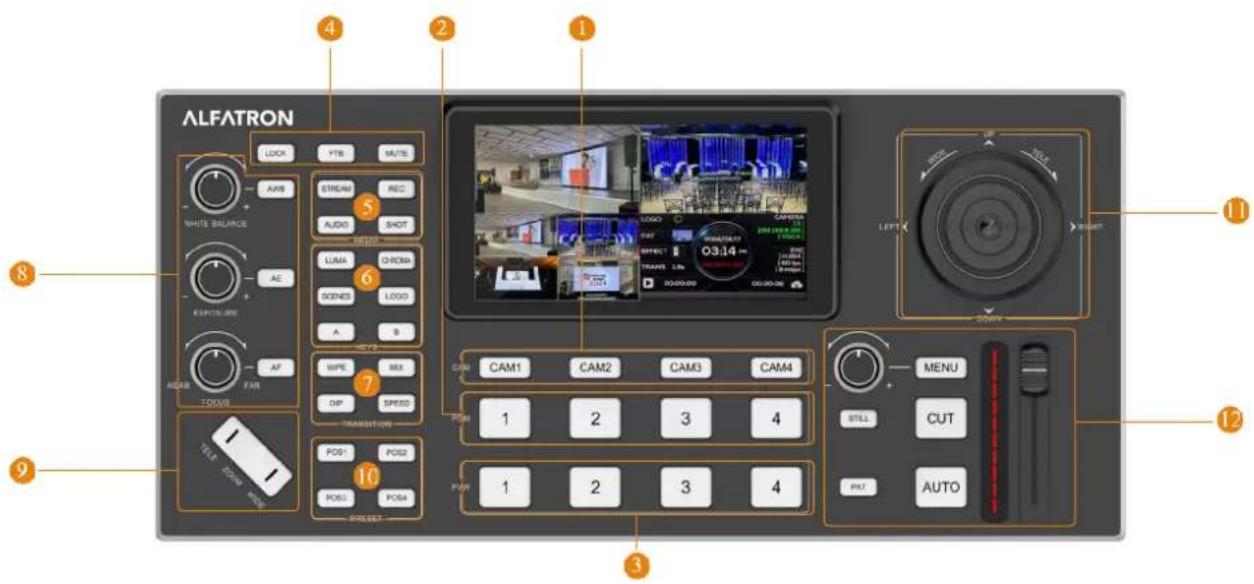
| 1 | CAM1-CAM4 | Camera mode, active with lighting |
| 2 | PGM KEY:1-4 | PGM indicator and directly switching key. See 5.1 |
| 3 | PVW KEY:1-4 | PVW indicator and Layer A\B select key. See 5.1 |
| 4 | Lock | Lock key, active with red blinking. It lock all the keys on front panel to avoid faulty operation. |
| FTB | Force PGM to black immediately, as well as mute PGM auto immediately. Active with red blinking | |
| MUTE | PGM Mute, active with red blinking | |
| 5 | STREAM | Active with green blinking |
| REC | Active with green blinking | |
| AUDIO | Audio menu. See 5.4.1 | |
| SHOT | Screen shot of PGM Signal | |
| 6 | CHROMA/LUMA | When tuened on, the button light will light up |
| SCENES | Scenes menu. See 5.4.3 | |
| LOGO | LOGO key | |
| A/B | A/B layer select key for PVW | |
| 7 | WIPE | Switching effect menu. See 5.4.2 |
| MIXD/P | MIXD/P effect | |
| SPEED | Set transition speed. See 7.1.2 | |
| 8 | AWB knob | Switch white balance mode and manually adjust the red and blue gain with the knob |
| AE knob | Switch exposure mode, manually adjust aperture, shutter and gain with the knob | |
| FOCUS knob | Switch focus mode and manually adjust the focal length with the knob | |
| 9 | ZOOM rocker | Controls the camera to zoom in and out |
| 10 | POS1 - POS4 | Camera position record. See 5.5 |
| 11 | PTZ Joystick | The joystick is multifunction and these functions are exclusive:1. Camera control.See 5.52. Layer control:Layer position, PIP/POP mask position,Logo position, UMD position |
| 12 | MENU/MENU KNOB | MENU: System menuKNOB: Multifunctional: Menu selection/Menu enter/Layer size controlSetting the PT speed of camera |
| STILL | PGM freezing | |
| PAT | Pattern selection in PVW | |
| CUT/AUTO | Switch PVW and PGM directly and immediatelyAUTO Switch PVW and PGM automatically with preset effect | |
| T-Bar | Manually switch with T-Bar |
5、Operation
5.1 Switching
Switching can be controlled by PVW, PGM, CUT, AUTO, PAT Keys and T-Bar.
PAT Pattern select for current layer in PVW
PVW KEY 1-4: Source select for current layer in PVW
PGM KEY 1\~4: Source select for directly switch in PGM. When there are two layers in PGM the selected source will display as Layer B
CUT: Switch PVW and PGM directly and immediately AUTO:
Switch PVW and PGM automatically with preset effect T-Bar:
Switch PVW and PGM manually with preset effect
5.2 Layer control
Both PGM and PVW support up to two layers, Layer A and Layer B. Each layer can be separately configured, including source, size, position, mask and keying.
A KEY/B KEY: Layer A/B control
If A/B KEY isn't active, Layer A/B doesn't display in PVW and A/B KEY is pressed, the A/B KEY will be active and Layer A/B will display in PVW.
If A/B KEY isn't active, Layer A/B already displays in PVW and A/B KEY is pressed, the A/B KEY will be active and Layer A/B will display on the top layer in PVW.
If A/B KEY is active, and A/B KEY is pressed, the A/B KEY will be inactive and Layer A/B will be removed in PVW.
Note: PVW needs at least one layer. Therefore, if Layer A is inactive, B key will active and Layer B will display in PVW, and vice versa. If there is only one layer in PVW, the corresponding Key will be active and it will keep active even being pressed.
Five Way Rocker : When Five Way Rocker is idle, user can use it to move the selected layer
Menu Knob : When Menu Knob is idle, user can use it to adjust the size of the selected layer
5.3 ON/OFF Function Keys
LOGO : Set LOGO ON/OFF
CHROMA: Set chroma keying of the selected layer ON/OFF
LUMA: Set luma keying of the selected layer ON/OFF REC:
Set video record ON/OFF
STREAM: Set streaming ON/OFF STILL:
Set freezing PGM ON/OFF
5.4 Shortcut keys
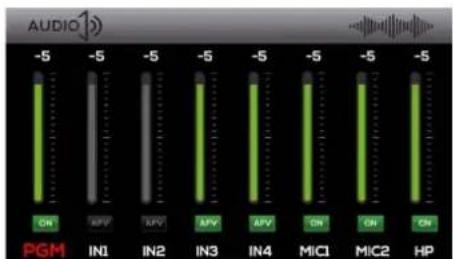
5.4.1 AUDIO: Audio Menu ON/OFF
User can evoke audio menu by pressing AUDIO key. In the Menu, user can:
-
Select audio channel with Five Way Rocker
-
Adjust volume of the selected audio channel with Menu Knob
-
Set ON/OFF of the selected audio channel by pressing Menu Knob
5.4.2 EFFECT: Switching Effect menu
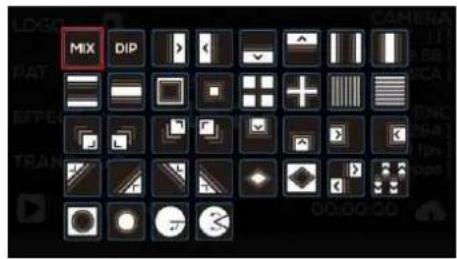
User can evoke Switching Effect Menu by pressing EFFECT key. In the Menu, user can select preset switching type and style. And the Auto and T-BAR switching will implement the selected preset.
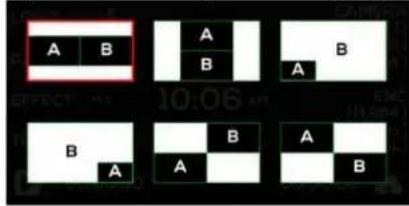
5.4.3 SCENES: AB Layout Menu
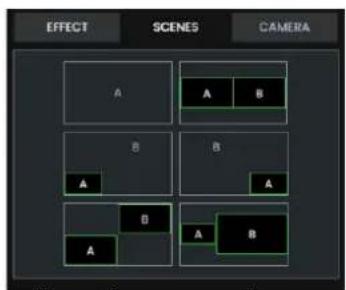
User can evoke AB Layout Menu by pressing SCENES key. In the Menu, user can select preset layout. And AB layers will display as preset.
When there is at least one camera, and the connection is fine, the user can control the camera with CAM, POS and Five Way Rocker, PGM Keys, PVW Keys. The operations are:
- Activate the camera: Press CAM Key. The PTZ Control Mode will be active. And the CAM light keep blinking.
- Camera Control: Use PVW Keys 1-4 to control Camera 1-4. When the user presses a PVW Key, the key will keep blinking and the corresponding camera is active. The left/right/up/down motion is controlled by the Five Way Rocker. And the Zoom In/Out is controlled by the Menu Knob. Therefore, the user can use both hands to implement camera motion and zoom at the same time.
- Camera Position Record and Recall: When the user complete adjusting the camera and finding the view, the user can save the camera position and agilely evoke the camera moving to the saved position, without additional adjusting and finding.
- Position Record: After activate the camera, press POS Key, then press PGM Key 1-4 to save the corresponding camera position.
Position Recall: After activate the camera, press the corresponding PGM Key to recall the saved position. The camera will automatically move to the position.
5.6 Lock
Long press the Lock Key for more than 2 seconds, and activate the Lock function with lock light blinking. When Lock is active, pressing any keys will not take effect. The Lock can keep the working status and prevent from faulty operation.
Long press again will inactivate the Lock function.
5.7 FTB
When pressing FTB, the PGM will be forced to black, and the volume of PGM will forced to mute.
5.8 Key Leds
| Key Leds | OFF | ON | Blinking |
| LOCK | OFF | - | Locking |
| MUTE | OFF | - | PGM MUTE |
| LOGO | OFF | Logo On | - |
| AUDIO | Audio Menu Off | Audio Menu On | - |
| EFFECT | Effect Menu Off | Effect Menu On | - |
| SCENES | Scenes Menu Off | Scenes Menu On | - |
| A | Layer A unselected | Layer A selected | - |
| B | Layer B unselected | Layer B selected | - |
| CHROMA | Chroma Key Off | Chroma Key On | - |
| LUMA | Luma Key Off | Luma Key On | - |
| REC | Off | - | Recording |
| STREAM | Off | - | Streaming |
| CAM | Off | - | Camera Activated |
| POS | Waiting PressingPGM Key 1-4 to recall camera position | - | |
| PGM1~4 | Source unselected | Source selected | - |
| PVW1~4 | Source unselected | Source selected | - |
| STILL | Off | - | PGM Freezing |
| PAT | Off | Activate pattern as source | - |
| AUTO | Off | Automatically switching | - |
| FTB | Off | - | PGM force to black and mute |
6、LCD Monitor
![13 14 PVW No Signal No Signal PGM LOGO ① CAMERA [1] PAT ② 2022/11/16 02:10 AM ENC [H.264] EFFECT MIX 00:00:00 TRANS. 0.5s ④ [60 fps] [5 mbps] 00:00:00 ⑧ 9 00:00:00 Welcome ! — ⑰](/content/2026/05/999160/images/45a1fb93b772592e1e2203fb725291a9129d3e4c8ab9297370a0012e2a04f130.jpg)
| 1 | LOGO | 7 | Date&Time | 13 | MIC1 Vol Meter |
| 2 | PAT | 8 | Recording Status | 10 | MIC2 Vol Meter |
| 3 | EFFECT | 9 | Streaming Status | 15 | PGM Vol Meter |
| 4 | TRANS Time | 10 | U-Disk Status | 10 | UMD |
| 5 | CAMERA Info | 4 | Signal Status | 4 | System |
| 6 | ENCODER Info | 12 | HDMI IN Vol Meter |
7. Menu
7.1 Transition
There are transitions including WIPE, MIX, DIP. The user can trigger a transition by pressing AUTO, or manually control the transition with T-BAR.
The user can enter the transition menu by pressing Menu Key or rotating the Menu Knob then selecting in the main menu.
7.1.1 Transition configuration
In the transition Menu, the user can select from MIX, DIP, WIPE, including more than 30 styles.
![Effect Duration [1.5 s] FTB [2.0 s] Softness [20] DIP 00:00:00 1/2 00:00:00 00:00:00 00:00:00 00:00:00 00:00:00 00:00:00 00:00:00 00:00:00 00:00:00 00:00:00 00:00:00 00:00:00](/content/2026/05/999160/images/e2c45b35b430e11dc44fd0431d3169c97347967e0495eb06579dbdca662fe069.jpg)
7.1.1.1 MIX
Select MIX in the transition menu, configure the transition time. Then the user can auto trigger or manually control the MIX transition.
7.1.1.2 DIP
Select DIP in the transition menu, configure the transition time. In the DIP menu, two styles can be select. One is DIP with color, and the default color is black. The other is DIP with background, which can be set in the library.
7.1.1.3 WIPE
Select WIPE in the transition menu, configure the transition time. In the WIPE mode, there are plenty styles to be selected, including horizontal, vertical, corner, cross, circle, diagonal, etc. The user can also configure the smoothness. The smoothness can make the edge smoother.
7.1.2 Duration Time
In the transition menu, the user can set the duration time. Larger value of time means the transition will last a longer time, and vice versa. The time range could be 0.1s-5.0sm and the default is 0.5s
![Effect Duration [1.5 s] FTB [2.0 s] Softness [20] DIP 1.5 s [36E:166.0:10] [ VISCA ] ENC [ H,284 ] [ 80 fps ] [ 5 mbps ]](/content/2026/05/999160/images/f643df571cda657381382356f6595ed9540e964bd1f5bb05a18aff0e2d8dfc8a.jpg)
7.1.3 FTB Time
In the FTB Time menu, the user can set the time from pressing the FTB Key to forcing PGM black.
![Effect Duration [1.5 s] FTB [2.0 s] Softness [20] DIP 2.0 s 192.168.0101 [ VISCA ] ENC [H.264] [60 fps] [5 mbps] 00:00:00 00:00:00](/content/2026/05/999160/images/2a335e8296e92a35a862694eb98943b4eb761b9503090bf099520038887e1295.jpg)
7.1.4 Softness
Select Transition Menu and select softness, turn the Menu Knob to change the softness. Smaller value means sharper edge, and greater value means smoother edge. The range is 0-100 and the default value is 20.
![Effect Duration [1.5 s] FTB [2.0 s] Softness [80] DIP 20 [92.158.0301] [VISCA] ENC [H.264] [60 fps] [5 mbps] 00:00:00 00:00:00](/content/2026/05/999160/images/098505b4b0f51b3540fde07b24dea1c62c8e0ac18cb022107f4bab8bbc70191f.jpg)
7.1.5 DIP Configuration
Select Dip to set Mode and Color. When select Color as Mode, the user can set the dip color. When select Image, the dip will work with the preset background picture.
![Effect Duration [1.5 s] DIP Mode [Color] FTB [2.0 s] Softness [20] DIP 09:08 AM 00:00:00 00:00:00 Color Image ENC [H.264] [60 fps] [5 mbps]](/content/2026/05/999160/images/4b61842396cb5b78c8a677ec0e9ddd84a0c41f5b0f120640d1ee5bddb5ccd531.jpg)
![Effect Duration [1.5 s] FTB [2.0 s] Softness [20] DIP 00:00:00 DIP Mode [Color] DIP Color 09:08 AM 00:00:00 6 HSV : [0,0,0] RGB : [0,0,0]](/content/2026/05/999160/images/bba1170e4cc763934424dbc9679a70cd8cae19e530835696a2a6d5fb5f3c1b89.jpg)
7.2 Layer
The switcher supports A/B layers. So, it can implement PIP/POP. And the size and position can be set as the user need.
Click Menu and enter the menu, select

7.2.1 Layer Source
In the Layer menu, the user can select the layer source by turning the Menu Knob. The user can select PVW 1-4 or PAT as the Layer source.
![Source [HDMI] Pos/Size Mask > Key [Off] Chroma > Luma > HDMI1 HDMI2 HDMI3 HDMI4 PAT [00:188.0.101] [VISCA] ENC [H.264] [80 fps] [5 mbps] 00:00:00](/content/2026/05/999160/images/f5797dd64c3b47b608460d6904046daf1d4bfccd5c26c26312a3f71396034f2a.jpg)
7.2.2 Position/Size
In the Layer menu, the layer size can be set by the Menu Knob, and the position can be set by the five-way rocker. The position and the size information also display in the menu.
![Source [HDMI] Pos/Size Mask Key [Off] Chroma Luma Layer Move & Resize Pos: (0.610) Size: (460,270) ENC [H264] [80 fps] [5 mbps] 00:00:00](/content/2026/05/999160/images/b942ae0b01f2a28a81bf625184fdfb8cbe65d17574d57e6b8d05b915754995ea.jpg)
7.2.3 Mask
In the Layer menu, the user can set the layer mask Select Mask and turn it on. Then set the size and position.
![Source [HDMI] Mask Pos/Size Shape Mask > Pos/Size Key [Off] Chroma > Luma >](/content/2026/05/999160/images/27f777fca6b5f1a11e951e3b4fe681b36c0dfedcee0247a9cab6a4c9ff6fa38e.jpg)
![Source [HDMI] Mask Pos/Size Shape Mask x Pos/Size Key [Off] Chroma x Luma x Mask Move & Scale Pos: (0,0) Scale: xl](/content/2026/05/999160/images/8bfda50379074149d6527fefee3bffd5fcc9d4c6ca1f757069d33775fe7bc24d.jpg)
7.2.4 Keying Configuration
The user can create lifelike virtual studio with Keying functions in the switcher. The keying function can work on multi stream and achieve very good keying result, including clean keying, detail retaining and edge balance, to meet the need of the users.
![Source [HDMI] Pos/Size Mask Key [Off] Chroma Luma Off Luma Chroma 09:13 AM 00:00:00 00:00:00 [192.158.0.10] [VISCA] ENC [H.864] [60 fps] [5 mbps]](/content/2026/05/999160/images/25c38021f0fefbaf56879ebd38577c461fce5b15c31c8b174b6fcddcf9727aad.jpg)
7.2.5 Chroma
Chroma Key is commonly used for virtual studio, such as weather broadcasts, news broadcast, film, gaming and so on. In the studio the presenter is actually standing in front of a green or blue background In chroma key two images are combined using a special technique and the background color of one image is removed. Then the remaining foreground displays over another image.
In the Layer Menu, select chroma key, set the key color, the similarity and smoothness.
![Source [HDMI] Color Pos/Size Region Mask > Similarity [10] Key [Off] Smoothness [10] Chromo Luma](/content/2026/05/999160/images/7d1322916fc346f740dd4e6a03bac4b4c57410b0aa11fece1ef9f9c838f144ac.jpg)
When press CHROMA KEY, it firstly works in PVW, and the CHROMA KEY will light green.
7.2.5.1 Color
In Chroma Key menu, the user can set the HVS value of the key color.
![Source [HDMI] Color Pos/Size Region Mask > Similarity [10] Key [Off] Smoothness [10] Chroma > Luma >](/content/2026/05/999160/images/117f69fca867f7c1992db3b6fcf117a176386cb1a10653ac1116913a6589c1a4.jpg)
7.2.5.2 Region
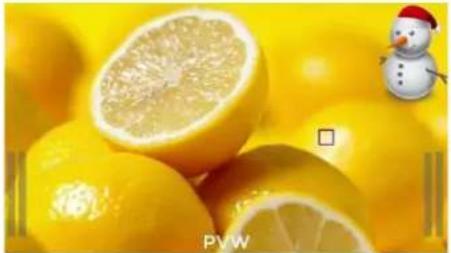
In Chroma Key menu, select Region, there is a rectangle in the top layer of A/B. The size of the rectangle can be set by turning the menu key, and the position can be adjusted with the five-way rocker.
![Source [PAT] Color Pos/Size Region Mask > Similarity [10] Key [Off] Smoothness [10] Chroma Luma Chroma Pick (235,174.0)](/content/2026/05/999160/images/1be5f7fb721001b92e9510fba79d9718cc4c92b64b10d757ca1374039b8f7ce3.jpg)
natural_image
Close-up of a whole and a halved lemon with a snowman figurine nearby (no text or symbols on the main subject)7.2.5.3 Similarity
In chroma key, the Similarity adjusts the color range from the set key color. The greater value means wide key range. The default is 0.
7.2.5.4 Smoothness
In chroma key, the Smoothness can help to remove the background very closed to the edge of the foreground. It's useful to get clear edge of the foreground, without any annoying artifacts visible. The greater value of smoothness means more clear and smoother edge. The default is 0.
7.2.6 Luma Key
The luma key using luma value to get a luma matte of the foreground video, which removes away the black background of the foreground video. And the remaining will display over another background video.
In the Layer Menu, select luma key, set the min, max, reverse, the similarity and smoothness.
![Source [PAT] Min [16] Pos/Size Max [30] Mask > Inv, OFF Key [Off] Similarity [0] Chroma > Smoothness [0] Luma 00:00:00](/content/2026/05/999160/images/6a1f61d47964130eb244ba827da6bb1aeef95e25c86512a3c76e2ac582d5f458.jpg)
When press LUMA KEY, it firstly works in PVW, and the LUMA KEY will right green.
7.2.6.1 Min/Max
The Min/Max adjust the range of luma key. And the luma value of the foreground video, out of the range, will be keyed away. The range is 16-235 and the default is 16.
7.2.6.2 Reverse
The Reverse keys away the luma value out of the range from min to max.
7.2.6.3 Similarity
In luma key, the Similarity adjusts the color range from the set key luma. The greater value means wide key range. The default is 0.
7.2.6.4 Smoothness
In luma key, the Smoothness can help to get smoother edge. The default is 0.
7.3 Audio
Support audios from 4 HDMI sources and 2 3.5mm mic sources. Each source has separate enable, volume, mix, delay control. The HDMI sources can be AFV.
Pressing Menu Key, in the menu select

7.3.1 PGM Audio
In the PGM, the Mute will turn off the audio in the PGM. The Volume range is -60dB to 0dB. The default is -5dB.
![PGM HDMI1 HDMI2 HDMI3 HDMI4 MIC1 MIC2 Mute Volume [-5 dB] 04:56 fps 00:00:00 00:00:00 [92.180 0.107] [VISCA] ENC [H.284] [80 fps] [5 mbps]](/content/2026/05/999160/images/e0c28c996590040b80ac38fcbe1c62daf92e5ea246497958eb4c3c4cfd914674.jpg)
7.3.2 HDMI Audio
In the Audio Menu, there are 4 HDMI sources can be set.
7.3.2.1 Mix Mode
The mix mode can be Off/On/AFV.
When set as AFV, the source audio will be active only when the video also displays in PGM.
![PGM HDMI1 HDMI2 HDMI3 HDMI4 MIC1 MIC2 Mix Volume Delay [AFV] [-5 dB] [0.0 s] OFF ON AFV [H 264] [60 fps] [5 mbps] 00:00:00 00:00:00](/content/2026/05/999160/images/6935285737c77b907426590ec999e00cd1f57a37c8331e6ba87f67e5778eafc6.jpg)
7.3.2.2 Volume
The volume of each source can be adjusted separately. The range is -60dB to 0dB. The default is -5dB.
7.3.2.3 Audio Delay
The audio delay of each source can be set separately. Adjust the delay and keep the synchronization between the audio and the video. The max delay is 5 secs. The default is 0 sec.
7.3.3 Mic 1/Mic 2
In Audio Menu, Mic1/Mic2 can be set. The Mic source can be linear audio device, desktop audio, lapel microphone and so on.
7.3.3.1 Mix
User can turn on or off the mixer. The default is on.
![PGM HDMI1 HDMI2 HDMI3 HDMI4 MIC1 MIC2 Mix Volume Delay Mode [0,0 s] [5 dB] [0,0 s] [Line] 00:00:00 [92 168.010] [VISCA] ENC [H.264] [60 fps] [5 mbps]](/content/2026/05/999160/images/db5dcfa278b36b24ee9b779f087ce7acbd3f313e122d3c2c2e6ad030d58d2248.jpg)
7.3.3.2 Volume
The volume of each source can be adjusted separately. The range is -60dB to 0dB. The default is -5dB.
7.3.3.3 Audio Delay
The audio delay of each source can be set separately. The max delay is 5 secs. The default is 0 sec.
7.3.3.4 Mode
The are mic and line mode for Mic 1/Mic 2. When the source device is microphone, set the mic mode. When the source device is line device, set the line mode.
7.3.4 Headphone
There is a headphone output in the switcher. User can monitor the audios by the headphone. The source of the headphone can be PGM audio, any source of HDMIs and Mics. The default source is PGM audio. The volume of headphone can be adjusted, and the range is -60dB to 0dB. The default is 0dB.
![PGM HDMI1 HDMI2 HDMI3 MIC1 MIC2 Mix Volume [0.0 s] Delay [5 dB] Mode [Line] Line Mic ENC [H:264] [60 fps] [5 mbps] 00:00:00 HDMI1 HDMI2 HDMI3 HDMI4 MIC1 MIC2 PGM Source [PGM] Volume [5 dB] 00:00:00 00:00:00](/content/2026/05/999160/images/6917ae1d8b1c5daef266172500c41fbbd65209a70abd31b70680eeebe6dcde5c.jpg)
7.4 Image
In the Image, the pattern, logo can be set.
Pressing MENU, select

7.4.1 Pattern
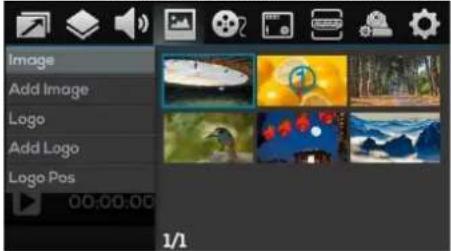
In the Image, select Image to show the pictures.
7.4.1.1 Image Selection
Select the image by turning the Menu Knob, then press the Knob. Select IMG1 at the bottom and press the Knob. The image is set as default background Pattern.
7.4.1.2 Image Deletion
The operation is similar to Image Selection. The difference is select DEL in the bottom.
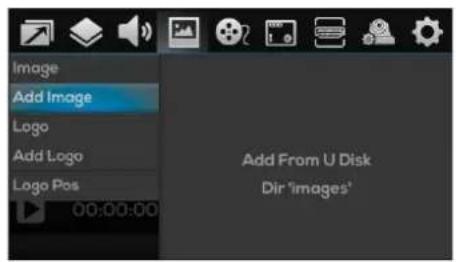
7.4.2 Add Image
Images can be import from U-Disk. Insert U-Disk and there will be a USB icon at the bottom. Please make sure the images are saved in the "images" directory. Then select the images and import to the switcher. PS: The max size supported is1920x1080.
7.4.3 LOGO
7.4.3.1 LOGO Select
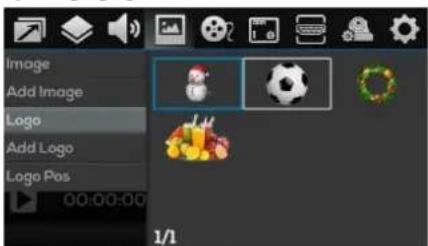
In Logo configuration, select LOGO and load preset LOGO.
7.4.3.2 LOGO Deletion
Select the preset LOGO with the Menu Knob, then press the knob. Select DEL at the bottom of the menu and delete the LOGO.
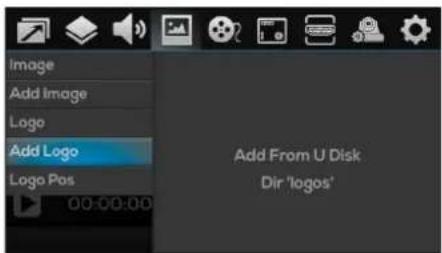
7.4.4 Add LOGO
Save LOGOs in the "logos" directory in the usb-disk, insert the usb-disk and there will be a USB icon at the bottom of the status/menu page. Then add the logos from the logo add menu.
The size of the logos should not be larger than 960x540. And formats such as *.png, *.jpeg, *.jpg, *.bmp are supported.
7.4.5 LOGO Position
In logo position, adjust the position of logo with the five away rocker.
![Image Add Image Logo Add Logo Logo Pos Logo Move Pos: (1120,-50) [192168.0.101] [VISCA] ENC [H.264] [60 fps] [5 mbps] 00:00:00 00:00:00](/content/2026/05/999160/images/75423ede62f3e6cfedd2f7c657bbd72635ac58f05d7a45ce6835e50c14282504.jpg)
7.5 Multi Media
In the multimedia, users can check and adjust the encoder, network streaming, recording.
Press MENU and then select

7.5.1 Encoder
In encoder, there are framer rate and code rate can be adjusted. The range of frame rate is 10-60, the range of code rate is 1mbps-30mbps. The default frame rate is 60, and the code rate is 5mbps.
![Encoder Stream Record TRANS: 1.5s FP5 [60] Bitrate [5 mbps] 09:25 AM 00:00:00 00:00:00 ENC [H.264] [80 fps] [5 mbps]](/content/2026/05/999160/images/6c40b3e0e54a64ea736d375dcbb41465f74c10f06f997af777db4808228b25a4.jpg)
7.5.2 Stream
In Multimedia Settings, select Stream. Two streaming addresses can be saved in network streaming. Click STREAM to start streaming. If the streaming address is available, the STREAM button flashes green and starts streaming, and the streaming address is displayed in green. If the streaming address is abnormal, the streaming address is displayed in red and the STREAM button is off. (Note: if the output is set to i mode, streaming is not allowed)
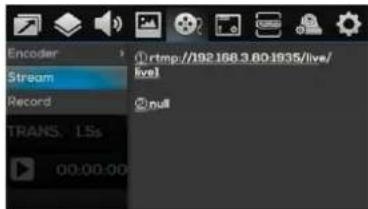
The streaming address is configured through the Web host computer. See 8.3.1 Streaming Settings.
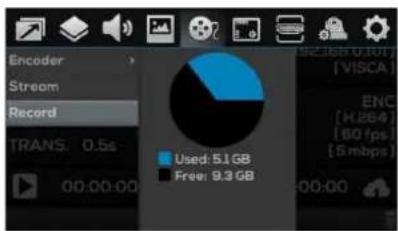
7.5.3 Record
The switcher records the picture and sound of PGM into the "video_rec" folder on the USB flash drive.
Support the USB flash disk format of FAT32 and NTFS (FAT32 can record 4G video at most)
When a USB key is inserted, a USB icon will appear at the bottom of the status/menu page. In Multimedia Settings, select Record to display the
pie
| Category | Value | | -------- | ----- | | Used | 51 GB | | Free | 9.3 GB |used capacity and available capacity of the USB flash drive. Click the REC button to start recording. The file name of the recorded file will appear below the pie chart, and the REC light will flash. Press REC again to stop recording.
Note: The system will automatically stop recording when the capacity of the USB flash disk is insufficient;
The recording will stop automatically when the FAT32 USB flash disk is 4G in size;
When the recording is not stopped normally (for example, the recording power is interrupted, and the USB stick is unplugged), the recording file cannot be used normally.
7.6 Screen Monitor
In the screen monitoring, you can operate the audio meters, input information and UMD.
Press Menu and select

7.6.1 Level Meter
Enter the screen monitoring settings and select the level meter. The level meter of four HDMI, two MIC and PGM can be turned off and turned on at the same time, or can be set separately.
![Level Meter Input Info UMD TRANS. 0.5s 00:00:00 All HDMI1 HDMI2 HDMI3 HDMI4 MIC PGM [92.168.01] [ VISCA ] ENC [ H.264 ] [ 80 fps ] [ 5 mbps ]](/content/2026/05/999160/images/16881f4590af8422613f87a5e0db72e3eed87557911478a75c3fa7e60bd5b796.jpg)
7.6.2 Input Information
Enter the screen monitoring setting, select the input info, and you can set the information of the four HDMI input signals to turn on and off, font color, etc.
![Level Meter Input Info UMD TRANS: 1.5s Visible Opacity Pos/Size Font Background [162:188.0.10] [ VISCA ] ENC [ H.264 ] [ 60 fps ] [ 5 mbps ] 00:00:00 00:00:00](/content/2026/05/999160/images/d0fe31bf436059b22e6db9e0f00aa8f47419817ab6e8d248bee95855296c39b4.jpg)
7.6.2.1 Visible
Turn on the Visible and display the information of four HDMI input signals. Otherwise, turn off the Visible, and close the information.
7.6.2.2 Opacity
Opacity sets the opacity of the background of the four HDMI input information display, ranging from 0% to 100%.
7.6.2.3 Position/Size
Enter the screen monitoring setting, select the input information - position/size, control the size of resolution display through the knob, and control the display position of resolution through the PTZ rocker.
7.6.2.4 Font Color
Enter the screen monitoring settings, and select the input information font color to customize the font color of the input information.
7.6.2.5 Background Color
Enter the screen monitoring settings, select Input Information - Background Color to customize the background color of the input information.
7.6.3 UMD
Enter the screen monitoring settings, select UMD, and you can set the opening/closing, font color, etc. of UMD in PVW and PGM windows.
7.6.3.1 Visible
Turn on the Visible and display the information of PVW and PGM. Otherwise, turn off the Visible, and close the information.
![Level Meter Input Info UMD TRANS: 1.5s Visible Opacity Pos/Size Font Background [192.168.0.101] [VISCA] ENC [H264] [60 fps] [5 mcps]](/content/2026/05/999160/images/7aa86412f8fa4c64c8bc6f44e37040a392601799b03e7ccf65e3bd688bfba2c2.jpg)
7.6.3.2 Opacity
Opacity sets the opacity of the background of the UMD, ranging from 0% to 100%.
7.6.3.3 Position/Size
Enter the screen monitoring setting, select the UMD - position/size, control the size of resolution display through the knob, and control the display position of resolution through the PTZ rocker.
7.6.3.4 Font Color
Enter the screen monitoring settings, and select the UMD font color to customize the font color of UMD.
7.6.3.5 Background Color
Enter the screen monitoring settings, select UMD - Background Color to customize the background color of the UMD.
7.7 Output
In the menu, the output format and color can be set.
Press MENU and select

7.7.1 Mode
Enter the output setting and select the mode. You can select different output modes through the knob. The default is 1080p60.
![Mode [1080p60] 1080p60 Color [RGB Full] 1080p50 EFFECT 1080p30 1080p25 1080p24 1080i80 1080i50 [192.168 U 101] [VISCA] ENC [H.264] [60 fps] [5 mbps] TRANS. 1.5s 00:00:00 00:00:00](/content/2026/05/999160/images/5e7bd403e2b162b54ae32a932df42a8b78fab3daac9e2afb58c0b890e36d5311.jpg)
7.7.2 Color
Enter the output setting and select the color. You can select different color modes through the knob. The default is RGB Full.
![Mode [1080p60] RGB Full [192.168.0.101] Color [RGB Full] RGB Limit [VISCA] EFFECT YUV 09:30 AM TRANS. 15s 00:00:00 00:00:00 00:00:00](/content/2026/05/999160/images/52d2ca02ee5d1ca7c4d832d0b53ac593c64d65685303a86854fe937332805a4b.jpg)
19
7.8 Camera
The switcher supports VISCA camera control protocol. The rocker and knob can be used to quickly and conveniently control camera movement. At the same time, camera focusing, exposure, white balance and other parameters can be set in the camera menu.
In addition, it also supports the camera position storage function, which can be quickly recalled (see "5.5 PTZ Control").
Press MENU and select

7.8.1 Camera Select
Enter the camera settings, select the camera, and use the knob to select the camera to be set.
![Camera [Cam1] Cam1 Cam2 Cam3 Cam4 Search Focus > Exposure > WB > 00:00:00 00:00:00 [INS 168 UDT] [ VISCA ] ENC [ H.264 ] [ 60 fps ] [ 5 mbps ]](/content/2026/05/999160/images/10572ea7449b83e0d42fa1567784cf729dea8c653ea160968a536b6f049eb7f0.jpg)
7.8.2 Camera IP
Enter the camera settings, select the camera IP, and the IP address of the camera is displayed. You can manually set the IP address.
![Camera [Cam1] 192.168.0 101 Cam IP Search Focus > Exposure > WB > 09:31 AM 00:00:00 [92.168.0.101] [VISCA] ENC [H,264] [60 fps] [5 mbps] 00:00:00](/content/2026/05/999160/images/f68f7e8feafa3abe5e66c55c532a223efce0bbc2fbac04a182d3fc55fa0e4253.jpg)
7.8.3 Search
Enter Camera Settings, select Search, and all found camera IPs in the same LAN will be displayed. Select the camera IP through the knob.
![Camera [Cam] Cam IP Search Focus Exposure WB Press [Enter] to Search Camera [92.168 U101] [VISCA] ENC [H.284] [60 fps] [5 mbps] 00:00:00](/content/2026/05/999160/images/13fadcf6c467afa0e2425523264ecb69d7fbf0c05c030f8e7c519d1fbcddb967.jpg)
7.8.4 Focus
Enter the camera settings and select Focus. You can set auto focus and manual focus. Manual focus can be set through the knob.
![Camera [Cam1] Auto Cam IP Search Focus Exposure WB Manual 09:33 AM 00:00:00 00:00:00 [92.159 0.10] [VISCA] ENC [H.264] [60 fps] [5 mbps]](/content/2026/05/999160/images/74bf6766b7d92b32b712e392a9c9a87ca42afda4c1d5ad6699404fcfba86a2d2.jpg)
7.8.5 Exposure
Enter the camera settings and select
exposure to set automatic exposure and manual exposure. Manual exposure can be set through the knob.
![Camera [Cam1] Auto Cam IP Manual Search Focus Exposure WB 09:34AM 00:00:00 00:00:00 [192.198.0101] [VISCA] ENC [H.284] [60 fps] [5 mbps]](/content/2026/05/999160/images/a6fe0d3a166ab970e94250e96c9afd40ccb857afe1190d1823c001430e29796b.jpg)
7.8.6 White Balance
Enter the camera settings, select white balance, and you can set automatic and manual gain. For manual, you can set the red gain and blue gain through the knob. The gain rage is 0-255.
![Camera [Cam1] Auto Cam IP Red Gain [0] Search BlueGain [0] Focus Exposure WB [92.185,107] [VISCA] ENC [H:264] [60 fps] [5 mbps] 00:00:00](/content/2026/05/999160/images/dd9a5603b260652d30f23a78844b6f30bf8be6c069dc6f25e82051eb40a73fda.jpg)
7.9 Setting
Press menu, then select

7.9.1 System setting
Select system settings to set the system of the switch station, including the settings of language, backlight, fan and reset
7.9.1.1 Language
Enter the system settings, select the language, and select the language with the knob. The default is English.
![System Time Network Firmware Help Language [English] Backlight [90%] Fan [Auto] Reset [Off] English 中文 ENC [H.264] [60 fps] [5 mbps]](/content/2026/05/999160/images/7e146969eaec56b778d0088a45d8a811396f5307d76ad825d4bdd0640da90149.jpg)
7.9.1.2 Backlight
Enter the system settings, select the backlight, and adjust the screen backlight through the knob. The range 10% - 100%. The larger than value, the brighter the screen.
![System Language [English] Time Backlight [90%] Network Fan [Auto] Firmware Reset [Off] Help 00:00:00](/content/2026/05/999160/images/7456a3fb0f45901ce8b14987527cb91692427cdf865cd67e15f585637370e9d2.jpg)
7.9.1.3 Fan
Enter the system settings, select the fan, and select the fan mode through the knob. The default is automatic mode.
Automatic mode: the fan speed is controlled according to the working temperature. The higher the temperature, the faster the speed.
Off mode: turn off the fan and switch to automatic mode only when a certain temperature is reached.
On mode: the fan is always on.
![System Language [English] Time Backlight [90%] Network Fan [Auto] Firmware Reset [Off] Help Auto Off On [ H.264 ] [ 60 fps ] [ 5 mbps ]](/content/2026/05/999160/images/9cb6312fc5af7ee222fc5efe1aeb64a3253746f844a4746037a5a7a005e72d5f.jpg)
7.9.1.4 Reset
Enter the system settings, select Reset, select On through the knob, and the switch station will perform reset operation. After reset, all configurations will be cleared.
![System Language [English] Off Time Backlight [90%] Network Fan [Auto] Firmware Reset [Off] Help 00:00:00 00:00:00 On ENC [H.284] [60 fps] [5 mbps]](/content/2026/05/999160/images/8339d9b13ced0a59f9e6c829109423a5d1f8de26bc99b40821c180c37a18f191.jpg)
7.9.2 Time Setting
Enter the time setting to operate the time, date, countdown, etc.
![System > Date Time < Time Network > Format [12h] Firmware Countdown Download Start OFF 00:00:00 00:00:00 [192.168.0101] [ VISCA ] ENC [ H.264 ] [ BO fps ] [ 5 mbps ]](/content/2026/05/999160/images/6e5a47313b5acf31e0a004a7f793020a1d2d52359ae2241159f87e0715a1af79.jpg)
7.9.2.1 Date
Enter the time setting, select the date, and set the date manually.
7.9.2.2 Time
Enter the time setting, select the time, and set the time manually.
7.9.2.3 Time Format
Enter the time setting, select the format, and the time can be set to display in 12h/24h format on the status page.
7.9.3 Network
In Network Settings, you can select to automatically obtain the network IP or manually set it.
7.9.4 Firmware
Enter the firmware settings and scan the QR code to display the ID number and Version number.
![System Time Network Firmware Help DHCP Manual 09:38 AM 00:00:00 00:00:00 [02 168.0.10] [ VISCA ] ENC [ H.264 ] [ 60 fps ] [ 5 mbps ]](/content/2026/05/999160/images/8498b4092e0f70a0b2a4ea1975be85884f56803bc9fdc857bb4533c1af50b0f6.jpg)
![System > ID Time > kd0000001 Network > Version PCB 5.0 20240619 FPGA V1.0 MCU V1.4 Firmware Help B [192.168.0.10] [VISCA] ENC [H.264] [60 fps] [5 mbps]](/content/2026/05/999160/images/67db09ca8a97de3b2b266f57511e0ea7e1744663b4204e1ff90f08ce323e2791.jpg)
7.9.5 Help
Enter the download settings, scan the QR code to enter the download link.
![System Time Network Firmware Help 00:00:00 00:00:00 [02.168 C:01] [ VISCA ] ENC [ H:284 ] [ 6D fps ] [ 5mbps ]](/content/2026/05/999160/images/b1ee552513a0f215a78737cb054a037867edfaba057d4e84945594f72b2079fd.jpg)
8、Upper Computer
8.1 Connect the upper computer
8.1.2 Using PC
Confirm that the computer and the switcher are connected to the same LAN by automatically obtaining or manually setting the network IP address of the switcher. Open the browser on the computer side, enter the IP address of the switcher and press Enter to connect, and enter the home page of the upper computer, namely the switch page.
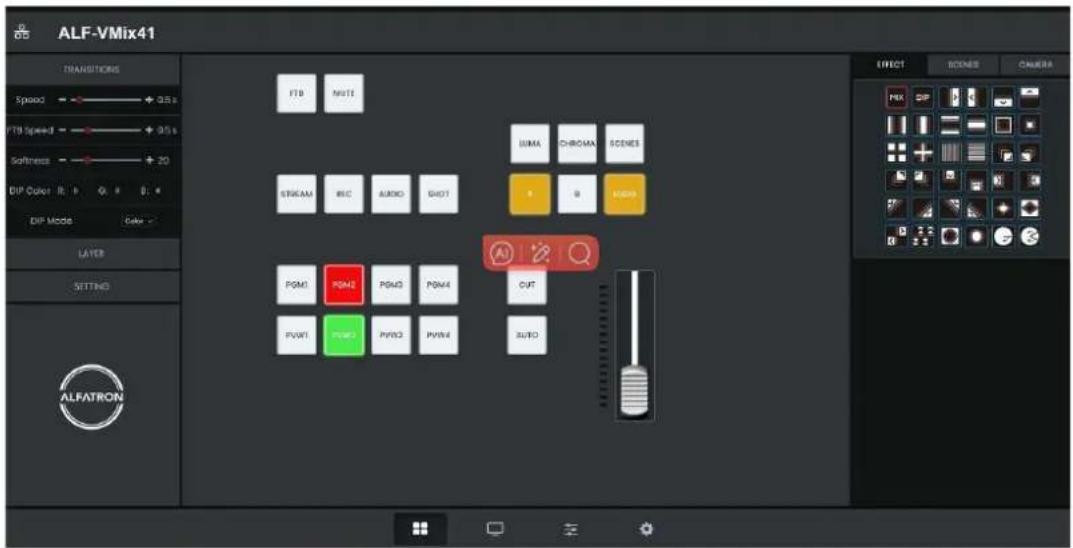
8.1.3 Using Phone
Ensure that the mobile phone and the switcher are on the same LAN. In the mobile browser, enter the IP address of the switcher and open it to connect to the upper computer.
8.2 Switcher Setting
Enter the switch station setting page of the upper computer to control the switch station.
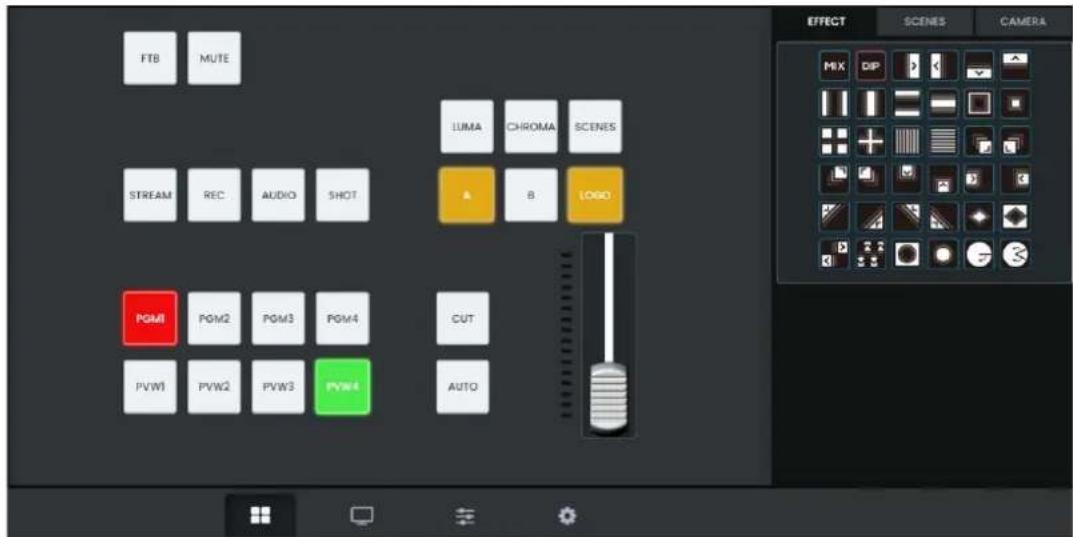
8.2.1 Front Panel
The front panel of the switching table contains buttons and push rods. Click the button to control the corresponding button on the switch table and set the transition time; Push the push rod to execute the push rod transition operation.
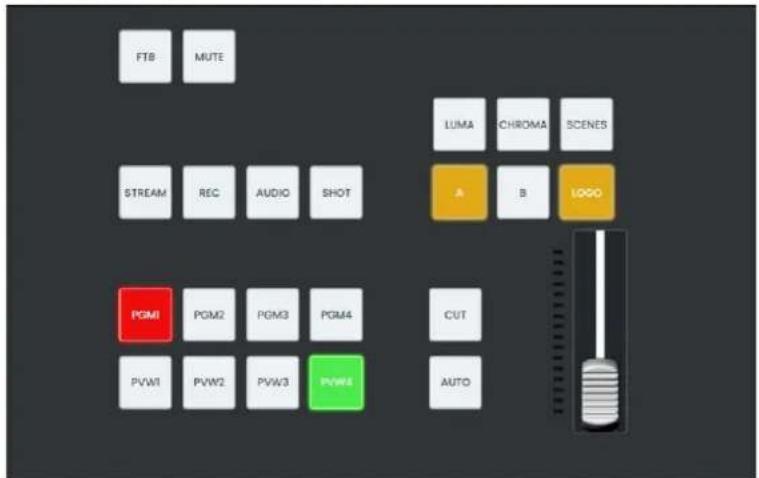
8.2.2 EFFECT
Enter the setting page of the upper computer, click the transition effect in the EFFECT on the right to select the corresponding transition effect.
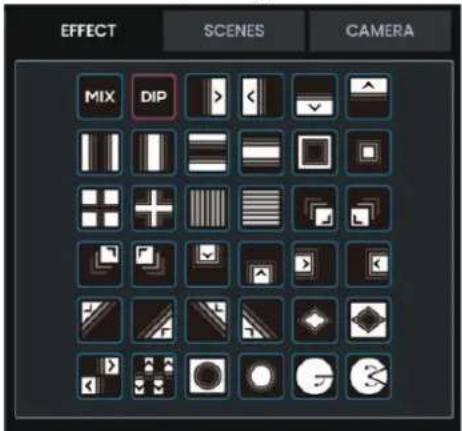
8.2.3 SCENES
Enter the switch station setting page of the upper computer, click SCENES on the right to select different scenes layouts.
Click the media module on the upper computer page to enter the media setting page, where you can set streaming, upload pictures, and upload LOGOs.
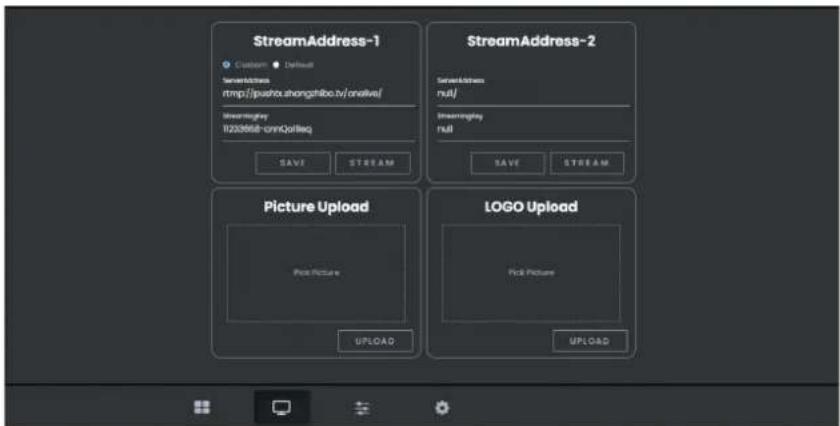
8.3.1 Streaming Setting
8.3.1.1 Streaming Address
Custom streaming address:
Enter the media settings page, enter the streaming server address and streaming secret key (for streaming of live broadcast platforms such as Station B and Tiger Teeth) in Streaming Address-1 and Streaming Address-2, and click Save to save the streaming address to the switcher Settings Multimedia Network Streaming; Click the push stream button to push the stream.
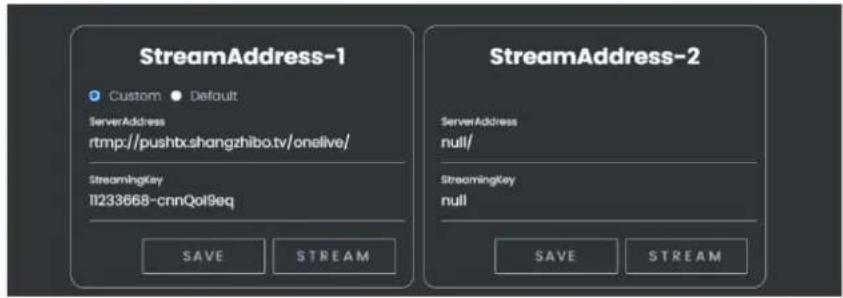
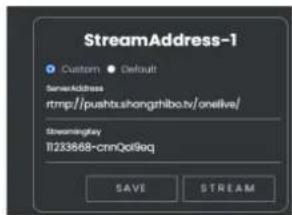
Default streaming:
Enter the media settings page, select the default streaming address - 1 (for local LAN streaming), and click the Save button to save the local streaming address to the address 1 in the switcher - Settings - Multimedia - Network Streaming; Click the push stream button to push the local stream.
8.3.2 Picture Upload
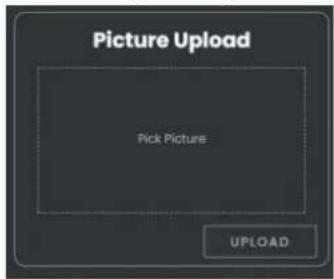
Enter the media settings page, in the picture upload box, click to Pick picture, select the picture to upload, and click the Upload button to upload the picture to the switcher and automatically set it as a background picture.
8.3.3 LOGO Upload
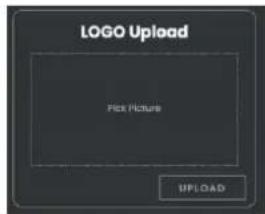
Enter the media setting page, in the LOGO upload box, click to pick picture, select the LOGO picture to upload, and click the Upload button to upload this LOGO picture to the switcher, and automatically set it as the current LOGO.
8.4 Audio Setting
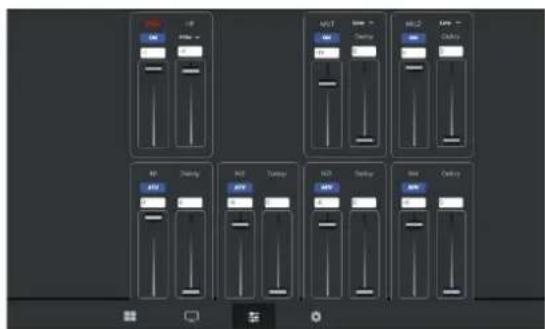
Click the audio module on the upper computer page to enter the audio setting page to set the audio for PGM, headset (HP), four input (IN1-4), and two microphones (Mic1-2).
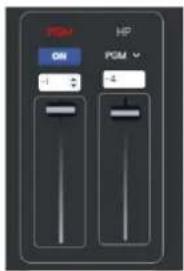
8.4.1 PGM/HP
Enter the audio setting page to set PGM mute and PGM volume; HP source selection, HP volume settings.
8.4.2 Microphone Audio Setting
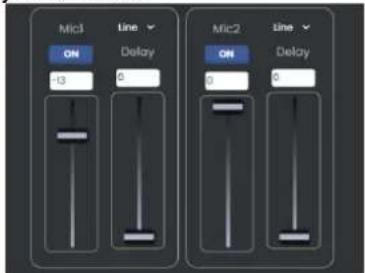
Enter the audio setting page to set Mic1/Mic2 mixing, volume, delay and mode.
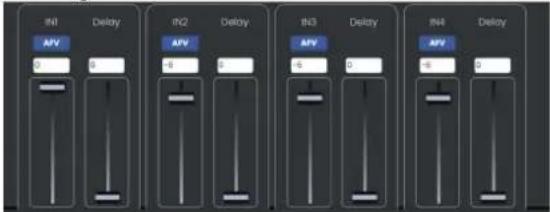
8.4.3 Quad HDMI Audio
Enter the audio setting page to set IN1-4 (4-way HDMI input) mixing, volume setting and delay setting.
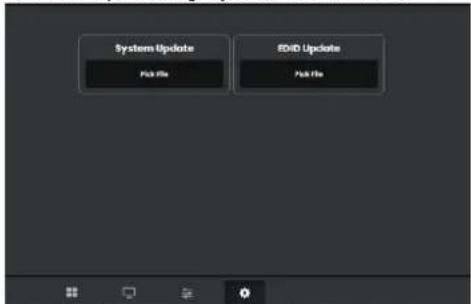
8.5 Update
Click Update on the upper computer page to enter the Update setting page, where you can Update the operating system and EDID.
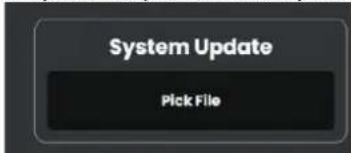
8.5.1 System Update
On the update page, click the File button in the system update, select the file to update, and click Update to perform the update operation.
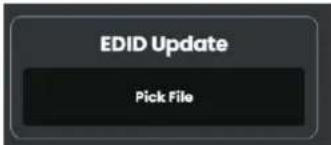
8.5.2 EDID Update
On the update page, click the File button in the EDID update, select the file to update, and click update to perform the update operation.
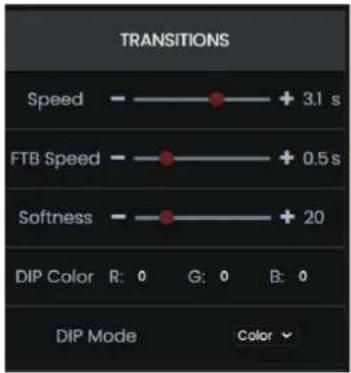
8.6 Transitions
Enter the upper computer page, click TRANSITIONS on the left to set the transition, including the transition duration setting (Speed), black field duration setting (FTB Speed), flexibility setting (Softness), immersion color setting (Color), and immersion mode setting (DIP Mode).

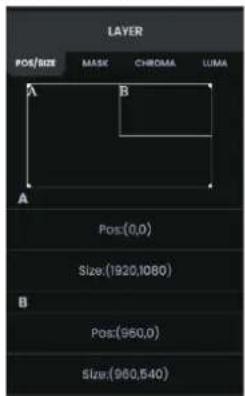
8.7 Layer
Enter the upper computer page, click LAYER on the left to set the layer, including layer position/size setting (POS/SIZE), mask setting (MASK), chroma key setting (CHROMA), and brightness key setting (LUMA).
8.7.1 Layer Position/Size
Enter the upper computer page, click LAYER on the left, enter POS/SIZE, select A/B layer, press and hold the left mouse button in the box to move, and then set the layer position; Press and drag the left mouse button at the four corners to set the layer size.
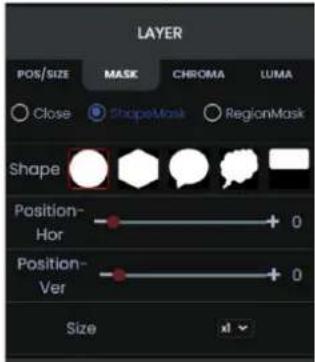
8.7.2 MASK
Enter the upper computer page, click LAYER on the left, click MASK, select the mask icon, mask the horizontal position and vertical position, and pull down to select the size of the mask.
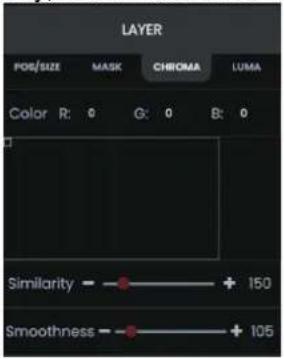
8.7.3 CHROMA Key
Enter the upper computer page, click LAYER on the left, and click CHROMA to set the color, similarity, and smoothness.
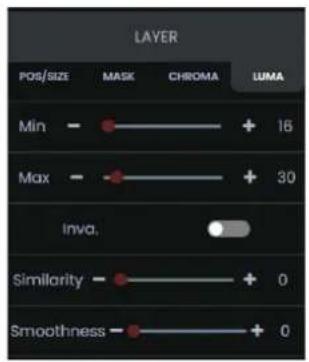
8.7.4 LUMA Key
Enter the upper computer page, click LAYER on the left, and click LUMA to set the minimum brightness, maximum brightness, inversion, similarity, and smoothness.
8.8 Setting
Enter the upper computer page and click SETTING on the left to set the system, time and network.
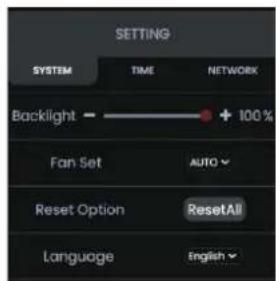
8.8.1 SYSTEM Setting
Enter the upper computer page, click SETTING on the left to enter SYSTEM, where you can set backlight and fan, and click ResetALL to reset.
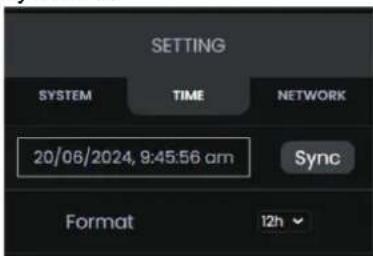
8.8.2 TIME Setting
Enter the upper computer page, click SETTING on the left, and click TIME to set the time format (FORMAT). The date and time are obtained from the computer system by default.
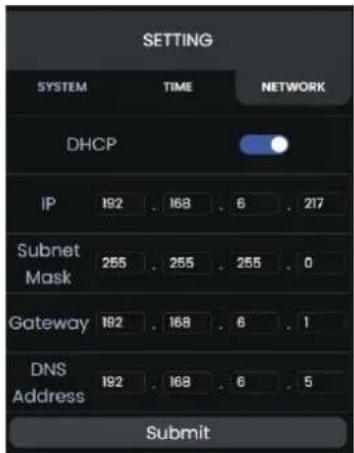
8.8.3 NETWORK Setting
Enter the upper computer page, click SETTING on the left, and click NETWORK to set the network. Open DHCP to automatically obtain the network IP; Close DHCP, enter IP, subnet mask and gateway, and click Modify to manually set the netwo
1. Limited warranty
1.1 This limited warranty covers defects in materials and workmanship in this product.
1.2 Should warranty service be required, proof of purchase must be presented to the Company. The serial number on the product must be clearly visible and not have been tampered with in any way whatsoever.
1.3 This limited warranty does not cover any damage, deterioration or malfunction resulting from any alteration, modification, improper or unreasonable use or maintenance, misuse, abuse, accident, neglect, exposure to excess moisture, fire, improper packing, and shipping (such claims must be presented to the carrier), lightning, power surges, or other acts of nature. This limited warranty does not cover any damage, deterioration or malfunction resulting from the installation or removal of this product from any installation, any unauthorized tampering with this product, any repairs attempted by anyone unauthorized by the Company to make such repairs, or any other cause which does not relate directly to a defect in materials and/or workmanship of this product. This limited warranty does not cover equipment enclosures, cables or accessories used in conjunction with this product.
This limited warranty does not cover the cost of normal maintenance. Failure of the product due to insufficient or improper maintenance is not covered.
1.4 The Company does not warrant that the product covered hereby, including, without limitation, the technology and/or integrated circuit(s) included in the product, will not become obsolete or that such items are or will remain compatible with any other product or technology with which the product may be used.
1.5 Only the original purchaser of this product is covered under this limited warranty. This limited warranty is not transferable to subsequent purchasers or owners of this product.
1.6 Unless otherwise specified, the goods are warranted in accordance with the manufacturer's product specific warranties against any defect attributable to faulty workmanship or materials, fair wear and tear being excluded.
1.7 This limited warranty only covers the cost of faulty goods and does not include the cost of labour and travel to return the goods to the Company's premises.
1.8 In the event of any improper maintenance, repair or service being carried out by any third persons during the warranty period without the Company's written authorization, the limited warranty shall be void.
1.9 A 7 (seven) year limited warranty is given on the aforesaid product where used correctly according to the Company's instructions, and only with the use of the Company's components.
1.10 The Company will, at its sole option, provide one of the following three remedies to whatever extent it shall deem necessary to satisfy a proper claim under this limited warranty:
1.10.1 Elect to repair or facilitate the repair of any defective parts within a reasonable period of time, free of any charge for the necessary parts and labour to complete the repair and restore this product to its proper operating condition.; or
1.10.2 Replace this product with a direct replacement or with a similar product deemed by the Company to perform substantially the same function as the original product; or
1.10.3 Issue a refund of the original purchase price less depreciation to be determined based on the age of the product at the time remedy is sought under this limited warranty.
1.11 The Company is not obligated to provide the Customer with a substitute unit during the limited warranty period or at any time thereafter.
1.12 If this product is returned to the Company this product must be insured during shipment, with the insurance and shipping charges prepaid by the Customer. If this product is returned uninsured, the Customer assumes all risks of loss or damage during shipment. The Company will not be responsible for any costs related to the removal or reinstallation of this product from or to any installation. The Company will not be responsible for any costs related to any setting up this product, any adjustment of user controls or any programming required for a specific installation of this product.
1.13 Please be aware that the Company's products and components have not been tested with competitor's products and therefore the Company cannot warrant products and/or components used in conjunction with competitor's products.
1.14 The appropriateness of the goods for the purpose intended is only warranted to the extent that the goods are used in accordance with the Company's installation, classification, and usage instructions.
1.15 Any claim by the Customer which is based on any defect in the quality or condition of the goods or their failure to correspond with specification shall be notified in writing to the Company within 7 days of delivery or, where the defect or failure was not apparent on reasonable inspection by the Customer, within a reasonable time after discovery of the defect or failure, but, in any event, within 6 months of delivery.
1.16 If delivery is not refused, and the Customer does not notify the Company accordingly, the Customer may not reject the goods and the Company shall have no liability and the Customer shall pay the price as if the goods had been delivered in accordance with the Agreement.
1.17 THE MAXIMUM LIABILITY OF THE COMPANY UNDER THIS LIMITED WARRANTY SHALL NOT EXCEED THE ACTUAL PURCHASE PRICE PAID FOR THE PRODUCT.
- Introduction
- Brief
- Features
- 2、Interfaces
- Description
- Configuration
- Front Panel
- Front Panel Description
- 5、Operation
- Switching
- Layer control
- ON/OFF Function Keys
- Shortcut keys
- AUDIO: Audio Menu ON/OFF
- EFFECT: Switching Effect menu
- SCENES: AB Layout Menu
- Lock
- FTB
- Key Leds
- 6、LCD Monitor
- Menu
- Transition
- Transition configuration
- MIX
- DIP
- WIPE
- Duration Time
- FTB Time
- Softness
- DIP Configuration
- Layer
- Layer Source
- Position/Size
- Mask
- Keying Configuration
- Chroma
- Color
- Region
- Similarity
- Smoothness
- Luma Key
- Min/Max
- Reverse
- Similarity
- Smoothness
- Audio
- PGM Audio
- HDMI Audio
- Mix Mode
- Volume
- Audio Delay
- Mic 1/Mic 2
- Mix
- Volume
- Audio Delay
- Mode
- Headphone
- Image
- Pattern
- Image Selection
- Image Deletion
- Add Image
- LOGO
- LOGO Select
- LOGO Deletion
- Add LOGO
- LOGO Position
- Multi Media
- Encoder
- Stream
- Record
- Screen Monitor
- Level Meter
- Input Information
- Visible
- Opacity
- Position/Size
- Font Color
- Background Color
- UMD
- Visible
- Opacity
- Position/Size
- Font Color
- Background Color
- Output
- Mode
- Color
- Camera
- Camera Select
- Camera IP
- Search
- Focus
- Exposure
- White Balance
- Setting
- System setting
- Language
- Backlight
- Fan
- Reset
- Time Setting
- Date
- Time
- Time Format
- Network
- Firmware
- Help
- 8、Upper Computer
- Connect the upper computer
- Using PC
- Using Phone
- Switcher Setting
- Front Panel
- EFFECT
- SCENES
- Streaming Setting
- Streaming Address
- Picture Upload
- LOGO Upload
- Audio Setting
- PGM/HP
- Microphone Audio Setting
- Quad HDMI Audio
- Update
- System Update
- EDID Update
- Transitions
- Layer
- Layer Position/Size
- MASK
- CHROMA Key
- LUMA Key
- Setting
- SYSTEM Setting
- TIME Setting
- NETWORK Setting
- Limited warranty
Brand : Alfatron
Model : ALF-VM41
Category : Blender