
12W2Wi - Air conditioner Windmill - Free user manual and instructions
Find the device manual for free 12W2Wi Windmill in PDF.


| Product Type | Window Air Conditioner |
| Model | 12W2Wi |
| Brand | Windmill |
| Cooling Capacity | 12,000 BTU |
| Power Supply | 115 V / 60 Hz |
| Current | 12 A |
| Energy Efficiency Ratio (EER) | 12.0 (estimated) |
| Dimensions (W x H x D) | 26 x 20 x 15 inches (estimated) |
| Weight | 60 lbs (estimated) |
| Refrigerant Type | R32 (common for modern units) |
| Airflow (CFM) | 350 CFM (estimated) |
| Noise Level (dB) | 52 dB (estimated) |
| Controls | Remote control, touch panel, WiFi app |
| Modes | Cool, Fan, Dry (dehumidify), Sleep, Eco |
| Timer | 24-hour programmable |
| Filter | Washable mesh filter |
| Installation | Window kit included, fits double-hung windows |
| Safety Features | Auto restart, child lock, overheat protection |
| Warranty | 1 year parts and labor (typical) |
Frequently Asked Questions - 12W2Wi Windmill
User questions about 12W2Wi Windmill
0 question about this device. Answer the ones you know or ask your own.
Ask a new question about this device
Download the instructions for your Air conditioner in PDF format for free! Find your manual 12W2Wi - Windmill and take your electronic device back in hand. On this page are published all the documents necessary for the use of your device. 12W2Wi by Windmill.
USER MANUAL 12W2Wi Windmill
Welcome to the breezy life.
The Windmill AC
10K BTU with WhisperTech™
Installation Guide
A few things before you get started:

Installing your Windmill AC should take about 45 minutes

If you're looking for professional assistance, we have some options for you: windmillair.com/support

We recommend doing this with a helper

We're here if you need us, so don't hesitate to chat or email: windmillair.com/support
IMPORTANT: Carefully read the entire installation guide and owner's manual before installing the unit
This installation guide and the complete owner's manual are available at: windmillair.com/support.
Some installations require additional support brackets. Please see windmillair.com/support for more information.
Safety first
It's really important you read these warnings and this entire installation guide before you get started. And please follow each step exactly as its shown:

General Installation Warnings & Cautions
Follow all warnings and safety instructions.
To avoid risk of personal injury, property damage, and product damage, pay close attention to the following during installation:
The AC could fall if it is not properly installed, which could result in death or serious injury. Pay close attention to steps 2 and 3 to ensure you properly position and secure the AC in the window.
The Windmill AC is heavy. Two or more people are needed to move and install the unit. We don't want you hurting yourself, so please use proper carrying and lifting techniques (as they say, lift with your legs, not your back!).
Do not touch the metal fins or the front and rear coils - they're sharp. Wear protective gloves whenever lifting or carrying the unit and handle the AC with care.
Carefully inspect the window where you are installing your AC unit. Make sure it is in good condition and can support the weight of the unit over a long period of time.
To make sure the AC doesn't fall out of the window during installation, use a helper to securely hold the back of the unit up while positioning it properly in the window.
Use only the screws that are specified in this guide.
To avoid injury, wear closed toe shoes and do not wear loose clothing that could get tangled in the unit during installation.
Save these instructions for future reference or visit windmillair.com/support.

Electrical Warnings & Cautions
The AC must be properly grounded to avoid a fire or electrocution hazard. You must use a grounded three-prong outlet. Do not remove, cut, or bypass the grounding prong on the plug. DO NOT use an extension cord, surge protector, or multi-outlet adapter with this window AC.
Observe all local, state, and national electrical codes and only use qualified, licensed, and authorized personnel for electrical assistance. Seek professional help if there is any doubt with your outlet or plug. If you do not have a three-prong outlet, call a licensed electrician to make any required changes to your outlets.
Power cord may include a current interrupter device. TEST & RESET buttons are included on the plug case. You should test the device periodically by first pressing the TEST button and then pressing the RESET button. If the TEST button doesn't trip or if the RESET button doesn't stay engaged, stop use of the AC and contact Windmill at windmillair.com/support.
Do not turn off the AC by pulling the electric cord or using the current interrupter device as an on/off switch.
DO NOT push the TEST button while the unit is running (this can damage the plug).
The conductors inside the cord are surrounded by shields, which monitor leakage current. They're not grounded. Periodically examine the cord for damage, and don't use the AC if the shields are exposed.
Electrical parts can cause shock or fire. Do not open the tamper-resistant, sealed portion of any electrical components. Do not attempt to replace the power cord or repair any electrical components. If the power cord is damaged contact Windmill at windmillair.com/support.
Improper installation or servicing and intentional damage will void the Limited Warranty.
Window Requirements
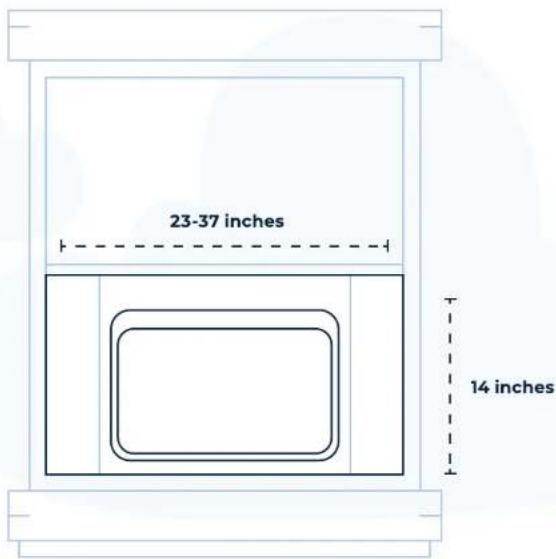
The medium size (8K BTU) Windmill AC is designed for windows that slide up and down (double-hung windows) with a width of 23-37 inches and a vertical opening of at least 14 inches.
Make sure your window is in good shape and can handle the weight of the AC for a long period of time.
You'll also want to make sure there is at least 2 feet of clearance on all sides of your AC (including the front and back). This helps ensure walls and other objects don't block airflow.
What's in the box?

natural_image
Simple line drawing of a rectangular frame with three vertical lines and three horizontal arrows pointing upward (no text or symbols)The Windmill AC
To simplify your setup, the AC comes with the top and bottom install bars, the front frame, side adapters, and both side panels pre-assembled.**
**Please ensure that the front frame and both side panels are secured (and not damaged) before installing your AC.
natural_image
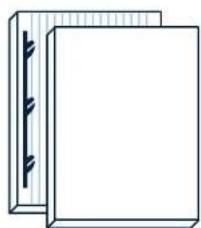
Two blank rectangular panels with vertical decorative elements on the left (no text or symbols)Cosmetic panels
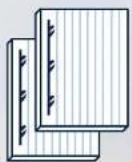
Left and right cosmetic panels with end caps attached.
SMALL STUFF

12 " Screws (7x)

Window sash lock (1x)

Adhesive & non-adhesive window insulation foam (1x each)

Rubber screw hole plug (1x)
TOOLS

Scissors (included)

Phillips head screwdriver *Not Included

Drill (If pilot holes are required) *Not Included
Step 1
Insulate your window.
WHAT YOU NEED




natural_image
Simple diagram of a rectangular frame with arrows indicating direction, no text or symbols presentFlip to view steps.
Step 1. Insulate your window.
1

2
natural_image
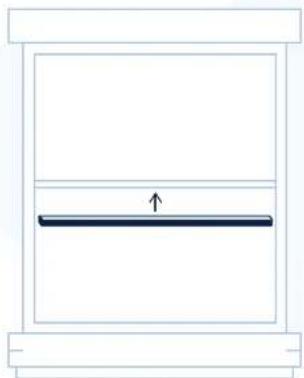
Simple line drawing of a rectangular frame with a horizontal line and an upward arrow, no text or symbols present.Cut the adhesive foam to the width of your window.
You should cut the foam to be the width of your window from the left to the right side. Make sure you're cutting the foam with the adhesive.
Stick the adhesive foam across the underside of the front window sash.\*\*
Peel off the backing paper to expose the adhesive. Stick this side of the foam to the underside of your window sash (i.e., the bottom of the window that will close down on your AC).
3

4

natural_image
Simple line drawing of a rectangular frame with two vertical bars and directional arrows, no text or symbols present.Cut the non-adhesive foam to the height of the bottom half of your window.
Cut the non-adhesive insulation foam to fit the length of the vertical side channels of the window frame.
Insert the foam into the channels on both sides.
This should be the sides of the lower half of your window.
Step 2
Lift the AC into the window.
WHAT YOU NEED

natural_image
Simple line drawing of a rectangular frame with rounded corners and vertical lines on both sides (no text or symbols)
natural_image
Top-down view of a white microwave oven with a mesh grille and a grid-patterned vent (no text or symbols visible)Flip to view steps.
Step 2. Lift the AC into the window.
1

natural_image
Pure diagram of a mechanical or architectural component with no text, numbers, or symbolsTogether with your helper, lift the assembled AC into the window frame.
Make sure you do this step with a helper. Very carefully, lift the assembled AC into the window frame.
Make sure someone is holding the back of the unit securely.
**It's helpful to rest the unit on the inside window sill until you're ready to reposition it correctly. Injury (to you and others) and property damage can occur if not done correctly.
2
Wooden Windows

Properly position the bottom bar BEHIND the inside window sill.
Properly position the bottom bar behind the inside window sill and into the bottom horizontal channel of the window frame. The front of the bottom bar should be pressing up against the back edge of the sill.
Make sure someone is holding the back of the unit securely.
Vinyl Windows

3

Close the window down onto the AC, BEHIND the top bar.

If you have storm windows, additional window setup is required. Otherwise, the unit will tilt into the room (which could damage your floor and the unit). Please visit windmillair.com/support.
Once the AC is centered and the bottom bar is successfully positioned, close the window down onto the AC, behind the top bar. See diagram above.
**Make sure the weight is supported before letting go of the back of the unit. The AC should be tilted slightly back with a \~1/4 inch downward tilt toward the outside. Please make sure the unit is NOT level or tilted into the room (we don't want water leaking into your home!).
You did the hard part. It's all smooth sailing from here.
Step 3
Secure the AC.
WHAT YOU NEED


natural_image
Top-down view of a white microwave oven with a mesh grille and side panel (no text or symbols visible)Flip to view steps.
Step 3. Secure the AC.
1

natural_image
Simple line drawing of a rectangular frame with internal curved lines and directional arrows (no text or symbols)Use the side panels to fit the AC to the window.
Extend the side panels out until they reach the window frames on each side.
2

natural_image
Technical line drawing of a mechanical component with a magnified inset showing a dropper tip (no text or symbols)Secure the AC using the included 1/2 inch screws.
Now that your AC is in the right position, you'll need to secure it using the included 12 inch screws. Locate the five screw hole locations on the unit and side panels as marked. Use the center screw hole on the top installation bar to secure your unit to the window frame. Use the remaining 4 screw holes to secure the side panels.
3

natural_image
Line drawing of a cabinet or enclosure with no text, numbers, or symbolsFill the center hole on the front frame with the included rubber plug.
This will give your AC a clean, finished look.
Nice and secure. Feels good right?
Step 4
Cut and attach the cosmetic panels.
WHAT YOU NEED


Flip to view steps.
Step 4. Cut and attach the cosmetic panels.
1
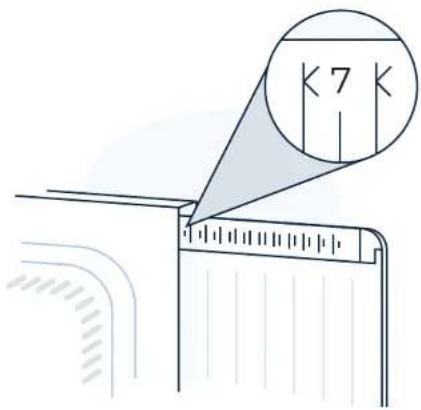
Determine the width of your side panels.
This is the number on your side panel that falls just behind the edge of the front frame.
The left and right numbers may be different if the AC is not perfectly centered in the window.
2
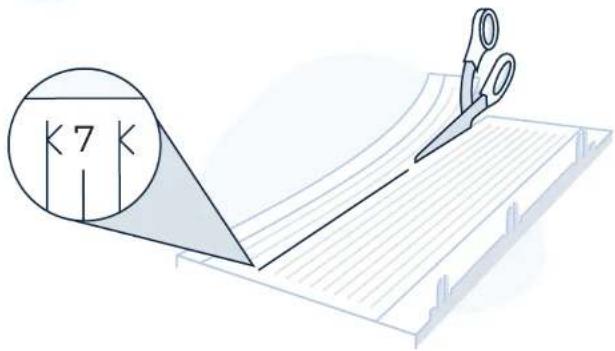
Find the corresponding number on your cosmetic panels.
(Make sure you are using the correct panel. They are labeled "Left" and "Right")
Cut straight, along the respective line. It's better to leave extra material - you can always recut but you can't get material back.
Once you cut one side, repeat on the other, keeping in mind the number (and where you cut) may be different.
3

natural_image
Illustration of a door panel mounted on a wall, showing structural details (no text or symbols)Insert the trimmed side panels into the front frame.
Align and insert the end you just cut into the vertical channel on both sides of the front frame. It helps to insert the bottom corner first and then the top. Then gently push the panel into the slot.
4

natural_image
Diagram showing a door panel corner with an inset close-up of a door handle detail (no text or symbols)Snap the prongs into place.
Snap the three prongs into the corresponding slots on the ends of the side panels. Repeat on both sides.
Step 5
Lock and insulate your window.
WHAT YOU NEED


natural_image
Simple diagram showing a horizontal line with a downward arrow, flanked by corner brackets (no text or symbols)
natural_image
White rectangular tray with a grid pattern, no visible text or symbolsFlip to view steps.
Step 5. Lock and insulate your window.
1
natural_image
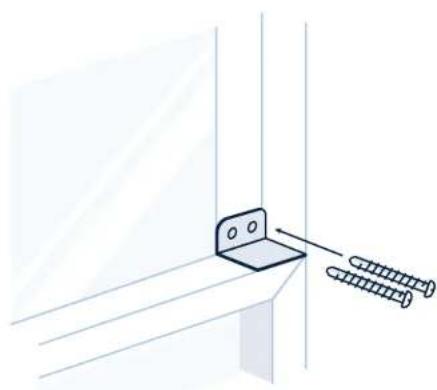
Technical line drawing of a bracket with two screws attached to a wall (no text or symbols)Option 1: Wood windows.
Attach the sash lock as shown in the diagram above.

natural_image
Illustration of two screws mounted on a metal bracket (no text or symbols)Option 2: Vinyl windows.
Attach the sash lock as shown in the diagram above.

CAUTION: For vinyl or similar windows, attach the bracket to the side jamb of the window (not the window itself). See diagram above. This will help avoid broken glass and window damage.
2

natural_image
Technical line drawing of a mechanical component with a cutting tool icon (no text or symbols)3

natural_image
Diagram showing a mechanical or architectural component with downward arrows indicating force or movement (no text or symbols present)Cut the non-adhesive insulation foam to fit the width of your window.
Make sure you are cutting the foam with the non-adhesive sides. Measure and cut the foam to be the width of your window from the left to right side.
Use the nonadhesive foam to fill the gaps in your window.
Stuff it between the gap of the upper and lower sashes of your window.
This will plug any air gaps and help keep out bugs and draft.
That's it for installation! Just a few more things to check over, and then you can relax.
Some other things you may want to know.
1
Connect your Windmill AC to your smartphone.
To learn how to connect your Windmill AC to your smartphone and for app related questions, please go to windmillair.com/support.
2
How to help the environment and save on your energy bill:
- Clean your large mesh filter at least monthly (and if applicable, replace your activated carbon filter every 2-4 months).
• Make sure nothing is blocking the air flow around your AC. We recommend a clearance of at least 2 feet. - Place your AC in a window that gets plenty of shade.
• Insulate your window well using weatherproof foam. - Run other appliances during cooler parts of the day.
3
To remove your AC from the window:
- Turn off the AC and unplug the power cord.
- Take out the insulation foam between the top and bottom window sashes.
- Unscrew all screws securing the AC and side panels to the window frame or sill.
- Remove the end caps and cosmetic panels.
- Then, slide the side panels back in, towards the unit.
- Place a plastic bag or towel on the floor under the unit (in case there is water in the unit from normal operation).
- With a helper, hold on to the back of the unit securely.
- Raise the window and slide the unit inside the room.
- Carefully lift the unit onto the floor. To avoid getting water in your home, do not tilt the front of the unit downward.
4
Windmill comes with a one year limited warranty.
To register your AC or learn about how to make a warranty claim, go to windmillair.com/support.
windmillair.com
@windmillair



- Welcome to the breezy life.
- A few things before you get started:
- IMPORTANT: Carefully read the entire installation guide and owner's manual before installing the unit
- Safety first
- General Installation Warnings & Cautions
- Electrical Warnings & Cautions
- Window Requirements
- What's in the box?
- The Windmill AC
- Cosmetic panels
- SMALL STUFF
- TOOLS
- Insulate your window.
- Cut the adhesive foam to the width of your window.
- Stick the adhesive foam across the underside of the front window sash.\*\*
- Cut the non-adhesive foam to the height of the bottom half of your window.
- Insert the foam into the channels on both sides.
- Lift the AC into the window.
- Together with your helper, lift the assembled AC into the window frame.
- Make sure someone is holding the back of the unit securely.
- Properly position the bottom bar BEHIND the inside window sill.
- Close the window down onto the AC, BEHIND the top bar.
- Step 3
- Secure the AC.
- Step 3. Secure the AC.
- Use the side panels to fit the AC to the window.
- Secure the AC using the included 1/2 inch screws.
- Cut and attach the cosmetic panels.
- Determine the width of your side panels.
- Find the corresponding number on your cosmetic panels.
- Insert the trimmed side panels into the front frame.
- Snap the prongs into place.
- Lock and insulate your window.
- Option 1: Wood windows.
- Option 2: Vinyl windows.
- Cut the non-adhesive insulation foam to fit the width of your window.
- Use the nonadhesive foam to fill the gaps in your window.
- Some other things you may want to know.
- Connect your Windmill AC to your smartphone.
- How to help the environment and save on your energy bill:
- 3
- To remove your AC from the window:
- 4
- Windmill comes with a one year limited warranty.
Brand : Windmill
Model : 12W2Wi
Category : Air conditioner