
Philadelphia 855 - Car radio BLAUPUNKT - Free user manual and instructions
Find the device manual for free Philadelphia 855 BLAUPUNKT in PDF.


| Product Type | Car Stereo |
| Brand | Blaupunkt |
| Model | Philadelphia 855 |
| Dimensions (W x H x D) | 180 x 50 x 160 mm (1 DIN) |
| Weight | Approx. 1.5 kg |
| Power Supply | 12 V DC (negative ground) |
| Radio Bands | FM, AM (LW/MW) |
| RDS | Yes |
| CD Player | Yes (compatible with CD-R/RW) |
| Audio Output Power | 4 x 20 W (max) |
| Preamp Outputs | 2 pairs (front/rear) |
| AUX Input | 3.5 mm front jack |
| Detachable Faceplate | Yes |
| Display Type | LCD with backlight |
| Equalizer Presets | Rock, Pop, Classic, Flat |
| Clock Function | Yes (12/24h) |
| Steering Wheel Control Compatible | Yes (requires adapter) |
| Maintenance | Clean with soft dry cloth; avoid solvents |
| Safety Notes | Disconnect battery before installation; use proper fuses |
| Spare Parts & Repairability | Contact Blaupunkt service center; faceplate and knobs available |
Frequently Asked Questions - Philadelphia 855 BLAUPUNKT
User questions about Philadelphia 855 BLAUPUNKT
0 question about this device. Answer the ones you know or ask your own.
Ask a new question about this device
Download the instructions for your Car radio in PDF format for free! Find your manual Philadelphia 855 - BLAUPUNKT and take your electronic device back in hand. On this page are published all the documents necessary for the use of your device. Philadelphia 855 by BLAUPUNKT.
USER MANUAL Philadelphia 855 BLAUPUNKT
MULTIMEDIA NAVIGATION
PHILADELPHIA 855

Enjoy it.
Safety Notes
This car radio has been manufactured according to established safety guidelines. However, dangers may still occur if the safety notes in this manual is not observed. This manual is intended to familiarize the user with the car radio's important functions. Read this carefully, prior to using the car radio. Keep this manual in an easily accessible location. In addition, do observe the instructions of the devices used in conjunction with this car radio.
Road Safety
Always observe the following notes for road safety:
- Car radio must be used in a way that compliments safety of the user when driving the vehicle. It is recommended for the user to at an appropriate location when operating the car radio. While driving, user is not recommended to use applications that can be prone to distraction e.g. streaming to videos, entering destination etc.
- User is recommended to proceed with proposed driving routes only if it does not violate any traffic regulations. Local traffic signs and regulations always prevail over the routes proposed.
- User is advised to keep the volume of the car radio to a moderate level for the protection of the ears and to increase the ability to hear any emergency warning signals (e.g. police and ambulance sirens). Do not increase the car radio volume while the car radio is muted as it is not audible. The car radio volume can be too loud when the car radio is unmuted.
General Safety Notes:
Observe the following for protection against injuries:
- This car radio is intended for installation and operation in a vehicle with 12V vehicle system outage, hence the radio unit must be installed in a DIN slot. Observe the output limits of the car radio. Do not dismantle or modify the car radio. Installation and repairs, if necessary, should be performed by a specialist. We are not liable for any loss or damage caused or resulting from unauthorized disassembly or modification to the product.
- This car radio's core components may result to damage when the car is driven on bumpy roads for a prolonged period of time or if it is used to play non-standard or severely damaged discs.
- Please do not operate the car radio under extreme temperature conditions (extremely high temperature or extremely low temperature); make sure that temperature within the car ranges from -20°C to 80°C before you connect the car radio to the power supply
- For abnormalities, please refer to the "Troubleshooting" section. If the problem cannot be resolved, please press the Reset button to recover its factory settings. Otherwise, please contact respective installer/seller directly for help.
- As SD/USB file formats, codecs, bitrate, resolution and other parameters available in the market are not all the same, there is no guarantee that this car radio can play all media file formats.
- Different cars may have different configurations. It is normal that some CAN-Bus functions cannot be enabled because it is not supported by the user's car or this car radio.
- Solvents, cleaning and scouring agents as well as dashboard spray and plastics care products may contain materials which can damage the surface and screen of the car radio. Use only dry or slightly moistened cloth to clean the car radio surface and screen.
This manual may be updated from time to time without any notice.
Road Safety
In no event shall Blaupunkt be liable for any direct, indirect, punitive, incidental, special consequential damages to property or life and whatsoever arising out of or connected with the use or misuse of our products.
USA & CANADA: This product is not intended for sale in the United States and Canada. If purchased in the U.S. or Canada, this product is purchased on as-is basis. No warranty, whether expressed or implied is provided in the U.S. or Canada.
Scope of Delivery
The scope of delivery includes:
- Car sound system
- Aux In Cable
- Manual
- Reverse Camera Cable
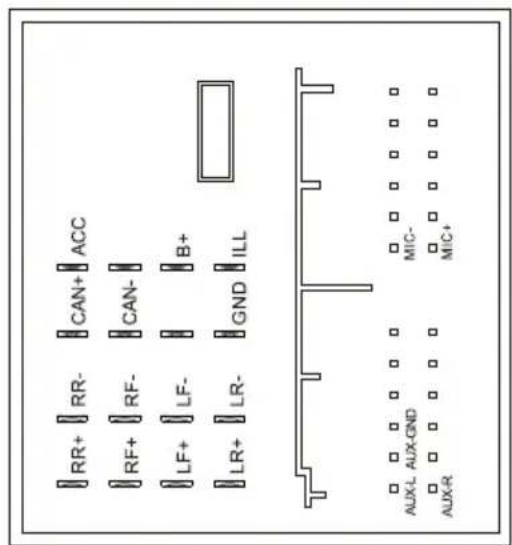
- Power Cable
- USB Cable 2-ways
Sub Hardness - GPS Antenna
- RCA Cable
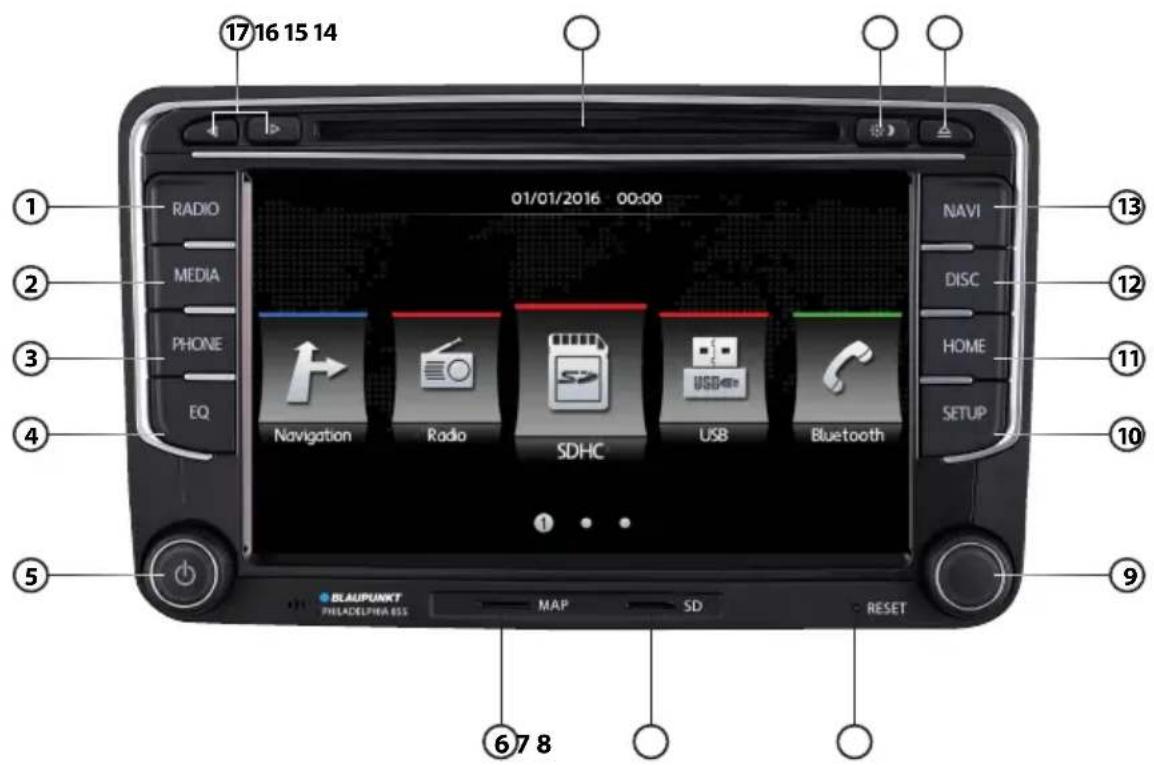
① RADIO
Start radio mode
② MEDIA
Start media modes (Disc, Navigation, SDHC, USB, Bluetooth, Aux In)
③ PHONE
Start Bluetooth Phone Connection
④ EQ
Start equalizer mode
⑤ POWER BUTTON
- Press to turn On / Mute / Unmute
- Press & hold to turn Off
- Turn knob to adjust volume
⑥ MAP SLOT
Micro SD card reader for navigation data
⑦ MICRO SD CARD SLOT
Micro SD card reader
⑧ RESET
Restoring the original factory settings of the device.
Caution! All personal setting will be lost!
⑨ TUNER
- Press to Play / Pause
- Turn knob to browse files / frequency
10 SETUP
Start/Exit Settings menu
⑪ HOME
Return to HOME menu
⑫ DISC
Start Disc mode
13 NAVI
Insert map to ⑥ to operate
⑭ EJECT
Eject the DVD/CD
⑮ BRIGHTNESS SWITCH
Set touchscreen brightness (Bright, Standard, Soft, Sleep)
16 CD/DVD SLOT
17 Left / Right Button
Select Files / Stations
HOME PAGE
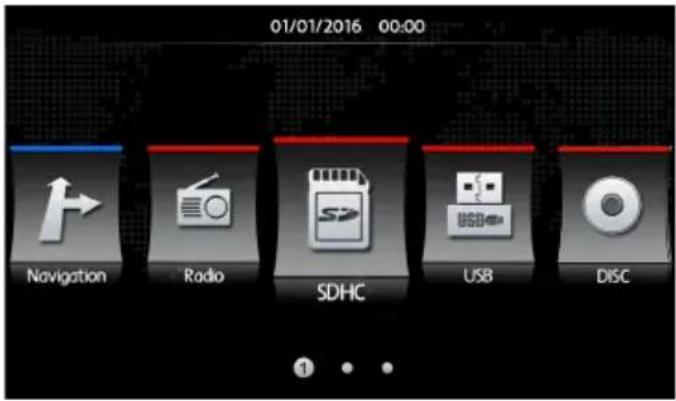
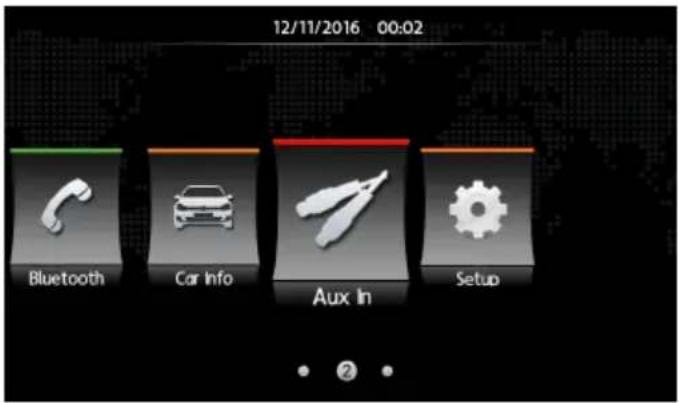
Press ⑪ to return to HOME PAGE
RADIO
At HOME PAGE, select RADIO or press ① to play radio stations.

Press ⑰ to change stored radio stations
Automatic Storing & Program Scanning
- Press Band to switch between FM (18 preset) & AM (12 preset).
- Press Scan to automatically search and save stations into all preset stations.
Note : Saved radio stations will be overwritten when Scan is selected.
Radio Stations List
- Press List to view the saved radio stations.
Storing Stations Manually
- Press Manual or rotate knob ⑨ to search radio stations from the frequency bar.
Press & hold 3sec the desired station number to save the current frequency.

Setup

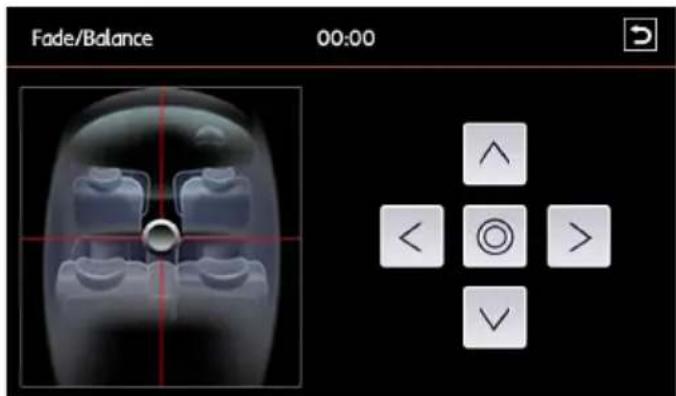
- Select FADE-BALANCE to change the sound output position.
Move to change sound output position.
Select return to Setup.
- Select EQ or press ④ to change equalizer setting. Manually change the EQ setting by moving the EQ bars or select ☐ set EQ mode as below
Flat / Pop / Classic / Rock / Jazz / Techno / Optimal / User
Select return to Setup.

bar
| Scale | EQ | |---|---| | 60 | 0 | | 100 | 0 | | 200 | 0 | | 500 | 0 | | 1K | 0 | | 1.5K | 0 | | 2.5K | 0 | | 10K | 0 | | 15K | 0 | | 17.5K | 0 | | Subwoofer | 24 |- Press Stereo to tune into STEREO mode to receive FM signals. Switching to MONO helps to reduce noise when signal is poor.
- Press Loud to activate or deactivate the function.
- Press Local to switch between LOCAL or DISTANCE. The unit will reduce the receiving sensitivity when searching in LOCAL mode. Therefore, only strong signal stations will be received. DISTANCE mode will allow device to receive weak signal stations.
- Press RDS to activate Radio Data System for standard communication protocol that allows traffic reports to be received and provides other facilities, including the radio station's name to be seen on the radio's display.
Note: Press 10 to change TA, AF, EON, CT at Radio option.

MEDIA
- The device support DVD, +/-R, +/-RW, -ROM, VCD, CD-DA, -ROM, -R/-RW, USB 2.0 and Micro SDHC. Note: To ensure proper functioning, use only original CD/VCD/DVD. Blaupunkt cannot guarantee the flawless function of copy-protected discs and all disc blanks, USB data carriers and memory cards available in the market.
• Device will automatically play files when SDHC / USB / DISC is inserted. - At HOME PAGE, select SDHC / USB or press ② to play media files in MicroSD / USB, or
- At HOME PAGE, select DISC or press ⑫ to play CD / VCD / DVD.
- Audio Player

Setup
Press Setup for Media Setting.
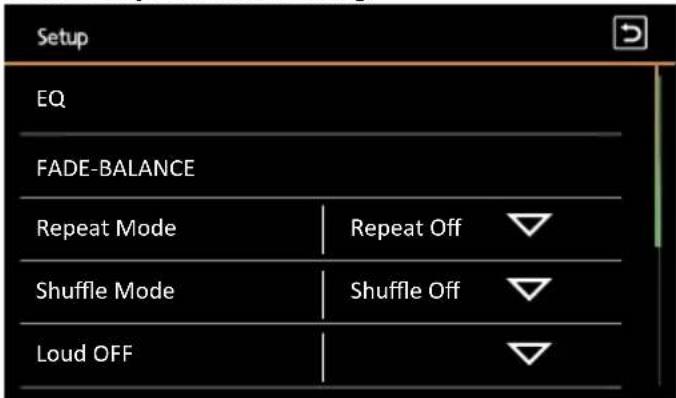
- Select EQ or press ④ to change equalizer setting. Manually change the EQ setting by moving the EQ bars or select ☐ set EQ.
Select return to Media Setting. (Refer RADIO OPERATION for more details)
- Select FADE-BALANCE to change the sound output position. (Refer RADIO OPERATION for more details)
- Select Repeat Mode to set Repeat All / Repeat Once / Repeat Folder / Repeat Off.
- Select Shuffle Mode to activate / deactivate shuffle/random play function.
- Press Loud to activate or deactivate the function.
Note : Media Setting is available at Audio Player only
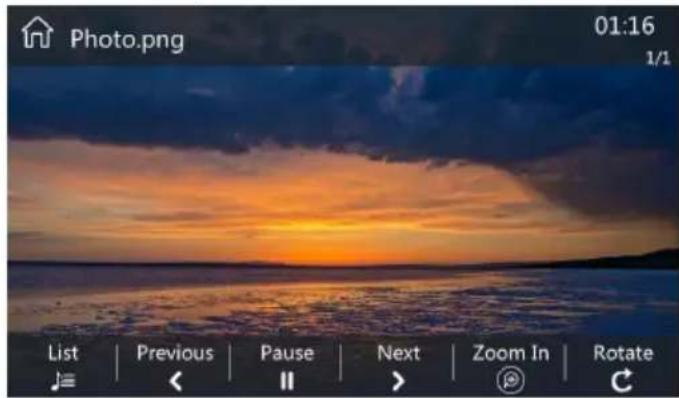
- Photo Player
• Video Player (CD)

• Video Player (VCD)

![VCD 14:20 00:35:41 00:67:21 2→1 A-B [1] 8.9.10.11.12.13.14.](/content/2026/05/998406/images/2d3c59e5e7464b90a1cbe7bcce7397c2fefddaef9607adc7bfe975251a9b63a2.jpg)
- Next page
- Press to skip to previous file / press & hold to rewind
- Pause/Play
- Press to skip to next file / press & hold to forward
- Stop
- Menu/List
- Eject
- Previous page
- Repeat
- Video Pin (Press to select start & end of clip to repeat, press Pin again to undo the clip selection)
- Shuffle play
- Select track/folder/scene
- Zoom in/out
- Left/right audio
Video Player (DVD)


- Next page
- Press to skip to previous file / press & hold to rewind
- Pause/Play
- Press to skip to next file / press & hold to forward
- Stop
- Menu/List
- Eject
- Previous page
- Repeat
- Video Pin (Press to select start & end of clip to repeat, press Pin again to undo the clip selection)-
- Subtitle
- Select track/folder/scene
- Zoom in/out
- Left/right audio
List
- At any Player, press List or rotate ⑨ to view all media files in SDHC / USB / DISC.
• Press⑨ to pause/play media files.
Note : The respective audio source can be selected only if a corresponding Data Carrier is inserted or a corresponding device is connected. The duration of the reading depends on the data volume and design of the device or data carrier.
The device only support standard USB memory disc approved by Microsoft USB MP3 player comes in different models with different standards. Therefore, not every MP3 player are supported. Remove battery (if any) from MP3 before connecting to avoid short-circuit.
NAVIGATION
- Ensure GPS SDHC is inserted into ⑥ before operating.
- At HOME PAGE, select Navigation or press 13 to start Navigation.
Polnav Main Menu (Subject to change)
- Select Find to search for location according to Address / POI / Keyword / Favorite / Recent / Current Position / Coordinate / Photo / Category.
- Select Map to return to map screen or Navigation/Free run screen.
- Select Route to access into Itinerary, Route Options / Turn List / Best Fit / Cancel Route / Demo / Stop Demo / Bypass Waypoint / Detour.

- All submenus contain top bar with Return, Region, Map and Menu button.

Navigation Screen
- Show distance to the next turn, maneuver at next turn and serial turn (Select to repeat voice instructions).
- Return to Main Menu.
- Current Time
- Switch View : 2D North-up / 2D Head-up / 3D / Head-up
- Current Position
- Lane Marking Instruction
- Current Street/City info (Select to switch info)
-
Speed Limit
-
Current Speed
- Sub Menu
- PIP (Picture in Picture)
- GPS signal status: Green (Connected) / Red (Lost Connection)
- Next Turn
- Road Sign
- Remaining Distance
- Estimated Time Arrival

2.3.4.5.6.7.8.9.10.

BLUETOOTH
- At HOME PAGE, select Bluetooth or press ③ to start Bluetooth connection.
Note : Device will automatically connect to your mobile phone if connection has been set up before.
Pre-pair Bluetooth
- Ensure mobile phone supports Bluetooth function before pairing. Different mobile phone will have different emissive power. To get the best connection, it is recommended to stay within the range of 3m (phone to device) without any object obstructions along the distance.
Bluetooth Pairing
- Turn on mobile phone's Bluetooth to set up. (Please refer to the instruction manual of the mobile phone on how to operate Bluetooth) "PHILADELPHIA 855" should appear on your available Bluetooth scanning list. Select "PHILADELPHIA 855" then input password "0000", if password is required. Press "YES/OK/ALLOW" to confirm when first pairing prompt message request to access your mobile phone. will be displayed on screen when pairing successful.

Dial No.
• Press Dial No. to dial new number.
Press or keying number to dial or press to answer incoming calls. Press to end calls. Note: To redial last called number, press ③ twice.

Contacts
- Press Contacts to view saved contacts. If contacts are now showing on the device screen, press Refresh to download contacts.

Note : The duration of the reading depends on the data volume of mobile phone's phonebook.
Ensure to press "Allow" on mobile phone to allow device to have phonebook access of the mobile phone.
Calls
• Press Calls to view call records.

Music
- Press Music to sync mobile's music player to device.
Note: Ensure mobile phone's music player is turned on before syncing.

Setup
• Press Setup for Bluetooth Setting.
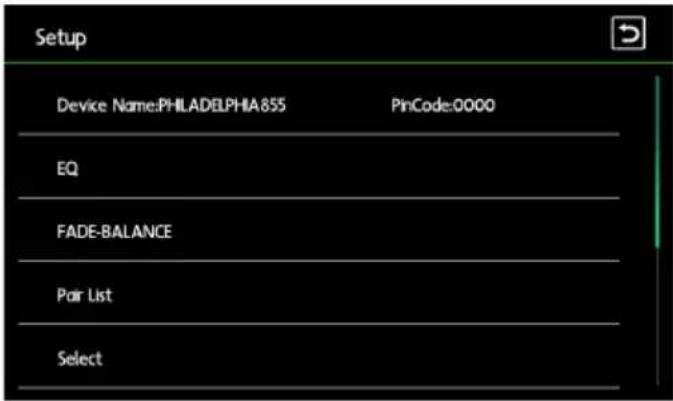
- Select EQ or press ④ to change equalizer setting. Manually change the EQ setting by moving the EQ bars or select a set EQ.
Select return to Media Setting. (Refer RADIO OPERATION for more details) - Select FADE-BALANCE to change the sound output position. (Refer RADIO OPERATION for more details)
• Select Pair List to change pairing device. - Select Select to search for nearby Bluetooth device.

- Select Bluetooth to active or deactivate the function.
- Select Auto Connect to active or deactivate the function.
- Select Auto Answerto active or deactivate the function.
- Select Loud to active or deactivate the function.
CAR INFO
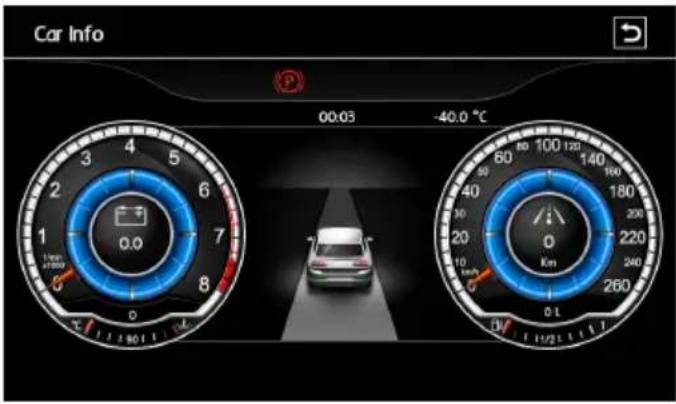
At HOME PAGE, select Car Info to display :
- Car signals
- Door status
• Handbrake status - Fuel level
- Car odometer
- Car temperature
- Clock
• Current media playback
Air Conditioning (A/C) Mode
Ensure device is connected to vehicle's Air Conditioning system to enable A/C status to be reflected on the device.
Device will automatically switch to A/C display whenever A/C is being adjusted. The display will appear with delay of at least 5sec before returning to previous mode.

natural_image
Interior view of a car with airflow indicators and digital camera icons (no readable text or symbols)Reverse Mode
Device will automatically switch to Radar Mode and display reverse view when vehicle is reversing. Reverse view will stop and return to previous mode when the car is parked or moving.

- Radar warning sound - On / Off
- Rear-view display setting - Brightness, Contrast, Ratio, Saturation, Resolution.
- Colorimetric parameter setting - Brightness, Contrast.
- Radar Interface display - On / Off
Radar Function
- Front & rear radar simulation view will appear when vehicle is in Park mode.
- Some vehicles may install a 360° panoramic camera. The reversing path can be turned off in the System Setting.

Right-view Mode (Optional)
- For vehicles with right-view camera, connect the device's right video input cable with video output port of camera.
- When the vehicle's right turn signal is on, the screen will automatically switch to right-view mode and return to previous mode when vehicle's right turn signal is off.
- For vehicles without these protocols, users can use right-view detection line to control the right-view camera to enable its right-view function.
Steering Wheel Control (SWC)
This car radio is compatible with the following Multi-Function Steering Wheel buttons:
VOL+ : Increase Volume
VOL- : Decrease Volume
SEEK+: (Audio Mode) Next Song; (Radio Mode) Search Radio Station backward
SEEK- : (Audio Mode) Previous Song; (Radio Mode) Search Radio Station forward
MUTE : Mute the system
PHONE:
- Press to receive incoming call / Press & hold to reject incoming call.
- Press to switch to PHONE mode when not receiving/dialing call / Press & hold to redial last called number.
- Press to end call during conversation to end call / Press & hold to switch between Private Call / Hands-free mode.

natural_image
Interior view of a Volkswagen car dashboard and steering wheel (no visible text or symbols)SETUP
At HOME PAGE, select Setup or press ⑩ to go to Setting.

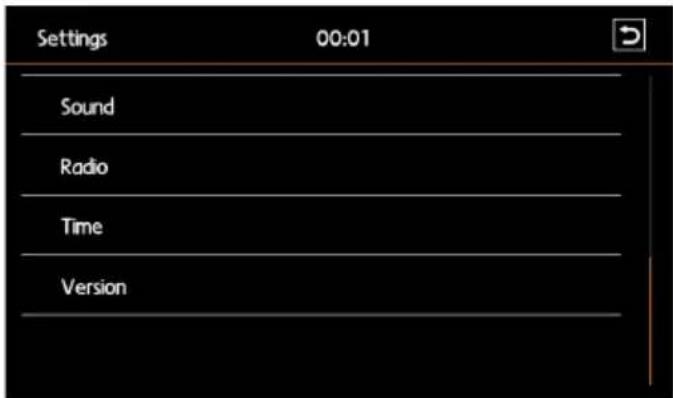
System Setting


-
Language : Set the corresponding radio language (Simplified Chinese, English, Deutsch, French, Russian, Spanish, Danish, Portuguese, Traditional Chinese, Italian, Greek).
-
Beep: Set whether there will be a beeping sound when the touch screen is touched (On, Off)
-
Brightness: Set the brightness of the car radio (Bright, Standard, Soft, Sleep)
-
Microphone : Switch between original/aftermarket car microphone (Internal, External)
-
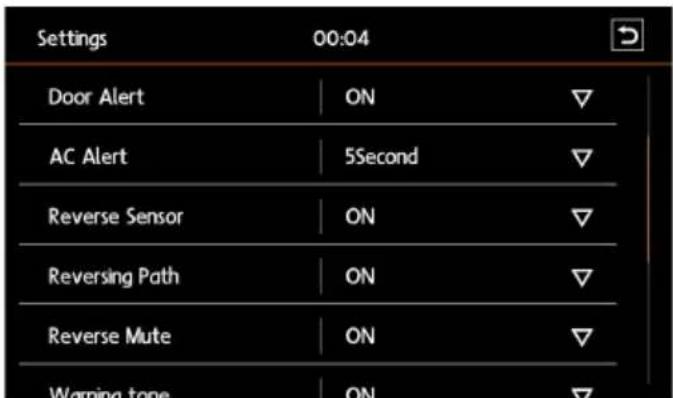
AC Info : Set the duration to display the air conditioning interface before returning to previous interface (OFF, 3 seconds, 5 seconds, 8 seconds)
-
Reverse Sensor: Set to display the reverse radar when the car reverse gear is engaged (On, Off)
-
Reversing Path : Set to display the reversing path when the car reverse gear is engaged (On, Off)
-
Reverse Mute : Set to turn on/off the reversing sound when the car reverse gear is engaged (On, Off)
-
Warning Tone: Set to turn on/off the warning tone when there's object near to the car (On, Off)
-
Video-In-Motion : Set to turn on/off the capability to play video while the car is in motion (On, Off)
-
Camera Video : Set the view of the reverse video when the car reverse gear is engaged (Normal, Mirror)
-
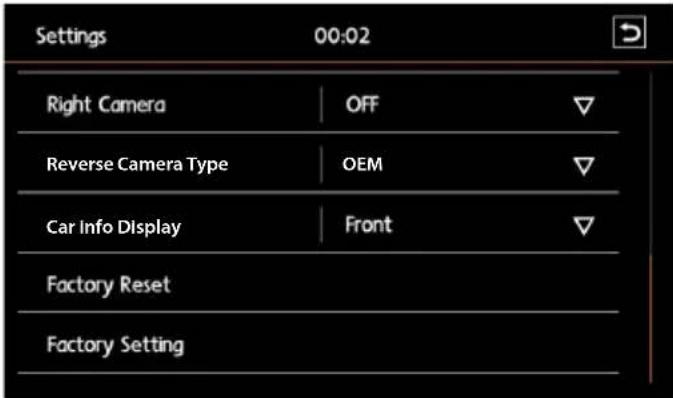
Right Camera : Set to turn on/off the right-view lane changing system (On, Off)
-
Car Info Display: Set the duration after which the car info will be displayed automatically on the car radio (OFF, 3 min, 5 min, 8 min)
- Reverse Back Light: Detection for the response time for different rear camera timing.
- Factory Reset: To reset the car radio based on original factory setting. User will need to confirm/Cancel this action.
Caution: All user's saved settings and info will be deleted.
Navigation Setting

- Background Music: Turn on/off the Navigator's background music. If this is off, no other audio source will play when the Navigation interface is running. (On, Off)
- Navigation Path : Specify the correct navigation path to be run by the car radio
- GPS Information: Launch the Navigator's Satellite Signal-receiving Interface. This will detect whether the car radio is able to receive satellite signal. If yes, it means that GPS signal-receiving module is working normally.
- Navigation Update : User can copy the latest Map into USB drive. Press this to upgrade the map (this feature depends on the navigation software running on the car radio).


bar_stacked
| Category | Total | |---|---| | 60 | 0 | | 100 | 0 | | 200 | 0 | | 500 | 0 | | 1K | 0 | | 1.5K | 0 | | 2.5K | 0 | | 10K | 0 | | 13K | 0 | | 17.5K | 0 | | Subwoofer | 24 |- FADE-BALANCE: To enter balance adjustments for 4 speakers. Press any position in the seat volume balance adjustment interface on the right part of the EQ settings Main Interface, you can adjust the left, right, front and rear volume allocation for different seats.
- EQ : Slide the bars and respectively to make adjustments to Subwoofer, Bass, Mid and Treble. Press the dropdown box to switch between for eight preset equalizer settings (Flat, Pop, Classic, Rock, Jazz, Techno, Optimal, User).
- Loud: To turn on/off the speaker loudness (On, Off)
- Restore Default EQ: To reset to the factory default sound settings
Radio Setting

- Radio Region : Set the radio region (USA, China, Europe, OIRT)
- LOC/DX : Specify whether to detect local/far radio stations (Distance, Local)
- Stereo : To turn on/off the stereo (On, Off)
- RDS : To turn on/off the car radio RDS feature (On, Off). When RDS is enabled, you can respectively press TA, AF, EON and CT to turn it On/Off (TA – Traffic Announcement, AF – Alternative Frequency, EON – Enhanced Other Network, CT – Clock Time). Note: This function is only available for countries with European RDS standards; for other countries, please set this to Off to avoid functionalities issues with the car radio.
Time Setting
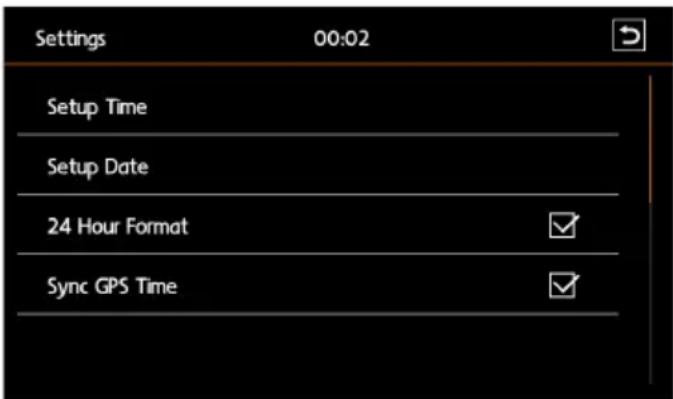
- Setup Time: To set the car radio hour/minute settings.
- Setup Date : To set the car radio year/month/day settings.
- 24 Hour Format : Switch between 24-hour system and 12-hour system.
- Sync GPS Time : Switch between the car radio GPS Time or internal time.
Working Voltage ....12V Working Voltage Range ....10.5-14.8 Maximum Working Current ....15A Dimensions ....220 Width of Higher Part (210 Width of Lower Part) x 130 x 175mm Ground System .... Negative Electrode of the Car-mounted Storage Battery
FM
Frequency Range ....87.5 - 108MHz SNR ....60dB Stereo Separation (1KHZ) ....≥30dB Radio Station Search Level....24±2dBuV Degree of Distortion....0.5%
AM
Frequency Range....522 - 1620MHz Noise-Limited Sensitivity (S/N=20Db)....≥26dB SNR....55dB
DVD
SNR ....70dB Frequency Response Range ....20Hz - 20kHz Degree of Distortion ....0.1%
If any of the following problems happens to your system, please resort to Troubleshooting for possible solutions. Consult Blaupunkt authorized dealer if problem persist.
| Problems | Possible Causes | Solutions |
| Unable to start up | The car key is not inserted into the ignition; ignition is off. | Insert the car key and turn on the ignition. |
| Power Cable is not inserted into the main body. | Insert the power cable. | |
| Burnt power fuse . | Replace it with a new one of the same specification. | |
| Exhausted car battery. | Charge or replace the car battery. | |
| No sound | Audio cables are not properly connected to the unit. | Ensure proper connection of the audio cables. |
| Mute setting is on. | Unmute the volume. | |
| Low volume. | Adjust the volume. | |
| No sound from front, rear, left and right speakers due to Fade-Balance settings. | Press EQ, and enter "Sound Equalizer" menu to adjust "left & right/front & rear balance". | |
| Unable to play the Disc | The Disc is not inserted properly. | Re-insert the Disc and ensure orientation is correct. |
| The Disc is scratched, distorted or stained. | Replace it with a functioning disc. | |
| The Disc is not readable by this system. | Please confirm the format of the file saved in the Disc, and make sure the Disc is playable. | |
| Dim screen or black-&-white screen while playing DVD | Brightness, contrast ratio and color values are excessively adjusted. | Adjust brightness, color and contrast ratio values, and make sure they are in normal range. |
| Slow in SD card reading | The pixel of the picture file exceeds this system's capacity. | Replace it with a new audio/video SD card with compatible file formats. |
| SD card may contain corrupted files or a virus. | ||
| No rear-view reverse image | The rear camera is not appropriately connected with power supply. | Please check the camera's power supply. There is a red reverse power-supply line, and it will automatically display 12V. |
| Camera's signal line is not well connected with this radio. | Insert the camera's signal line into the interface port of this machine. | |
| Unable to search enough radio stations or fix on a radio station | Radio's antenna is not well inserted. | Fix radio antenna installation. |
| GPS is unable to perform positioning and Navigation | Map has not been set up. | Set up the map - Refer to the Navigation section --> Initial Setup section in this manual. |
| GPS antenna is not well inserted. | Re-insert GPS antenna properly | |
| The car may arrive at a place where GPS signal is blocked. | Move car to area where GPS signal reception is better. | |
| Blind Areas that are not covered by the Navigation Map. | Update the Navigation Map. | |
| Unable to correctly find the destination | The destination keyed-in is not included in the Navigator's database. | Confirm that the destination input is correct; can try to input another name of the place, or input any other landmark nearby. |
① RCA-OUT ② TPMS ③ AUX-IN ④ CAM
⑤ DISC-IN ⑥ DTV/DAB ⑦ USB ⑧ DVR


natural_image
Simple line drawing of a GPS device with two circular components (no text or symbols)
| Format | Supports |
| Video Format | RMVB |
| AVI | |
| MOV | |
| MP4 | |
| 3GP | |
| WMV | |
| MPG | |
| VOB | |
| MKV | |
| FLV | |
| h.263 | |
| H.264 | |
| MPEG4 | |
| Audio Format | FLAC |
| APE | |
| WMA | |
| MP3 | |
| ACC | |
| OGG | |
| Picture Format | JPEG |
| DVD Format | DVD |
| DVD-ROM | |
| VCD | |
| CD-ROM | |
| CD-RW |


- MULTIMEDIA NAVIGATION
- PHILADELPHIA 855
- Safety Notes
- Road Safety
- General Safety Notes:
- Scope of Delivery
- HOME PAGE
- RADIO
- Press ⑰ to change stored radio stations
- Automatic Storing & Program Scanning
- Radio Stations List
- Storing Stations Manually
- • •
- Setup
- MEDIA
- - Audio Player
- - Photo Player
- • Video Player (CD)
- • Video Player (VCD)
- List
- NAVIGATION
- Polnav Main Menu (Subject to change)
- Navigation Screen
- BLUETOOTH
- Pre-pair Bluetooth
- Bluetooth Pairing
- Dial No.
- Contacts
- Calls
- Music
- CAR INFO
- Air Conditioning (A/C) Mode
- Reverse Mode
- Radar Function
- Right-view Mode (Optional)
- Steering Wheel Control (SWC)
- This car radio is compatible with the following Multi-Function Steering Wheel buttons:
- PHONE:
- System Setting
- FM
- AM
- DVD
Brand : BLAUPUNKT
Model : Philadelphia 855
Category : Car radio