
SEC350XW0 - Cooker Roper - Free user manual and instructions
Find the device manual for free SEC350XW0 Roper in PDF.


| Product Type | Electric Range |
| Brand | Roper |
| Model | SEC350XW0 |
| Width | 30 inches (76.2 cm) |
| Depth | 27.5 inches (69.9 cm) |
| Height (without backguard) | 36 inches (91.4 cm) |
| Weight | Approx. 150 lbs (68 kg) |
| Power Supply | 240 V, 40 A, 60 Hz |
| Cooktop Type | Coil burners |
| Number of Burners | 4 |
| Oven Type | Standard electric oven |
| Oven Capacity | 5.0 cu. ft. (142 L) |
| Cleaning Method | Manual cleaning |
| Self-Cleaning | No |
| Oven Features | Bake, Broil |
| Oven Light | Yes |
| Timer | Yes |
| Storage Drawer | Yes |
| Warranty | 1 year limited |
| Color | White |
| Installation | Freestanding |
Frequently Asked Questions - SEC350XW0 Roper
User questions about SEC350XW0 Roper
0 question about this device. Answer the ones you know or ask your own.
Ask a new question about this device
Download the instructions for your Cooker in PDF format for free! Find your manual SEC350XW0 - Roper and take your electronic device back in hand. On this page are published all the documents necessary for the use of your device. SEC350XW0 by Roper.
USER MANUAL SEC350XW0 Roper
natural_image
Line drawing of a standard electric stove with four burners on top, mounted on a cabinet (no text or symbols)Electric Range
Use and Care Guide

Home Appliances
SEP340X
SEC350X
Thank you for choosing a Roper appliance.
This Use and Care Guide will help you operate and maintain your new, quality-built Roper range. Keep this Use and Care Guide in a safe place for future reference.
Complete and mail the Product Registration Card.
This card enters your warranty into our warranty system that ensures efficient claim processing, can be used as a proof of purchase for insurance claims and helps Roper to contact you immediately in the unlikely event of a product-safety recall.
You are responsible for
It is your responsibility to be sure that your range:
- Has been properly installed where it is protected from the elements, and on a floor strong enough to support its weight. (See the Installation Instructions.)
- Is not used by anyone unable to operate it properly.
■ Is properly maintained. - Is used only for jobs expected of a home range.
- Is secured by properly installed anti-tip bracket. The bracket must overlap the range base.
Contents
Page
Important Safety Instructions ____ 2
Parts And Features 4
Using Your Range 5
Using the surface units 5
Setting the clock 5
Using the Minute Timer 5
Using the oven controls 6
Using the automatic MEALTIMER™ clock _7
The oven vent 8
The optional backguard accessory ____ 8
The storage drawer 8
Caring For Your Range 9
The control knobs
The control panel 9
The surface units and reflector bowls 9
The lift-up cooktop 10
The removable oven door 10
The standard-cleaning oven 11
The continuous-cleaning oven 11
Cleaning chart 12
The oven light 14
Before You Call For Service ____ 15
Warranty 16
How to get service or assistance 16
Important Safety Instructions
WARNING
To reduce the risk of fire, electrical shock, injury to persons, or damage when using the range, follow basic precautions, including the following:
- Read all instructions before using the range.
- Install or locate the range only in accordance with the provided Installation Instructions. It is recommended that the range be installed by a qualified installer. The range must be properly connected to electrical supply and grounded.

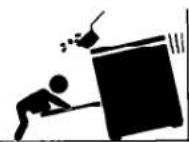
- To reduce the risk of tipping of the appliance, the appliance must be secured by properly installed anti-tip bracket. To check if the bracket is installed properly, remove the storage drawer (see page 8) and verify that the anti-tip bracket is engaged.
- DO NOT operate the range if it is not working properly, or if it has been damaged.
- DO NOT use the range for warming or heating the room. Persons could be burned or injured, or a fire could start.
- Use the range only for its intended use as described in this manual.
- DO NOT wear loose or hanging garments when using the range. They could ignite if they touch a surface unit and you could be burned.
- Make sure the reflector bowls are in place during cooking. Cooking without reflector bowls may subject the wiring and components underneath them to damage.
-
DO NOT line reflector bowls with aluminum foil or other liners. Improper installation of these liners may result in a risk of electric shock or fire.
-
DO NOT touch surface units, areas near units, heating elements or interior surfaces of oven. Surface units and heating elements may be hot even though they are dark in color. Areas near surface units and interior surfaces of an oven become hot enough to cause burns. During and after use, DO NOT touch, or let clothing or other flammable materials contact surface units, areas near units, heating elements or interior surfaces of oven until they have had sufficient time to cool. Other surfaces of the range may become hot enough to cause burns; such as, the oven vent opening, the surface near the vent opening, the cooktop, the oven door and window.
-
Select a pan with a flat bottom that is about the same size as the surface unit. If pan is smaller than the surface unit, some of the heating element will be exposed and may result in the igniting of clothing or potholders. Correct pan size also improves cooking efficiency.
-
Turn pan handles inward, but not over other surface units. This will help reduce the chance of burns, igniting of flammable materials, and spills due to bumping of the pan.
-
Use only dry potholders. Moist or damp potholders on hot surfaces may result in burns from steam. DO NOT let potholder touch hot heating elements. DO NOT use a towel or bulky cloth for a potholder. They could catch on fire.
-
Check to be sure glass cooking utensils are safe for use on the cooktop. Only certain types of glass, glass-ceramic, ceramic, earthenware or other glazed utensils are suitable for cooktops without breaking due to the sudden change in temperature.
-
DO NOT heat unopened containers. They could explode. The hot contents could cause burns and container particles could cause injury.
-
Grease is flammable and should be handled carefully. Let fat cool before attempting to handle it. DO NOT allow grease to collect around cooktop or in vents. Wipe spill-overs immediately.
- DO NOT use water on grease fires. Never pick up a flaming pan. Smother flaming pan on range by covering with a well-fitted lid, cookie sheet or flat tray. Flaming grease outside of pan can be extinguished with baking soda or, if available, a multipurpose dry chemical or foam-type extinguisher.
- Never leave surface units unattended at high heat settings. A boil-over could result and cause smoking and greasy spill-overs that may ignite.
- Make sure surface units are off when you are finished, and when you are not watching.
- Use care when opening oven door. Let hot air or steam escape before removing or replacing food.
- Always position oven rack(s) in desired location while oven is cool. If rack must be removed while oven is hot, do not let potholder contact hot heating element in oven.
- DO NOT store flammable materials on or near the range. They could explode or burn.
- DO NOT store things children might want above the range. Children could be burned or injured while climbing on it.
- DO NOT leave children alone or unattended in area where the range is in use. They should never be allowed to sit or stand on any part of the range. They could be burned or injured
- Keep range vents unobstructed.
- Clean your range regularly. See care and cleaning instructions in this manual.
-
Be sure all range parts are cool before cleaning.
-
DO NOT soak removable heating elements in water. The element will be damaged and shock or fire could result.
-
DO NOT clean door heat seal. It is essential for a good seal. Care should be taken not to rub, damage, or move the seal. Clean only parts recommended in this Use and Care Guide.
-
DO NOT use oven cleaners on continuous-cleaning ovens. No commercial oven cleaner or oven liner protective coating of any kind should be used in or around any part of the oven.
-
DO NOT repair or replace any part of the range unless specifically recommended in this manual. All other servicing should be referred to a qualified technician.
-
Disconnect the electrical supply before servicing the range.
■ FOR YOUR SAFETY ■
DO NOT STORE OR USE GASOLINE OR OTHER FLAMMABLE VAPORS AND LIQUIDS IN THE VICINITY OF THIS OR ANY OTHER APPLIANCE. THE FUMES CAN CREATE A FIRE HAZARD OR EXPLOSION.
■ SAVE THESE INSTRUCTIONS ■
Parts & Features
Models SEC350X (shown) & SEP340X

Using Your Range Using the surface units
00
natural_image
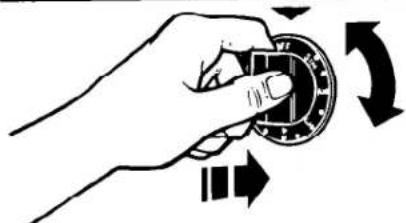
Hand holding a mechanical component with directional arrows indicating rotation (no text or symbols)Control knobs must be pushed in before turning them to a setting. They can be set anywhere between HI and OFF.
Surface unit markers
The solid dot in the surface unit marker shows which surface unit is turned on by that knob.
Surface unit indicator lights
One of the Surface Unit Indicator Lights on the control panel will glow when a surface unit is on.
WARNING
Burn And Fire Hazard Be sure all control knobs are turned to OFF and all indicator lights are OFF when you are not cooking. Someone could be burned or a fire could start if a surface unit is accidentally left ON.
Until you get used to the settings, use the following as a guide. For best results, start cooking at the high settings, then turn the control knob down to continue cooking.
Use a high setting to start food cooking; to bring liquids to a boil.
Use a medium-high setting to hold a rapid boil: to fry chicken or pancakes.
Use a medium setting for gravy, pudding and icing; to cook large amounts of vegetables.
Use a medium-low setting to keep food cooking after starting it on a higher setting.
Use a low setting to keep food warm until ready to serve. Set the heat higher or lower within the low band to keep food at the temperature you want.
Cookware
natural_image
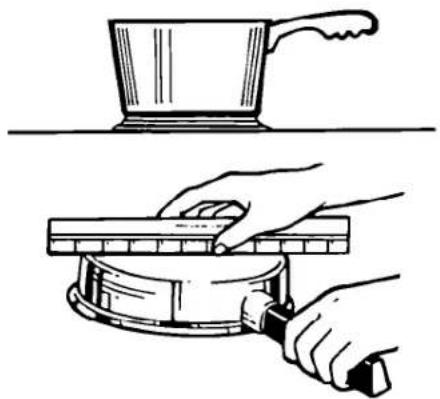
Illustration of two hands operating a kitchen pan and a lid (no text or symbols)Pans should be the same size or larger than the surface unit to prevent boil-overs and hot handles.
Use only flat-bottomed utensils. Flat bottoms allow maximum contact between the pans and surface units for fast, even cooking. Pans with uneven bottoms or with raised patterns on the bottoms are not suitable. Do not use trivets, woks with skirts, or canners with concave or ridged bottoms.
To check your cookware for flatness, place a straight-edge across the bottom of each piece. Rotate the straight-edge across the bottom. If light shows anywhere between the pan and the straight-edge, the pan is not flat. Do not use it.
WARNING
Burn And Product Damage Hazard
- If the pan is too small for the surface unit, you could be burned by the heat from the exposed section of the surface unit. Use correctly sized cooking utensils to prevent injury.
- If a surface unit stays red for a long time, the bottom of the pan is not flat enough or is too small for the surface unit. Prolonged usage of incorrect utensils for long periods of time can result in damage to the surface unit, cooktop, wiring and surrounding areas. To prevent damage, use correct utensils, start cooking on high setting and turn control down to continue cooking.
Setting the clock
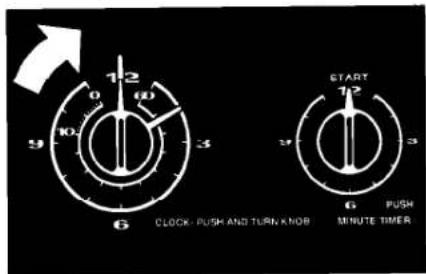
Push in and turn the Minute Timer Knob to set the Clock.
- Push in Minute Timer Knob and turn clockwise until clock shows the correct time of day.
- Let the Minute Timer Knob pop out. Turn clockwise until Minute Timer hand points to "12". The clock setting will change if you push in the knob when turning.
Using the Minute Timer

The Minute Timer does not start or stop the oven. It works like a kitchen timer. Set it in minutes up to an hour. You will hear a buzzer when the set time is up.
Do not push in the knob when setting the Minute Timer.
- Without pushing it in, turn the Minute Timer Knob until the timer hand passes the setting you want.
- Without pushing in, turn the knob back to the setting you want.
When the time is up, a buzzer will sound. To stop the buzzer, turn the Minute Timer hand to "12".
NOTE: Pushing in and turning the Minute Timer Knob changes the clock setting.
Using the oven controls
Baking
- Position the rack(s) properly before turning on the oven. To change rack position, pull rack out to stop, raise front edge and lift out. The rack(s) should be placed so the top of the food will be centered in the oven. Always leave at least 1 1/2 to 2 inches (4-5 cm) between the sides of the pan and the oven walls and other pans.
- Make sure the Timed Bake Switch is set to BAKE/BROIL. The Timed Bake Indicator Light will be off. Set the Oven Control Knob to the baking temperature you want. The Oven Indicator Light will come on. The oven is preheated when the Oven Indicator Light first goes off.
- Put food in the oven.

natural_image
Simple line drawing of a cooking pan with a lid and side legs, no text or symbols present.- During baking, the elements will turn on and off to maintain the temperature setting. The Oven Indicator Light will turn on and off with the elements. The top element helps heat during baking, but does not turn red.
- When baking is done, turn the Oven Control Knob to OFF.
Adjusting the oven temperature control
Does your oven seem hotter or colder than your old oven? The temperature of your old oven may have shifted gradually without you noticing the change. Your new oven is properly adjusted to provide accurate temperatures. But, when compared to your old oven, the new design may give you different results.
If, after using the oven for a period of time, you are not satisfied with the temperature settings, they can be adjusted by following these steps:

natural_image
Hand holding a mechanical component with a circular housing and directional arrow (no text or symbols)- Pull the Oven Temperature Control Knob straight off and turn upside-down.

- Loosen the locking screws. Note the position of the indicator.
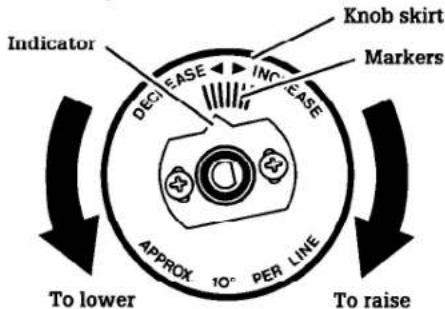
- To lower the temperature, hold knob handle firmly and turn knob skirt counterclockwise to move the indicator one marker line to the right. Each line equals about 10^ F ( 5^ C).
- To raise the temperature, hold knob handle firmly and turn knob skirt clockwise to move the indicator one marker line to the left. Each line equals about 10^ F ( 5^ C).
Tighten the locking screws and replace the control knob.
Broiling
natural_image
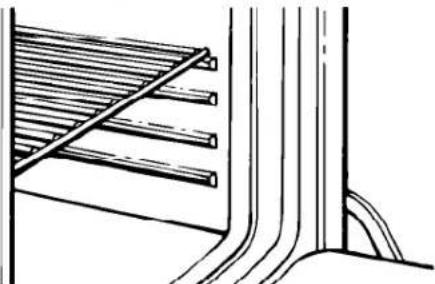
Pure technical line drawing of a structural component with parallel grooves and diagonal braces (no text or symbols)- Position the rack(s) before turning the oven on. Refer to a rack placement chart and broiling chart in a reliable cookbook for recommended rack positions and broiling times.
- Put the broiler pan and food on the rack.
natural_image
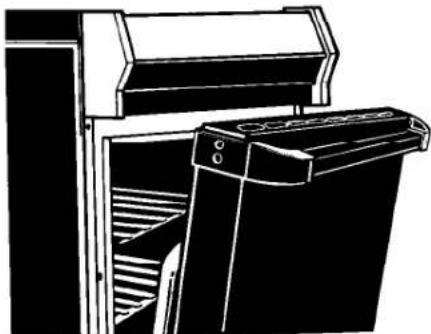
Line drawing of a staircase with an open elevator (no text or symbols)- Close the door to the Broil Stop position (open about 4 inches, 10.2 cm). The door will stay open by itself.
NOTE: The door must be partly open whenever the oven is set to BROIL. Leaving the door open allows the oven to maintain proper temperatures. - Make sure the Timed Bake Switch is set to BAKE/BROIL. The Timed Bake Indicator Light will be off. Set the Oven Control Knob to BROIL.
- When broiling is done, turn the Oven Control Knob to OFF.
Using the automatic MEALTIMER™ clock
The automatic MEALTIMER clock is designed to turn the oven on and off at times you set, even when you are not around.
Automatic baking is ideal for foods which do not require a preheated oven such as meats and casseroles. Do not use the automatic cycle for cakes, cookies, etc...undercooking will result.
To start baking now and stop automatically:
- Position rack(s) properly, and place the food in the oven.
- Make sure the clock is set to the correct time of day.

natural_image
Simple black-and-white diagram showing a car silhouette with a sun symbol and a downward arrow (no text or labels)- Set the Timed Bake Switch to TIMED BAKE. The Timed Bake Indicator Light will come on.
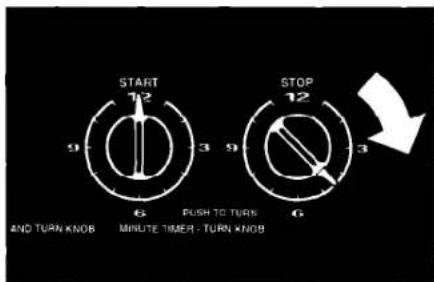
- Push in and turn the Stop Time Knob clockwise to the time you want the oven to shut off.
- Push in and turn the Start Time Knob until it pops out.
OVEN
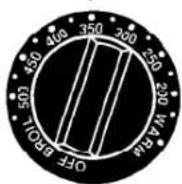
- Turn the Oven Control Knob to the baking temperature you want.
- After baking is done or to stop the oven before the preset time, turn the Oven Control Knob to OFF.
- Set the Timed Bake Switch to BAKE/BROII. The Timed Bake Indicator Light will go out.
To delay start and stop automatically:
- Position the oven rack(s) properly and place the food in the oven.
- Make sure the clock is set to the correct time of day.
- Set the Timed Bake Switch to TIMED BAKE. The Timed Bake Indicator Light will come on.
- Push in and turn the Start Time Knob clockwise to the time you want baking to start.
- Push in and turn the Stop Time Knob clockwise to the time you want the oven to shut off.
- Turn the Oven Control Knob to the baking temperature you want. The oven will now start and stop automatically.
- After baking is done or to stop the oven before the preset time, turn the Oven Control Knob to OFF.
- Set the Timed Bake Switch to BAKE/BROIL. The Timed Bake Indicator Light will go out.
For regular baking and broiling:
- Set the Timed Bake Switch to BAKE/BROIL. The Timed Bake Indicator Light will be off.
- Push in and turn the Start Time and Stop Time Knobs until they pop out.
- Set the Oven Control Knob to the baking temperature you want.
WARNING
To avoid sickness and food waste when using the MEALTIMER™ clock:
- Do not use foods that will spoil while waiting for cooking to start, such as dishes with milk or eggs, cream soups, and cooked meats or fish. Any food that has to wait for cooking to start should be very cold or frozen before it is put in the oven. MOST UNFROZEN FOODS SHOULD NEVER STAND MORE THAN TWO HOURS BEFORE COOKING STARTS.
- Do not use foods containing baking powder or yeast when using delay start. They will not rise properly.
■ Do not allow food to remain in oven for more than two hours after end of cooking cycle.
The oven vent

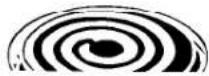
Hot air and moisture escape from the oven through a vent under the right rear surface unit. You can cook on the unit, or keep food warm on it while the oven is on.
The vent is needed for air circulation. Do not block the vent. Poor baking will result.
WARNING
Burn Hazard
If you leave a utensil on the right rear surface unit, use potholders when moving it. Pan handles can become hot enough to burn. Plastic utensils left over the vent can melt.
The optional backguard accessory
An optional backguard accessory can be added to the back of the cooktop. This accessory (Part No. 4315465) is available from your Roper Appliance dealer.
The storage drawer
The storage drawer is for storing pots and pans. The drawer can be removed to make it easier to clean under the range, and to check for installation of the anti-tip bracket. Use care when handling the drawer.
Removing the storage drawer:
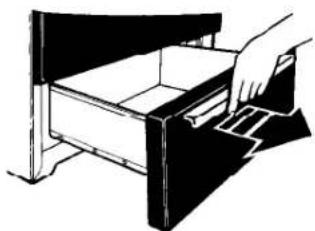
natural_image
Illustration of a hand opening a drawer with a handle, no text or symbols present- Empty drawer of any pots and pans before removing drawer. Pull drawer straight out to the first stop. Lift front and pull out to the second stop.
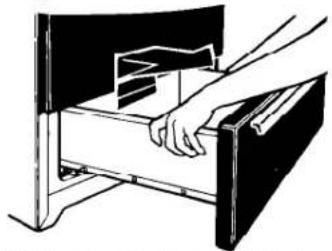
natural_image
Illustration of a hand opening a drawer into a cabinet (no text or symbols visible)- Lift back slightly and slide drawer all the way out.
Replacing the storage drawer:

- Fit ends of drawer slide rails over the drawer slide rails on bottom of oven frame.

- Lift front and push in until plastic stops on drawer slide rails clear rollers on oven frame drawer slide rails. Lift drawer front again to clear second stop and slide drawer closed.
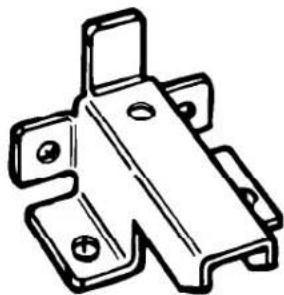
To verify that the anti-tip bracket is engaged:
natural_image
Technical line drawing of a mechanical bracket or mounting plate (no text or symbols)■ Remove storage drawer.
- Look to see if the anti-tip bracket is attached to floor with screws.
■ Make sure bracket overlaps the range base.
- See "Important Safety Instructions" on page 2 and Installation Instructions for further details.
NOTE: The range will not tip during normal use. Tipping can occur if excessive force or weight is applied to open door without anti-tip bracket properly secured.
Caring For Your Range
WARNING
Burn And Electrical Shock Hazard Make sure all controls are OFF and the range is cool before cleaning. Failure to do so can result in burns or electrical shock.
The control knobs
- Turn control knobs to the OFF position.
- Pull control knobs straight off.
- Wash in warm, soapy water.
- Rinse well and dry completely. Do not soak.
The control panel
- Wipe with warm, soapy water or spray glass cleaner, and a soft cloth.
- Rinse well.
- Dry with soft cloth.
- Replace control knobs by pushing them firmly into place.
NOTE: When cleaning, never use steel wool, abrasives, or commercial oven cleaners which may damage finish. After cleaning, make sure all control knobs point to the OFF position.
The surface units and reflector bowls
Removing

natural_image
Illustration of hands holding a coiled device with arrows indicating direction (no text or symbols)- Turn off all surface units and let cool.
- Lift the edge of the unit opposite the receptacle, just enough to clear the reflector bowl.

natural_image
Line drawing of a hand pressing down on a bowl with a scale (no text or symbols)- Pull the surface unit straight away from the receptacle.
- Lift out the reflector bowl. See Cleaning Chart on page 12 for cleaning instructions.
Replacing
- Make sure all surface units are turned OFF.
- Line up openings in the reflector bowl with the surface unit receptacle.
- Hold the surface unit as level as possible with the terminal just started into the receptacle. Push the surface unit terminal into the receptacle.
- When the terminal is pushed into the receptacle as far as it will go, the surface unit will fit into the reflector bowl.
Reflector bowls reflect heat back to the utensils on the surface units. They also help catch spills. When they are kept clean, they reflect heat better and look new longer.
If a reflector bowl gets discolored, some of the utensils may not be flat enough, or some may be too large for the surface unit. In either case, some of the heat that's meant to go into or around a utensil goes down and heats the reflector bowl. This extra heat can discolor it.
WARNING
Fire And Electrical Shock Hazard Do not line the reflector bowls with foil. Fire or electrical shock could result.
The lift-up cooktop

natural_image
Technical line drawing of a mechanical device with four circular components and a central shaft (no text or symbols)- Lift front of cooktop at center.
- Swing up the support rod.
- Carefully lower the cooktop onto the support rod.
- Wipe surface under cooktop with warm, soapy water. Use a soap-filled plastic scouring pad on heavily-soiled areas.
WARNING
Personal Injury And Product Damage Hazard
- Be sure the rod fits in the notch in the front right corner of the cooktop and is held securely. The cooktop could accidentally fall and injure you.
- Do not drop the cooktop. Damage can result to the finish and the cooktop frame.
The removable oven door
natural_image
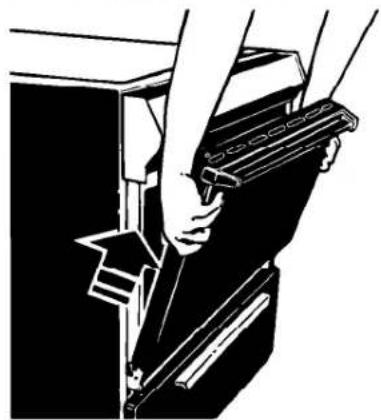
Illustration of hands holding a device with a tray, no visible text or symbolsRemoving the oven door will help make it easier to clean the oven.
WARNING
Burn And Electrical Shock Hazard Make sure all controls are OFF and the oven is cool before removing oven door. Failure to do so can result in burns or electrical shock.
- Open the door to the first stop position.
- Hold the door at both sides and lift it at the same angle it is in.
- To replace, fit the bottom corners of the door over the ends of the hinges.
Push the door down evenly. The door will close only when it is on the hinges correctly.
The standard-cleaning oven (Model SEP340X)
The standard oven has to be hand cleaned. Use warm soapy water, soapy steel wool pads or a commercial oven cleaner. See "Cleaning Chart" on page 12 for further instructions.
CAUTION
Do not allow commercial oven cleaner to contact the heating elements, thermostat, heat seal or exterior surfaces of the oven. Damage will occur.
Using foil
To catch sugar or starchy spills from pies and casseroles, use a piece of heavy-duty aluminum foil or a shallow pan on the lower rack, slightly larger than the cooking container.
NOTE: Do not use foil or foil liner to cover the oven floor. Poor baking results could occur.
The continuous-cleaning oven (Model SEC350X)
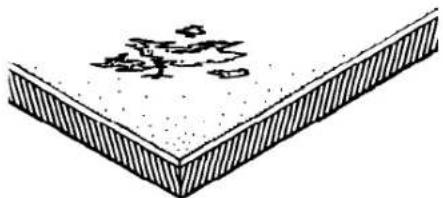
Standard oven walls are coated with smooth porcelain. Your continuous-cleaning oven walls are coated with a special, rougher porcelain. A fat spatter beads up on the smooth surface, but spreads out on the rougher surface. The bead of fat on the smooth surface chars and turns black. The spread-out fat on the rough surface gradually burns away at medium to high baking temperatures so the oven can return to a presentably clean condition.
Fat spatter beads up.
Turns black.
Standard porcelain

natural_image
Simple line drawing of a V-shaped structure with small droplets on top (no text or symbols)Fat spatter spreads out.
Burns away.
Continuous-
cleaning porcelain
natural_image
Diagram of a layered structure with textured surfaces and diagonal hatching (no text or symbols)Using foil
Using foil on the continuous-cleaning oven bottom is recommended to catch sugar and starchy spills from pies and casseroles. It must be used properly. Cut foil from a roll of heavy-duty 18-inch (45 cm) aluminum foil, or buy a foil kit (Part No. 241430) from your Roper Appliance dealer.
WARNING
Burn, Electrical Shock And Product Damage Hazard
■ Make sure all controls are OFF and the oven is cool before using foil. Failure to do so can result in burns or electrical shock.
- Do not let foil touch the bake element. It could damage the element. Make sure foil is flat on the bottom and away from the bake element.
- Turn off all controls.
- Lift the cool bake element slightly to lift the feet off the oven bottom.
- Slide the foil under the bake element. Make sure the foil is centered and long enough to start up both side oven walls without wrinkling. For proper baking, lower the bake element so all feet rest solidly on the foil.
Cleaning tips
- The oven window and racks are not coated. Clean them by hand.
- The oven door does not get as hot as the walls. Some hand cleaning may be needed.
- If you do more broiling than baking, hand cleaning may be needed.
- Use aluminum foil on the oven bottom according to instructions. Spill-overs may not burn away and could stain the bottom.
Hand cleaning

natural_image
Simple line drawing of a spray can with a cross mark, emitting exhaust smoke (no text or symbols)WARNING
Personal Injury Hazard Do not use oven cleaning products in a continuous-cleaning oven. Some can become trapped in the porcelain surface and give off harmful fumes.

natural_image
Line drawing of a hand pressing down on a car's side panel (no text or symbols)WINDOW – Keep clean with warm, soapy water or spray glass cleaner. Use a plastic scouring pad for heavily-soiled areas. Rinse well. Do not use steel wool or abrasive cleansers.
natural_image
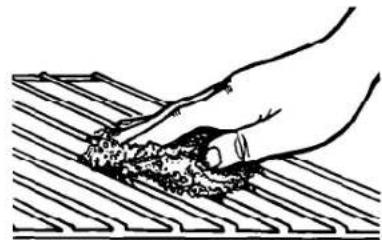
Hand holding a small object over a textured surface (no text or symbols visible)RACKS - Use a soapy steel wool pad for best cleaning results. Rinse well.
natural_image
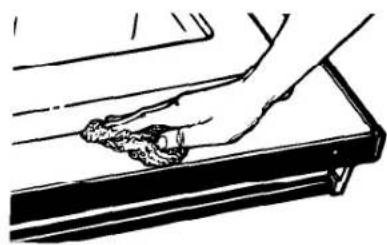
Line drawing of a hand cleaning a car trunk with a cloth (no text or symbols)WALLS AND DOOR - Wash with warm, soapy water. Use a steel wool pad or plastic scouring pad for heavily-soiled areas. Rinse well.
Cleaning chart
| AWARNING | Burn And Electrical Shock HazardMake sure all controls are OFF and the range is cool before cleaning. Failure to do so can result in burns or electrical shock. | |
| PART | WHAT TO USE | HOW TO CLEAN |
| Exterior surfaces | Warm, soapy water and a soft cloth. Non-abrasive plastic scouring pad for heavily-soiled areas. | Wipe off regularly when range is cool.Do not allow food containing acids (such as vinegar, tomato or lemon juice) to remain on surface. Acids may remove the glossy finish. Also, wipe up milk or egg spills when cooktop is cool.Do not use abrasive or harsh cleansers. |
| Surface units | No cleaning required. | Splatters or spills will burn off.Do not immerse in water. |
| Chrome reflector bowls | Warm, soapy water and a soft cloth; non-abrasive plastic scouring pad. | Clean frequently.Wash, rinse and dry well.Do not use metal scouring pads or harsh cleansers.Use non-abrasive plastic scouring pad for cooked-on food. |
| Control knobs | Warm, soapy water and soft cloth. | Wash, rinse and dry well.Do not soak. |
| Control panel and trim | Warm, soapy water or spray glass cleaner, and a soft cloth. | Wash, rinse and dry well.Follow directions provided with cleaner. |
| Broiler pan and grid | Warm, soapy water or a soapy steel wool pad. | Clean after each use.Wash, rinse and dry well. |
| Oven racks | Warm, soapy water or soapy steel wool pads. | Wash, rinse and dry well. Use soapy steel wool pads for heavily-soiled areas. |
| Oven door glass | Spray glass cleaner or warm, soapy water and a non-abrasive plastic scouring pad. | Make sure oven is cool.Follow directions provided with the cleaner.Wash, rinse and dry well. |
| Standard oven | Warm, soapy water or soapy steel wool pads.ORCommercial oven cleaners.Heavy-duty aluminum foil or shallow pan. | Make sure oven is cool.Remove door for easier access.Clean heavily-soiled areas or stains. Rinse well with water.Remove door for easier access.Place newspaper on floor to protect floor surface.Follow directions provided with the oven cleaner.Rinse well with clear water.Use in well-ventilated room.Do not allow commercial oven cleaners to contact the heating elements, heat seal, thermostat or exterior surfaces of the range. Damage will occur.Place piece of foil or shallow pan, slightly larger than the cooking container, on lower rack to catch spill-overs. |
| PART | WHAT TO USE | HOW TO CLEAN |
| Continuous-cleaning oven | Warm, soapy water or a soapy steel wool pad.Heavy-duty aluminum foil. | Make sure oven is cool.Remove door for easier access.Clean heavily-soiled areas or stains. Rinse well with water.Place piece of foil on oven floor to catch spill-overs. Make sure the foil is centered and long enough to start up both side oven walls without wrinkling.Do not use commercial oven cleaners.Most fat splatters on oven walls and floor will gradually reduce to a presentably clean condition during baking. |
The oven light (Model SEC350X)
To turn the oven light on, push the Oven Light Switch on the control panel. Push the switch again to turn off the light.
To replace:
WARNING
Electrical Shock And Personal Injury Hazard
- Make sure oven and light bulb are cool and power to the oven has been turned OFF before replacing the light bulb. Failure to do so can result in electrical shock or burns.
■Be careful not to drop the bulb. Broken glass could cause injury.

natural_image
Hand holding a switch with ON/OFF labels (no text or symbols beyond basic electrical symbols)- Turn off power at the main power supply.

natural_image
Simple line drawing of a mechanical device with no text or symbols- Remove the light bulb from its socket. Replace with a 40-watt appliance bulb. Turn on power at the main power supply.
Before You Call For Service
If you are having an operating problem, check the chart to see what the cause might be before you call for assistance.
| OPERATING PROBLEM | CHECK IF | WHAT TO DO |
| Nothing operates. | Range is properly connected to a live circuit with the proper voltage.Your home's main fuse has blown or circuit breaker has tripped. | Contact an authorized Roper ^SM service technician to reconnect range to electrical supply. (See Installation Instructions.)Replace fuse or reset circuit breaker. |
| Oven will not operate. | Oven Control Knob is turned to a temperature setting or BROIL.For normal baking and broiling, the Start Time and Stop Time Knobs are both in the "popped out" position, and the Timed Bake Switch is set to BAKE/BROIL.For clock-controlled oven operation, the clock and Timed Bake Switch are set properly. | Turn Oven Control Knob to the desired temperature setting or BROIL.See page 7 for setting information.See page 7 for setting information. |
| Surface units will not operate. | Range is connected to electrical power.Your home's main fuse has blown or circuit breaker has tripped. | Contact an authorized Roper ^SM service technician to reconnect range to electrical supply. (See Installation Instructions.)Replace fuse or reset circuit breaker. |
| Control knob(s) will not turn. | You pushed in knob(s) before trying to turn. | Push in knob(s) before turning. |
| Soil is visible on continuous-cleaning oven finish. | You broil often.Soil is on door.Soil is caused by sugar and starchy spills. | The special finish is designed to gradually reduce oven soil during normal baking or roasting. It is not designed to keep your oven spotless, only presentably clean. If you broil often, you may see oven soil. Follow hand cleaning tips on page 11.The door is cooler than the oven walls. Soil will be more visible on the door than other areas in the oven. See hand cleaning tips on page 11.Sugar and starchy spills may leave stains. See page 11 for hand cleaning tips. Keep foil on oven bottom to catch these spills. |
| Cooking results are not what you expected. | The range is level.Pans are the size called for in the recipe.You are following a tested recipe from a reliable source.The cooking utensils have smooth, flat bottoms and fit the surface units.When baking, you have preheated the oven as the recipe calls for.When baking, you have allowed 1 1/2 to 2 inches (4-5 cm) on all sides of the pans for air circulation.When broiling, you have not completely closed the oven door. | Adjust leveling legs.Use correct-size pans.Modify recipe or find a new recipe.Use cooking utensils with smooth, flat bottoms.Preheat the oven according to recipe's specifications.Reposition pans for best air circulation.Open oven door to the Broil Stop position. |
LIMITED WARRANTY
Home Appliances
| LENGTH OF WARRANTY(From date of purchase) | PRODUCTS COVERED | WHAT WE WILL PAY FOR |
| FULL ONE YEAR WARRANTY | All Roper Appliances | Replacement parts and repair labor to correct defects in materials or workmanship. |
| FULL FIVE YEAR WARRANTY | RefrigeratorsFreezersAir ConditionersDehumidifiers | Replacement parts and repair labor for the sealed refrigeration system (compressor, evaporator, condenser, drier or connecting tubing) which we find to be defective in materials or workmanship. |
| LIMITED 2ND-5TH YEAR WARRANTY | Microwave Ovens | Repair or replacement of magnetron tube which we find to be defective in materials or workmanship. |
| LIMITED 2ND-5TH YEAR WARRANTY | Automatic Washers | Repair or replacement of any part of the gear case assembly which we find to be defective in materials or workmanship. |
WHAT WE WILL NOT PAY FOR
A. SERVICE CALLS TO:
- Correct the installation of your appliance.
- Instruct you how to use your appliance
- Replace house fuses or correct house wiring or plumbing.
- Replace owner accessible light bulbs.
B. Repairs when appliance is used in other than normal, single-family household use.
C. Pick up and delivery. Your appliance is designed to be repaired in the home.
D. Damage to appliance caused by accident, misuse, fire, flood, acts of God, or use of product not approved by us.
E. Any labor costs during the limited warranties.
This Roper appliance is warranted by Whirlpool Corporation. Under no circumstances shall it be liable under this warranty for incidental or consequential damages and all implied warranties are limited to the same time periods stated in the express warranties for Roper Brand Appliances. Some states do not allow the exclusion or limitation of incidental or consequential damages or limitations of how long an implied warranty may last, so the above limitations or exclusions may not apply to you.
This warranty gives you specific legal rights, and you may also have other rights which vary from state to state.
Outside the United States, a different warranty may apply. For details, please contact your franchised Roper distributor or military exchange.
HOW TO GET SERVICE OR ASSISTANCE
If you need service, first see the "Before You Call For Service" section of this book. If you still need service after checking this section, additional help can be found if you:
- Contact your selling dealer for the authorized servicer in your area*
OR
■ Phone 1-800-44-ROPER (1-800-447-6737) between 8:00 a.m. and 4:30 p.m. Eastern Time, Monday through Friday* OR
- For further information, write to: Consumer Relations Dept., Roper Brand Appliances, 2000 M-63 North, Benton Harbor, MI 49022*
* When requesting assistance, please provide the model and serial numbers, date of purchase, and a complete description of the problem. The model and serial numbers are located beneath the lift-up cooktop (see illustrations on page 4).
If you are not satisfied with the service received, contact the Major Appliance Consumer Action Panel (MACAP). MACAP is a group of independent consumer experts that voices consumer views at the highest levels of the major appliance industry.
Contact MACAP only when the dealer, authorized servicer or Roper Brand Appliance warrantor have failed to resolve your problem:
Major Appliance Consumer Action Panel
20 North Wacker Drive
Chicago, IL 60606
MACAP will in turn inform us of your action.
- Electric Range
- Use and Care Guide
- Thank you for choosing a Roper appliance.
- Complete and mail the Product Registration Card.
- You are responsible for
- Contents
- Important Safety Instructions
- WARNING
- ■ FOR YOUR SAFETY ■
- DO NOT STORE OR USE GASOLINE OR OTHER FLAMMABLE VAPORS AND LIQUIDS IN THE VICINITY OF THIS OR ANY OTHER APPLIANCE. THE FUMES CAN CREATE A FIRE HAZARD OR EXPLOSION.
- ■ SAVE THESE INSTRUCTIONS ■
- Parts & Features
- Using Your Range Using the surface units
- Surface unit markers
- Surface unit indicator lights
- Using the oven controls
- Baking
- Adjusting the oven temperature control
- Using the automatic MEALTIMER™ clock
- To start baking now and stop automatically:
- To delay start and stop automatically:
- For regular baking and broiling:
- Burn Hazard
- The optional backguard accessory
- The storage drawer
- Caring For Your Range
- The control knobs
- The control panel
- The surface units and reflector bowls
- Replacing
- Personal Injury And Product Damage Hazard
- The standard-cleaning oven (Model SEP340X)
- CAUTION
- Using foil
- The continuous-cleaning oven (Model SEC350X)
- Burn, Electrical Shock And Product Damage Hazard
- Cleaning tips
- The oven light (Model SEC350X)
- Electrical Shock And Personal Injury Hazard
- Before You Call For Service
- LIMITED WARRANTY
- WHAT WE WILL NOT PAY FOR
- HOW TO GET SERVICE OR ASSISTANCE
Brand : Roper
Model : SEC350XW0
Category : Cooker