
Hampton 3211AN-LED - Lighting Hinkley Lighting - Free user manual and instructions
Find the device manual for free Hampton 3211AN-LED Hinkley Lighting in PDF.


| Product Type | Outdoor Wall Light Fixture |
| Model | Hampton 3211AN-LED |
| Brand | Hinkley Lighting |
| Light Source | Integrated LED |
| Wattage | 12W (estimated) |
| Color Temperature | 3000K (Warm White) |
| Lumens | 800 lm (estimated) |
| Voltage | 120V |
| Dimmable | Yes (with compatible dimmer) |
| Material | Aluminum housing, glass lens |
| Finish | Antique Nickel (AN) |
| Dimensions (Height) | 12.5 inches (estimated) |
| Dimensions (Width) | 7 inches (estimated) |
| Dimensions (Depth) | 8 inches (estimated) |
| Weight | 3.5 lbs (estimated) |
| Mounting Type | Wall mount |
| Weather Rating | Wet location rated for outdoor use |
| Energy Efficiency | Energy Star certified (estimated) |
| Warranty | 5-year limited warranty |
| Installation | Hardwired, includes mounting hardware |
| Cleaning | Wipe with dry cloth, avoid abrasive cleaners |
| Safety | UL listed for safety |
Frequently Asked Questions - Hampton 3211AN-LED Hinkley Lighting
User questions about Hampton 3211AN-LED Hinkley Lighting
0 question about this device. Answer the ones you know or ask your own.
Ask a new question about this device
Download the instructions for your Lighting in PDF format for free! Find your manual Hampton 3211AN-LED - Hinkley Lighting and take your electronic device back in hand. On this page are published all the documents necessary for the use of your device. Hampton 3211AN-LED by Hinkley Lighting.
USER MANUAL Hampton 3211AN-LED Hinkley Lighting
Drawing 1 - Fixture Assembly

natural_image
Technical line drawing of a mechanical setup with two components and a base, no visible text or symbolsDrawing 2 - Fixture Assembly

Drawing 3 - Mounting Instructions
assembly instructions
Family: Hampton | Item No. 3211
T24 JA8-2016
natural_image
Simple line drawing of a rectangular frame with two vertical supports and a horizontal base (no text or symbols)
start here
- Find a clear area in which you can work.
- Unpack fixture and glass from carton.
- Carefully review instructions prior to assembly.
*** The construction of this fixture will be accomplished by first assembling the main body structure, installing the mounting hardware to the junction box, mounting the fixture to the ceiling and then installing the shade.
-
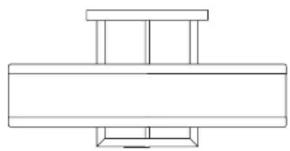
Attach acrylic lens assembly (1) by threading coupler (2) onto end of lower upright stems (3) - see Drawings 1 and 2.
-
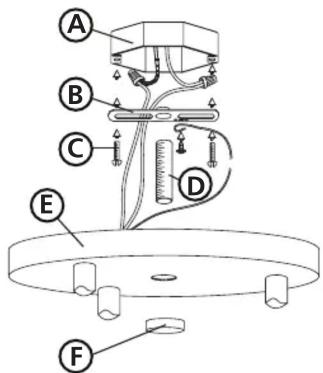
Fasten mounting strap (B) to outlet box (A) with the original outlet box screws (C) - see Drawing 3.
- Thread nipple (D) into mounting strap (B) approximately 3/8".
SAFETY WARNING: READ WIRING AND GROUNDING INSTRUCTIONS (I.S. 18) AND ANY ADDITIONAL DIRECTIONS. TURN POWER SUPPLY OFF DURING INSTALLATION. IF NEW WIRING IS REQUIRED, CONSULT A QUALIFIED ELECTRICIAN OR LOCAL AUTHORITIES FOR CODE REQUIREMENTS.
Make electrical connections from supply wire to fixture lead wires. Refer to instruction sheet (I.S. 18) and follow all instructions to make all necessary wiring connections. Then refer back to this page to continue installation of this fixture.
- Slip canopy (E) over nipple (D) and up against ceiling - see Drawing 3.
-
Thread decorative finial (F) onto end of nipple (D).
-
Fixture can now be lamped accordingly.
- Slip shade (4) onto acrylic assembly (1) - see Drawing 2.
Drawing 1 - Flush Mount

Drawing 2 - Chain Hung
Drawing 3 - Post-Mount

SAFETY WARNING: READ WIRING AND GROUNDING INSTRUCTIONS (I.S. 18) AND ANY ADDITIONAL DIRECTIONS. TURN POWER SUPPLY OFF DURING INSTALLATION. IF NEW WIRING IS REQUIRED, CONSULT A QUALIFIED ELECTRICIAN OR LOCAL AUTHORITIES FOR CODE REQUIREMENTS.
wiring instructions
Indoor Fixtures
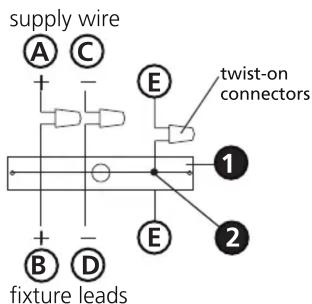
- Connect positive supply wire (A) (typically black or the smooth, unmarked side of the two-conductor cord) to positive fixture lead (B) with appropriately sized twist on connector - see Drawings 1 or 2.
- Connect negative supply wire (C) (typically white or the ribbed, marked side of the two-conductor cord) to negative fixture lead (D).
- Please refer to the grounding instructions below to complete all electrical connections.
Outdoor Fixtures
- Connect positive supply wire (A) (typically black or the smooth unmarked side of the two-conductor cord) to positive fixture lead (B) with appropriately sized twist on connector - see Drawings 2 or 3.
- Connect negative supply wire (C) (typically white or the ribbed, marked side of the two-conductor cord) to negative fixture lead (D).
- Cover open end of connectors with silicone sealant to form a watertight seal.
- If installing a wall mount fixture, use caulk to seal gaps between the fixture mounting plate (backplate) and the wall. This will help prevent water from entering the outlet box. If the wall surface is lap siding, use caulk and a fixture mounting platform specially.
- Please refer to the grounding instructions below to complete all electrical connections.
grounding instructions
Flush Mount Fixtures
For positive grounding in a 3-wire electrical system, fasten the fixture ground wire (E) (typically copper or green plastic coated) to the fixture mounting strap (1) with the ground screw (2) - see Drawing 1.
Note: On straps for screw supported fixtures, first install the two mounting screws in strap. Any remaining tapped hole may be used for the ground screw.
Chain Hung Fixtures
Loop fixture ground wire (E) (typically copper or green plastic coated) under the head of the ground screw (2) on fixture mounting strap (1) and connect to the loose end of the fixture ground wire directly to the ground wire of the building system with appropriately sized twist-on connectors - see Drawing 2.
Post-Mount Fixtures
Connect fixture ground wire (E) (typically copper or green plastic coated) to power supply ground with appropriately sized twist-on connector inside post. Cover open end of connector with silicone sealant to form a watertight seal - see Drawing 3.
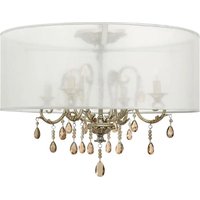
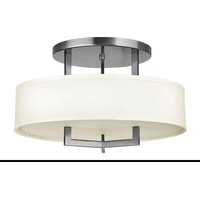
Brand : Hinkley Lighting
Model : Hampton 3211AN-LED
Category : Lighting