
NU-GM3 - Car radio PAC - Free user manual and instructions
Find the device manual for free NU-GM3 PAC in PDF.


| Product Type | Car Stereo |
| Brand | PAC |
| Model | NU-GM3 |
| Dimensions (W x H x D) | 178 mm x 50 mm x 100 mm (standard DIN) |
| Weight | Approx. 0.5 kg |
| Power Supply | 12V DC (negative ground) |
| Power Output | 4 x 50 Watts max |
| Radio Bands | AM/FM |
| Audio Playback | CD, USB, AUX-in |
| Bluetooth | Yes (hands-free calling and audio streaming) |
| Display | LCD with backlight |
| Controls | Rotary knob, push buttons, remote control (optional) |
| Audio Features | EQ presets, bass/treble adjustment, loudness |
| Connectivity | USB port (front), 3.5mm AUX input |
| Supported Audio Formats | MP3, WMA, WAV |
| Installation Size | Single-DIN (2" height) |
| Usage Environment | Indoor vehicle installation |
| Maintenance | Clean with dry cloth; avoid liquids |
| Spare Parts Availability | Contact PAC support or authorized dealers |
| Repair Service | Refer to authorized service centers |
Frequently Asked Questions - NU-GM3 PAC
User questions about NU-GM3 PAC
0 question about this device. Answer the ones you know or ask your own.
Ask a new question about this device
Download the instructions for your Car radio in PDF format for free! Find your manual NU-GM3 - PAC and take your electronic device back in hand. On this page are published all the documents necessary for the use of your device. NU-GM3 by PAC.
USER MANUAL NU-GM3 PAC
The NU-GM3 is a Navigation Unlock integration interface that allows the factory navigation features of your GM radio or the reverse camera to be used by the passenger at anytime.
Installation
Installation: Disconnect the black 44-pin main harness from the back of the radio (see fig. A) Plug the male connector on the NU-GM3 harness into the 44-pin port on the back of the radio. Connect the factory 44-pin harness into the female connector on the NU-GM3 harness. Plug the Black micro-fit 24-pin connector on the NU-GM3 harness into the NU-GM3.
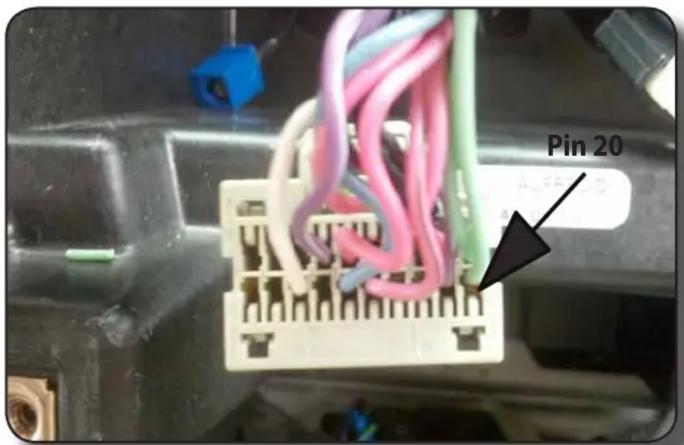
Locate the vehicles VSS wire in pin 20 of the gray 20-pin plug on the back of the radio (see fig. A & B). PLEASE NOTE: The color of the wire in pin 20 will differ depending on the vehicle you are working on. This wire will need to be cut then connected as follows: The green/black wire from the NU-GM3 should be connected to the radio/plug side of the VSS wire and the green/white wire from the NU-GM3 should be connected to the vehicle side of the VSS wire.
If you wish to enable the reverse camera unlock feature you must power up the factory reverse camera. To do this a wire must be ran from the NU-GM3's red camera turn on wire to the factory power wire for the reverse camera. The location of this wire will vary depending upon which vehicle you are installing the NU-GM3 into. Please see the next page for the different locations.
Please Note: If the customer does not wish to use the Reverse Camera unlock feature you do not have to locate and connect this wire. However if the lock button is pressed when the NU-GM3 is active the screen will switch to reverse camera mode.

Fig A

Fig B
Reverse Camera Wire Connection
- You will need to locate the reverse camera harness. If you are installing the NU-GM3 into a Cadillac SRX, Chevrolet Equinox or GMC Terrain, the reverse camera harness is in the tailgate (Fig A). If you are installing the NU-GM3 into a Buick LaCrosse, the reverse camera harness is in the trunk lid (Fig-B).
- Now you will need to locate the reverse camera wire. In the SRX, Equinox & Terrain the reverse camera wire is the lt. green wire in pin 6 of the 16 pin plug (Fig- C). In the LaCrosse the reverse camera wire is the lt. green wire in pin 8 of the 10-pin plug (Fig- D). Please verify that this wire shows 12v (+) when the vehicle is shifted into reverse.
- Connect the red camera turn on wire from the NU-GM3 to the lt. green wire using a diode (Fig E). The diode is needed to prevent the reverse lights from coming on when the reverse camera is activated.
- Verify that the reverse lights do not come on when the reverse camera unlock feature is being used.
Fig A

Fig B

Fig C
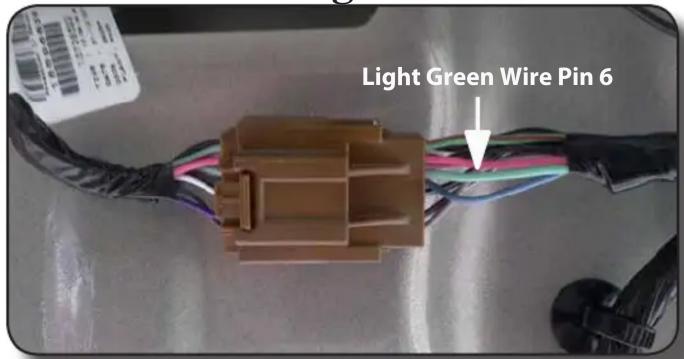
Fig D

Fig E

flowchart
graph LR
    A["Red Camera Activation Wire"] --> B["Connect Red Wire From NU-GM3 Here"]
    C["Lt Green Camera Wire"] --> D["Connect Diode Here"]
    D --> E["Reverse Camera"]
Operation
Pre 2012 Cadillac SRX Controls

- Press & Hold the
Source Button - Navigation Screen
Displays: Confirm
Safe Passenger Use - Press the Source
Button Again to
Confirm - Repeat Step 1
to De-Activate
Chevy Equinox, GMC Terrain Buick LaCrosse & 2012+ Cadillac SRX Controls

- Press & Hold the
Mute Button - Navigation Screen
Displays: Confirm
Safe Passenger Use - Press the Mute
Button Again to
Confirm - Repeat Step 1
to De-Activate
Activating the Navigation Unlock
In the SRX, press and hold the “Source” button on the steering wheel controls (SWC) for two seconds to activate the NU-GM3. In the Equinox, Terrain & LaCrosse, press and hold the “Mute” button on the steering wheel controls (SWC) for two seconds to activate the NU-GM3. You will hear one chime and the navigation screen will display “Confirm Safe Passenger Use”. Press the “Source” or “Mute” button on the SWC again to acknowledge “safe use”, agreeing that use will be performed only by the passenger whenever the vehicle is in motion, and activate the NU-GM3. To de-activate the NU-GM3 simply press and hold the “Source” or “Mute” button on the SWC until three chimes are heard.
Activating the Reverse Camera Unlock
Activate the navigation unlock using the SWC. Press the "Lock" button on the radio or center console, the rearview camera image will now display on the navigation screen. Press the "Lock" button again to de-activate the reverse camera
WARNING: In order to avoid distraction, which could lead to an accident, the driver should never utilize systems unlocked by the NU-GM3 when the vehicle is in motion. Even when operated by the passenger, the vehicle driver should maintain their attention on the road at all times.
Installation/Compatibility Notes
- The NU-GM3 text will not be displayed when the OnStar Turn-by-Turn Navigation is being used.
- When you first install the interface you must move the shifter to drive and back to park before the reverse camera override will work
DISCLAIMER: Under no circumstances shall the manufacture or the distributors of the NU-GM3 be held liable for claims of any loss or damage, consequential, direct or indirect, arising from the sale, installation, or use of the NU-GM3. The manufacture and its distributors will not, nor will they authorize any representative or any other individual, to assume obligation or liability in relation to the NU-GM3 other than its replacement.
AGREEMENT: End user agrees to use this product in compliance with the instructions and terms of use above and with all State and Federal laws. PAC provides instructions and safety warnings with respect to this product and disclaims all liability for any use not in conformity with those instructions or other misuse of its product. If you do not agree, please discontinue use immediately and return product to place of purchase. This product is intended for off-road use and passenger use only.


Brand : PAC
Model : NU-GM3
Category : Car radio