BT9370 - TV Stand B-Tech - Free user manual and instructions
Find the device manual for free BT9370 B-Tech in PDF.


| Product Type | TV Stand |
| Brand | B-Tech |
| Model | BT9370 |
| Material | Steel frame with tempered glass shelves |
| Color | Black |
| Maximum TV Size | 55 inches |
| Weight Capacity | 30 kg (66 lbs) |
| Dimensions (W x D x H) | 1200 x 400 x 400 mm (47.2 x 15.7 x 15.7 inches) |
| Weight | 15 kg (33 lbs) |
| Number of Shelves | 2 adjustable shelves |
| Cable Management | Yes, with rear cable holes |
| VESA Compatibility | Yes, up to 400 x 400 mm |
| Assembly Required | Yes, with included hardware |
| Cleaning Instructions | Wipe with a damp cloth; avoid abrasive cleaners |
| Safety Features | Anti-tip bracket included for wall anchoring |
| Spare Parts Availability | Contact B-Tech support for replacements |
| Repairability | Modular design; shelves and fasteners replaceable |
| Warranty | 2 years limited warranty |
Frequently Asked Questions - BT9370 B-Tech
User questions about BT9370 B-Tech
0 question about this device. Answer the ones you know or ask your own.
Ask a new question about this device
Download the instructions for your TV Stand in PDF format for free! Find your manual BT9370 - B-Tech and take your electronic device back in hand. On this page are published all the documents necessary for the use of your device. BT9370 by B-Tech.
USER MANUAL BT9370 B-Tech
natural_image
Isometric line drawing of a multi-panel metal frame structure with support legs (no text or symbols)FEATURES
- Options for front or rear access panels
- Assembled from off-the-shelf components
- Open frame allows panel access for easy servicing and maintenance
• Keyhole mounting for rear access panels allows safe and secure installation of large scale LED video walls
• Includes adjustable levelling feet - All mounting hardware included
CONTENTS
Installation Safety Notes....2
Parts List....4
Installation Instructions....6
B-Tech Contact Details....16
INSTALLATION TOOLS REQUIRED
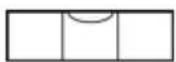
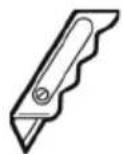
Flathead & crosshead screwdriver
Level Knife

B-TECH AV MOUNTS
www.btechavmounts.com
INSTALLATION SAFETY INSTRUCTIONS

CAUTION: This stand / trolley is intended for
use only with the maximum weights indicated. Use with flat screens heavier than the maximum indicated may result in instability causing possible injury.
Do not attempt to install this product until all instructions and warnings have been read and properly understood. Please keep these instructions for future reference.
Please check carefully to make sure there are no missing or defective parts - defective parts must never be used.
B-Tech International Design & Manufacturing Ltd, its distributors and dealers are not liable or responsible for damage or injury caused by improper installation, improper use or failure to observe these safety instructions. In such cases, all guarantees will expire.
General
Great care must always be taken during installation as most AV equipment is of a fragile nature, possibly heavy and easily damaged if dropped.
If you do not fully understand the instructions or are not sure how to install this product safely, then please consult a professional for advice and/or to install this product for you. Failure to mount this product correctly may cause serious injury or death both during installation and at any time thereafter.
Do not mount any AV equipment that exceeds the specific weight limit of the product you are installing. This weight limit will be clearly stated on each product and its packaging and will vary from product to product.
Product location
Please pay careful attention to where this product is located, some locations are not suitable for installation. For indoor use only. Install stand on level ground. When verifying the stability of the structure, consider the following external factors: The strength of the floor, exposure to sudden and severe wind and danger arising from contact with people and / or objects (eg installations in passageways, emergency exits), if located in a public or frequently populated area ensure that the product is out of the immediate reach of people.
Fixing hardware
It is highly recommended that all fixing screws be used where supplied and that the purpose of all other fixing hardware is fully understood. In some cases more AV equipment fixing hardware will be supplied to accommodate different models of equipment and set up configurations.
The installer must be satisfied that any supplied fixing hardware is suitable for each specific installation. If any fixing screws or included hardware are deemed not sufficient for a safe installation then please consult a professional or your local hardware store.
Hazard limitation
When routing cables take advantage of any built in cable management features that the product might provide and ensure that all cables are tidy and secure. Check to see that any moving aspect of the product can do so unhindered by any cabling.
Some products have moving parts and the potential to cause injury through the crushing or trapping of fingers or other body parts.
Particular attention to the nature of moving parts is required especially when assembling installing and adjusting during set up.
Immediately after installations double-check that the work done is safe and secure. Double-check all necessary fixings are present and are of ample tightness.
It is recommended that periodic inspections of the product and its fixing points are made as frequently as possible to ensure that safety is maintained. If in doubt consult a professional AV installer or other suitably qualified person.
CS
G
OUTER INTERFACE ARM
PLEASE KEEP THIS FOR FUTURE REFERENCE
BASE
| REF | PART NAME | QTY PER PACK |
| A1 | BASE | 1 |
| A2 | SUPPORT STEM | 1 |
| A3 | M8 x 90mm SCREW | 4 |
| A4 | M8 WASHER | 4 |
| A5 | LEVELLING FOOT | 2 |
| A6 | 6AF HEX KEY | 1 |
| A7 | 24mm SPANNER | 1 |
COLUMN
| ITEM | PART NAME | QTY PER PACK |
| B1 | 180cm COLUMN | 1 |
| B2 | END CAP | 1 |
| B3 | 180cm PLASTIC SLOT INSERT | 4 |
| B4 | CABLE COVER | 3 |
| B5 | M8 SLIDING NUT | 2 |
| B6 | M8 x 12mm SCREW | 2 |
| B7 | 60cm COLUMN | 1 |
| B8 | CABLE COVER | 1 |
| B9 | 60cm PLASTIC SLOT INSERT | 4 |
| B10 | COLUMN JOINER | 4 |
| B11 | GRUB SCREW | 16 |
| B12 | HEX BOLT | 8 |
| B13 | 3AF HEX KEY | 1 |
JOINING KIT
| ITEM | PART NAME | QTY PER PACK |
| C1 | JOINING PLATE | 1 |
| C2 | M8 SLIDING NUT | 8 |
| C3 | M8 x 12mm SCREW | 8 |
| C4 | M8 x 16mm SCREW | 4 |
| C5 | 5AF HEX KEY | 1 |
MOUNTING RAIL
| ITEM | PART NAME | QTY PER PACK |
| D1 | MOUNTING RAIL | 1 |
| D2 | END CAP | 2 |
EXTENSION KIT
| ITEM | PART NAME | QTY PER PACK |
| E1 | JOINING BAR | 6 |
| E2 | M6 x 8mm GRUB SCREW | 8 |
| E3 | 3AF HEX KEY | 1 |
INTERFACE KIT
| ITEM | PART NAME | QTY PER PACK |
| F1 | INNER INTERFACE ARM | 1 |
| F2 | M6 x 14mm HEX SCREW | 2 |
| F3 | M6 SLIDING NUT | 2 |
| F4 | CORNER BRACKET CAP | 2 |
| F5 | 4AF HEX KEY | 1 |
| F6 | M8 x 30mm HEX SCREW | 8 |
| F7 | M8 SLIDING NUT | 8 |
| ITEM | PART NAME | QTY PER PACK |
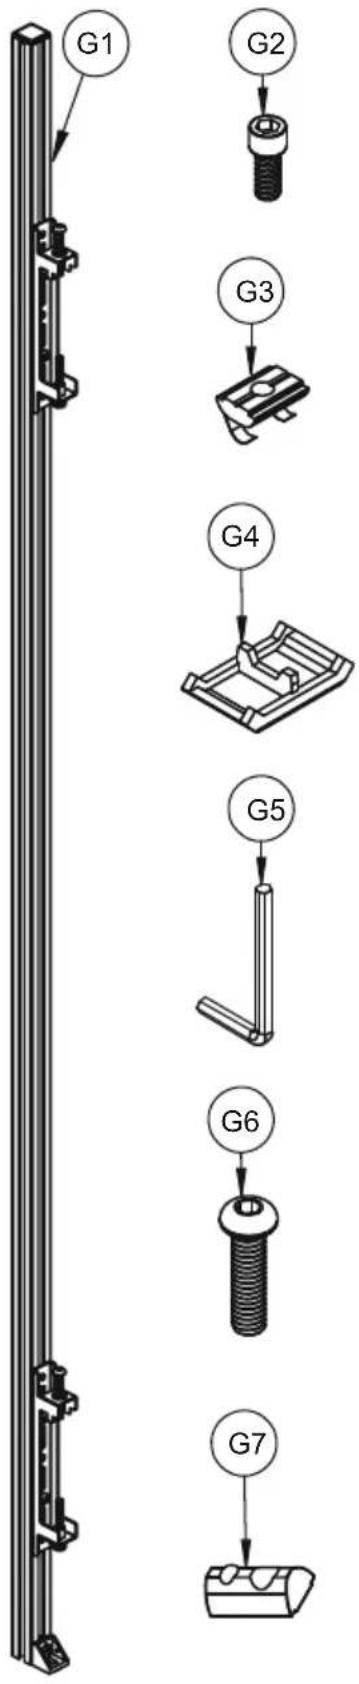
| G1 | OUTER INTERFACE ARM | 1 |
| G2 | M6 x 14mm HEX SCREW | 3 |
| G3 | M6 SLIDING NUT | 3 |
| G4 | CORNER BRACKET CAP | 1 |
| G5 | 4AF HEX KEY | 1 |
| G6 | M8 x 30mm HEX SCREW | 4 |
| G7 | M8 SLIDING NUT | 4 |
BESPOKE LED FIXING KIT
INSTALLATION INSTRUCTIONS
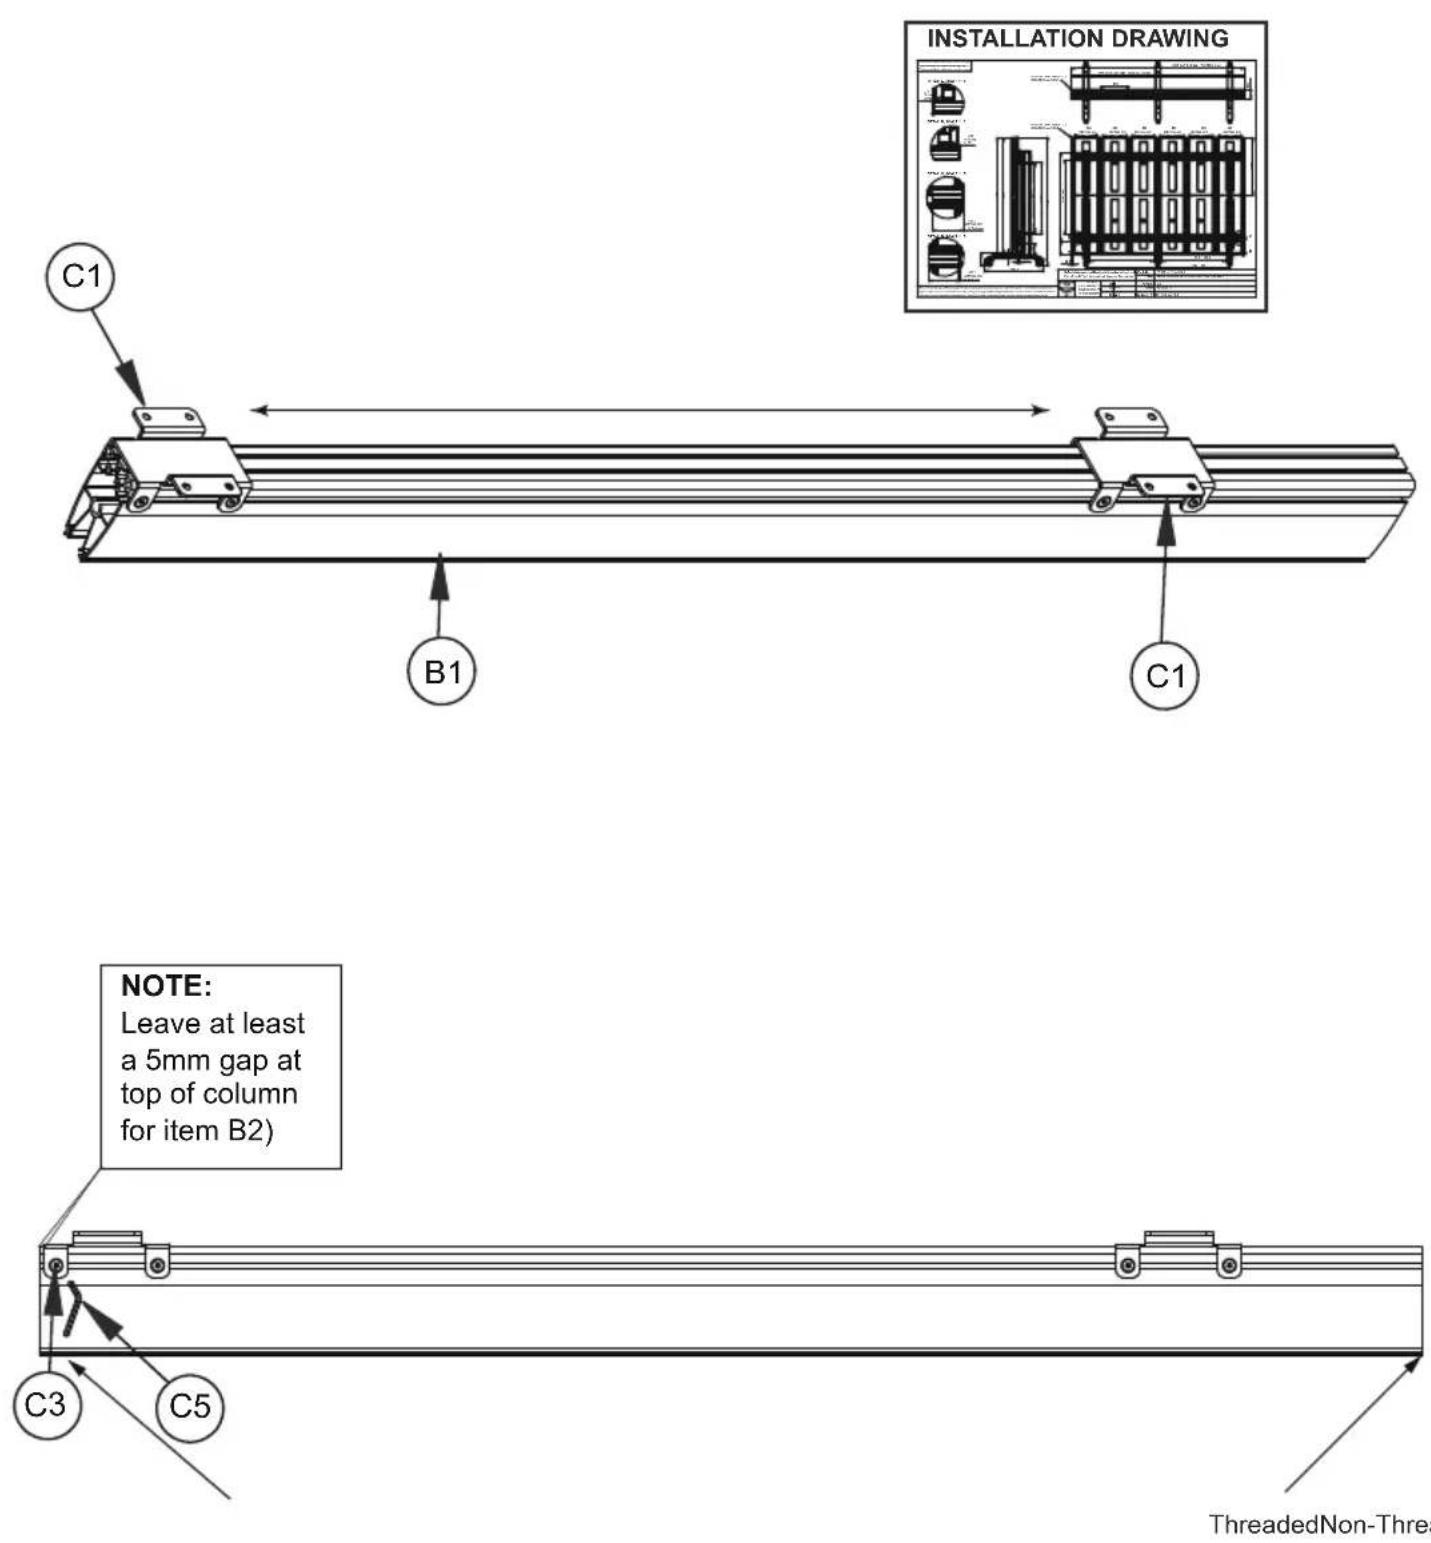
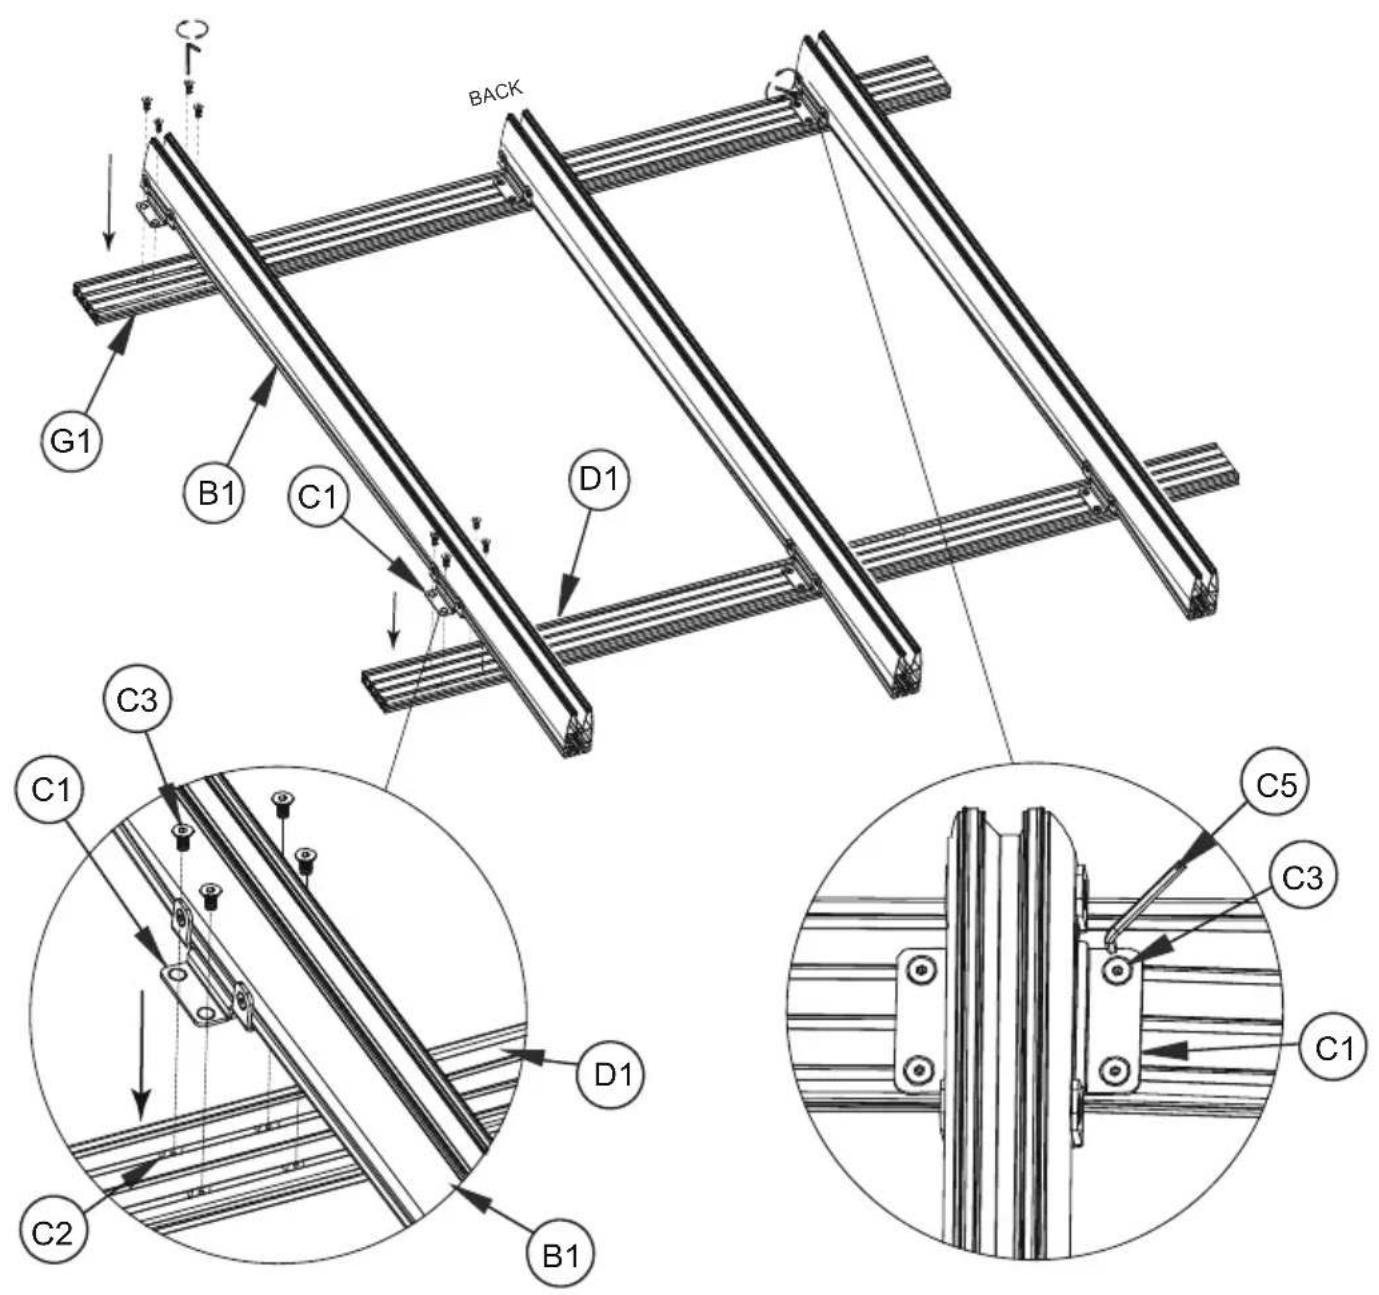
1 Attach Joining Plate to Column
i. Connect together four item C3 with item C2 onto each item C1 using item C5. ii. Lay items E1 on the floor and slide two item C1 onto each item B1.
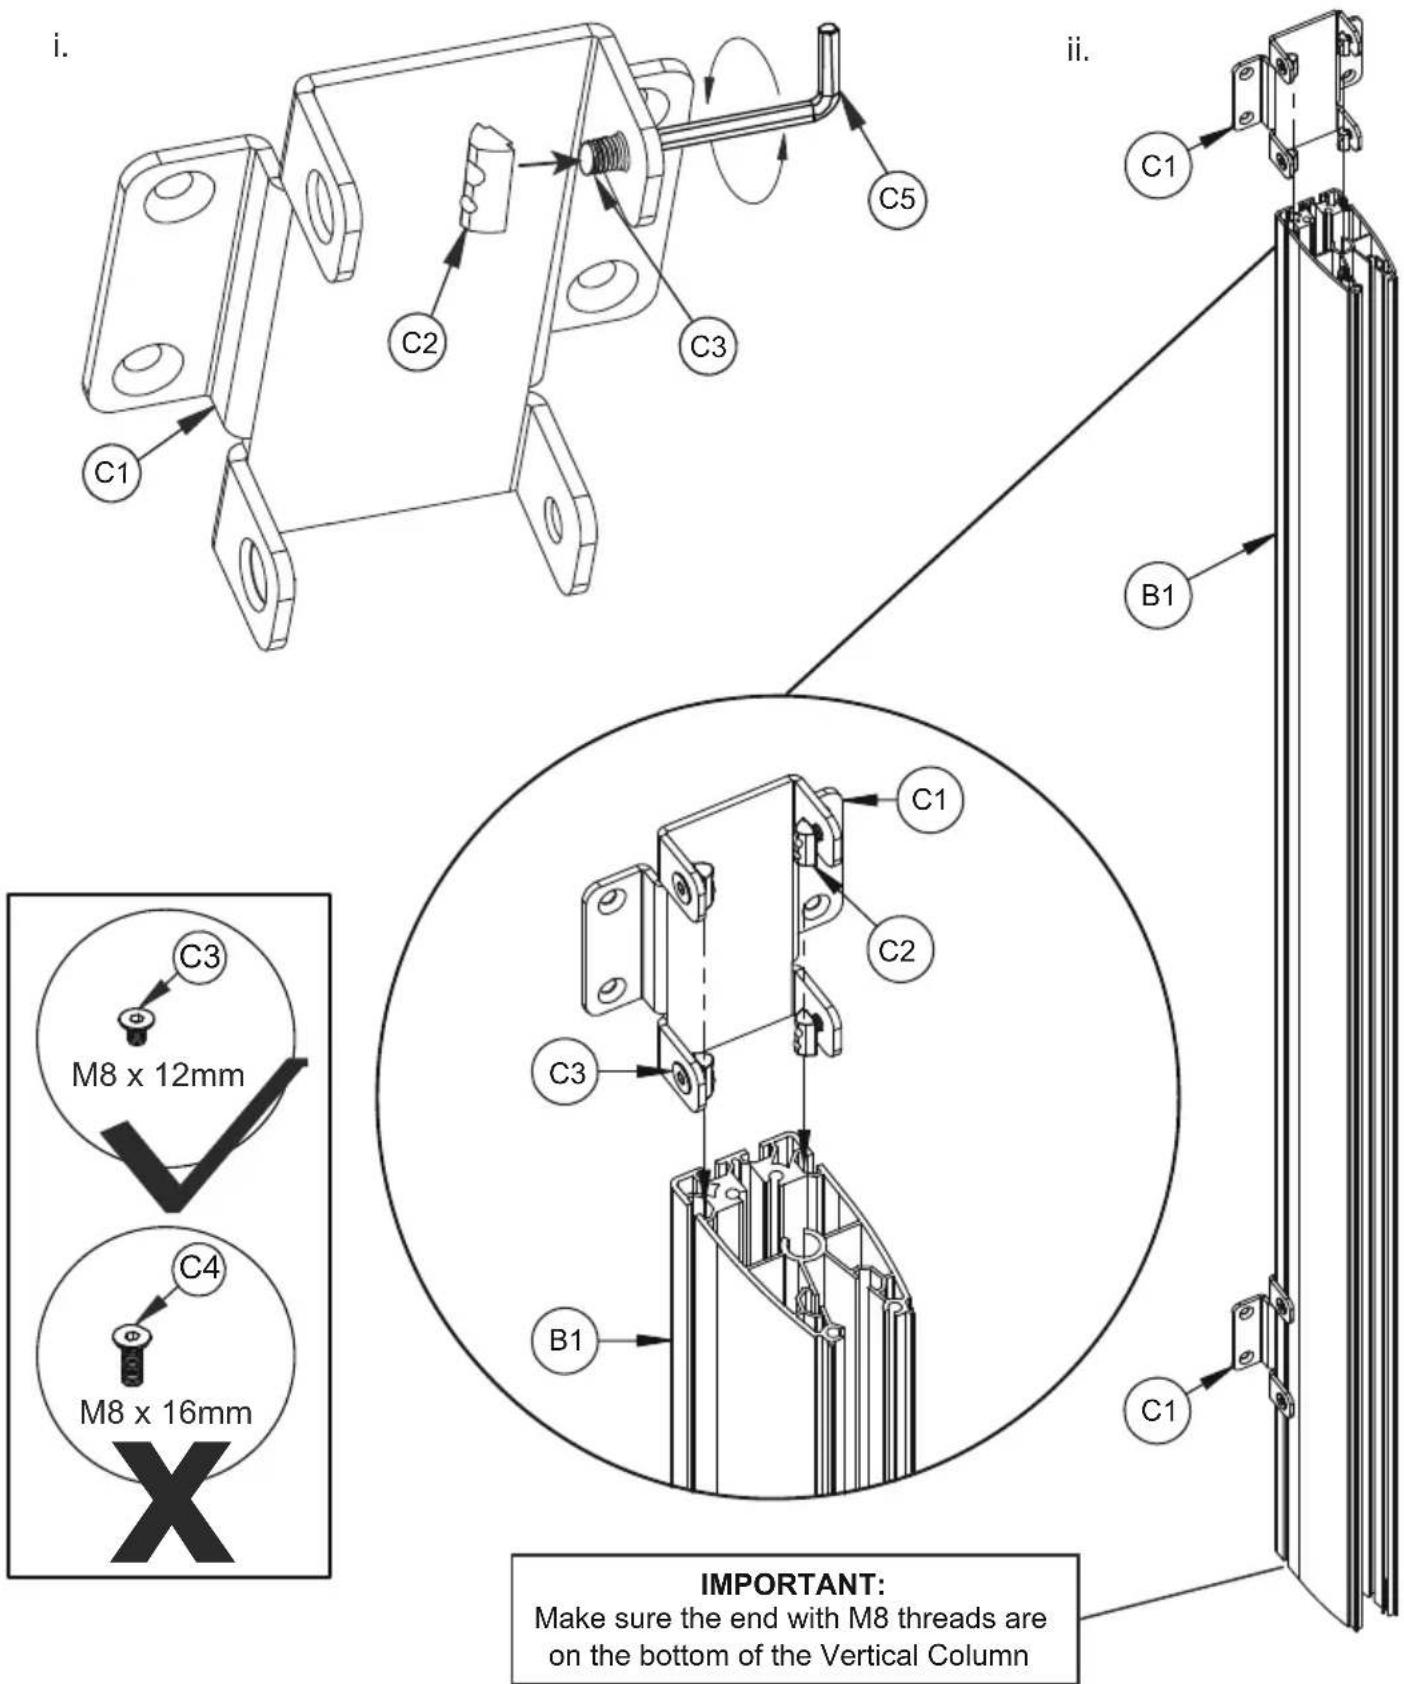
iii. Use the installation drawing to set the distance for each of the items C1 on item B1. Once set, tighten all items C3 on C1 with C5.
ThreadedNon-Threaded
2
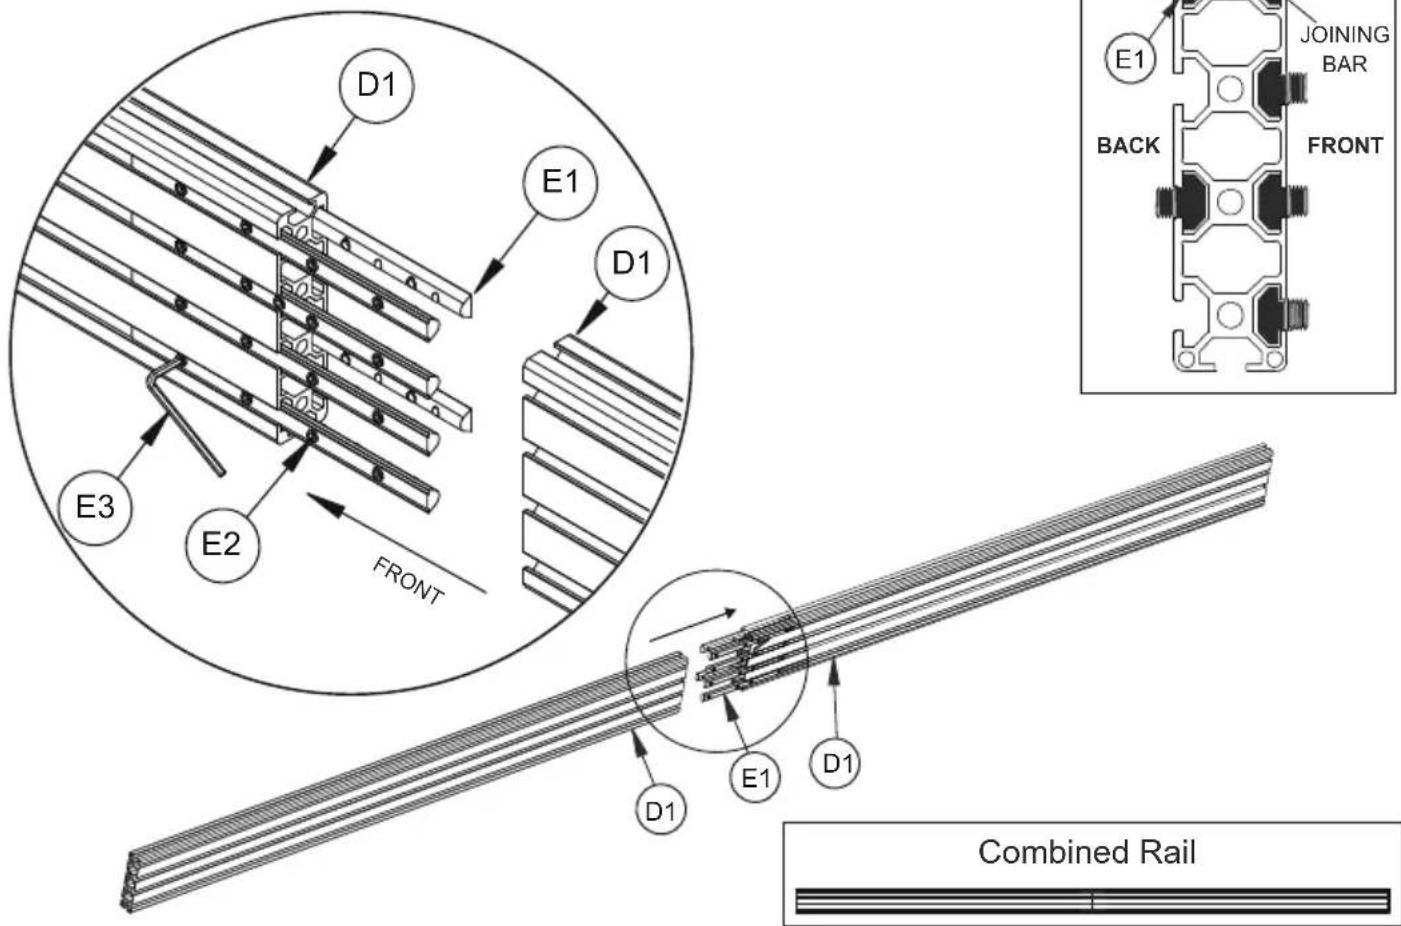
Combine 2 Mounting Rails
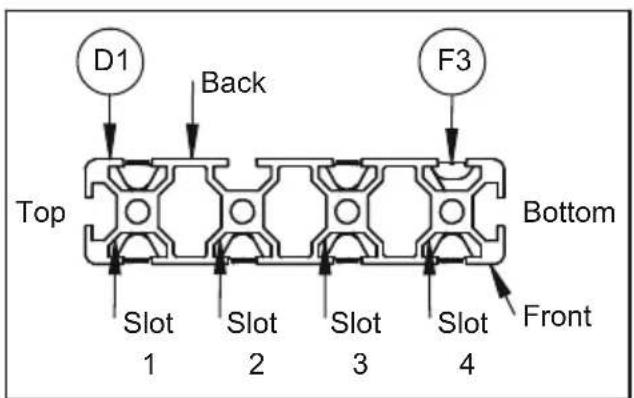
i. On the front side of item D1, insert 4 x item E1 half-way into each slot, on the back side insert 1 x item E1 into the top slot and 1 x item E1 into the third slot. Loosley fasten item E2 on each joining bar fixing it to the mounting rail.
ii. Slide together items D1 onto item E1 and tighten all items E2, combining the two rails securely.
Repeat this procedure for the other rails.
Note: 1 rail will be used as a bottom row ledger.
3
Assembly Rails to Columns
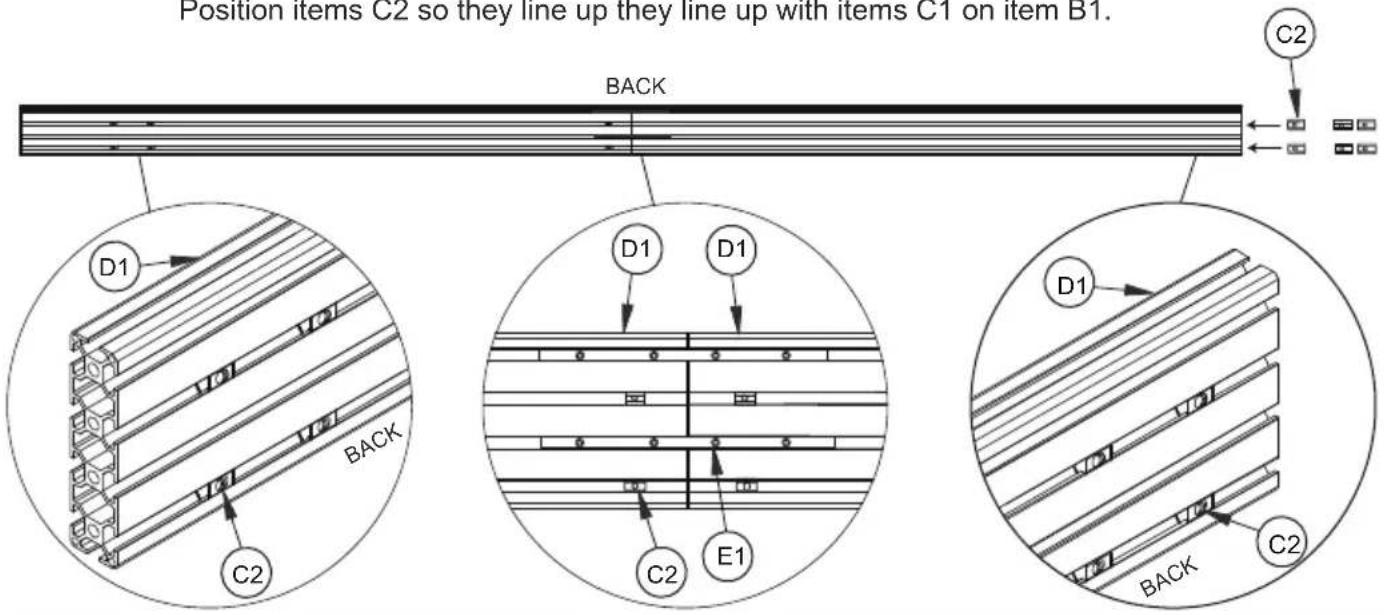
i. Insert 6 x item C2 into the bottom back slots of two of the combined rails. 6 in the bottom slot and 6 in the second from top slot.
Position items C2 so they line up they line up with items C1 on item B1.
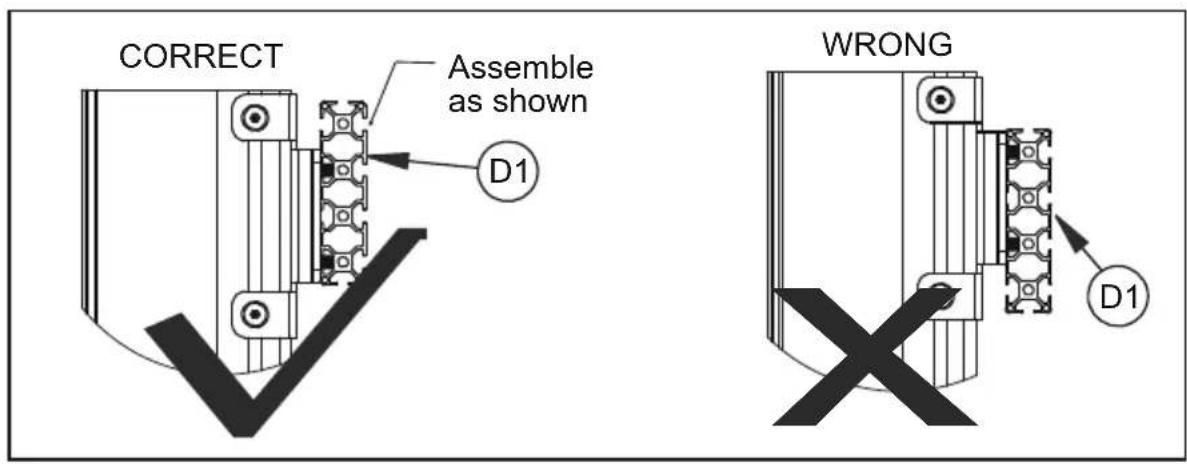
ii. Place 2 x items D1 on the floor. and position 3 x C1 onto items D1 using the installation drawing.
Attach items C1 to items D1 by fastening items C3 to items C2.
4
Assemble Bases to Columns
ii. On the floor, attach item A1 to item B1 using items A2, A3 and A4. Once bases are fixed, return stand to upright position.
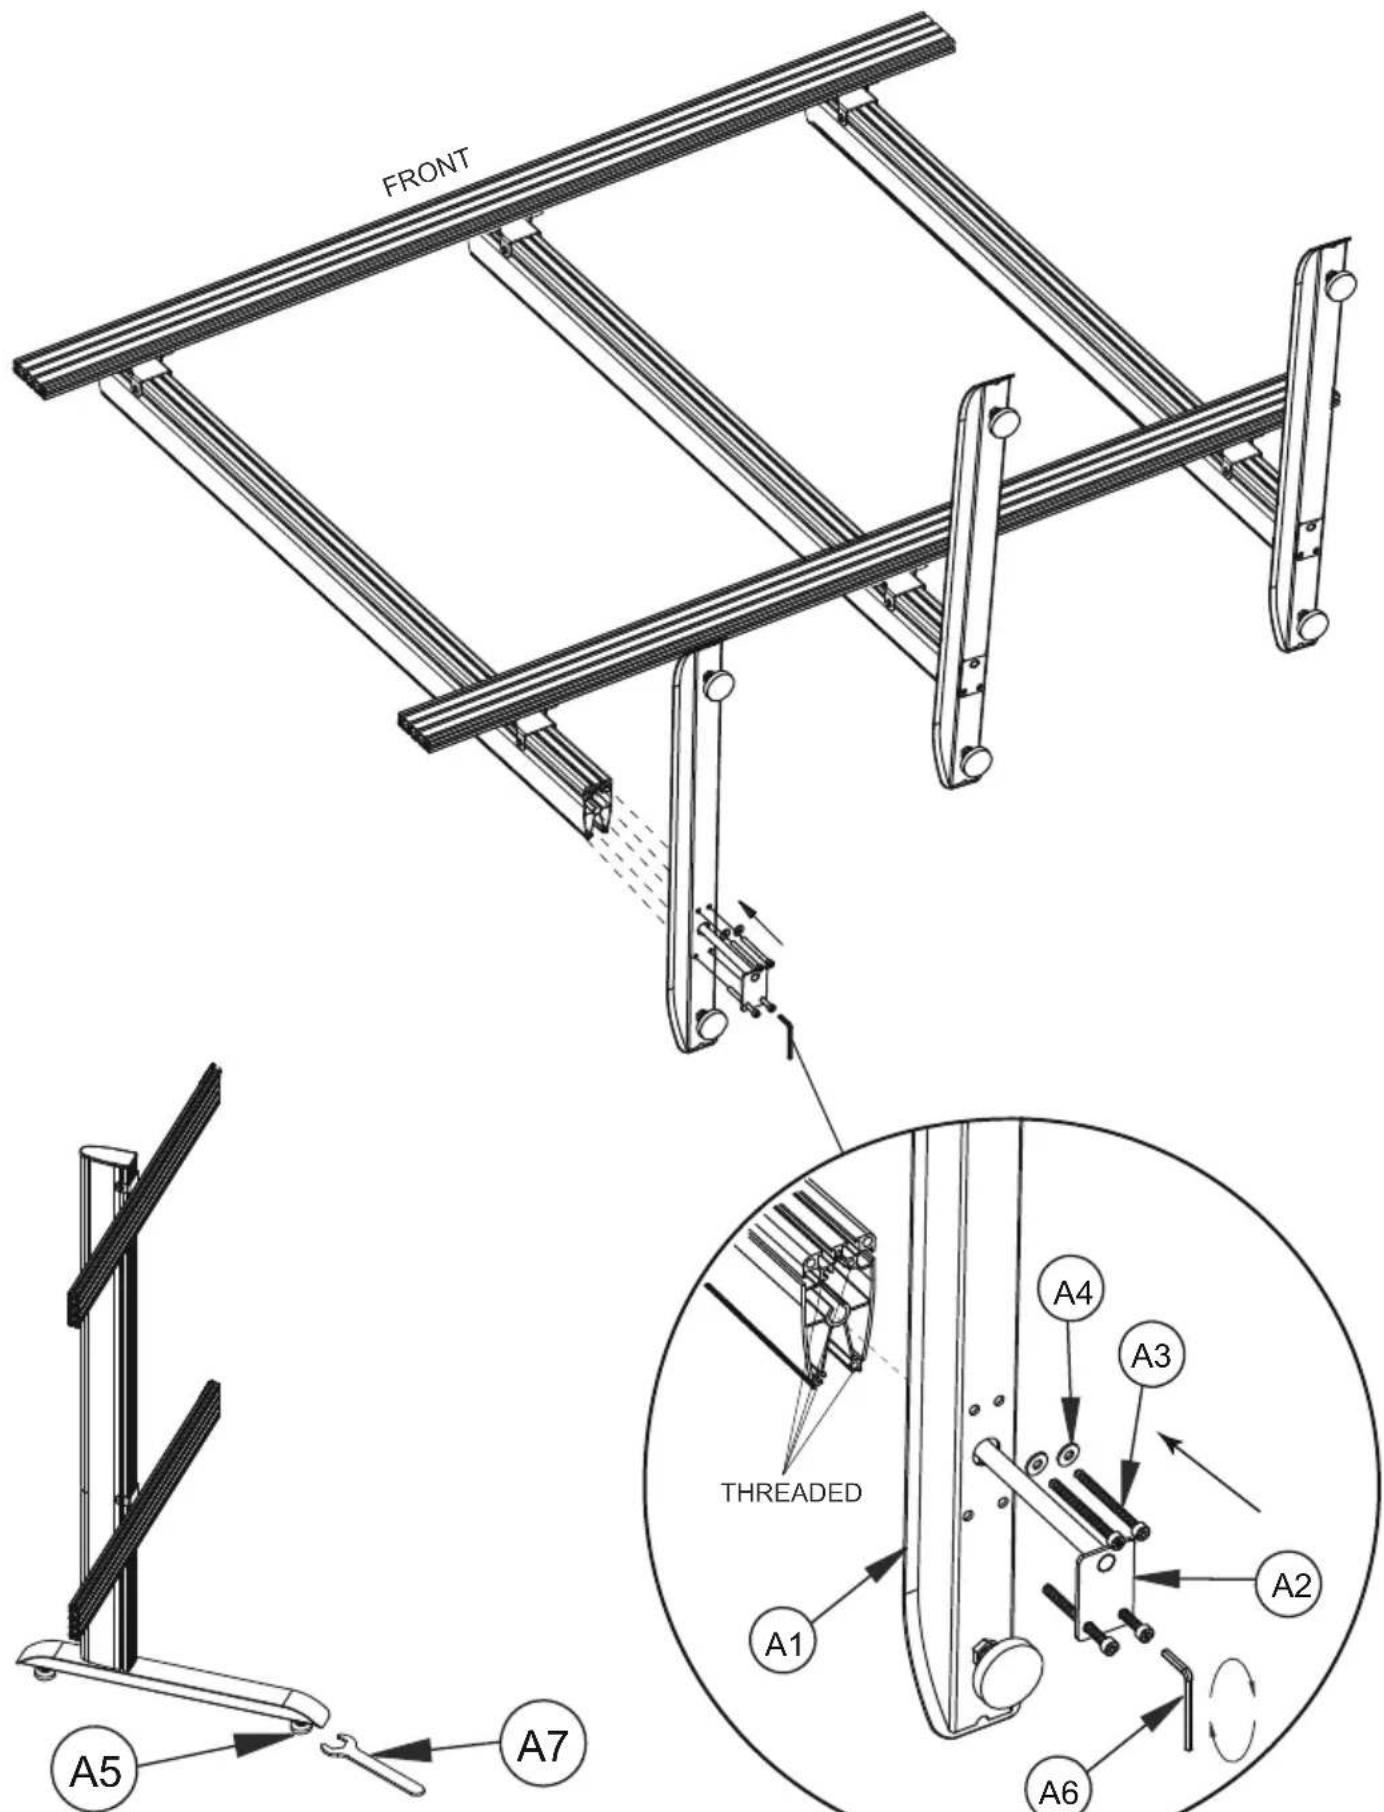
NOTE: If necessary use item A7 to adjust item A5.
6
Attach Bottom Row Ledger to Interface Arms
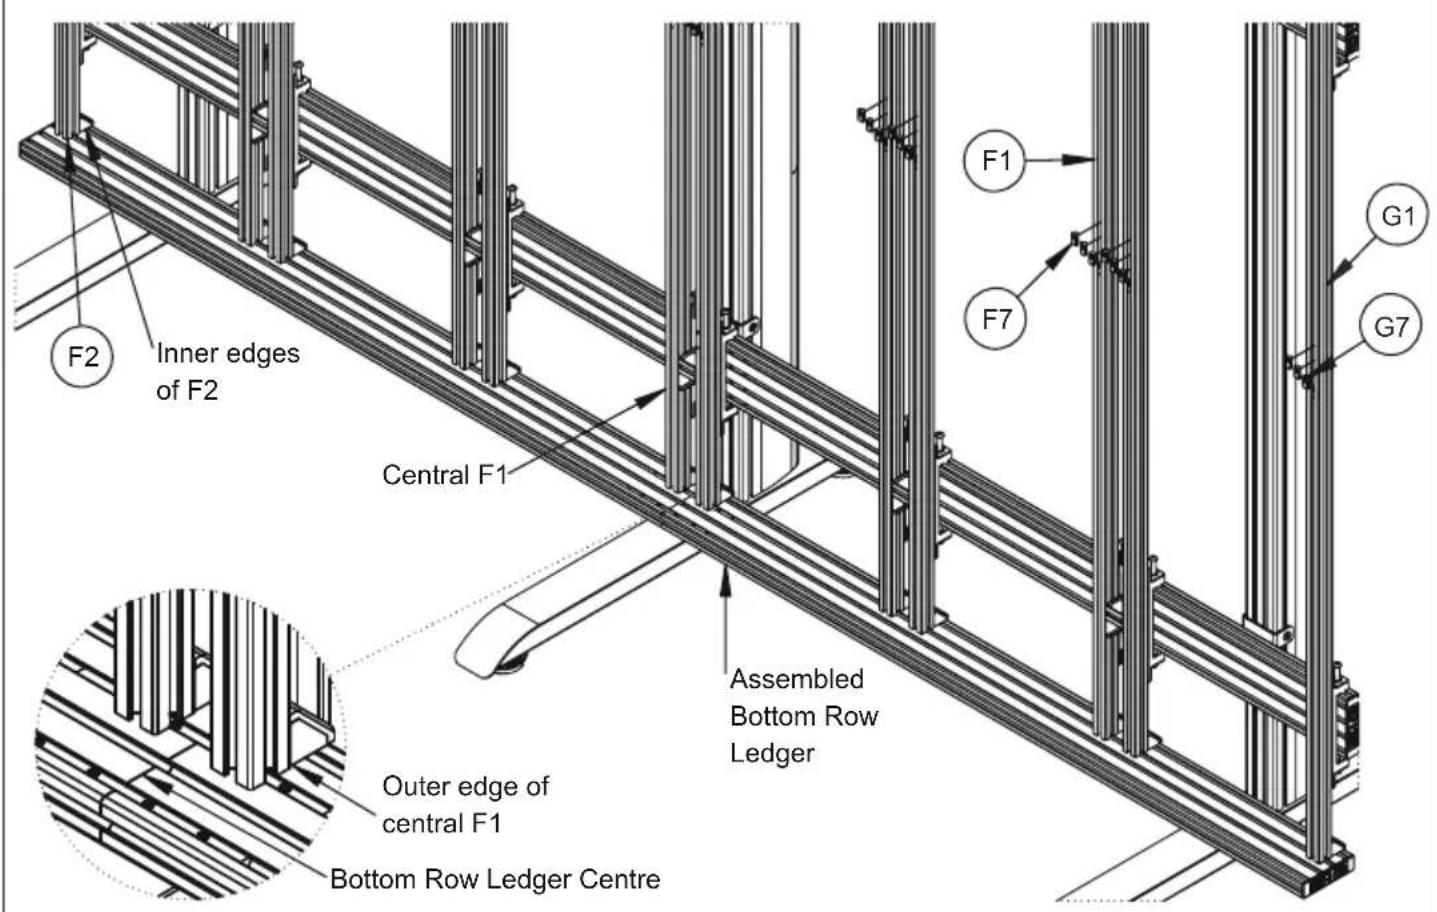
i. Insert items F3 into the fourth slot of the combined items D1 (Bottom Row Ledger) as close as possible to where the outer edges of items F1 and inner edges of items F2 will be. ii. Use the installation drawing to position and semi-fix in place items F1 and G1 onto items D1.
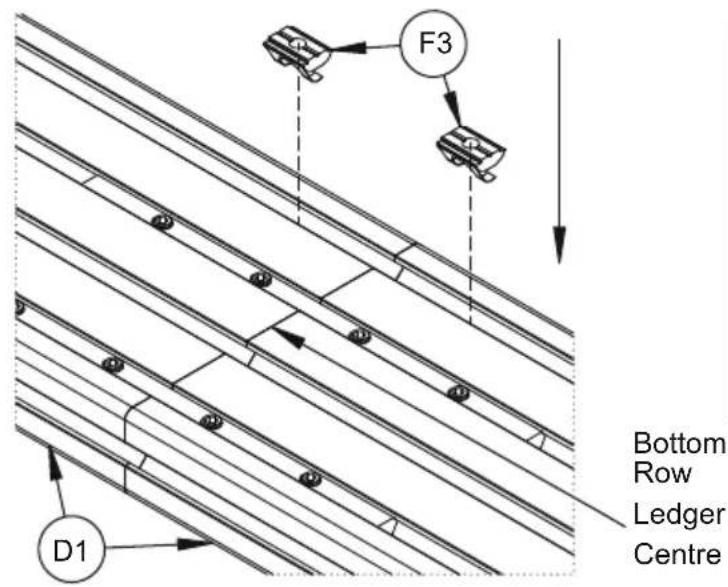
iii. Position the Bottom Row Ledger centre, in-line with the central item F1.
Fasten items F2 through the corner bracket into item F3 using item F5.
Use the installation drawing to measure where the Bottom Row Ledger and items F1, G1 and D1 must be fixed together to create a horizontal surface.
Note: 2 persons maybe be required during installation.
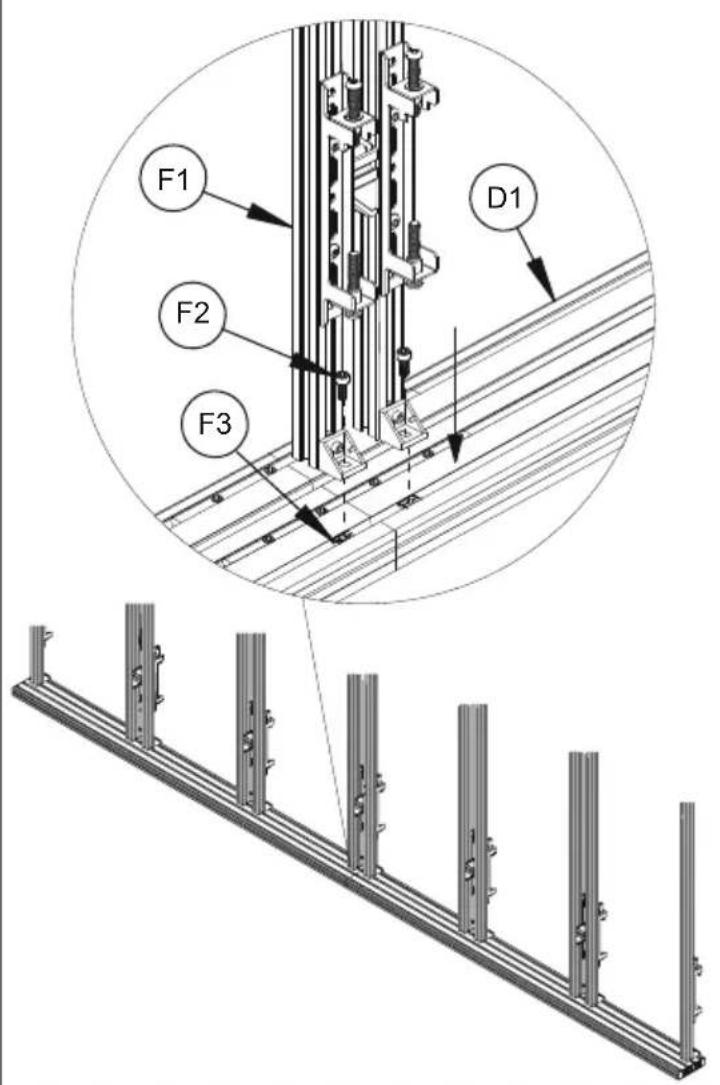
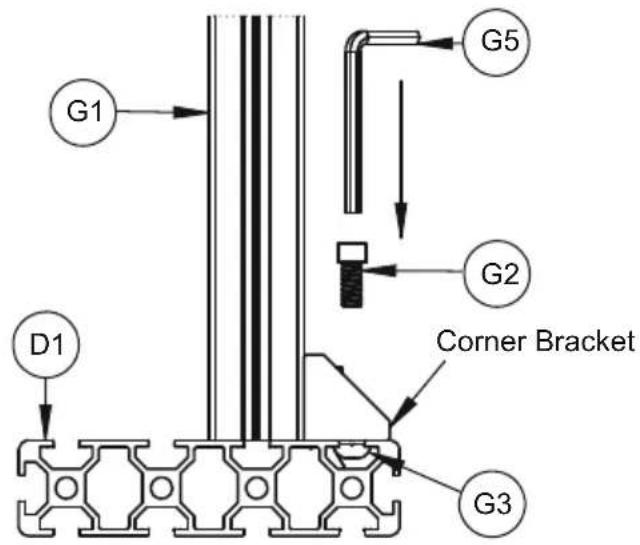
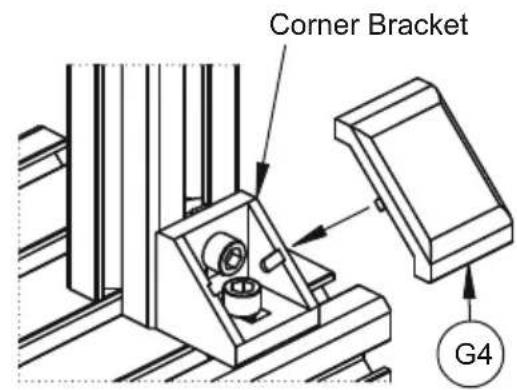
iv. Once satisfield that the Bottom Row Ledger is perfectly horizontal and fixed in position, push fit items F4/G4 onto each corner bracket.
7
Hook the Interface Arms onto the Stand
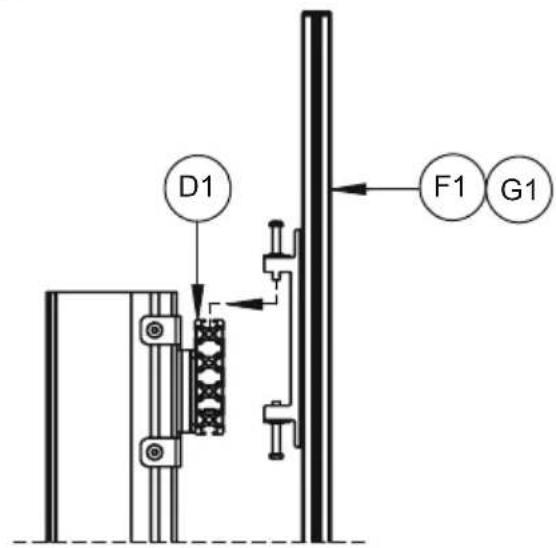
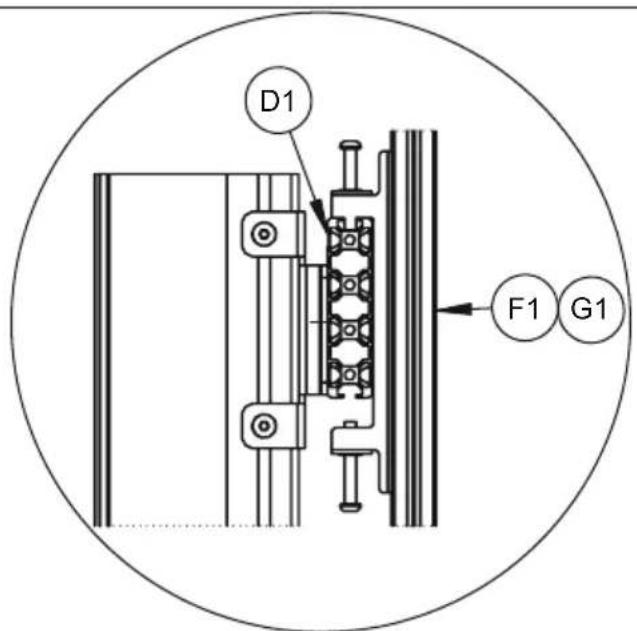
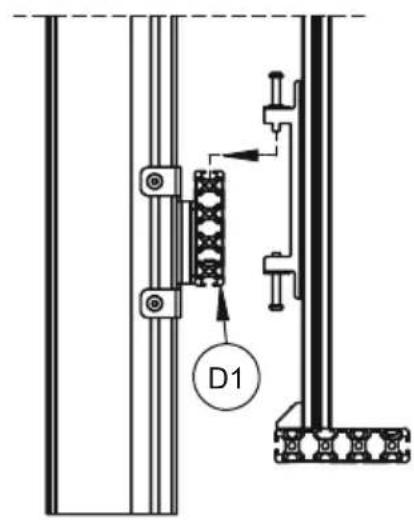
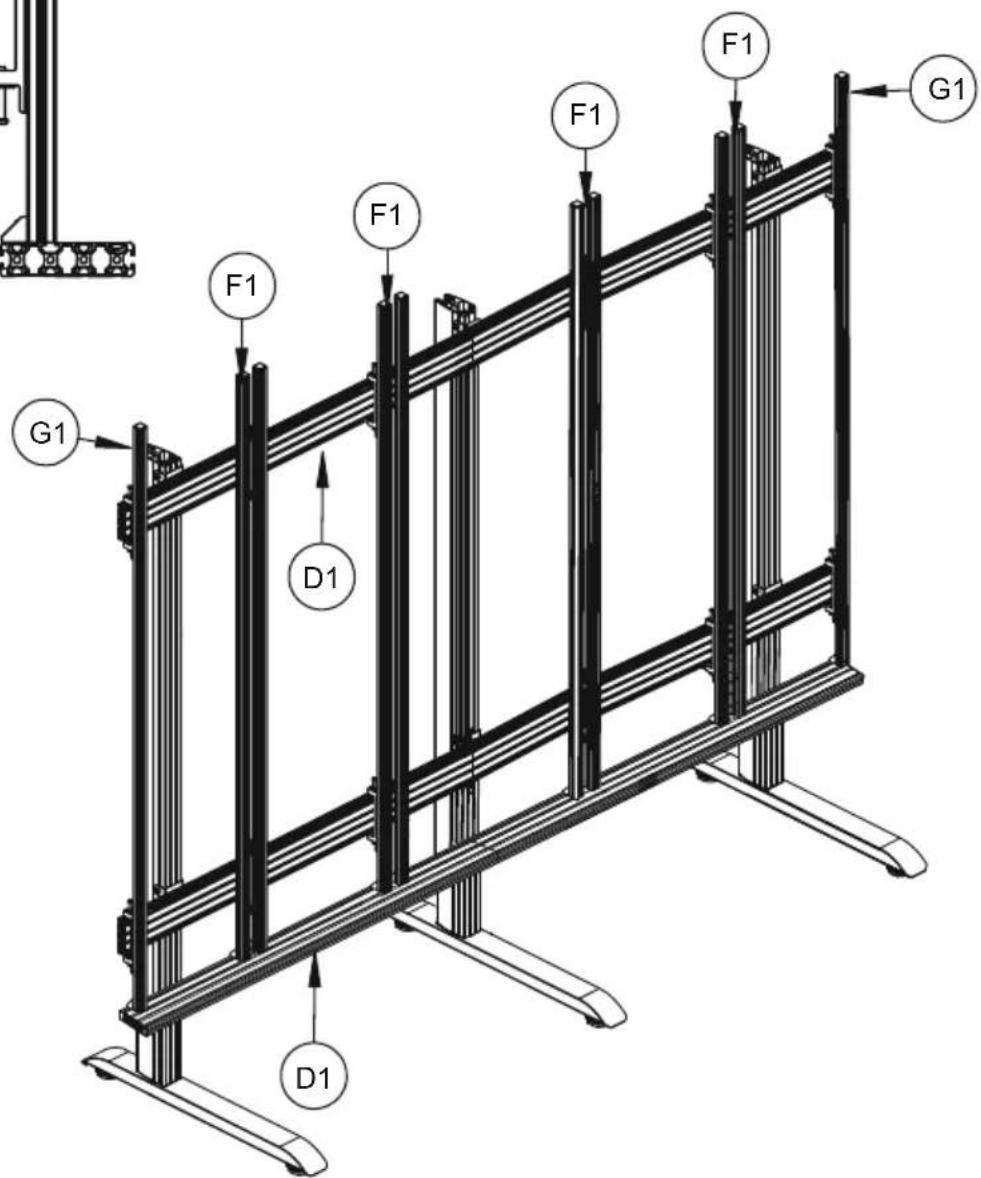
Ensure items F1/G1 are hooked onto items D1 correctly.
8
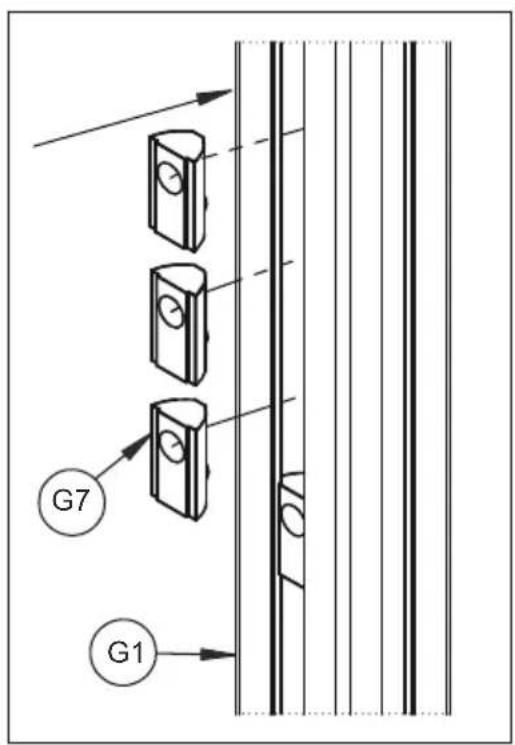
Insert M8 Sliding Nuts into Interface Arms
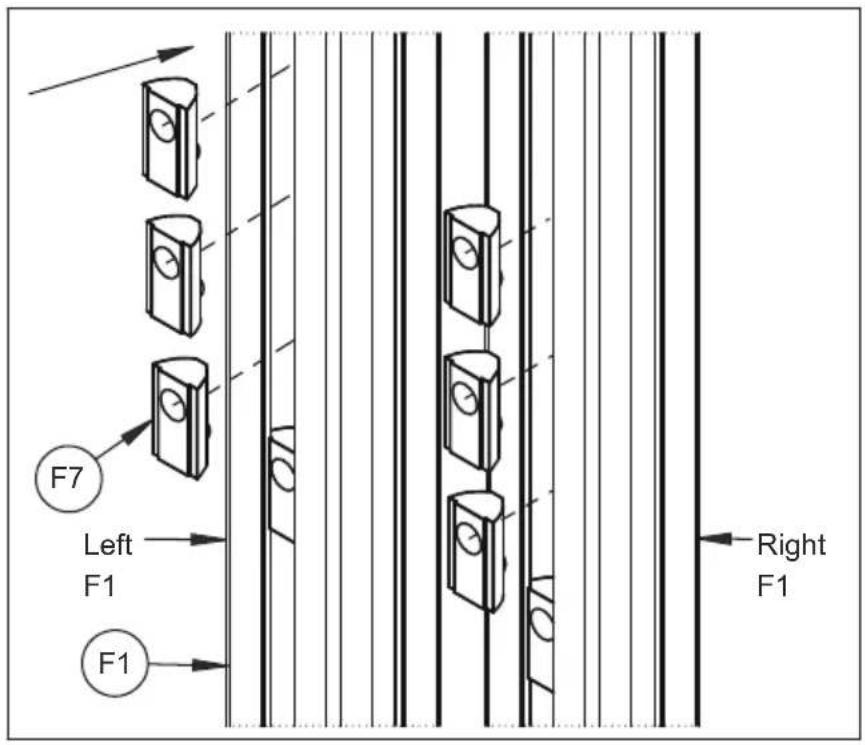
i. Insert item F7 into the left and right front centres of item F1.
ii. Insert item G7 into the front centre of both items G1.
9
Position Sliding Nuts To Mount LED Cabinets
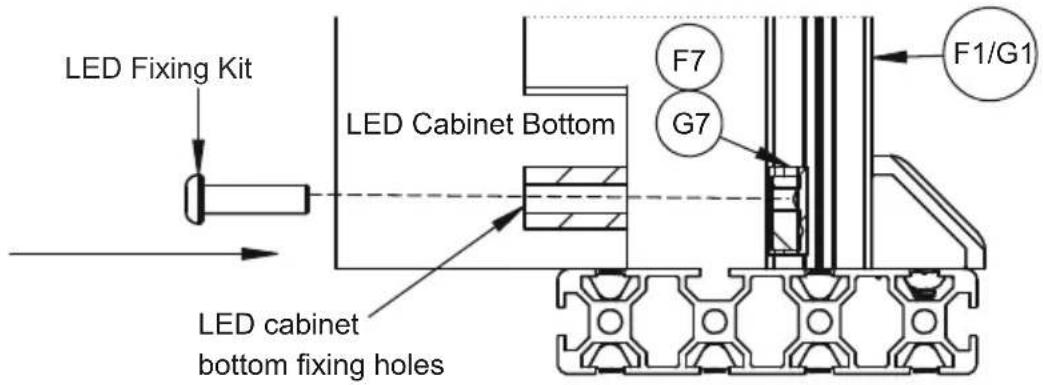
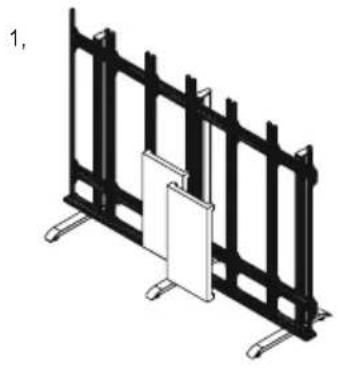
i. Place the correct sequence LED cabinet centrally onto the bottom row ledger.
ii. Slide down 2 of items F7/G7 until the threads are as parallel as possible to the LED cabinet bottom fixing holes.
iii. Loosley secure the LED cabinet into position using the fixing kit provided.
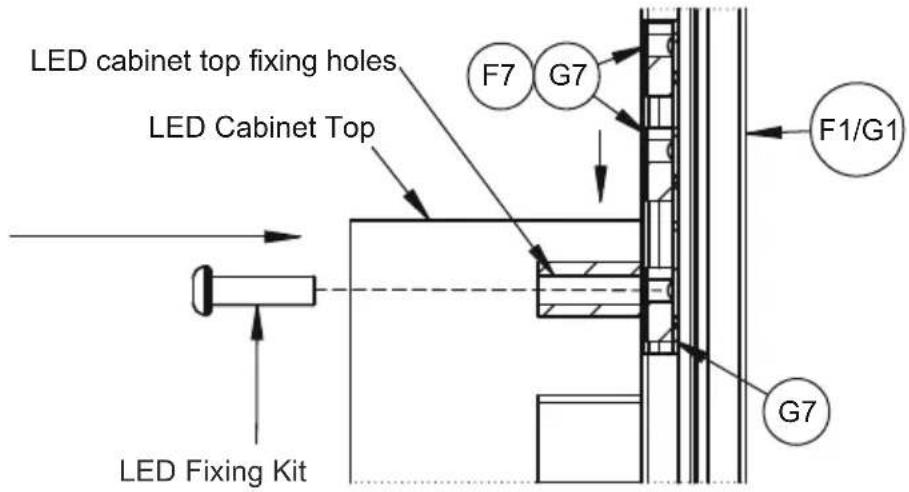
iv. Slide down the next 2 items G7 until the threads are as parallel as possible to the LED cabinet top fixing holes.
v. Semi-tighten the four fixings to secure the LED cabinet into position.
vi. Repeat the above steps to mount each LED cabinet until the desired width is achieved, then tighten all the fixing kit screws.
vii. Repeat the previous steps to mount the next row of LED cabinets, until the desired height is achieved.
natural_image
Diagram of a black metal fence structure with a white panel, mounted on support poles (no text or symbols)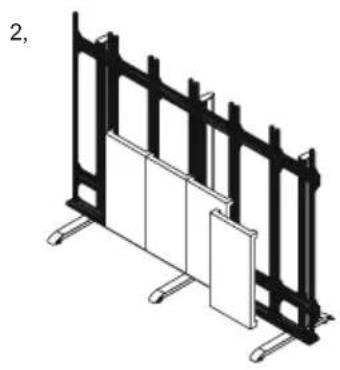
natural_image
Isometric diagram of a modular lattice structure with vertical panels and horizontal supports (no text or symbols)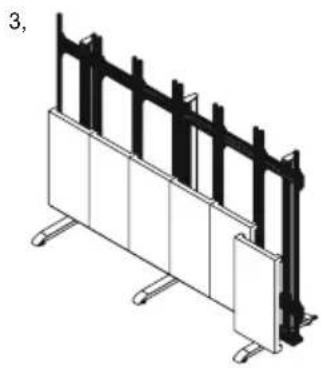
natural_image
Isometric diagram of a structural frame with vertical supports and a central panel (no text or symbols)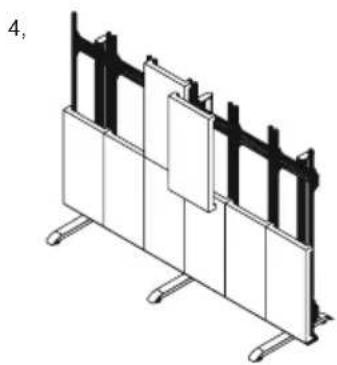
natural_image
Isometric line drawing of a modular storage or rack structure with vertical panels and mounting feet (no text or symbols)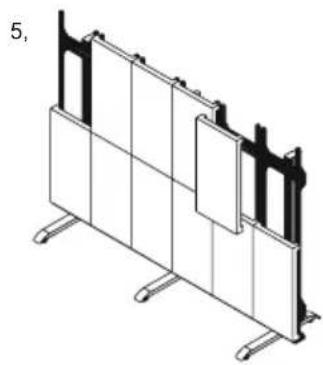
natural_image
Isometric line drawing of a modular storage or rack structure with vertical panels and mounting feet (no text or symbols)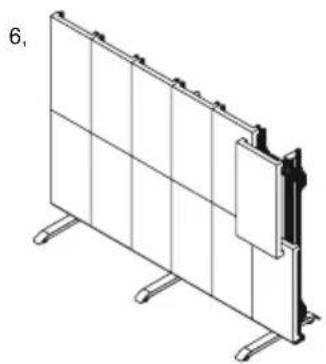
natural_image
Isometric line drawing of a modular panel or enclosure structure with no text or symbols9
Add End Caps & Cable Management Covers
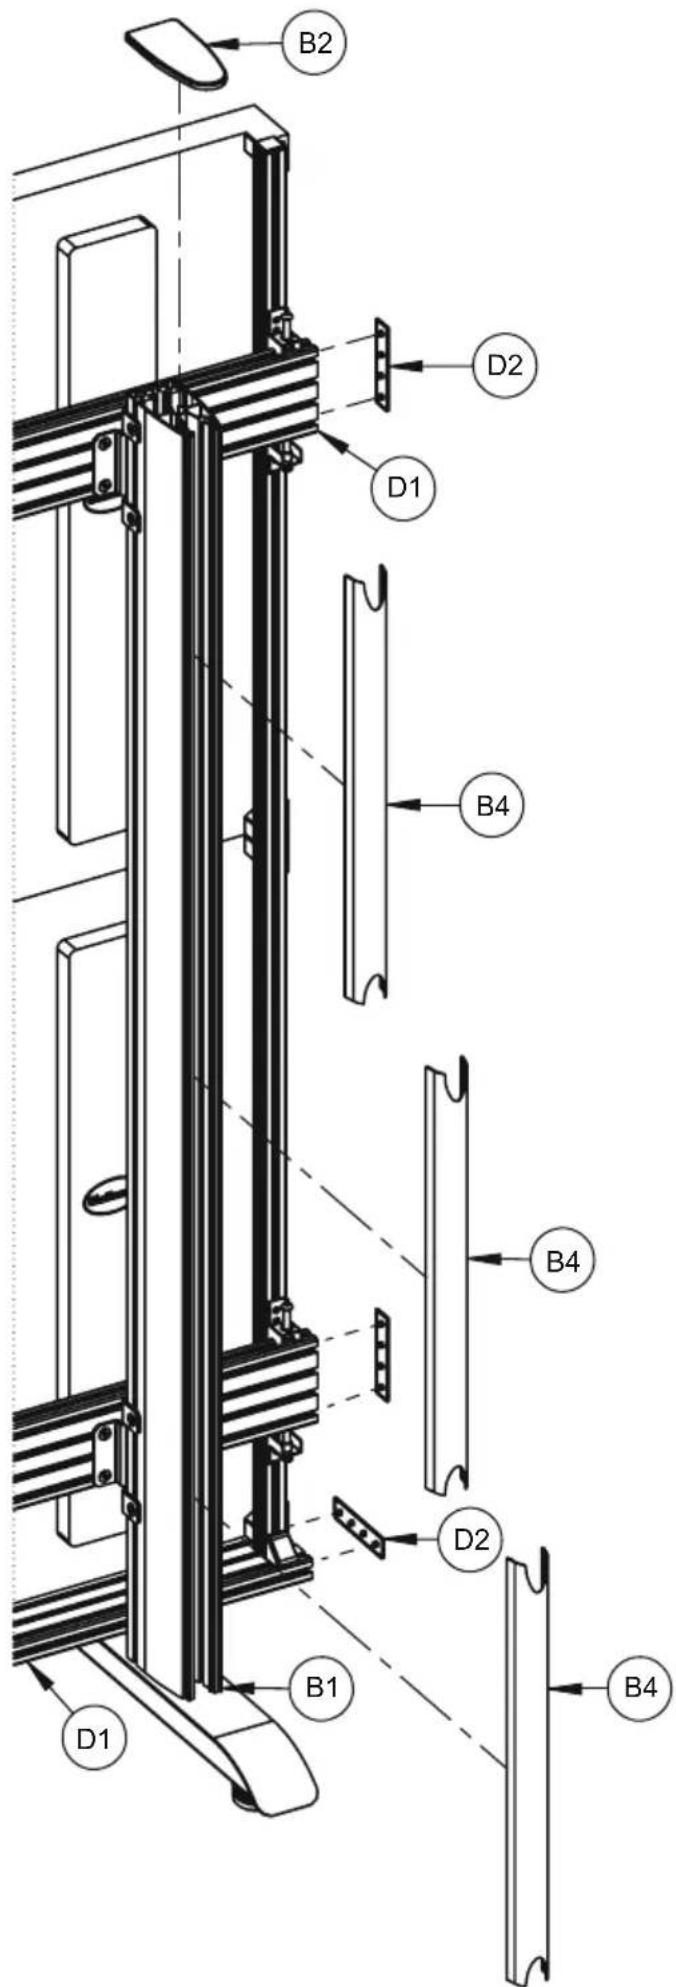
i. Once all the LED power and data cables are connected and if possible routed down the backs of items B1, partially clip on items B4, this allows easy removal if more cables need adding. Once satisfied all cables are fitted, clip items B4 on fully.
ii. Fit items D2 to items D1.
Fit items B2 to items B1.
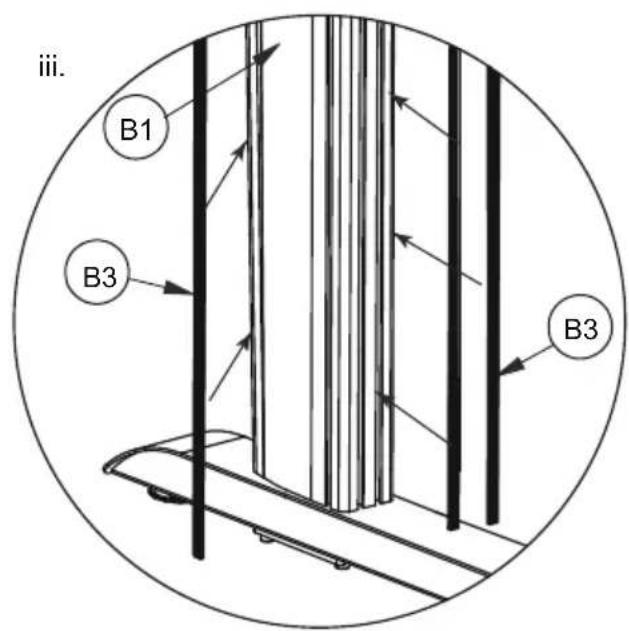
iii. With a knife, cut to length items B3 and slot into the front and sides of item B1.
www.btechavmounts.com
B-TECH AV MOUNTS
HEAD OFFICE
B-Tech International Limited
Bennett House, Long March, Daventry, Northants., NN11 4NR, UK
Email: info@btechavmounts.com
©2018 B-Tech International Design and Manufacturing Limited. All rights reserved.
B-Tech AV Mounts is a division of B-Tech International Design & Manufacturing Ltd.
B-Tech, Better By Design & System X are registered trademarks of B-Tech International Design & Manufacturing Ltd.
All other brands and product names are trademarks of their respective owners.
Photographs are for illustrative purposes only. E&OE.
- FEATURES
- CONTENTS
- INSTALLATION TOOLS REQUIRED
- INSTALLATION SAFETY INSTRUCTIONS
- CAUTION: This stand / trolley is intended for
- use only with the maximum weights indicated. Use with flat screens heavier than the maximum indicated may result in instability causing possible injury.
- General
- Product location
- Fixing hardware
- Hazard limitation
- CS
- INSTALLATION INSTRUCTIONS
- Attach Joining Plate to Column
- 2
- Combine 2 Mounting Rails
- 3
- Assembly Rails to Columns
- 4
- Assemble Bases to Columns
- 6
- Attach Bottom Row Ledger to Interface Arms
- 8
- Insert M8 Sliding Nuts into Interface Arms
- 9
- Position Sliding Nuts To Mount LED Cabinets
- Add End Caps & Cable Management Covers
- www.btechavmounts.com
- B-TECH AV MOUNTS
- HEAD OFFICE
- B-Tech International Limited
Brand : B-Tech
Model : BT9370
Category : TV Stand