
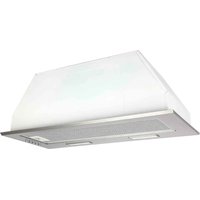
CK75UCF - Range hood Emilia - Free user manual and instructions
Find the device manual for free CK75UCF Emilia in PDF.


| Product Type | Range Hood |
| Brand | Emilia |
| Model | CK75UCF |
| Width | 75 cm |
| Depth | 50 cm |
| Height | 60 cm (adjustable) |
| Weight | 15 kg |
| Power Supply | 220-240 V, 50 Hz |
| Motor Power | 200 W |
| Number of Speeds | 3 |
| Max Extraction Rate | 650 m³/h |
| Noise Level (Max) | 65 dB(A) |
| Control Type | Electronic push buttons |
| Lighting | 2 x 3 W LED |
| Filter Type | Metal grease filter (aluminum) |
| Duct Outlet Diameter | 150 mm |
| Energy Class | A+ |
| Cleaning | Wipe with damp cloth; filter washable in dishwasher |
| Safety Features | Overheat protection, auto shut-off |
| Spare Parts | Filters and bulbs available from retailer |
| Installation Type | Wall-mounted or recirculation |
| Certifications | CE, RoHS |
Frequently Asked Questions - CK75UCF Emilia
User questions about CK75UCF Emilia
0 question about this device. Answer the ones you know or ask your own.
Ask a new question about this device
Download the instructions for your Range hood in PDF format for free! Find your manual CK75UCF - Emilia and take your electronic device back in hand. On this page are published all the documents necessary for the use of your device. CK75UCF by Emilia.
USER MANUAL CK75UCF Emilia
INSTRUCTION MANUAL AND
INSTALLATION GUIDE
Please read this guide before installing and using the hood
MODEL
DESCRIPTION
CK53UCF UNDERCUPBOARD RANGEHOOD
CK75UCF UNDERCUPBOARD RANGEHOOD
Glem Gas Australasia Pty Ltd
48 Percy Street Auburn NSW 2144
Tel 1 300 307 917
Dear Customer,
If you follow the recommendations contained in this Instruction Manual, our appliance will give you constant high performance and will remain efficient for many years to come.
RECOMMENDATIONS AND SUGGESTIONS CHARACTERISTICS INSTALLATION & USE MAINTENANCE TROUBLE SHOOTING
Product Specification & Technical Parameters
| Model CK53UCF/CK75UCF | |
| Rated Voltage 230V | |
| Rated Power Frequency | 50Hz |
| Light Power | 2x2W (LED) |
| Motor Power | 230W |
| Total Power | 234W |
| Motor 1 | |
| Diameter of Outlet Adapter | 150mm |
| Dimension (mm) | W520/750 x D286x H250 |
INSTALLATION and USE
- The manufacturer will not be held liable for any damages resulting from incorrect or improper installation.
- Please read this instruction manual before installing and using this rangehood. Please keep this instruction manual in a safe place for future reference.
- Only a qualified and trained service technician can undertake thework of installation and servicing.
- Check that the main voltage corresponds to the one indicated on the rating plate fixed inside the hood.
- Do not connect the hood to exhaust ducts carrying combustion fumes (boilers, fireplaces, etc.)
- If the hood is used in conjunction with non-electrical appliances (e.g. gas burning appliances), a sufficient degree of ventilation must be guaranteed in the room in order to prevent the backflow of exhaust gas. The kitchen must have an opening directly with the open air in order to guarantee the entry of clean air.
- The minimum distance is 750mm from the cooker hood to a gas hob, and is 650mm to an electric hob. If the installation instructions for gas hobs specify a greater distance, this must be taken into account.
NOTICE: Two or more people are required to install or move this appliance. Failure to do so can cause physical injuries.
USE
- The rangehood has been designed only for domestic use to eliminate kitchen fumes.
- Never use the hood for purposes other than what it has been designed for. Never leave high naked flames under the hood when it is in operation.
- Adjust the flame intensity to direct it onto the bottom of the pan only; making sure that it does not engulf the pan sides.
- Deep fryer fat must be continuously monitored during use: overheated oil can burst into flame.
- The hood should not be used by children or person not instructed in its correct use.
MAINTENANCE
- Proper maintenance of the rangehood will assure proper performance of the unit.
- Disconnect the hood from the main supply before carrying out any maintenance work.
- Clean and/or replace aluminum grease filters and activated charcoal filters after specified period of time.
- Clean the hood using a damp cloth and a neutral liquid detergent.
- DISPOSAL: Do not dispose this product as unsorted municipal waste. Collection of such waste separately for special treatment is necessary.
WARNING!!
In certain circumstances electrical appliances may be a danger hazard.
- Do not check the status of the filters while the rangehood is operating.
- Do not touch the light bulbs after appliance use.
- Do not disconnect the appliance with wet hands.
- Avoid free flame, as it is damaging for the filters and a fire hazard.
• Constantly check food frying. Overheated oil may become a fire hazard. - Disconnect the electrical plug prior to any maintenance.
- Children don't recognize the risks of electrical appliances. Therefore use or keep the appliance only under supervision of adults and out of the reach from children.
- Don't use this product outdoors.
- This appliance is not intended for use by persons (including children) with reduced physical, sensory or mental capabilities, or lack of experience and knowledge, unless they have been given supervision or instruction, concerning use of the appliance by a person responsible for their safety. Children should be supervised to ensure that they do not play with the appliance.
- There should be adequate ventilation of the room where the range hood is used at the same time as appliances burning gas or other fuels. * There is a fire risk if cleaning is not carried out in accordance with instructions.
- Do not flambé under the rangehood.
- The exhaust air must not be discharged into a flue which is used for exhausting fumes from appliances burning gas or other fuels.
DIMENSIONS

INSTALLATION & USE
Note 1: On stainless steel hoods, carefully remove the plastic protective film from all exterior surfaces of the hood prior to final installation.
Note 2: At least two people will be required to mount the hood.
DESCRIPTION / CONNECTIONS
The hood is only installed in the Ducting version. The hood draws cooking fumes saturated with fumes and odour through the grease filters and expels it to the outside through an outlet pipe.
Caution: To reduce the risk of fire, use of metal ductwork is preferred. Do not use flammable material to convey exhaust air.

- Decide where the ductwork will run between the hood and the outside.
- A straight, short duct run will allow the hood to perform most efficiently.
- Long duct runs, elbows, and transitions will reduce the performance of the hood. Use as few of them as possible. Larger ducting may be required for best performance with longer duct runs.
- It is recommended that 150mm round duct is to be used, however a reducer from 150mm to 120mm can be ordered supp 120mm be required.
- The air must not be discharged into a flue that is used for exhausting fumes from appliances burning gas or other fuels. Regulations concerning the discharge of air have to be followed. Check with the local authority and building code for exhaust ducting requirements.
- Install a roof/wall cap. Connect round ductwork to cap and work back towards hood location.
Electrical Connection
Electrical wiring must be done by a qualified person(s) in accordance with all applicable codes and standards. Turn off electrical power at service entrance before wiring.
If the supply cord is damaged, it must be replaced by the manufacturer, its service agent or similarly qualified persons in order to avoid a hazard. * Do not use the plug and an extension cord other than the ones initially supplied with the hood.
INSTALLATION
Before beginning installation, to better handle the hood, we advise removing the face plate.
- Attach the air outlet adapter over the hood. Tighten it with 4 screws.
- The range hood is designed to operate with 150mm exhaust Ducting.
DUCTING VERSION INSTALLATION:
Before fixing, the outlet exhaust duct for air evacuation to the outside must be installed. Use an outlet exhaust duct with: - minimum indispensable length; - Minimum possible bends (maximum angle of bend: 90°); - certified material (according to local, building and fire regulations); and as smooth as possible inside. It is also advisable to avoid any drastic changes in duct cross-section
(recommended diameter: 150mm).

natural_image
Technical line drawing of a mechanical component with a cylindrical shaft and base, showing internal structure (no text or symbols)Fitting under wall unit
-
Before fixing the hood to the unit, drill a hole of 165mm diameter for 150mm exhaust Ducting or 135mm for 120mm exhaust Ducting in the wall unit.
-
In any case, check the position of the power outlet and consider where the power cable will run, since a hole might have to be made in the wall unit to accommodate it.
-
Unscrew the 2 visible screws located on hood of both the side-ends and remove the face plate. The 8 mounting holes around the unit are then accessible.
-
Lift the rangehood and fit through the opening of the cabinet. Secure unit by using 8 long mounting screws. Fit the face plate on the hood by screwing 2 screws.
-
Make the electrical connection.

natural_image
Technical line drawing of a mechanical assembly with multiple views and mounting brackets (no text or symbols)Installation is now complete.
OPERATION
This hood may be operated using the push button on the face plate.
The light switch turns the lamps on and off.
The fan switch turns the fan on to three speed settings:
0 - OFF
1 - LOW SPEED
2 - MEDIUM SPEED
3 - HIGH SPEED

MAINTENANCE
GREASE FILTER
* The grease filters should be cleaned frequently (every two months of operation, or more frequently for heavy use). Use a warm detergent solution.
* Grease filters are washable.
- push in on the metal latch tab. This will disengage the filter from the hood. Tilt the filter downward and remove.
- Wash the filters, taking care not to bend them. Allow them to be dry before refitting.
- To install the grease filter, align rear filter tabs with slots in the hood. Push in the metal latch tab, push filter into position and release. Make sure the filter is securely engaged after assembly.

natural_image
Line drawing of a device casing with internal components and directional arrows (no text or symbols)CHARCOAL FILTER(optional)
This filter is not washable, cannot be regenerated, and should be replaced approximately every 3 months of operation, or more frequently in the case of heavy usage.
- To install the charcoal filter, lock it until the stop click is heard.
- Install the face plate after charcoal filter is installed.
- To remove the charcoal filters, remove the charcoal filter by turning anti-clockwise.
LAMPS
This rangehood may require two LED lamps (AC 230V, 2W Max)
WARNING: Always switch off the electrical supply before carrying out any operation on the appliance.

To change lights:
-
Push the LED lights from inside to outside. The lights will come out.
-
Undo the light wire terminal, and replace with LED lights of same kind.

natural_image
Line drawing of a microwave oven with internal components and base compartments (no text or symbols)CAUTION:
-
THE SURFACE, THE LIGHT COVER MAY BE HOT. TAKE CARE WHEN REPLACING LED LAMPS.
-
THE LED LAMPS MAY BE HOT. TAKE CARE WHEN REPLACING LED LAMPS.
We recommend only using lamps of the same specification as the ones being replaced.
HOOD CLEANING
Stainless steel is one of the easiest materials to keep clean. Occasional care will help preserve its fine appearance.
Cleaning tips:
* Hot water with soap or detergent is all that is usually needed.
* Follow all cleaning by rinsing with clear water. Wipe dry with a clean, soft cloth to avoid water marks.
* For discolorations or deposits that persist, use a non-scratching household cleanser or stainless steel polishing powder with a little water and a soft cloth.
* For stubborn cases use a plastic scouring pad or soft bristle brush together with cleanser and water. Rub lightly in direction of polishing lines or "grain" of the stainless finish. Avoid using too much pressure that may damage the surface.
* Do not allow deposits to remain for long periods of time.
* Do not use ordinary steel wool or steel brushes. Small bits of steel may adhere to the surface causing rust.
* Do not allow salt solutions, disinfectants, bleaches, or cleaning compounds to remain in contact with stainless steel for extended periods. Many of these compounds contain chemicals that may be harmful. Rinse with water after exposure and wipe dry with a clean cloth.
* Painted surfaces should be cleaned with warm water and mild detergent only.
TROUBLE SHOOTING
The rangehood may not work or work improperly. Before calling after-sales service, switch off the appliance, unplug the power supply and refer to this guide to determine the problem.
If malfunction persist, contact our After Sales Service and specify the nature of the problem, appliance model no and serial number (on the rating plate inside the hood)
| STATUS | REASONS | SOLUTIONS |
| No Response of the lamps And themotor | 1. The plug is off fromthe power socket.2. The power cord is damaged. | 1. Ensure that the plug is put into the power socket properly.2. Replace the power cord if the power cord is damaged. |
| The fuse on the PCBboard is damaged. | Replace the fuse on the PCB board. | |
| The switch is damaged. | Repair or replace the switch. | |
| The lamp doesn't work | The lamp is damaged. | Replace the damaged lamp. |
| The hoodbody givesout strong vibrations and a loud noise | 1. The hood has not been installedproperly according to the installation process described in the instruction manual.2. Check if the joint connection of each part is damaged. | Ensure the hood has been installed properly according to the instruction manual. |
| The air exhaust performance is bad. | Check if the distance between the hood and the cooker top is too big. | The ideal distance is 65-75cm. |
| Ensure there is adequate ventilation. | Open the door and windows properly. Improve the environment. | |
| The duct is damaged.Grease Filters or charcoal filter clogged or air outlet clogged | Repair or replace the damaged duct.Replace or clean the filters Clear the air exhaust outlet |


- INSTRUCTION MANUAL AND
- INSTALLATION GUIDE
- RECOMMENDATIONS AND SUGGESTIONS CHARACTERISTICS INSTALLATION & USE MAINTENANCE TROUBLE SHOOTING
- INSTALLATION and USE
- USE
- MAINTENANCE
- WARNING!!
- DIMENSIONS
- INSTALLATION & USE
- DESCRIPTION / CONNECTIONS
- Electrical Connection
- INSTALLATION
- DUCTING VERSION INSTALLATION:
- Fitting under wall unit
- OPERATION
- GREASE FILTER
- CHARCOAL FILTER(optional)
- LAMPS
- CAUTION:
- HOOD CLEANING
- Cleaning tips:
- TROUBLE SHOOTING
Brand : Emilia
Model : CK75UCF
Category : Range hood