
CGG-059 - Grill CUISINART - Free user manual and instructions
Find the device manual for free CGG-059 CUISINART in PDF.


| Product Type | Gas Grill |
| Brand | Cuisinart |
| Model | CGG-059 |
| Color | Stainless Steel |
| Material | Cast aluminum body, stainless steel cooking grate |
| Cooking Surface | 145 sq. in. grilling area |
| BTU Output | 5,500 BTUs |
| Ignition | Electric ignition with push-button start |
| Fuel Type | Liquid propane (LP) gas |
| Dimensions (L x W x H) | 12.5 x 18.5 x 12 inches |
| Weight | 12.5 lbs |
| Adjustable Heat Control | Yes, continuous adjustment |
| Cleaning | Drop-down cooking grate for easy cleaning |
| Safety Features | CSA certified, safety gas valve |
| Warranty | 3-year limited warranty |
| Spare Parts Availability | Replacement grates and burners available |
| Assembly Required | Minimal assembly (attach legs and side shelf) |
| Fuel Tank Included | No, standard 1-lb or 20-lb LP tank (not included) |
Frequently Asked Questions - CGG-059 CUISINART
User questions about CGG-059 CUISINART
0 question about this device. Answer the ones you know or ask your own.
Ask a new question about this device
Download the instructions for your Grill in PDF format for free! Find your manual CGG-059 - CUISINART and take your electronic device back in hand. On this page are published all the documents necessary for the use of your device. CGG-059 by CUISINART.
USER MANUAL CGG-059 CUISINART
Gourmet Outdoor Grilling
GRILLSTER PORTABLE GAS GRILL
MODEL: CGG-059
ASSEMBLY AND OPERATING INSTRUCTIONS
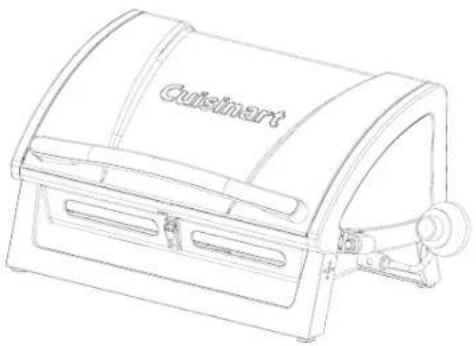
natural_image
Line drawing of a cooking pan with 'Cuismart' branding (no other text or symbols)⚠ WARNING: FOR OUTDOOR USE ONLY
This instruction manual contains important information necessary for the proper assembly and safe use of the appliance
⚠️ Read and follow all warnings and instructions before assembling and using the appliance
⚠️ Follow all warnings and instructions when using the appliance
⚠️ Keep this manual for future reference
Note to installer: Leave this Owner's Manual with the consumer after delivery and/or installation.
Note to customer: Leave this Owner's Manual in a convenient place for future reference.
⚠️ DANGER
- Do not store or use gasoline or other flammable liquids or vapors in the vicinity of this or any other appliance.
- An LP cylinder not connected for use shall not be stored in the vicinity of this or any other appliance.
WARNING
CALIFORNIA PROPOSITION 65
- Combustion by-products produced when using this product contain chemicals know to the State of California to cause cancer, birth defects, and other reproductive harm.
- This product contains chemicals, including lead and lead compounds, know to the State of California to cause cancer, birth defects or other reproductive harm.
Wash your hands after handling this product.
DANGER
If you smell gas:
- Shut off gas to the appliance.
- Extinguish any open flame.
- Open lid.
- If odor continues, keep away from the appliance and immediately call your fire department.
DANGER
Failure to follow these instructions could result in fire, explosion or burn hazard, which could cause property damage, personal injury or death.


DANGER
- Never operate this appliance unattended.
- Never operate this appliance within 10 feet (3.05m) of any other gas cylinder.
- Never operate this appliance with 25 feet (7.5m) of any flammable liquid.
- If a fire should occur, keep away from the appliance and immediately call your fire department.
Do not attempt to extinguish an oil or grease fire with water. - Heated liquids remain at scalding temperatures long after the cooking process. Never touch cooking appliance until liquids have cooled to 115°F (45°C) or less.
⚠️ DANGER
Failure to follow these instructions could result in fire, explosion or burn hazard, which could cause property damage, personal injury or death.
Table of Contents
-
Warnings and Safety Instructions 3
-
Illustrated Parts List 4
-
Exploded View 5
-
Assembly Instructions 6
-
Operating Your Grill
5.1 Select a proper location 7
5.2 Special Instructions for the use of regulator and cylinder 7
5.3 Installing the LP gas cylinder 8
5.4 Checking for gas leak 8
5.5 Lighting instructions 9
5.6 Match lighting 9
5.7 Using the grill 9
-
Care and Maintenance 10
-
FAQ and Troubleshooting 11
-
Warranty Program and Replacement Parts 12
1. Warnings and Safety Instructions
If these instructions are ignored, there is a possibility of a hazardous fire or explosion which could result in physical injury or property damage! It is your responsibility to assemble, operate and maintain your gas grill properly.
READ ALL WARNINGS AND INSTRUCTIONS PRIOR TO ASSEMBLING AND OPERATING YOUR GRILL
WARNINGS:
This grill is for outdoor use only. It should NOT be used in a building, garage or any other enclosed area.
The use of alcohol, prescription or non-prescription drugs may impair an individual's ability to properly assemble or safely operate this appliance.
⚠ Do not leave the grill unattended.
⚠️ Keep children and pets away from the grill all the times.
⚠ Do not use the grill in high wind.
This grill must be used with propane gas only. Liquid propane is not natural gas. The conversion or attempted use of natural gas in a liquid propane grill is dangerous and will void your warranty.
Do not attempt to attach this grill to the self-contained propane system of a camper, trailer, motor home or house.
Do not use charcoal or lighter fluid.
Do not use gasoline, kerosene or alcohol for lighting. The LP-gas cylinder must be constructed and marked in accordance with the specifications for propane gas cylinder of the U.S. Department of Transportation (DOT).
Do not move appliance when in use. Allow the grill to cool to 115° (45) before moving or storing.
Do not use the grill unless it is COMPLETELY assembled and all parts are securely fastened and tightened. If there are any missing or damaged parts, contact customer service for a replacement.
Do not alter the grill in any manner.
Do not operate the grill if there is gas leak present.
The use and installation of this product must conform to local codes. In the absence of local codes, use the National Fuel Gas Code: ANSI.NFPA 58 or Natural Gas and Propane Installation Code, CSA B149.1; Propane Storage and Handling, CSA B149.2. Natural Gas and Propane Installation Code.
This appliance is not intended to be installed in or on a boat or recreational vehicle.
⚠️ Locate the grill away from any combustible or non-combustible materials or construction by at least 24 inches (61cm) from the back and sides.
The appliance shall not be located used under overhead unprotected combustible construction.
This appliance is not intended for and should never be used as a heater.
This appliance will be hot during and after use. Use insulated oven mitts or gloves for protection from hot surfaces or splatter from cooking liquids.
This appliance is not intended for commercial use.
The pressure regulator supplied with the Cuisinart Portable LP Gas Grill must be used.
⚠ PROPOSITION 65 WARNING: Handling the brass material on this product exposes you to lead, a chemical known to the state of California to cause cancer, birth defects or other reproductive harm. (Wash hands after handling this product.)
2. Illustrated Parts List
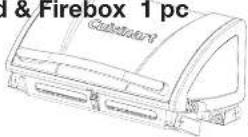
A. Lid & Firebox 1 pc
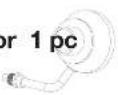
B. Regulator 1 pc
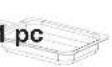
C. Drip Tray 1 pc
3. Exploded View
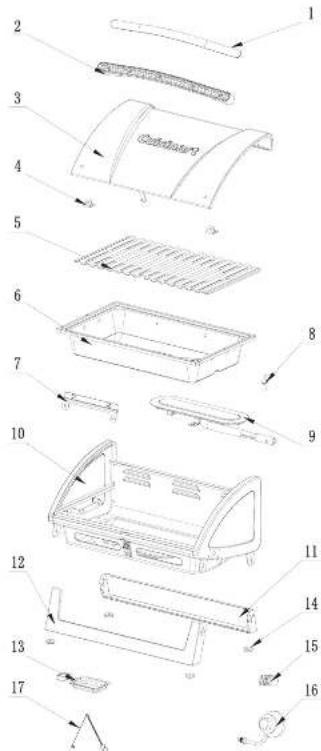
- Handle cover
- Handle
- Lid
- Cooking grate stopper
- Cooking grate
- Fire Box
- Cooking grate stopper (rear)
- Electrode
- Burner
- Grill Body
- Rear Leg
- Front Leg
- Drip Tray
- Rubber Feet
- Push Button starter
- Regulator
- Match Holder assembly
North American Distributor: The Fulham Group, Newton, MA 02466
4. Assembly Instructions
Remove all the contents from packaging, and ensure all parts are present before attempting to assemble. (See Parts List on page 4)
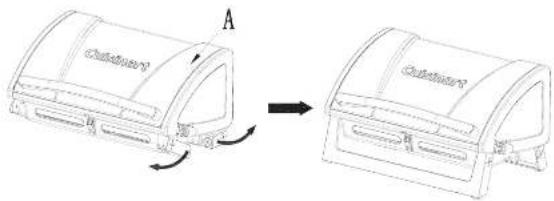
Step 1:
Extend the grill legs as shown.
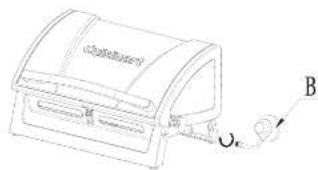
Step 2:
Install the regulator to the burner and turn it clockwise to secure.
natural_image
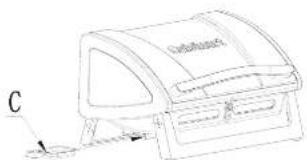
Line drawing of a device with a labeled component 'B' and a curved arrow indicating motion (no text or symbols beyond label)Step 3:
Insert the drip tray as shown.
natural_image
Line drawing of a portable electronic device with a labeled component 'C' and no visible text or symbols5. Operating Your Grill
5.1 Select a Proper Location
Once you have assembled your new grill, find a suitable location for use.
Note: The use and installation of this product must conform to local codes. In absence of local codes, use the National Fuel Gas Code: ANSI Z223.1/NFPA54, Storage and Handling of Liquified Petroleum Gases, ANSI.NFPA 58 or Natural Gas and Propane Installation Code. CSA B149.1; Propane Storage and Handling, CSA B149.2.
DANGER
- Never use this outdoor grill inside any building, garage, shed or breezeway, or inside any boat, trailer or recreational vehicle and/or boat, to prevent possible fire and to prevent the possibility of carbon monoxide poisoning or asphyxiation.
- Always place your grill on a hard and level surface far away from combustible materials and structures.
- Do not use this grill under an overhead combustible surface or covered area (e.g., awnings, umbrellas, porches or gazeboes). Keep all combustible surfaces at least 24" (61cm) away.
- Locate the grill away from any combustible and non-combustible material or construction by at least 24 inches (61cm) from back and 24 inches (61cm) from side.(See the diagram below)
- Never store or use gasoline or other flammable or volatile substances in the vicinity of this grill or in the vicinity of any other heat-generating appliance, because of the danger of starting a fire.
- The cylinder be disconnected when the appliance is not in use.
5.2 Special Instructions for the Use of Regulator and Propane Cylinder
A propane gas cylinder is required for operation. Use a 14.1 oz, or 16.4 oz.
This Cuisinart grill is equipped with a regulator having a CGA No.600 cylinder connection device for connecting to a 14.1 oz. or 16.4 oz. Only cylinders marked "PROPANE" must be used.
The propane cylinder must be constructed and marked in accordance with the specification for LP-Gas cylinders of the U.S Department of Transportation (D.O.T) or the National standard of Canada, CAN/CSA-B339, Cylinders, Spheres and Tubes for Transportation of Dangerous Goods.
- Store spare fuel canisters in a well-ventilated area away from the grill.
• Do not puncture or burn fuel canister.
- If the grill is not in use, the control knob must be turned to the "OFF" position to shut off the gas flow from the cylinder.
- Do not store a spare propane cylinder under or near this grill. Never fill the cylinder beyond 80 percent full. If this instruction is not followed exactly, a fire causing death or serious injury may occur.
- Save the cylinder cap and reinstall when not in use.
- Cylinder supply system must be arranged for vapor withdrawal. Do not block the pressure relief valve during use or storage.
• Always remove LP-gas cylinder from grill when transporting and when not in use.
5.3 Installing the Gas Cylinder
(The propane gas cylinder is not provided with the appliance.)
A gas cylinder complying with the requirements listed in section 5.2 must be obtained before the grill can operate.
Connect the LP cylinder to the grill outdoors only
Read and follow all direction on the cylinder.
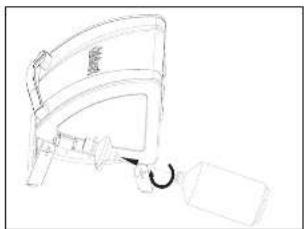
- Turn the burner control knob to "OFF" position.
- Remove the protective caps from the cylinder valve and coupling nut, if present,
- Ensure grill legs are extended as shown in
Assembly Instruction, Step 1 (page 6). - Push the cylinder into the threaded regulator connector and turn clockwise until tight.
- TIGHTEN BY HAND ONLY. Do not use tools.
Removal Of The Gas Cylinder
- Turn the regulator's knob to "OFF" position.
- Turn the cylinder counterclockwise until it comes off.
5.4 Checking for Gas Leak
natural_image
Line drawing of a mechanical device with a curved top and attached cylindrical component (no text or symbols)DANGER
Check gas system for leaks to prevent fire or explosion hazard
- The "Leak Check" must be performed before lighting the grill and each time the cylinder is connected for use.
- Do not smoke or allow other sources of ignition in the area while conducting a leak test.
- Conduct the leak test outdoors in a well-ventilated area.
- Do not use matches, lighters or a flame to check for leaks.
- Do not use grill until all leaks have been stopped. If you are unable to stop a leak, disconnect the propane supply, and call for gas application service or your local propane gas supplier.
Leak Check Method
- Make 2-3 oz. of leak solution by mixing one part liquid dishwashing soap with three parts water.
- Make sure control knob is in the "OFF" position.
- Spray or paint some leak solution on the cylinder and regulator connection.
- Inspect the solution at the connections, looking for bubbles. If no bubbles appear, the connection is secure,
- If bubbles appear, a leak is detected. Go to step 6.
- Disconnect the cylinder from the regulator, and reconnect. Make sure the connection is secure and no leak is found before using the grill.
- If you continue to see bubbles, DO NOT USE THE GRILL. Repeat the above process with a different LP cylinder. If leaks are still present, contact the customer service center.
natural_image
Technical line drawing of a mechanical component with an inset showing a cross-section view (no text or symbols)5.5 Lighting Instructions
- Read all instructions before lighting.
- Open lid during lighting.
- Make sure the regulator's knob is in "OFF" position.
- Push the gas control knob and quickly turn counterclockwise to "HIGH" position. The igniter will click and light the burner.
- If ignition does not occur in 5 seconds, turn the gas control knob off, wait 5 minutes, and repeat steps 2 - 5." Before cooking on this grill for the first time, operate the grill for about 15 minutes with the lid closed and the gas turned on "HIGH". This will "heat clean" the internal parts and dissipate odor from the painted finish.
'Clean your grill after each use. See Section 5.3 for instructions
'If the burner does not light, turn the gas control knob off and wait 5 minutes to let the gas clear before you try again.
5.6 Match lighting
IMPORTANT!
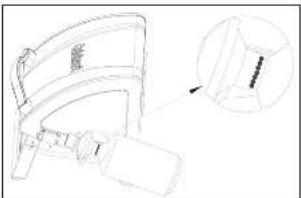
A match lighting hole is located on the left side of the firebox.
Match lighting instructions:
- Read all instructions before lighting.
- Open lid during lighting.
- Make sure the knob on the regulator is in "OFF" position.
- Strike a long wooden match and position the burning match through the match lighting hole in the left side of the firebox. Place the flame near the bottom edge of the burner.
- Push down and turn the burner control knob counterclockwise to the high setting.
- The burner should light. The flame will carry around the burner. Allow grill to pre-heat with the grill lid closed for 2-3 minutes before cooking.
△CAUTION:
Do not touch any hot grill parts. The outside of the grill bottom especially becomes very hot during use. Use protective gloves to handle any parts that might become hot during use.
5.7 Using the Grill
Inspect the burner flame by looking through the match lighting holes.
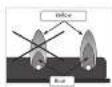
A good flame should be blue with some yellow tips coming from the burner holes. Yellow tips on flames up to 1/4" in height are acceptable as long as no carbon or soot deposits appear.
During operation, stand to the side of grill when opening the grill lid.
Do not expose any part of your body directly above the cooking area.
The burner opening must be positioned properly over the valve orifices.
6. Care And Maintenance
6.1 Care
Regular care of your grill will help keep it operating properly. All maintenance should be done only when the grill is cool and with the fuel supply turned off. Occasionally inspect and tighten hardware that may become loose.
6.2 Cleaning The Venturi Tube
A spider's nest or wasp's mud inside the Venturi Tube can block gas flow and can even cause a fire at the gas control valve. Such a fire can cause operator injury and serious damage to your grill. To prevent insect related problems, inspect the Venturi Tube screen cover regularly and remove any dirt.
WARNING!
Do not disassemble or alter the fuel supply system. Improper assembly can result in a hazardous condition. Seek qualified professional assistance if repairs are required.
6.3 Cleaning And Maintenance
- WARNING: Do not clean any grill surface while grill is operating. Let grill cool to a safe temperature prior to cleaning.
• Disconnect the fuel supply and remove the fuel supply cylinder prior to cleaning. - Cleaning should be done where detergent won't harm work surface or lawn.
Exterior Cleaning
• Clean grill exterior surfaces with warm soapy water.
- Wash drip tray in warm soapy water – do not run through dishwasher.
Interior Cleaning
- Cooking grate can be cleaned with a grill brush. For best results, cooking grate should be warm (warm, not hot – never brush with grill operating, or when interior is very hot). If desired, cool cooking grate can be removed from grill and cleaned with warm soapy water.
• Cooking grate is also dishwasher safe. You can remove when cool and place in the dishwasher to clean.
- Should you wish to remove accumulated debris from the bottom of the fire box, proceed as follows:
- Let grill cool completely
- Remove cooking grate and set aside
- Carefully scrape and remove debris from bottom of firebox using care not to touch burner element, igniter, or igniter wire.
WARNING: DO NOT APPLY ANY CLEANERS OR LIQUIDS TO BURNER ELEMENT
OR ATTEMPT TO CLEAN IN ANY WAY
- DO NOT USE WATER OR LIQUIDS TO CLEAN GRILL INTERIOR
7. FAQ and Troubleshooting
Frequently Asked Questions
Can I use a 20lb LP tank?
"You may use a standard 20 lb. LP tank with your Cuisinart Gas Grill, but you will need a conversion hose, such as the Cuisinart QG-012B or equivalent. These hoses are widely available online, and at most home centers and hardware stores. [be sure the 20 lb tank you are planning to use is intended for gas grill use, and has an OPD valve]"
Can I use my Cuisinart Gas Grill with natural gas?
"NO. Your Cuisinart Gas Grill is intended for use only with LP (Liquid Propane) gas. Natural Gas is NOT Liquid Propane. Never use any other fuel source with your grill, as it will create a dangerous situation."
"Can I add lava rocks, ceramic tiles, or charcoal briquettes to my Cuisinart Gas Grill?"
"NO. Your grill is not intended to operate with these items, and doing so may create an unsafe situation, and will void your warranty. You may use wood planks or a wood chip "smoker box"" on top of the cooking grate surface, but nothing should go under the cooking grate."
Where can I buy accessories or replacement parts?
Visit www.cuisinart.com or call 1-800-211-9604.
Troubleshooting
Burner won't light (using a 16.4oz or 14.1oz LP bottle)
- Be sure LP bottle still has fuel in it by gently shaking it - there will be sounds of liquid inside if fuel remains.
- Ensure LP bottle is correctly threaded into regulator (not cross threaded) and fully tightened
- Check to see that the venturi tube air inlet screen is not covered or clogged (see Section 6.2 on page 10).
- "Check to see that burner orifice holes are clear. If obstructed, with gas bottle disconnected, gently brush orifice holes with a small brush."
- Check to see that ignitor is producing a spark against the burner (best checked in shady spot).
"If above do not solve problem, unless LP tank is new, replace with new tank and attempt lighting again."
Burner won't light (using 20lb. Tank with conversion hose)
- Review all steps in LP bottle section above
- Ensure that LP tank supply valve is open (turned counterclockwise until stop)
- Ensure that the orifices at both ends of the conversion hose are not obstructed or damaged.
• Straighten sharp kinks in conversion hose
Grill doesn't reach high enough temperature (using LP bottle)
- Be sure LP bottle still has fuel in it by gently shaking it - there will be sounds of liquid inside if fuel remains.
- Check to see that the venturi tube air inlet screen is not covered or clogged (see Section 5.2 on page 11).
• "Test gas system for leaks (Section 5.4, page 9)"
Grill doesn't reach high enough temperature (using 20lb LP tank with conversion hose)
"Your LP tank has a safety device that is intended to reduce gas flow in the event of a leak. When this device is active, it is commonly called ***bypass***". This device can be inadvertently activated by not following proper lighting procedures. Should you experience low flame, you should do the following:
1) shut off gril
2) close tank valve fully
3) remove conversion hose to relieve pressure, then re-attach
Then, restart the grill (and start the grill each time) using the proper procedure:
1) ensure the grill fuel knob is turned to OFF
2) slowly open the gas tank valve fully
3) WAIT 15 SECONDS
4) follow the grill lighting steps (printed on grill, and in owner's manual)"
For additional FAQs, please visit www.cuisinartgrilling.com/customerservice
8. Warranty and Replacement Parts
This warranty covers defects in parts and workmanship for a period of 3 years from the original purchase date. Any damage claim regarding the enameling must be submitted within 30 days of purchase to be covered by the warranty.
The following conditions are NOT covered by this warranty:
- Unevenness and color variations in the coated surfaces.
• Damage caused by improper assembly or disregard of the manual.
• Use of spare parts not supplied by manufacturer.
• Damage resulting from modifications or inappropriate use. - Abuse of the grill
• Damage caused by improper maintenance or repairs by an unauthorized person.
Limitations and exclusions:
- This warranty applies only to the original purchaser and may not be transferred.
- If you can not verify the purchase date of the grill the warranty period will begin on the date the grill was manufactured.
- Replacement or repair parts are warranted for the remaining period of the original part warranty.
Your obligations:
This grill must be assembled, installed, operated and maintained in accordance with all applicable codes and the instruction manual furnished with this grill. You must keep an invoice, cancelled check or payment record to verify the purchase date of the grill.
For troubleshooting, FAQs or customer service, visit us at www.cuisinartgrilling.com/customerservice or contact us at grilling@thefulhamgroup.com OR 1-866-994-6390
To order replacement parts or additional Cuisinart Grilling products, visit us at www.cuisinart.com or contact us at grilling@thefulhamgroup.com OR 1-866-994-6390
Model #CGG-059
North American Distributor:
The Fulham Group
Newton, MA 02466
- GRILLSTER PORTABLE GAS GRILL
- ⚠ WARNING: FOR OUTDOOR USE ONLY
- ⚠️ DANGER
- WARNING
- CALIFORNIA PROPOSITION 65
- DANGER
- Table of Contents
- Warnings and Safety Instructions
- READ ALL WARNINGS AND INSTRUCTIONS PRIOR TO ASSEMBLING AND OPERATING YOUR GRILL
- WARNINGS:
- Illustrated Parts List
- Exploded View
- Assembly Instructions
- Step 1:
- Step 2:
- Step 3:
- Operating Your Grill
- Select a Proper Location
- Special Instructions for the Use of Regulator and Propane Cylinder
- Installing the Gas Cylinder
- Removal Of The Gas Cylinder
- Checking for Gas Leak
- Check gas system for leaks to prevent fire or explosion hazard
- Leak Check Method
- Lighting Instructions
- Match lighting
- IMPORTANT!
- Match lighting instructions:
- △CAUTION:
- Using the Grill
- Care And Maintenance
- Care
- Cleaning The Venturi Tube
- WARNING!
- Cleaning And Maintenance
- Exterior Cleaning
- Interior Cleaning
- OR ATTEMPT TO CLEAN IN ANY WAY
- FAQ and Troubleshooting
- Frequently Asked Questions
- Troubleshooting
- Warranty and Replacement Parts
- The following conditions are NOT covered by this warranty:
- Limitations and exclusions:
- Your obligations:
Brand : CUISINART
Model : CGG-059
Category : Grill