FT602 - Media player Truly - Free user manual and instructions
Find the device manual for free FT602 Truly in PDF.


| Product Type | Portable Media Player |
| Brand | Truly |
| Model | FT602 |
| Dimensions | Approximately 100 x 60 x 10 mm |
| Weight | Approximately 80 g |
| Power Supply | Built-in rechargeable lithium-ion battery, 5V via USB |
| Battery Life | Up to 8 hours of music playback |
| Display | 2.4-inch color LCD screen |
| Storage | Supports microSD card up to 32 GB |
| Audio Formats | MP3, WMA, WAV, FLAC |
| Video Formats | AVI, MP4, RMVB |
| Image Formats | JPEG, BMP, GIF |
| Radio | FM tuner with recording |
| Recording | Voice and FM recording via built-in microphone |
| Connectivity | USB 2.0, 3.5 mm headphone jack |
| Main Functions | Music, video, photo playback, FM radio, voice recorder, e-book reader |
| Cleaning and Maintenance | Wipe with a soft dry cloth. Do not use liquids. |
| Safety | Do not expose to water, heat, or direct sunlight. Keep away from children. |
| Spare Parts | Not available. Contact manufacturer for service. |
| General Information | User manual available for download in PDF format. |
Frequently Asked Questions - FT602 Truly
User questions about FT602 Truly
0 question about this device. Answer the ones you know or ask your own.
Ask a new question about this device
Download the instructions for your Media player in PDF format for free! Find your manual FT602 - Truly and take your electronic device back in hand. On this page are published all the documents necessary for the use of your device. FT602 by Truly.
USER MANUAL FT602 Truly
User's Manual
Table of Contents
1 QUICK START
Safety Instructions
Product Features
Included Accessories
Minimum System Requirements
Buttons and Controls
Connecting to/Disconnecting from Your PC
Charging the Battery
More About Connecting Your PC
More About Disconnecting from Your PC
Managing Music Files
2 BASIC OPERATIONS
Power On/Off
Adjusting the Volume
Lock (HOLD)
3 USING YOUR F602
Playing Music
FM Radio
Recording
Playing Video
Viewing Images
Using the Podcast Feature on your FT602
Changing System Settings
4 MANAGING YOUR FT602
Installing, Using, and Uninstalling Software
Upgrading the Firmware
Formatting
5 MISCELLANEOUS
Connecting to/Disconnecting from Your PC
Troubleshooting
Frequently Asked Questions
Product Specifications
Copyrights and Declarations
Certifications and Environmental Protection
6 INDEX
RJFOD/LMS
1 QUICK START
- Safety Instructions
A. Power
- Make sure that the adapter is firmly plugged in to the power outlet. Unplug it when it is not in use.
- Do not try to bend or fold the power cable. Do not put heavy objects on the power cable.
- Turn off the player and unplug the adapter immediately if the player accidentally comes into contact with water or other liquids.
- If the player or the adapter emits smoke or unusual odor, turn off the player and unplug the adapter immediately.
- Avoid using the adapter during thunderstorms.
B. Product
- Do not place heavy objects on the player.
- Do not place or use the player in moist, dusty, or smoky areas.
- Do not let the player come into contact with water or other liquids.
- Do not press the player's buttons with excessive force.
- Do not subject this player to severe impact.
- Avoid using chemical solutions to clean the player.
- Do not subject the player to magnetic fields.
- Do not try to disassemble or modify this player.
- Do not disconnect the USB cable while data is being transferred.
C. Other
- Do not use earplugs/earphones when riding a bike or driving a car.
- Adjust the volume to a lower level when walking, especially when crossing a street.
- Limit the volume to an appropriate level when using earphones.
- If your ears ring, adjust the volume to a lower level or stop using the player.
- Always place cables properly to avoid damage.
• Product Features
◆ Display
High resolution display with 262K colors
- Simple and Elegant Design
Simple, screw-free design. Anti-scratch metal case built with Nano technology.
♦ Crystal Clear Sound
Top-of-the-line Korean decoding chips provide clear, smooth sound. The built-in EQ equalizer provides personalized sound effects.
◆ Supports Multiple Music Formats
Supports WMA (Secure WMA with DRM10), MP3, MP2, WAV, OGG, and ADPCM formats.
◆ Supports BBE Headphone Sound Effects
BBE Headphone technology provides enhanced music playback.
◆ PlaysForSure! Supports PlaysForSure 2.01.
High-Quality Recording
The built-in high-quality microphone provides professional quality recording.
FM Radio
Listen to Hi-Fi stereo radio.
◆ Clear and Fluid Video Playback
Share video clips with your family and friends.
◆ Line-in Recording
Make recordings directly from external sources.
♦ Playback Time
The built-in Lithium-ion battery provides 10 hours of continuous playback.
◆ Firmware Upgrade
Add new features to your FT602 by downloading the latest firmware from our website, www.picnroll.com.
- Acts as an MTP (Media Transport Protocol) Device or a Removable Drive
The player can be recognized as an MTP device (Windows XP or higher only) or a removable drive when it is connected to your PC.
- Other Features
On-the-go playlist, quick search for music files, and image viewing.
• Included Accessories
TRULY FT602 includes the following accessories in the package. Contact your local dealer if any contents are missing.

natural_image
Illustration of four different types of audio cable connectors and a device case (no text or symbols)Earphone USB Cable Line-in Cable Carrying Pouch

natural_image
Three icons: a CD, a notepad labeled 'click-start manual', and a rectangular device labeled 'Warranty card' (no text or symbols on objects)Installation CD Quick-Start Manual Warranty Card
• Minimum System Requirements
◆ CPU clock 200MHZ
◆ Windows ME, Windows 2000, Windows XP, or Windows Vista
◆ CD-ROM driver
◆ 32MB RAM
◆ 60MB hard driver space
- Buttons and Controls
(1) Earphone Jack
(2) Line-in Jack
(3) Microphone
(4) Reset (RESET)
(5) Lock (☐)
(6) Display
(7) Escape (ESC)
(8) Menu (MENU)
(9) Previous / Rewind ( )
(10) Next / Fast Forward ( )
(11) Volume Up (▲)
(12) Volume Down (▼)
(13) Play / Pause / Confirm ( ▶ )
(14) USB Port
(15) EQ Setting
(16) A-B Repeat / Recording (REC)
(17) Power (⏻) / Repeat Mode (Mode)
(18) Lanyard Hole

- Connecting to / Disconnecting from Your PC
Use the supplied USB cable to connect the player to your PC.

• Charging the Battery
There are two ways to charge the battery:
-
Connect the player to your PC using the supplied USB cable. When fully charged, the lightning bolt will be replaced by "OK!"
-
You can charge your FT602 by connecting the USB cable to your computer, but you cannot use your player while it is being charged this way.


Note:
It takes approximately 3 hours to charge the battery to full capacity.
- Please use the supplied USB cable. Using another USB cable may cause problems.
The running battery indicator bar on the screen will show the charging progress. The indicator bars will be fully lit when the battery is fully charged.
For better battery performance, it is recommended that you charge the battery for an extra hour before unplugging the charger. If the battery has been fully charged, do not leave the player connected to the charger for a long period. After using the battery for the first time, it is recommended that you charge the battery for two extra hours before unplugging the charger.
• More About Connecting to Your PC
Connecting as an MTP (Media Transport Protocol) device. The FT602 player can be recognized as an MTP device in Windows XP OS. You must set up the player as an MTP device in order to manage and play DRM10 protected music tracks.
- In Settings, select USB Mode and choose MTP.
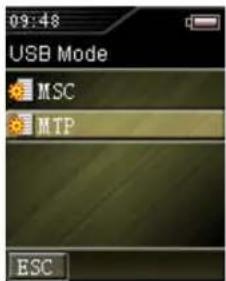
- Connect the player to your computer. If successfully connected, a "图标" icon will appear in the system notification area and the player will display the following message:
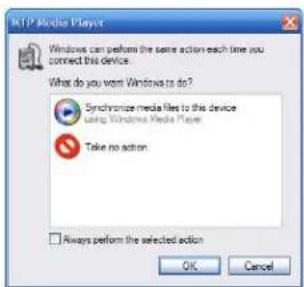
- A new MTP Device will appear in My Computer.
Quick Start Page 7
Connecting as a removable drive. The player can be recognized as a removable drive in your PC. You can download and upload files in any format. You can simply use Windows Explorer to transfer multimedia files to your FT602.
A. In Settings, select USB Mode and choose MSC. The player is, by default, in MSC mode.
B. A confirmation screen, as shown below, should appear for about 2 seconds.

• More About Disconnecting from Your PC
Note: These directions are for users of Windows XP or Vista. For users of operating systems prior to Microsoft Windows XP, see Chapter 5, Miscellaneous, page 25.
MTP device. Simply unplug your FT602 to disconnect from your PC.
Removable drive. Simply unplug your FT602 to disconnect from your PC.
The LCD display will show the following screen for about 1 second:

natural_image
Illustration of a laptop connected to a USB with a glowing cable (no text or symbols)• Managing Music Files
A. Using Your Player as a Removable Disk
Installing MP3 Files Directly from Your Computer
- Make sure your FT602 player is set to MSC mode.
- Plug the player into your computer's USB port.
- Double-click on My Computer.
- Double-click on Truly Media Player.
- Drag and drop your MP3 files into the Truly Media Player's music folder.
- Close the Truly Media Player folder.
- Disconnect the FT602 player from the USB connector.
Installing MP3 Files from Other Sources
- Extract CD tracks to MP3 files. Install TMusic music management software from included CD. Extract CD tracks to MP3 files. (See Part 4.)
a. Select Audio CD, then right click it to select Extract ALL CD tracks to MP3 files in the pop-up menu.

b. In the editing panel, input the name of the album, bit rate, sample rate, directory where generated MP3 files are saved, and other options.
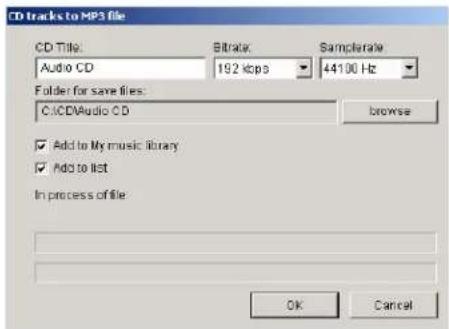
c. Click OK; TMusic starts to convert the selected tracks into MP3 files.
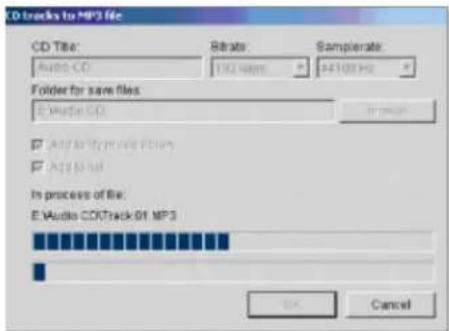
- Download music from Internet. Music tracks can be purchased from such Internet sites as www.napster.com.
Transfer Music Files
1. Use Explorer to transfer music files.
a. Using Windows Explorer, copy the files that you want to transfer.

b. Paste the files to the Removable Disk (FT602).

2. Use TMusic to transfer music files.
a. Click All Music Files in My Music Library.

b. From the pop-up menu, right-click to select Download all music files to player; or, in the main menu, select File/My music library/Download all music files to player.

c. All music files in My music library will be copied to the player.

3. Build my music library.
a. Right click My Music Library and select Search folders and add music files in the pop-up menu.
b. Select the files that you want to add to My Music Library.

4. Download a list of files to the player
a. Click + to expand the list of Titles, Artists, and Genres. Select a list of files to be downloaded to the player.
b. Right-click on the list and select Download music files in list to player. The selected files will be downloaded to the player.

5. Build hierarchy of folders for song tracks. You can use TMusic to store songs in the player in hierarchy orders of . . .\Artist\Album\Tracks to easily and quickly locate tracks.
a. On the drop-down menu, click Operate -> Settings.
b. In the Download music files section, check the item Create folder with ID3 information. Click OK to confirm.
c. All tracks will be transferred to the player into hierarchy folders of... Artist Album Tracks.
Note: For more information on how to use TMusic to manage your music files, refer to the Help Topics in TMusic.

6. Use Windows Media Player 10 to transfer music files
a. Open Windows Media Player 10. Select the files that you want to transfer to your player. You can select files based on artists, albums, or genres.

b. Click Start Sync to transfer the selected files to your player.
c. Transfer completed.
Note: You must have WMP10 installed in your PC. Please refer to the Help section in Windows Media Player 10 for details on how to transfer files to portable devices.

Deleting Files. Select the files you want to delete in the Removable Disk. Right-click, and select Delete from the pop-up menu.

B. Using Your Player as an MTP Device
Purchase and download music files from the Internet using Windows Media Player 10 (WMP10): Choose music from an online music store or from your favorites in the Windows Media Player Library. Purchase and download songs and select Sync to upload to the FT602.
Synchronize music to FT602 using WMP10:
1. Manual synchronization
a. Start WMP10.

Quick Start Page 12
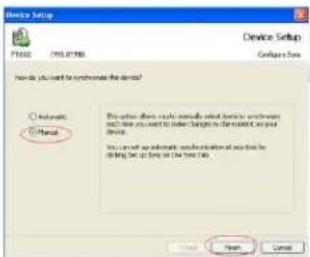
b. Connect the FT602 to your PC, select the Manual option in the pop-up Device Setup window, and click the Finish button to return to WMP10.
Note: If you had previously selected the Sync Mode, the Device Setup window will not pop up.

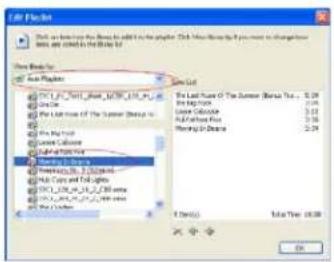
c. Click Edit Playlist in WMP10 to enter the Edit Playlist window. Then select music files based on artists, albums, genres, etc., to Sync List on the right-hand side. After selecting Sync Music, click OK to return to WMP10.
d. Click Start Sync.
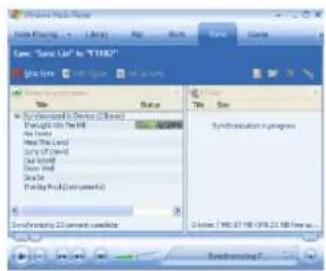
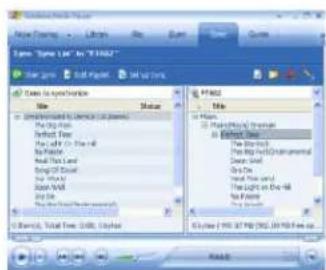
e. Sync Completed.
2. Automatic synchronization
a. Start WMP10.

Quick Start Page 13
b. Connect the FT602 to your PC. Select Automatic option in the pop-up Device Setup window.

c. Start Sync. In the Device Setup window, click the Finish button to return to WMP10 and start the auto sync process.

d. Sync completed.

Note: For detailed instructions, please refer to the Help section in WMP10.
2 | BASIC OPERATIONS
• Power On / Off
ON: When power is off, press and hold Ⓞ/Mode to turn the player on.
OFF: When power is on, press and hold Ⓞ/Mode to turn the player off.
- Adjusting the Volume
Use </> to adjust volume. Volume can be adjusted from level 0 to level 40.
Volume up: Press .▲
Volume down: Press .▼
- Lock (HOLD)
Push HOLD to lock and unlock the player.
A 🔒 icon will display on the screen when the player is locked.
When 🔒 is displayed, all buttons are disabled.
If the player is locked after the power is turned off, the player cannot be turned on until the player is unlocked.
3 | USING YOUR FT602
- Playing Music
Play files in MP3, WMA, MP2, WAV, and ADPCM formats.

natural_image
Product image of a music headset with colorful musical notes and playback controls (no text or symbols on the headset itself)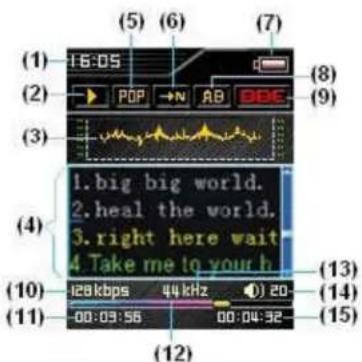
- Time Display 9. BBE status
- Playback Status 10. Bit rate
- EQ animation 11. Elapsed time
- Play list/ID3 info 12. Progress bar
- EQ Modes 13. Sample rate
- Loop modes 14. Volume info
- Battery information 15. Total time
- A-B repeat Bit rate
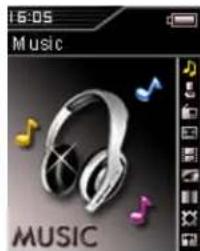
Adding music to a playlist. After entering the Music mode, click MENU and the Option menu will pop up. Select Add All or Add songs to add files to the playlist. For detailed operations, please refer to the operations on the Option menu in the Play mode.
natural_image
Product image of a metallic headphones with musical notes and playback controls (no readable text or symbols)
Selecting files in the playlist. Press ▲▼ or ◀◀◀ to select files in the playlist. Press ▶ll (shown as #13 on Buttons and Controls chart) to play the selected file. Press ▶ll again to pause. Press and hold ▶ll to switch among ID3 info, lyrics, and the playlist. Press ESC to return to the main interface.

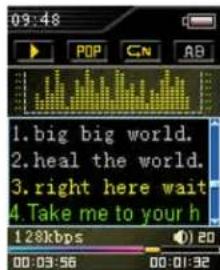
Using the segment-repeat function [A-B]. Press the A-B button during music playback to define the beginning of a repeat segment (A). Press again to define the end of this segment (B) and repeat it. Press the A-B button again to go back to normal music playback.
Selecting operations on the Option menu in the play mode:
Click MENU to bring up the Option menu.
Click ▲ or ▼ to select an item on the Option menu.
Click to enter the selected item.
Add Songs: Add one or more songs to the playlist. You can quickly find your favorite songs based on artists, albums, genres, ratings, and other information. Press A-B to add the selected song to the playlist. Press A-B again to remove it from the playlist. Pressing and holding A-B will add all songs in the current directory or category to the playlist.
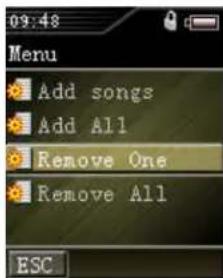
Add All: Add all songs in the player to the playlist.
Remove One: Remove the selected song from the playlist. Note: This operation will not delete the selected song from the player.
Remove All: Clear the current playlist.
Using repeat modes, EQ modes:
In the Play mode, press Ⓞ/Mode to switch among different repeat modes.
| Normal | play all tracks in the play list once |
| Repeat one | play the current track repeatedly |
| Repeat all | repeat all tracks in the play list |
| Shuffle | Randomly play all tracks in the play list |
In the Play mode, press EQ to switch among the following different sound effects:
| Classical | UserEQ | ||
| Pop | Normal | ||
| Live | Rock | ||
| Bass | Jazz |
Using other features when listening to the music. In the Play mode, press and hold MENU to switch back to the main interface. Press ▲ or ▼ to select View image /System settings. The player will stop playing music when you select FM Radio, Voice Playback or Play video.

natural_image
3D rendering of a satellite dish antenna with visible signal waves and base structure (no text or symbols)- FM Radio
Radio mode interface
(1) Radio status: radio 📄, search
(2) Channel frequency
(3) Search progress indicator
(4) Frequency range
(5) Preset slots
(6) Sound channel: mono, stereo
(7) Fine tuner indicator
(8) Station mode: single-step search, switch mode
(9) Volume info
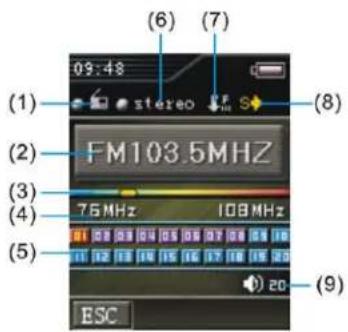
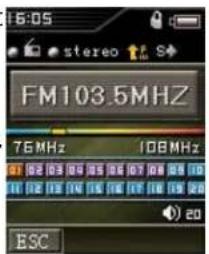
Listen to the FM radio. Press ▶ to enter the FM Radio interface. In Switch mode ☐, if there are stations saved in the player already, press ◀ or ▶ to select a station to listen to.
• Purple block: A station is saved in that block.
• Red block: The current station.
Basic FM radio operations
Press ◀◀ or ▶▶ to select the previous or next station.
Press Mode to switch between Single-Step Search mode and Switch mode. (Arrows indicate location of these icons.)
Press A-B or EQ to increase or decrease the frequency to perform a fine tuning.

Press ⬆ to adjust the volume.
Press ESC to go back to the main interface.


Search and save stations
Automatic Search: Press MENU to enter the option menu. Select Auto Search Low, Auto Search Medium, or Auto Search High to start automatic search. When a station is found during a search, it will be automatically saved.
Note: A higher search level provides better stations with better reception, but fewer radio frequencies will be found. This feature is used to optimize the search process based on different geographic locations.

Manual search. In the Single-Step Search mode, press ◀or ▶ to decrease or increase the frequency by 0.1MHZ increments to find a station. When a station is found, press A-B to save the station.
Note: The earphones serve as the antenna in Radio mode, so they must be plugged in during frequency navigation.

Delete a station. In the Switch Station mode, press ◀ or ▶ to select the station that you want to delete. Press A-B delete the station.
Note: The FT602 can save up to 20 stations. Save a station is available only in the Single-Step Search mode. Delete a station is available only in the Switch Station mode.
- Recording
Recording using the built-in microphone or Line-in cable. Line-in cable must be plugged in before the line-in recording can start. Recording can be triggered at any time by pressing and holding the A-B/REC button.

To start recording, select Start recording. Press ▶ to pause, and Press ▶ again to resume. An animated cassette will show up when recording. Press ESC to save the recording and go back to the recording interface.

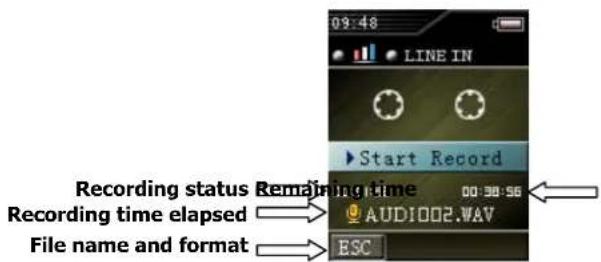
Note: Recording will stop automatically if the unit is running out of free space. Recorded files will be saved as VOCR+serial_number.WAV in the RECORD directory.
Recording setup
1. Source setting
Go back to the recording interface after you have selected the source for recording. Press ▶ to start recording.
• Line In: record from external device via the line-in cable.
• Microphone: record using the built-in microphone.

2. BitRate setting
Set up the recording quality. The bigger the value, the better quality the recorded file will be. Better quality recording demands more memory space.
- Playback of a recorded file: Select "VOICE" from the Main Menu. Select a recorded file and press ▶ to add it to the playlist and play.
- Operation during playback: Refer to "Playing Music" in Part 3, page 15.

- Playing Video
You can play video files in AVI format. You can easily create your AVI video clips using the supplied Truly AVI Transcoder tool. For details on how to convert video files, please see "Using Truly AVI Transcoder Tool" in Part 4, pages 22-23.

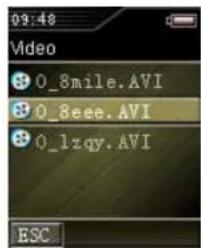
A. Search video files
- Press ▲ or ▼ to select a video clip from the list of video files.
- Press ▶ to play the selected file.
B. Play video
- Press t▲rewind.
- Press to go forward.
- Press and hold down ▲ or ▼ to rewind or fast forward.
- Press ▶ to pause or resume.
- When in video mode, press ESC to exit.

natural_image
Close-up of a vibrant red fumaryl flower with green foliage in the background (no text or symbols visible)- Viewing Images
You can view images in JPEG (.JPG) formats.

Select Manual to view photos manually, one by one. Press ◀ or ▶ to go to the previous or next image.
Select Slide show to start auto-playing photos, one by one, at three-second intervals.
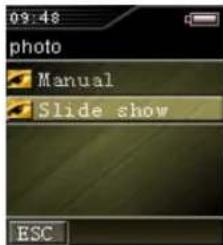
Note: Images with higher resolution may take longer to open. A "X" icon will appear while these images are loading.

natural_image
Exterior view of a traditional Chinese palace with tiled roof and stone lions (no signage)• Using the Podcast Feature on Your FT602
A. Using your MyPodder software for the first time
- Connect your FT602 to your PC.
- Click on the "podcastready" file to begin installation.
- Follow the on-screen instructions to complete the installation process.
B. Downloading Podcast files directly to your FT602
- Connect your FT602 to your PC.
- Click on the "podcastready" icon.
- Follow the on-screen instructions to download your podcast contents.
C. Listening to your Podcast files on your FT602
- Go to Explore > Podcasts.
Note: Refer to the myPodder User Manual for additional help in using your myPodder software. The myPodder User Manual is preloaded in the root folder of your FT602. Connect your FT602 to your PC to retrieve the myPodder User Manual.
- Changing System Settings
You can customize the settings of your FT602.
Press ▲ or ▼ to select the setting that you want to modify.
Backlight: Backlight will turn off automatically after the time period set. Note: Backlight will not turn off if the backlight timer is set to Always On.
Auto Sleep: Turn off the player after certain period of inactivity.
Language: Change the language.
USB Mode: Switch between the MTP mode and the Removable Drive (MSC) mode.
Date & Time: Set the current time and date.
Default: Restore all settings to default values.
Format: Erase all contents in the player.
HDS Format: Low-level format of the player's memory. Note: Do not use this function unless advised by manufacturer.
Version Information: Display model / version / date.


4 | MANAGING YOUR FT602
• Installing, Using, and Uninstalling FT602 Related Software
A. Installation
- Insert the supplied installation CD in your CD-ROM drive and wait until the main interface appears, as shown at right.
- Click on the software that you want to install.

B. Using Truly AVI Transcoder. You can use Truly AVI Transcoder to create video files for your FT602. The transcoder supports *.AVI, *.ASF, *.MPEG, *MPG, and *.WMV files.
- Overview of the main interface. Click Start/Programs/Truly Transcoder/Truly Transcoder to start the program.

2. Conversion procedures:
a. Choose a source folder in Area A and select source file in Area B.
b. Choose the output folder and target file name in Area C.
c. Click Convert to start converting.
d. To play back, upload the generated AVI target file to the FT602 Removable Drive.
C. Uninstalling Transcoder. Double click Add or remove programs in Control Panel. Select Truly Transcoder and click Change/Remove. Follow the instructions to uninstall Transcoder from your PC.

Note: The aforementioned operations are performed in Windows 2000 operating system and may be different when using other operating systems. Screenshots are for your reference only.
- Upgrading the Firmware
A. Download the latest firmware from http://www.picnroll.com
B. Connect the player to your PC using the supplied USB cable.
C. Copy the latest firmware to the root directory of your player. The player will automatically shut down once the USB cable is unplugged.
D. Press and hold Ⓜ/Mode to turn on your player; it will automatically start to upgrade its firmware. You may have to repeat this process several times.
E. An OK will show on the display once it finishes upgrading.

- Formatting
Be sure to back-up your important data before formatting.
A. Connect your player to your PC using the USB cable.
B. Click My computer/removable disk.
C. Right click on the removable disk and select Format. When the Format window pops up, click Start to begin formatting. Click Close when formatting is completed.
D. This player does NOT support NTFS format. Using NTFS format may damage your player. Please choose either FAT or FAT32 when formatting.
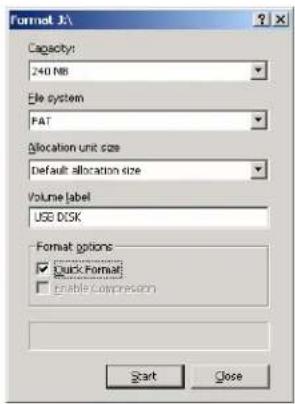
Note: All menus will be restored to their default states after formatting. Please be careful when formatting, since all files will be lost during formatting. If the battery is too low, formatting may fail.
5 | MISCELLANEOUS
- Connecting to / Disconnecting from Your PC
These instructions are for users of operating systems prior to Windows XP.
A. Disconnecting from Your PC: Follow these steps to disconnect the player from your PC:
- Right click the USB icon ⚫ in the Taskbar area.

- Select Unplug or eject devices or Stop USB Mas s Storage Device.

- Click OK to safely disconne ct the player from your PC.

- Troubleshooting
A. Cannot turn the player on.
Power in battery may be too low to run player; charge the battery and then retry.
◆ Make sure that HOLD is in the Unlocked position. Unlock the player and retry.
◆ Press Reset to reset your player.
Error occurred or the USB connection was broken when upgrading the firmware.
◆ The flash memory is physically damaged.
B. There is noise, distortion, or no sound whatsoever when playing.
◆ Make sure the volume level is not set to 0.
◆ Make sure the earphones are securely plugged in and not broken.
◆ Make sure the music file is intact.
When using MP3 or WMA files, it is possible to hear noises when the source file is of low quality. Try another file.
C. The characters on the display are unreadable.
Make sure you have selected the correct language. (You can change the language setting in System settings – language setting.)
D. FM radio quality is poor.
Make sure that the earphone is securely plugged in. (The earphone wire serves as the antenna when in radio mode.)
♦ Reposition the player and the earphone.
◆ Nearby electronic devices may be causing interference; try turning them off.
E. Cannot download.
◆ Make sure that the USB cable is securely plugged in.
◆ Make sure that you have sufficient memory space before downloading.
F. FT602 shows an error message and stops.
◆ Please reset your player. However, all files and data in your player will be lost.
G. Display does not respond.
◆ Please restart the player. If the problem persists, reset your player.
H. Data is missing.
An unstable power supply could lead to missing data. It is recommended that you back-up all your data.
• Frequently Asked Questions
Q Why can some WMA format songs on the digital player not be played?
A Some websites only offer songs in WMA format with DRM (Digital Right Management) license protection (for example: www.napster.com and www.musicmatch.com). We call these DRM-protected songs "Secure WMA songs." These Secure WMA songs cannot be played in the digital player unless they are synchronized to the player using Windows Media Player.
Q How many minutes of MP3/WMA songs can be stored on the player?
A This depends upon the player's memory capacity and how much is available for storage. One minute of MP3/WMA music occupies approximately 1MB of space; so if the capacity of the memory is 1GB, then it can store around 1,000 minutes of music.
Q Why do different songs play at different volumes?
A Depending on how a song is recorded and how the volume levels were set at that time, songs can have different volumes levels and some can sound much louder than others.
• Product Specifications
| Model Number TRULY | FT602 |
| Storage Media | Built-In 2GB NAND Flash Memory |
| Interface to PC | USB2.0 High Speed |
| Transmission Speed | Downloading >10MBps, Uploading >4MBps |
| Recording Format WAV | |
| Bit Rate MP3 (8KBps-320KBps), WMA (5KBps-320KBps) | |
| Video Format | Support AVI Format (Converted from WMV/MPG/MPEG/ASF/AVI Formats) |
| Recording Time | Approximately 5 Hours |
| Display LCD | 262K Colors, 1.8 inch, 128 x 160 pixels |
| Battery | Built-in Lithium Battery |
| Recharging Time | Approximately 3 Hours |
| Playing Time | >10 Hours (Backlight OFF, 128kbps/44.1kHz MP3 songs) |
| Maximum Output | Earphone 25mw*2 |
| FM Frequency | 76.0 - 108.0MHz |
| Dimensions | 77mm(L) * 42mm(W) *13.5mm(H) |
• Copyrights and Declarations
A. Copyrights. All rights reserved. No information in this publication shall be redistributed in any format whatsoever, including but not limited to electronic versions, mechanical versions, records, and/or copies, nor shall such information be translated to any other natural languages or computer languages, without first obtaining written permission from Truly Electronics Mfg. Ltd.
B. Declarations. Truly Electronics Mfg. Ltd. assumes no implicit or explicit guarantees or declarations on the quality and accuracy of the information covered in this publication. Information covered in this publication may subject to change without notice.
- Windows ME, Windows 2000, Windows XP, Windows Vista, and PlaysForSure are registered trademarks of Microsoft (US) Inc. All related trademarks and products are properties of Microsoft.
- Always back-up your important data. Truly assumes no liability for any loss resulting from loss of data.
- This user manual (content and screenshots) are created based on the initial version of the player.
◆ BBE and BBE Headphones are registered trademarks of BBE Sound {US} Inc.
Features and related operations are subject to change without notice. The latest user manual can be found in the supplied installation CD and Truly's website.
Should you need more information on an upgraded version of this player, please visit www.picnroll.com. You can also contact one of our service hotlines: 1-866-PIC-N-ROL (1-866-742-6765, USA, toll free), +86 660 3394007 (Mainland China) or +852 24879803 (Hong Kong).
• Certifications and Environmental Protection
A. FCC Certification. This player has been certified by the Federal Communications Commission and complies with the requirements outlined in FCC Rule Section 15. These restrictions protect radio receivers and television sets against interference. This player can emit radio signals. It may cause interference to radio communications if it is used inappropriately. However, we assume no guarantees that there are no interferences under any circumstance. You can turn the unit on and off to determine whether there is any interference. If you detect any interference and wish to minimize it, please try one or more of the following:
♦ Reposition the receiver or the antenna.
◆ Move the player away from the receiver.
◆ Use different power outlets for the player and the receiver.
When necessary, consult with a dealer or a professional technician.
Note: Unauthorized modification to the player may result in the loss of certain rights of the user. Truly assumes no liability for any loss resulting from unauthorized modification to the player.
B. Environmental Protection: Disposal of electronic devices
(applicable to EU members and other European countries that have recycle regulations in force). If a product or its packaging bears the icon shown at right, the item must be disposed of properly by returning it to local organizations for proper recycling. Your assistance will help prevent potential health threats. For more information about how to recycle this product, please contact your dealer or our local offices.

6 | INDEX
Accessories Included 4
Battery, Charging 6
Buttons and Controls 5
Connecting/Disconnecting from PC 5-7, 25
Copyrights 27
Declarations 27
Disposal of Electronic Devices 28
Downloading Files to Player 10
Downloading Music from Internet 9
Environmental Production 28
FCC Certifications 28
Firmware, Upgrading 23
FM Radio Operations 17-18
Formatting 24
Frequently Asked Questions 26
Installing/Uninstalling Software 22-23
Lock (HOLD) 14
MP3 Files, Installing 8
MP3 Songs, Minutes of Storage 26
Music Files, Managing 8
Music Files, Transferring 9
Music Library, Building 10
Music, Playing 15
Play Mode Interface 15
Play Mode, Option Menu 16
Playlist Files 16
Playlist, Adding Music to 16
Podcast Features 21
Power On/Off 14
Product Features 3
Product Specifications 27
Recording 19
Recording, BitRate Setting 19
Recording, Source Setting 19
Recording Files, Playback 19
Repeat Modes, EQ Modes 17
Safety Instructions 3
Segment-Repeat Function [A-B] 16
Songs, Hierarchy of Folders 10
Synchronization, Automatic 12
System Requirements 5
System Settings, Changing 21
Transcoder, Uninstalling 23
Transcoder, Using 22
Troubleshooting 25
Video, Playing 20
Viewing Images 20
Volume, Adjusting 14, 26
Windows Media Player 10-11
WMA Songs, Minutes of Storage 26
WMA-Format Songs, Playability 26
- Table of Contents
- QUICK START
- BASIC OPERATIONS
- USING YOUR F602
- MANAGING YOUR FT602
- MISCELLANEOUS
- INDEX
- - Safety Instructions
- Power
- Product
- Other
- • Product Features
- • Included Accessories
- • Minimum System Requirements
- - Buttons and Controls
- - Connecting to / Disconnecting from Your PC
- • Charging the Battery
- Note:
- • More About Connecting to Your PC
- Quick Start Page 7
- • More About Disconnecting from Your PC
- • Managing Music Files
- Using Your Player as a Removable Disk
- Installing MP3 Files Directly from Your Computer
- Installing MP3 Files from Other Sources
- Transfer Music Files
- Use Explorer to transfer music files.
- Use TMusic to transfer music files.
- Build my music library.
- Download a list of files to the player
- Build hierarchy of folders for song tracks. You can use TMusic to store songs in the player in hierarchy orders of . . .\Artist\Album\Tracks to easily and quickly locate tracks.
- Use Windows Media Player 10 to transfer music files
- Using Your Player as an MTP Device
- Synchronize music to FT602 using WMP10:
- Manual synchronization
- Quick Start Page 12
- Automatic synchronization
- Quick Start Page 13
- | BASIC OPERATIONS
- • Power On / Off
- - Adjusting the Volume
- - Lock (HOLD)
- | USING YOUR FT602
- - Playing Music
- Selecting operations on the Option menu in the play mode:
- Using repeat modes, EQ modes:
- - FM Radio
- Radio mode interface
- Basic FM radio operations
- Search and save stations
- - Recording
- Recording setup
- Source setting
- BitRate setting
- - Playing Video
- Search video files
- Play video
- - Viewing Images
- • Using the Podcast Feature on Your FT602
- Using your MyPodder software for the first time
- Downloading Podcast files directly to your FT602
- Listening to your Podcast files on your FT602
- - Changing System Settings
- | MANAGING YOUR FT602
- • Installing, Using, and Uninstalling FT602 Related Software
- Installation
- Conversion procedures:
- - Upgrading the Firmware
- - Formatting
- | MISCELLANEOUS
- - Troubleshooting
- Cannot turn the player on.
- There is noise, distortion, or no sound whatsoever when playing.
- The characters on the display are unreadable.
- FM radio quality is poor.
- Cannot download.
- FT602 shows an error message and stops.
- Display does not respond.
- Data is missing.
- • Frequently Asked Questions
- • Product Specifications
- • Copyrights and Declarations
- • Certifications and Environmental Protection
- Environmental Protection: Disposal of electronic devices
- | INDEX
Brand : Truly
Model : FT602
Category : Media player