
Chancellor SW470 - Amplifier AmpliVox - Free user manual and instructions
Find the device manual for free Chancellor SW470 AmpliVox in PDF.


| Product Type | Public Address Amplifier |
| Model | Chancellor SW470 |
| Brand | AmpliVox |
| Power Output | 470W RMS |
| Inputs | 2 x XLR, 2 x 1/4" (6.35mm), RCA aux |
| Outputs | 70V / 100V speaker, 4/8 ohm, line out |
| Frequency Response | 20 Hz - 20 kHz |
| Signal-to-Noise Ratio | >90 dB |
| THD | <0.5% |
| Power Consumption | 600W |
| Power Supply | AC 100-240V, 50/60Hz |
| Dimensions (W x D x H) | 19" x 10.5" x 5.25" (483 x 267 x 133 mm) |
| Weight | 22 lbs (10 kg) |
| Cooling | Fan-cooled |
| Mounting | 2U rackmount with included ears |
| Material | Steel chassis |
| Controls | Volume, bass, treble, voice priority |
| Indicators | Power, signal, clip, protect |
| Protection | Short circuit, thermal, overload |
| Certifications | CE, RoHS |
| Warranty | 2 years |
Frequently Asked Questions - Chancellor SW470 AmpliVox
User questions about Chancellor SW470 AmpliVox
0 question about this device. Answer the ones you know or ask your own.
Ask a new question about this device
Download the instructions for your Amplifier in PDF format for free! Find your manual Chancellor SW470 - AmpliVox and take your electronic device back in hand. On this page are published all the documents necessary for the use of your device. Chancellor SW470 by AmpliVox.
USER MANUAL Chancellor SW470 AmpliVox
Your lectern may not contain all of the electronic modules as shown and explained here. Speakers and lectern microphone are pre-wired. To install gooseneck microphone, pull out connector from microphone holder and snap microphone into connector. Install back into microphone holder.
NEED HELP? Call 800-267-5486
CONTROL PANEL
- MIC 1: Adjusts volume level of gooseneck microphone on reading table.
- MIC 2: Adjusts volume level of microphone plugged into the MIC 2 input jack on amplifier.
- AUX: Controls output level of device that is plugged into the L/R RCA jacks.
- BASS: This control cuts or boosts the bass level.
- TREBLE: This control cuts or boosts the treble level.

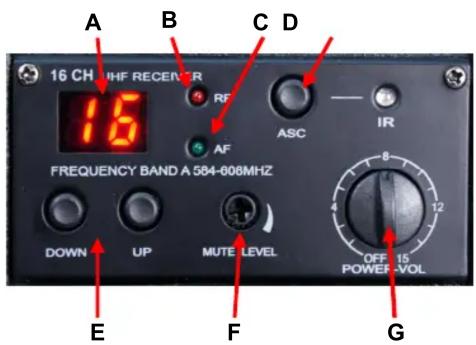
16 CHANNEL WIRELESS RECEIVER
- Channel Display (A)
• RF - Radio Frequency Indicator (B)
• AF - Audio Frequency Indicator (C) - ASC / IR Auto Channel Select (Handheld Only) (D)
- Select Buttons - Manual Channel Selection (E)
- Mute Level Adjustment (F)
• Volume Control (G)
RECEIVER / TRANSMITTER SETUP:
- The receiver has its own POWER / VOLUME Control (G). Turn Power On. A Frequency Channel will appear in the Channel Display (A). Press Select Buttons (E) to select a channel. Channel number must match channel number on wireless transmitter.
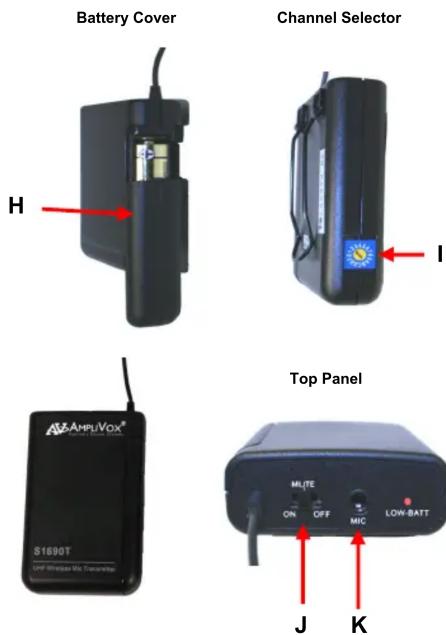
- The transmitter bodypack is operated by 1 - "AA" 1.5 Volt alkaline battery. Slide off battery cover (H) and install battery as shown. Make certain the battery is fully seated in its compartment so the cover slides in place easily. Battery life with alkaline batteries is approximately 8 hours of operating time.
- Select a channel (1-16) on side panel (I) using the supplied screw driver to select channel number. Channel selected should match channel on receiver. When transmitter and receiver are set to correct channel the RF indicator (B) will glow red when transmitter is turned on.
- Plug the Lapel microphone into the Mic Input Jack (K). The microphone can be clipped to a necktie or other clothing, using the supplied clip. The lapel mic should be placed under the chin, as close to the center of the body as possible.
- Slide the power ON/OFF switch (J) to the ON position (the LED indicator light will illuminate green). Replace batteries when this LED turns red.
- MUTE LEVEL (F) is set at half way mark when it leaves the factory. If speaker sound is breaking up, turn level clockwise with small screwdriver until condition improves.
Wireless Transmitter - Bodypack
If you are using the AmpliVox S1695 Wireless Handheld Microphone Transmitter, screw off the lower bottom section of microphone and insert 2 - "AA" 1.5 Volt alkaline batteries.
IMPORTANT: Because the microphone has an AUTO SYNC function, you first select channel you wish to use on the receiver. Then press the ASC button (D), the IR light will start to flash. Turn on microphone and point end (6) of microphone at the flashing IR light on receiver and the microphone will auto sync to the same channel as selected on the receiver.
BATTERIES
- Hold the body of microphone in hand and twist off bottom section of microphone.
- Insert two ÊAAË batteries.
- Twist bottom section back on to microphone.
BATTERY STATUS
The life expectancy of the two batteries is about 10 hours. When the “BATTERY” symbol on the display screen keeps flashing the batteries should be replaced immediately.

OPEN


CLOSE

6

Functions
1) Interchangeable Microphone Head
2) LCD Screen
3) Power / Mute Control Switch
4) Select Button
5) Microphone Input Sensitivity AdjustmentE is used to set the gain of microphone. If you are a soft talking speaker you will need to turn the control counter clockwise. Turn clockwise if you are a loud talker. Use plastic screwdriver that is supplied.

- TURN ON MICROPHONE: Push and hold the ÉPOWER/MUTE" (3) button until LCD screen lights up.
- TO MUTE: Press "POWER/MUTE" button twice to MUTE. Channel number will flash when muted. Press button again twice to remove ÉMUTE".
- TURN OFF MICROPHONE: Push and hold the ÉPOWER/MUTE" (3) button for 2 seconds to turn microphone ÉOFF".
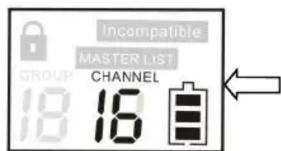
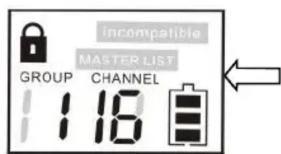
- SELECT CHANNEL (Manual): Press and hold the ÉSELECT" (4) button for 2 seconds until you only see the word Channel and channel number. To change channel, when flashing, press the ÉSELECT" (4) button until you reach the desired channel. Flashing will stop after 10 seconds and channel is now set.
- LOCK / UNLOCK CHANNEL: Push the ÉPOWER/MUTE" (3) button and ÉSELECT" button at the same time to lock or unlock channel. When locked, channel cannot be changed. ÉLOCKED" symbol appears in upper left-hand corner.
- With main power switch (L) on, press ▶ button (M) to turn Bluetooth pairing on and hold for 4 seconds to enter into the pairing mode.
- The RED LED (N) will start to flash, searching for a Bluetooth signal. Search function will stay active for 10 minutes. If no signal is found, this function will shut off. During the search function turn on your Bluetooth device for pairing. On your Bluetooth menu of your device, choose pin code 0000. Once paired, red LED will stay on.
- Use this ▶ button (0) to move to the next song or ◀ (P) to play previous song. Use ▶ (M) to pause. When paused you will need to press again to start playing.
- VOLUME CONTROL (L) Use to adjust the volume of the Bluetooth material.
AMPLIFIER

The Bluetooth® word mark and logos are registered trademarks owned by Bluetooth SIG, Inc. and any use of such marks by Amplivox Portable Sound Systems is under license. Other trademarks and trade names are those of their respective owners.
• MIC 2: XLR connector for external wired microphone
• LINE IN: 1/4" connector
• LINE OUT: 1/4" connector
- EXTERNAL SPEAKER A: 1/4" connector
- EXTERNAL SPEAKER B: 1/4" connector
• BATTERY STATUS: NOT USED WITH THIS LECTERN
• POWER : ON / OFF SWITCH

IMPORTANT
This device complies with Part 15 of the FCC Rules. Operation is subject to the following two conditions:
(1) This device may not cause harmful interference, and (2) this device must accept any interference received, including interference that may cause undesired operation.
The unit/s circuitry may cause interference to nearby radios. To prevent interference, either switch the unit off or move away from the affected radio.
NOTE: This equipment complies within the limits for a class B digital device, pursuant to Part 15 of the FCC Rules. These limits are designed to provide reasonable protection against harmful interference in a residential installation. This equipment generates, uses and can radiate radio frequency energy and, if not installed and used in accordance with the instructions, may cause harmful interference to radio communications. However, there is no guarantee that interference will not occur in a particular installation. If this equipment does cause harmful interference to radio or television reception, which can be determined by turning the equipment off and on, the user is encouraged to try to correct the interference by one or more of the following measures:
- Increase the separation between the equipment and receiver.
- Connect the equipment into an outlet on a circuit different from that to which the receiver is connected.
- Consult the dealer or an experienced radio / TV technician for help.
NOTE: Shielded cables may be required to be used with this unit to en-sure compliance with the Class B FCC limits.
TROUBLESHOOTING GUIDE
PROBLEM & ITEMS TO CHECK
UNIT WILL NOT TURN ON
- Is unit plugged in?
SOUND IS MUFFLED
- Bass too high
- Treble too low
FEEDBACK: A LOUD SQUEALING, SHRILL OR HOWLING SOUND THAT IS SELF GENERATED
- Feedback occurs when a microphone is too close to the speaker or the microphone volume is too high, or the microphone is pointed towards the speaker. It is also caused by sound reflecting off hard surfaces.
-
Reduce or eliminate Feedback by
-
Pointing the microphone in a different direction
- Keeping the microphone BEHIND the speakers
- Turn down the volume levels
POWER IS ON, BUT NO SOUND
- Check main volume level.
- If using wireless, be sure receiver and transmitter battery is installed and both units are turned on.
- If microphone has batteries, check batteries.
- Check cables/connectors.
WIRELESS MIC DOES NOT WORK
- Check that transmitter batteries are fully charged and ensure transmitter is on.
- Does yellow ÊsignalË LED light when transmitter is turned on?
- Are the transmitter and receiver on the same channel? (1-16)
WIRELESS MIC CUTS IN AND OUT
- Is unit visible (line of sight) from user? If not, move unit into view when using wireless microphone.
- Does the yellow ÊsignalÉ LED go out when signal drops out? Check battery in transmitter.
MAKES BUZZING NOISE
- Check cables a damaged cable will cause this. Unplug cables one at a time until buzzing stops.
- Check for Ground loops use a ground loop isolator where needed.
NEED HELP? Call 800-267-5486

- CONTROL PANEL
- 16 CHANNEL WIRELESS RECEIVER
- RECEIVER / TRANSMITTER SETUP
- BATTERIES
- BATTERY STATUS
- FUNCTIONS
- AMPLIFIER
- IMPORTANT
- TROUBLESHOOTING GUIDE
- PROBLEM & ITEMS TO CHECK
- UNIT WILL NOT TURN ON
- SOUND IS MUFFLED
- FEEDBACK: A LOUD SQUEALING, SHRILL OR HOWLING SOUND THAT IS SELF GENERATED
- POWER IS ON, BUT NO SOUND
- WIRELESS MIC DOES NOT WORK
- WIRELESS MIC CUTS IN AND OUT
- MAKES BUZZING NOISE
Brand : AmpliVox
Model : Chancellor SW470
Category : Amplifier