
Captiva 600 - Heating Real Flame - Free user manual and instructions
Find the device manual for free Captiva 600 Real Flame in PDF.


| Product Type | Electric Fireplace Heater |
| Brand | Real Flame |
| Model | Captiva 600 |
| Dimensions (W x H x D) | 600 mm x 450 mm x 200 mm |
| Weight | 12 kg |
| Power Supply | 220-240 V ~ 50 Hz |
| Heating Power | 1500 W (maximum) |
| Heating Type | Fan-forced electric heater |
| Flame Effect | Realistic LED flame effect with adjustable brightness |
| Thermostat | Adjustable thermostat with temperature range 15-30°C |
| Remote Control | Includes remote control for on/off, flame brightness, thermostat, and timer |
| Timer | Programmable timer up to 8 hours |
| Safety Features | Overheat protection, tip-over switch, cool-touch glass |
| Installation | Freestanding or built-in (recessed) installation |
| Material | Steel body with tempered glass front |
| Maintenance | Clean glass with non-abrasive cleaner; replace LED bulbs every 3-5 years |
| Spare Parts Availability | Heating element, remote control, LED modules available from manufacturer |
| Energy Class | A (heating mode) |
| Noise Level | < 40 dB (flame only), < 50 dB (heating) |
| Certifications | CE, RoHS, GS |
Frequently Asked Questions - Captiva 600 Real Flame
User questions about Captiva 600 Real Flame
0 question about this device. Answer the ones you know or ask your own.
Ask a new question about this device
Download the instructions for your Heating in PDF format for free! Find your manual Captiva 600 - Real Flame and take your electronic device back in hand. On this page are published all the documents necessary for the use of your device. Captiva 600 by Real Flame.
USER MANUAL Captiva 600 Real Flame
natural_image
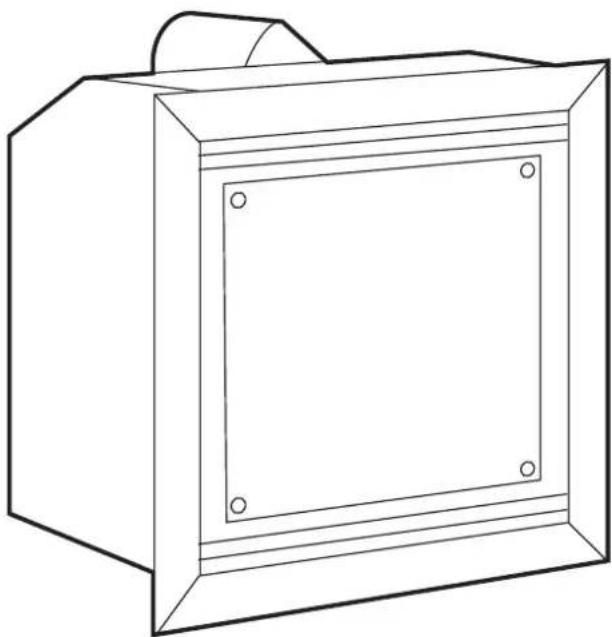
Line drawing of a rectangular box with a square frame and mounting points (no text or symbols)CAPTIVA® BALANCED FLUE SPACE HEATER
INSTALLATION & OPERATING MANUAL
The Captiva 600 & 900 are approved to be installed as a zero clearance firebox and are designed to operate on Natural Gas and Propane (LPG) gases ONLY. Approval Number GSCS20081.
WARRANTY INFORMATION
The benefits provided to you under the following warranty are in addition to any other rights and remedies available to you under the law.
1. Warranty
If:
(a) during the first 15 years from the date of purchase (Firebox Warranty Period), there is a defect in the firebox of the Gas Burner; or
(b) during the first 2 years from the date of purchase (Parts Warranty Period), there is a defect in the gas valves or other parts of the Gas Burner.
due to improper workmanship or material, Glen Dimplex will replace or repair the Gas Burner without charge. Any replacement product is warranted only for the time remaining on the original Firebox Warranty Period or the Parts Warranty Period as relevant.
2. Registration
You must register to receive the benefit of this warranty by completing the warranty registration on our website (www.realflame.com.au) or completing and mailing the attached registration card within 30 days of purchase of your Gas Burner (or, if the Gas Burner is fitted to a new home, within 30 days of the date of settlement of purchase of such new home).
3. Exclusions
Glen Dimplex is not obliged to replace or repair the Gas Burner under clause 1 if:
(a) it has been improperly stored, installed, connected, used, operated or repaired, or damaged, abused, tampered with, altered (without our written approval), or not maintained in strict accordance with our installation and operating instructions; or
(b) it has been installed in an outdoor setting.
4. Limit of Liability
The warranty provided under this warranty is limited to replacement or repair of the Gas Burner only, at our option. To the extent permitted by law, Glen Dimplex excludes liability for consequential loss or any other loss or damage caused to property or persons arising from any cause whatsoever, and damage arising from normal wear and tear.
5. Claiming under the Warranty
In order to claim under this warranty you must, within the Firebox Warranty Period or the Parts Warranty Period (as relevant), contact Glen Dimplex, providing the original proof of purchase and the details below:
Supplier Name
Date Of Purchase / settlement of property if new home ____
Model / Serial Number
This warranty does not cover the cost of claiming under the warranty or transporting the Gas Burner to and from the supplier.
Our goods come with guarantees that cannot be excluded under the Australian Consumer Law. You are entitled to a replacement or refund for a major failure and for compensation for any other reasonably foreseeable loss or damage. You are also entitled to have the goods repaired or replaced if the goods fail to be of acceptable quality and the failure does not amount to a major failure.
If you would like to speak to someone about your Gas Burner or claiming under this warranty, please contact the Service Warranty Desk on 1300 554 155.
Glen Dimplex Australia Pty Ltd ACN 69 118 275 460
Head Office: 1340 Ferntree Gully Road, Scoresby 3179
Telephone: (03) 8706 2000 Facsimile: (03) 876 2001
WARNING
The “Captiva 600 & 900” have a primary safety glass fitted in front of the glass door. This safety glass is fitted to these appliances to reduce the risk of injury from burns and at no time should this glass be permanently removed. For protection of young children or the infirm, a secondary guard is required.
The appliance is not intended for use by persons (including children) with reduced physical, sensory or mental capabilities, or lack of experience and knowledge, unless they have been given supervision or instruction concerning use of the appliance by a person responsible for their safety. Children should be supervised to ensure that they do not play with the appliance.
INSTALLATION NOTICE
The installation of this appliance is only to be carried out by an authorised person in accordance with the Manufacturer's Instructions, local gas fitting regulations, AS/NZS 5601 installation code for gas burning appliances and any other relevant statutory regulations.
In all cases the installation of this appliance shall meet the requirements as set out in AS/NZS 5601.
NOTE: Not intended for fireplace insert.
■ Do not install in a fireplace.
NOTE: A slight smell may be apparent for the first few hours of use. This is due to the heat resistant paint curing. It is recommended to open windows in the room for the first lighting of the fire. In some instances a slight discolouration may occur inside the firebox. This is a normal condition and is not covered by warranty.
IMPORTANT SAFETY NOTICE
■ DO NOT PLACE ARTICLES ON OR AGAINST THIS APPLIANCE.
■ DO NOT MODIFY THIS APPLIANCE.
■ DO NOT USE OR STORE FLAMMABLE MATERIALS IN OR NEAR THIS APPLIANCE.
■ DO NOT SPRAY AEROSOLS IN THE VICINITY OF THIS APPLIANCE WHILST IT IS IN OPERATION.
CARE MUST BE TAKEN TO ENSURE THAT ANY RETURN AIR REGISTER OR EXHAUST SYSTEM DOES NOT ADVERSLEY AFFECT THE OPERATION OF THE APPLIANCE OR DRAUGHT OF CHIMNEY OR FLUE.
WARNING
The outer glass panel gets extremely hot! Precaution should be taken and young children supervised at all times when heater is operating.
SERVICING
It is recommended you service your gas fire every 2 years as a minimum.
CORD REPLACEMENT
Electrical cord replacement must be undertaken by qualified and trained personnel only.
■ APPLIANCE IS DESIGNED TO OPERATE WITH LUMINOUS FLAMES. MAY EXHIBIT SLIGHT CARBON DEPOSIT.
CONTENTS
Contents 4
Data Plate....5
Zero Clearance introduction ....6
Installation Procedure 7
Dimensions Captiva 600....14
Dimensions Captiva 900....15
Timber frame installation....16
Vertical venting installation ....18
Tests to be carried out by installer 20
Servicing and maintenance ....20
Parts list 22
Gas control assembly 22
Flue termination (cowls) regulations ....24
Remote control operating guide....25
Optional marble hearth and/or margin set ....28
Optional mantelpiece ....29
Electrical diagram 30
Glen Dimplex contact information....32
DATA PLATE (Affixed to the base of the unit for reference to gas pressure & consumption)
| MODEL CAPTIVA 600 SERIAL NO. DATE OF MANUFACTURE | |||||
| GAS TYPE APPROVAL: GSCS20081 | |||||
| NATURAL GAS @ 1.00 kPa Test Pressure Point (High) Injector Size | jector Size Gas Consumption | ||||
| 1.65 mm 26 Mj/hr | |||||
| LPG @ 2.65 kPa Test Pressure Point (High) Injector Size | Gas Consumption | ||||
| 1.00 mm 26 Mj/hr | |||||
| NATURAL GAS @ .40 kPa Test Pressure Point (Low) Injector Size | jector Size Gas Consumption | ||||
| 1.65 mm 15 Mj/hr | |||||
| LPG @ 0.95 kPa Test Pressure Point (Low) Injector Size | Gas Consumption | ||||
| 1.00 mm 15 Mj/hr | |||||
| MODEL CAPTIVA 900 SERIAL NO. DATE OF MANUFACTURE | |||||
| GAS TYPE APP | ROVAL: GSCS20081 | ||||
| NATURAL GAS @ 1.00 kPa Test Pressure Point (High) Injector Size | jector Size Gas Consumption | ||||
| 1.85 mm 30 Mj/hr | |||||
| LPG @ 2.65 kPa Test Pressure Point (High) Injector Size | Gas Consumption | ||||
| 1.1 mm 30 Mj/hr | |||||
| NATURAL GAS @ .40 kPa Test Pressure Point (Low) Injector Size | jector Size Gas Consumption | ||||
| 1.85 mm 19 Mj/hr | |||||
| LPG @ 1.00 kPa Test Pressure Point (Low) Injector Size | Gas Consumption | ||||
| 1.1 mm 18 Mj/hr | |||||
CAPTIVA ZERO CLEARANCE MODEL
INTRODUCTION
The Glen Dimplex “Captiva” is a log/coal or pebble effect space heater for use with Natural Gas and Propane.
The Glen Dimplex warranty will be voided by, and Glen Dimplex disclaims any responsibility for the following actions:
- Modification of the space heater and/or components including balanced flue assembly or glass door.
- Use of any component part not manufactured or approved by Glen Dimplex in combination with this “Captiva” fireplace system.
• Installation other than as instructed in this manual.
CAUTIONS
- Due to its high operating temperature, the appliance should be located out of traffic and away from furniture and draperies.
- Children and adults should be alerted to the hazards of the high surface temperature, which could cause burns of clothing ignition.
- Young children should be carefully supervised when they are in the same room as the appliance.
- Clothing or other flammable materials should not be placed on or near the appliance.
SELECTING YOUR APPLIANCE LOCATION
Your appliance may be installed in any location that is free of air conditioning ducts, electrical wiring and plumbing. Safety, as well as efficiency of operation, must be considered when selecting the heater location. Try to select a location that does not interfere with room traffic, has adequate ventilation, and offers access for the Balanced Flue terminal installation. Refer to AS/NZS 5601 for minimum clearances for Balanced Flue termination.
WARNING
When this appliance is installed directly on carpeting, tile or other combustible materials other than wood flooring, the appliance should be installed on a metal or wood panel extending the full width and depth of the appliance.
WARNING
Transit material such as cardboard packaging, pallet, plastic wrap, glass warning labels and burner media protection label must be removed prior to use of appliance.
CAPTIVA INSTALLATION PROCEDURE
natural_image
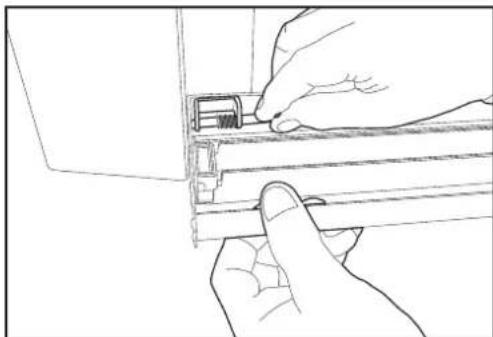
Line drawing of hands installing or adjusting a mechanical component (no text or symbols visible)Figure (1) Remove bottom louvre door by releasing spring loaded catch on left side.

natural_image
Line drawing of a hand reaching toward a window with shelves (no text or symbols)Figure (2) Remove top louvres by removing the screws on each side.

natural_image
Line drawing of a hand inserting a small component into a device panel (no text or symbols)Figure (3) Undo the door locating clips on each side of the door.

natural_image
Line drawing of three stacked rectangular panels with a door and circular button, no text or symbols presentFigure (4) Pull door outwards at the bottom and then lift the door up and remove from channel.
Re-installation of glass door is reverse of above.
N.B. Ensure sealing rope is sitting securely in track prior to fitting door.
FIT MEDIA AS PER FOLLOWING
NOTE MEDIA TYPE: Log and Coal
Pebbles
Coals only
Redgum media
Forest wood media
Log and Coal Media - Captiva 600 & 900 Models

natural_image
Cross-sectional diagram of a layered geological or material structure with no visible text or symbolsFigure (5) Remove box containing logset, and unpack. Place the large log at the rear of the firebox between the 2 location tabs.
natural_image
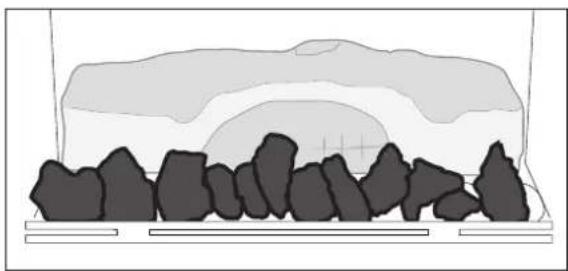
Diagram of a geological or mining structure with layered rock formations and a central arch (no text or labels)Figure (6) Place the coals on top of the white ceramic blanket.
Ensure front row of coals are placed 10 - 12mm away from the front grille.
CAPTIVA INSTALLATION PROCEDURE
Log and Coal Media - Captiva 600 & 900 Models (cont'd)

natural_image
Abstract grayscale illustration of a landscape with irregular shapes and textures (no text or symbols)Figure (7) Place the 2 'Y' shaped logs as shown, the larger on the left. Position the 'Y' end of the logs towards the front of the heater. N.B. 600 model has only 1 'Y' shaped log.

natural_image
Abstract grayscale diagram with irregular shapes and a horizontal bar at the bottom (no text or symbols)Figure (8) Place the 2 straight logs as shown
Pebble only/Coals only Media
To install pebbles follow the installation instructions as per figures 1 to 4 above, and then proceed as follows (figures 9 to 11)

natural_image
Simple line drawing of a rectangular block with six oval shapes arranged on a base (no text or symbols)Figure (9) Install the metal angle at the rear of the fireplace and place one row of pebbles behind the burner rail.

natural_image
Simple line drawing of a tray holding several smooth, rounded stones (no text or symbols)Figure (10) Place pebbles between the first row and the angled tray.
Note: Keep pebbles clear of burner rail.
natural_image
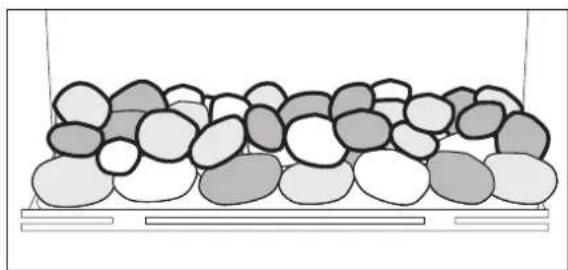
Illustration of a container filled with multiple smooth, rounded stones arranged in rows (no text or symbols)Figure (11) Place remaining pebbles up the angle of the rear tray so as the tray is hidden.
Note: If a coals only configuration is being used, use the same set up as pebbles.
CAPTIVA INSTALLATION PROCEDURE
Redgum Media - Captiva 600
Place the coals on to top of the ceramic fibre blanket. Ensure front row of coals are placed 10-12mm away from the front grille.

natural_image
Stacked concrete blocks in a metal container (no visible text or symbols)Place red gum logs as per the following sequence. Ensure burner rail is not obstructed

natural_image
Two rectangular food items placed on a dark, textured surface resembling salt or gravel (no text or symbols visible)Place log 1 and 2 first

natural_image
Stacked brown wood steaks on a dark stone base, no text or symbols visiblePlace log 3, 4 and 4 (2 off) on top
CAPTIVA INSTALLATION PROCEDURE
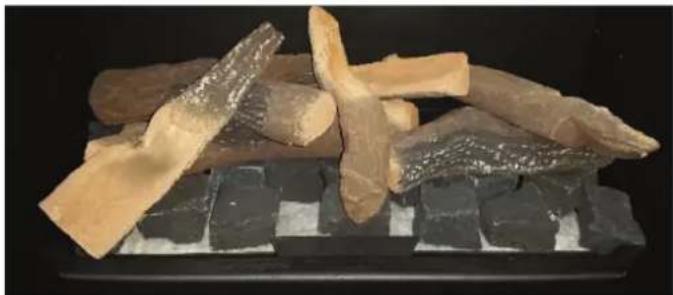
Forest Wood Media - Captiva 600
Place the coals on to top of the ceramic fibre blanket. Ensure front row of coals are placed 10-12mm away from the front grille.

natural_image
Stacked concrete blocks in a metal container (no visible text or symbols)Place forest wood logs as per the following sequence. Ensure burner rail is not obstructed.

natural_image
Stacked wood logs on a dark stone base, no visible text or symbolsPlace log G and F first

natural_image
Stacked wood chips with visible patterns on a dark surface (no text or symbols)Place logs E, B, and A
natural_image
Stacked wood logs on a dark stone tray against a black background (no text or symbols visible)Place log B and D
CAPTIVA INSTALLATION PROCEDURE
Redgum Media - Captiva 900
Place the coals on to top of the ceramic fibre blanket. Ensure front row of coals are placed 10-12mm away from the front grille.

natural_image
Stacked translucent mineral or rock fragments on a white surface, possibly from a metal tray (no text or symbols visible)Place red gum logs as per the following sequence. Ensure burner rail is not obstructed

natural_image
Two rectangular brown objects placed on dark gray blocks, possibly coal or stone (no text or symbols visible)Place log 1 and 8

natural_image
Stacked wood chips on a black stone base, no visible text or symbolsPlace log 1, 3, 4 and 6
CAPTIVA INSTALLATION PROCEDURE
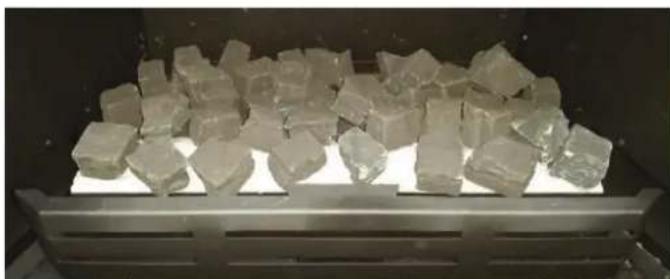
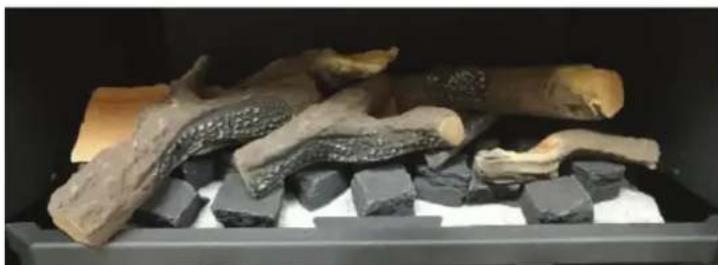
Forest Wood Media - Captiva 900
Place the coals on to top of the ceramic fibre blanket. Ensure front row of coals are placed 10-12mm away from the front grille.
natural_image
Stacked translucent mineral or rock fragments on a metal tray (no text or symbols visible)Place forest wood logs as per the following sequence. Ensure burner rail is not obstructed.

natural_image
Close-up of two wooden tools resting on dark, irregularly shaped gray blocks on a white surface (no text or symbols visible)Place log C, D and B

natural_image
Stacked dark stone blocks with irregular brown and orange patterns, possibly dried or mineral (no text or symbols visible)Place log A and G
natural_image
Assorted firewood and coal blocks arranged on a dark tray (no text or symbols visible)Place log E and F
CAPTIVA INSTALLATION PROCEDURE
TICK BOXES
☐ Replace the glass front to its original position.
☐ Fit the trim to the front of the heater.
☐ Light the unit following the procedure on pages 19-21.
☐ Test the unit for safe operation and show customer correct operating procedures.
Test for spillage.
☐ Perform pressure test.
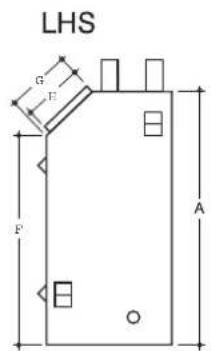
DIMENSIONS
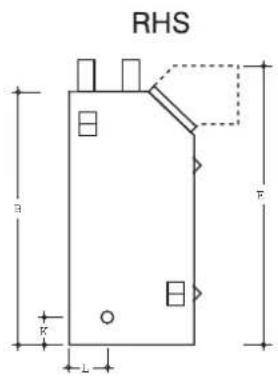
Captiva 600

| A | B | C | D | E | F | G | H |
| 782 | 780 | 588 | 655 | 860 | 645 | 190 | 180 |
| I | J | K | L |
| 385 | 140 | 85 | 120 |


Captiva 600 Trim
FRONT - 4 SIDED FRONT - 3 SIDED

natural_image
Pure geometric diagram of a square frame with side length labeled A and height labeled B (no text or symbols beyond labels)
natural_image
Pure technical drawing of a rectangular frame with internal horizontal lines and corner holes, no text or symbols present.| A | B | C |
| 790 | 930 | 840 |
DIMENSIONS
Captiva 900

| A | B | C | D | E | F | G | H |
| 790 | 780 | 860 | 923 | 840 | 600 | 255 | 180 |
| I | J | K | L | M |
| 410 | 180 | 85 | 100 | 120 |

Captiva 900 Trim
FRONT - 4 SIDED FRONT - 3 SIDED

natural_image
Simple geometric diagram of a square frame with labeled dimensions A and B (no text or symbols within the frame)
natural_image
Simple line drawing of a rectangular frame with horizontal lines and corner markers, labeled 'C' at the bottom (no text or symbols within the frame)| A | B | C |
| 1020 | 930 | 840 |
CAPTIVA ZERO CLEARANCE MODEL (continued)
Captiva Zero Clearance Timber Frame Installation
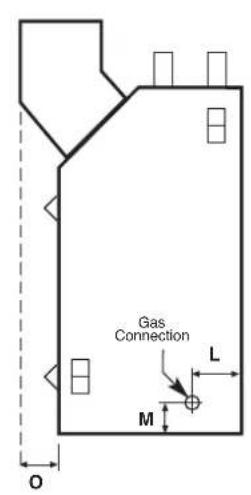
Overall Dimensions (in mm)
| MODEL A | B | C | D | E | F | G | H | J | |||||||
| 600 | 785 | 580 | 380 | 775 | 865 | 790 | 655 | 930 | 100 | 60 | 120 | 85 | 120 | 65 | |
| 900 | 785 | 860 | 410 | 750 | 835 | 1020 | 920 | 930 | 100 | 90 | 120 | 60 | 70 | 15 | |
K

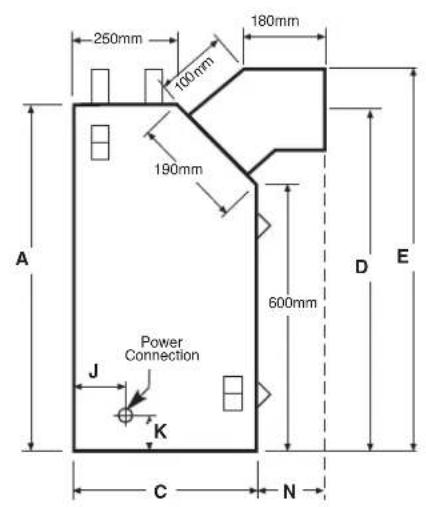
| Flue Size | Inner | Outer |
| 600 | 100mm | 180mm |
| 900 | 100mm | 180mm |
Gas connection - 15mm (1/2") Compression connection Electrical connection - 3 Pin 10Amp GPO plug Power rating of appliance 230V 50Hz 0.4Amp
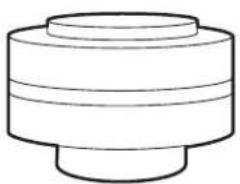
Zero Clearance cowl types
- The Captiva balanced flue space heater is a "Zero Clearance" type heater which comes complete in a zero clearance casing.
- It can be installed with the flue terminating with a horizontal or vertical cowl to suit the application.
natural_image
Simple line drawing of a cylindrical mechanical part with concentric rings (no text or symbols)Vertical top termination

natural_image
Pure diagram of a cylindrical component with horizontal stripes, no text or symbols presentHorizontal rear termination
CAPTIVA ZERO CLEARANCE MODEL (continued)
Captiva Zero Clearance Timber Frame Installation (continued)

NOTE: If fire is to be installed off the floor with a 4 sided trim, use the same A, B, C and D dimensions as shown with framework included below fire to required height. Ensure frame is suitable for fire weight.
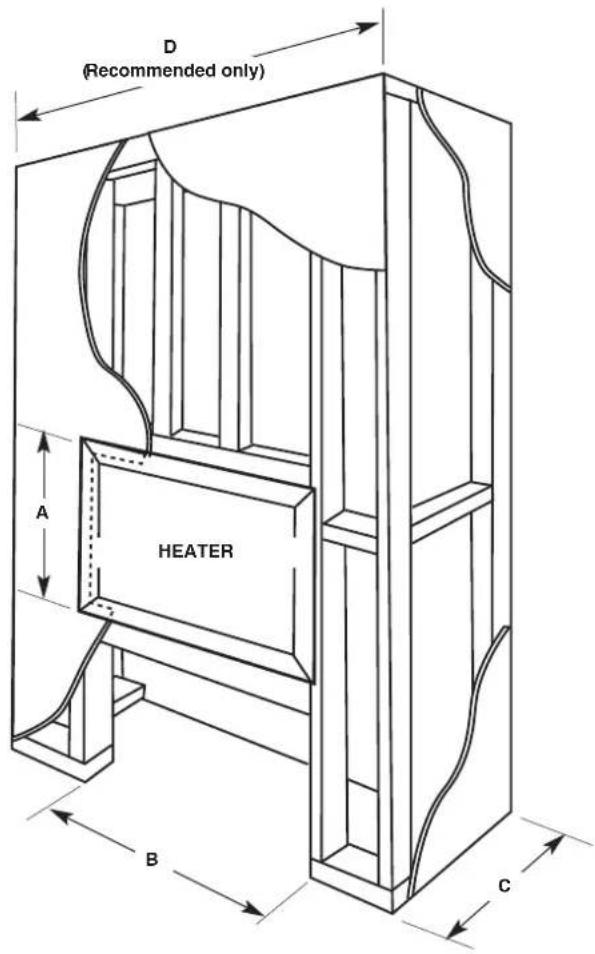
Frameout Dimensions (in mm)
| MODEL A | B | C |
| 600 885 680 475 1800 | ||
| 900 895 970 475 1800 | ||
D

CLEARANCES FROM COMBUSTIBLES
| Floor 0 mm |
| Sides 50 mm |
| Top 100 mm |
| Flue Outer 25 mm |
CAPTIVA ZERO CLEARANCE MODEL (continued)
INSTALLATION OF VERTICAL VENTING
Vertical terminations must be installed with the following clearances:
- Minimum of 500 mm from the nearest part of the roof (Measurement is taken from the bottom of the termination).
• Minimum of 1500 mm from any mechanical air inlet. - Minimum of 500 mm from any building structure or obstruction facing the termination.
• Maximum vent height is 8.9 meters from the base of the unit. - Minimum clearances 50mm from vent to all combustible materials must be maintained.
- 2 × 45^ off sets allowed, must not exceed 25% of the height. e.g. Typical vent installation of 8.9 meters from base of unit; 25% of 8.9 meters = 2.335 meters.
- Note – All horizontal flue runs must use a 45 deg bend from the appliance then a 90deg bend to run horizontal as shown in diagram A and B (page 18)
(A)

(B)


natural_image
Pure electrical circuit lines without any symbolsFlue configuration straight out of appliance is not suitable.
CAPTIVA ZERO CLEARANCE MODEL (continued)
This section is used to determine where your Balanced Flue termination will be located.:
- Flue terminations shall not be recessed in walls or sidings.
• EXTREMELY IMPORTANT: In heavy snow areas take extra care to prevent blocking flue termination with snow removal equipment. - Flue gases exiting flue terminals are very hot and must not be restricted to assure fireplace combustion is not affected.
- Do not place, build any obstruction, plant any bushes or for any reason attempt to conceal the flue termination. To do so will affect the operation of the fireplace and may be hazardous.
- This unit must always vent directly to outdoors.
CAUTIONS AND REQUIREMENTS
All flueing must maintain a clearance of 50mm from combustible materials.
NOTE: It is imperative for satisfactory operation of the “Captiva” space heater that no flueing components be modified in any way. All components have been manufactured to eliminate the need for modification when properly selected and installed.
CAPTIVA ZERO CLEARANCE MODEL (continued)
Tests to be carried out by installer
- Check unit for gas leaks.
- Ensure that both high and low pressures are set as per the appliance data plate. Refer Page 5 for adjustments and Test pressure points
- Turn the unit on to ensure it operates correctly.
- Instruct the customer on the use of the remote control. Refer to remote control operating guide on pages 25, 26 and 27.
- Should the appliance fail to ignite or recently turned off, please allow 5 minutes before attempting to relight appliance. In the event of abnormal operation please contact your lisecned gas installer, gas service personnel or Glen Dimplex Pty Ltd. Abnormal operation may consist of the following, noisy fan, excessive of small flame, unusual flame appearance, excessive sooting or other.
SERVICING AND MAINTENANCE
■ To follow when servicing, removing fan or changing valve or control modules.
IMPORTANT: POWER MUST BE ISOLATED PRIOR TO CARRYING OUT THE SERVICE/MAINENANCE.
SERVICE/MAINENANCE ONLY TO BE CARRIED OUT BY AN AUTHORISED PERSON.
natural_image
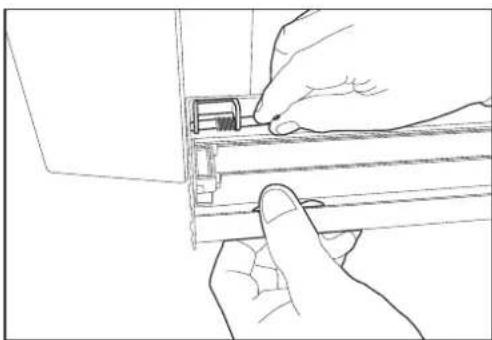
Line drawing of hands installing or adjusting a mechanical component (no text or symbols visible)Figure (1) Remove bottom louvre door by releasing spring loaded catch on left side.

natural_image
Line drawing of a hand reaching toward a window with shelves (no text or symbols)Figure (2) Remove top louvres by removing the screws on each side.

natural_image
Line drawing of a hand holding a tool inside a washing machine (no text or symbols)Figure (3) Undo the door locating clips on each side of the door.
natural_image
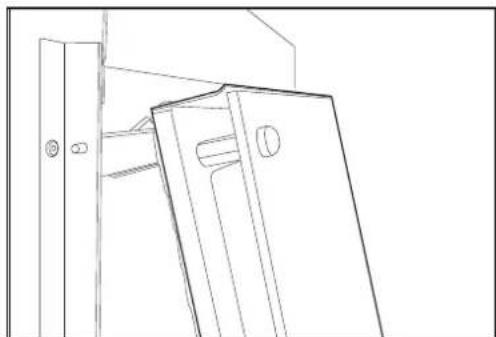
Line drawing of a door frame with handle and mounting bracket (no text or symbols)Figure (4) Pull door outwards at the bottom and then lift the door up and remove from channel.

natural_image
Line drawing of a hand holding a tool near a metal bracket (no text or symbols)Figure (5) Remove the screw holding back plate in position and remove plate.
SERVICING AND MAINTENANCE (continued)

natural_image
Technical line drawing of a mechanical assembly with a hand operating a tool (no text or symbols present)Figure (6) Undo bulkhead/burner nut.

natural_image
Line drawing of a mechanical assembly with a lever and base mount (no text or symbols)Figure (7) Remove holding screws from each side of burner.
natural_image
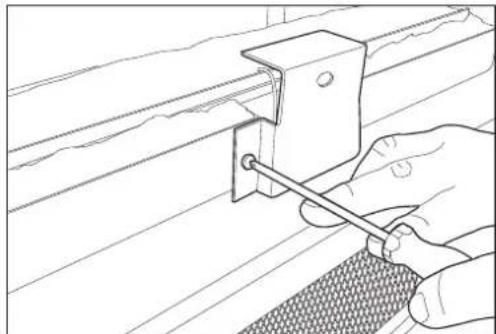
Line drawing of a hand using a tool to adjust or install a metal bracket (no text or symbols present)Figure (8) Remove sparker cover from front of burner and then gently remove burner taking care not to move the sparker/sensor.
natural_image
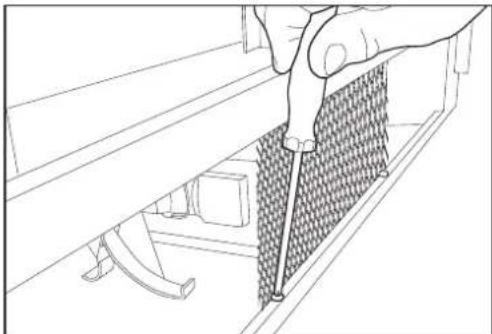
Line drawing of a hand using a tool to cut a textured surface between two metal frames (no text or symbols)Figure (9) Remove front protection mesh by removing screws.

natural_image
Line drawing of hands installing or adjusting a component on a mechanical assembly (no text or symbols)Figure (10) To remove the remote control module, remove screw from lid, remove lid and disconnect wiring, the module can then be removed.

natural_image
Technical line drawing of a mechanical assembly with a tool inserted (no text or symbols)Figure (11) To remove control module firstly remove the rectifier
SERVICING AND MAINTENANCE (continued)
natural_image
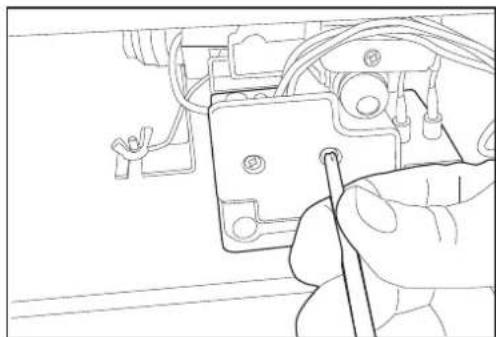
Line drawing of a hand inserting a component into an electrical panel (no text or symbols)Figure (12) Undo the two screws at the front of the module, then remove the wiring harness, the module can then be removed.

natural_image
Technical line drawing of a mechanical assembly with no visible text or symbolsFigure (13) Loosen the wing nuts of each side of the valve which will allow the valve to slide out.

natural_image
Technical line drawing of a mechanical assembly with hoses and components (no text or symbols)Figure (14) Remove the burner to be nut either from the bulkhead or the brass elbow. the valve can then be removed.

natural_image
Line drawing of a cylindrical object mounted on a floor, with a small protrusion and a wavy line near the base (no text or symbols)Figure (15) To remove the fan undo the wing nuts on each side of the fan. the fan can then be removed. to get the fan out the remote box must be removed and the burner tube is to be undone at the bulkhead.
■ After carrying out service or replacing parts, reverse the above processes to reinstate the components.
■ Prior to lighting ensure there are no gas leaks.
PARTS LIST


GAS CONTROL ASSEMBLY

CAPTIVA FLUE TERMINATION (COWLS) REGULATIONS
Balanced Flue
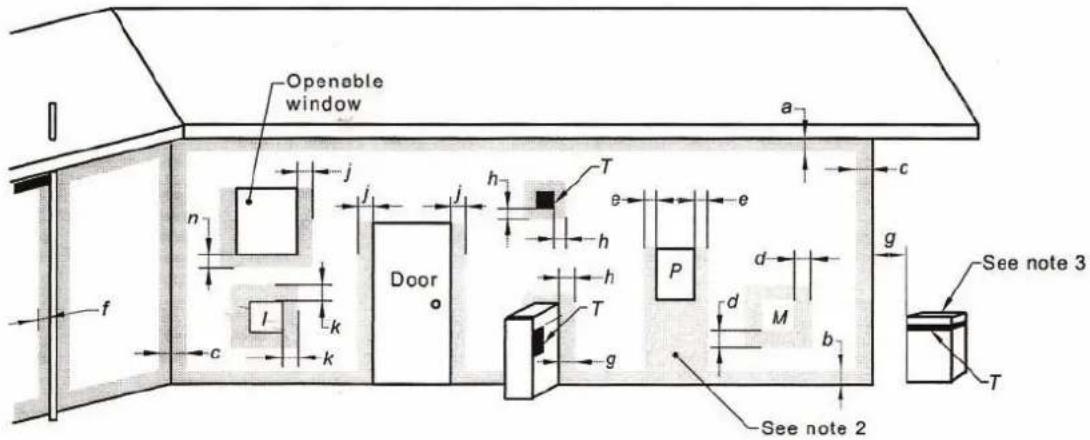
LEGEND:
T = Flue terminal
I = Mechanical air inlet
M = Gas meter
P = Electricity meter
or fuse box
Shading indicates prohibited areas for flue terminals
| Ref. | Item | Minimum clearances (mm) | |
| Natural draft | Fan assisted | ||
| a | Below eaves, balconies and other projections: | ||
| • Appliances up to 50 MJ/h input | 300 | 200 | |
| • Appliances over 50 MJ/h input | 500 | 300 | |
| b | From the ground, above a balcony or other surface † | 300 | 300 |
| c | From a return wall or external corner † | 500 | 300 |
| d | From a gas meter (M) (see 4.7.11 for vent terminal location of regulator) | 1000 | 1000 |
| e | From an electricity meter or fuse box (P) | 500 | 500 |
| f | From a drain pipe or soil pipe | 150 | 75 |
| g | Horizontally from any building structure † or obstruction facing a terminal | 500 | 500 |
| h | From any other flue terminal, cowl, or combustion air intake † | 500 | 300 |
| j | Horizontally from an openable window, door, non-mechanical air inlet, or any other opening into a building with the exception of sub-floor ventilation: | ||
| • Appliances up to 150 MJ/h input | 500 | 300 | |
| • Appliances over 150 MJ/h input up to 200 MJ/h input | 1500 | 300 | |
| • Appliances over 200 MJ/h input up to 250 MJ/h input † | 1500 | 500 | |
| • Appliances over 250 MJ/h input † | 1500 | 1500 | |
| • All fan-assisted flue appliances, in the direction of discharge | - | 1500 | |
| k | From a mechanical air inlet, including a spa blower | 1500 | 1000 |
| n | Vertically below an openable window, non-mechanical air inlet, or any other opening into a building with the exception of sub-floor ventilation: | ||
| • Space heaters up to 50 MJ/h input | 150 | 150 | |
| • Other appliances up to 50 MJ/h input | 500 | 500 | |
| • Appliances over 50 MJ/h input and up to 150 MJ/h input | 1000 | 1000 | |
| • Appliances over 150 MJ/h input | 1500 | 1500 | |
† Unless appliance is certified for closer installation
NOTES:
1 All distances are measured to the nearest part of the terminal.
2 Prohibited area below electricity meter or fuse box extends to ground level.
3 See Clause 5.13.6.6 for restrictions on a flue terminal under a covered area.
4 See Appendix J, Figures J2(a) and J3(a), for clearances required from a flue terminal to an LP Gas cylinder. A flue terminal is considered to be a source of ignition.
5 For appliances not addressed above acceptance should be obtained from the technical regulator
The Captiva is controlled completely by the use of the remote control; this remote can be used either as a manual operation or an auto operation.
- The remote thermostat uses radio frequency to transmit to the gas/fan controller.
• The remote thermostat has a LCD display - The remote thermostat uses 2 off "AA" batteries which should last for 12 months. (Depending on quality of battery.) Batteries should be changed when smoke alarms are changed.
- The remote control and the controller are non-serviceable parts and if faulty should be returned to Glen Dimplex Pty Ltd for replacement.

Locating the remote
The remote houses the thermostat that controls the heat output of the fire. When storing the remote either on its wall bracket or by placing it somewhere in the room where the fire is located, ensure there are no other heat sources that will affect the thermostats ability to accurately read the room temperature. For example, by placing the remote in direct sunlight or under a cushion, the fire may turn down or off before the room reaches the set temperature.
Factory Set Features
- When turned on the fire will always start on the low setting and remain on low for 3 minutes, it will then go to the high setting.
- The fan will automatically come on in the high mode after the fire has been operating for 3 minutes 20 seconds.
- When the fire shuts off on auto mode or is shut off in manual mode, the fan will continue to operate for 3 minutes in the "High" mode.
- The fire can be operated in either "Auto" mode or "Manual" mode.
Quick Start Guide
On/Off
Press and release the ⏻ button to turn the thermostat on and off.
Setting the day of the week and time
With the thermostat off, press and hold the 'T' button for 2 seconds or longer to initiate programming the time. Time, the hour setting and AM/PM will flash.
Setting the hour function
Press and release the ▲ or ▼ button to increase or decrease the hour setting by 1 hour.
Press 'OK' to accept.
Setting the minute function
Press and release, or press and hold the ▲ or ▼ button to increase or decrease the minute setting by 1 minute.
Press 'OK' to accept.
Setting the day of the week function
Press and release the ▲ or ▼ button to change the day of the week to the following or previous day. Press and hold the ▲ or ▼ button for 2 seconds or longer to increase or decrease the day of the week by 1 day every 0.5 seconds.
Press 'OK' to complete setting.
REMOTE CONTROL OPERATING GUIDE (continued)
Manual mode
Manual mode does not require that the time and day of the week are set.
Press the ▲ or ▼ button to increase or decrease the temperature desired.
Automatic mode
The automatic mode allows the temperature to be regulated according to a programmed level and time.
Manually overriding the set program
At any time, the temperature may be adjusted up or down. However, whenever the thermostat changes to a new time period, the temperature will be set automatically according to that period's setting.
Programming
Each day of the week can be programmed individually for 4 periods P1, P2, P3 and P4, making a total of 28 programmed periods.
Alternatively, a weekday program can be set, so the same program is used for Monday-Friday. Similarly, a weekend program can be set for Saturday-Sunday. The entire week can also have the same program.
Alternatively, a weekday or weekend program can be set with individual programs for the remaining days.
The suggested period settings for each day/s are:
- Period 1 - morning
- Period 2 - daytime
- Period 3 - evening
- Period 4 - night-time
To begin programming
With the thermostat off, press and hold the 'P' button for 2 seconds or longer to initiate programming. The LCD will display PROG, P_d and the time at which the thermostat is currently set. NO flash.
Period 1 can now be set.
- Setting the day of the week
You must choose which day/s of the week you wish to program.
Press and release the ▲ or ▼ button to change the day of the week to the following or previous day. Press and hold the ▲ or ▼ button for 2 seconds or longer to increase or decrease the day of the week by 1 day every 0.5 seconds.
The order that you can scroll through the days is as follows:
MO → TU → WE → TH → FR → MO TU WE TH FR → SA → SU → SU SA → MO TU WE TH FR SA SU
To accept the selected day/s of the week press 'OK'.
REMOTE CONTROL OPERATING GUIDE (continued)
Programming
- Setting the period starting time
The hour and AM/PM settings will now flash. To set the P1 starting time, press and release the ▲ or ▼ button to increase or decrease the hour setting. Press and hold the ▲ or ▼ button for 2 seconds or longer to increase or decrease the hour setting by 1 hour every 0.5 seconds.
Please ensure that AM/PM is set correctly.
Press 'OK' to accept.
The minute setting will now flash. Adjust the minute setting similarly, using ▲ or ▼ button
Press 'OK' to accept.
- Setting the temperature
The temperature setting will now flash. Press and release the ▲ or ▼ button to increase or decrease the temperature setting by 1 °C. Press and hold the ▲ or ▼ button for 2 seconds or longer to increase or decrease the temperature setting by 1°C every 0.5 seconds.
Press 'OK' to accept.
Period 1 is now set for the day/s of the week that you have chosen. The LCD will display P2 to indicate that Period 2 can now be set for the same day/s of the week.
Repeat the programming process for periods 3 and 4.
After program 4 is set, press 'OK' and the program for the selected day/s will be set.
Repeat the programming process for any other periods/days that are required.
Restore factory default settings
With the thermostat off, press the following sequence of buttons: 'P', 'T', 'T' ▼.
Teaching RF thermostat ID code to control unit
CAUTION: The thermostat has already been programmed with a unique code. Do not attempt to teach the RF Thermostat ID code unless instructed by the manufacturer.
With the thermostat off, press the following sequence of buttons: 'P', 'T', 'T' ▲.
The LCD display will show 'CL' (Code Learn) for 2 seconds then return to the normal OFF state display. During this time a special code will be transmitted by the RF Thermostat to the Control Unit, causing the Control Unit to learn its ID.
WARNING
When the RF thermostat is in the “Auto” mode and the room temperature drops below the minimum temperature, the fire and fan will come on and operate until the room temperature is 3^ above the minimum and then turn off, therefore:
- The minimum temperature should be set at a temperature that is not likely to cause the fire to continually turn on and off.
- If leaving the house for an extended period, the RF thermostat should be turned "OFF".
- As long as the RF thermostat is in the “Auto” mode and the temperature goes below the minimum set temperature, the fire will come on no matter what times are programmed into the thermostat.
- If you are unsure of the operation of the RF thermostat, please contact the manufacturer.
- In the event of loss of power, the appliance will shut down safely. The appliance may automatically resume operation once power is restored, pending the operation mode of the remote control.
OPTIONAL MARBLE HEARTH AND/OR MARGIN SET

| MODEL ABCDEF | ||||||
| 600 FLUSH 1190 200 820 200 375 1695 | ||||||
| 900 FLUSH 1340 180 820 180 375 1840 | ||||||
| 600 BOX | 988 118 | 820 120 375 1695 | ||||
| 900 BOX | 1138 | 78 | 820 | 80 | 375 | 1840 |
Marble Margin Set Installation Procedure
- Install Captiva with trim removed.
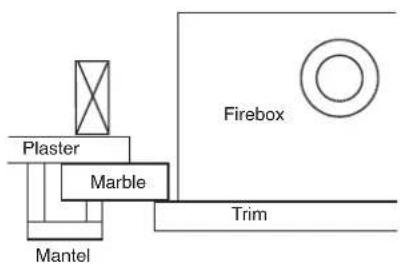
- Install marble up to the fire flange. Use liquid nails to fix to wall. Marble should look like the diagram below once it has been installed and before mantelpiece has been attached.
- Refit trim over the marble.

OPTIONAL MANTELPIECE INSTALLATION

MANTELPIECE
| MODEL A | B | C | D | E | F | G |
| 600 FLUSH | 1695 | 1240 | 990 | 940 | 60 | 80 |
| 900 FLUSH | 1840 | 1240 | 1140 | 900 | 60 | 80 |
| 600 BOX | 1695 | 1240 | 750 | 820 | 20 | 320 |
| 900 BOX | 1840 | 1240 | 980 | 820 | 20 | 320 |
Captiva Flush

ELECTRICAL DIAGRAM
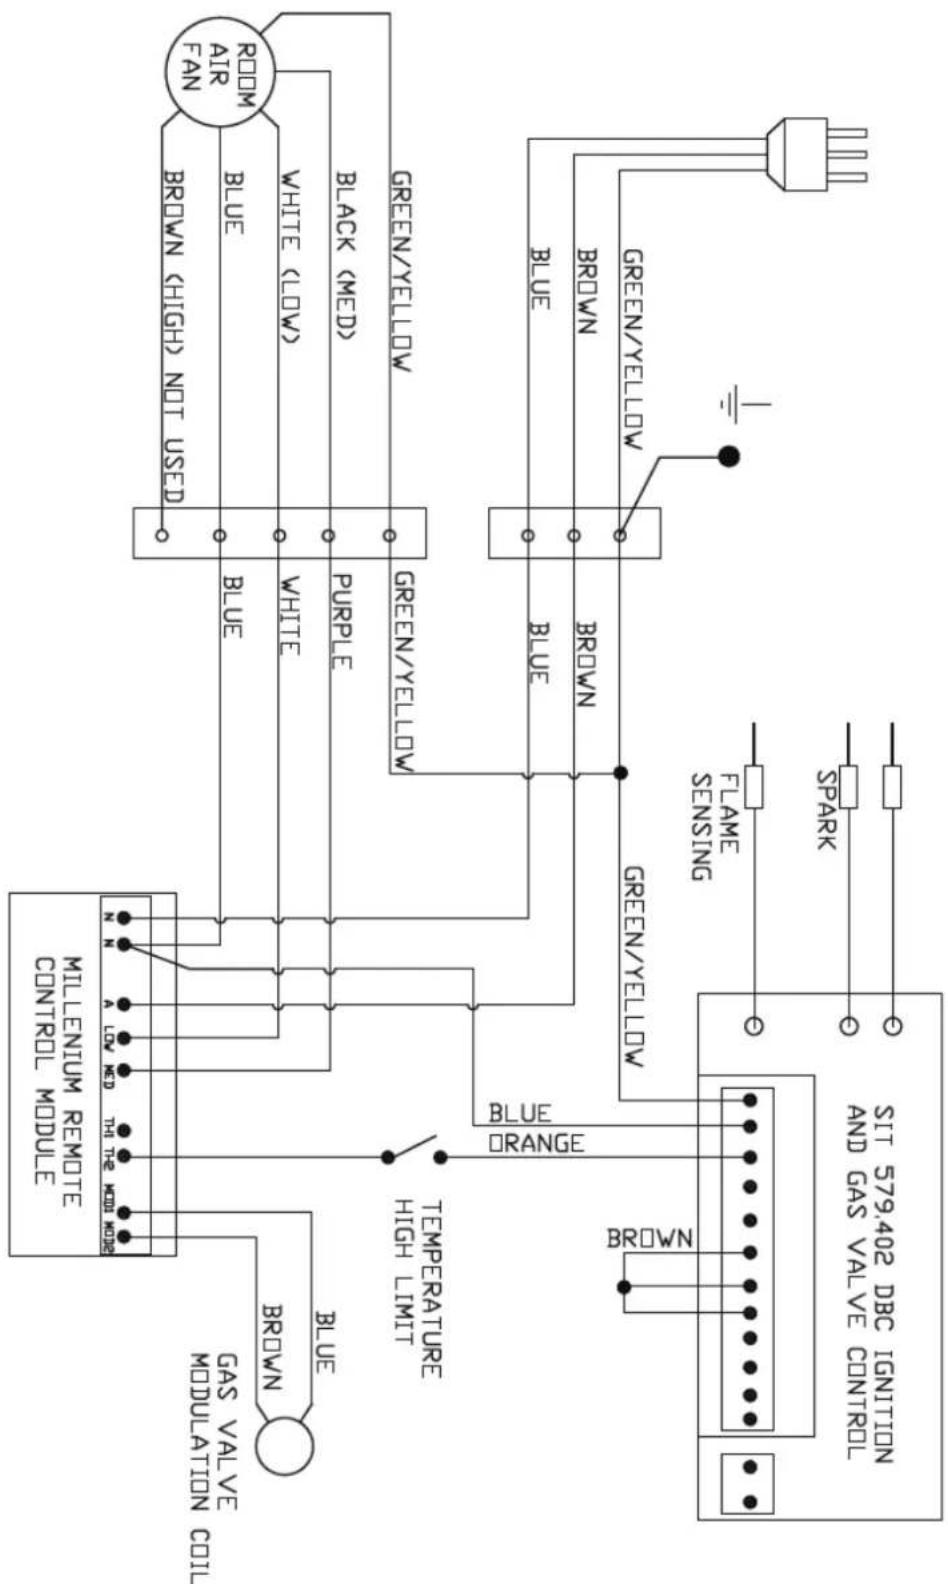
flowchart
graph TD
    A["CONTROL MODULE"] --> B["MLLENUM REMOTE"]
    B --> C["BROWN (HIGH) NOT USED"]
    B --> D["BDOWN (HIGH)"]
    B --> E["Black (MCD)"]
    B --> F["White (LOW)"]
    B --> G["Purple"]
    B --> H["GREEN/YELLW"]
    B --> I["GREEN/YELLW"]
    J["AIR AIR"] --> K["OPEN AIR"]
    L["BROWN"] --> M["FLAME SENSING"]
    N["SPARK"] --> O["Ground"]
    P["BROWN"] --> Q["GREEN/YELLW"]
    R["BROWN"] --> S["GREEN/YELLW"]
    T["BROWN"] --> U["GREEN/YELLW"]
    V["BROWN"] --> W["GREEN/YELLW"]
    X["BROWN"] --> X["GREEN/YELLW"]
    Y["BROWN"] --> Z["GREEN/YELLW"]
    AA["BROWN"] --> AA["GREEN/YELLW"]
    AB["BROWN"] --> AC["GREEN/YELLW"]
    AD["BROWN"] --> AD["GREEN/YELLW"]
    AE["BROWN"] --> AE["GREEN/YELLW"]
    AF["BROWN"] --> AF["GREEN/YELLW"]
    AG["BROWN"] --> AH["GREEN/YELLW"]
    AI["BROWN"] --> AI["GREEN/YELLW"]
    AJ["BROWN"] --> AJ["GREEN/YELLW"]
    AK["BROWN"] --> AK["GREEN/YELLW"]
    AL["BROWN"] --> AL["GREEN/YELLW"]
    AM["BROWN"] --> AN["GREEN/YELLW"]
    AO["BROWN"] --> AO["GREEN/YELLW"]
    AP["BROWN"] --> AP["GREEN/YELLW"]
    AQ["BROWN"] --> AQ["GREEN/YELLW"]
    AR["BROWN"] --> AR["GREEN/YELLW"]
    AS["BROWN"] --> AS["GREEN/YELLW"]
    AT["BROWN"] --> AT["GREEN/YELLW"]
    AU["BROWN"] --> AU["GREEN/YELLW"]
    AV["BROWN"] --> AW["GREEN/YELLW"]
    AX["BROWN"] --> AX["GREEN/YELLW"]
    AY["BROWN"] --> AZ["BLUE"]
    BA["BROWN"] --> BB["Purple"]
    BC["BROWN"] --> BC
    BD["BROWN"] --> BD
    BE["BROWN"] --> BE
    BF["BROWN"] --> BF
    BG["BROWN"] --> BG
    BH["BROWN"] --> BH
    BI["BROWN"] --> BI
    BJ["BROWN"] --> BJ
    BK["BROWN"] --> BK
    BL["BROWN"] --> BL
    BM["BROWN"] --> BM
    BN["BROWN"] --> BN
    BO["BROWN"] --> BO
    BP["BROWN"] --> BP
    BQ["BROWN"] --> BQ
    CA["BROWN"] --> CA
    CB["BROWN"] --> CB
    CC["BROWN"] --> CC
    DD["BROWN"] --> DD
    EE["BROWN"] --> EE
    FF["BROWN"] --> FF
    GG["BROWN"] --> GG
    BH["AIR AIR"] --> BH
    BI["AIR AIR"] --> BI
    AK["AIR AIR"] --> AK
    AL["AIR AIR"] --> AL
    AM["AIR AIR"] --> AM
    AN["AIR AIR"] --> AN
    AO["AIR AIR"] --> AO
    AP["AIR AIR"] --> AP
    AQ["AIR AIR"] --> AQ
    AR["AIR AIR"] --> AR
    AS["AIR AIR"] --> AS
    AT["AIR AIR"] --> AT
    AU["AIR AIR"] --> AU
    AV["AIR AIR"] --> AV
    AW["AIR AIR"] --> AW
    AX["AIR AIR"] --> AX
    AY["AIR AIR"] --> AY
    AZ["AIR AIR"] --> AZ
    BA["AIR AIR"] --> BA
    BB["AIR AIR"] --> BB
    BC["AIR AIR"] --> BC
    AD["AIR AIR"] --> AD
    AE["AIR AIR"] --> AE
    AF["AIR AIR"] --> AF
    AG["AIR AIR"] --> AG
    AH["AIR AIR"] --> AH
GLEN DIMPLEX AUSTRALIA PTY LTD
ABN 69 118 275 460
Head Office/Factory/Showroom
1340 Ferntree Gully Rd.
Scoresby Vic 3179
Ph: (03) 8706 2000 Fax: (03) 8706 2001
E-mail: info@realflame.com.au
Richmond - VIC Showroom
300 Swan St.
Richmond Vic 3121
Ph: (03) 9428 4443 Fax: (03) 9428 4445
Dandenong - VIC Showroom
3/328 South Gippsland Highway,
Dandenong South Vic 3164
Ph: (03) 9702 7853
E-mail: sales@realflamedandenong.com.au
Geelong - VIC Showroom
1/2A Gordon Avenue
Geelong West Vic 3218
Ph/Fax: 5229 0844
E-mail: info@realflamegeelong.com.au
Sydney - NSW Showroom
546 Pacific Highway.
Chatswood NSW 2067
Ph: (02) 8905 0189 Fax: (02) 8905 0192
E-mail: info@realflame.com.au
Miranda - NSW Showroom
36 Kareena Rd
Miranda NSW 2228
Ph: (02) 8513 6202 Fax: (02) 9520 1974
E-mail: fireplace@realflamesouth.com.au
Adelaide - SA Showroom
173 -175 Magill Rd.
Norwood SA 5067
Ph: (08) 8132 0371 Fax: (08) 8132 1687
E-mail: realflamesa@iprimus.com.au
Milton - QLD Showroom
46 Douglas St,
Milton QLD 4064
Ph: (07) 3368 2011
Perth – WA Showroom
47-53 McDonald St East,
Osborne Park WA 6017
Ph: (08) 9444 9900 Fax: (08) 9444 9800
Fyshwick – ACT Showroom
88 Wollongong St,
Fyshwick ACT 2609
Ph: (02) 6280 5522
Ulverstone – TAS Showroom
31A Victoria St,
Ulverstone TAS 7315
Ph: (03) 6425 4440
- CAPTIVA® BALANCED FLUE SPACE HEATER
- INSTALLATION & OPERATING MANUAL
- WARRANTY INFORMATION
- Warranty
- Registration
- Exclusions
- Limit of Liability
- Claiming under the Warranty
- WARNING
- INSTALLATION NOTICE
- IMPORTANT SAFETY NOTICE
- SERVICING
- CORD REPLACEMENT
- CONTENTS
- CAPTIVA ZERO CLEARANCE MODEL
- INTRODUCTION
- CAUTIONS
- SELECTING YOUR APPLIANCE LOCATION
- CAPTIVA INSTALLATION PROCEDURE
- FIT MEDIA AS PER FOLLOWING
- Log and Coal Media - Captiva 600 & 900 Models
- Pebble only/Coals only Media
- Forest Wood Media - Captiva 600
- Forest Wood Media - Captiva 900
- TICK BOXES
- DIMENSIONS
- Captiva 600
- Captiva 600 Trim
- Captiva 900
- Captiva 900 Trim
- CAPTIVA ZERO CLEARANCE MODEL (continued)
- Captiva Zero Clearance Timber Frame Installation
- Gas connection - 15mm (1/2") Compression connection Electrical connection - 3 Pin 10Amp GPO plug Power rating of appliance 230V 50Hz 0.4Amp
- Zero Clearance cowl types
- Captiva Zero Clearance Timber Frame Installation (continued)
- INSTALLATION OF VERTICAL VENTING
- CAUTIONS AND REQUIREMENTS
- Tests to be carried out by installer
- SERVICING AND MAINTENANCE
- SERVICING AND MAINTENANCE (continued)
- CAPTIVA FLUE TERMINATION (COWLS) REGULATIONS
- Balanced Flue
- NOTES:
- Locating the remote
- Factory Set Features
- Quick Start Guide
- On/Off
- Setting the day of the week and time
- REMOTE CONTROL OPERATING GUIDE (continued)
- Manual mode
- Automatic mode
- Programming
- Restore factory default settings
- Teaching RF thermostat ID code to control unit
- Marble Margin Set Installation Procedure
- OPTIONAL MANTELPIECE INSTALLATION
- ELECTRICAL DIAGRAM
- GLEN DIMPLEX AUSTRALIA PTY LTD
- Head Office/Factory/Showroom
- Richmond - VIC Showroom
- Dandenong - VIC Showroom
- Geelong - VIC Showroom
- Sydney - NSW Showroom
- Miranda - NSW Showroom
- Adelaide - SA Showroom
- Milton - QLD Showroom
- Perth – WA Showroom
- Fyshwick – ACT Showroom
- Ulverstone – TAS Showroom
Brand : Real Flame
Model : Captiva 600
Category : Heating