
MVH-3000 - Heating MAGNAVOX - Free user manual and instructions
Find the device manual for free MVH-3000 MAGNAVOX in PDF.


| Product Type | Portable Electric Heater |
| Brand | Magnavox |
| Model | MVH-3000 |
| Heating Power | 1500W (Max) |
| Voltage | 120V / 60Hz |
| Dimensions (HxWxD) | 30 cm x 20 cm x 15 cm |
| Weight | 2.0 kg |
| Heating Type | Fan-forced ceramic |
| Controls | Thermostat dial, fan speed switch, power indicator |
| Fan Speeds | Low / High |
| Safety Features | Tip-over switch, overheat protection, cool-touch housing |
| Noise Level | Approx. 45 dB on low setting |
| Coverage Area | Up to 20 m² (215 sq ft) |
| Power Cord Length | 1.8 m (6 ft) |
| Materials | ABS plastic body, ceramic heating element |
| Cleaning | Unplug, vacuum dust from intake/outlet, wipe with damp cloth |
| Filter | Washable mesh filter, clean monthly |
| Certifications | ETL listed, ENERGY STAR compliant |
| Warranty | 1 year limited manufacturer warranty |
Frequently Asked Questions - MVH-3000 MAGNAVOX
User questions about MVH-3000 MAGNAVOX
0 question about this device. Answer the ones you know or ask your own.
Ask a new question about this device
Download the instructions for your Heating in PDF format for free! Find your manual MVH-3000 - MAGNAVOX and take your electronic device back in hand. On this page are published all the documents necessary for the use of your device. MVH-3000 by MAGNAVOX.
USER MANUAL MVH-3000 MAGNAVOX

YOU MUST ACTIVATE YOUR PRODUCT WITHIN 30 DAYS OF PURCHASE
Purchase Date ____ Serial Number (located on back of unit) ____

Questions, problems, missing parts? Contact technical support department at 1-866-484-2066, 9:00 a.m. - 5 p.m., CST, Monday - Friday or visit us online at www.magnavox.com
Please have your model and serial number ready
Package Contents.... 3
Safety Information 4
Frequently Asked Questions 6
Preparation 8
Troubleshooting 8
Control Panel....9
Remote Control.... 10
Operating Instructions 11
Care and Maintenance 13
One-Year Limited Warranty 14
Replacement Parts List 15

| PART DESCRIPTION QUANTITY | ||
| A Infrared Heater 1 | ||
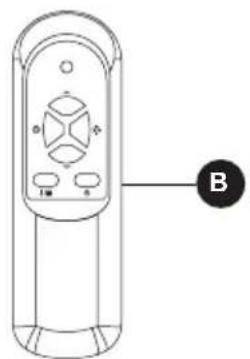
| B Remote Control 1 | ||
| C Control Panel (preassembled to Infrared Heater (A)) 1 | ||
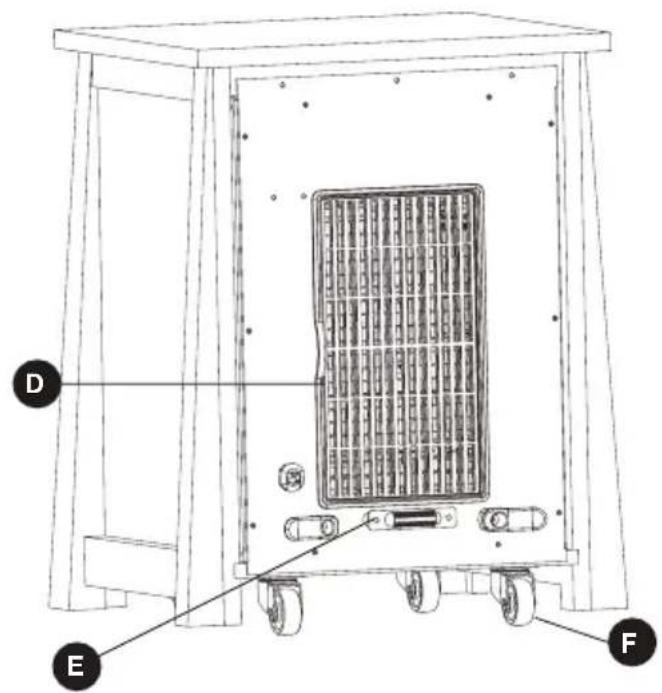
| D Master Power Switch (preassembled to Infrared Heater (A)) 1 | ||
| E Filter Cover (preassembled to Infrared Heater (A)) 1 | ||
| F Temperature Sensor (preassembled to Infrared Heater (A)) 1 | ||
| G Caster Wheels (pre assembled to Infrared Heater (A)) 4 | ||
Please read and understand this entire manual before attempting to assemble, operate, or install the product.
IMPORTANT SAFETY INSTRUCTIONS
WARNING: POTENTIAL ELECTRICAL HAZARD IF NOT ADHERED TO. When using electrical appliances, basic precautions should always be followed to reduce the risk of fire, electric shock, and injury to persons, including the following:
- This heater must be plugged into a 120 V, 15 amp (or more) circuit of its own. Do not plug anything else into the same circuit. If unsure if your home meets this specification, consult a certified electrician prior to use. Risk of fire, overheating, malfunction, property damage, injury, or even death may result if not adhered to!
- Connect to a properly grounded, 3-prong outlet only. Do not connect the heater to extension cords, surge protectors, timers, direct breakers, or an outlet with other appliances connected to the same outlet. Risk of fire, overheating, malfunction, property damage, injury, or even death may result if not adhered to!
- This heater is hot when in use. To avoid burns, do not let bare skin touch hot surfaces. Use handles (certain models) or wheels to move this heater.
- Keep combustible materials, such as furniture, pillows, bedding, papers, clothes, and curtains at least 3 ft. (0.9 m) from the front of the heater and keep them away from the sides and rear of the heater.
- Extreme caution is necessary when any heater is used by or near children, invalids, pets, or when the heater is left operating unattended.
• Always unplug the heater when not in use.
- Do not operate any heater with a damaged cord or plug or after the heater malfunctions, has been dropped, or damaged in any manner. Contact the manufacturer for resolution options.
- Do not use outdoors. Exposure to outdoor elements such as rain, snow, sun, wind, or extreme temperatures may cause the heater to become a safety hazard.
- This heater is not intended for use in bathrooms, laundry areas, and similar indoor locations, nor any locations that use GFCI outlets.
- Never place the heater where it may fall into a bathtub or other water receptacles.
- Do not run the cord under carpet. Do not cover the cord with throw rugs, runners, or similar coverings. Arrange the cord away from traffic areas and where it will not be tripped over.
- The heater must be plugged into a wall outlet that is a dedicated circuit with a minimum 15 amp rating on that individual circuit.
- To disconnect the heater, first turn the power button to the OFF position and then remove the plug from the wall outlet.
- Do not allow foreign objects to enter or block any ventilation or exhaust opening as this may cause electric shock, fire, or damage the heater.
- Allow at least 3 ft. of unobstructed space to the front and rear of the heater to allow for maximum heat, air, and ventilation flow.
- A heater has hot and arcing or sparking parts inside. Do not use it in areas where gasoline, paint, or flammable liquids are used or stored, nor use flammable solvents to clean the heater. Keep the heater dry at all times.
- Use this heater only as described in this manual. Any other use not recommended by the manufacturer may cause fire, electric shock, or injury to persons.
- Do not use abrasive solvents to clean the heater as it may cause damage to the finish or casing.
- To prevent a possible fire, do not block air intakes or exhaust in any manner. Do not use on soft surfaces, like a bed, where opening may become blocked.
- Always plug heaters directly into a wall outlet/receptacle. Never use with an extension cord or relocatable power tap (outlet/power strip).
SAVE THESE INSTRUCTIONS
Child Lock Safety Feature
Press and hold the child lock button located on the control panel for 5 seconds or remote control for 3 seconds. Locking is confirmed when a buzzer rings and the control panel displays "CL". When locked, the control panel and remote control (if provided) will not function.
To unlock the control panel or remote (if provided), repeat this procedure. Unlocking is confirmed when a buzzer rings and the lock indication disappears.

Tip-Over Safety Feature
This heater is equipped with a tip-over safety feature. Once the heater is tipped over, an internal switch will automatically shut the heater off. Once the heater is restored to an upright position, the heater will reset. To continue operation, turn on the heater using the control panel or supplied remote control (if provided) on the heater.
Overheat Safety Feature
This heater is equipped with an overheat safety feature. When the internal components of the heater reach a certain temperature that could cause overheating or possible fire, the heater will automatically shut off. If the unit has been overheated, you will need to unplug the unit from the wall and replug it in to use the heater again.
WARNING: This heater has a voltage rating of 120 volts. The cord has a three-blade, grounding-type plug. An adapter is available for connecting three-blade grounding-type plugs to two-slot receptacles. The grounding lug extending from the adapter must be connected to a permanent ground such as a properly grounded outlet box. The adapter should not be used if a three-slot grounded receptacle is available.
DO NOT DEFEAT THE SAFETY PURPOSE OF THE GROUNDED PLUG.

⚠ WARNING: It is normal for the power cord to feel warm to the touch. However, a loose fit between the outlet and the plug may cause overheating of the plug. If this occurs, try inserting the plug into a different outlet. Contact a qualified electrician to inspect the original outlet for damage.
Specifications
| Voltage Rating | |
| Power Consumption | 1,000 W/1,500 W |
| Unit Size | 2 in. (H) |
| Unit Weight |
Please review these frequently asked questions on the next few pages prior to using your heater.
Q. My heater emits a strange odor when I first open the box and when I turn the heater on for the first time. Why is this happening?
A. This is normal. This heater is treated with a special heat safe/resistant coating. This odor will sometimes be present when the box is opened. When the coating is exposed to heat, it produces this particular odor during the first few hours of operation. This will dissipate after the break-in period. If you are sensitive to odors, you may want to pre-burn the unit in a garage with the door open until the initial odor dissipates.
Q. If my heater runs on its max wattage setting, how many BTUs is that?
A. This heater is intended to be used as supplemental heat in areas most needed. It may take several minutes to several hours to heat your area, depending on various factors. The below chart provides BTU translations for different wattages.
| WATTAGE BTUS | |
| 1,500 5,118 | |
| 1,000 3,412 | |
| 750 2,559 | |
| 500 1,706 | |
Q. Can the heating elements be replaced?
A. Replacement heating elements can be obtained from the manufacturer. All parts may be purchased through the manufacturer if your product is out of warranty. If you feel that the elements are definitely faulty right out of the box, contact Customer Support. A representative can then direct you to the next step.
Q. Once I plug the unit in and turn it on, how long will it take to heat my room?
A. The heating process in the heater begins immediately upon powering on and setting the desired temperature above the ambient temperature. A noticeable change in the ambient temperature of the room will vary due to variables such as the location of the heater (in the home), floor plan and size of the room, how well the room is insulated, how many doors/windows, how much bare concrete (acts as a heat sink with any type of heating), the opening and closing of an exterior door, long hallways, high ceilings, etc. Customers with smaller rooms experience quick heat changes. Rooms with larger and open floor plans can expect up to 24 hours to completely heat up.
Q. I do not have a grounded outlet. Can I use adapters, a 2-prong power strip, or remove the ground prong from the cord?
A. NO! If you do not have a grounded outlet, contact a certified electrician for advice. Removing or altering any part of the heater's original design or intent (including the power cord) will void the warranty and make you liable for any unexpected or hazardous results.
Q. My Heater has an ECO setting? How does this setting work?
A. The ECO mode on your heater is a program that attempts to keep the temperature strictly at a “warm” 68°F (20°C). This also helps with efficiency, as it is programmed to 1) Increase the power to the unit’s maximum wattage if the temperature drops below 64.4°F (18°C) 2) Gradually reduce the wattage used as it approaches 66.2° (19°C) F and 3) Stop heating when 68°F (20°C) is achieved. This is considered an Economical function, since in the ECO setting, the heater is almost never running at the maximum watts.
Q. The temperature on my heater does not match the temperature display on my wall, or external thermostat. Why?
A. This is completely normal. The temperature display on your heater may vary from the temperature display on another thermostat (like the one mounted to your wall or a purchased external thermostat). This is because the temperature sensor on the heater reads the temperature directly around the heater. With the heater near the cold floor (and heat rising), any readings on elevated or external thermostats will differ in readings on the heater. The best way to operate your heater is to set the unit on High and dial up to a temperature that feels comfortable to you. Then, leave it at that temperature, regardless of the mismatch. The heater will cycle off when the set temperature is met or exceeded slightly.
Q. Can I use more than one heater at a time? Can I use the heater and another appliance at the same time?
A. Yes, but make sure they are not plugged into the same circuit. Each heater requires its own minimum 15-amp circuit with no other items plugged into that circuit or outlet. This is because heaters are considered appliances and draw out high amperage. If you are unsure your circuit meets these requirements, verify with a certified electrician.
⚠ WARNING: Risk of fire, damage to property, or injury may result if requirements are not met.
Q. Why does my heater's fan continue to run after the set temperature is reached or the power is turned off?
A. This is normal. The heater's fan will continue to run even after the heater automatically cycles down. The fan continues to run so that every last bit of heat is blown out of the heat chamber while allowing the unit to continue filtering your air. Once the internal box/components cool completely, the fan should then shut off on its own. In this case, allow a few minutes after the heat cycles off (with power on). The fan will shut off faster when the power is turned off.
Q. My heater's display shows my ambient temperature to be in the 20s when I know it is warmer than that. Why?
A. The heater's display is defaulted to read the temperature as Fahrenheit. If your heater is definitely heating but shows it is in the 20s you probably have the setting to read your temperature in Celsius rather than Fahrenheit.
Q. My heater's power cord gets warm. My cord is showing signs of heat or melting at the outlet. Is this normal?
A. A warm power cord is normal. These power cords are rated safe for up to 105° C/221°F by the UL, CSA, or ETL. The exception is, if you detect heat, smoke, or signs of melting at the contact point of the wall outlet, it may be due to loose or worn wall contacts (or arcing). Please stop using the heater immediately, contact warranty support for a replacement power cord, and have a certified electrician replace the wall outlet as soon as possible.
Q. My unit features an ionizer function. How does it work?
A. The unit's ionizer function is always on. This unit contains a passive ionizer without a collection plate. The dirt and dust particles that pass through the unit become charged, causing them to cling to the floor instead of remaining in the air.
Place the heater on a firm, level surface and plug into a grounded 120 V, 60 Hz power outlet and turn on the power switch on the rear of the unit. Only operate heater in upright position.
Insert two AAA batteries into the remote control before using (batteries not included). *(Not all products will include a remote control.)
Please note that infrared heaters do not heat like a traditional space heater. You should not expect infrared heaters to blow hot air like a traditional space heater. Infrared heaters heat objects not air. Infrared heaters are intended to supplement an already heated, insulated room. Square footage specifications assume a single enclosed room not an entire home. Infrared heaters do not heat through walls, floors, and are not intended to replace a main heat source. Infrared heat can take at least 24 hours to warm a room but operate much more efficiently to maintain the desired temperature. Infrared heaters will not work well in uninsulated unheated spaces like screened in porches, RV's, garages, unheated basements, etc.
TROUBLESHOOTING
| PROBLEM POSSIBLE CAUSE CORRECTIVE ACTION | ||
| The heater does not turn on. | 1. The power cord is not plugged in.2. The electricity at the main fuse box is not working.3. The battery in the remote control is dead.4. The thermostat on the heater is set lower than the room temperature.5. The power switch in the back of the unit is not in the ON position. | 1. Plug the power cord into an electrical outlet.2. Check the electricity at the main fuse box.3. Replace the batteries in the remote control.4. Increase the thermostat temperature on the heater for a higher heat setting.5. Switch the power switch to the ON position. |
| The heater displays an error code “E1” | 1. The heater has overheated.2. Insufficient power to the unit3. The air filter is clogged.4. Insufficient air flow to the heater. | 1. Unplug the heater from the wall, wait a few seconds then plug the power cord back in.2. Make sure the unit is plugged into a dedicated 3-prong outlet, with no extension cords or surge protectors.3. Clean the air filter located on the back of the unit. see page 13.4. Move the unit at least 3ft from the wall. |
| The heater displays an error code “E2” | 1. Temperature sensor not functioning properly. | 1. Please contact technical support. |

| PART NAME DESCRIPTION | ||
| 1 Fan | Indicator Light Indicates when the Fan is on | |
| 2 Timer | Indicator Light Indicates when the timer function is active | |
| 3 Digital | Display Readout of the set room temperature or timer value | |
| 4 Celsius | Indicator Light Indicates that the temperature is being displayed in Celsius | |
| 5 Fahrenheit | Indicator Light Indicates that the temperature is being displayed in Fahrenheit | |
| 6 Power | Indicator Light Indicates when the unit is receiving power from the wall outlet | |
| 7 Power | Switch Button Powers the heater ON or OFF | |
| 8 Ambient Temp. Button | Indicates ambient temp / hold to toggle between °C/°F | |
| 9 Temp-Down Button | Decreases the set temperature | |
| 10 Temp-Up Button | Increases the set temperature | |
| 11 Timer Button | Engages the on/off timer function | |
| 12 Heater Mode Button | Toggles between Hi / Low / Eco Modes | |
| 13 Safety Lock Button Hold to Lock / Unlock heater's control panel | ||
| 14 Energy Saving Indicator | Indicates when energy-saving mode is on | |
| 15 High Heat Indicator | Indicates when High Heat mode is on | |
| 16 Low Heat Indicator Indicates when Low Heat mode is on | ||

PART NAME DESCRIPTION
| 1 Temp Up Button Increases the set temperature value | ||
| 2 Heater Mode Button Toggles between Hi / Low/ Eco Modes | ||
| 3 Temp Down Button Decreases the set temperature value | ||
| 4 Power Button Powers the heater on or off | ||
| 5 Ambient/Lock Button | Shows ambient temp/hold to engage or disengage safety lock function | |
| 6 Timer Button Engages the on/off timer | ||
- Turn the heater on or off by pressing the Power button on the control panel (C) or by pressing the Power button on the remote control (B).
Once the power is off, heating elements will stop working first. The fan will continue working for up to 90 seconds to dispense residual heat inside the heater. This is a normal function.
- Select a heat setting by pressing the HEAT button on either the control panel (C) or the remote control (B) to toggle between the three heat settings.
Power for heat-up mode is 1,500 W; heat-down is 900 W. ECO mode is an Economic Energy Saving Function. When ECO mode is chosen, the heater will operate to maintain a constant warm 68°F
Note: The ECO LED light will only illuminate when the ECO function is active and the ambient room temperature falls below 68° F / 20° C.
- Set the temperature by pressing the arrows on the control panel (C) or the remote control (B).
You can set the temperature on the heater anywhere between 50°F and 90°F or between 10°C and 32°C. Once you have chosen the desired temperature, the heater will remain on until the room temperature increases to the temperature on the digital display. The heater will cycle on and off to maintain the desired room temperature.
To view the ambient temperature press the ambient temperature button on the control panel.
Note: Press and hold the ambient temperature button on the control panel (C) for 5 seconds to switch the digital display indicator on the heater between Fahrenheit and Celsius. On the remote, short press the ambient temperature button to engage Ambient Temperature, long press for 3 seconds to engage Child Lock.

![graph TD C["● C"] --> A["○"] A --> B["△"] B --> C B --> B style A fill:#fff,stroke:#000 style B fill:#fff,stroke:#000 style C fill:#000,stroke:#000 style E fill:#fff,stroke:#000 subgraph HIGHLOW direction LR O1["○"] --> O2["→"] O3["○"] --> O4["→"] O5["○"] --> O6["→"] end subgraph E direction LR O7["…](/content/2026/05/996551/images/8a35a52f9facbc5e482de2806f2dd762299998e6ae3e1fffe008d88c881a6841.jpg)

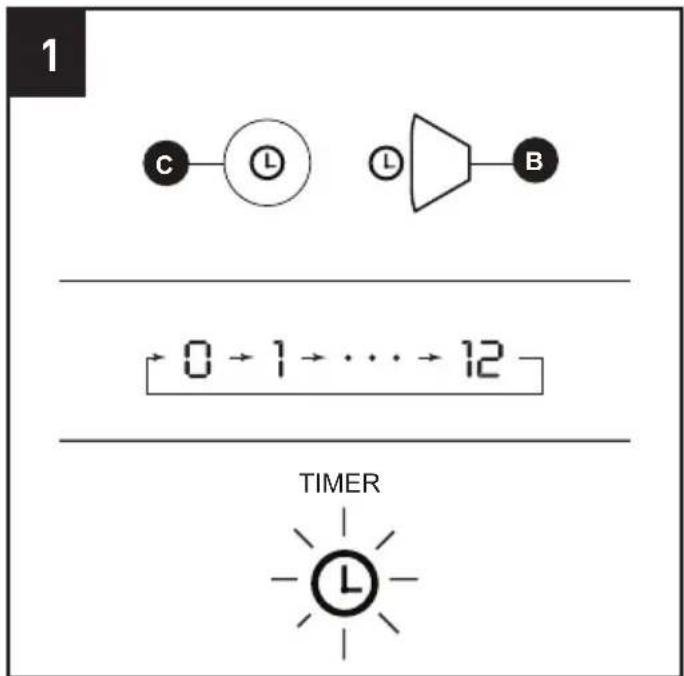
- To set the timer power off, start the unit and press the Timer button on the control panel (C) or remote control (B).
Note: The timer-power-off function can only be set when the heater is in power-on mode.
The digital display on the control panel (C) changes from the set temperature readout to a time value for the timer. Press the Timer button repeatedly to change the number value between a range of 0 to 12 hours (in 1-hour intervals).
The Timer light turns on when the timer is set.
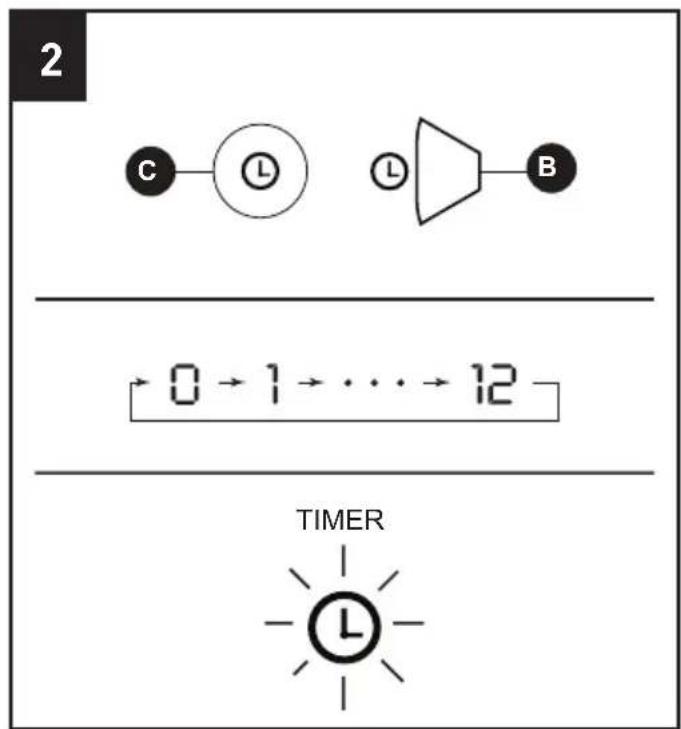
- To set the timer power on, while powering off the unit press the Timer button on the control panel (C).
Note: The timer-power-on function can only be set when the heater is in power-off mode.
The digital display on the control panel (C) will indicate time value for the timer. Press the Timer button repeatedly to change the number value between a range of 0 to 12 hours (in 1-hour intervals).
The Timer light turns on when the timer is set.
- To replace the batteries, remove the battery cover (1) from the remote (B) by applying pressure to the battery cover (1) and sliding it away from the remote (B). Insert two AAA batteries (not included) (2) and close the remote by placing the battery cover (1) back on the remote (B).
Note: Do not mix old and new batteries. Do not mix alkaline, standard (carbon-zinc), or rechargeable (NiCad, ni-mh, etc) batteries. Non-rechargeable batteries are not to be recharged. Batteries are to be inserted with the correct polarity. Exhausted batteries are to be removed from the product.

WARNING: Before performing any maintenance task, turn off the power switch in the rear of the unit, unplug the unit, and allow it to cool completely.
- To keep the heater clean, clean the outer shell with a soft, damp cloth. Use a mild detergent if necessary. After cleaning, dry the unit with a soft cloth.
CAUTION: DO NOT let liquid enter the heater.
- DO NOT use alcohol, gasoline, abrasive powders, furniture polish, or rough brushes to clean the heater. This may cause damage or deterioration to the surface of the heater.
- DO NOT immerse the heater in water.
- Wait until the unit is completely dry before use.
- If you will not be using the heater for a while, take the batteries out of the remote control and store for future use.
- Store the heater in a cool, dry location when not in use. To prevent dust and dirt build-up, use the original packaging to repack the unit.
CLEANING THE AIR FILTER
- Clean the air filter (2) after three months or if it appears to be blocking airflow. With the heater unplugged, remove the air filter cover (1) as illustrated below. Clean all parts of the filter assembly and allow parts to completely dry.
- Reassemble and reinstall the filter (2).
WARNING: Do not use the heater without the filter assembly in place.


The manufacturer warrants this heater against defects in materials and workmanship on functional parts, for a period of 1 year from the original date of purchase. Your sales receipt showing the date of purchase of the product is your proof of purchase. Keep it in a safe place for future reference. This warranty is subject to personal use only, commercial or rental applications will not be covered.
This product is made with the highest quality materials and is warranted to be free from defects in materials and workmanship at the time of purchase. This limited warranty applies to products manufactured or distributed by the manufacturer, are delivered in the continental United States or Canada and extends to the original purchaser, or gift recipient. This warranty becomes valid at the time of purchase and terminates either by the specified time frame listed above and/or owner transfer. Any refunds or monetary compensations must be claimed through the place of purchase (retailer), and not through the manufacturer. Any extended warranties (warranties that cover above and beyond this manufacturer warranty) that are sold through a retailer or third party, are not directly correlated with this products' limited warranty, and may be redirected to said retailer or third party for coverage.
This warranty extends through the manufacturer of the product, and covers functional parts only. Cosmetics are not covered, unless unequivocally determined it is a workmanship defect. Shipping damage should be addressed with the shipping company, retailer, or place of purchase, not the manufacturer unless the manufacturer was the direct shipper.
The manufacturer's sole obligation under this warranty shall be limited to furnishing the original purchaser replacement parts for units deemed repairable by the supplier's warranty department. The purchaser is responsible for insuring any parts shipped or returned, if desired. The purchaser is responsible to prepay any shipping charges (both ways) including, but not limited to taxes and duties. All exchanged parts and products replaced under this warranty will become the property of manufacturer. The manufacturer reserves the right to change manufacturers of replacement parts or products for use, in order to cover any existing warranty.
The purchaser may be asked to provide the supplier with proof of purchase documents (including the date of purchase) if requested. Any evidence of alteration, erasing, or forgery of proof of purchase documents will be just cause to VOID this limited warranty. Products, in which the serial number has been defaced or removed are not eligible for warranty coverage.
This warranty does not apply if the unit has been subject to negligence, fabrication, misuse, abuse, or repairs, alteration by non-manufacturer authorized personnel, inappropriate installations, or any case beyond the control of the manufacturer. Examples of warranty invalidation may also include, but are not limited to:
- Use of lacquer or paints in (and around) the heaters
- Heater placed on non-approved surfaces
• Electrical requirement deficiencies (15-20 amp dedicated outlet) - Use on extension cords/timers/surge protectors/GFCI
• Outdoor applications
• Normal wear/tear/weathering - Pet/consumer accidents
• Purchases from dealers unauthorized by the manufacturer (Authorization in writing)
The manufacturer shall not be liable for any loss due to use (or misuse) of the heater or other incidental or consequential costs, expense or damages without irrefutable foundations. Under no circumstances shall the manufacturer or any of its representatives be held liable for injury to any person or damage to any property, however arising. Any implied warranty shall have duration equal of the applicable warranty stated above. Specifications are subject to change without notice or obligation.
This limited warranty gives the original purchaser specific legal rights. Other rights may vary from state to state.
For replacement parts, call our technical support department at 1-866-484-2066, 9:00 a.m. - 5 p.m., CST, Monday - Friday
| PART DESCRIPTION PART # | ||
| A Control panel COPA-H2016 | ||
| B Fan FAN3018 | ||
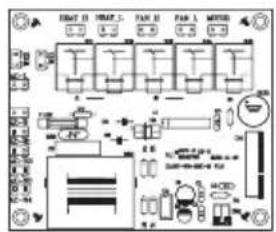
| C Power board POBO-H2016 | ||
| D Tip-over switch TIPSW | ||
| E Limit switch LIMITSW130 | ||
| F Infrared tube QUAR-R150 | ||
| G | Thermostat Wire | SENSOR |
| H Remote control REMO-H2016 | ||
A

B

C
D

E

F

G

H

YOU MUST ACTIVATE YOUR PRODUCT WITHIN 30 DAYS OF PURCHASE:
web: www.magnavox.com
Printed in China
MAGNAVOX and SMART. VERY SMART are registered trademarks of Koninklijke Philips N.V. and are used under license from Koninklijke Philips N.V.


- YOU MUST ACTIVATE YOUR PRODUCT WITHIN 30 DAYS OF PURCHASE
- IMPORTANT SAFETY INSTRUCTIONS
- SAVE THESE INSTRUCTIONS
- CHILD LOCK SAFETY FEATURE
- TIP-OVER SAFETY FEATURE
- OVERHEAT SAFETY FEATURE
- MY HEATER EMITS A STRANGE ODOR WHEN I FIRST OPEN THE BOX AND WHEN I TURN THE HEATER ON FOR THE FIRST TIME. WHY IS THIS HAPPENING
- IF MY HEATER RUNS ON ITS MAX WATTAGE SETTING, HOW MANY BTUS IS THAT
- CAN THE HEATING ELEMENTS BE REPLACED
- ONCE I PLUG THE UNIT IN AND TURN IT ON, HOW LONG WILL IT TAKE TO HEAT MY ROOM
- I DO NOT HAVE A GROUNDED OUTLET. CAN I USE ADAPTERS, A 2-PRONG POWER STRIP, OR REMOVE THE GROUND PRONG FROM THE CORD
- MY HEATER HAS AN ECO SETTING? HOW DOES THIS SETTING WORK
- TROUBLESHOOTING
- CLEANING THE AIR FILTER
- WEB: WWW.MAGNAVOX.COM
Brand : MAGNAVOX
Model : MVH-3000
Category : Heating