
CR1208A - Jukebox Crosley - Free user manual and instructions
Find the device manual for free CR1208A Crosley in PDF.


| Product Type | Jukebox |
| Brand | Crosley |
| Model | CR1208A |
| Dimensions (H x W x D) | 39.5 x 19.7 x 14.2 inches |
| Weight | 58.4 lbs |
| Power Supply | 120V, 60Hz |
| Turntable Speed | 33 1/3, 45, 78 RPM |
| Record Size Supported | 7, 10, 12 inch |
| Built-in Radio | AM/FM Stereo |
| Bluetooth Version | 4.2 with A2DP |
| Audio Power Output | 50W RMS |
| Speaker Configuration | 2 x 6.5 inch full-range |
| USB Input | Yes, for MP3 playback |
| CD Player | Top-loading, CD/CD-R/CD-RW |
| Built-in LED Lighting | Yes, multi-color |
| Cartridge Type | Moving Magnet, with diamond stylus |
| Cabinet Material | Wood veneer with chrome trim |
| Care Instructions | Wipe with a soft dry cloth; avoid moisture |
| Safety Warnings | Do not expose to heat sources; use on a stable surface |
| Replacement Parts | Stylus (model 3BS-9A), belt (model FB-2) |
| Warranty | 1 year limited warranty |
Frequently Asked Questions - CR1208A Crosley
User questions about CR1208A Crosley
0 question about this device. Answer the ones you know or ask your own.
Ask a new question about this device
Download the instructions for your Jukebox in PDF format for free! Find your manual CR1208A - Crosley and take your electronic device back in hand. On this page are published all the documents necessary for the use of your device. CR1208A by Crosley.
USER MANUAL CR1208A Crosley
natural_image
Decorative wooden einger with a glowing interior and arched top, featuring a red star emblem on the chest (no visible text or symbols)CROSLEY®
Contents
I) Introduction Pg 3
2) Taking Delivery / Transit Mode Pg 5
3) Inserting title cards and compact discs Pg 8
4) Playing the jukebox Pg 12
5) Connecting external audio devices Pg 14
6) Adding additional speakers Pg 16
7) Adjusting amplifier settings Pg 17
8) Diamond pack lighting Pg 20
9) Bluetooth receiver Pg 22
10) Troubleshooting
Pg 25
I. Introduction
Thank you for purchasing a Classic Jukebox from Crosley Brands, manufactured by Sound Leisure, the world's premier jukebox manufacturer. This product has been designed and built to give you many years of enjoyment and trouble free use.
This owner's guide provides all the information you will need to install and operate the jukebox safely.
Important Safety Instructions
I. Read these instructions.
2. Keep these instructions.
3. Heed all warnings.
4. Follow all instructions.
5. Do not use this apparatus near water.
6. Clean only with a dry cloth.
7. Do not block any ventilation openings. Install in accordance with the manufacturers instructions.
8. Do not install near any heat sources such as radiators, heat registers, stoves or other apparatus (including amplifiers) that produce heat.
9. Do not defeat the safety purpose of the polarized or grounding-type plug.
A polarized plug has 2 blades with one wider than the other. A grounding type plug has two blades and a third grounding prong. The wide blade or the third prong are provided for your safety. If the provided plug does not fit into your outlet, consult an electrician for replacement of the obsolete outlet.
10. Protect the power cord from being walked on or pinched particularly at plugs, convenience receptacles, and the point where they exit from the apparatus.
II. Only use attachments/accessories specified by the manufacturer.
12. Use only the cart, stand, bracket or table specified by the manufacturer, or sold with the apparatus. When a cart is used, use caution when moving the cart/apparatus combination to avoid injury from tip-over.
13. Unplug this apparatus during lightning storms or when unused for long periods of time.
14. Refer all servicing to qualified service personnel. Servicing is required when the apparatus has been damaged in any way, such as if a power-supply cord or plug is damaged, liquid has been spilled or objects have fallen into the apparatus, the apparatus has been exposed to rain or moisture, does not operate normally or has been dropped.
Additionally
This jukebox contains high voltage & high temperature parts. Do not attempt to carry out any work that is not specifically instructed in this manual. If the jukebox fails to operate correctly, switch off and consult the trouble shooting guide at the end of this manual. No user serviceable parts inside.
This jukebox is heavy. DO NOT attempt to lift the unit.
DO NOT attempt to move the jukebox with the front door open. The jukebox is top heavy and may tip forwards if moved with the door open.
This appliance must be connected to a mains socket with a protective earth connection.
The mains plug is the designated ‘disconnection device’ and as such should be readily operable.
'WARNING' To reduce the risk of fire or electric shock, do not expose this apparatus to rain or moisture.
Fuses should be replaced like for like at all times.
Terminals marked with the symbol below are considered hazardous live and external wiring connected to these terminals requires installation by an instructed person or the use of ready made contact leads.

High voltage
Bubble Tubes
The bubble tubes in the top & side pilasters must only be handled by trained personnel. They contain small amounts of the harmful chemical DCM (dichloromethane). In the event of accidental leakage the chemical will generally evaporate. However please take the following precautions. Ventilate the room immediately by opening doors & windows. Vacate the room until any residual odour disperses. Extinguish any source of ignition. Avoid breathing vapours & contact with skin. If skin contact occurs wash immediately with soapy water, remove contaminated clothing & wash before reuse.
2. Taking Delivery / Transit Mode
Once the jukebox has been positioned in its designated space the following instructions will allow you to prepare it for use. The keys to open the jukebox will be found attached to the rear of the cabinet. The keys will open the side lock and the rear cabinet lock. See below (FIG 1) The key will also open the cash box located inside the jukebox. (Not available in 1015 slimline)
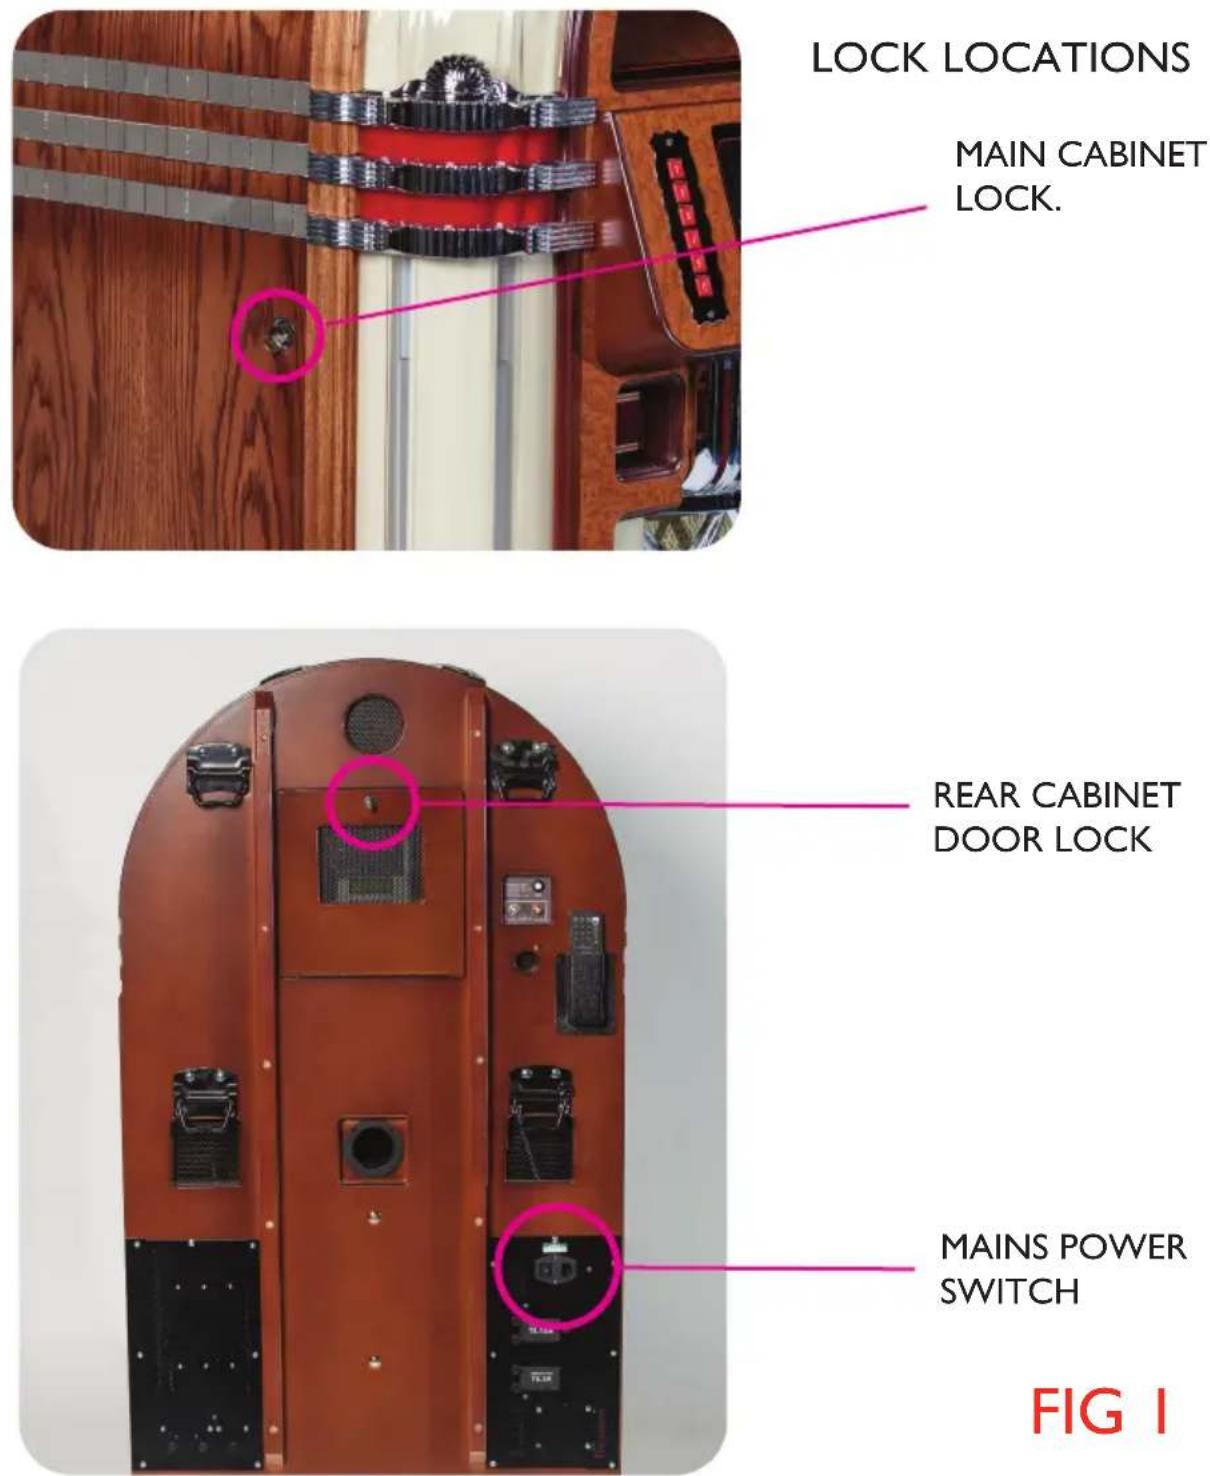
MAIN CABINET
LOCK.
REAR CABINET
DOOR LOCK
MAINS POWER
SWITCH
Upon delivery the Jukebox will be in Transitmode. Follow the guide below to put the Jukebox into Operation mode.
i) Unlock the side lock, and open the front door of the jukebox.
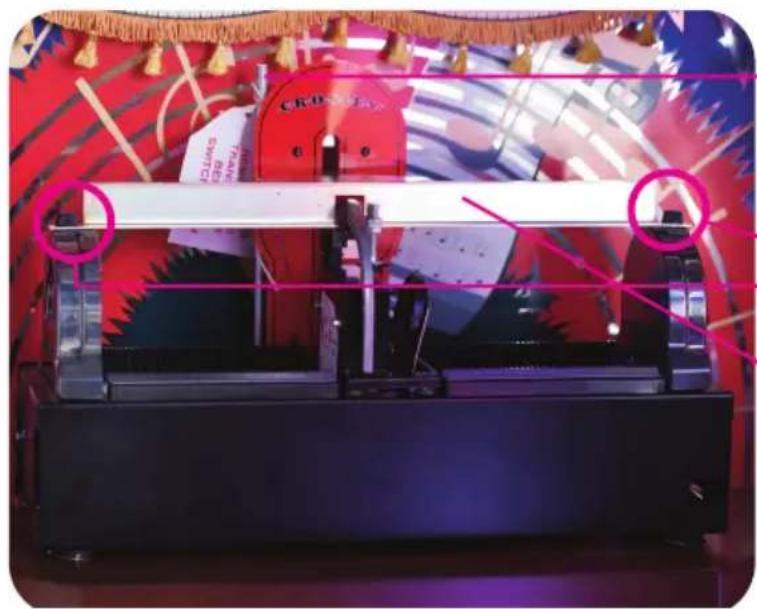
ii) Remove the horizontal transit bar (see fig. 2) by unscrewing the black capped retaining screws at either end. Re-insert the screws once the bar is removed.
iii) Remove the vertical transit bar by twisting it counter clockwise.
These transit bars should be retained for future use. Do not store these inside the machine
MECHANISM IN
TRANSIT MODE
natural_image
Exterior view of a red industrial machine with a white beam and control panel, surrounded by decorative patterns (no readable text or symbols)FIG 2
VERTICAL TRANSIT BAR
HORIZONTAL TRANSIT BAR RETAINING SCREWS
HORIZONTAL TRANSIT BAR
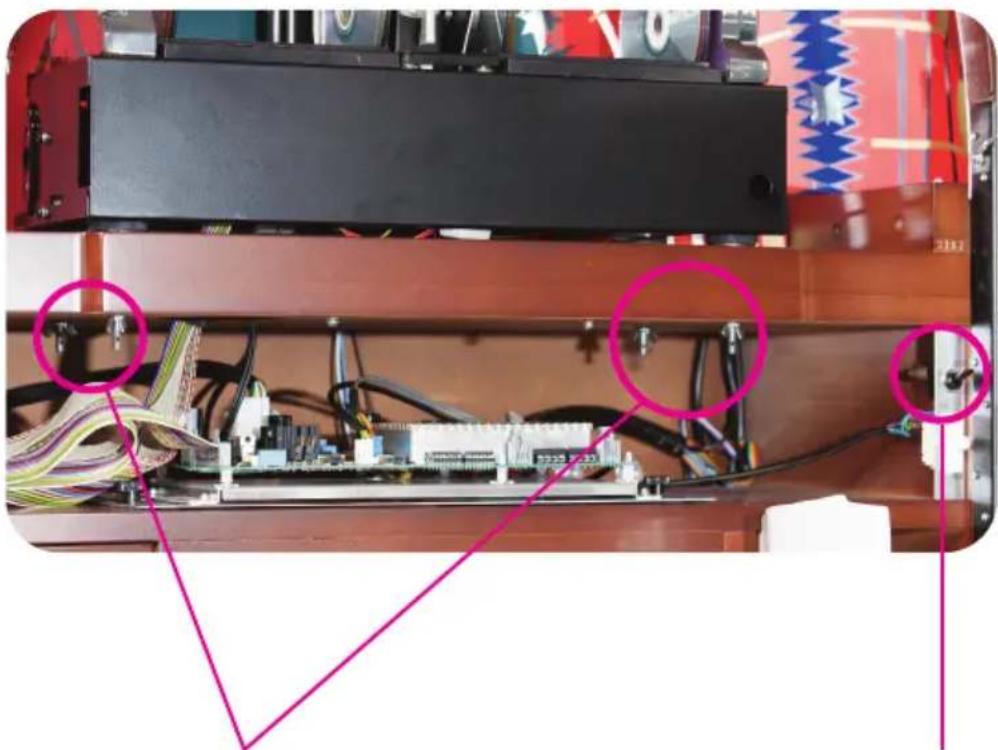
iii) Locate the 4 wing nuts underneath the CD mechanism shelf. (see below fig. 3) Unscrew the wing nuts until they spin freely, (this helps the mechanism 'float', for optimum performance).
iv) Plug the jukebox in and switch the mains power switch on. (location of power switch is shown in Fig 1 on page 5) The front LED display (located on the shelf in front of the CD mechanism) will show "TRANSIT".
v) Locate the transit switch on the inside right of the cabinet. (see fig.3) Switch to Operate mode, the CD lifting mechanism will traverse to the left, and then return to its central position. The front LED display will show "OPE".
vi) Close the jukebox door. The display will show “CH-01” along the top. Below this will be displayed “100 - 01”
vii) The jukebox is now ready to play.
VIEW OF LOCATION OF MECHANISM RETAINING SCREWS AND TRANSIT SWITCH
natural_image
Interior view of an electronic device showing exposed circuit board, wires, and connectors (no visible text or symbols)Wing nuts x 4. loosen to allow mechanism "floating"
Transit switch
FIG 3
Moving the Jukebox
If you are moving the Jukebox over a distance, over uneven surfaces or intend tipping the machine, it is recommended that it is placed back in Transitmode. There is no need to remove CD's as the horizontal transit bar will hold them in position. Follow the guide below to put the Jukebox back into Transitmode.
i) Open the front door while the Jukebox is switched on.
ii) Put the transit switch (see Fig 3 - page 7) back into the Transit position.
iii) The lifting mechanism will return to the central position
iv) Re-tighten the mechanism securing wing nuts and, ensuring the display is now showing TRANSIT, re-attach both the vertical and horizontal transit bars.
v) Switch off the Jukebox and close the door.
The Jukebox is now safe to move.
3) Inserting title cards and compact discs
Title cards
Blank CD title cards and a software CD are provided with your jukebox. This will assist you in printing title cards without having to type each song individually or handwrite the cards.
Please note:
The CD software is unable to read home produced compilation albums.
Types of Title cards
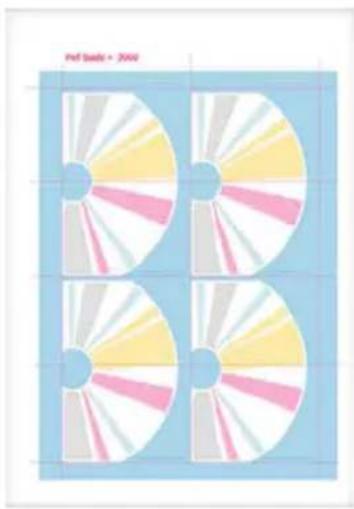
The cards that are required for the jukebox title rack are an “SL split - 2 part title card.” These are perforated horizontally and, once printed, should be torn along the perforations and inserted into the title rack.
Additional cards are available to purchase through our website at www.crosleyradio.com/accessories
natural_image
Four circular discs with yellow, pink, and gray blades arranged in a 2x2 grid on a light blue background (no text or symbols)SL SPLIT - 2 part title card for use in the title rack of your Jukebox
The title cards start at selection no. 100 and finish at 179. The following guide instructs how to change the title cards in the title card rack.
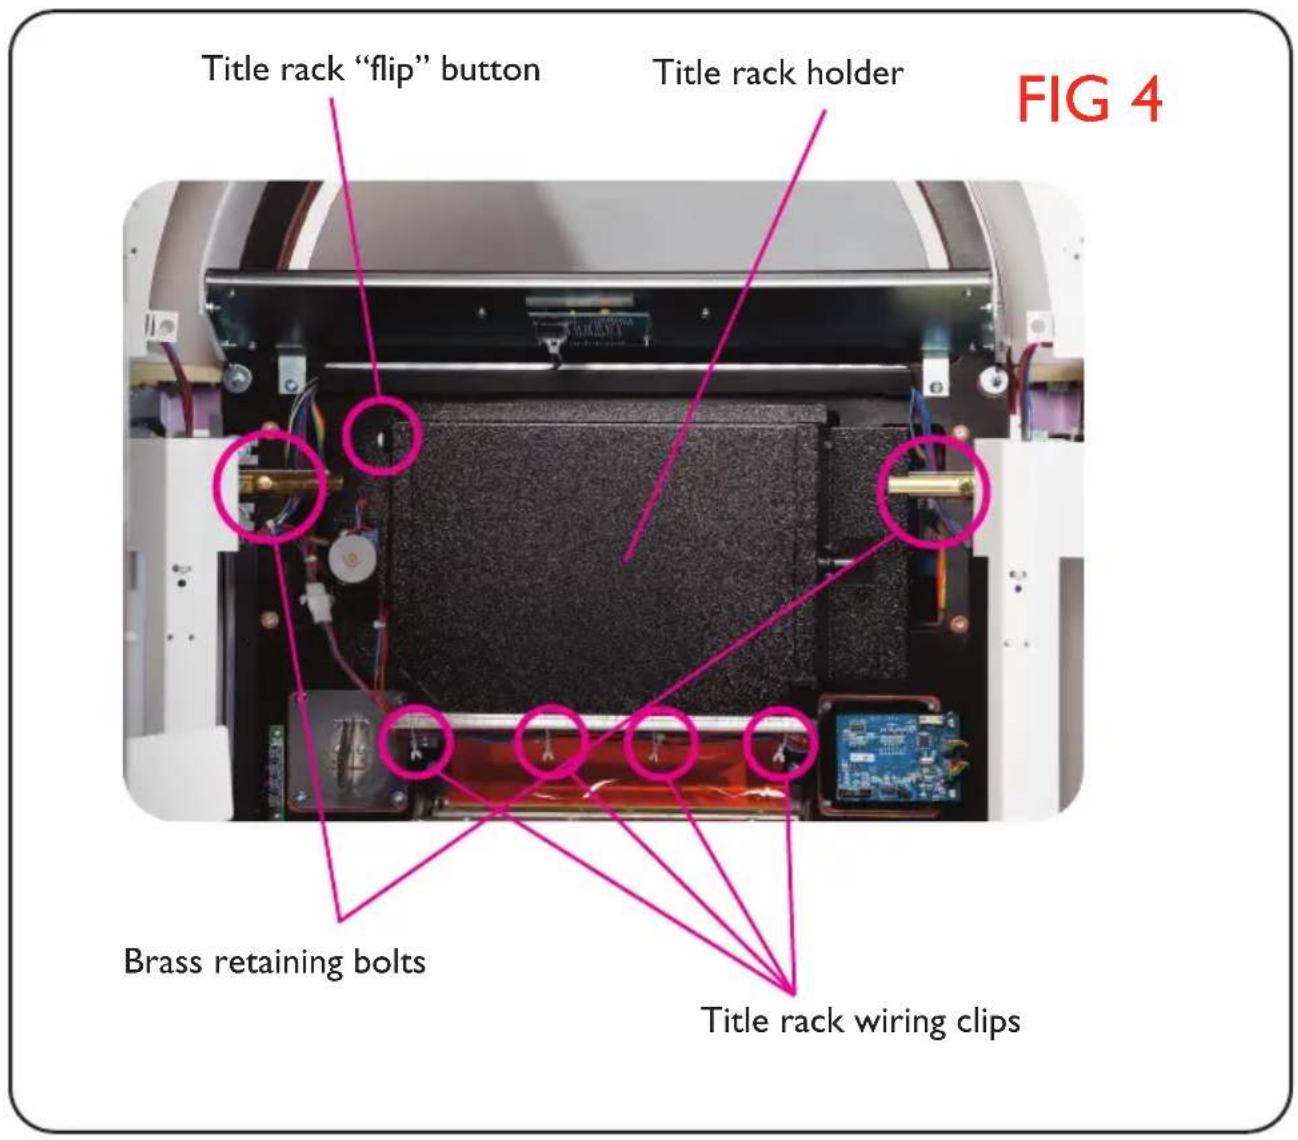
i) Unlock and open the jukebox door. On the inner side of the door you will find the title rack holder.
ii) Gently release the wiring from the title rack wiring clips.
iii) Slide the brass bolts shown in Fig 4 across to the unlocked position.
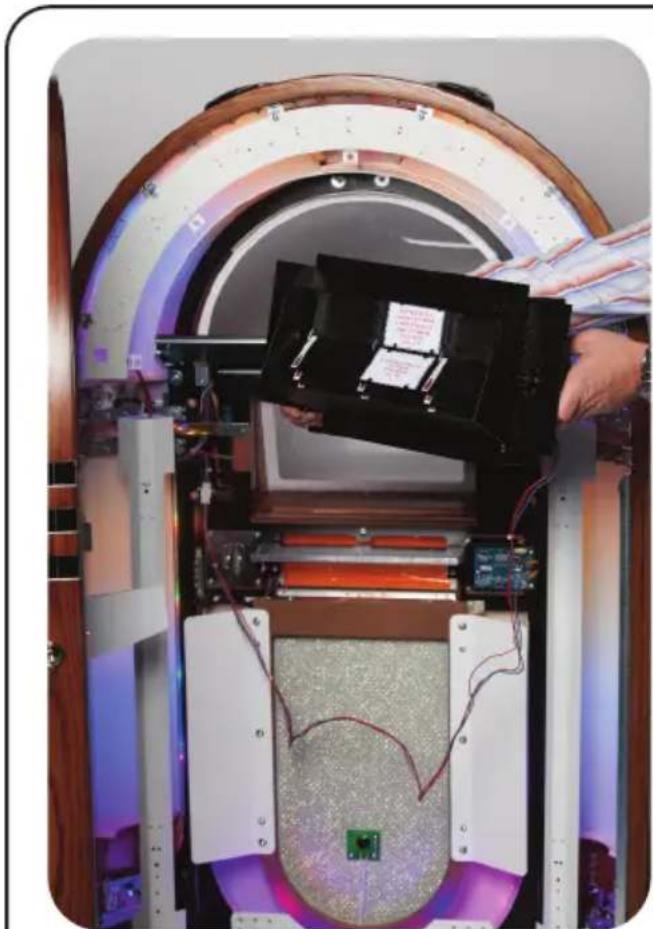
iv) Remove the title rack from the jukebox as shown in fig 5.
natural_image
Interior view of a circular electronic device with glowing components and wiring, no visible text or symbolsFIG 5
Image shows the title rack holder removed from the jukebox cabinet.
v) With the title rack removed from the jukebox you can now insert the title cards into the title rack. To rotate the title rack to the next page use the title rack "flip" button located on the side of the title rack (shown in fig 4)
DO NOT ROTATE THE TITLE RACK BY HAND AS THIS CAN DAMAGE THE TITLE RACK MECHANISM.
vi) Once you have finished inserting the cards, place the title rack back into the cabinet and secure with the brass retaining bolts. Then coil the wiring securely back into the clips.
Compact Discs
The rack that holds the CDs is numbered to correspond with the title selection cards.
Slot 00 = title card 100
Slot 01 = title card 101
Slot 02 = title card 102 etc.
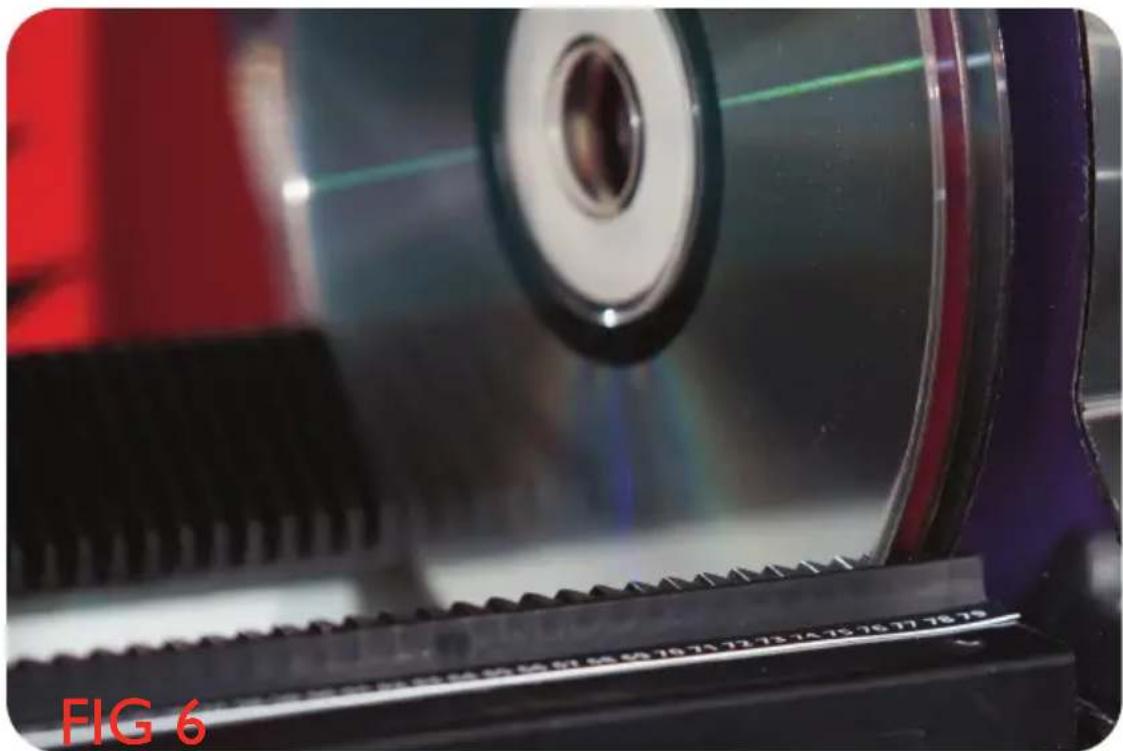
Insert the CDs with the CD label facing to the right, (see fig 6).
natural_image
Close-up of a mechanical component with a gear-like base and circular head, no visible text or symbolsFig 6 : Note the CD's are facing with their labels to the RIGHT
The mechanism holds 80CDs.
PLEASE ENSURE THAT THE CDs ARE INSERTED ABSOLUTELY STRAIGHT.
Failure to do so can result in the mechanism mishandling the CD's which can cause damage to the CD's or the mechanism.
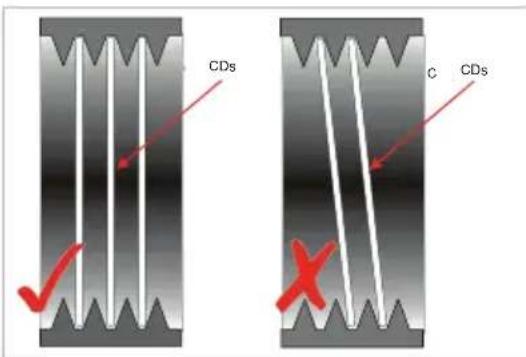
If the jukebox is moved for any reason, please check again that all the CDs are aligned correctly, and none have been displaced. If moving the jukebox over an uneven surface or any significant distance please follow the instructions on page 8. "Moving the Jukebox."
4) Playing the jukebox
Making Selections
When the discs and labels are installed, selections can be made using the keyboard at the front of the jukebox or via the remote control.
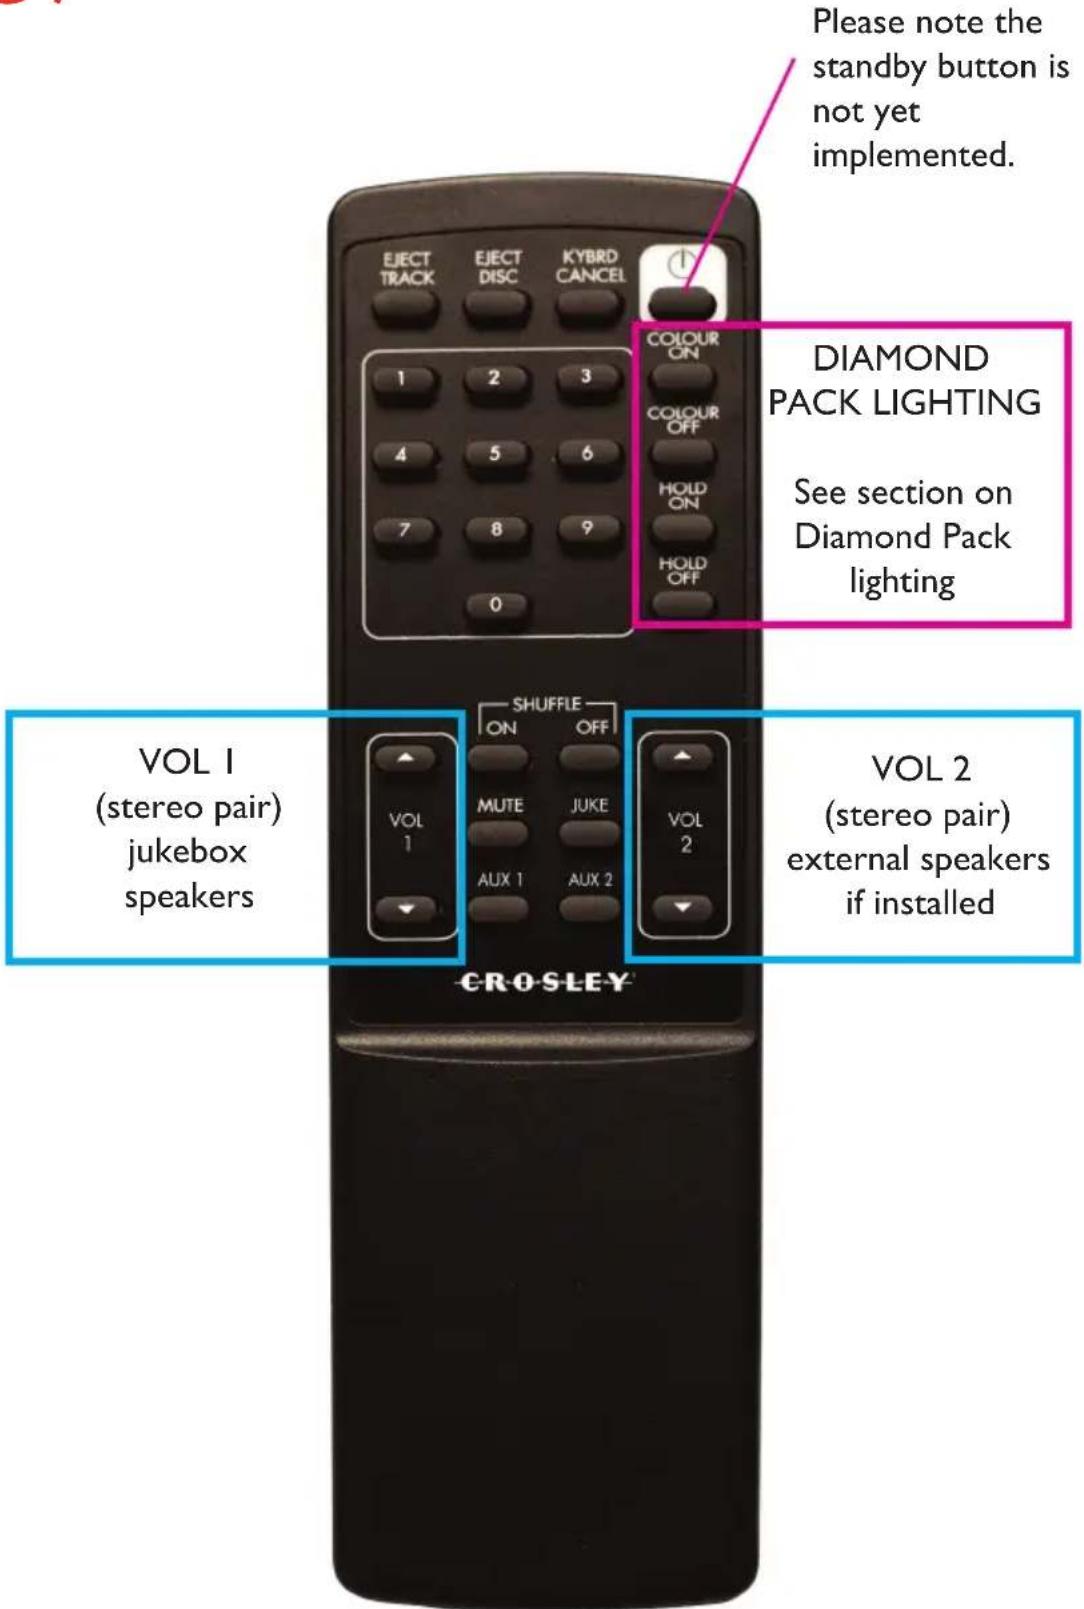
To “flip” the title rack pages press the red button located underneath the number “0” on the jukebox button bank.
To play a track, select the 3 digit number for the disc, and then the 2 digit number of the individual track. These numbers will show up on the display as they are entered.
To play the whole of an album, without keying all the tracks individually, select the 3 digit disc number then enter the 2 digit track number as '00'.
To eject an entire disc press 'EJECT DISC' on the infra red remote.
To reject a single track press 'EJECT TRACK' on the infra red remote.
If you make a mistake while entering a selection press 'KYBRD CANCEL' on the infra red remote to re-start the selection process, or press "C" on the jukebox button bank.
For continuous random play, press 'SHUFFLE ON' on the remote, the display will briefly show 'SH On' and a small dot will appear in the bottom right corner of the LED display.
To turn off this function, press 'SHUFFLE OFF', the display will briefly show 'SH OFF' and the dot in the bottom right corner will clear.
Please note: If the front door is opened while the jukebox is playing, the CD will reject and the CD mechanism will return to its central position.
Adjusting Volume
As a precaution against overloading the speakers when switching the jukebox on, the volume is preset to a low level. To raise the volume to the preferred level, select a track, wait until the CD is playing, then adjust the volume using the “VOL I” buttons on the remote control unit (See fig 7 opposite for remote control layout - the volume adjustment buttons are shown highlighted in blue).
The display will briefly show the volume level as 'L -'. The number will vary dependant on the volume level with 0 for off and 50 for full volume.
The ‘VOL 2’ volume keys (on the remote) are used to adjust the volume of any external speakers connected to the jukebox. please refer to section 6 “Adding additional speakers”. Pressing the ‘MUTE’ key on the remote, will instantly mute the amplifier and the display will show ‘L —’, to return the volume to the previous level press any of the volume keys.
FIG 7 INFRA RED REMOTE CONTROL
5) Connecting external audio devices
The Jukebox has the facility to connect to external audio devices.
Audio sources, such as DAB radios or MP3 players can be connected to the auxiliary inputs to allow them to play through the Jukebox speakers.
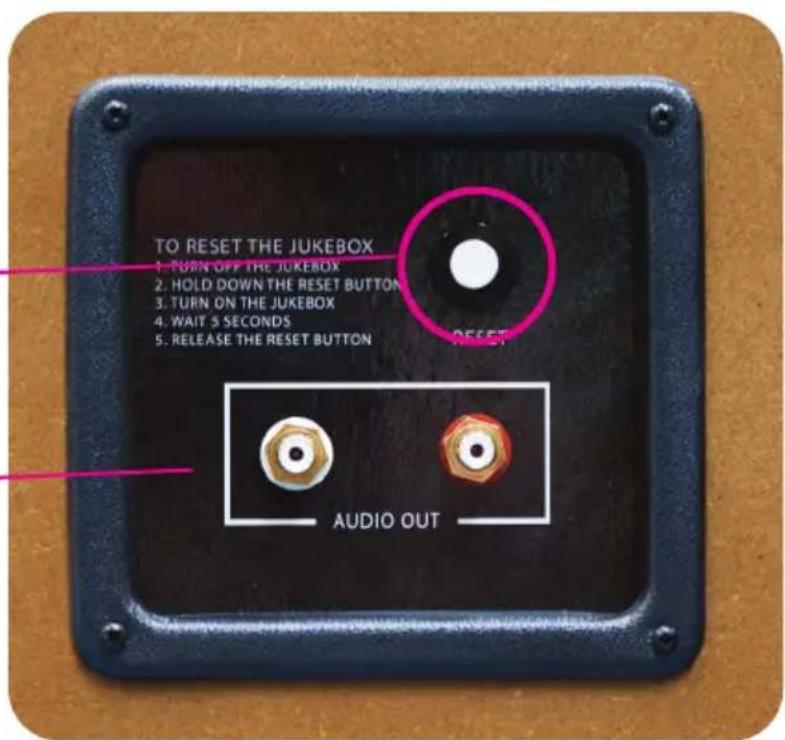
An audio output is provided to allow the Jukebox to play through another amplifier, such as Surround Sound or Multi-room audio system. Connect a stereo phono lead to the audio output on the break-out connections located on the rear of the jukebox (fig 9). The audio level is approximately 2Vp-p but will vary depending upon the audio being played.
To play an external audio source through the jukebox, simply connect its output leads to one of the AUX inputs on the D4 amplifier. (see Fig 8) A 3.5mm jack with fly lead is included in the packaging of your jukebox.
By default the amplifier is in automatic switch over mode, this means the 3 audio inputs are prioritised.
If a CD is playing on the Jukebox, this has highest priority and the display will show ‘Ch I’.
If a CD is not playing the amplifier will prioritise ‘AUX I INPUT’, if audio is detected on this input for 10 seconds, this input will become active and the display will show ‘Ch 2’
If a CD is not playing and no audio is detected on 'AUX 1 INPUT', 'AUX 2 INPUT is prioritised, if audio is detected on this input for 10 seconds, this input will become active and the display will show 'Ch 3'.
Please note:
It is recommended that the audio output level of the connected device is kept at between 34 and full and the volume is adjusted using the volume control of the Jukebox.
The connected device should be connected in stereo. Although 2 AUX inputs are available, one of these will be used by any accessories such as the Bluetooth receiver or iPod dock.
It is possible to manually switch the audio inputs using the JUKE, AUX 1, AUX 2 keys on the remote, if you would like to do this please contact Crosley Brands.
FIG 8 VIEW OF D4 DIGITAL AMPLIFIER
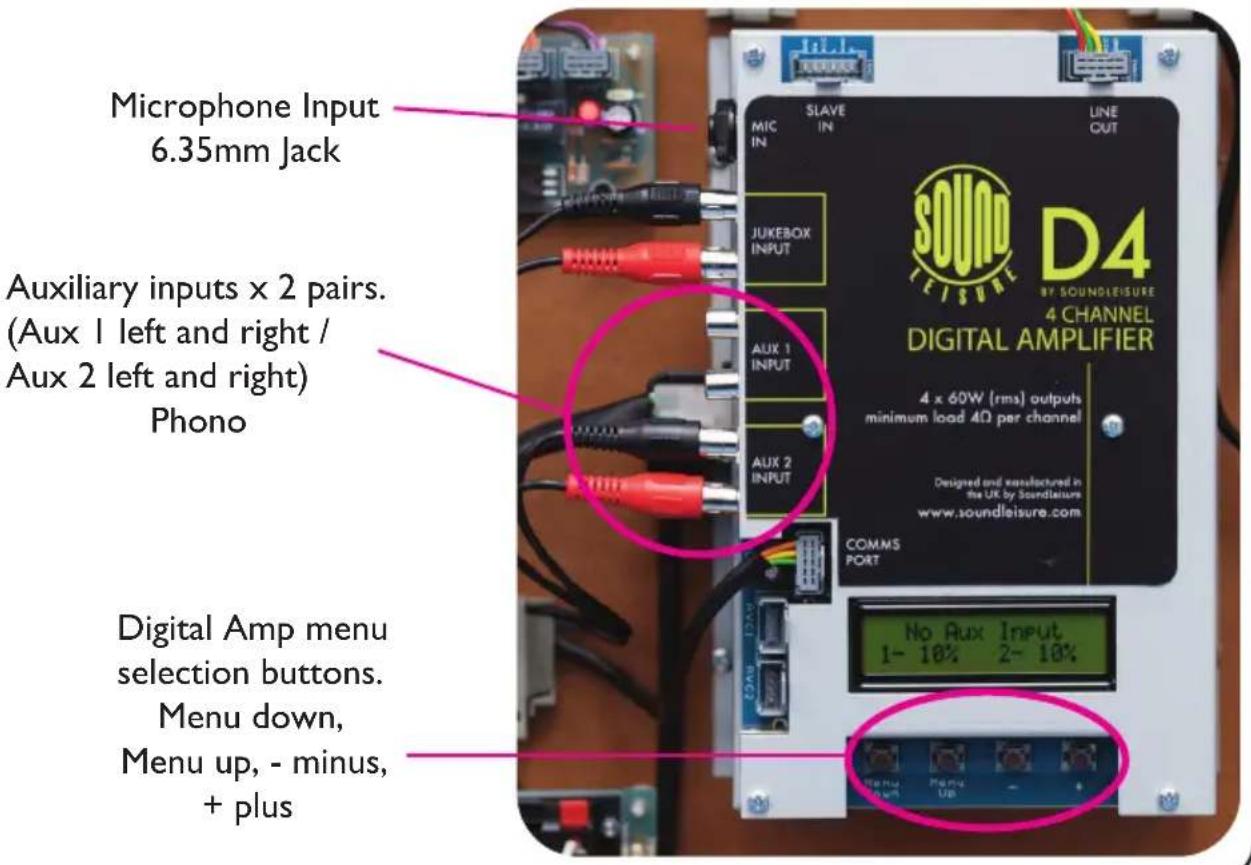
FIG 9
Amplifier breakout box located on the rear of the jukebox
Jukebox Reset Button
Amplifier Audio Out sockets phono
6) Adding additional speakers
The D4 Digital Amplifier has 4 independent outputs, configured as 2 stereo pairs. 2 outputs are used to drive the Jukebox's internal speakers (Shown on amplifier as Channel 1) leaving 2 outputs (left and right) free for the connection of additional speakers (Shown on amplifier as Channel 3). If you have a D2 amplifier channels 3/4 are unavailable.
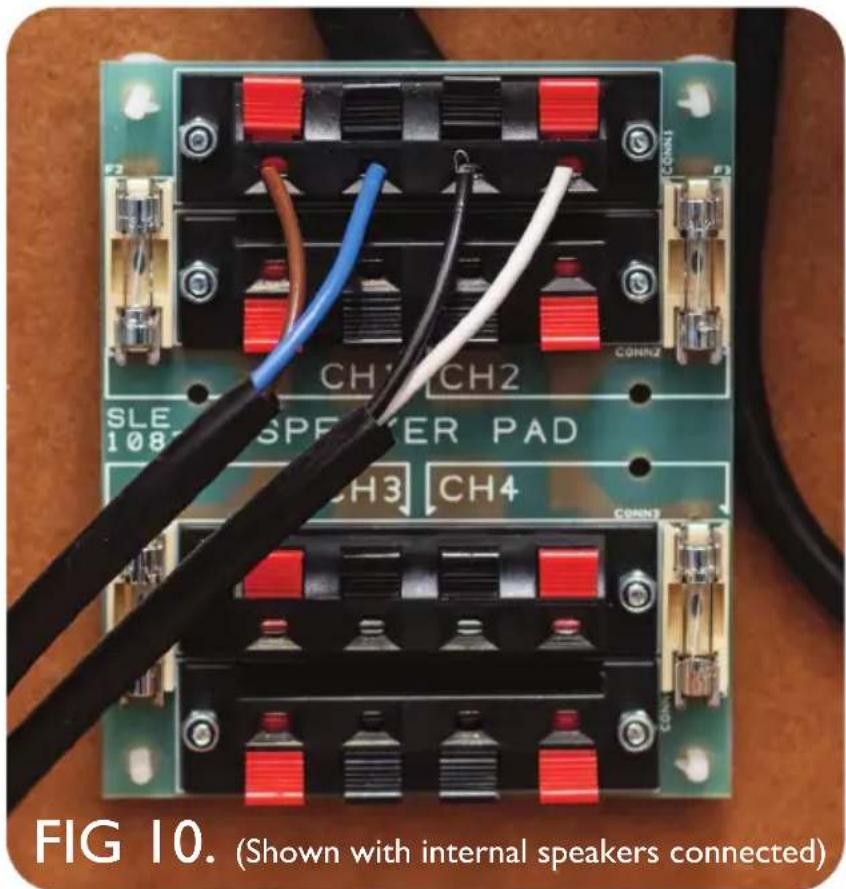
In the rear of the Jukebox is the 'Speaker Matching Pad' (Fig 10 above) Additional speakers should ideally be set-up in a stereo configuration where the left speaker is connected to CH3 and the right speaker is connected to CH4.
The volume for these speakers is controlled using the VOL 2 keys on the remote control.
The additional speakers should not present a load lower than 4 Ohms to each amplifier channel, please contact Crosley Brands if you are unsure which speakers are suitable or would like a different speaker set-up to the one described above.
7) Adjusting amplifier settings
It is possible to adjust the audio equalisation of the amplifier to suit a specific environment or taste. There are separate settings for the internal Jukebox speakers (Channel 1/2) and any additional speakers that may be connected (Channel 3/4).
Pressing the ‘MENU UP’ or ‘MENU DOWN’ buttons on the D4 amplifier will cycle through the available menus. Pressing the ‘+’ or ‘-’ buttons will increment or decrement the value of the current menu. Any changes will be automatically saved. (The location of these buttons is shown in Fig 8 on page 15) If no buttons are pressed for 1 minute, the amplifier will revert back to its default display mode.
Below is a description of the available menus:
Channel I Stereo / Mono Switch
This menu is used to set the amplifier in Stereo or 2 channel Mono. This should be left as 'Stereo'.
Channel I Master
This menu sets the maximum volume level that can be achieved with the remote and should be used to set a maximum level for the Jukebox speakers.
Channel I Bass
This menu sets the bass level of the Jukebox speakers. It can provide a cut or boost of 15dB.
Channel I Middle
This menu sets the middle level of the Jukebox speakers. It can provide a cut or boost of 15dB.
Channel I Treble
This menu sets the treble level of the Jukebox speakers. It can provide a cut or boost of 15dB.
Channel I Microphone Volume
If you wish to use a microphone we recommend a wired low impedance mic. If you wish to use a wireless microphone please contact Crosley Brands.
Aux Input I
This Menu sets the master volume level for Auxiliary Input I.
This allows the volume of the Auxiliary input to be balanced against the volume of the CD mechanism.
Aux Input 2
This Menu sets the master volume level for Auxiliary Input 2.
See Aux Input I for description.
Aux Input Auto/Manual
Changes from auto input selection to manual input selection.
Contact Crosley Brands for more information.
Aux Input Time
This menu sets the time that an auxiliary input must be present before the amplifier will make it active and is defaulted to 10 seconds.
The value can be set between 2 and 60 seconds.
Microphone Voiceover / Karaoke
If karaoke is selected the music and microphone will be heard together.
If voiceover is selected whenever the microphone is used the music will be muted, the music will un-mute when the microphone is no longer being used.
Microphone Bass
This menu sets the Bass level of the microphone input.
It can provide a cut or boost of 15dB.
Microphone Middle
This menu sets the Middle level of the microphone input.
It can provide a cut or boost of 15dB.
Microphone Treble
This menu sets the Treble level of the microphone input.
It can provide a cut or boost of 15dB.
Line Out Master
This menu sets the volume level of the Audio Output.
Line Out Microphone Volume
This menu sets the volume of the microphone sent to the Line Output.
Line Out Voiceover / Karaoke
If karaoke is selected the Line Out music and microphone will be heard together. If voiceover is selected, whenever the microphone is used the Line Out music will be muted, the music will un-mute when the microphone is no longer being used.
Loudness
When switched on the loudness control will provide a dynamic boost to the bass and treble when the Jukebox is used at low volume, the lower the volume the higher the boost. This is a subtle effect that adds clarity to music at low volumes.
8) Diamond Pack
The Diamond Pack is a full LED lighting system that allows the user to select a lighting pattern from 10 pre-loaded patterns or pause the program on any colour to create a custom Jukebox illumination.
To use the Diamond Pack, press the “COLOUR ON” button on the remote control. This turns on the lower left display panel situated below the title rack.
The following patterns are available to select using the number keys on the remote control:
![[ 9 ]](/content/2026/05/996543/images/5612399c694eef3265e0d2123cd7f1bf0170c46c34daaec6ea26e0bc0c07a743.jpg)
Lower left display panel as activated by pressing the “COLOUR ON” button on the remote. Notice this display shows that pattern 9 - sound to light slow is selected.
FIG 11.
Pattern Number Colour Pattern
I Antique
2 iPod
3 Slow Disco
4 Red-Green mix
5 Blue-Red mix
6 Disco
7 Rotisserie
8 Ladder
9 Sound To Light Slow
0 Sound To Light Fast
WARNING : OPTIONS 9 AND 0 (SOUND TO LIGHT) ENABLES FLASHING LIGHTS WHEN MUSIC IS PLAYING.
Should you wish to hold a pattern on a specific colour, press the “Hold On” button on the remote control when the Jukebox has the desired illumination. The lower left display panel will change to a ‘H’ to indicate a pattern is held as shown below In Fig 12.
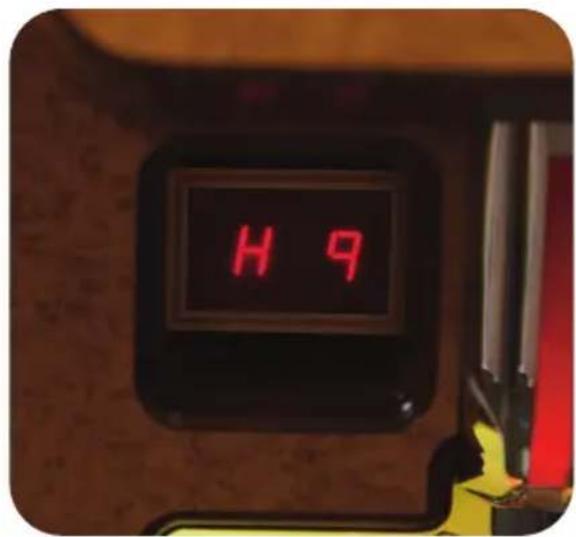
FIG 12.
Further changes to the pattern cannot be carried out until the hold is released by pressing the "Hold Off" button on the remote control.
When you have chosen your selected pattern press the “COLOUR OFF” button on the remote control to return to jukebox selection mode.
Please note:
Track selections can only be resumed when colour selection mode is turned off. If the Jukebox is not accepting selections ensure that the colour mode is turned off.
Should you encounter problems with the Diamond Pack, please contact Crosley Brands.
9) Bluetooth
Installing the Bluetooth receiver:
The Bluetooth receiver is an accessory and therefore may not be installed at the time of purchase. No tools are required to install the Bluetooth receiver.
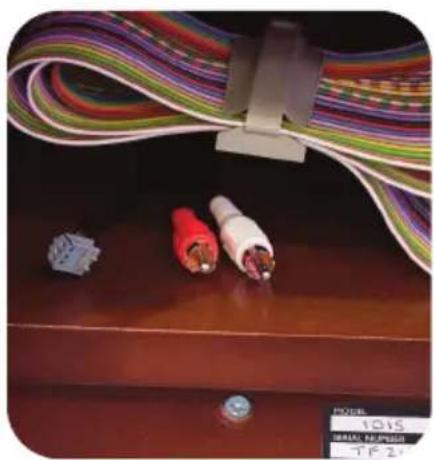
I. The audio cables (phono) and power connections are already installed. Upon delivery these cables will be located on the lock side of the shelf that is situated underneath the player mechanism. (shown in step I below.) The Bluetooth receiver will also be packaged inside the jukebox.
-
Plug each cable into the Bluetooth receiver as shown in step 2. Insert the black and red plugs into the bluetooth receiver. The grey power cable pushes into its socket and clips into place.
-
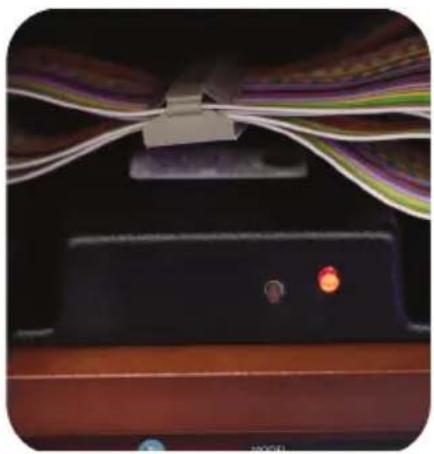
Remove the backing from the self adhesive tape on the back of the Bluetooth receiver and attach firmly to the shelf as shown in step 3.
-
- 3.
natural_image
Close-up of a wooden table with three colored USB connectors and a white cable, no visible text or symbols on the main subject.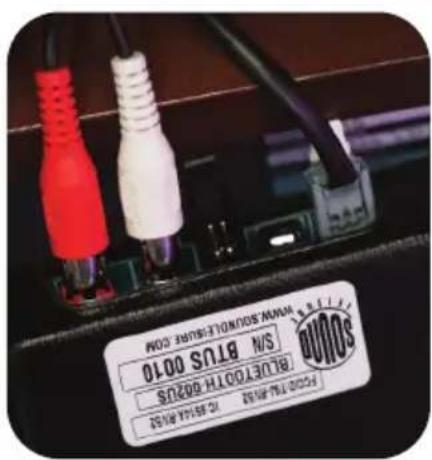
natural_image
Close-up of a black electronic device with two illuminated lights and wires attached (no visible text or symbols)The Bluetooth accessory allows most Bluetooth enabled devices to wirelessly stream audio directly to the Jukebox.
To pair an audio device to the Bluetooth accessory:
I Ensure the LED on the front of the Bluetooth accessory is solid red. If the LED is not solid red, press the button on the front of the accessory to enter pairing mode.
-
Turn on the Bluetooth connection on your audio device and begin searching for devices (refer to your audio device manual for instruction on how to do this).
-
From the list of found devices, select 'crosley-XXXX'. If your audio device asks for a confirmation, press ok If your audio device asks for a password, enter '1234'.
-
Once pairing is complete, the LED on the front of the Bluetooth accessory will begin to flash green.
-
The LED will change to solid green, when audio is being played on your audio device.
To pair to a new device:
Press the button on the front of the Bluetooth accessory to unpair your connected device or unpair using your audio device (refer to your audio device manual for instruction on how to do this).
The LED on the front of the Bluetooth accessory will change to solid red when unpaired.
To connect to a new device repeat the pairing procedure above.
Please set your audio streaming source (ipod, phone etc) volume to three quarters or above.
Jukebox Auxiliary Switching:
The jukebox will switch to the Bluetooth accessory automatically when a CD is not being played. By default it will take 10 seconds before the Bluetooth audio is heard.
Bluetooth unit located on the shelf inside the jukebox front door.
Pairing button
LED Display
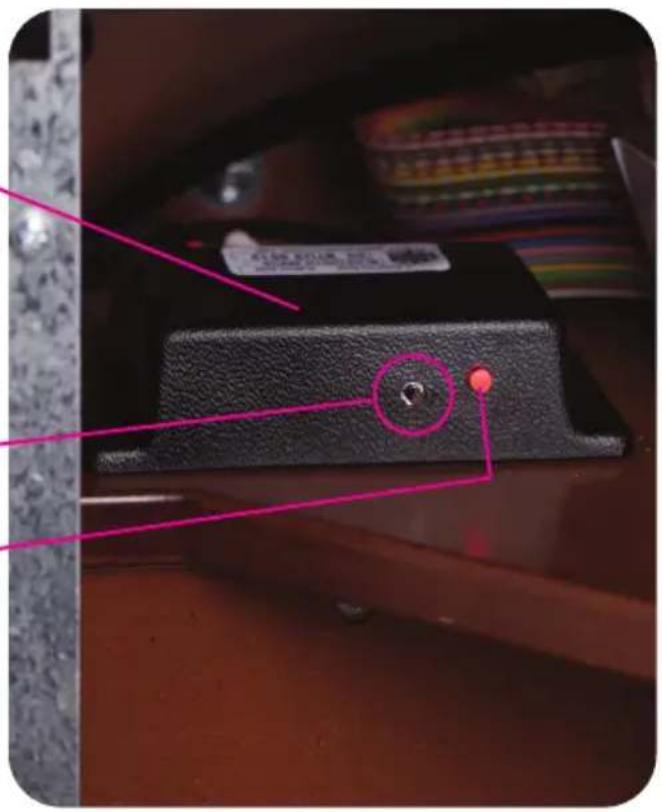
FIG 13
10) Trouble shooting
If the fault you have is not covered below or occurs repeatedly please contact Crosley Brands on the phone or email address shown on the back of this manual.
Fault : CD mechanism stuck or vibrating
Solution : Possible CD obstruction, switch off the Jukebox and remove CD's around the CD lift arm. Switch the Jukebox back on using the reset procedure outlined on the next page.
Fault : Display showing multiple digits along the top line of the LED display and selections cannot be made.
Solution : Jukebox door switch is open, close the front door of the Jukebox.
Fault : Intermittent remote control
Solution : Ensure new batteries are used.
If only certain keys are not working correctly, such as the volume keys which get the most use, contact Crosley Brands to obtain a replacement.
Fault : Cannot make track selections via remote control or Jukebox button bank
Solution : Ensure that the machine is in normal Jukebox operation and colour selection mode is turned off by pressing the “COLOUR OFF” button on the remote control.
Reset Procedure
Occasionally if the machine has not been used for a long period of time or has experienced voltage spikes or CD mechanism jams, it may be necessary to reset the Jukebox. The reset procedure re-synchronises the various electronic parts of the Jukebox and will clear any data corruption that may have occurred.
To reset the Jukebox:
i) Switch off the Jukebox and ensure the front door is closed and locked.
ii) Hold down the Jukebox Reset button on the back of the machine (fig 9 - page 15).
iii) Switch the Jukebox back on while holding the Jukebox Reset button down.
iv) Wait 10 seconds then release the button.
If the reset has been successful the display will flash 179 and then 30. The CD mechanism should be parked over position 100 (far left side).
Please note: This procedure will completely reset the CD mechanism, please remove any CD's that have been left on the Laser Player before making any further selections.
This product is proudly manufactured in the UK under license to Crosley Brands by Sound Leisure Limited

CE Declaration of Conformity
We, Sound Leisure Ltd, UK, declare under our sole responsibility that the following products
Manhattan, Melody, 1015, 1015 Slimline, Gazelle, Britannia & Rocket Jukeboxes
To which this declaration relates is in compliance with the essential requirements of:
EMC
Council Directive 2004/108/EC
Standards EN 55022 & EN 55024
Electrical Safety
Low Voltage Directive 2006/95/EC
Standards EN 60065:2001(7th Ed) + A1:2005 + A2:2010
RoHS
Council Directive 2002/95/EC
When installed in accordance with the manufacturers specifications
Sound Leisure Ltd
Sandleas Way
Leeds
West Yorkshire
England
LS15 8AR
Signed on behalf of Sound Leisure Ltd

Chris Black
Managing Director
Date of issue: 21 ^st November 2013
CROSLLEY®
Crosley Brands
1220 east oak Street
Louisville, KY 40204
United States
Phone: 618-427-3761
Email:retailsales@crosleybrands.com
www.crosleyradio.com
Manufactured under licence in the UK by

- CROSLEY®
- Contents
- Introduction
- Important Safety Instructions
- Additionally
- Bubble Tubes
- Taking Delivery / Transit Mode
- Moving the Jukebox
- 3) Inserting title cards and compact discs
- Title cards
- Types of Title cards
- Compact Discs
- 4) Playing the jukebox
- Making Selections
- Adjusting Volume
- 5) Connecting external audio devices
- Please note:
- FIG 9
- 6) Adding additional speakers
- 7) Adjusting amplifier settings
- Channel I Stereo / Mono Switch
- Channel I Master
- Channel I Bass
- Channel I Middle
- Channel I Treble
- Channel I Microphone Volume
- Aux Input I
- Aux Input 2
- Aux Input Auto/Manual
- Aux Input Time
- Microphone Voiceover / Karaoke
- Microphone Bass
- Microphone Middle
- Microphone Treble
- Line Out Master
- Line Out Microphone Volume
- Line Out Voiceover / Karaoke
- Loudness
- 8) Diamond Pack
- Pattern Number Colour Pattern
- 9) Bluetooth
- 10) Trouble shooting
- Reset Procedure
- To reset the Jukebox:
- CE Declaration of Conformity
- CROSLLEY®
Brand : Crosley
Model : CR1208A
Category : Jukebox