
KT1215A-WA - Jukebox Crosley - Free user manual and instructions
Find the device manual for free KT1215A-WA Crosley in PDF.


| Product Type | Jukebox |
| Brand | Crosley |
| Model | KT1215A-WA |
| Dimensions (W x D x H) | 15.5 x 12 x 20 inches |
| Weight | 15 lbs |
| Power Supply | 120V, 60Hz |
| Turntable Speeds | 33 1/3, 45 RPM |
| Speakers | 2 x 3-inch full-range |
| Output Power | 20W |
| Bluetooth | Yes, version 4.2 |
| FM Radio | Yes, with built-in antenna |
| LED Lighting | Multi-color, selectable modes |
| Headphone Jack | 3.5mm |
| Record Player Type | Belt-driven, fully automatic |
| Stylus | Replaceable diamond stylus |
| Cleaning | Use a soft brush for stylus; wipe cabinet with dry cloth |
| Safety | Keep away from water and heat sources |
| Repairability | Replaceable turntable belt and stylus |
| Warranty | 1 year limited |
Frequently Asked Questions - KT1215A-WA Crosley
User questions about KT1215A-WA Crosley
0 question about this device. Answer the ones you know or ask your own.
Ask a new question about this device
Download the instructions for your Jukebox in PDF format for free! Find your manual KT1215A-WA - Crosley and take your electronic device back in hand. On this page are published all the documents necessary for the use of your device. KT1215A-WA by Crosley.
USER MANUAL KT1215A-WA Crosley
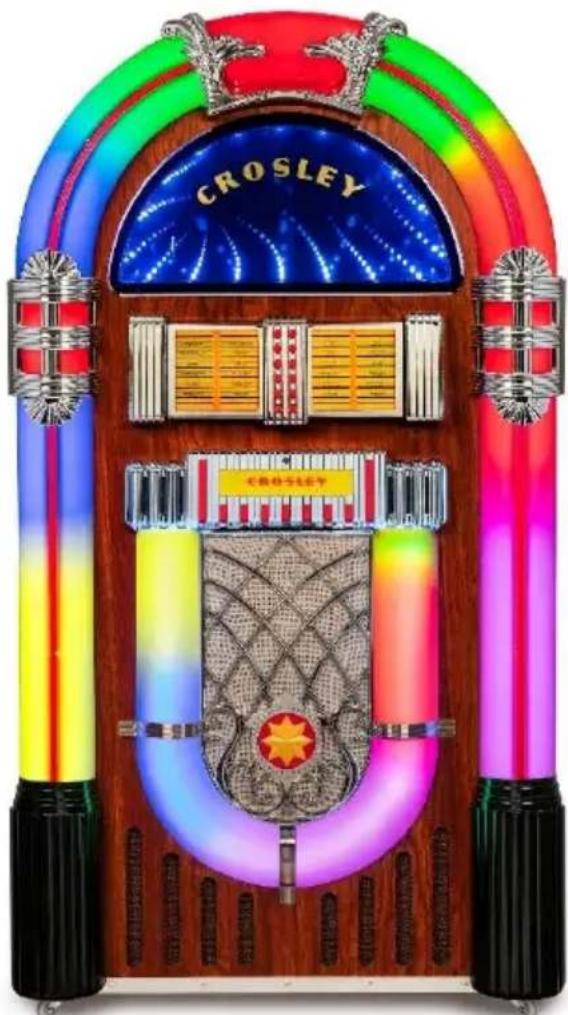
Crosley Digital LED Jukebox with Bluetooth Instruction Manual
natural_image
Illustration of a jupecker with rainbow arches and decorative panels, featuring 'CROSLEY' branding (no readable text beyond branding)Questions, problems, missing parts?
Before returning to the store, call Customer Service
8 a.m. – 6 p.m., EST, Monday – Friday
1-888-CROSLEY
www.crosleyradio.com
Important Safety Instructions
- Please read and keep these instructions handy.
- Please follow all instructions and heed all warnings.
- Do not use this jukebox in or near water. Jukebox is for indoor use only.
- Clean only with a dry cloth.
- Do not block any ventilation openings. Install in accordance with the manufacturer's instructions.
- Do not install near any heat sources such as radiators, heat registers, stoves or other apparatus (including amplifiers) that produce heat.
- Do not defeat the safety purpose of the polarized or grounding-type plug. A polarized plug has 2 blades with one wider than the other. A grounding type plug has two blades and a third grounding prong. The wide blade or the third prong are provided for your safety. If the provided plug does not fit into your outlet, consult an electrician for replacement of the obsolete outlet.
- Protect the power cord from being walked on or pinched particularly at plugs, convenience receptacles, and the point where they exit from the apparatus.
- Only use attachments/accessories specified by the manufacturer.
- Use only the stand, specified by the manufacturer. When a stand is used, do not attempt to move the jukebox and stand together. Separate the jukebox from the stand prior to moving.
- Unplug this apparatus during electrical storms or when unused for long periods of time.
- Refer all servicing to qualified service personnel. Servicing is required when the jukebox has been damaged in any way, such as if a power-supply cord or plug is damaged or the jukebox does not operate normally or has been damaged.
This jukebox contains high voltage parts. Do not attempt to carry out any work that is not specifically instructed in this manual. If the jukebox fails to operate correctly, disconnect power source and read the troubleshooting instructions at I this manual before attempting to locate issue.
DO NOT attempt to lift the jukebox with one person.
This appliance must be connected to a main electrical socket with a protective grounded connection.
WARNING: To reduce the risk of fire or electric shock, do not expose this apparatus to rain or moisture.
Remove and save all packing materials from jukebox for warranty purposes.
Power Source and Initial Set-Up
- Remove the AC power adapter and cord from the packing material and connect the AC power cord to the AC adapter.
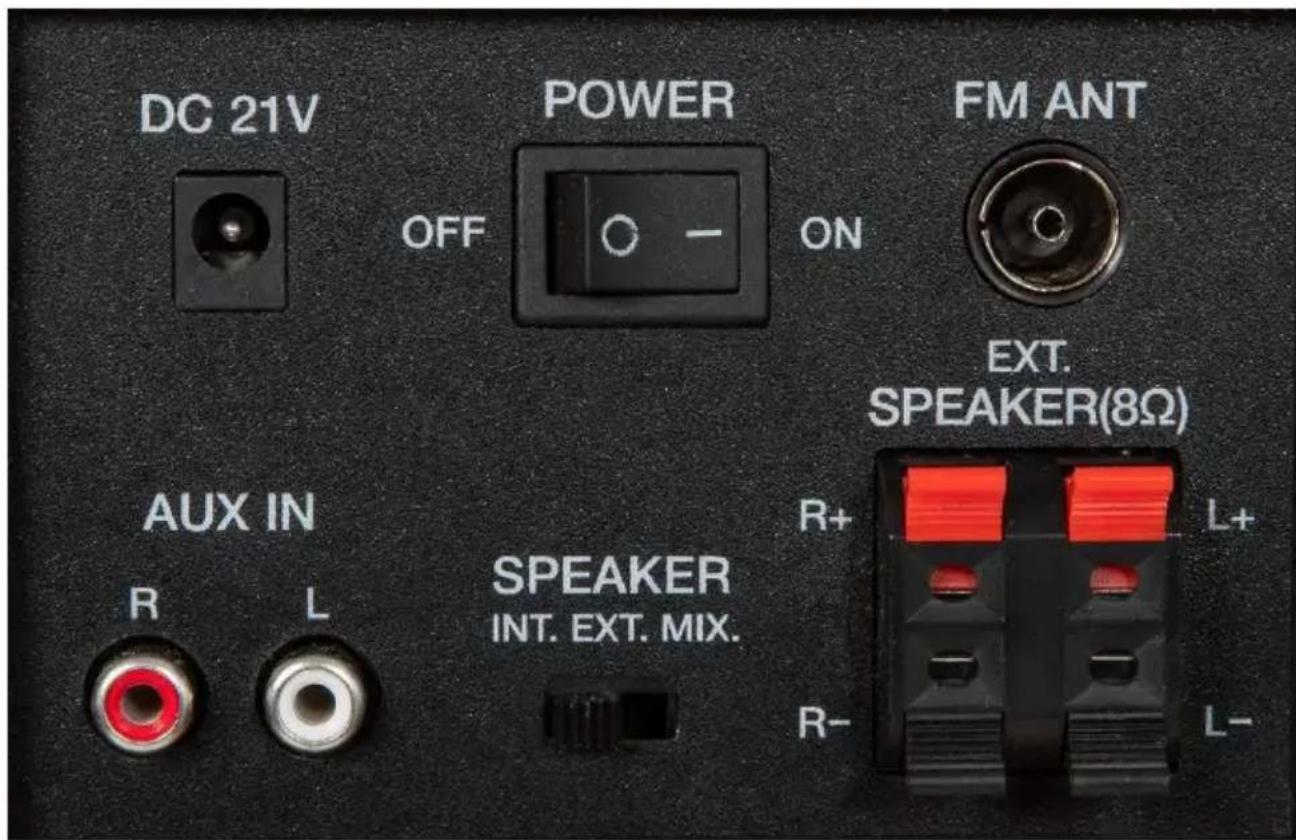
- Plug the small end of the adapter into the DC jack on the back of the jukebox.
- Connect the AC adapter cord into the wall socket.
- Push the toggle switch on the rear of the jukebox to "ON". This toggle switch can remain activated in the "ON" position once the jukebox is in its final position.
- Ensure the SPEAKER switch is moved the to the INT (Internal) setting unless you intend to attach your own set of external speakers. See details contained in manual regarding the External Speaker Option if you intend to utilize external speakers.
Antenna
- Unwind the FM Antenna supplied and connect it to the FM Antenna jack on the rear of the jukebox.
- Position the antenna where you can obtain optimum FM reception. Note: If you have trouble tuning into an FM station, you may have to re-position the antenna for better reception until it is clear with no interference.
Set-Up - Rear Panel Layout & Connections
Jukebox Operation - Front Panel Layout & Controls
Basic Jukebox Audio & LED Settings
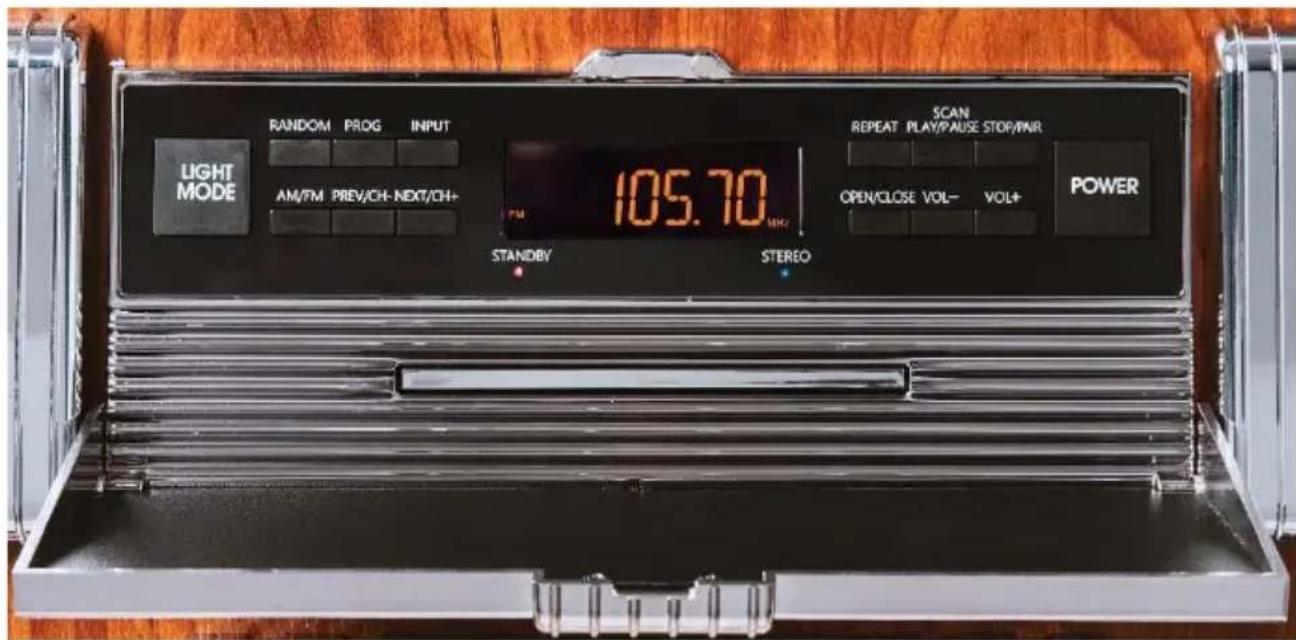
Press the front POWER button located on the right front panel behind the simulated title strips. The simulated title strip panel flips down to reveal all necessary jukebox controls.
Volume Control: Press VOL + (UP) or VOL - (DOWN) on the remote or on the front panel to adjust the volume.
Select from each of the audio options using the "INPUT" button: Tuner (for AM/FM Radio) – CD – Bluetooth (BT) or AUX input by selecting the function displayed in the LED panel. The INPUT function button on the remote control will also change the audio functions.
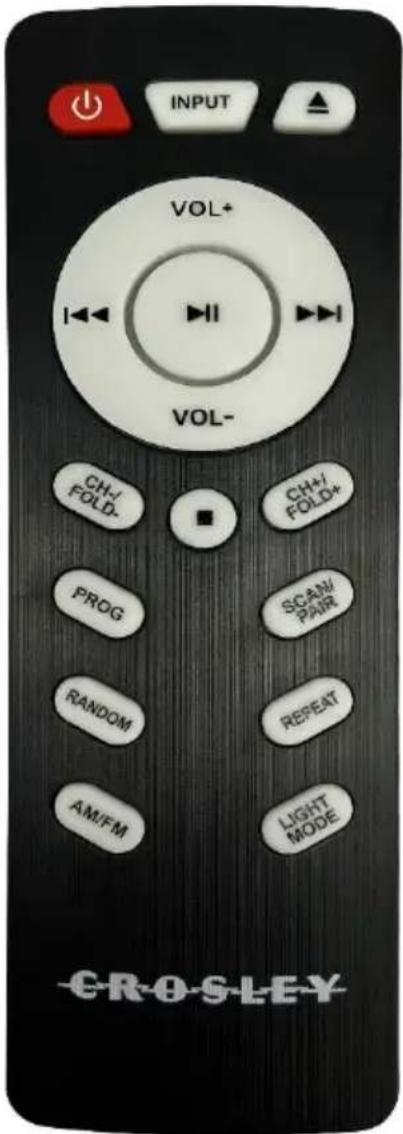
When the jukebox is on, press the front POWER switch to turn the jukebox off. This will turn off both the LED lighting and audio controls. The red button located on the remote control also will turn the jukebox lighting and audio control on or off.
Press the LIGHT MODE button on the front panel or the remote control to change the external lighting pattern. There are 4 light sequences to choose from.
Nearly all the functions of the jukebox can be operated remotely. For best performance, the remote control should be pointed toward the jukebox and have a clear path for the signals to travel.
Ensure the remote has two fresh AAA batteries. Batteries are included with the jukebox but must be installed prior to initial use.
Playing a CD
- Press the Input button on the remote or front panel to select the CD operation mode.
- Open the simulated title strip compartment and press the Open/Close button on the remote or on the front panel to open the CD compartment.
- Insert a disc with the printed side facing up. Press the OPEN/CLOSE button on the remote or on the front panel again to close the compartment, READING is displayed as the CD player scans the contents of the disc.
- Track No. 1 will be played automatically after it finishes the reading of CD contents.
- Press FF>> or FR<< on the remote once or repeatedly until the desired track number appears in display. Press and hold either the FF>> or FR>> to advance or go back within a song or track.
- Press the STOP button on the remote or the front panel to stop playback completely.
- For repeat play of a single song or CD track, press REPEAT on the remote once. Press REPEAT twice to repeat the entire CD
- Press the Play/Pause button on the remote to suspend playback. Press the Play/Pause button to resume playback.
CD-MP3 Disc Playback
If your MP3 CD is separated into folders, follow the steps below to access the folders.
- While the CD is stopped, press the Folder Up or the Folder Down buttons on the remote to advance forward or backwards through the folders on your disc.
- Once the desired folder is reached, use the Forward Skip or the Backward Skip buttons to select the desired track.
- Press the Play button to begin playback of the selected track.
- For repeat play of a single song or CD track, press the REPEAT once. Press REPEAT twice to repeat the current folder. Press the "REPEAT" button three times to repeat all the folders on CD.
Programming Tracks
You may store up to 20 tracks in the desired sequence from any readable CD disc.
-
Use the remote and press the STOP button using the remote press PROGRAM to start programming.
-
Press PREV/CH+ or NEXT/CH- on the front panel or the remote press FF>> or FR<< once or relatedly until the desired track number appears in the display.
a. For MP3 use the remote and press the STOP button. Using the remote, press PROGRAM to start programming.
b. Press PREV/CH+ or NEXT/CH- on the front panel or on the remote. Press FF>> or FR<< to select desired folder. Then press PROGRAM again to select the desired track. Press FF>> or FR<< once or repeatedly until the desired track number appears in the display.
- Press PROGRAM to confirm, display shown stored track No. and next store position.
- Repeat steps to select and store all desired tracks. FULL is displayed if you attempt to program more than 20 tracks.
- Press PLAY/PAUSE to play the program
- You will erase the contents of the memory by: Pressing the POWER button, selecting another INPUT mode or opening closing the CD tray.
Bluetooth Operation
- To pair the jukebox with the audio device of your choice, Select the BT INPUT mode by pressing the input button on the front panel or remote control to select the BT INPUT mode.
- On your Bluetooth audio device, select the Bluetooth settings or functions and look for a connection labeled "CR-1215A". The device should show the "CR-1215A" connection as available but "Not Connected". Select the "CR-1215A" Bluetooth connection on the audio device to pair the connection to the jukebox.
- When successfully paired with the jukebox, you'll hear an ascending tone when connected.
- Select an audio option from your connected Bluetooth device. Press play on the device to start the music. Ensure Bluetooth audio device has volume adjusted properly.
- Press the FF>> or FR<< on the remote to skip forward or backwards.
- Press the Play/Pause button on the remote to start and stop the playback of your music.
AM/FM Radio Operation
- Press the INPUT button on the front panel or on the remote to select the Tuner Mode.
- To choose between AM/FM, press the AM/FM button on the front panel or on the remote.
- To Auto Scan stations and set them in memory, press the SCAN/PAUSE/PLAY button on the front panel or SCAN/PAIR on the remote.
- To manually scan a radio station, press PREV/CH- or PREV/CH+ on the front control or the FF>> or FR<< on the remote, this will auto tune the next radio station available.
- To listen to a preset station: Press CH-/FOLD or CH+/Fold on the remote or PREV/CH- or PREV/CH+ on the front panel.
RCA input is located on the REAR CONTROL PANEL and can accept a variety of device inputs. No input cord is supplied with the jukebox. The user-supplied cable should match the output of the device attached to the jukebox and have an “RCA” connection for input and connection with the jukebox. Ensure the audio device connected to the AUX connection has a proper volume adjustment for output.
Audio Controls – External Speaker Option
The jukebox does not require the use of external speakers. If you intend to fill a large room or would like a larger volume, external speakers can be used either alone or in conjunction with the speakers built-in to the jukebox. If you elect not to use external speakers, be sure the SPEAKER switch is switched to INT. (Internal)
The speaker jacks for external speakers are located on the rear of the jukebox. Located near the speaker jacks is a switch labeled INT (Internal Speakers Only) EXT (External Speakers Only) and MIX. (Using both Internal and External Speakers) When using external speakers only, this switch must be switched to the EXT position. Doing this turns off the internal speakers in the jukebox and redirects the sound to the external speakers only. The MIX position will play through both the internal jukebox speakers and external speakers at the same time and will produce the highest volume sound available. The MIX position will result in lower volumes through the internal jukebox speaker if no speakers are attached and jukebox is operated in MIX mode.
ST15-WA Jukebox Stand Set-up (Stand Not Included)
The ST15-WA Crosley Jukebox Stand is sold separately and elevates the height of the jukebox slightly for easier user operation while providing a convenient storage location for CDs and the remote.
- Unbox the stand and remove all packing materials
- Place the stand where the jukebox will stay.
- With the assistance of another individual, place the jukebox on the stand, ensuring the jukebox casters are within the indentations located on the top of the jukebox stand.
- Do not move the jukebox while it's located on the stand.
No Power
- Ensure jukebox is plugged in to wall socket correctly.
- Verify the LED is glowing green on the AC adapter attached to the jukebox and wall socket.
- Ensure wall socket is working properly and not switched off.
- Ensure AC adapter has all connections tight from the wall socket to the jukebox.
- Remove the AC adapter from the back of jukebox and plug back and ensure the rear POWER switch is ON.
No Sound
- Check that the volume is turned up by pressing VOL+ button on the remote or front control panel. NOTE: Volume range on some units start at level 1 and ends at level 30 MAX.
- Make sure the SPEAKER INT.EXT.MIX. Slide switch on back panel of the jukebox is switched to the correct setting. INT for internal speakers only, EXT for external speakers only, MIX for both internal and external speaker operation.
- Check to make sure POWER switch is turned on and jukebox is receiving power from the wall socket. Ensure POWER switch on back on jukebox is switched to ON.
- If jukebox is operated in "AUX" input mode, ensure the device has a volume switch which is adjusted properly.
CD does not play
- Ensure CD is inserted correctly, with label of CD facing up.
- Check to see that the surface of the CD is clean.
- Make sure the function switch is set to CD mode, with jukebox volume adjusted properly.
- If CD was not commercially produced, it may be an unsupported format if produced from a CD burner with audio files from a computer.
Remote is not working
- Replace batteries in remote.
- Be sure to point the remote towards the remote sensor when operating. Remote sensor is located near center of jukebox, just above the “CROSLEY” name.
- Remove obstacles in the path of the remote and jukebox so the remote signal has a straight path to the sensor that is on the front of the jukebox.
FCC Statements
This equipment has been tested and found to comply with the limits for a Class B digital device, pursuant to Part 15 of the FCC Rules. These limits are designed to provide reasonable protection against harmful interference in a residential installation. This equipment generates, uses, and can radiate radio frequency energy and, if not installed and used in accordance with the instructions, may cause harmful interference to radio communications. However, there is no guarantee that interference will not occur in a particular installation. If this equipment does cause harmful interference to radio or television reception, which can be determined by turning the equipment off and on, the user is encouraged to try to correct the interference by one or more of the following measures:
- Reorient or relocate the receiving antenna.
- Increase the separation between the equipment and receiver.
- Connect the equipment into a circuit different from that to which the receiver is connected.
- Consult the dealer or an experienced radio TV technician for help.
- Crosley Digital LED Jukebox with Bluetooth Instruction Manual
- Important Safety Instructions
- Power Source and Initial Set-Up
- Antenna
- Set-Up - Rear Panel Layout & Connections
- Jukebox Operation - Front Panel Layout & Controls
- Basic Jukebox Audio & LED Settings
- Playing a CD
- CD-MP3 Disc Playback
- Programming Tracks
- Bluetooth Operation
- AM/FM Radio Operation
- Audio Controls – External Speaker Option
- ST15-WA Jukebox Stand Set-up (Stand Not Included)
- No Power
- No Sound
- CD does not play
- Remote is not working
- FCC Statements
Brand : Crosley
Model : KT1215A-WA
Category : Jukebox