W870 - Sewing machine White - Free user manual and instructions
Find the device manual for free W870 White in PDF.


| Product Type | Sewing Machine |
| Model | W870 |
| Brand | White |
| Dimensions (approx.) | 40 x 18 x 30 cm (15.7 x 7.1 x 11.8 inches) |
| Weight (approx.) | 7 kg (15.4 lbs) |
| Power Supply | 110-220V AC, 50/60 Hz |
| Power Consumption | 85 W |
| Stitch Types | Straight, Zigzag, Buttonhole, Blind Hem, and Decorative Stitches |
| Maximum Sewing Speed | 1100 stitches per minute |
| Built-in Stitches | 22 |
| Needle Threading | Manual |
| Bobbin Type | Top drop-in, class 15 |
| Lighting | Built-in LED light |
| Foot Pedal | Variable speed control |
| Free Arm Capability | Yes |
| Maintenance | Regular cleaning of the race hook and oiling of moving parts |
| Safety | Unplug before cleaning; keep fingers away from needle |
| Accessories Included | Seam ripper, bobbins, needles, dust cover |
| Repairability | Repairs possible; spare parts available online |
| Documentation | User manual in PDF format |
Frequently Asked Questions - W870 White
User questions about W870 White
0 question about this device. Answer the ones you know or ask your own.
Ask a new question about this device
Download the instructions for your Sewing machine in PDF format for free! Find your manual W870 - White and take your electronic device back in hand. On this page are published all the documents necessary for the use of your device. W870 by White.
USER MANUAL W870 White
natural_image
Line drawing of a sewing machine with labeled front and reverse buttons (no text or symbols on the device itself)OWNER'S OPERATING AND MAINTENANCE MANUAL
MODEL NUMBER 870 +869
You are now the owner of a new zigzag sewing machine, the most versatile type of its kind you can possess.
Buttonholes, monogramming, overcasting and creative embroidery are done with ease and speed.
To aid you in obtaining the greatest performance from your new machine this book on its care and use has been written for you. Read the instructions carefully as a thorough understanding of your machine will reward you with many hours of trouble-free, creative sewing.
Time-saving attachments such as rufflers, binders, edgestitchers, cording feet and soforth to complement the accessories furnished with your machine are available from the store where you purchased your machine.
WHITE SEWING MACHINE COMPANY Cleveland, Ohio 44111
White Consolidated Industries Inc. Toronto, Ontario, Canada
INDEX
Page.
Features and Parts 2-3-4
Needle and Thread Chart 5
Setting the Needle 6
Winding the Bobbin 7
Threading Bobbin Case 8
Upper Threading 9
Straight Stitching 10
Setting the Stitch Length....11
Adjusting the Tensions 12
Adjusting Pressure and Feed 13
General Sewing 13
Light Weight Fabrics 13
Darning and Monogramming 13
Removing the Work 14
Zigzag Stitch System 15
Page.
Creative Embroidery and Satin Stitch…15
Free Hand Embroidery Patterns……16
Twin Needle 17
Making Buttonholes....18-19
Sewing on Buttons 20
Embroidering With a Hoop 21
Quilting 22
Narrow Hemmer 23
Sewing With Braid 24
Blind Stitch Hemming 24-25
Care and Maintenance 26
Oiling 27
Useful Hints 28
Minor Faults 29
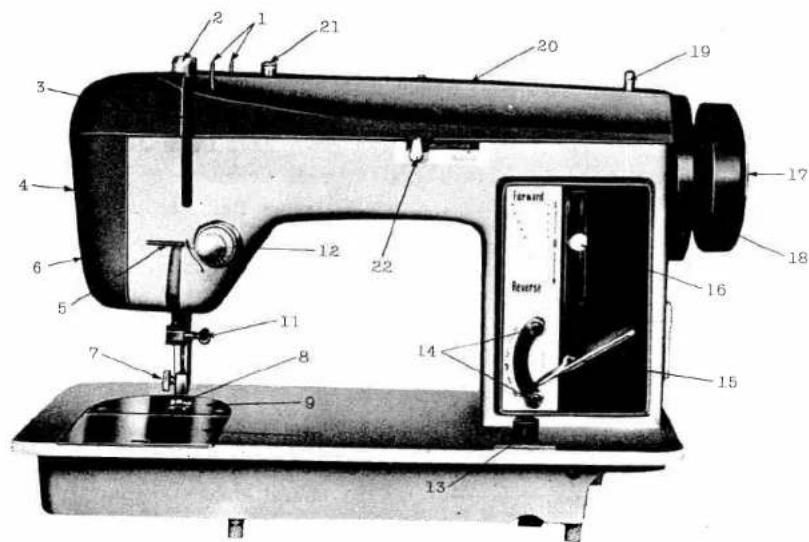
Fig. 1
FEATURES AND PARTS (Front View)
- Top thread guides
- Pressure release (Darner)
- Thread take up lever
- Face plate
- Lower thread guide
- Sew light (inside face plate)
- Presser foot clamp screw
- Presser foot
- Cover plate
- Needle plate
- Needle clamp screw
- Upper thread tension
- Drop feed knob
- Zigzag width stops
- Zigzag width control lever
- Stitch length control and reverse lever
- Stop motion knob
- Hand wheel
- Bobbin winder
- Top cover plate
- Bobbin Winder tension
- Blind stitch lever
(Rear View)
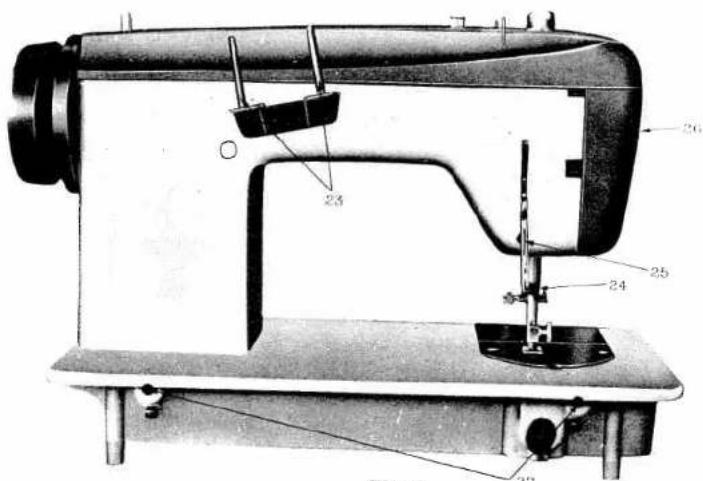
Fig. 2
- Spool pins
- Thread cutter
-
Head hinge mounting holes
-
Presser bar lever
-
Sew light switch
NEEDLE-THREAD-FABRIC-STITCHING GUIDE
| Fabric | Needle No. | Machine Stitches Per Inch | Cotton Thread | Mercerized Thread | Silk or Nylon |
| Extremely heavy tarpaulin, sacking, canvas, duck, etc. | 4 | 6 to 8 | 10 to 30 | Heavy Duty | |
| Heavy upholstery fabric, ticking, denim, leatherette | 3 | 8 to 10 | 30 to 40 | Heavy Duty | |
| Medium heavy drapery fabric, velveteen, suiting, felt, terry, etc. | 2 | 10 to 12 | 40 to 60 | Heavy Duty | |
| Medium broadcloth, percale, gingham, linen, wool, shantung, etc. | 1 | 12 to 14 | 60 to 80 | 50 | A |
| Sheer voile, lawn, dimity, crepe, handkerchief linen, plastic film, etc. | 0 | 14 to 16 (plastic film) 8 to 10 | 80 to 100 | 50 | A |
| Very sheer chiffon, batiste, lace, organdy, ninon, net, marquisette, etc. | 00 | 16 to 20 | 100 to 150 | 50 | A |
SETTING THE NEEDLE
See Fig.3. Raise the needle bar A to its highest point, turning hand wheel toward you by hand.
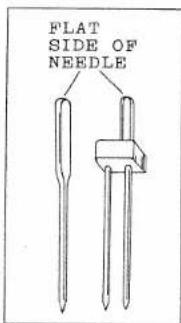
Then loosen the needle clamp screw B and the needle can be inserted into clamp C. Place needle (flat side to back) in the needle clamp and push it upward as for as it will go into the needle clamp hole, tightening the needle clamp screw securely with a screwdriver.
After Changing the needle, make one complete revolution of hand wheel by hand to be sure the needle is in the correct position.
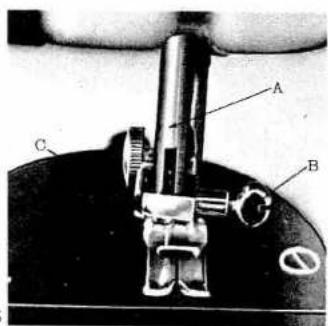
Fig. 4
WINDING THE BOBBIN
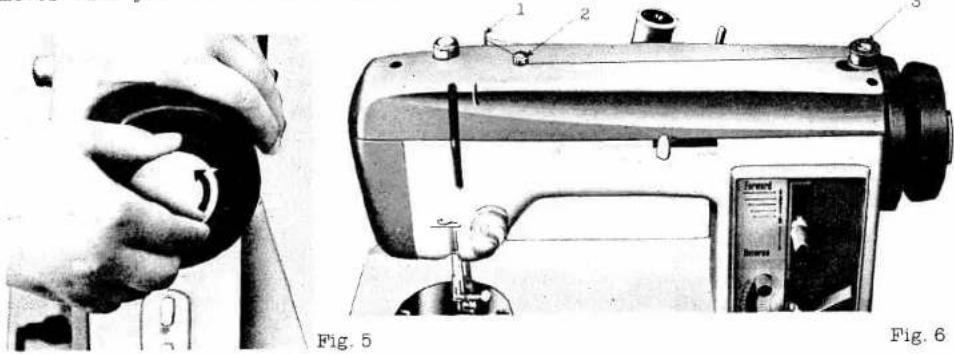
Disengage the hand wheel (Fig.5) from the stitching mechanism by turning the clutch toward you or counter-clockwise. Place a spool of thread on one of the spool pins, lead thread through the upper rear thread guide (1) and to the right around the bobbin winder tension discs (2). Make one winding around the discs and run end of thread through a hole in the bobbin edge and place bobbin on spindle (3) fitting the notch in bobbin over small pin on spindle.
Hold the thread end loosely and start machine slowly. Stop the machine when it is filled. Break off loose thread end used to start the winding.
Turn clutch away from you until sewing mechanism is again engaged so that the needle moves when you turn the hand wheel.
natural_image
Illustration of a hand operating a sewing machine with labeled parts (no text or symbols on the device itself)THREADING THE BOBBIN CASE
Refer to Figs. 7, 8 and 9 and practise the following procedure.
Hold the bobbin case in your left hand. Let about two inches of thread hang free from the bobbin, and insert bobbin into case so that thread will be rotating counterclockwise. Guide the thread end through the slot on the side of the case and under the tension spring until it enters the small notch on the edge of the spring.
PLACING BOBBIN CASE IN SHUTTLE
Open cover plate in front of the needle. (See 9 Fig. 1). Hold the bobbin case latch, (D), Fig. 10, between the thumb and forefinger of the left hand, with at least three inches of thread running from the top of the bobbin case to the right. Insert and center the bobbin case on the stud of the shuttle body, (C). Be sure the bobbin case finger, (E), is opposite shuttle race notch, (A). Press the bobbin case into the shuttle as far as possible until latch catches on the center post of shuttle. Then, release the bobbin case latch, (D). Press bobbin case again after latch has been released to make sure the bobbin case is locked securely in place. Close the cover plate.
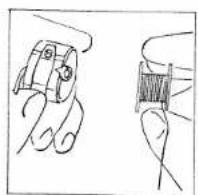
Fig. 7
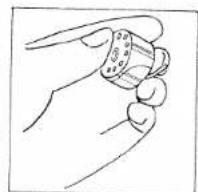
Fig. 8
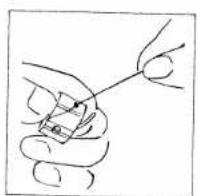
Fig. 9
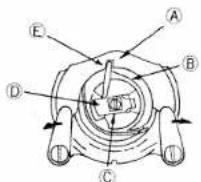
Fig. 10
UPPER THREADING SINGLE NEEDLE
- Turn hand wheel toward you to raise take-up lever to highest position.
- Place a spool of thread on one of the spool pins. (Fig. 11).
- Lead thread through thread guides (1) and (2) on top cover.
- Down and around one set of tension discs (3) from right to left.
- Up into check spring (4).
- Continue pulling thread upward and at the same time with tip of forefinger of other hand lightly hold spool of thread. This will cause thread to enter notch (5).
- Lead thread up and through take-up lever (6) from right to left.
- Down into thread guide (7).
- Into needle bar thread guide (8) an through needle eye from FRONT to REAR, pulling three to four inches of thread through needle.
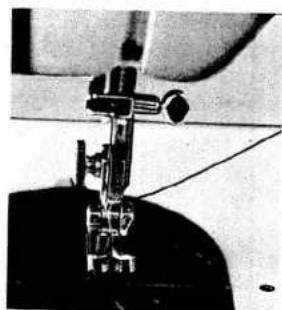
Hold the end of the upper thread loosely and turn hand wheel toward you until the needle goes all the way down and comes back up. A loop (Fig. 12) will be formed over the upper thread which then can be pulled out straight. Place both thread ends under the slot of the presser foot and draw toward the back of the machine, leaving both threads three to four inches long.
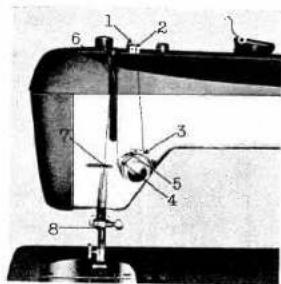
Fig. 11
natural_image
Close-up of a sewing machine needle stitching fabric (no visible text or symbols)Fig. 12
STRAIGHT STITCHING
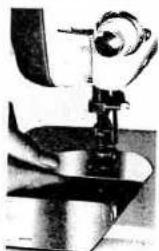
For straight sewing on fine fabric or very soft material, it is advisable to use the straight stitch presser foot and the straight stitch needle plate which are included in your accessory box. Both have appropriate needle slots.
Changing the foot and plate. To change presser foot (8, Fig.1), loosen thumb screw and remove zigzag foot.
Replace with straight stitch foot (Fig.13) and tighten screw securely.
To change needle plate (10, Fig.1), slide the cover plate open, lift off the needle plate (See Fig.14), and replace with the straight stitch needle plate fitting the recess on the plate edge under the screw (1) and two holes of the plate on screws (2) on bed. Close the cover plate.
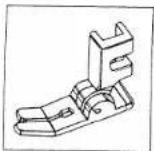
Fig. 13
Be sure to set the stitch width at 0, or the needle will break on striking the foot or plate.
- Set lower stitch width lock (D, Fig.15) at 0 position.
- Move stitch width lock (E, Fig.15) as far down as possible to lock width control lever (F, Fig.15) in straight stitch position. (To move locks, turn counter-clockwise set position and tighten.)
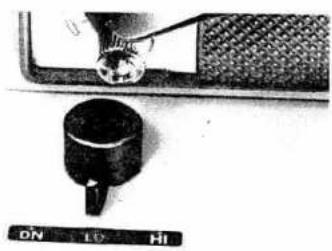
- Put drop feed knob (A, Fig.16) at HI setting.
- Set stitch length control beyond number 1 (adjust stitch length to suit material being sewn.)
- Have take up lever at highest point before starting to sew.
- Place material and threads in position under the presser foot and then lower the presser foot.
- Turn the hand wheel toward you and start sewing by pressing the foot control. The speed of the machine is regulated by increasing or decreasing the amount of pressure exerted on the control.
Never run the machining without material between the presser foot and feed.
zigzag stitch
natural_image
Close-up of a mechanical device with a cylindrical component mounted on a base (no visible text or symbols)Fig. 14
SETTING THE STITCH LENGTH
The length of the stitch is regulated by the lever (A) shown in Fig.15. Near 0 is the shortest and 4 the longest. Adjust stitch length stops by turning knurl knob on end of stitch regulator.
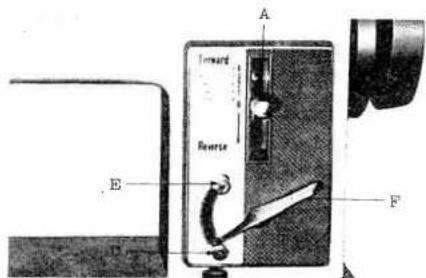
Fig. 15
natural_image
Close-up of a mechanical component with a spherical part and a scale ruler (no visible text or symbols)Fig. 16
SEWING IN REVERSE
When you wish to sew in reverse to tie the threads at the beginning or the end of a seam, push down lever (A) as far as it will go. The machine will sew in reverse until lever (A) is returned to the forward stitching position.
ADJUSTING THE TENSION
Always adjust the upper thread tension with the presser foot down, as the tension is automatically released when it is raised.
To increase the tension turn dial (A) (Fig. 17) to the right, or clockwise. To decrease, turn to the left. The higher the number on the dial, the tighter the tension. Set numbers to indicating pointer (B). Before adjusting lower tension, be sure the machine is threaded correctly. When it is necessary to change the bobbin tension, turn small screw (Fig. 18) on side of the bobbin case clockwise to tighten, counterclockwise to loosen.
When the tensions are properly balanced, a perfect stitch will be formed with both threads interlocking in the center of the fabric.(Fig. 19.)
When the upper tension is too tight the lower thread is pulled up over the upper thread which is lying flat on the top of the fabric. Fig. 20.
When the upper tension is too loose, the upper thread forms loops over the lower thread which is lying flat under the fabric. Fig. 21.
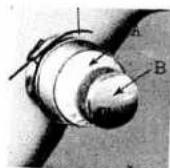
Fig. 17
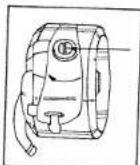
Fig. 18
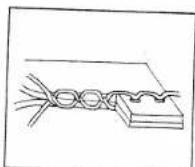
Fig. 19
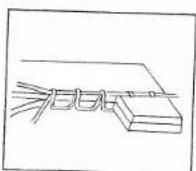
Fig. 20
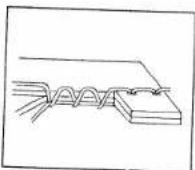
Fig. 21
ADJUSTING PRESSURE AND FEEDING OF FABRIC
General Sewing' Usually, for straight sewing, zigzag stitching, and manual embroidery, the pressure bar cap or darning release (A) (Fig. 22) is at its lowest position and the feed is at its highest level with the drop feed knob (A, Fig. 16) turned to HI position.
Sewing Thin or Lightweight Fabrics When lighter pressure is required to sew satisfactorily on thin silk or flimsy material, the pressure bar cap should be about half-way down. Release all the way by pressing the snap locking (B, Fig. 22), then press cap (A) down again to half-way spot. Lower the feed slightly by turning the drop feed (A, Fig. 16) to LO position.
Darning and Monogramming In order to move the fabric freely in any direction for darning, mending, and certain kinds of free-hand embroidery, release the pressure cap (A. Fig. 22) completely by pressing down on the snap lockring (B. Fig. 22). Turn the drop feed knob to DN position which drops the feed well below the needle plate. To return feed to normal, turn knob to HI position.
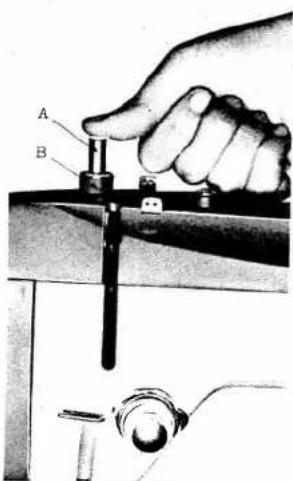
Fig. 22
REMOVING THE WORK
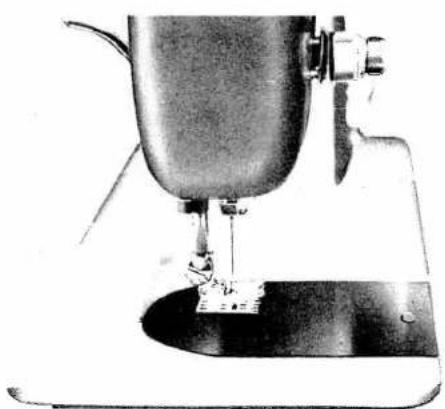
Be sure to stop the machine with the thread take up lever and needle bar at the highest position. Now raise the presser foot and draw the fabric back and to the left, Fig. 23 and 24, and pass the threads over the thread cutter (A). Pull down sharply, holding the threads in both hands, so as not to bend the needle. Leave the ends of thread under the presser foot.
natural_image
Close-up of a vintage sewing machine needle stitching a dark surface (no visible text or symbols)Fig. 23
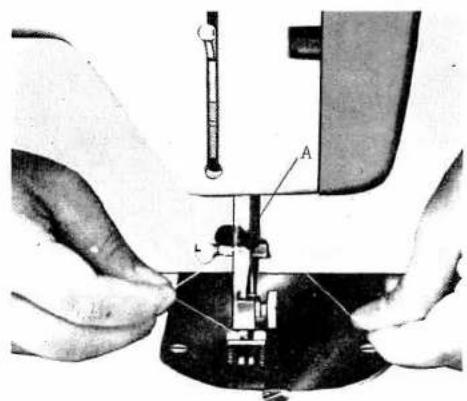
Fig. 24
ZIGZAG STITCHING
Be sure zigzag needle plate and presser foot are in place.
- Moving lever (A, Fig. 25) gradually down and up will produce zigzag stitches of varying widths. To maintain selected widths of zigzag stitches, employ locks (C, Fig. 25).
- Lower lock determines the minimum width stitch width, while upper lock controls the maximum. Locks can be set by turning to the left in slightly and moved to the desired position and tightened.
CREATIVE EMBROIDERY-SATIN STITCH
The satin stitch (Fig. 26), which is really just a very short and close zigzag stitch, is the basis for most embroidery, and is obtained by setting the stitch length as near O as possible without stopping the feeding action.
The position of the blind hem lever should be set to "Manual" and the width may be set anywhere from 0 to 5 for single needle work.

Fig. 26
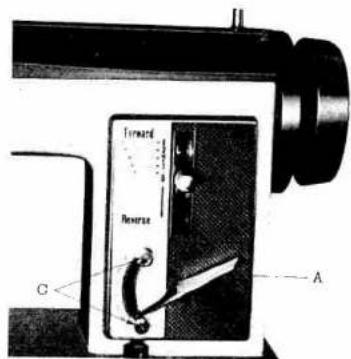
Fig. 25
FREE HAND EMBROIDERY PATTERNS
With the machine set on a short length, different designs can be made by swinging the stitch width lever (A, Fig. 25) up and down between O and 5 or with any combination of widths. Try setting the locks at 1 and 5, 2 and 5, etc. Obtain a rhythm of movement and then proceed. After a while you will become quite skillful, varying your designs by the speed of the machine, stitch length and width and the manipulation of stitch width lever. Always run the machine at a uniform speed whether this be fast or slow.
The following patterns can be altered by the machine speed. At slow speed the patterns will be shorter than at a moderate or fast speed.
A. To make pattern A, Set stitch width locks at 2 and 5 then move lever slowly between setting, operating machine rather fast.
B. To make pattern B. Set stitch width locks at O and 5, and gradually move lever from O to 5, then snap it back quickly to O.
You will be able to produce many various patterns by using your own combinations of settings and the operation of controls.
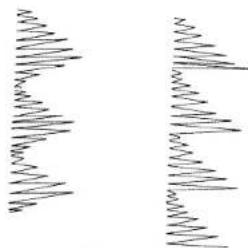
Fig. 27
TWIN NEEDLE-UPPER THREADING AND SEWING
- Be sure zigzag needl plate and presser foot are in place.
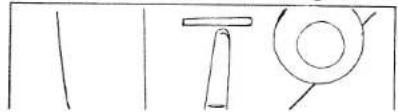
- Fit twin needles which are supplied in the accessory box. (Fig. 28).
-
Follow threading instruction for single needle with these exceptions:
A Place a spool of thread, matching or contrasting in color, on both spool pins.
B. Pass threads through arm thread guide (1, Fig. 1) one thread per hole.
C. Pass down around tension discs with one thread passing between the back discs and the other between the front discs.
D. Now treat both threads as one, until you reach the needle eye.
E. Pass one thread through each needle_eye. -
Set upper zigzag width stop lock at 212 . Zigzag lever in area beyond 212 will break a needle.
-
Straight stitching and decorative stitch designs can be produced in the same manner as followed for single needle sewing. (Fig. 29)
natural_image
Simple line drawings of three abstract shapes resembling a T and a circle, with no text or symbols present.
MAKING BUTTONHOLES
Buttonholes of various widths and lengths can be made easily. To establish the correct length buttonhole required add 1/8 inch to the desired cutting space for bar tacks. To obtain the length of the cutting space, the opening through which the button passes is measured by adding the width (A) and thickness (B) of the button.(Fig.30).
The width of the buttonhole sides are governed by the thickness of the material and a lower number for thin material.
Mark the beginning and end of the buttonhole on the fabric with a basting line or tailor's chalk. Now first practise making a buttonhole on scrap fabric, following the directions below to be sure machine adjustments are correct.
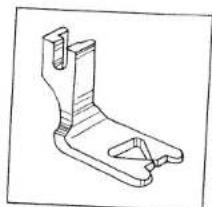
(1) Replace presser foot with the special purpose buttonhole foot, it provides maximum visibility and allows closely spaced stitches to feed evenly.(Fig.31)
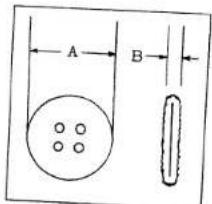
Fig. 30
natural_image
Technical line drawing of a mechanical bracket component (no text or symbols)Fig. 31
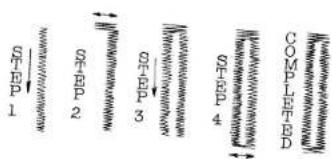
Fig. 32
(2) Set stitch length lever as near 0 as possible without stopping the feeding action.
(3) Position zigzag width lock on the right to suit material being sewn or width of buttonhole desired. (Number 5 for the widest buttonhole.)
(4) Set lower lock at number 2 1/2 on lower set upper lock at twice. The size of the lower lock for bar tack.
(5) Lower needle carefully into the marks on fabric indicating the beginning of buttonhole. Stitch to the mark for the end of the buttonhole, Step 1, Fig.32, stopping machine with needle in fabric at right side of stitching.
(6) Lift the presser foot and using the needle as a pivot, turn the fabric end for end.
(7) Lower presser foot and turn hand wheel just enough to raise needle out of fabric.
(8) Drop feed all the way down (drop feed knob at DN position) and move zigzag lever down as far as it will go against lock.. While holding the lever at this position, take five or six stitches to form bar tack, Step 2. Fig.32.
(9) Raise needle out of fabric and return feed to "HI" position and stitch width lever to the lower position automatically.
(10) Stitch second side of buttonhole, Step 3.
(11) Make bar tack by repeating (8) and (9) above ... Step 4.
(12) Return stitch width to 0 and take two or three stitches to fasten the threads and prevent raveling.
(13) Cut the buttonhole opening with a seam ripper, being careful not to cut the stitching.
If you plan to make buttonholes on sheer soft material, place tarlatan or paper, which can be torn away after stitching, under the fabric. And it is always wise to make several buttonholes on scraps of fabric before working on the garment.
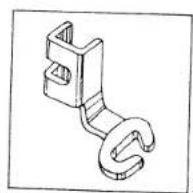
Fig. 33
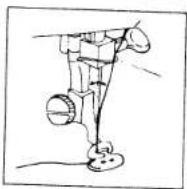
Fig. 34
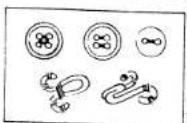
Fig. 35
SEWING ON BUTTONS
- Set blind stitch change lever to "Manual" position.
- Remove zigzag presser foot and attach button sewing foot. (Fig.33).
- Turn drop feed knob to E position.
- Set zigzag width lever at O. Place the button so its left-hand hole comes directly under the needle, then gently lower the presser foot.
- Move zigzag stitch width lever down until the needle comes down exactly over the right-hand hole in the button.
- Move lower zigzag lever stop lock to hold lever in position. Turn the hand wheel slowly by hand to be sure the needle enters the center of both holes on button without deflecting needle.
Correct width if necessary. (Fig.34). - With the needle sewing into the center of each hole, run the machine at medium speed, making six or eight stitches, stopping with the needle in the left hole.
- To lock the zigzag stitch and prevent unravelling, set the stitch width at 0, and sew a few stitches into the same hole.
If you wish, you may place a rounded toothpick over the button, between the two holes, and sew button to fabric in regular way. Remove the toothpick and wind thread under the button forming A shank to faster.
Apply the above method to sew on buttons with four holes, also hooks snaps and etc. If a four hole button is to be sewn, follow the same procedure above as for the two hole button. Now lift presser foot slightly and move fabric to permit the sewing of the remaining two holes. (Fig.35).
EMBROIDERING WITH A HOOP
It is easy to follow a prepared design or to work free hand when embroidering or monogramming. (See Fig.36). If the following procedure is carried through.
Release the pressure from the foot by pressing down the snap lock ring on the darner.(See Fig.22) Turn the drop feed knob to DN position.
Remove the presser foot and be sure blind stitch lever is set to "Manual".
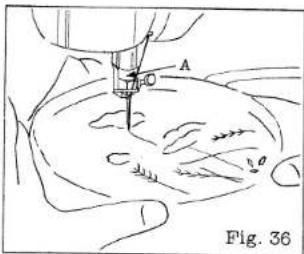
Lower presser bar. Set the stitch width to the size you prefer. Stretch the fabric in an embroidery hoop and place under the needle. Turn hand wheel to bring needle down into fabric and loring up bobbin thread through fabric.
Holding both threads by hand, start operating the machine.
Run the machine at a slightly high speed while moving the hoop slowly with both hands. Work carefully keeping fingers out of the path of the needle.
natural_image
Technical line drawing of a sewing machine needle and foot (no text or symbols)Fig. 37
natural_image
Line drawing of a sewing machine needle and base (no text or symbols)Fig. 38
QUILTING
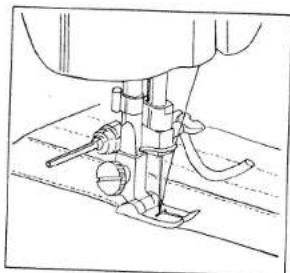
The quilting attachment included with your machine will enable you to sew horizontal lines on padded fabric without the necessity of marking them in advance.
To attach the quilter raise the presser foot lever and loosen presser foot screw. Insert forked portion of quilter holder from behind needle and between presser foot screw and presser foot shank. Push holder as far as it will go and tighten presser foot screw. (Fig.37).
Adjust the curved bar for the distance desired between rows of stitches and set so that it presses lightly on the fabric. By letting the guide ride on the previous stitching line, successive rows can be sewn an equal distance apart.
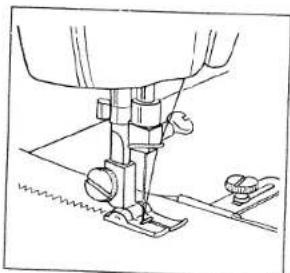
SEAM GAUGE OR CLOTH GUIDE
Use the seam gauge as a guide for sewing straight seams and even rows of sewing along the edge of fabrics. (Fig.38)
Fasten gauge by the screw provided, into the appropriate hole in bed of the machine and adjust to desired width.
NARROW HEMMER
With needle at its highest position replace regular presser foot with narrow hemming foot (Fig.39) tightening it securely in place. Set zigzag width lever at 0 for a straight sewn hem or at number 3 for a zigzag sewn hem. Set stitch length control to suit.
For a plain narrow hem make a 1/8 inch double fold for about two inches along the edge of fabric. Hold each end of the two inch fold, slip under hemmer. Bring fold up into the scroll of hemmer, draw fabric forward to end of scroll and fasten with point of needle. Lower presser bar lever. Gently pull end of thread as you start stitching. (Fig.39 for straight sewn hem. Fig.40 for zigzag sewn hem.)
Guide the material slightly to the left and it will take a double turn through scroll.
The narrow hem provides an excellent finish for the edge of ruffles.
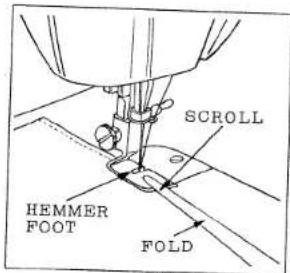
Fig. 39
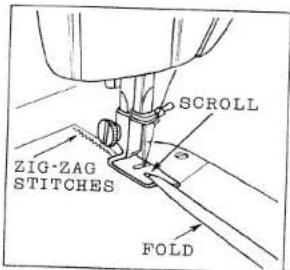
Fig. 40
SEWING WITH BRAID
Replace regular presser foot with braiding foot (Fig.41). Thread braid through the small hole at front of foot. Set zigzag width and stitch length of the braid is obtained.
Draw design you wish to sew on fabric with tailor's chalk, and place material under foot being sure that the braid from the notch in the foot is at the beginning of the design. Start sewing guiding material and braid with hands. Be sure that upper thread overcasts the braid in the notch of the foot.
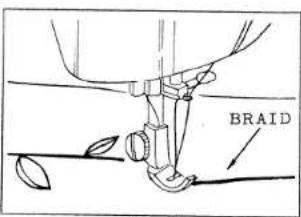
Fig. 41
BLIND STITCH HEMMING
Use the blind stitch foot. (See Fig.42-B)
Set stitch length control at number 3 or 4 and then set blind stitch change lever to the position marked "Blind Stitch"
Set zigzag stitch width lever to suit material being sewn and hold in place with left lock. Blind stitch hemming provides a durable hem finish that is almost invisible and comparable to hand sewing.
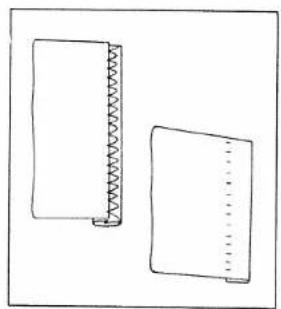
After hemming has been completed, unfold fabric. (Fig.42-C).
Step 1. If hem with folded edge is used, make first fold 3/8" deep.
Step 2. Turn hem to depth desired and baste 1/4" from upper edge. Press into place.
Step 3. Fold hem back toward right side of garment leaving 1/4" extended.
Step 4. Place garment under presser foot and sew blind hem.
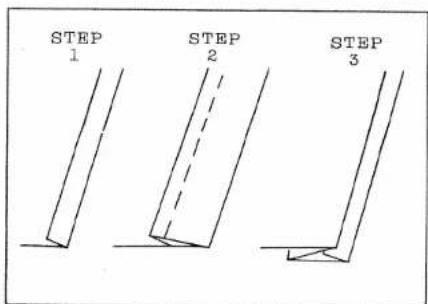
Fig. 42-A
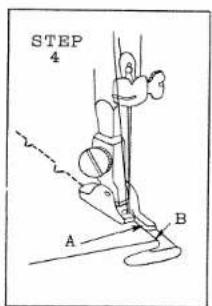
Fig. 42-B
natural_image
Two simple line drawings of a notebook or binder with a spring-like cover and a dotted-line cover (no text or symbols)Fig. 42-C
CARE AND MAINTENANCE OF YOUR MACHINE
Cleaning and Oiling the Shuttle
The stitch forming mechanism occasionally becomes clogged with loose thread and lint. This will interfere with the efficient operation of the machine. Cleaning should be done with
To remove the stitch forming mechanism, record or follow
-
Turn hand wheel until the needle reaches its highest position. Tilt machine head back on its hinges.
-
Remove bobbin case E (Fig.43).
-
Turn the two shuttle race cover clamps C outward and remove the shuttle race cover B and shuttle A.
-
Clean the shuttle race, shuttle and shuttle race cover by removing all threads, lint, etc.
-
Apply a drop of oil with finger tip to outer edge of shuttle.
When the cleaning has been completed, proceed as follows to replace the shuttle assemble:
- Turn hand wheel until the needle reaches its highest position.
-
Place shuttle body
-
Replace shuttle race cover B, fitting pin at lower edge into notch, and lock into position with shuttle race cover clamps C, making certain the clamps have been snapped securely into position.
-
Put bobbin into bobbin case, and replace bobbin case into the shuttle
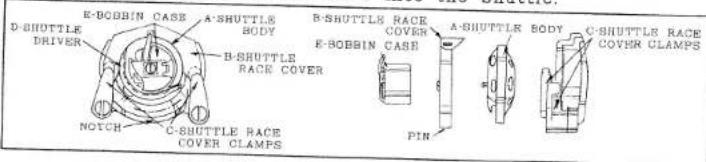
Fig. 43
HOW TO OIL YOUR MACHINE
27
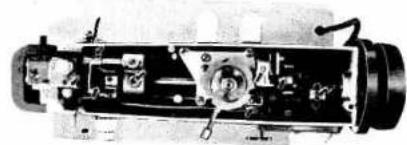
Your machine should be oiled occasionally to keep it operating smoothly how often depends on the amount of sewing you do. Oil the upper part of the machine at points indicated by arrows in Fig. 44, after removing the top cover.
To oil moving parts inside the face plate, which only rarely require oiling, open face plate and oil at spots indicated in Fig.45.
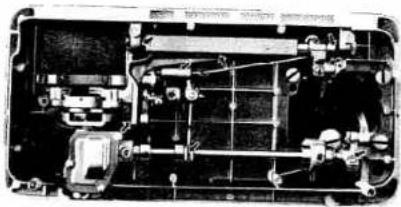
To oil parts under the bed of the machine, tip the unit back on its hinges and apply a drop of oil at each point indicated in Fig.46.
Fig. 44
natural_image
Cross-sectional view of a mechanical device showing internal components and housing (no visible text or symbols)Fig. 46
natural_image
Interior view of a vehicle chassis with visible structural components and wiring (no text or symbols)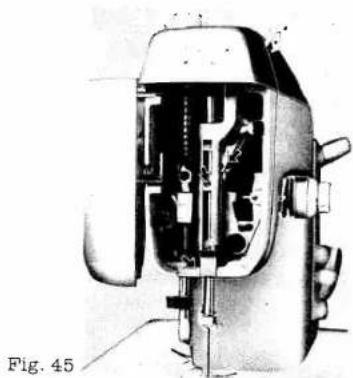
natural_image
Cross-sectional diagram of a mechanical device showing internal components and parts (no text or symbols)SOME USEFUL HINTS WHEN USING YOUR SEWING MACHINE
To turn sewing fabrics on corners
- Stop the machine while the needle is still in the material.
- Raise the presser foot and turn the fabric using the needle as a pivot.
- Lower the presser foot and resume sewing.
To sew elastic and stretch fabrics
In sewing elastic type materials it is advisable to sew them with a slight zigzag stitch otherwise the thread will break when the sewn materials are stretched.
To sew very thin materials
When sewing very thin materials which tend to gather as you sew, place a sheet of newspaper or any other thin paper underneath the material and sew the shortest stitch possible. This will keep your work from gathering.
Tear paper away after sewing.
Basting
- Loosen the tension of the upper thread and use the longest stitch possible.
- The stitches may then be easily removed by pulling the lower thread.
To keep your machine in perfect condition
- Keep all moving parts of the machine constantly oiled and clean
- Always turn hand wheel toward you.
- Do not run machine without materials.
- When sewing, do not pull the material, otherwise you will bend or break the needle. The machine is designed to feed the material by itself.
- Do not operate machine when the presser bar lever is raised.
ACCESSORIES
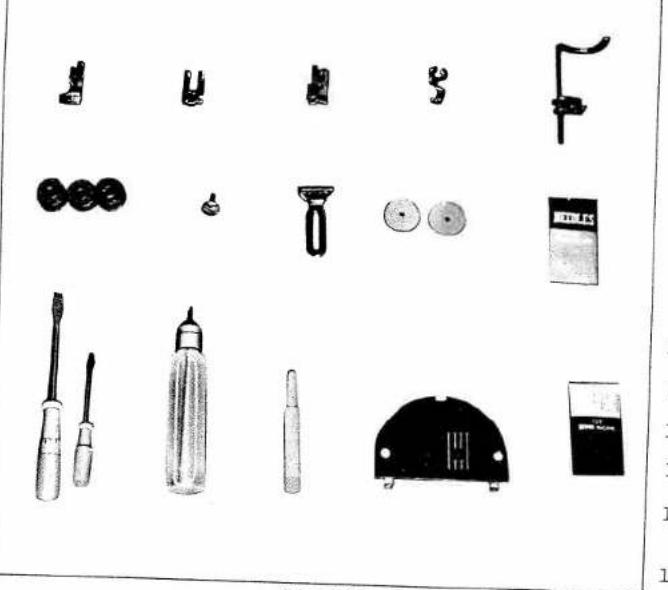
natural_image
Collection of various screwdriver and cleaning tools including a brush, screwdriver, screwdriver with clips, and a doorbell (no text or labels visible)Fig. 47
29
1 Straight Stitch Foot
2 Buttonhole Foot
3 Hemmer Foot
4 Button Sewing Foot
5 Quilter Guide
6 Bobbins
7 Thumb Screw
8 Cloth Guide
9 Felt Washers
10 Needles
11 Screw-driver
12 Tubed Oil
13 Buttonhole Cutter
14 Needle Plate for Straight stitching
15 Twin Needles
MINOR FAULTS AND THEIR CORRECTION
Breaking of upper thread
- Incorrect threading.
- Defective needle or needle inserted incorrectly.
- upper thread tension too tight.
- Needle rubbing against presser foot or other attachments.
- Needle eye too small for thread used.
- Knot in sewing thread.
- Hole in the needle plate damaged or rough.
Breaking of lower thread
-
Incorrect threading of the bobbin case.
-
Lower thread tension too tight.
-
Bobbin wound too full.
Breaking of needle.
-
Pulling the fabric while machine is sewing thus causing needle to bend and strike the needle plate.
-
Using bent needle.
Machine slipping stitches
-
Using bent or blunt needle.
-
Needle inserted incorrectly.
-
Needle threaded improperly.
-
Using wrong size needle.
-
Pressure on presser foot insufficient, especially when sewing heavy material. Uneven stitches
.. Presser foot not resting evenly on material
- Feed dog not adjusted high enough.
. Stitch length too short.
Pulling the cloth while the machine is running.
. Needle too fine for material or thread too heavy.
M E M O
PARTS #88779
SJH
TO OBTAIN THE BEST PERFORMANCE FROM YOUR MACHINE BE SURE THE CABINET, CARRYING CASE OR OTHER ITEMS USED WITH YOUR MACHINE ARE GENUINE WHITE SEWING MACHINES PRODUCTS
- OWNER'S OPERATING AND MAINTENANCE MANUAL
- INDEX
- Page.
- FEATURES AND PARTS (Front View)
- SETTING THE NEEDLE
- WINDING THE BOBBIN
- THREADING THE BOBBIN CASE
- PLACING BOBBIN CASE IN SHUTTLE
- UPPER THREADING SINGLE NEEDLE
- STRAIGHT STITCHING
- SETTING THE STITCH LENGTH
- SEWING IN REVERSE
- ADJUSTING THE TENSION
- ADJUSTING PRESSURE AND FEEDING OF FABRIC
- REMOVING THE WORK
- ZIGZAG STITCHING
- CREATIVE EMBROIDERY-SATIN STITCH
- FREE HAND EMBROIDERY PATTERNS
- TWIN NEEDLE-UPPER THREADING AND SEWING
- MAKING BUTTONHOLES
- SEWING ON BUTTONS
- EMBROIDERING WITH A HOOP
- QUILTING
- SEAM GAUGE OR CLOTH GUIDE
- NARROW HEMMER
- SEWING WITH BRAID
- BLIND STITCH HEMMING
- CARE AND MAINTENANCE OF YOUR MACHINE
- HOW TO OIL YOUR MACHINE
- SOME USEFUL HINTS WHEN USING YOUR SEWING MACHINE
- Basting
- MINOR FAULTS AND THEIR CORRECTION
Brand : White
Model : W870
Category : Sewing machine