W844 - Sewing machine White - Free user manual and instructions
Find the device manual for free W844 White in PDF.


| Product Type | Sewing Machine |
| Brand | White |
| Model | W844 |
| Dimensions (approx.) | 40 x 20 x 30 cm |
| Weight (approx.) | 7 kg (15.4 lbs) |
| Power Supply | 100-240 V AC, 50/60 Hz |
| Power Consumption | 100 W |
| Number of Stitches | 15 built-in stitches including straight, zigzag, buttonhole |
| Stitch Length | Adjustable, up to 4 mm |
| Stitch Width | Adjustable, up to 5 mm |
| Buttonhole Maker | One-step auto buttonhole |
| Reverse Sewing | Yes, with reverse lever |
| Free Arm | Yes, for cuffs and sleeves |
| Needle Threader | Built-in automatic needle threader |
| Bobbin Winding | Automatic bobbin winding |
| Speed Control | Foot pedal with variable speed |
| Lighting | LED sewing light |
| Accessories Included | 7 presser feet, needle set, bobbins, dust cover |
| Maintenance | Clean lint after each use; oil moving parts regularly |
| Safety | Unplug before cleaning; keep away from water |
| Spare Parts | Available from authorized dealers |
| Intended Use | Home sewing and light to medium fabrics |
Frequently Asked Questions - W844 White
User questions about W844 White
0 question about this device. Answer the ones you know or ask your own.
Ask a new question about this device
Download the instructions for your Sewing machine in PDF format for free! Find your manual W844 - White and take your electronic device back in hand. On this page are published all the documents necessary for the use of your device. W844 by White.
USER MANUAL W844 White
- Name of parts.... 1
- Turning of light.... 2
- Winding the bobbin.... 3
- Inserting of the needle.... 4
- How to thread the needle.... 5
- How to remove the bobbin case.... 6
- How to insert the bobbin case.... 6
- How to thread the bobbin case.... 7
- How to sew straight stitches.... 8
- Adjustment of stitches and reverse Sewing.... 11
- Use drop feed device.... 11
- Adjustment of pressure to cloth.... 12
- Regulating width of zigzag stitch.... 13
- Manual zigzag sewing.... 14
- How to keep the machine in good repair.... 15
- How to make button holes.... 16
- Darning and embroidery.... 18
- Sewing on buttons.... 19
- Narrow hemming.... 20
- Sewing in a zipper.... 21
- Installing sewing heads in cabinet or portable base.... 22
- Blind hems 24
1. NAME OF PARTS
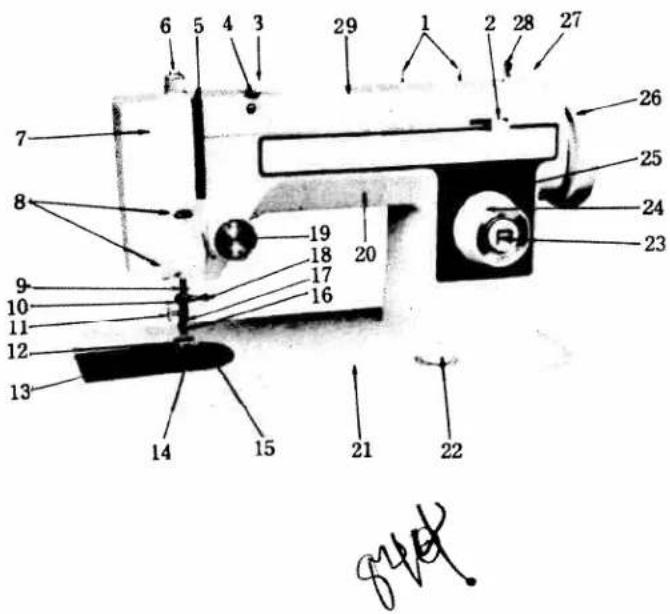
- Spool pin
- Zigzag width control knob
- Bobbin winder thread guide
- Top cover thread guide
- Thread take-up lever
- Patchomatic darner
- Face plate
- Thread guides
- Needle bar
- Needle bar thread guide
- Presser foot thumb screw
- Presser foot
- Shuttle cover slide plate
- Feed teeth
- Needle plate
- Needle
- Presser bar
- Needle clamp
- Thread tension regulator
- Arm
- Bed plate
- Drop feed knob
- Reverse button
- Stitch length regulator knob
- Stitch indicator window
- Balance wheel
- Bobbin winder latch
- Bobbin winder spindle
- Top cover
2. TURNING ON LIGHT
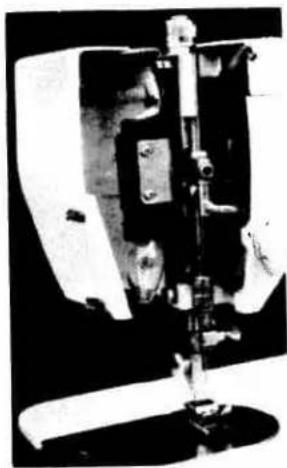
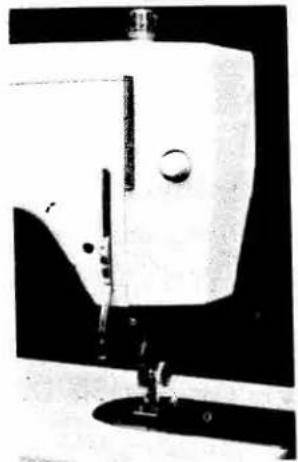
The lamp housing is enclosed in the face plate (Fig 2).
The switch for operating the light is beneath the face plate (Fig 3).
Changing bulb:
Be sure to first unplug your sewing machine. With your left hand, open the face plate and the bulb is easily replaced.
natural_image
Black-and-white photo of a sewing machine needle and clasp mechanism (no visible text or symbols)Fig. 2
natural_image
Close-up of a sewing machine needle and base (no visible text or symbols)Fig. 3
-2-
3. WINDING THE BOBBIN
The bobbin is easily wound by the following method.
(a) Turn the stop motion knob (1) toward you while holding the balance wheel (2) with the left hand, loosening it so the wheel will run free without operating the sewing mechanism.
(b) Place the Spool on the Spool pin (3). Pass the end of the thread through the Arm Thread Guide (4). Also pass it between the discs of the tension bracket (5). Wind the thread around the Bobbin (6) seven or eight times, and place the bobbin on the Bobbin winder spindle (7). The bobbin winder automatically disengages when the bobbin is about 90% full.
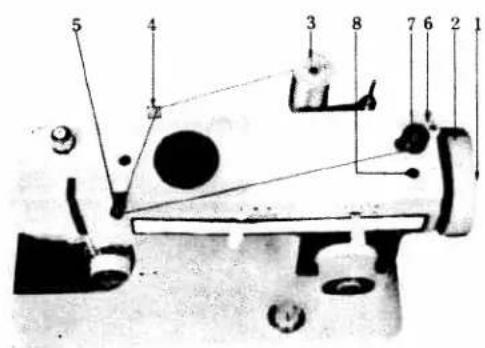
Fig. 4
4. INSERTING OF THE NEEDLE
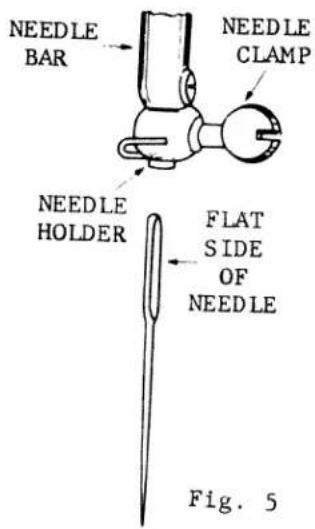
(a) Loosen the needle clamp with your right hand and hold needle so that the flat side is to your right, Then insert the upper part of the needle until it hits the closed end of the clamp.
(b) Tighten the needle clamp with your right hand.
(c) As the picture indicates, turn the needle clamp to the left to loosen it, and turn it to the right to tighten it.
(d) Always make sure that the long groove in the needle is toward the left.
5. HOW TO THREAD THE NEEDLE
(a) Raise the needle bar to its highest point.
(b) Thread the needle by following the numbers indicated in the picture.
(1) Arm Thread Guide
(2) Tension Bracket
(3) Tension Disc
(4) Tension Thread Guide
(5) The Take-up Spring
(6) Thread Take-up Lever
(7) Arm Thread Guide
(8) Arm Thread Guide
(9) Needle Clamp Thread Guide
(10) Needle
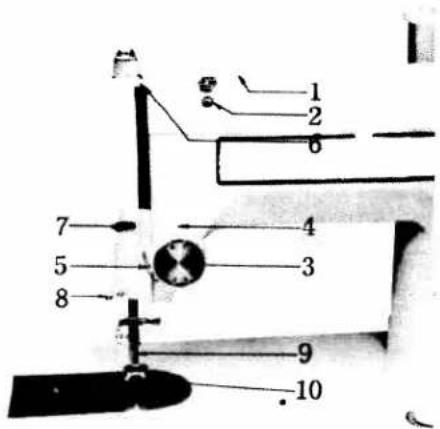
Fig. 6
6. HOW TO REMOVE THE BOBBIN CASE
(a) Raise the needle bar to its highest point by turning the balance wheel.
(b) Open the bobbin case cover.
(c) Open the latch of the bobbin case and take it out.
(d) Close the latch of the bobbin case thus taken out, and turn it with the open side downward. The bobbin will drop out.
7. HOW TO INSERT THE BOBBIN CASE
(a) Open the latch and insert the bobbin case on the shuttle race pin. Be sure that the horn goes into the slot in the shuttle race.
(b) Close the latch when the bobbin case has been inserted.
(c) Be careful not to remove or insert the bobbin case when the needle bar is lowered. The shuttle body and the shuttle race will be damaged if this warning is ignored.
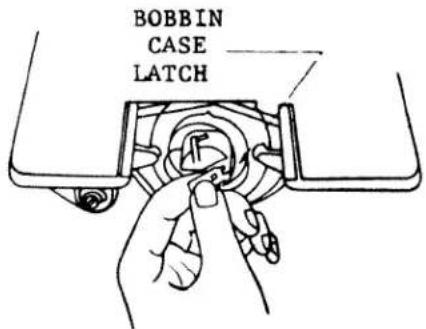
Fig. 7
8. HOW TO THREAD THE BOBBIN CASE
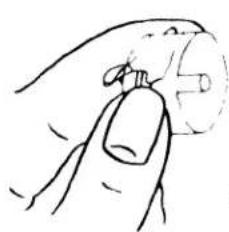
(a) Hold the bobbin in your right hand, pull out the thread about 5 inches, and insertin the bobbin case. (Fig. A)
(b) Pull the thread through the slot in the bobbin case as indicated in Figure B, and pull the thread under the tension spring.
(c) Pull out the thread, and it will come out to the position indicated in Figure C.
natural_image
Simple line drawing of a hand holding a small object, no text or symbols present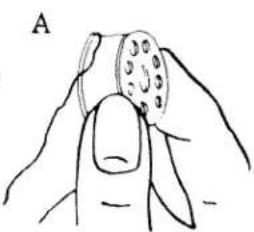
natural_image
Hand holding a small, segmented object with circular holes, labeled 'A' (no text or symbols on the object itself)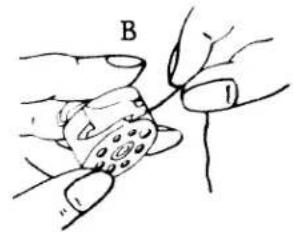
natural_image
Illustration of a hand holding a small object with a labeled point B, no text or symbols present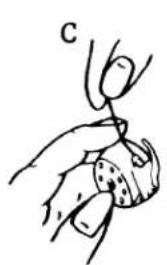
natural_image
Illustration of a hand holding a small object with a string, labeled 'C' (no text or symbols on the object itself)Fig. 8
9. HOW TO SEW STRAIGHT STITCHES
natural_image
Line drawing of a sewing machine needle and base mount (no text or symbols)Fig. 9
natural_image
Line drawing of a foot and ankle mechanism on a sewing machine (no text or symbols)Fig. 10
natural_image
Simple line drawing of a mechanical component with a downward arrow and dotted lines (no text or symbols)Fig. 11
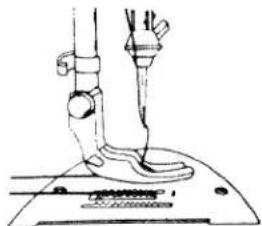
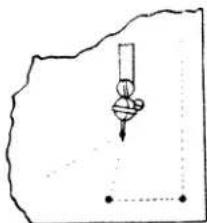
(1) Prepare for Sewing as Follows:
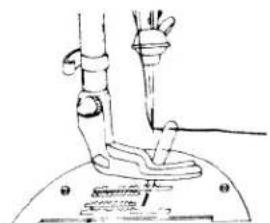
(a) Set the zigzag width regulating knob to "0" (zero position). Now you can sew straight sewing.
(b) Hold the upper thread lightly in your left hand.
(c) Turn the balance wheel toward you gently with your right hand, until needle enters needle plate & returns to highest point.
(d) When the needle bar with the thread inserted into the needle has been raised, pull the upper thread, and the lower thread will come out of the needle hole picked up by the upper thread.
(e) Put both the upper and the lower thread beneath the presser foot and pull the ends to the back.
(2) Actual Sewing:
(a) Place the cloth to be sewn beneath the presser foot, making one stitch by turning the balance wheel, and lower the presser foot.
(b) Start sewing.
(c) Do not pull on the material. This often causes the needle to break.
(3) How to Change the Direction of Sewing:
(a) Stop sewing with the needle in the cloth.
(b) Raise the presser foot and reverse the direction of the material.
(c) Lower the presser foot and resume sewing.
(4) How to Remove the Cloth:
(a) When the needle bar has reached its highest point, stop sewing.
(b) Raise the presser foot and pull the material out to the left.
A
B
C
Fig. 12
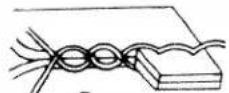
(5) Adjustment of the Upper and Lower Thread Tension:
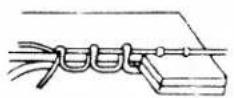
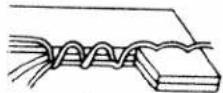
(a) Satisfactory seams can be produced by being sure the upper thread and the lower thread are knotted right in the middle of the two pieces of material being sewn. See Figure C.
(b) When too much tension is applied to the upper thread, the result shown in Figure A is produced.
(c) When too much tension is applied to the lower thread, the result shown in Figure B
natural_image
Close-up of a rotary knob dial with no visible text or symbols (pure electrical circuit lines)Fig. 13
is produced. (looping on the bottom)
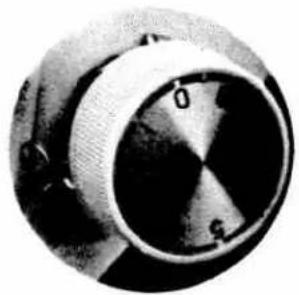
(6) How to Adjust the Tension of the Upper Thread
(a) Usually perfect seams can be produced by regulating the tension applied to the upper thread.
(b) Turn the tension disc to the right to increase the tension.
(c) Turn it to the left to loosen the tension.
(d) Do not turn the disc too far at one time or irregular seams will be produced.
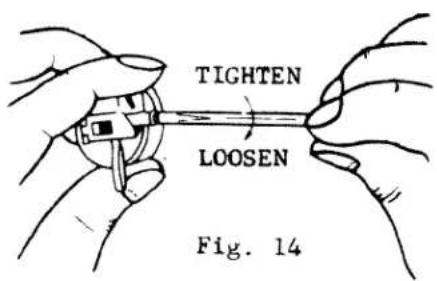
(7) How to Adjust the Tension of the Lower Thread
(a) Ordinarily it is unnecessary to change the tension of the lower thread, but there are some fabrics that require a change.
(b) Turn the screw to the right in order to tighten the tension.
(c) Turn the screw to the left in order to loosen the tension.
(d) As it depends entirely upon the tension whether or not you sew well, it is highly important that you learn how to adjust the tension as soon as possible.
(e) Use the small screw driver in your accessory kit to make these adjustments.
10. ADJUSTMENT OF STITCHES AND REVERSE SEWING
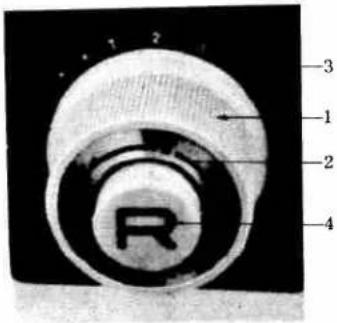
(a) The figures on the indicating plate (3) show the stitch length.
(b) Turn the knob (1) setting the desired length of the stitch to the black-mark on the knob (2).
(c) For reverse sewing, push the push button reverse (4) until it stops.
11. TO USE DROP FEED DEVICE
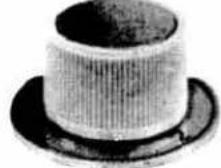
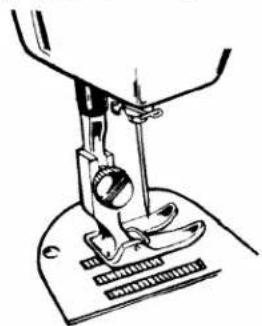
Darning and embroidering is facilitated by means of the drop feed knob on the right hand corner of the bed.
When this knob is set at "0", the feed teeth drop below the surface of the needle plate so that it will not interfere with the free movement of the cloth.
natural_image
Line drawing of a sewing machine needle and foot (no text or symbols)The feed teeth will return and resume their normal operation when the knob is set at "2". For sewing light materials like silk, it may be set at "1" position in order to avoid puckering the material.
12. ADJUSTMENT OF PRESSURE TO CLOTH
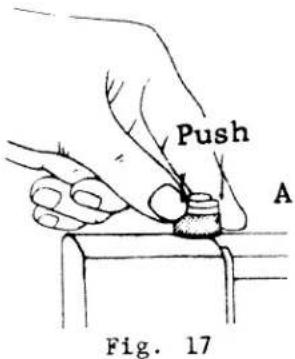
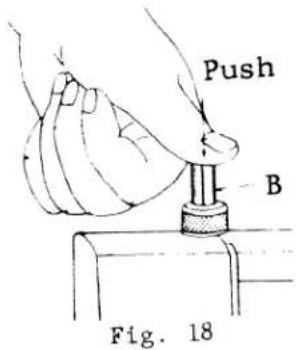
(a) In the case of ordinary cloth, it is seldom necessary to adjust the pressure, but when sewing thin or delicate materials the pressure must be so adjusted that the cloth gets the proper pressure. For instance, too much pressure will cause the material to pucker.
(b) Press down the patch-o-matic darner (A) and the presser bar will jump up and the pressure will release. Press down the presser bar (B) and the pressure will become strong.
(c) You can easily adjust the pressure. In the case of embroidering, the presser bar should be raised to its highest point.
13. REGULATING WIDTH OF ZIGZAG STITCH
The width of zigzag stitch is regulated by the zigzag width lever. By moving the zigzag width lever to desire zigzag stitch accordingly. For instance, to "0" as straight stitch. and to "5" max zigzag stitch.
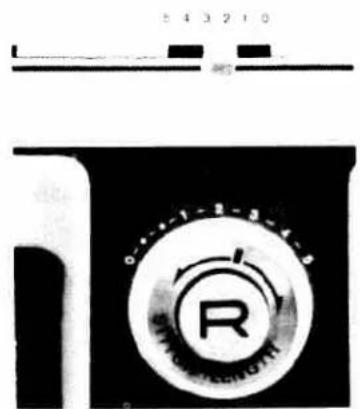
Fig. 9
14. MANUAL ZIGZAG SEWING
By manually adjusting the stitch length, zigzag width while running the machine, a variety of ornamental stitches are sewo.
The following are some examples of manually sewn ornamental stitches:
| Patterns | Stitch Length | Width |
| any length | 0 | |
| short | 5 | |
| any length | 1-5 | |
| " | " | |
| long and short (repeat) | any width | |
| any length | 5-2-5 | |
| " | " |
15. HOW TO KEEP THE MACHINE IN GOOD REPAIR
(1) Oiling
Oiling is so important that if you should be negligent in this respect you would not only shorten the machine's service life but also could cause it to become out of order.
Do not use too much oil. It is not only unnecessary but may stain or soil the material.
(2) Where to Oil
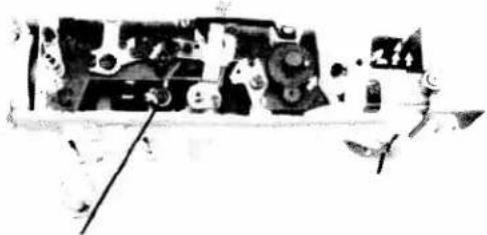
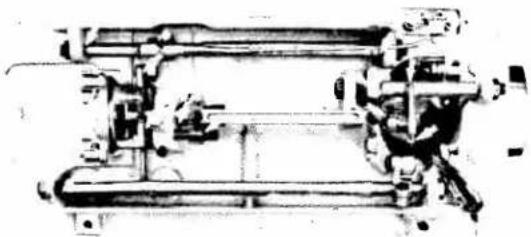
(a) The arrows indicate those parts to be oiled.
(b) Just one drop at a time will do.
(c) When you have oiled those parts indicated, run the machine for a while slowly so that the oil can penetrate and spread itself.
(3) The Quality of the Oil Used
Oil of poor quality will not only cause the machine to run heavily but also will cause wear and tear of the unit.
Use only good quality oil refined for use on sewing machines. -15-
natural_image
Black-and-white photo of a vintage computer monitor with visible screen, lens, and tower (no readable text or symbols)PIN
Fig. 21 TOP & BOTTOM
natural_image
Technical line drawing of a mechanical assembly (no visible text or symbols)Fig. 22
16. HOW TO MAKE BUTTON HOLES
natural_image
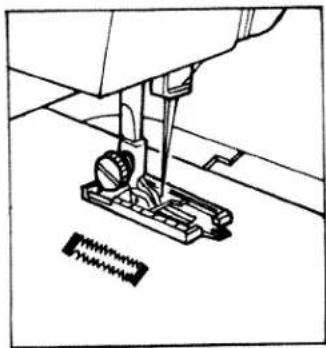
Line drawing of a sewing machine needle and base mechanism (no text or symbols)Place a marking needle across the cutting space to protect the stitching.
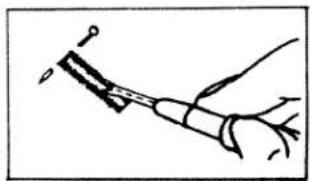
natural_image
Hand holding a tool with a spring-like object inserted (no text or symbols visible)-
Remove the regular presser foot and attach the buttonhole foot.
-
Set the zigzag width lever between "1" and "2".
Set the stitch length regulator knob to obtain close stitches (stain stitch).
-
Mark with a pencil or chalk the position and exact length of the buttonhole on the fabric.
-
Lower the needle carefully into the mark on the fabric indicating the beginning of buttonhole.
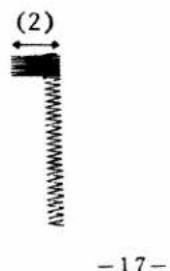
Lower the presser foot and commence sewing the left row of the buttonhole until it reaches the end of the marking. (1)
Stop the machine with needle on fabric at point A.
-
Lift the presser foot and using the needle as a pivot, turn the fabric end for end to bring the buttonhole to position (2).
-
Raise needle from fabric and drop the feed teeth by setting the drop feed knob at "0".
-
Set the zigzag width lever at "4" and sew three or four stitches to make bar-tack. (2)
-
Raise needle from fabric, also raise feed teeth by setting the drop feed knob at "2".
-
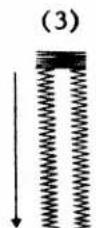
Now to sew the other row of the buttonhole, return the zigzag width lever between "1" and "2" (to its original setting) and commence to sew until your stitching reaches the position shown in figure (3).
-
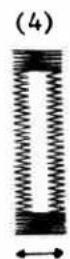
To make the final bar-tack, again setting the drop feed knob at "0" and sew the bar-tack. (4)
-
Return zigzag width to "0" and take two or three stitches to fasten bar threads and prevent ravelling.
-
Remove fabric from the machine and open the buttonhole with a buttonhole cutter or seam ripper.
(1)
A
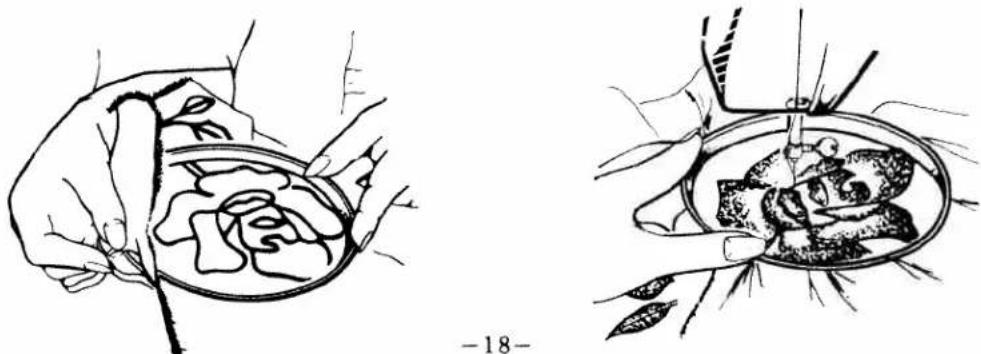
17. DARNING AND EMBROIDERY
Raise the presser bar lifter and remove the presser foot. Then lower the presser bar lifter to ensure the thread tension device is set correctly.
Set the drop feed knob at "0".
Now your machine is ready for embroidery and darning.
Embroidery will be done most successfully when the fabric is stretched and fixed in an embroidery hoop. Hold the hoop closely on the machine bed with both hands, press the material with your left forefinger in the vicinity of the needle.
This will help in holding down the material and will prevent the machine from making skipped stitches. Manipulate work carefully and be sure to keep fingers out of the path of the needle.
Adjust thread tensions for the best appearance of embroidery work and slightly increase the bobbin thread tension to avoid the lower thread from being pulled up.
natural_image
Medical illustration showing two steps of surgical procedure: slicing tissue and treating a patient's mouth (no text or labels)18. SEWING ON BUTTONS
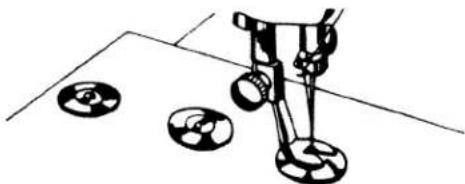
(a) Use the button sewing foot.
(b) Push down drop-feed button in Fig. 16 Page 11.
(c) Place the button under the button sewing foot. Get both holes centered under the foot evenly.
(d) Turn the balance wheel to set the width of your button eyes, and fix the zigzag width knob at the proper position.
(e) Run the machine at medium speed, making about 5 or 6 stitches.
(f) Set the Zigzag width knob making a few straight stitches in the same hole to lock zigzag stitch.
natural_image
Simple line drawing of a robotic arm with two circular components on a flat surface (no text or symbols)Fig. 25
19. NARROW HEMMING
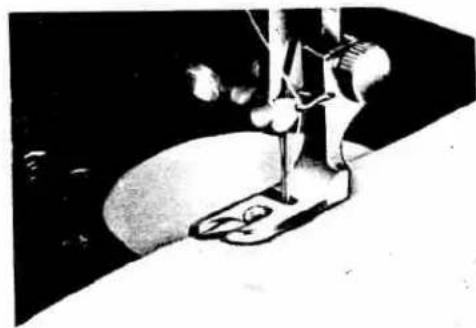
Turn balance wheel towards you until needle reaches its highest point. Raise presser bar and remove the regular presser foot. Attach hemmer foot (Fig. 27).
-
Fold over edge of material approximately 18 " wide, then fold it over again in the same way for a length of about 2". Insert this folded end from beneath into spiral formed opening (scroll) or hemmer foot. Move material back and forth until the hem forms itself in the scroll.
-
Pull material towards you until the beginning of the hem is just below the needle.
-
Lower presser foot and begin to sew. Guide material into hemmer foot while sewing (Fig. 27).
natural_image
Close-up of a sewing machine needle stitching fabric (no visible text or symbols)Fig. 27
NOTE: Do not crowd material into scroll and do not leave scroll only partly filled by material.
Feed just enough material into the hemmer foot to fill out the scroll. Instead of a straight stitch, you can also use a zigzag stitch for this hemming operation. Be sure however, to adjust the width of the zigzag stitch to be as wide as the hem itself. Using a very long stitch and tight tensions will produce a shell stitch.
20. SEWING IN A ZIPPER
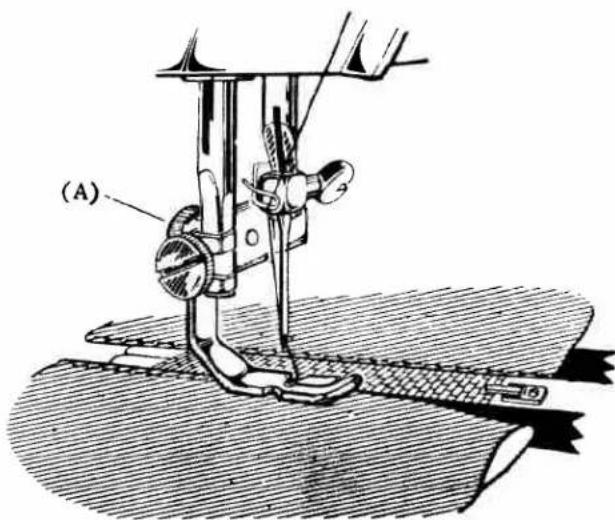
The zipper foot included in the accessories enables you to attach a zipper on fabric.
Remove the regular presser foot and attach the zipper foot to the presser bar of the machine.
First open out the zipper and place fabric in the position under the needle.
Set the machine for straight stitching.
Loosen the thumb screw (A) to set the foot on the left side of the needle and sew the left-side zipper as shown.
To sew the right-side zipper, bring the foot to the right side of the needle.
natural_image
Technical line drawing of a sewing machine with labeled component (A), no readable text or symbols beyond label21. INSTALLING SEWING HEAD IN CABINET OR PORTABLE BASE
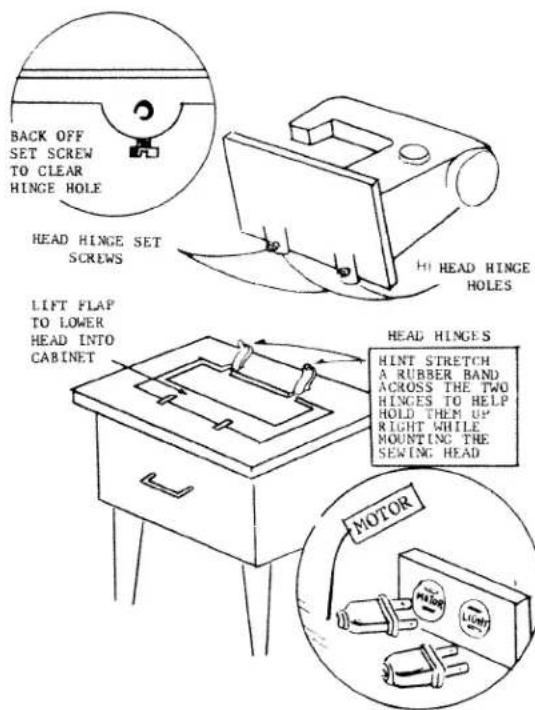
(1) CABINET
-
Back off both head hinge set screws until head hinge hole is clear.
-
Tilt head hinge tongues up and back as far as they will go.
-
Carefully slip head onto head hinges-making sure tongues are inserted as far as they can go into head hinge holes.
-
Allow the head to rest in its tiltedback position.
-
Tighten boht set screws securely with screw driver.
-
Plug electrical leads into sockets located inside cabinet. Cord identified with "motor" tag must be plugged into socket marked "motor". Untagged cord goes to "light" socket.
(2) PORTABLE BASE
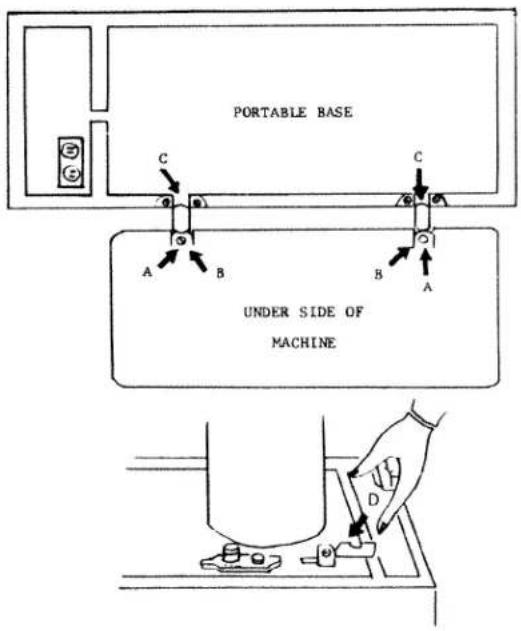
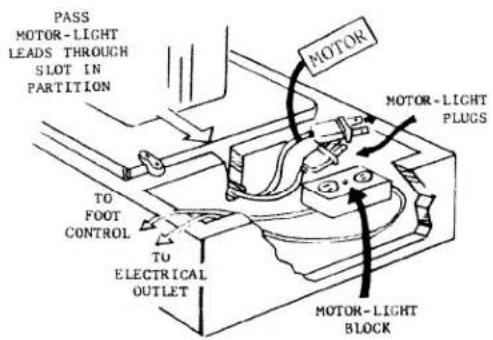
22. BLIND HEMS
-
Use blind stitch cam. NO. 8
-
Use standard zigzag presser foot
-
Set needle position lever in right notch marked ◀ R
-
Set zigzag stitch width control knob at "o"
-
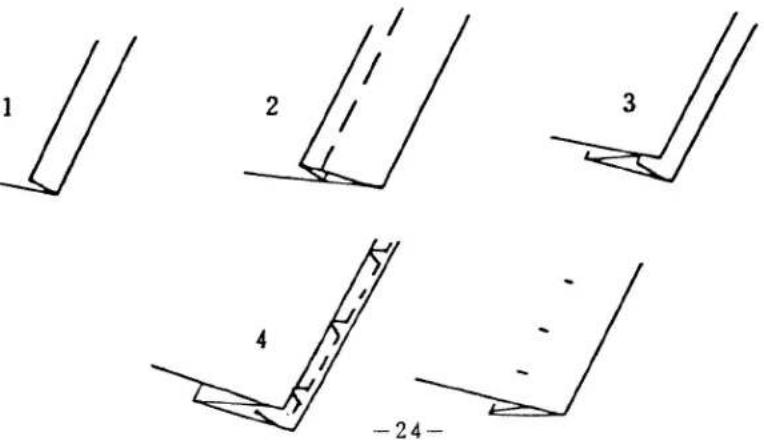
Set stitch length control dial between "2" and "3".
Remove the garment in the same manner as for hand hemming.
Prepare the garment in the same manner. If her, if her with folded edge is used, make first fold 3/8" deep.
Step 1. If hem with folded edge is used, made a tool for the angle of the depth desired and haste 1/4'' from upper edge.
Step 2. Turn hem the depth desired and baste 1/1 from application
- NAME OF PARTS
- TURNING ON LIGHT
- WINDING THE BOBBIN
- INSERTING OF THE NEEDLE
- HOW TO THREAD THE NEEDLE
- HOW TO REMOVE THE BOBBIN CASE
- HOW TO INSERT THE BOBBIN CASE
- HOW TO THREAD THE BOBBIN CASE
- HOW TO SEW STRAIGHT STITCHES
- ADJUSTMENT OF STITCHES AND REVERSE SEWING
- TO USE DROP FEED DEVICE
- ADJUSTMENT OF PRESSURE TO CLOTH
- REGULATING WIDTH OF ZIGZAG STITCH
- MANUAL ZIGZAG SEWING
- HOW TO KEEP THE MACHINE IN GOOD REPAIR
- Oiling
- Where to Oil
- The Quality of the Oil Used
- HOW TO MAKE BUTTON HOLES
- DARNING AND EMBROIDERY
- SEWING ON BUTTONS
- NARROW HEMMING
- SEWING IN A ZIPPER
- INSTALLING SEWING HEAD IN CABINET OR PORTABLE BASE
- CABINET
- BLIND HEMS
Brand : White
Model : W844
Category : Sewing machine