
ViewBook VNB102 - Laptop VIEWSONIC - Free user manual and instructions
Find the device manual for free ViewBook VNB102 VIEWSONIC in PDF.


| Product Type | Laptop |
| Brand | ViewSonic |
| Model | ViewBook VNB102 |
| Processor | Intel Celeron N4020 (dual-core, up to 2.8 GHz) |
| RAM | 4 GB DDR4 |
| Storage | 64 GB eMMC |
| Display | 11.6-inch HD (1366 x 768) LED-backlit |
| Operating System | Windows 10 Home |
| Dimensions (W x D x H) | 28.5 x 19.5 x 1.8 cm (11.22 x 7.68 x 0.71 in) |
| Weight | 1.2 kg (2.65 lbs) |
| Battery | 2-cell Li-ion, 36 Wh |
| Power Adapter | 12V 2A, 24W |
| Wireless Connectivity | Wi-Fi 802.11ac, Bluetooth 4.2 |
| Ports | 1 x USB 3.0, 1 x USB 2.0, 1 x HDMI, 1 x headphone/microphone combo |
| Camera | 0.3 MP webcam |
| Audio | Built-in stereo speakers, microphone |
| Keyboard | Chiclet keyboard, touchpad |
| Security | Kensington lock slot |
| Cleaning & Care | Clean with a soft, dry cloth. Do not use liquids or sprays. |
| Spare Parts & Repairability | Contact ViewSonic support for spare parts. User-replaceable battery and RAM. |
| General Information | Designed for everyday productivity, browsing, and light tasks. |
Frequently Asked Questions - ViewBook VNB102 VIEWSONIC
User questions about ViewBook VNB102 VIEWSONIC
0 question about this device. Answer the ones you know or ask your own.
Ask a new question about this device
Download the instructions for your Laptop in PDF format for free! Find your manual ViewBook VNB102 - VIEWSONIC and take your electronic device back in hand. On this page are published all the documents necessary for the use of your device. ViewBook VNB102 by VIEWSONIC.
USER MANUAL ViewBook VNB102 VIEWSONIC
This device complies with part 15 of FCC Rules. Operation is subject to the following two conditions: (1) this device may not cause harmful interference, and (2) this device must accept any interference received, including interference that may cause undesired operation.
This equipment has been tested and found to comply with the limits for a Class B digital device, pursuant to part 15 of the FCC Rules. These limits are designed to provide reasonable protection against harmful interference in a residential installation. This equipment generates, uses, and can radiate radio frequency energy, and if not installed and used in accordance with the instructions, may cause harmful interference to radio communications. However, there is no guarantee that interference will not occur in a particular installation. If this equipment does cause harmful interference to radio or television reception, which can be determined by turning the equipment off and on, the user is encouraged to try to correct the interference by one or more of the following measures:
- Reorient or relocate the receiving antenna.
- Increase the separation between the equipment and receiver.
- Connect the equipment into an outlet on a circuit different from that to which the receiver is connected.
- Consult the dealer or an experienced radio/TV technician for help.
Warning: You are cautioned that changes or modifications not expressly approved by the party responsible for compliance could void your authority to operate the equipment.
For Canada
This Class B digital apparatus complies with Canadian ICES-003.
CE Conformity for European Countries

The device complies with the EMC Directive 2004/108/EC and Low Voltage Directive 2006/95/EC.
Following information is only for EU-member states:
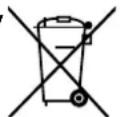
The mark shown to the right is in compliance with the Waste Electrical and Electronic Equipment Directive 2002/96/EC (WEEE).
The mark indicates the requirement NOT to dispose the equipment as unsorted municipal waste, but use the return and collection systems according to local law.

If the batteries, accumulators and button cells included with this equipment, display the chemical symbol Hg, Cd, or Pb, then it means that the battery has a heavy metal content of more than 0.0005% Mercury or more than, 0.002% Cadmium, or more than 0.004% Lead.
FCC Radiation Exposure Statement
This device and its antenna(s) must not be co-located or operating in conjunction with any other antenna or transmitter.
End-users must be provided with specific operating instructions for satisfying RF exposure compliance.
The highest reported SAR level is: Body: 0.019 W/kg.
Industry Canada Notice
This wireless module device complies with Canadian RSS-210. To prevent radio interference to the licensed service, this device is intended to be operated indoors and away from windows to provide maximum shielding. Equipment (or its transmitting antenna) that is installed outdoors is subject to licensing. The installer of this radio equipment must ensure that the antenna is located or pointed such that it does not emit RF field in excess of Health Canada limits for the general population; consult Safety Code 6, obtainable from Health Canada's web site www.hc-sc.gc.ca/rpb.
R&TTE Compliance Statement C€!
This wireless module device complies with the Essential Requirements of the R&TTE Directive of the European Union (1999/5/EC). This equipment meets the following conformance standards:
ETSI EN 300 328V1.7.1
EN 301 489-01 V1.6.1
EN 301 489-17 V1.2.1
EN 62311
Notified Countries: Germany, UK, Netherlands, Belgium, Sweden, Denmark, Finland, France, Italy, Spain, Austria, Ireland, Portugal, Greece, Luxembourg, Estonia, Latvia, Lithuania, Czech Republic, Slovakia, Slovenia, Hungary, Poland and Malta.
ENERGY STAR® information
The computer complies with the ENERGY STAR ^® requirements of less than 15 min of user inactivity for the display and less than 30 min of inactivity for the computer.
Move the mouse or click any button on the keyboard to wake the computer from Sleep mode.
Important Safety Instructions
- DO NOT press or touch the LCD Screen. DO NOT place the Notebook PC with small items, they may scratch LCD Screen or enter the Notebook PC.
- DO NOT expose the Notebook PC to dirty or dusty environment. Keep the environment clean and dry.
- DO NOT place the Notebook PC on uneven or unstable work surface.
- DO NOT place or drop objects on the top of the Notebook PC. DO NOT shove any foreign objects into the Notebook PC. DO NOT cover the LCD Screen strongly.
- DO NOT expose the Notebook PC to strong magnetic or electrical fields; DO NOT place the floppy disk near or on the Notebook PC, that may loss the data of the floppy disk.
- DO NOT leave the Notebook PC facing the sun as it can damage the LCD Screen, especially in the car.
- SAFE TEMP: This Notebook PC should only be used in environments with ambient temperatures between 5°C (41°F) and 35°C (95°F).
- DO NOT expose the Notebook PC to or use near liquids, rain, or moisture.
- Caution: risk of explosion if battery is replaced by an incorrect type. Dispose of used batteries according to the instructions.
- DO NOT throw the Notebook PC in municipal waste. Check local regulations for disposal of electronic products. Please recycle the Battery Pack, and check with your Local Authority or retailer for recycling advice.
- The Notebook PC and the Adapter may occur some heat during operating or charging. DO NOT leave the Notebook PC on your lap or any part of the body in order to prevent discomfort or injury from heat exposure.
- INPUT RATING: Refer to the rating label on the Notebook PC and be sure that the Power Adapter complies with the rating. Only use attachments or accessories specified by the manufacturer.
- Checking the connections between the main unit and attachments before turning on the Notebook PC.
- DO NOT use the Notebook PC during eating food avoid dirtying the Notebook PC.
- DO NOT insert anything into the Notebook PC that may result in short circuit or damage the circuit.
-
Powering off the Notebook PC, if you want install or remove some external devices, which are not support hot-plug.
-
Disconnect the Notebook PC from the electrical outlet and remove any installed batteries before cleaning. And Keep it away from children.
- DO NOT disassemble the Notebook PC, only a certified service technician should perform repairs on your computer. Otherwise, problem may result and the manufacturer should not hold responsibility for the damage.
- Only use Battery Packs approved by the manufacturer or else damage may occur.
- The Notebook PC has some little metal flake to disperse heat. DO NOT place the Notebook PC on soft objects (e.g.: bed, sofa, your lap), or else the Notebook PC may become hot and halt the system operating.
Declaration of RoHS Compliance
This product has been designed and manufactured in compliance with Directive 2002/95/EC of the European Parliament and the Council on restriction of the use of certain hazardous substances in electrical and electronic equipment (RoHS Directive) and is deemed to comply with the maximum concentration values issued by the European Technical Adaptation Committee (TAC) as shown below:
| Substance | Proposed Maximum Concentration | Actual Concentration |
| Lead (Pb) 0,1% < 0,1% | ||
| Mercury (Hg) 0,1% < 0,1% | ||
| Cadmium (Cd) | 0,01% < 0,01% | |
| Hexavalent Chromium (Cr6+) | 0,1% < 0,1% | |
| Polybrominated biphenyls (PBB) | 0,1% < 0,1% | |
| Polybrominated diphenyl ethers (PBDE) | 0,1% < 0,1% |
Certain components of products as stated above are exempted under the Annex of the RoHS Directives as noted below:
Examples of exempted components are:
- Mercury in compact fluorescent lamps not exceeding 5 mg per lamp and in other lamps not specifically mentioned in the Annex of RoHS Directive.
- Lead in glass of cathode ray tubes, electronic components, fluorescent tubes, and electronic ceramic parts (e.g. piezoelectronic devices).
- Lead in high temperature type solders (i.e. lead-based alloys containing 85% by weight or more lead).
- Lead as an allotting element in steel containing up to 0.35% lead by weight, aluminium containing up to 0.4% lead by weight and as a cooper alloy containing up to 4% lead by weight.
Copyright Information
Copyright © ViewSonic® Corporation, 2009. All rights reserved.
Microsoft ^® , Windows ^® , Windows NT ^® , and the Windows ^® logo are registered trademarks of Microsoft ^® Corporation in the United States and other countries.
ViewSonic ^® , the three birds logo, OnView ^® , ViewMatch ^™ , and ViewMeter ^® are registered trademarks of ViewSonic ^® Corporation.
Intel ^® , Pentium ^® , and Atom ^™ are registered trademarks of Intel Corporation.
ENERGY STAR ^® is a registered trademark of the U.S. Environmental Protection Agency (EPA).
As an ENERGY STAR® partner, ViewSonic Corporation has determined that this product meets the ENERGY STAR® guidelines for energy efficiency.
Disclaimer: ViewSonic® Corporation shall not be liable for technical or editorial errors or omissions contained herein; nor for incidental or consequential damages resulting from furnishing this material, or the performance or use of this product.
In the interest of continuing product improvement, ViewSonic® Corporation reserves the right to change product specifications without notice. Information in this document may change without notice.
No part of this document may be copied, reproduced, or transmitted by any means, for any purpose without prior written permission from ViewSonic® Corporation.
Product Registration
To meet your future needs, and to receive any additional product information as it becomes available, please register your product on the Internet at: www.viewsonic.com. The ViewSonic® Wizard CD-ROM also provides an opportunity for you to print the registration form, which you may mail or fax to ViewSonic®.
For Your Records
Product Name:
VNB102
ViewSonic 10" NetBook
Model Number:
VS12867
Document Number:
VNB102-1_UG_ENG Rev. 1B 10-27-09
Serial Number:
Purchase Date:
Product disposal at end of product life
ViewSonic® is concerned about the preservation of our environment. Please dispose of this product properly at the end of its useful life. For the recycling information, please refer to our website:
- USA: www.viewsonic.com/company/green/recycle-program/
- Europe: www.viewsoniceurope.com/uk/support/recycling-information/
- Taiwan: recycle.epa.gov.tw
Directions
Meanings of icons:

Forbidding: forbid improper operations to avoid damaging the Notebook PC.

Caution: cautions for operators to avoid potential damages. Please note and remember.

Importance: important information, common notes, definitions, general knowledge and references, etc.
Content
External Appearance....1
1-1 Top View....1
1-2 Rear View....2
1-3 Bottom View .... 3
1-4 Left View....4
1-5 Right View 4
Setting Up Your Computer....5
2-1 Installing/Removing the Battery....5
2-2 Connecting the Power Supply 7
2-3 Startup....7
2-4 Emergency Shutdown 8
Using the Touchpad....9
3-1 Introduction to the Touchpad 9
3-2 Single Tap/ Single Click....9
3-3 Double Tap/ Double Click....9
3-4 Drag....9
Special Function Keys 10
Viewsonic System Recovery DVD/HDD Partition 11
4-1 Running the Recovery DVD 11
4-2 System Recovery HDD Partition 12
Netbook FAQ.... 13
Specifications 15
Customer Support.... 16
Limited Warranty 17
External Appearance
The Netbook is a compact and easy to use portable computer. It is equipped with an intuitive graphical interface and full wireless connectivity so you can use the Netbook and access the Internet at any time and in any place. Provided below is an introduction to each product function.
1- 1 Top View
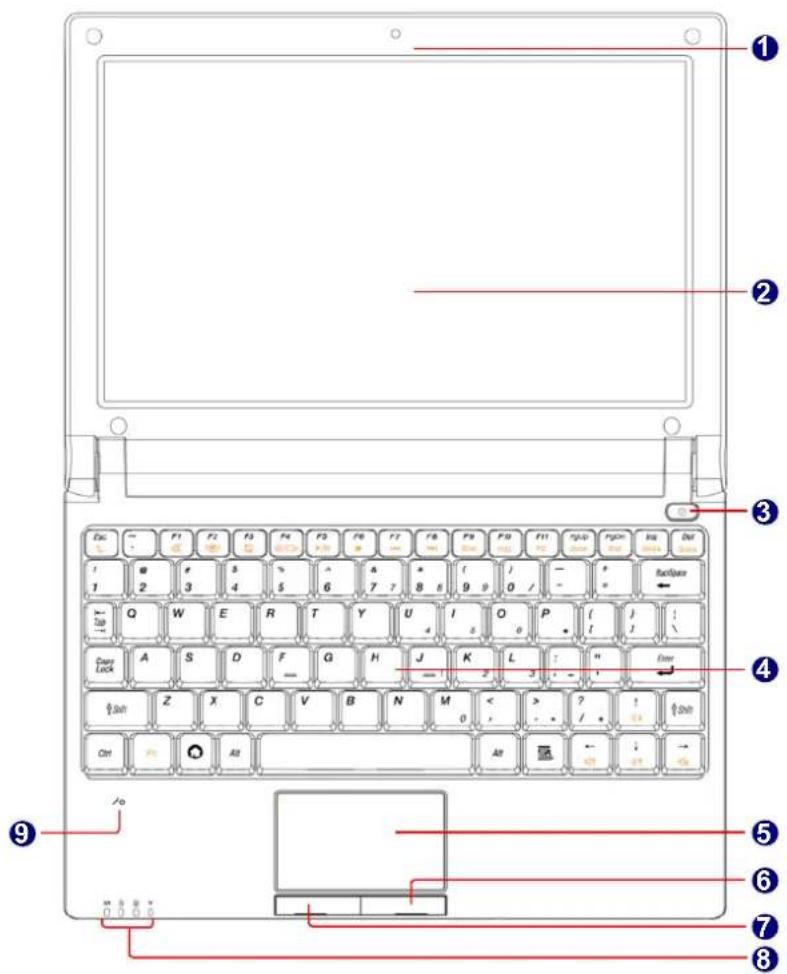

Your Netbook keyboard may vary depending on the country/region of purchase.
| No. | Purpose Description | |
| 1 | CCD Camera Records videos or take photos. | |
| 2 | Color LCD Display Netbook's screen. | |
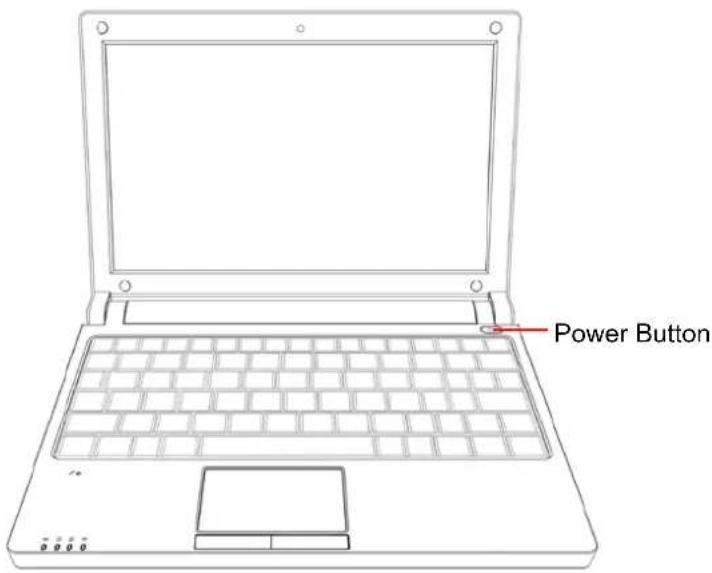
| 3 | Power Button Button for turning the computer's power on/off. | |
| 4 | Keyboard Input device used for controlling the Netbook's various functions. | |
| 5 | Touchpad Works the same way as a mouse and is used for controlling the computer cursor. | |
| 6 | Right Touchpad Button Works the same way as the right mouse button. | |
| 7 | Left Touchpad Button Works the same way as the left mouse button. | |
| 8 | Computer Status Light From left to right:Power iconNum Lock iconCaps Lock iconWireless Network icon | |
| 9 | Microphone Netbook's built-in microphone. | |
1-2 Rear View

natural_image
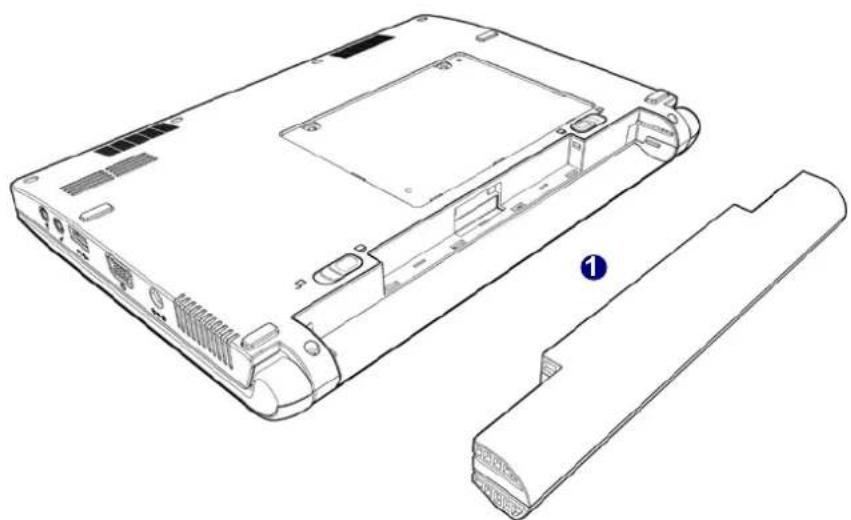
Technical line drawing of a rectangular mechanical component with mounting holes and a numbered label (1) at the base (no text or symbols on the diagram itself)| No. | Purpose Description | |
| 1 | Battery Replaceable battery | that serves as Netbook's power supply. |
1-3 Bottom View
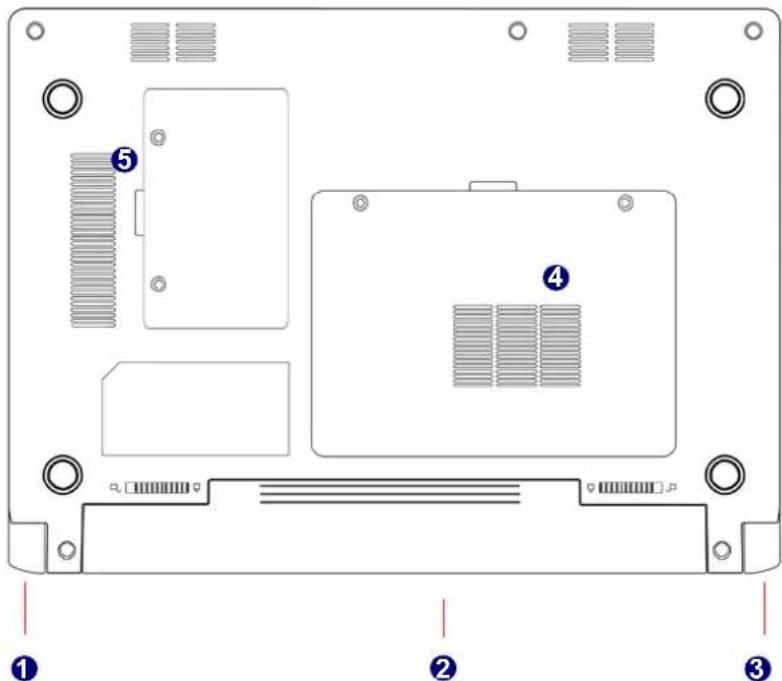
| No. | Purpose Description | |
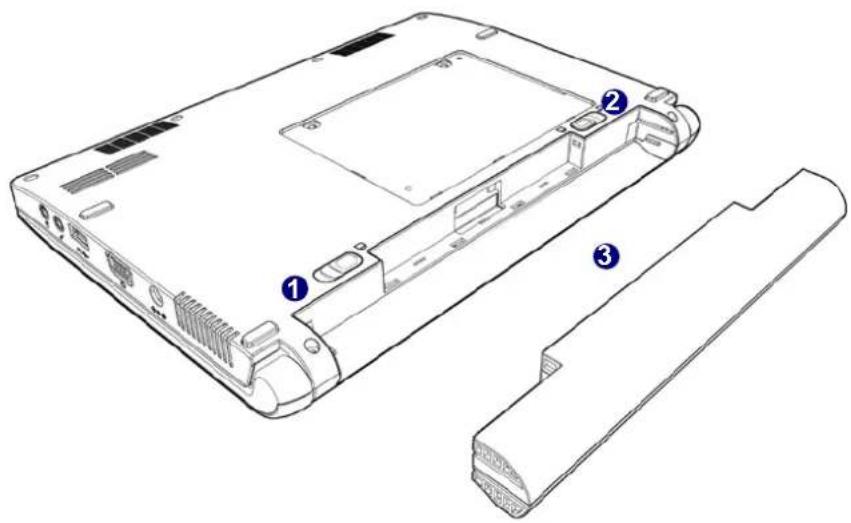
| 1 | Battery Lock Slide inwards to lock the battery in place. Slide outwards to unlock battery. | |
| 2 | Battery Replaceable battery. | Serves as the Netbook's power supply. |
| 3 | Battery Latch Push outwards to release battery for removal. | |
| 4 | Hard Disk Cover The Hard Disk Cover protects the internal hardware. Open to exchange device. | |
| 5 | Memory Cover The cover is to protect the memory from damage. | |

When the computer is running or charging, heat is produced inside the Netbook and transferred to the back of the chassis by the heat dissipation system for cooling. The transformer may also produce a lot of heat during normal use as well. The Netbook and its transformer should therefore not be placed in the lap or on any other body part for prolonged periods during use. Also avoid placing the Netbook on a soft surface (e.g. sofa) as it might block the heat vents and interfere with cooling.
1-4 Left View
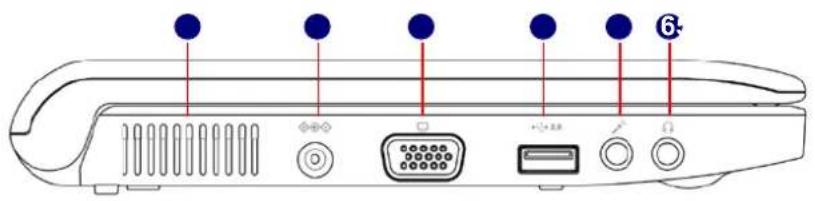
| No. | Purpose Description | |
| 1 | Vent Netbook's cooling vent | |
| 2 | Power Port Connects to the external power supply transformer | |
| 3 | External Display Port Connects to an externally display | |
| 4 | USB Port Connects to USB 2.0 device | |
| 5 | Microphone Connects to external microphone | |
| 6 | Headphone Connects to external headphone |
1-5 Right View
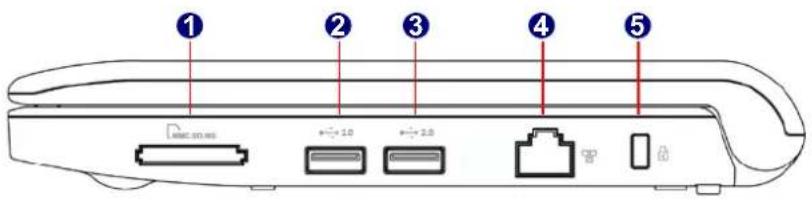
| No. | Purpose Description | |
| 1 | Multi-Function Card Reader | Supports MMC/SD/MS memory cards |
| 2 | USB Port Connects to USB | 2.0 device |
| 3 | USB Port Connects to USB | 2.0 device |
| 4 | Network Port | Standard RJ-45 network port |
| 5 | Anti-Theft Lock Slot | Connects to anti-theft lock |
Setting Up Your Computer
2-1 Installing/Removing the Battery
Please install the battery before using the Netbook and connect the external power supply transformer. The Netbook can be powered by the battery or the external transformer. If you are in an office environment, we recommend using the external transformer as much as possible. If you are away from the office and no power socket is available, use the battery instead.
Installing the Battery
Step 1: Turn the Netbook over and have the back of the battery facing upwards as well. Now push the end of the battery with the metal contacts into the Netbook's battery slot evenly and slowly along the battery rails.
Step 2: Push the end of the Netbook battery with the metal contacts completely into the battery slot. When there is a "click", this means the battery latch has engaged and the battery is now secured to the Netbook.
Step 3: Push the Battery Lock inwards lightly to lock the battery in place.
natural_image
Line drawing of a laptop chassis showing front panel, rear panel, and internal components (no text or symbols)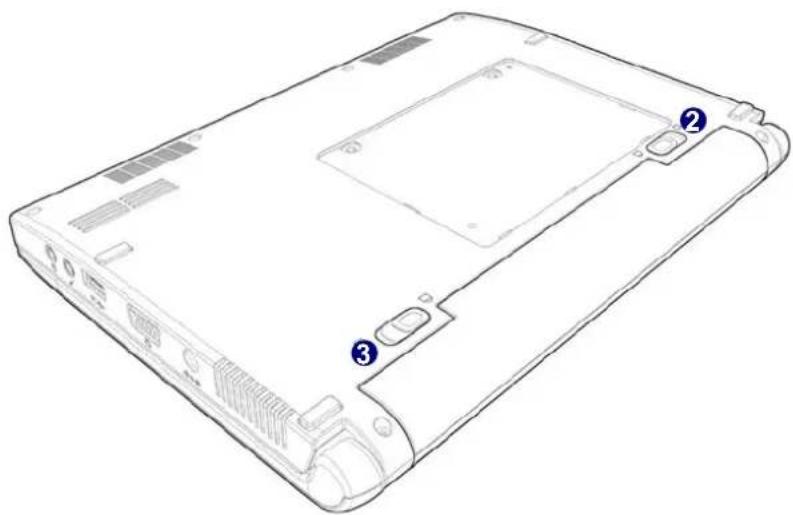
natural_image
Line drawing of a device rear panel with labeled components (no text or symbols)Removing the Battery
Step 1: Shut down the Netbook. Disconnect all cables and devices.
Step 2: Turn the Netbook over and unlock the battery by pushing the Battery Lock outwards.
Step 3: Push the Battery Latch outwards and hold it in place with your finger. Now use the other hand to pull the battery out.

Do not remove the battery while the Netbook is still running. This may damage the data on the hard disk.
2-2 Connecting the Power Supply
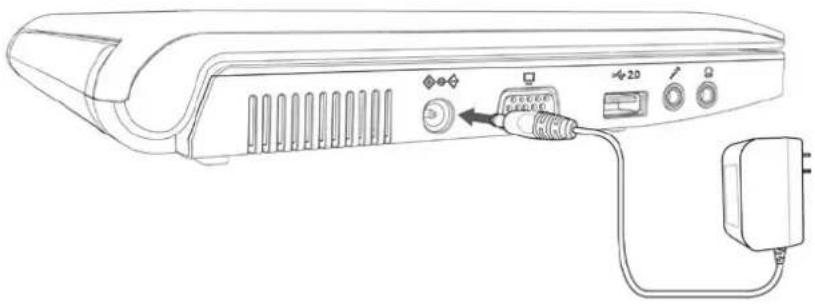
Step 1: Insert the round end of the power supply transformer into the charging port on the left side of the Netbook.
Step 2: Insert the other end of the power supply transformer into a power socket.
natural_image
Line drawing of a portable electronic device with ports, cables, and a power plug (no text or symbols)
The power connector for the power socket may vary depending on the local national standards. The appropriate connector will be bundled with your Netbook. Please always use the adapter when connecting the power supply. The connector shown here may not match the type included in the box and is provided for reference purposes only.
2-3 Startup
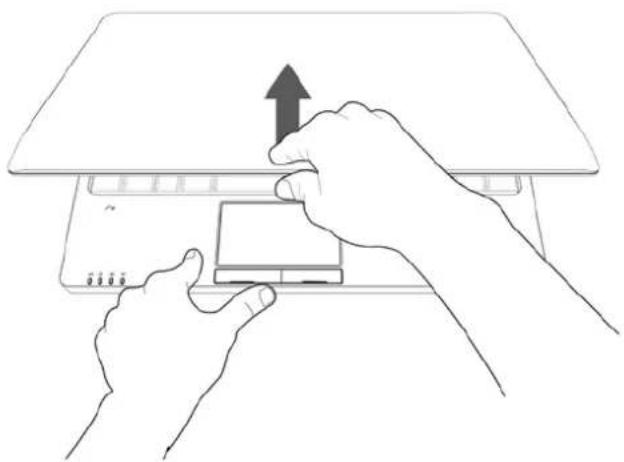
Step 1: Open the screen of your Netbook.
natural_image
Line drawing of hands installing a device component with an upward arrow (no text or symbols)Step 2: Turn on the machine by pressing the Power Button.
2-4 Emergency Shutdown
When the Netbook cannot be shut down through normal means, please press and hold the Power Button until the Netbook powers off.
Using the Touchpad
3-1 Introduction to the Touchpad
The touchpad is like a computer mouse. It senses the pressure from the user's finger and generates a voltage that is used to control the cursor's movements and issue commands.
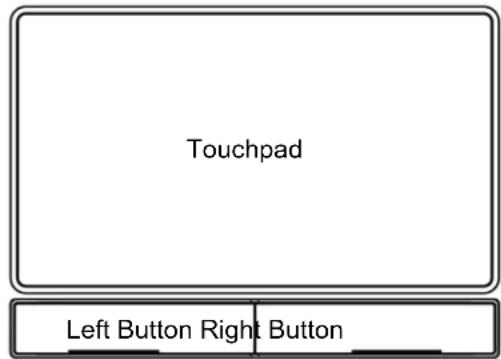
The touchpad senses finger movements. Simply move one finger across the touchpad to control the movement of the cursor on screen. Below the touchpad is two buttons. The left button is like the left mouse button and is used for selecting options or launching programs on screen. The right button works the same way as the right mouse button.
3-2 Single Tap/ Single Click
To select a window function or press a button icon, move your finger across the touchpad to move the cursor to the window or button to select. Now tap the touchpad with your finger to perform the action. This action is equivalent to pressing the left mouse button. You can also press the left touchpad button for the same effect.
3-3 Double Tap/ Double Click
To open a file or document, move your finger across the touchpad to move the cursor to the file you wish to open. Now quickly tap the touchpad twice with your finger to perform the action. This action is equivalent to pressing the left mouse button twice. You can also press the left touchpad button twice for the same effect.
3-4 Drag
Move your finger across the touchpad to move the cursor to the object you wish to drag. Now hold down the left touchpad button with one hand and move the cursor to the desired location. Release the button and complete the drag operation. You can also double tap the object you wish to drag and keep the finger on the touchpad after the second tap to perform the drag operation with one hand.
Special Function Keys
The following defines some special function keys on the netbook.
| Function Keys Description | |
| Fn + F1 WWAN on or off | |
| Fn + F2 Wireless LAN on or off | |
| Fn + F3 Touchpad on or off | |
| Fn + F4 Switches to the external display | |
| Fn + F5 Audio on or off | |
| Fn + F9 To terminate some applications | |
| Fn + F10 Toggles the "Print Screen" key to initiate screen capture utility to capture, save or print the contents of desktop | |
| Fn + F11 F12 / Enters into the dialog box of "Save As" in Windows Office applications | |
| Fn + Page Up Presses to move the cursor to the beginning of the line | |
| Fn + Page Down Presses to move the cursor to the end of the line | |
| Fn + Ins "Number Lock" on or off | |
| Fn + Del "Scroll Lock" on or off | |
| Fn + Esc Enter S3 mode | |
| Fn + ↑ (up arrow) | Increases the display brightness |
| Fn + ↓ (down arrow) | Decreases the display brightness |
| Fn + ←(left arrow) Decreases the system volume | |
| Fn + ←(right arrow) Increases the system volume | |
Viewsonic System Recovery DVD/HDD Partition
Your computer supports system recovery to allow you to restore the system to its default factory settings.
You can run the Recovery DVD, or recover the system from the hard disk partition, if you:
- Have a system or hardware failure.
- Need to restore the system to factory settings.
- Have forgotten the system password.
4-1 Running the Recovery DVD
You will need to attach a DVD drive to the computer in order to access the Recovery DVD.
- Make sure an external USB DVD drive is attached to the computer.
- Start-up your notebook computer and press
to enter the BIOS. - Use the arrow keys to go to the Boot menu.
- Set the CD/DVD-ROM Drive (make sure the Recovery DVD is inserted) as the first device in the boot order from the Boot menu (use the up/down arrow keys to select 1st Boot Device, and then use the "+" or "-" keys to move the device up and down the order).
- Select Save and Exit Setup from the Exit menu (or press F10) and press Enter to exit the BIOS and reboot the computer.
- Make sure the Recovery DVD is inserted into the external USB DVD drive.
- As the computer boots up press a key when you see the message "Press any key to boot from CD or DVD".
- Click RECOVERY TO FACTORY DEFAULT (button) when the Recovery System message appears.
- You will then receive a Final Confirmation warning to make sure you are aware that all the partitions and data will be removed (if you need to back up data/partitions then click No to exit and back up any data before running the Recovery DVD again).
- If you are sure you want to delete all data and partitions then click Yes.
- The tools will load and the recovery process will then begin (note that the keyboard and mouse will be temporarily locked during the recovery process).
- When the recovery process is complete the computer will restart.
- Disconnect the external DVD drive and start up the computer.
- You will then need to input your country and region preferences, passwords etc.
- A short introductory video will appear before the system personalizes your settings.
- When the system recovery is complete you can then restore any backed up data.
4-2 System Recovery HDD Partition
Alternatively you can use the hard disk partition to recover the system.
- Start-up your notebook computer and press
during the POST (Power On System Test at boot up). - Click OK (button) when the Recovery System message appears.
- Follow the instructions above from steps 9 to 16.
Netbook FAQ
- Q: Does the HDD shock-proof designed?
A: Yes, it does.
- Q: Can I expand the RAM stick?
A: No, you can't.
- Q: Could the VGA share memory be adjusted in BIOS?
A: No, it could't.
- Q: Could Windows Vista be installed properly?
A: Not Vista ready
- Q: How long the battery could be used after complete charge?
A: About 2-3 hours normally, according to netbook loading.
- Q: Introduce the function of lights on the bottom-left corner
A: From left to right is in turn:
The first light refers to battery charging or not.
The second light means NumLock on or off.
The third light means Caps Lock on or off.
The fourth light means Wireless LAN on or off.
- Q: Why does the touchpad fail to work?
A: You need to confirm whether the touchpad function key is enabled or not.
- Q: Why does the wireless LAN fail to work?
A: You need to confirm whether the wireless LAN function key is enabled or not.
- Q: SD card reader is unable to work normally.
A: Please confirm whether the specification of SD card is 3-in-1 MS/SD/MMC and then the gold pins of SD card are placed down, or to insert it again.
- Q: How to get Windows XP driver?
A: In CD
- Q: How to view system configuration in Windows XP?
A: Please click "Computer" in desktop or use "CPU-Z" and other system tool softwares.
- A: The problem is that wireless LAN card does not distribute IP address.
B: Maybe it is relative to the configuration of Windows XP optimize edition. Please use Windows XP complete edition, and pay attention to the items of optimized configuration. No Windows XP complete edition may cause abnormal operation of the system.
- A: After choosing the option of "safely removing the hardware" and taking out the using SD card in Windows XP, but why the SD card can not be detected while inserting it again?
B: It is normal. The card reader is designed for hot plug, you needn't to choose the option of "safely removing the hardware". The card reader can work normally only after rebooting the computer.
Specifications
| Main Feature | ||
| CPU Intel Atom N270 (1.6GHz, 533MHz FSB) | ||
| CPU Power Consumption | 2.5W MAX | |
| L1 Cache Size | On-die, primary 32-kB instructions cache and 24-kB, write-back data cache | |
| L2 Cache Size 512-kB on-die second level cache | ||
| Memory (#) 1GB | ||
| Memory Type DDRII 533/667 MHz | ||
| Storage | ||
| HDD Capacities (#) | 160 GB | |
| TFT Screen | ||
| TFT Screen Size 10" inch | ||
| Screen Type TFT | ||
| Description | 1024X600 (WSVGA) | |
| Built-in Camera | ||
| Resolution 0.3M Pixels | ||
| Video/Audio Feature | ||
| Video Card Type | Intel GMA 950 | |
| Video Card Capacity Share | Dynamic EMS Memory 128MB(Max) | |
| Audio System Built-in speaker | ||
| Sound Card Type HD Codec | ||
| I/O Device | ||
| Mouse Touch Pad | ||
| Keyboard 80-key keyboard | ||
| Condition | ||
| Operating Temperature | 5-35 °C | |
| Operating Humidity | 20%-80% | |
| Storage Temperature -20-60 °C | ||
| Storage Humidity | 10%-90% | |
| Power | ||
| Adapter | AC 100~240V; DC 19V | |
| Output Power (maximum) | ≤40W | |
| Battery (Type) | Lithium rechargeable battery | |
| Voltage | 11.1V | |
| Port Standard | ||
| LAN | LAN Type: 10/100 Base-T Wireless Card: 802.11 b/g | |
| Audio Port | Headphone Port, Speaker, Built-in Microphone, Microphone Port | |
| USB Port | USB-A Port(x3), USB2.0 | |
| SD Card Port | Support SD/MMC/MS Card | |
| VGA Port | D-15 Output | |
| Physical Features | ||
| Weight | No battery | About 1.0 Kg |
| With battery | About 1.1 Kg | |
| Dimension | 253mm x 188mm x 10/28.1mm | |
Customer Support
For technical support or product service, see the table below or contact your reseller.
NOTE: You will need the product serial number.
| Country/Region Website | T = TelephoneF = FAX | ||
| Australia/New Zealand | www.viewsonic.com.au | AUS= 1800 880 818NZ= 0800 008 822 | service@au.viewsonic.com |
| Canada www.viewsonic.com | T (Toll-Free)= 1-866-463-4775T (Toll)= 1-424-233-2533F= 1-909-468-1202 | service.ca@viewsonic.com | |
| Europe www.viewsoniceurope.com www.viewsoniceurope.com/uk/Support/Calldesk.htm | |||
| Hong Kong www.hk.viewsonic.com T= 852 3102 2900 service@hk.viewsonic.com | |||
| India www.in.viewsonic.com T= 1800 11 9999 service@in.viewsonic.com | |||
| Ireland (Eire) www.viewsoniceurope.com/uk/ www.viewsoniceurope.com/uk/support/call-desk/ service_ie@viewsoniceurope.com | |||
| Korea www.kr.viewsonic.com T= 080 333 2131 service@kr.viewsonic.com | |||
| Latin America(Argentina) | www.viewsonic.com/la/ T= 0800 | 666 0194 soporte@viewsonic.com | |
| Latin America (Chile) | www.viewsonic.com/la/ | T= 800 440 303 | soporte@viewsonic.com |
| Latin America(Columbia) | www.viewsonic.com/la/ T= 01 800 | 915 6588 soporte@viewsonic.com | |
| Latin America (Mexico) | www.viewsonic.com/la/ | T= 001 800 514 6518 | soporte@viewsonic.com |
| Renta y Datos, 29 SUR 721, COL. LA PAZ, 72160 PUEBLA, PUE. Tel: 01.222.891.55.77 CON 10 LINEASElectroser, Av Reforma No. 403Gx39 y 41, 97000 Mérida, Yucatán. Tel: 01.999.925.19.16Other places please refer to http://www.viewsonic.com/la/soporte/index.htm#Mexico | |||
| Latin America (Peru) | www.viewsonic.com/la/ | T= 0800 53458 | soporte@viewsonic.com |
| Macau | www.hk.viewsonic.com T= 853 2870 0303 service@hk.viewsonic.com | ||
| Middle East | ap.viewsonic.com/me/ | Contact your reseller | service@ap.viewsonic.com |
| Puerto Rico & Virgin Islands | www.viewsonic.com | T= 1-800-688-6688 (English)T= 1-866-379-1304 (Spanish)F= 1-909-468-1202 | service.us@viewsonic.comsoporte@viewsonic.com |
| Singapore/Malaysia/Thailand | www.ap.viewsonic.com | T= 65 6461 6044 service@sg.viewsonic.com | |
| South Africa | ap.viewsonic.com/za/ | Contact your reseller | service@ap.viewsonic.com |
| United Kingdom | www.viewsoniceurope.com/uk/ | www.viewsoniceurope.com/uk/support/call-desk/ | service_gb@viewsoniceurope.com |
| United States | www.viewsonic.com | T (Toll-Free)= 1-800-688-6688T (Toll)= 1-424-233-2530F= 1-909-468-1202 | service.us@viewsonic.com |
Limited Warranty
VIEWSONIC® NETBOOK
What the warranty covers:
ViewSonic warrants its products to be free from defects in material and workmanship during the warranty period. If a product proves to be defective in material or workmanship during the warranty period, ViewSonic will, at its sole option, repair or replace the product with a similar product.
Replacement Product or parts may include remanufactured or refurbished parts or components.
The replacement unit will be covered by the balance of the time remaining on the customer's original limited warranty. ViewSonic provides no warranty for the third-party software included with the product or installed by the customer.
How long the warranty is effective:
ViewSonic NetBook products are warranted for (1) year from the first consumer purchase for parts and labor.
User is responsible for the back up of any data before returning the unit for service. ViewSonic is not responsible for any data lost.
Who the warranty protects:
This warranty is valid only for the first consumer purchaser.
What the warranty does not cover:
- Any product on which the serial number has been defaced, modified or removed.
- Damage, deterioration or malfunction resulting from:
a. Accident, misuse, neglect, fire, water, lightning, or other acts of nature, unauthorized product modification, or failure to follow instructions supplied with the product.
b. Any damage of the product due to shipment.
c. Removal or installation of the product.
d. Causes external to the product, such as electrical power fluctuations or failure.
e. Use of supplies or parts not meeting ViewSonic's specifications.
f. Normal wear and tear.
g. Any other cause which does not relate to a product defect.
- Any product exhibiting a condition commonly known as "image burn-in" which results when a static image is displayed on the product for an extended period of time.
- Removal, installation, one way transportation, insurance, and set-up service charges.
How to get service:
- For information about receiving service under warranty, contact ViewSonic Customer Support (Please refer to Customer Support page). You will need to provide your product's serial number.
- To obtain warranty service, you will be required to provide (a) the original dated sales slip, (b) your name, (c) your address, (d) a description of the problem, and (e) the serial number of the product.
- Take or ship the product freight prepaid in the original container to an authorized ViewSonic service center or ViewSonic.
- For additional information or the name of the nearest ViewSonic service center, contact ViewSonic.
Limitation of implied warranties:
There are no warranties, express or implied, which extend beyond the description contained herein including the implied warranty of merchantability and fitness for a particular purpose.
Exclusion of damages:
ViewSonic's liability is limited to the cost of repair or replacement of the product. ViewSonic shall not be liable for:
- Damage to other property caused by any defects in the product, damages based upon inconvenience, loss of use of the product, loss of time, loss of profits, loss of business opportunity, loss of goodwill, interference with business relationships, or other commercial loss, even if advised of the possibility of such damages.
- Any other damages, whether incidental, consequential or otherwise.
- Any claim against the customer by any other party.
- Repair or attempted repair by anyone not authorized by ViewSonic.
Effect of state law:
This warranty gives you specific legal rights, and you may also have other rights which vary from state to state. Some states do not allow limitations on implied warranties and/or do not allow the exclusion of incidental or consequential damages, so the above limitations and exclusions may not apply to you.
Sales outside the U.S.A. and Canada:
For warranty information and service on ViewSonic products sold outside of the U.S.A. and Canada, contact ViewSonic or your local ViewSonic dealer.
The warranty period for this product in mainland China (Hong Kong, Macao and Taiwan Excluded) is subject to the terms and conditions of the Maintenance Guarantee Card.
For users in Europe and Russia, full details of warranty provided can be found in www.viewsoniceurope.com under Support/Warranty Information.
- For Canada
- CE Conformity for European Countries
- Following information is only for EU-member states:
- FCC Radiation Exposure Statement
- Industry Canada Notice
- R&TTE Compliance Statement C€!
- ENERGY STAR® information
- Important Safety Instructions
- Declaration of RoHS Compliance
- Copyright Information
- Product Registration
- For Your Records
- Product disposal at end of product life
- Directions
- Meanings of icons:
- Content
- External Appearance....1
- Setting Up Your Computer....5
- Using the Touchpad....9
- Special Function Keys 10
- Viewsonic System Recovery DVD/HDD Partition 11
- Netbook FAQ.... 13
- Specifications 15
- Customer Support.... 16
- Limited Warranty 17
- External Appearance
- 1- 1 Top View
- 1-2 Rear View
- 1-3 Bottom View
- 1-4 Left View
- 1-5 Right View
- Setting Up Your Computer
- 2-1 Installing/Removing the Battery
- Installing the Battery
- Removing the Battery
- 2-2 Connecting the Power Supply
- 2-3 Startup
- 2-4 Emergency Shutdown
- Using the Touchpad
- 3-1 Introduction to the Touchpad
- 3-2 Single Tap/ Single Click
- 3-3 Double Tap/ Double Click
- 3-4 Drag
- Special Function Keys
- Viewsonic System Recovery DVD/HDD Partition
- 4-1 Running the Recovery DVD
- 4-2 System Recovery HDD Partition
- Netbook FAQ
- Customer Support
- Limited Warranty
- VIEWSONIC® NETBOOK
- What the warranty covers:
- How long the warranty is effective:
- Who the warranty protects:
- What the warranty does not cover:
- How to get service:
- Limitation of implied warranties:
- Exclusion of damages:
- Effect of state law:
- Sales outside the U.S.A. and Canada:
Brand : VIEWSONIC
Model : ViewBook VNB102
Category : Laptop