
ViewBook VNB107 - Laptop VIEWSONIC - Free user manual and instructions
Find the device manual for free ViewBook VNB107 VIEWSONIC in PDF.


| Product Type | Laptop |
| Brand | ViewSonic |
| Model | ViewBook VNB107 |
| Display Size | 10.1 inches |
| Screen Resolution | 1366 x 768 pixels |
| Processor | Intel Celeron N4020 or equivalent |
| RAM | 4 GB DDR4 |
| Storage | 64 GB eMMC |
| Operating System | Windows 10 Home in S mode |
| Battery Type | 3-cell Li-ion, 10.8V, 3000mAh |
| Battery Life | Up to 8 hours |
| Dimensions (W x D x H) | 10.9 x 7.5 x 0.8 inches |
| Weight | 2.2 lbs (1.0 kg) |
| Wireless Connectivity | 802.11ac Wi-Fi, Bluetooth 4.2 |
| Ports | USB 3.0 x2, HDMI, MicroSD, Headphone/Mic combo |
| Camera | 0.3 MP webcam |
| Audio | Built-in speakers, microphone |
| Power Adapter | 10W USB-C charger |
| Maintenance | Clean with dry cloth; avoid liquids |
| Safety | Do not disassemble; avoid overheating |
| Spare Parts | Battery, charger, keyboard (service center) |
| Repairability | Limited; professional service recommended |
Frequently Asked Questions - ViewBook VNB107 VIEWSONIC
User questions about ViewBook VNB107 VIEWSONIC
0 question about this device. Answer the ones you know or ask your own.
Ask a new question about this device
Download the instructions for your Laptop in PDF format for free! Find your manual ViewBook VNB107 - VIEWSONIC and take your electronic device back in hand. On this page are published all the documents necessary for the use of your device. ViewBook VNB107 by VIEWSONIC.
USER MANUAL ViewBook VNB107 VIEWSONIC
CE Conformity for European Countries

The device complies with the EMC Directive 2004/108/EC and Low Voltage Directive 2006/95/EC.
Following information is only for EU-member states:
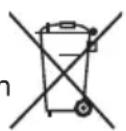
The mark shown to the right is in compliance with the Waste Electrical and Electronic Equipment Directive 2002/96/EC (WEEE).
The mark indicates the requirement NOT to dispose the equipment as unsorted municipal waste, but use the return and collection systems according to local law.
If the batteries, accumulators and button cells included with this equipment, display the chemical symbol Hg, Cd, or Pb, then it means that the battery has a heavy metal content of more than 0.0005% Mercury, or more than 0.002% Cadmium, or more than 0.004% Lead.

R&TTE Compliance Statement C€!
This wireless module device complies with the Essential Requirements of the R&TTE Directive of the European Union (1999/5/EC). This equipment meets the following conformance standards:
ETSI EN 300 328
EN 301 489-01
EN 301 489-17
EN 50371
EN 62209-2
Notified Countries: Germany, UK, Netherlands, Belgium, Sweden, Denmark, Finland, France, Italy, Spain, Austria, Ireland, Portugal, Greece, Luxembourg, Estonia, Latvia, Lithuania, Czech Republic, Slovakia, Slovenia, Hungary, Poland and Malta.
Important Safety Instructions
- DO NOT press or touch the LCD Screen. DO NOT place notebook PC with small items, they may scratch LCD Screen or penetrate the vents of notebook PC.
- DO NOT expose notebook PC to dirty or dusty environment. Keep the environment clean and dry.
- DO NOT place notebook PC on uneven or unstable work surface.
- DO NOT place or drop objects on the top of notebook PC. DO NOT shove any foreign objects into notebook PC. DO NOT close with force the LCD Screen lid.
- DO NOT expose notebook PC to strong magnetic or electrical fields; DO NOT place floppy disks near or on notebook PC as this may cause the loss of data on the floppy disks.
- DO NOT leave notebook PC facing the sun as it can damage the LCD Screen, especially when in a car.
- SAFE TEMPERATURE: This notebook PC should only be used in environments with ambient temperatures between 5°C (41°F) and 35°C (95°F).
- DO NOT expose notebook PC to or use near liquids, rain, or moisture.
- Caution: there is a risk of explosion if the battery is replaced by an incorrect type. Dispose of used batteries according to the instructions.
- DO NOT throw notebook PC in municipal waste. Check local regulations for disposal of electronic products. Please recycle the Battery Pack, and check with your Local Authority or retailer for an advice on recycling.
- Notebook PC and its power adapter may produce some heat during operation or charging of its internal battery. DO NOT leave notebook PC on your lap or any part of your body in order to prevent discomfort or injury from heat exposure.
- INPUT RATING: Refer to the rating label on notebook PC and make sure that the Power Adapter complies with that rating. Only use accessories recommended by ViewSonic.
- Check the connections between the main unit and attached devices before turning on your notebook PC.
- DO NOT use notebook PC during eating to avoid dirtying your notebook PC.
- DO NOT insert anything into notebook PC that may result in short circuit or can damage the electronic circuits.
- Power off your notebook PC, if you want to install or remove some external devices, which do not support hot-plugging-in.
- Disconnect your notebook PC from the electrical outlet and remove any installed batteries before cleaning the notebook PC. Keep your notebook PC away from children.
- DO NOT disassemble notebook PC. Only a certified service technician should perform repairs on your computer.
- Use only the Battery Packs approved by ViewSonic.
- Notebook PC has vents to disperse heat. DO NOT place notebook PC on soft objects (e.g.: bed, sofa, your lap) as this can block the air flow from those vents and cause system halt due to overheating.
Declaration of RoHS Compliance
This product has been designed and manufactured in compliance with Directive 2002/95/EC of the European Parliament and the Council on restriction of the use of certain hazardous substances in electrical and electronic equipment (RoHS Directive) and is deemed to comply with the maximum concentration values issued by the European Technical Adaptation Committee (TAC) as shown below:
| Substance | Proposed Maximum Concentration | Actual Concentration |
| Lead (Pb) 0,1% < 0,1% | ||
| Mercury (Hg) 0,1% < 0,1% | ||
| Cadmium (Cd) 0,01% < 0,01% | ||
| Hexavalent Chromium (Cr6+) 0,1% < 0,1% | ||
| Polybrominated biphenyls (PBB) 0,1% < 0,1% | ||
| Polybrominated diphenyl ethers (PBDE) 0,1% < 0,1% |
Certain components of products as stated above are exempted under the Annex of the RoHS Directives as noted below:
Examples of exempted components are:
- Mercury in compact fluorescent lamps not exceeding 5 mg per lamp and in other lamps not specifically mentioned in the Annex of RoHS Directive.
- Lead in glass of cathode ray tubes, electronic components, fluorescent tubes, and electronic ceramic parts (e.g. piezoelectronic devices).
- Lead in high temperature type solders (i.e. lead-based alloys containing 85% by weight or more lead).
- Lead as an allotting element in steel containing up to 0.35% lead by weight, aluminium containing up to 0.4% lead by weight and as a cooper alloy containing up to 4% lead by weight.
Copyright Information
Copyright © ViewSonic® Corporation, 2010. All rights reserved.
Microsoft ^® , Windows ^® , Windows NT ^® , and the Windows ^® logo are registered trademarks of Microsoft ^® Corporation in the United States and other countries.
ViewSonic ^® , the three birds logo, OnView ^® , ViewMatch ^™ , and ViewMeter ^® are registered trademarks of ViewSonic ^® Corporation.
Intel ^® , Pentium ^® , and Atom ^TM are registered trademarks of Intel Corporation.
Disclaimer: ViewSonic® Corporation shall not be liable for technical or editorial errors or omissions contained herein; nor for incidental or consequential damages resulting from furnishing this material, or the performance or use of this product.
In the interest of continuing product improvement, ViewSonic® Corporation reserves the right to change product specifications without notice. Information in this document may change without notice.
No part of this document may be copied, reproduced, or transmitted by any means, for any purpose without prior written permission from ViewSonic® Corporation.
Product Registration
To meet your future needs, and to receive any additional product information as it becomes available, please register your product on the Internet at:
www.viewsonic.com. The ViewSonic® Wizard CD-ROM also provides an opportunity for you to print the registration form, which you may mail or fax to ViewSonic®.
For Your Records
Product Name:
VNB107
ViewSonic ViewBook
Model Number:
VS13323
Document Number:
VNB107-1_UG_ENG Rev. 1A 01-04-10
Serial Number:
Purchase Date:
Product disposal at end of product life
ViewSonic® is concerned about the preservation of our environment. Please dispose of this product properly at the end of its useful life. For the recycling information, please refer to our website:
- USA: www.viewsonic.com/company/green/recycle-program/
- Europe: www.viewsoniceurope.com/uk/support/recycling-information/
- Taiwan: recycle.epa.gov.tw
Contents
Chapter 1: Preparing the netbook for use
Package contents 1
Insert the battery 1
Connect the power adapter .... 1
Chapter 2: Turning on the VNB107
Top View with the lid open 2
Turn on the VNB107 2
The function keys .... 3
Chapter 3: Configuring BIOS, installing an operating system and drivers
Installing an operating system 4
Other settings of the Setup CMOS Utility 5
Installing the drivers 8
Chapter 4: Devices and interfaces
Expand the interface devices 9
Chapter 5: Control Center Functions
Using the Control Center 10
User's Guide
Dear customer!
Thank you for choosing ViewSonic's VNB107 netbook.
Your VNB107 has powerful information processing capabilities and mobile characteristics. Whether you are in the office, at home, or travelling, VNB107 is your effective assistant that accompanies you all the time.
This manual will help you master the methods and techniques of using VNB107 to the best.
Chapter 1
Preparing the netbook for use
NO.1.1 Package contents
First of all, please open the VNB107 box and carefully remove the contents; check if anything is missing or damaged.
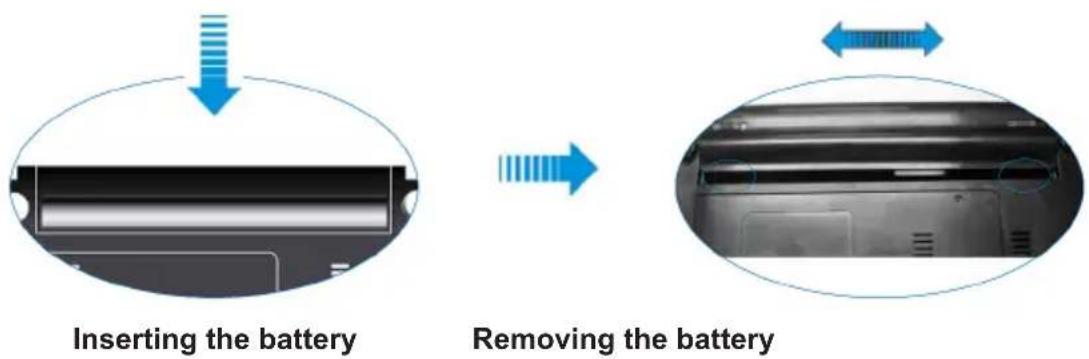
NO.1.2 Insert the battery
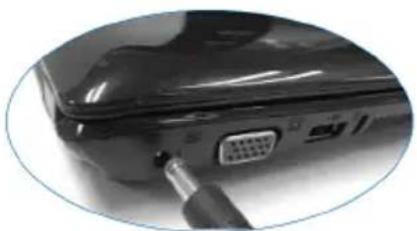
NO.1.3 Connect the power adapter
natural_image
Close-up of a black electronic device with a V15 port and cable inserted (no visible text or symbols)Chapter 2
Turning on the VNB107
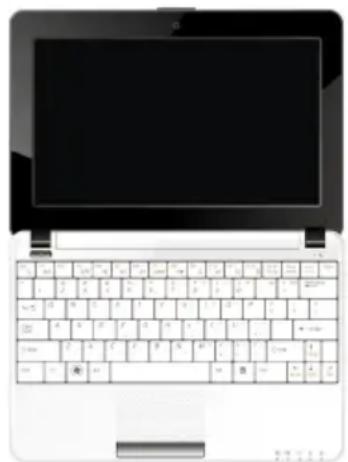
NO.2.1 Top View with the lid open
Open the lid of your VNB107. Please be careful when opening or closing the lid; do not do it with excessive force as you can damage the netbook.
natural_image
Front view of a laptop keyboard with blank screen (no text or symbols visible)VNB107
appearance
NO.2.2 Turn on the VNB107
Make sure both the battery and the power adapter are connected to the netbook and to wall AC power outlet. Press the Power button for one second to turn on the netbook.
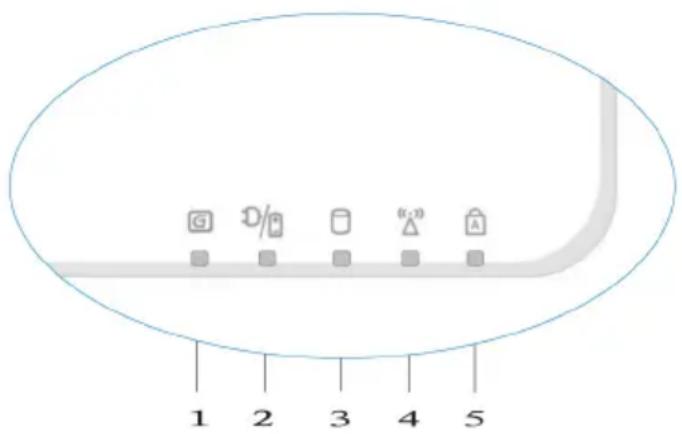
| 1 | 3G indicator: when the 3G LED is flashing in blue, VNB107 is connected to the 3G network. If the LED is off, either the 3G module is disabled or there is no connection for the 3G network. |
| 2 | The battery and charging status indicator: the LED glowing in amber means the battery is being charged; once the battery is fully charged the LED changes its color to blue. |
| 3 | HDD indicator: flashing in blue, this LED shows the HDD activity. |
| 4 | Wi-Fi indicator: when the netbook is connected to the wireless AP, the LED is flashing in blue. When the Wi-Fi module is disabled, the LED is not lit. |
| 5 | CapsLock: glowing in blue, this LED shows that all the input characters will appear in upper case. |
NO.2.3 The function keys
| Key Description | |
| Fn+Esc Enter suspend state | |
| Fn+F1 | Enable or disable the touchpad |
| Fn+F2 | Enable or disable the 3G module |
| Fn+F3 Enable or disable the Wi-Fi module | |
| Fn+F4 Toggle the sound ON and OFF | |
| Fn+F5 Decrease the brightness of the LCD | |
| Fn+F6 Increase the brightness of the LCD | |
| Fn+F7 | Turn ON of OFF the video-out signal for externally connected LCD or projector |
| Fn+F8 Turn ON or OFF the internal display | |
| Fn+F9 Customizable; the default setting is to open a web browser | |
| Fn+F10 Customizable; the default setting is to open an email client | |
| Fn+F11 Customizable; the default setting is to open a media player | |
| Fn+F12 | Customizable; the default setting is to open the Bluetooth application (optional) |
| Fn+ Increase the sound volume | |
| Fn+ Decrease the sound volume | |
| Fn+ ↑ Page up | |
| Fn+ ↓ Page down | |
| Fn+ ← Home | |
| Fn+ → End | |
Chapter 3
Configuring BIOS, installing an operating system and drivers
NO.3.1 Installing an operating system
Before installing OS, you will need to set up BIOS to allow boot from USB-CD/DVD drive. To do that, turn on VNB107, and press F2 when prompted to run BIOS setup.
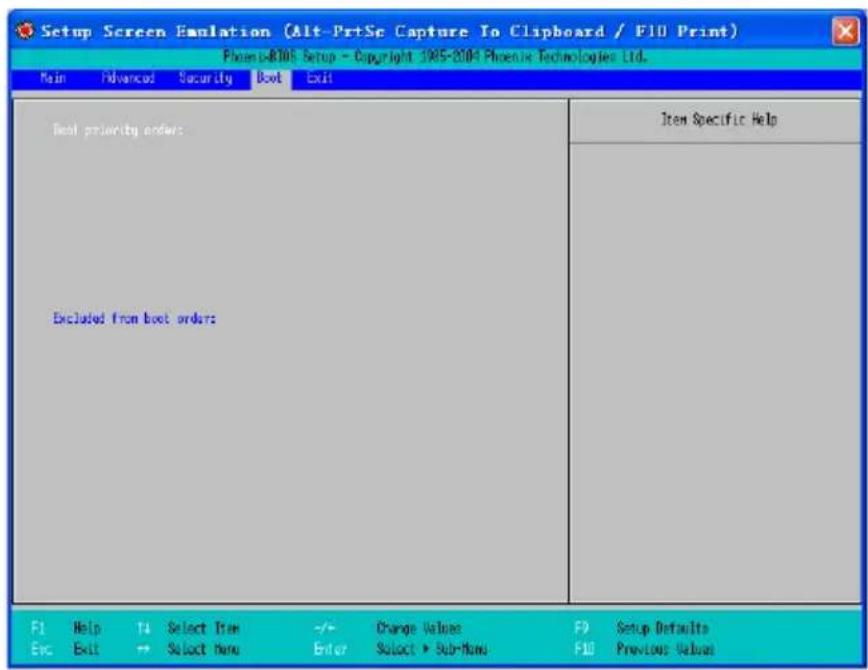
After you enter BIOS setup application, use the [] and [] keys to choose BOOT section of the main menu, select your USB-CD/DVD drive in the Boot priority list and use the [+] and [-] buttons to set the order in which drives and devices will be checked for a useable OS to boot at the time of startup.
NO.3.2 Other settings of the Setup CMOS Utility
Main Menu: Here you can set the system's date and time, as well as check system information like BIOS version, embedded controller firmware version, motherboard version, and the amount of the system memory and extended memory.
![Setup Screen Emulation (Alt-PrtSe Capture To Clipboard / F10 Print) Phen 1-806 Setup - Copyright 1985-2004 Phoenix Technologies Ltd. Main Advanced Security Boot Exit System Type: [09:30:11] System Dates (2009-12-02) B108 Part 1 System Memory: [XXXX KB] Extended Memory: [XXXX KB] B108 Version: EC Version: H/O Version: Item Specific Help , , or selects field. F1 Help T4 Select Item -/+ Change Values F9 Setup Defaults Esc Exit → Select Item Enter Select ▶ Sub-Menu F10 Previous Values](/content/2026/05/974461/images/7c00d6a4866d3e249032acfabfdd03482c1a865d66db8bc6971a4f57edcfb028.jpg)
- Sata Port: the settings specific to SATA devices can be done here. The specific operation can be found in the System promoted screens.
Advanced Menu: you can make the following settings.
![Setup Screen Emulation (Alt-Pr+Se Capture To Clipboard / F10 Print) Phoenix 800 Setup - Copyright 1965-2004 Phoenix Technologies Ltd. Main Advanced Security Boot Exit Legacy USB Supports: [Enabled] Summary screens: [Disabled] Boot-line Diagnostic Screen: [Disabled] FXE OFFDM: [Disabled] SPTR Controller Mode Options: [Enhanced] SPTR HCI Enable: [Enabled] Item Specific Help Enable support for Legacy Universal Serial Bus F1 Help ↑ Select Tree -/+ Change Values F9 Setup Defaults Esc Exit → Select New Enter Select ▶ Sub-Menu F10 Previous Value](/content/2026/05/974461/images/f45bccc016ba8134982607d102a0e230b971baa9231e031180c487a2ecb8c64c.jpg)
- Legacy USB: set if a USB device can be used under DOS.
- Summary Screen: set if you would like to see system configuration information each time you boot your VNB107.
- Boot-time Diagnostic Screen: choose between the image wallpaper mode and text information mode during the POST process.
- PXE OPROM: Set up if your VNB107 can be booted from LAN.
- Sata Controller Mode Option: setup the working mode of your HDD. If you are using Windows XP, you need to have AHCI disabled.
- AHCI Enable: enables or disables the Advanced Host Controller Interface for SATA devices.
Security Menu: security settings to enter the system.
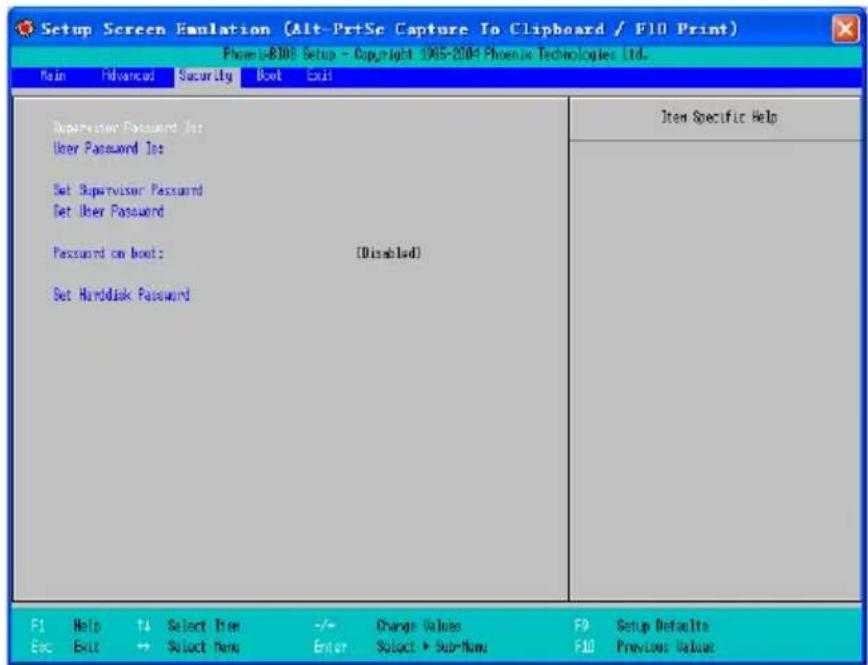
- Supervisor Password: defines if a supervisor password is asked when entering the BIOS Setup Utility.
- User Password: defines if a user password is asked when entering the BIOS Setup Utility.
- Set User Password: used to define the User Password.
- Set Supervisor Password: used to define the Supervisor Password, which authority is higher than that of the User Password.
- Password on Boot: defines if a password is required to startup the VNB107.
- Set Harddisk Password: specifies the password for getting access to the HDD.
[Warning]: Please write down the passwords if you set any, as to avoid any inconvenience in the future.
Exit Menu: options for exiting the BIOS Setup Utility after you have made changes to the settings.
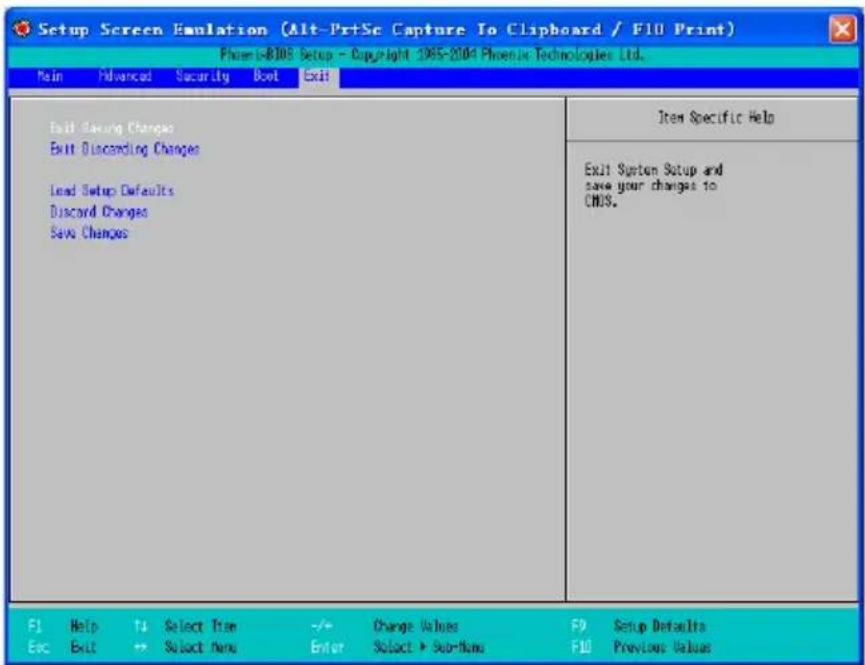
- Exit Saving Changes: to store the values and exit.
- Exit Discarding Changes: to exit without storing the values.
- Load Setup Defaults: to restore the settings to their factory values.
- Discard Changes: to abandon all the settings done during current session, yet to remain in the BIOS Setup Utility.
- Save Changes: to save the settings.
NO.3.3 Installing the drivers
Use the CD bundled with your VNB107 to install drivers and additional applications.
Choose the driver you need to install, and follow the on-screen instructions. After a driver is installed you may be requested to restart your system.
Chapter 4
Devices and interfaces
NO.4 Expand the interface devices
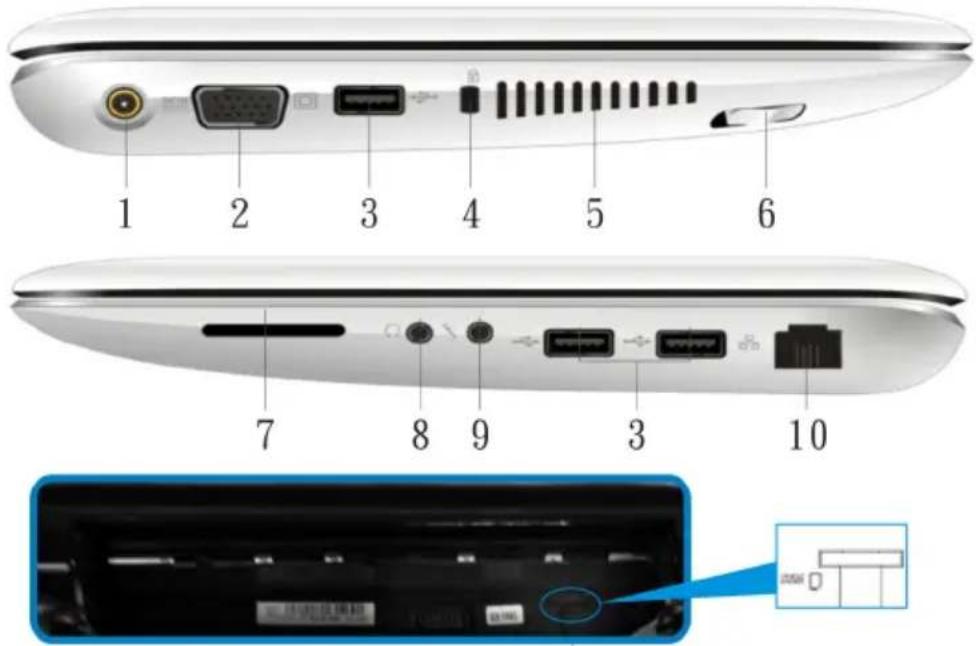
11
| NO. | Item Description | |
| 1 | DC-in jack Power jack for AC-DC adapter | |
| 2 | VGA port To connect to an external monitor or projector | |
| 3 | USB port | To connect USB devices, such as pen drives, printers, etc. |
| 4 | Security Lock Slot To connect a key-type security lock | |
| 5 | Ventilation slot | The ventilation slot should not be obstructed while VNB107 is running |
| 6 | 3G switch Toggles the 3G module ON and OFF (optional) | |
| 7 | Card reader Can accom modate SD/MMC/MS/MS PRO cards | |
| 8 | Microphone-in jack Used to connect an external microphone | |
| 9 | Headphone-out Jack Used to connect headphones or external speakers | |
| 10 | RJ-45 LAN Jack Used to connect the Ethernet network cable | |
| 11 | SIM card Slot | Please refer to the drawing next to the slot for a correct way to insert your SIM card |
[Attention]: Your VNB107 may not have all the interfaces listed above.
Chapter 5
Control Center Functions
NO.5 Using the Control Center
You can search for all kinds of system information through the Control Center, conduct the system settings and view the help information.
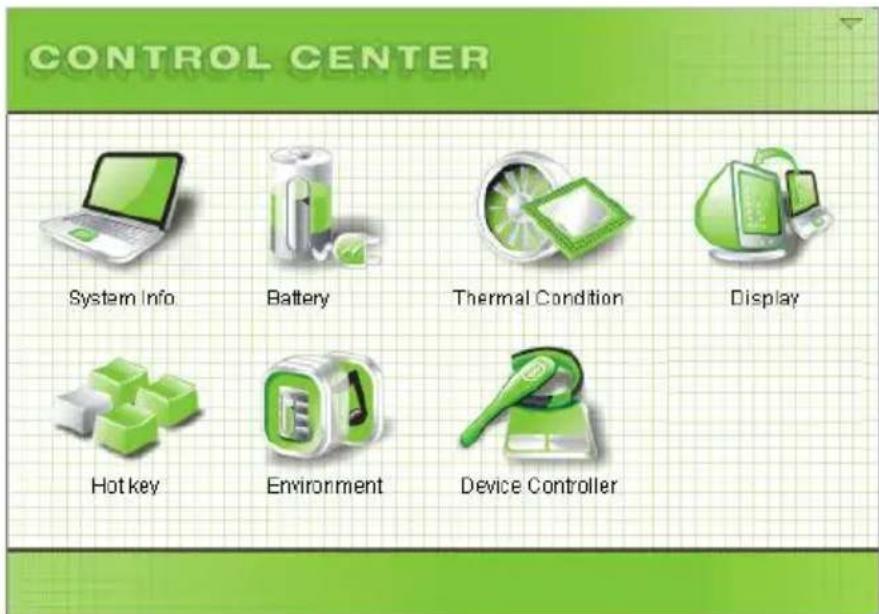
[Note]: To enjoy the functionality of the Control Center, please install it from the Driver disc bundled with the VNB107.
The Control Center can have some modifications and thus be different from the description herein.
System Information
Click on the System Info icon on the home-page of the Control Center to see the VNB107 basic system information.
![CONTROL CENTER Microsoft Windows XP Professional Service Pack 2 5.1.2600 System BIOS Version: 1.02a [2008-09-05] Embedded Controller Firmware Version: 1.0U_ [2008-08-28] Intel(R) Atom(TM) CPU N270 @ 1.60GHz Intel(R) Atom(TM) CPU N270 @ 1.60GHz FUJITSU MHZ2160BH G1 Total Size:149.05GB C: D: E: Size:14.64GB Size:19.50GB Size:114.64GB Free:9.10GB Free:17.83GB Free:114.630B](/content/2026/05/974461/images/b0847ad89b8c94a688754398f04f78b432cfbd2e573ce25887270b5f970bbeee.jpg)
[Note]: Click on the drop-down menu in the lower right corner of the window for more information.
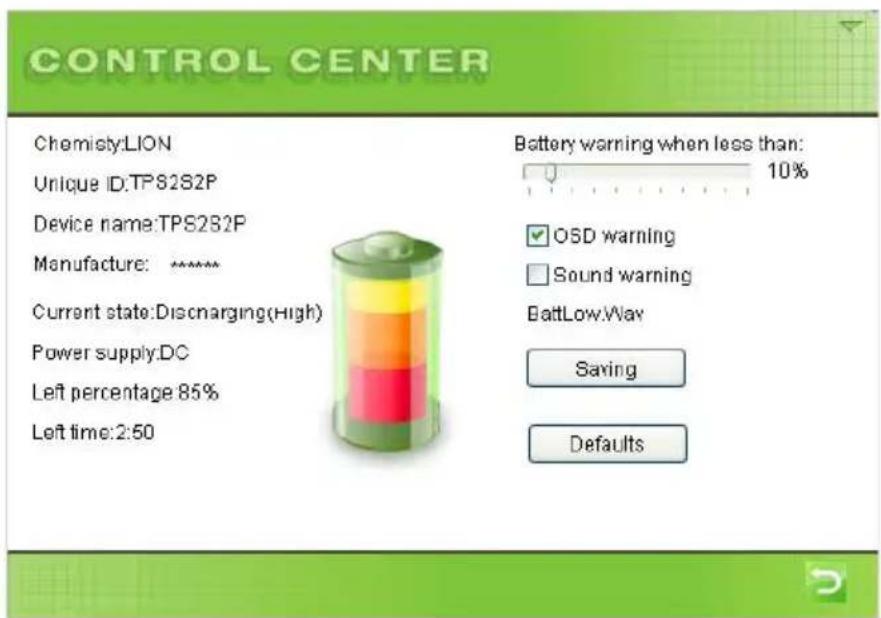
Click on the Battery icon on the home-page of the Control Center to view the system power supply information and change the auto-warning settings.
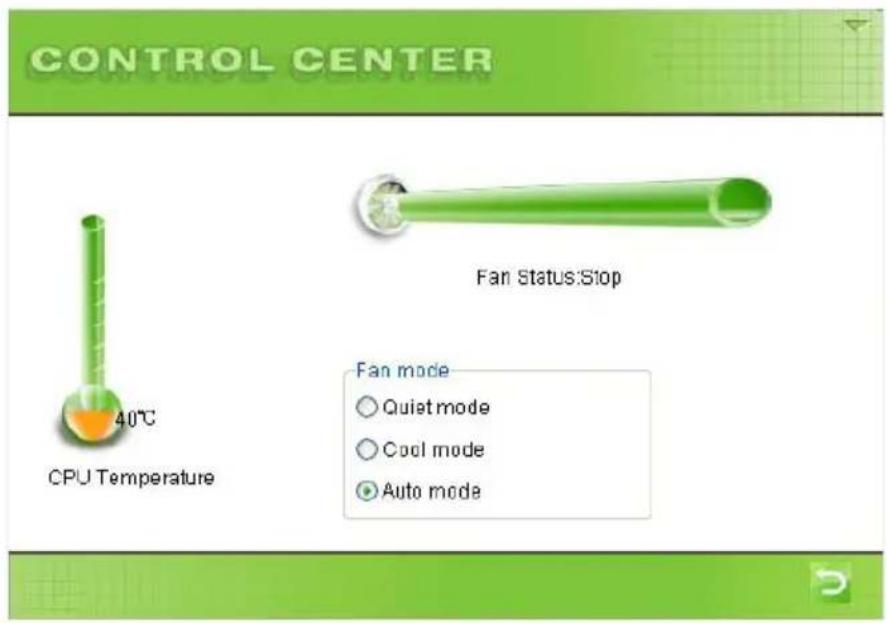
Click on the Cooling Control icon on the home-page of the control center to view the relevant CPU and fan information.
Click on the Display icon on the home-page of the Control Center to do the display settings and adjust the brightness of the LCD back light.
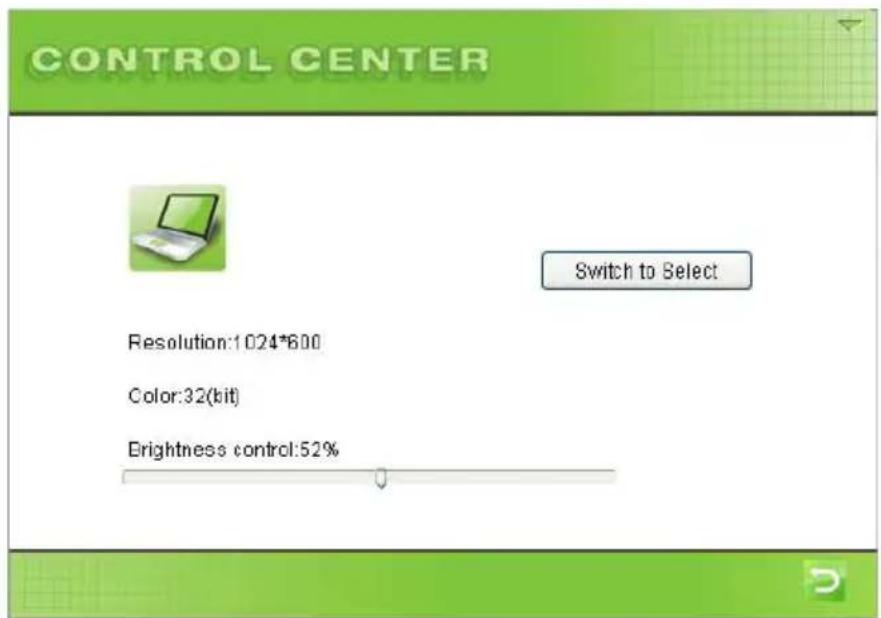
To adjust the settings of the externally connected monitor, click on the external monitor icon first to select it, then click on the Switch button.
[Note]: The Control Center would maximum show two display devices simultaneously.
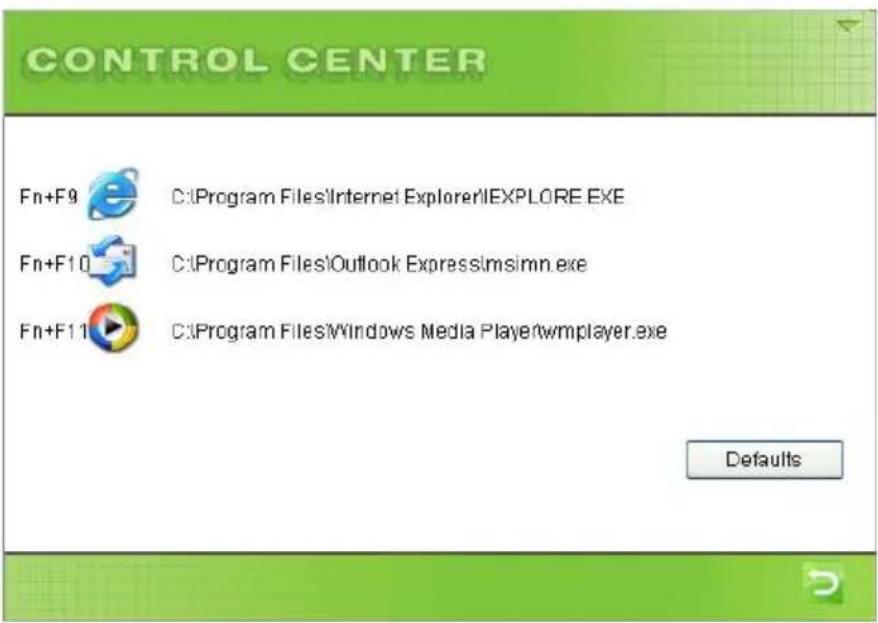
Click on the Shortcuts icon on the home-page of the Control Center to select the applications you want to be run when you press function key combinations. You can also restore the settings to their factory defaults.
Click on the Profile icon on the home-page of the Control Center to set up different power profiles.
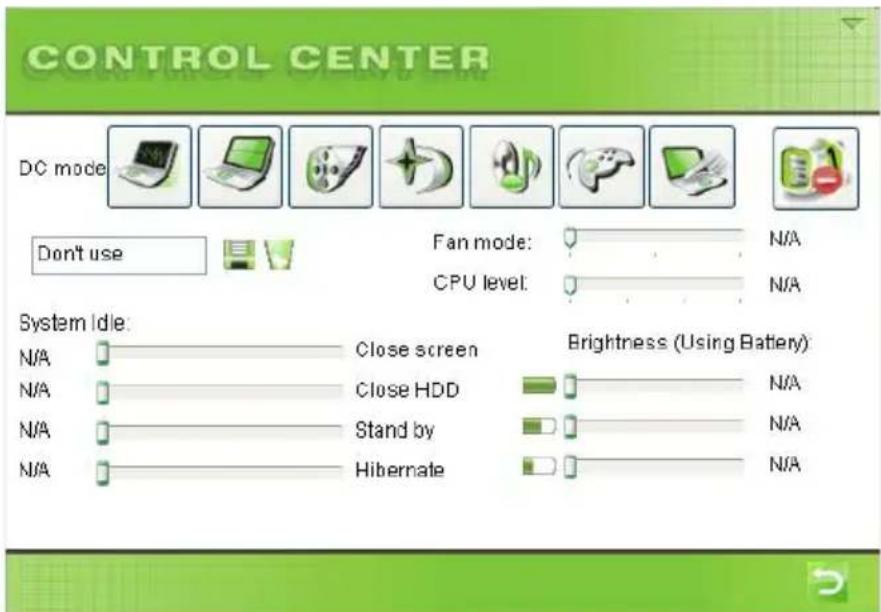
Windows XP operating system
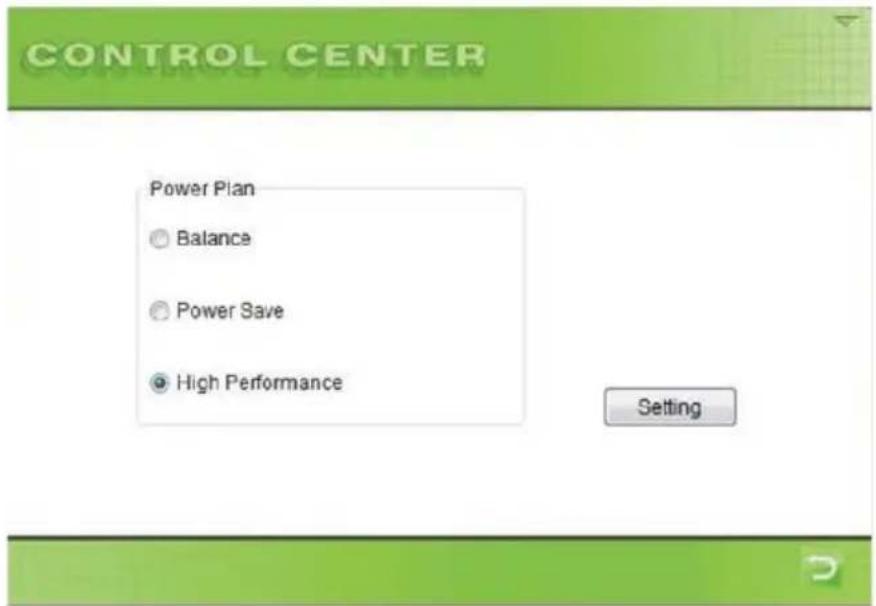
Windows Vista operating system
Click on the Device Control icon on the home-page of the Control Center to enable/disable certain modules of your VNB107.
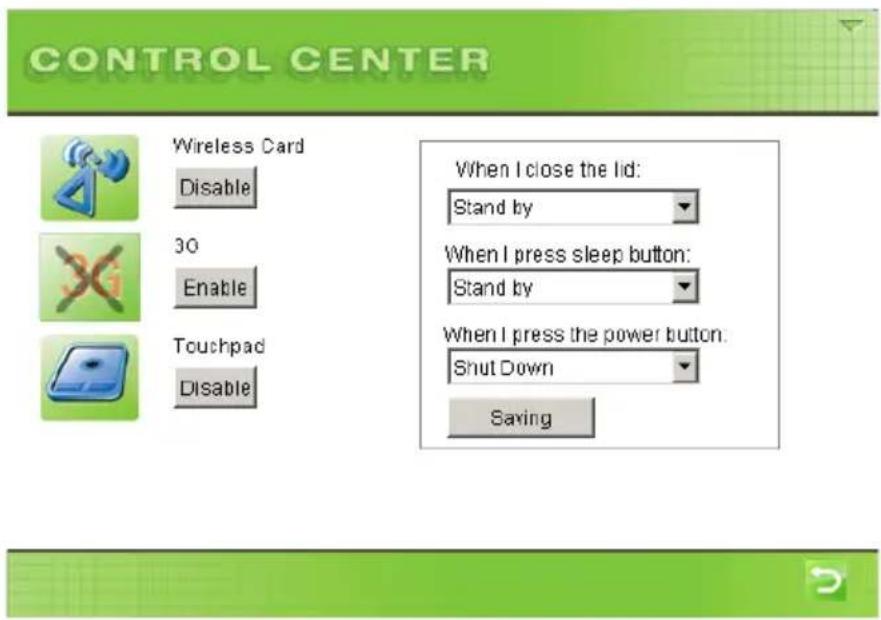
[Note]: The picture you would see here may be different due to hardware differences across models.
Customer Support
For technical support or product service, see the table below or contact your reseller.
NOTE: You will need the product serial number.
| Country/Region Website | T = TelephoneF = FAX | ||
| Australia/New Zealand www.viewsonic.com.au | AUS= 1800 880 818NZ= 0800 008 822 | service@au.viewsonic.com | |
| Canada www.viewsonic.com | T (Toll-Free)= 1-866-463-4775T (Toll)= 1-424-233-2533F= 1-909-468-1202 | service.ca@viewsonic.com | |
| Europe www.viewsoniceurope.com www.viewsoniceurope.com/uk/Support/Calldesk.htm | |||
| Hong Kong www.hk.viewsonic.com T= 852 3102 2900 service@hk.viewsonic.com | |||
| India www.in.viewsonic.com T= 1800 11 9999 service@in.viewsonic.com | |||
| Ireland (Eire) www.viewsoniceurope.com/uk/ | www.viewsoniceurope.com/uk/support/call-desk/ | service_ie@viewsoniceurope.com | |
| Korea www.kr.viewsonic.com T= 080 333 2131 service@kr.viewsonic.com | |||
| Latin America(Argentina) | www.viewsonic.com/la/ T= 0800 | 666 0194 soporte@viewsonic.com | |
| Latin America (Chile) www.viewsonic.com/la/ T= 800 440 303 | soporte@viewsonic.com | ||
| Latin America(Columbia) | www.viewsonic.com/la/ T= 01 800 | 915 6588 soporte@viewsonic.com | |
| Latin America (Mexico) | www.viewsonic.com/la/ | T= 001 800 514 6518 | soporte@viewsonic.com |
| Renta y Datos, 29 SUR 721, COL. LA PAZ, 72160 PUEBLA, PUE. Tel: 01.222.891.55.77 CON 10 LINEASElectroser, Av Reforma No. 403Gx39 y 41, 97000 Mérida, Yucatán. Tel: 01.999.925.19.16Other places please refer to http://www.viewsonic.com/la/soporte/index.htm#Mexico | |||
| Latin America (Peru) | www.viewsonic.com/la/ | T= 0800 53458 | soporte@viewsonic.com |
| Macau | www.hk.viewsonic.com T= 853 2870 0303 service@hk.viewsonic.com | ||
| Middle East | ap.viewsonic.com/me/ | Contact your reseller | service@ap.viewsonic.com |
| Puerto Rico & Virgin Islands | www.viewsonic.com | T= 1-800-688-6688 (English)T= 1-866-379-1304 (Spanish)F= 1-909-468-1202 | service.us@viewsonic.comsoporte@viewsonic.com |
| Singapore/Malaysia/Thailand | www.ap.viewsonic.com | T= 65 6461 6044 service@sg.viewsonic.com | |
| South Africa | ap.viewsonic.com/za/ | Contact your reseller | service@ap.viewsonic.com |
| United Kingdom | www.viewsoniceurope.com/uk/ | www.viewsoniceurope.com/uk/support/call-desk/ | service_gb@viewsoniceurope.com |
| United States | www.viewsonic.com | T (Toll-Free)= 1-800-688-6688T (Toll)= 1-424-233-2530F= 1-909-468-1202 | service.us@viewsonic.com |
Limited Warranty
VIEWSONIC® NETBOOK
What the warranty covers:
ViewSonic warrants its products to be free from defects in material and workmanship during the warranty period. If a product proves to be defective in material or workmanship during the warranty period, ViewSonic will, at its sole option, repair or replace the product with a similar product. Replacement Product or parts may include remanufactured or refurbished parts or components. The replacement unit will be covered by the balance of the time remaining on the customer's original limited warranty. ViewSonic provides no warranty for the third-party software included with the product or installed by the customer.
How long the warranty is effective:
ViewSonic Netbook products are warranted for (1) year from the first consumer purchase for parts and labor.
User is responsible for the back up of any data before returning the unit for service.
ViewSonic is not responsible for any data lost.
Who the warranty protects:
This warranty is valid only for the first consumer purchaser.
What the warranty does not cover:
- Any product on which the serial number has been defaced, modified or removed.
- Damage, deterioration or malfunction resulting from:
a. Accident, misuse, neglect, fire, water, lightning, or other acts of nature, unauthorized product modification, or failure to follow instructions supplied with the product.
b. Any damage of the product due to shipment.
c. Removal or installation of the product.
d. Causes external to the product, such as electrical power fluctuations or failure.
e. Use of supplies or parts not meeting ViewSonic's specifications.
f. Normal wear and tear.
g. Any other cause which does not relate to a product defect.
-
Any product exhibiting a condition commonly known as "image burn-in" which results when a static image is displayed on the product for an extended period of time.
-
Removal, installation, one way transportation, insurance, and set-up service charges.
How to get service:
- For information about receiving service under warranty, contact ViewSonic Customer Support (Please refer to Customer Support page). You will need to provide your product's serial number.
- To obtain warranty service, you will be required to provide (a) the original dated sales slip, (b) your name, (c) your address, (d) a description of the problem, and (e) the serial number of the product.
- Take or ship the product freight prepaid in the original container to an authorized ViewSonic service center or ViewSonic.
- For additional information or the name of the nearest ViewSonic service center, contact ViewSonic.
4.3: ViewSonic Netbook Warranty
Page 1 of 2 NB_LW01 Rev. 1a 02-11-09
Limitation of implied warranties:
There are no warranties, express or implied, which extend beyond the description contained herein including the implied warranty of merchantability and fitness for a particular purpose.
Exclusion of damages:
ViewSonic's liability is limited to the cost of repair or replacement of the product. ViewSonic shall not be liable for:
- Damage to other property caused by any defects in the product, damages based upon inconvenience, loss of use of the product, loss of time, loss of profits, loss of business opportunity, loss of goodwill, interference with business relationships, or other commercial loss, even if advised of the possibility of such damages.
- Any other damages, whether incidental, consequential or otherwise.
- Any claim against the customer by any other party.
- Repair or attempted repair by anyone not authorized by ViewSonic.
Effect of state law:
This warranty gives you specific legal rights, and you may also have other rights which vary from state to state. Some states do not allow limitations on implied warranties and/or do not allow the exclusion of incidental or consequential damages, so the above limitations and exclusions may not apply to you.
Sales outside the U.S.A. and Canada:
For warranty information and service on ViewSonic products sold outside of the U.S.A. and Canada, contact ViewSonic or your local ViewSonic dealer.
The warranty period for this product in mainland China (Hong Kong, Macao and Taiwan Excluded) is subject to the terms and conditions of the Maintenance Guarantee Card. For users in Europe and Russia, full details of warranty provided can be found in www.viewsoniceurope.com under Support/Warranty Information.
- Following information is only for EU-member states:
- R&TTE Compliance Statement C€!
- Important Safety Instructions
- Declaration of RoHS Compliance
- Copyright Information
- Product Registration
- For Your Records
- Product disposal at end of product life
- Contents
- Chapter 1: Preparing the netbook for use
- Chapter 2: Turning on the VNB107
- Chapter 3: Configuring BIOS, installing an operating system and drivers
- Chapter 4: Devices and interfaces
- Chapter 5: Control Center Functions
- User's Guide
- Chapter 1
- Preparing the netbook for use
- NO.1.1 Package contents
- NO.1.2 Insert the battery
- NO.1.3 Connect the power adapter
- Chapter 2
- Turning on the VNB107
- NO.2.1 Top View with the lid open
- NO.2.2 Turn on the VNB107
- NO.2.3 The function keys
- Chapter 3
- Configuring BIOS, installing an operating system and drivers
- NO.3.1 Installing an operating system
- NO.3.2 Other settings of the Setup CMOS Utility
- NO.3.3 Installing the drivers
- Chapter 4
- Devices and interfaces
- Chapter 5
- Control Center Functions
- NO.5 Using the Control Center
- System Information
- Customer Support
- Limited Warranty
- VIEWSONIC® NETBOOK
- What the warranty covers:
- How long the warranty is effective:
- Who the warranty protects:
- What the warranty does not cover:
- How to get service:
- Limitation of implied warranties:
- Exclusion of damages:
- Effect of state law:
- Sales outside the U.S.A. and Canada:
Brand : VIEWSONIC
Model : ViewBook VNB107
Category : Laptop