
M1STB09 - Receiver MATSUI - Free user manual and instructions
Find the device manual for free M1STB09 MATSUI in PDF.


| Product Type | Digital Terrestrial Receiver (Set-top box) |
| Brand | Matsui |
| Model | M1STB09 |
| Dimensions (approx) | 20 cm x 15 cm x 5 cm |
| Weight (approx) | 0.5 kg |
| Power Supply | 5V DC, 1A via external adapter |
| Input Connections | Antenna (RF), USB 2.0 |
| Output Connections | HDMI, AV (RCA composite), Optical audio |
| Video Resolution | Up to 1080p Full HD |
| Supported Standards | DVB-T/T2, MPEG-2/4, H.264 |
| USB Playback | Yes (video, music, photo) |
| Remote Control | IR remote included |
| Electronic Program Guide (EPG) | Yes, 7-day |
| Parental Lock | Yes |
| Maintenance | Clean with a soft, dry cloth. Do not use liquids. |
| Safety Warnings | Keep away from water, heat sources, and direct sunlight. Do not cover ventilation slots. |
| Spare Parts & Repair | Not user-serviceable. For repairs, contact authorized service center. |
| General Information | Free-to-view digital TV receiver with recording capability via USB. |
Frequently Asked Questions - M1STB09 MATSUI
User questions about M1STB09 MATSUI
0 question about this device. Answer the ones you know or ask your own.
Ask a new question about this device
Download the instructions for your Receiver in PDF format for free! Find your manual M1STB09 - MATSUI and take your electronic device back in hand. On this page are published all the documents necessary for the use of your device. M1STB09 by MATSUI.
USER MANUAL M1STB09 MATSUI
natural_image
Exterior view of a black wireless router device (no visible text or symbols on body)Contents
Unpacking the Set-top Box ....3
Product Overview......4
Remote Control Overview ....5
- Battery replacement of the remote control....6
- Handling the Batteries....6
- Handling the Remote Control....6
- Remote control operation range ....6
System Connection....7
Connecting to the Mains Socket ....7
- First Time Installation......8
- Volume Adjustment....8
- Channel Selection....8
- EPG (Electronic Program Guide ......9
- Customising the Channel Settings 10
- Creating the Favourite TV/Radio Channel List....10
- Finding Channels in the TV/Radio Channel List 12
- Sorting Channels in the TV/Radio Channel List.... 12
- Moving the Channel order in the TV/Radio Channel List 13
- Deleting Channels....14
-
Renaming Group 15
-
Customising the Installation Settings 16
-
Auto Scan 16
- Channel Scan 17
- Tuner Setting....18
-
Service Language 19
-
Customising the Setup Settings ......20
-
Setting the Timer 20
-
Other Setup Settings....22
-
Customising the Tools Settings ......23
Hints and Tips ......24
Specifications....25
Safety Warnings....26
Unpacking the Set-top Box
Remove all packaging from the set-top box. Retain the packaging. If you dispose it please do so according to local regulations.
- Set-top Box

- Remote Control

(P.N.: BM02-003)
- AAA Battery X 2
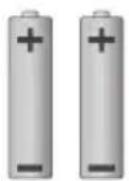
(P.N.: BM02-008)
- Quick Start Guide

(P.N.: BM02-005A-R2)
- Instruction Maunal

(P.N.: BM02-005B-R2)
If items are missing or damaged, please contact partmaster (UK only). Tel: 0870 6001 338 for assistance.
GB-3
Product Overview
Front Panel

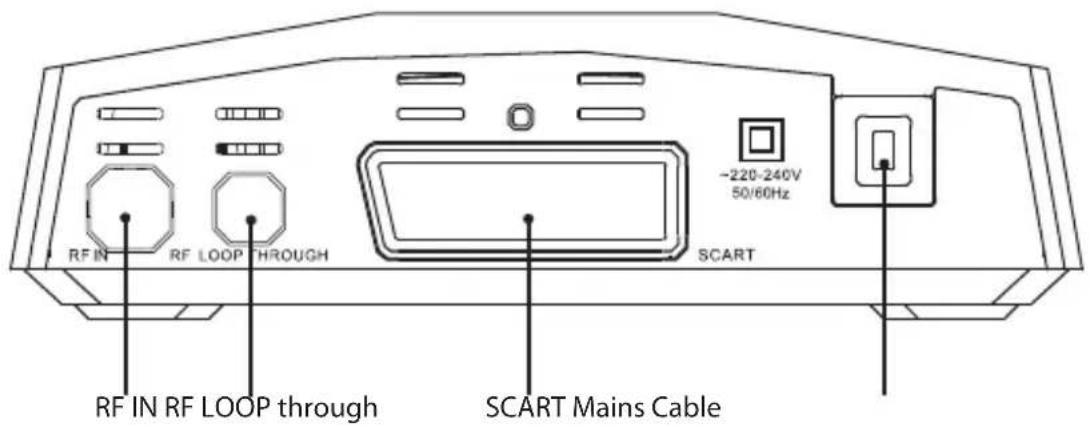
Rear Panel
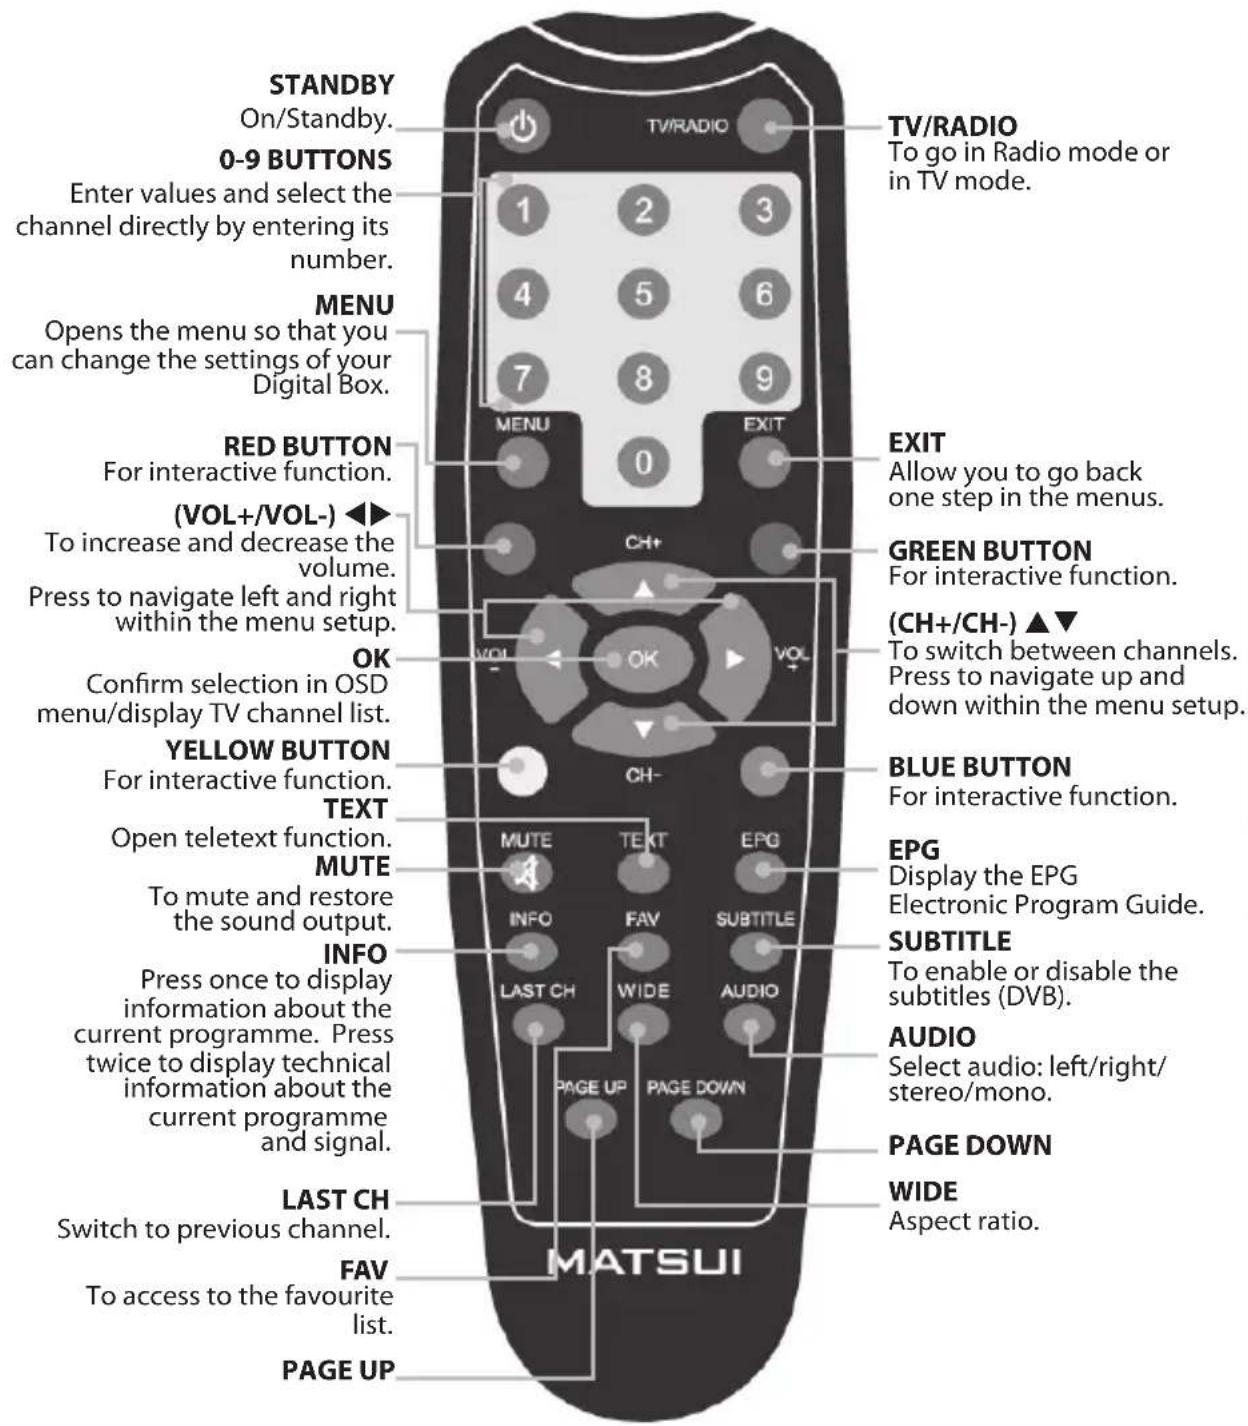
Remote Control Overview
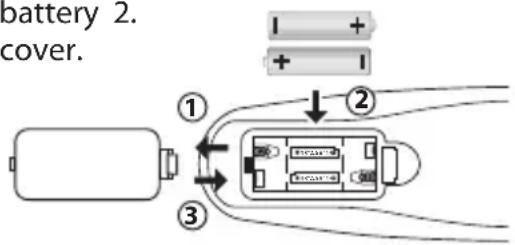
Battery replacement of the remote control
Remove the battery compartment cover.1.
Load two AAA (UM-4 or R03) batteries into the battery 2.
compartment. Close the battery compartment cover.

Install the batteries correctly by following the polarity (+ and -) indications in the battery compartment.
Handling the Batteries
Take care of your fingernails when you press and hold the battery release tab.
Improper or incorrect use of batteries may cause corrosion or battery leakage, which could cause fire, personal injury or damage to property.
Install the batteries correctly by following the polarity (+ and -) indications in the battery compartment.
When the batteries are exhausted, the remote will not function. Replace both • batteries at the same time with new ones.
Use only the types of the batteries which are indicated in this manual.
Do not install new batteries with used ones and do not mix different types of • batteries.
Do not dispose of the used batteries as domestic waste. Dispose of them in accordance with the local regulations.
Handling the Remote Control
Do not drop or cause impact to the remote control.
Do not spill water or any liquid on the remote control.
- Do not place the remote control on a wet object.
- Do not place the remote control under direct sunlight or near sources of excessive heat.
- Remove the battery from the remote control when not in use for a long period of time, as it could cause corrosion or battery leakage and may result in physical injury and/or property damage including fire.
Remote control operation range
Point the remote control unit within
approx. 6 metres from the remote control sensor on the set-top box and within 60^ in front of the set-top box.
The operating distance may vary depending on the brightness of the room.

System Connection

flowchart
graph TD
    A["Aerial wall socket"] -->|Aerial| B["RF coaxial cable"]
    B --> C["SCART cable"]
    C --> D["TV"]
    D --> E["Main Socket"]
    E --> F["Mains cable"]
    F --> G["Main Socket"]
    H["Aerial"] --> I["RF coaxial cable"]
    I --> J["SCART socket"]
    J --> K["Main Socket"]
    style A fill:#f9f,stroke:#333
    style B fill:#ccf,stroke:#333
    style C fill:#cfc,stroke:#333
    style D fill:#fcc,stroke:#333
    style E fill:#cff,stroke:#333
    style F fill:#ffc,stroke:#333
    style G fill:#fcc,stroke:#333
    style H fill:#fff,stroke:#333
    style I fill:#fff,stroke:#333
    style J fill:#fff,stroke:#333
    style K fill:#fff,stroke:#333
※ RF coaxial cable and SCART cable are not supplied with this set-top box.
Make sure your TV and any other equipment you are connecting to are switched off.1. Connect one end of the RF coaxial cable (not supplied) to the aerial socket on the 2. wall and the other end of the cable to the RF IN socket on the back of the set-top box receiver.
Connect a SCART cable (not supplied) between the TV SCART socket on the back panel 3. of the set-top box receiver and the SCART socket on your TV.
Connect another RF coaxial cable (not supplied) between the RF LOOP socket on the 4. back panel of the set-top box receiver and the RF IN socket on your TV.
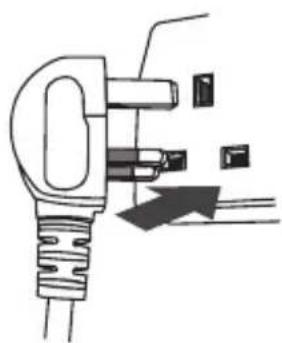
Connecting to the Mains Socket
Plug in the mains plug into the mains socket after you have 1. completed all the connections.
The green power indicator on the front panel will illuminate.2.
natural_image
Diagram of an electrical plug with a black arrow indicating direction (no text or symbols present)GB-7
1. First Time Installation
- When your set-top box is switched on for the first time, an Easy Install Menu will be displayed.

- Use the ◀▶ buttons to select the Region and that you are operating the set-top box. The OSD Language is set as English.
- Press the ▼ button to highlight the OK on the screen and press the OK button on the remote control to begin the channel scan.
2. Volume Adjustment
- Press the VOL+/- button to adjust the volume.

- Press the Mute ✗ button to switch the sound off. Press the Mute ✗ button again or press the VOL+/- button to cancel this function.
3. Channel Selection
- Press the CH+/- button repeatedly or 0-9 buttons to select the channel.
- Press the OK button to enter the List of Channels. Then use the ▲▼ buttons to highlight and select the channel. Press the OK button to watch.
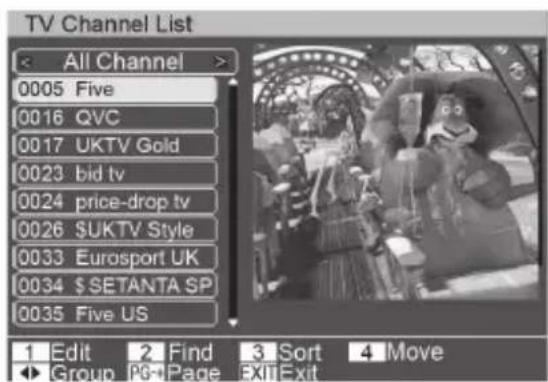
- Press the Last CH button to return to the channel you previously watched.
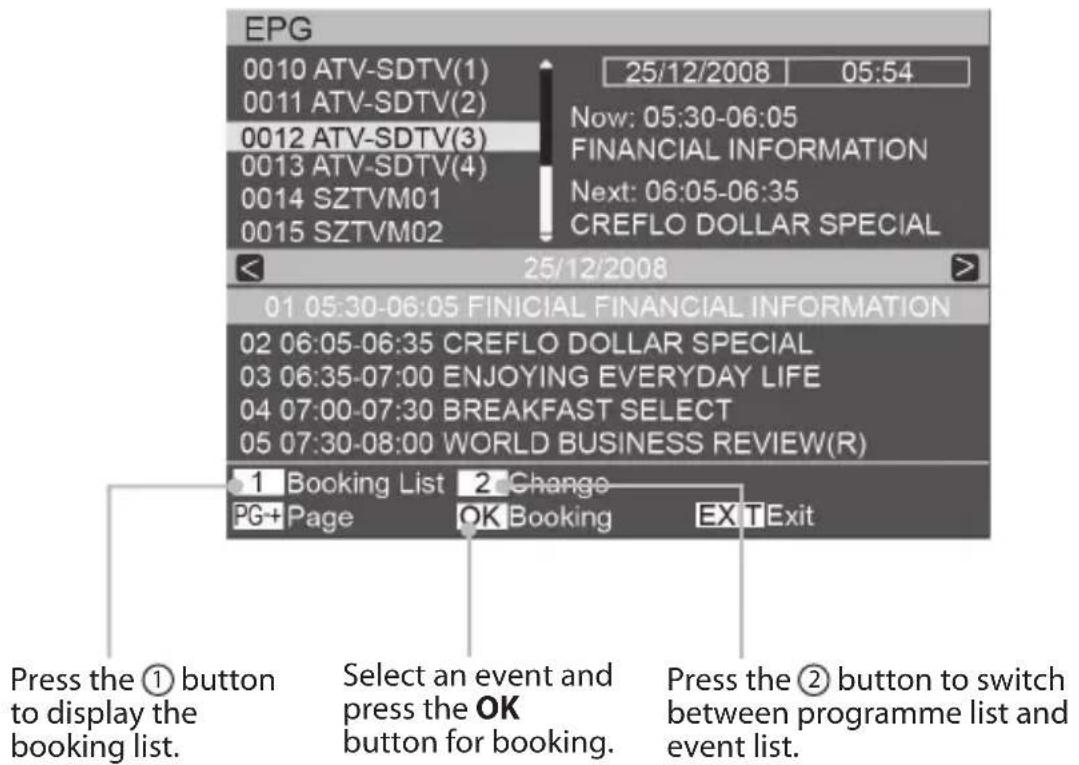
4. EPG (Electronic Program Guide)
Press the EPG button to display all the information of the Channels.
5. Customising the Channel Settings
Press the Menu button and use the ▲▼ buttons to select Channel. Press the OK button to confirm.

Press the ▲▼ buttons to select TV/Radio Channel List and then press the OK button to confirm.


Creating the Favourite TV/Radio Channel List
You can create up to 8 favourite channel group.
- In the TV/Radio Channel List, press the ▲▼ buttons to select your favourite channel. Press the ① button to edit the selected channel, then press the OK button to confirm. You can see the “√” icon at the end of program title.


GB-10


- Press the ① button to show the Group Menu then press the ▲▼ buttons to select a Group Name which you want to store your favourite channel in.
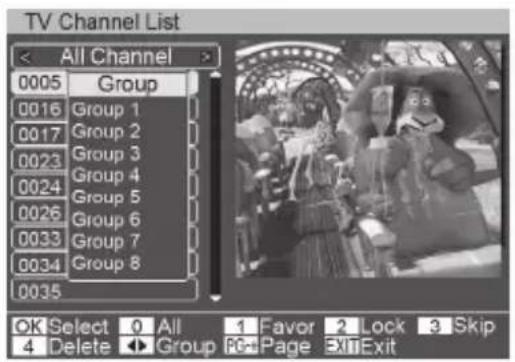

Press the OK button to confirm. The screen will pop up the below menu.

Press the ◀▶ buttons to select "Yes" and then press the OK button to confirm.
-
Switching between the All Channel List and Favourite Channel List In the TV Channel List, press the ◀▶ buttons to switch between All Channel List and various Favourites Group Channel List.
-
Switching between the different Favourites Channel List Press the FAV button, a Favourites Channel Group List will be displayed for selection. Press the ▲▼ buttons to select the Group number.
-
Selecting the channel within the Favourites Channel List After you selected the Favourites Channel Group, press the OK button to show the channel list and press the ▲▼ buttons.

Finding Channels in the TV/Radio Channel List
- In the TV/Radio Channel List, press the ② button to display the keypad. Press the ▲▼◀▶ buttons to select characters and press the OK button after keying in the first few character of the channel title.

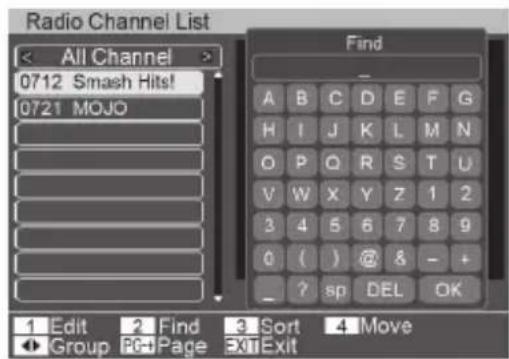
- Press the ▲▼◀▶buttons to select OK on the keypad and press the OK button to confirm. Your desired channel will be listed.
Sorting Channels in the TV/Radio Channel List
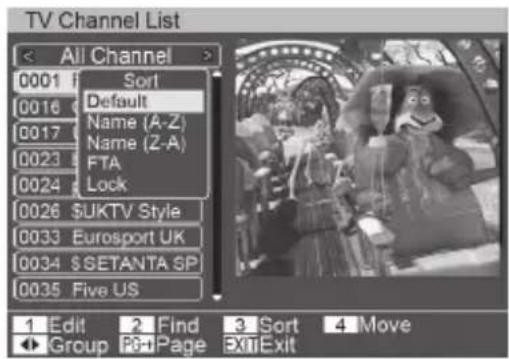
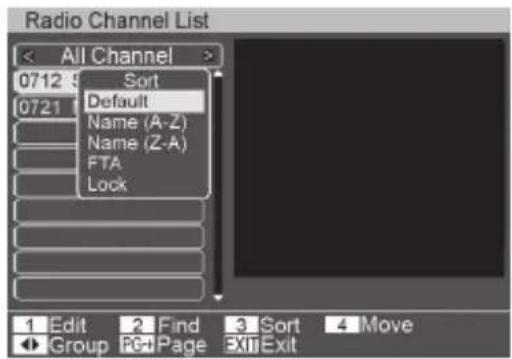
- In the TV/Radio Channel List, press the ③ button to sort channels.


- Press the ▲▼ buttons to move the highlight and press the OK button to select the sorting method such as Default/Name (A-Z)/ Name (Z-A)/ FTA/ Lock.
GB-12
Moving the Channel order in the TV/Radio Channel List
- In the TV/Radio Channel List, press the ④ button to select and move the channel. You will find a preview screen on the right side of the selected channel as above example.
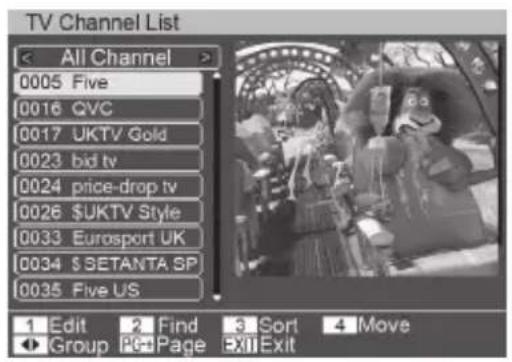

- Press the ▲▼ buttons to move the selected channel to the position that you want to place it.


Press the OK button to confirm. The screen will pop up the below menu.

Press the ◀▶ buttons to select "Yes" and then press the OK button to confirm.
Deleting Channels
- Press the Menu button and use the ▲▼ buttons to select Channel. Press the OK button to confirm.

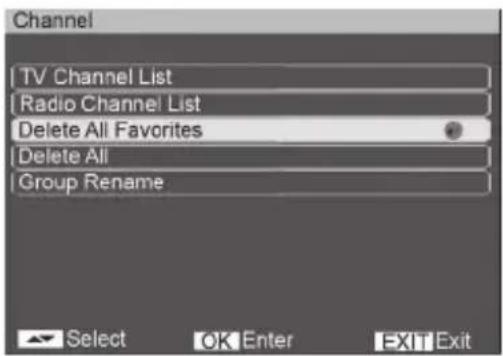
- Press the ▲▼ buttons to select Delete All Favorites and then press the OK button. Press the ◀▶ buttons to select "Yes" then press the OK button to delete all favourite channels.
Press the ▲▼ buttons to select Delete All and then press the OK button.
Input password "0000" and press the ◀▶ buttons to select "Yes" then press the OK button to delete all tuned channels.

Renaming Group
- Press the Menu button and use the ▲▼ buttons to select Channel. Press the OK button to confirm.
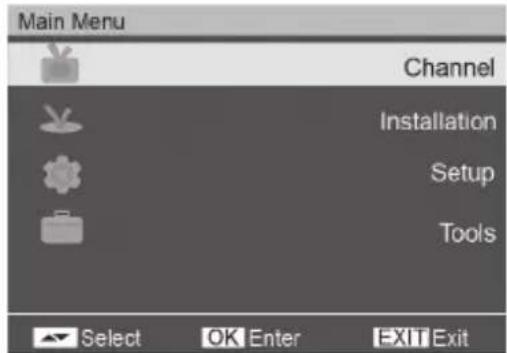
- Press the ▲▼ buttons to select Group Rename and then press the OK button to confirm. The group list will be shown on the screen.

- Press the ▲▼ buttons to select the group you want to rename. Press the OK button to confirm and display the keypad.

- Press the ▲▼◀▶ buttons to select characters and press the OK button to keying in the selected character.
Press the ▲▼◀▶ buttons to select OK on the keypad and press the OK button to confirm the group name you have entered.
6. Customising the Installation Settings
Auto Scan
- Press the Menu button and use the ▲▼ buttons to select Installation. Press the OK button to confirm.

- Press the ▲▼ buttons to select Auto Scan and then press the OK button to confirm.
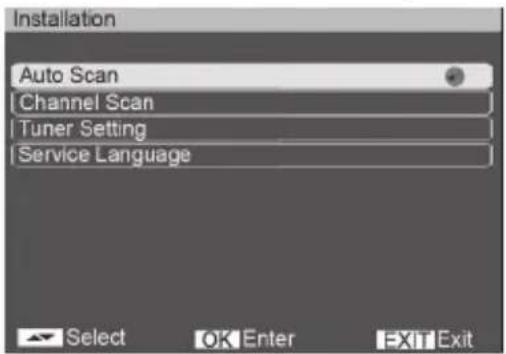
- Press the ◀▶ buttons to select All/Free.
Press the ▲▼ buttons to highlight Search and press the OK button to confirm the channel search. Press the ◀▶ buttons to select "Yes" then press the OK button to start the channel scanning.

When Auto Scan finished, the last channel on the list will be shown on the screen.
Channel Scan
- Press the Menu button and use the ▲▼ buttons to select Installation. Press the OK button to confirm.

- Press the ▲▼ buttons to select Channel Scan and then press the OK button to confirm.
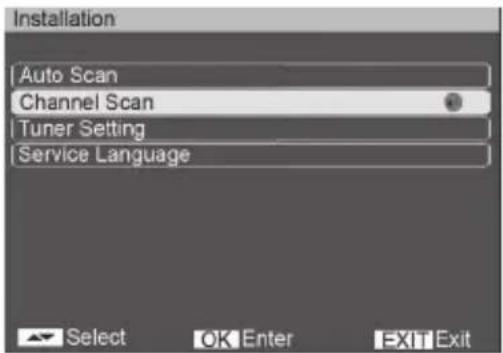
- Press the ▲▼◀▶ buttons set the appropriate parameter. Press the ▼ button to highlight Search and press the OK button to start the channel scanning.

After the Channel Scan finished, the last channel on the list will be shown on the screen.
Tuner Setting
- Press the Menu button and use the ▲▼ buttons to select Installation. Press the OK button to confirm.

- Press the ▲▼ buttons to select Tuner Setting and then press the OK button to confirm.
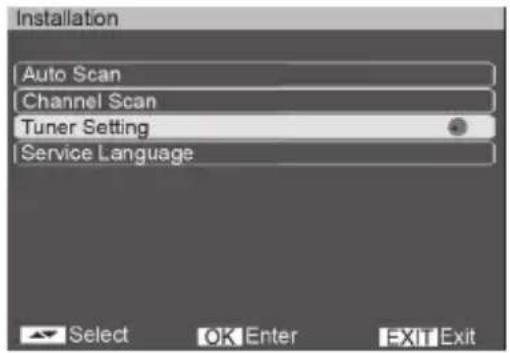
- Press the ◀▶ buttons to power on or power off the tuner.

Service Language
- Press the Menu button and use the ▲▼ buttons to select Installation. Press the OK button to confirm.
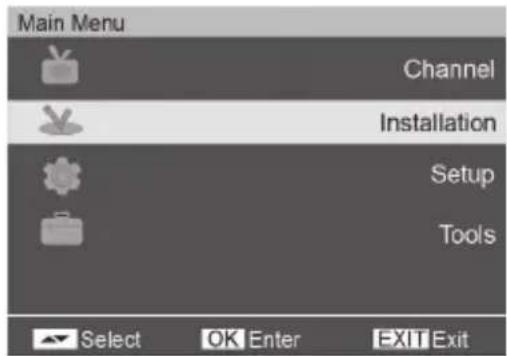
- Press the ▲▼ buttons to select Service Language and then press the OK button to confirm.

- Press the ◀▶ buttons to select the Service Language: English, Gaelic, Welsh.

- Press the ▲▼ buttons to highlight the Update button and press the OK button to change the language for the TV Program's name.
7. Customising the Setup Settings
Press the MENU button to display the Main Menu. Press the ▲▼ buttons to select the Setup option and press the OK button to enter the System Setup.

Setting the Timer
- Press the ▲▼ buttons to select Timer Setting and then press the OK button to confirm.

- There are two options under Timer Setting: Program Timer and Sleep Timer.
![Timer Setup Program Timer [Sleep Timer] Select OK Enter EXIT Exit](/content/2026/05/995816/images/a5a2e58b245b1c70aa0e87f84669dea11ddf494cfd841b3dcd92198457b35ae9.jpg)

GB-20
Program Timer•
In this menu, you can set maximum 8 timers to turn on the Set-top box for watching.

Sleep Timer•
In this menu, you can set a time duration before the Set-top box goes into Standby mode. The maximum time duration is 120 min.


The unit will automatically switch to standby mode 3 hours after the last time the remote control was used. An auto standby reminder will pop up, press any button on the remote control to continue viewing.
Other Setup Settings
Press the ▲▼ buttons to navigate in the System Setup Menu. Press the OK button to enter the options. Press the ▲▼◀▶ buttons to change settings.


flowchart
graph TD
    A["System Setup OSD Language"] --> B["TV System Aspect Ratio"]
    B --> C["Video Output — RGB/CVBS"]
    B --> D["LCN Mode — On/Off"]
    A --> E["Region and Time Region"]
    E --> F["GMT Usage — User Default/By Region/Off"]
    E --> G["GMT Offset"]
    E --> H["Date"]
    E --> I["Time"]
    E --> J["Summer Time"]
    E --> K["Time Display On/Off"]
    A --> L["Timer Setting Program Timer"]
    L --> M["Sleep Timer"]
    A --> N["OSD Setting Subtitle Display"]
    N --> O["OSD Transparency — 10/20/30/40/50%/Off"]
    N --> P["OSD Style — Style 1/Style 2"]
    N --> Q["Load Default OSD Setting"]
    A --> R["Parental Lock"]
    R --> S["Menu Lock — ON/OFF"]
    R --> T["Channel Lock — OFF/Manual/age: 4/age: 5/.../age: 18"]
    R --> U["New password"]
    R --> V["Confirm password"]
    V --> W["(Channels or menu operations can be locked using password. The default password is "0000")"]

If you forgot your password, you can use the master password (3330) to regain the access of the Parental Lock Menu prior changing your user password again.
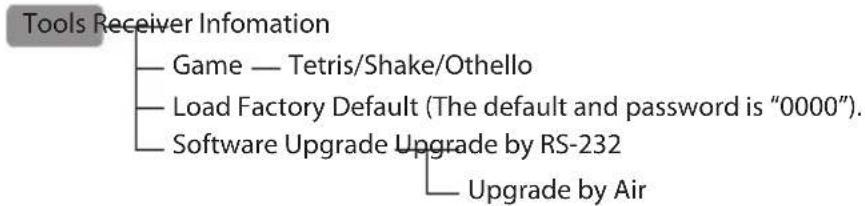
8. Customising the Tools Settings
- Press the MENU button to display the Main Menu. Press the ▲▼ buttons to select the Tools option and press the OK button to confirm.


- Press the ▲▼◀▶ buttons and the OK button to change the following settings.
Hints and Tips
In some regions, the digital terrestrial signal may be weak. Please ensure that your antenna is suitable for your location.
| Problem Possible cause What to do | ||
| No signal found Aerial is | disconnected.•Aerial is damaged/ •misaligned.Out of a digital signal area. | Check aerial connection.•Check aerial.•Check with dealer. |
| No picture or sound The | unit is in Standby mode. Turn on the unit by pressing the ⏻ button of the remote control. | |
| Encrypted program message | Channel is encrypted. | Select alternative channel. |
| No response from remote control | • Receiver is off.• Remote control is not being aimed at the receiver correctly.• Front panel is obstructed.• Batteries are exhausted. | • Plug in and turn on.• Aim handset at front panel.• Check for obstructions.• Check and replace the batteries in the remote control. |
| Forgotten channel lock code | Delete locked channel and scan channels again. | |
| Forgotten menu lock code | Master password : 3330 | |
| After moving the STB to another room you find you are no longer able to receive digital reception. | The aerial feed to the new aerial point may come through a distribution system which may reduce the digital signal now being received by the set-top box. | Try a direct feed from the antenna. |
Specification
| Model Matsui M1STB09 | |
| RF Turner & Connections RF Input Connector x 1(D-Type, IEC169-2, Female) | |
| DecoderTransport StreamProfile LevelInput RateVideo FormatsAudio FormatVideo Output | MPEG-2 ISO/IEC13818-1MPEG-2 Main Profile @Main Level |
| Max. 15Mbit/s4:3/16:9 SwitchableMPEG Layer I & II, 32/44.1/48KHzCVBS, RGB | |
| ConnectionMains CableTunerSCART | Fixed TypeAntenna Input x 1, RF Output x 1TV x 1 |
| Power SupplyInput VoltagePower Consumption | 220V-240V AC 50/60HzMax. 8W |
Safety Warnings
Read all the instructions carefully before using the unit and keep them for future reference.
Retain the manual. If you pass the unit • onto a third party make sure to include this manual.
Check that the voltage marked on the rating label matches your mains voltage.
Damage
Please inspect the unit for damage after • unpacking.
Do not continue to operate the unit if you are in any doubt about it working normally, or if it is damaged in any way - switch off, withdraw the mains plug and consult your dealer.
Location of Unit
The unit must be placed on a flat stable surface and not subjected to vibrations.
Do not place the unit on sloped or • unstable surfaces as the unit may fall off or tip over.
The mains socket must be located near the unit and should be easily accessible.
This unit is designed for indoor use only.
Temperature
Avoid extreme degrees of temperature, • either hot or cold. Place the unit well away from heat sources such as radiators or gas/electric fires.
Avoid exposure to direct sunlight and other sources of heat.
Naked Flames
Never place any type of candle or naked • flame on the top of or near the unit.
GB-26
Moisture
- To reduce the risk of fire, electric shock or product damage, do not expose this unit to rain, moisture, dripping or splashing. No objects filled with liquids, such as vases, should be placed on the unit. If you spill any liquid into the unit, it can cause serious damage. Switch it off at the mains immediately. Withdraw the mains plug and consult your dealer.
Ventilation
- To prevent the risk of electric shock or fire hazard due to overheating, ensure that curtains and other materials do not obstruct the ventilation vents.
- Do not install or place this unit in a bookcase, built-in cabinet or in another confined space. Ensure the unit is well ventilated.
Safety
- Always disconnect the unit from the mains supply before connecting/disconnecting other devices or moving the unit.
Mains Cable
Make sure the unit or unit stand is not • resting on top of the mains cable, as the weight of the unit may damage the mains cable and create a safety hazard.
- If the mains cable is damaged it must be replaced by the manufacturer, its service agent, or similarly qualified persons in order to avoid a hazard.
Interference
- Do not place the unit on or near appliances which may cause electromagnetic interference. If you do, it may adversely affect the working of the unit, and cause a distorted sound.
Standby
The ⏻ button on the remote control does not switch off the unit completely. The unit will continue to draw electricity from the mains supply while in standby. In the interests of safety and to avoid unnecessary energy consumption, never leave the unit in standby while unattended for long periods of time, e.g. overnight, while on holiday or while out of the house. Switch it off and disconnect the mains plug from the mains socket.
Batteries
Batteries used in the remote control for this unit are easily swallowed by young children and this is dangerous.
Keep loose batteries away from young • children and make sure that the battery holder tray is secure in the remote control. Seek medical advice if you believe a cell has been swallowed.
Please dispose of batteries correctly by following the guidance in this manual.
Supervision
Children should be supervised to ensure that they do not play with the unit and the remote control.
Never let anyone especially children • push anything into the holes, slots or any other openings in the case - this could result in a fatal electric shock.
Service
To reduce the risk of electric shock, do not remove screws. The unit does not contain any user-serviceable parts.
Please leave all maintenance work to qualified personnel.
Do not open any fixed covers as this may expose dangerous voltages.
Maintenance
Ensure to unplug the unit from the mains • socket before cleaning.
Do not use any type of abrasive pad or abrasive cleaning solutions as these may damage the unit's surface.
Do not use liquids to clean the unit.

CAUTION
RISK OF ELECTRIC SHOCK DO NOT OPEN


The lightning flash with arrowhead symbol, within an equilateral triangle, is intended to alert the user to the presence of uninsulated “dangerous voltage” within the product’s enclosure that may be of sufficient magnitude to constitute a risk of electric shock.

The exclamation point within an equilateral triangle is intended to alert the user to the presence of important operating and maintenance (servicing) instructions in the manual accompanying the appliance.
| NOTE: If you require a replacement for any of the items listed below, please quote their corresponding part numbers: | |
| Replacement Part Part Number | |
| Remote Control BM02-003 | |
| AAA Battery BM02-008 | |
| Quick Start Guide BM02-005A-R2 | |
| Instruction Manual BM02-005B-R2 | |

Visit Partmaster.co.uk today for the easiest way to buy electrical spares and accessories. With over 1 million spares and accessories available we can deliver direct to your door
the very next day. Visit www.partmaster.co.uk or call 0870 6001 338 (UK customers only) Calls charged at National Rate.

natural_image
Symbol of a trash bin crossed out by two crossed lines, with no text or numbers present.This symbol on the product or in the instructions means that your electrical and electronic equipment should be disposed at the end of its life separately from your household waste. There are separate collection systems for recycling in the EU.
For more information, please contact the local authority or your retailer where you purchased the product.
Notes for battery disposal
The batteries used with this product contain chemicals that are harmful to the environment. To preserve our environment, disposal of used batteries according to your local laws or regulations. Do not dispose of batteries with the normal household waste.
For more information, please contact the local authority or your retailer where you purchased the product.
The FREEVIEW word and logo are trademarks of DTV Services LTD and are used under licence. © DTV Services Ltd 2002.
All trademarks are the property of their respective owners and all rights are acknowledged.
DSG Retail Ltd. Maylands Avenue Hemel Hempstead
Hertfordshire HP2 7TG England
(P.N.: BM02-005B-R2)
- Contents
- Unpacking the Set-top Box
- Product Overview
- Remote Control Overview
- Battery replacement of the remote control
- Handling the Batteries
- Handling the Remote Control
- Remote control operation range
- System Connection
- Connecting to the Mains Socket
- First Time Installation
- Volume Adjustment
- Channel Selection
- EPG (Electronic Program Guide)
- Customising the Channel Settings
- Creating the Favourite TV/Radio Channel List
- Finding Channels in the TV/Radio Channel List
- Sorting Channels in the TV/Radio Channel List
- Moving the Channel order in the TV/Radio Channel List
- Deleting Channels
- Renaming Group
- Customising the Installation Settings
- Auto Scan
- Channel Scan
- Tuner Setting
- Service Language
- Customising the Setup Settings
- Setting the Timer
- Program Timer•
- Sleep Timer•
- Other Setup Settings
- Customising the Tools Settings
- Hints and Tips
- Safety Warnings
- Damage
- Location of Unit
- Temperature
- Naked Flames
- Moisture
- Ventilation
- Safety
- Mains Cable
- Interference
- Standby
- Batteries
- Supervision
- Service
- Maintenance
- Notes for battery disposal
Brand : MATSUI
Model : M1STB09
Category : Receiver