
DTR1 - Receiver MATSUI - Free user manual and instructions
Find the device manual for free DTR1 MATSUI in PDF.


| Product Type | Free-to-air Digital TV Receiver (DVB-T) |
| Brand | Matsui |
| Model | DTR1 |
| Dimensions (W x H x D) | 307 x 210 x 46 mm |
| Weight | 1.7 kg |
| Power Supply | 230-240V AC, 50Hz |
| Power Consumption | 12 W max |
| Processor | STI5518 32-bit @ 81 MHz |
| Memory | Flash 2 Mbyte, SDRAM 16 Mbyte, EEPROM 32 Kbit |
| Reception Frequency | 474-858 MHz |
| Signal Level | -82 dBm |
| Transmission Standards | DVB-T, MPEG-2 |
| Video Output | MP@ML, PAL, 4:3/16:9 |
| Audio Output | MPEG Layer I & II, 32/44.1/48 kHz |
| Connections | UHF aerial input, UHF aerial loopthrough, TV SCART, Left/Right Audio, RS-232 |
| Remote Control Batteries | 2 x AAA (not included) |
| Main Functions | Electronic Programme Guide (EPG), Digital Teletext, Channel Lock, Favourite Channels, Timer Recording, Subtitle Support, Multi-language Audio, Widescreen Switching (16:9/4:3), Over Air Download |
| Cleaning | Unplug receiver, use lightly dampened cloth only; no liquid or aerosol cleaners |
| Safety Notes | Do not cover ventilation slots; avoid heat, moisture, and naked flames; unplug during lightning storms |
| Spare Parts & Repairability | Use manufacturer-specified or equivalent parts; service only by qualified personnel at Matsui authorised service centre |
Frequently Asked Questions - DTR1 MATSUI
User questions about DTR1 MATSUI
0 question about this device. Answer the ones you know or ask your own.
Ask a new question about this device
Download the instructions for your Receiver in PDF format for free! Find your manual DTR1 - MATSUI and take your electronic device back in hand. On this page are published all the documents necessary for the use of your device. DTR1 by MATSUI.
USER MANUAL DTR1 MATSUI
Free to View Digital TV Receiver
USER MANUAL
SAFETY
POWER
The receiver should be plugged into a 230V to 240V AC, 50Hz supply only.
LEADS
Ensure the power supply lead, and all other leads, are positioned so they are not likely to be walked on or pinched by things placed on or against them. Pay particular attention to the power lead, where it enters the mains plug and where it comes out of the receiver. Do not connect or adjust leads when the receiver is plugged in.
TEMPERATURE AND MOISTURE
Do not leave or use the receiver in a hot, cold or humid area. Do not allow the receiver to get wet - from drips or splashes - as this may be dangerous. Do not place water-filled objects such as flower vases, on top of the receiver.
VENTILATION
Slots and openings in the receiver's cover are for ventilation. Do not cover or block them as this could lead to overheating.
CLEANING
Unplug the receiver before it is cleaned. Use a lightly dampened cloth only. Do not use liquid or aerosol cleaners.
HEAT AND FLAMES
The receiver should not be placed near to naked flames or sources of intense heat, such as an electric fire. Ensure that no naked flames sources, such as lighted candles, are placed on top of the Receiver.
LIGHTNING
Unplug your receiver from the wall socket if there is a storm or lightning, or if it is to be unused for a long time.
REPLACEMENT PARTS
If your receiver needs a replacement part, ensure the person undertaking the repair uses parts which are specified by the manufacturer or have the same specifications as the original part. Other parts may cause a fire, electric shock or other hazards.
BATTERY DISPOSAL
Please ensure that exhausted batteries from the remote control handset are disposed of safely.
SERVICING
Ensure the person who services your receiver is qualified to do so. Do not remove the cover yourself - you could get an electric shock.
We are proud to offer a high-quality product. To keep this level of quality, your receiver should be serviced at a Matsui authorised service centre.
CONTENTS
- Safety
- Contents
- Remote Control Handset 1
- Your Digital Receiver 3
-
Everyday
-
Changing Channels 4
- Channel List 5
- Electronic Programme Guide 6
- Audio Control 7
-
Digital Teletext 7
Operation
- Advanced Operation 9
- Configuring Your Receiver 9
- Editing The Channel List 10
- Channel And Menu Protection 11
- Favourite Channels 12
- Programme Reminders And Timers 12
- Re-installation 14
● Over Air Download 15
- Connecting a VCR or DVD (with one scart socket) 16
- Connecting a VCR and DVD (with two SCART sockets) 17
- Troubleshooting Guide 18
- Specification 19
REMOTE CONTROL HANDSET

REMOTE CONTROL HANDSET
REMOTE BUTTONS
Button Function
1 Standby Turn the receiver on and off
2 Mute Silence received audio
3 TV/DTV Exit most menus to return to television viewing
Switch the TV set between analogue, digital TV and VCR
4
M
e
n
u
Display the Main Menu. Exits menus
5 Up, Down, Left, Right Move between menu items
6 Select Make selection in a menu
7 Number keys Change channels
Enter PIN code
Enter numbers and letters into menus
8 Guide Display and exit electronic programme guide
9 V+, V- Adjust the received audio volume
10 P+, P- Change channels
11 Page Up/Red Move up a page through channel list
Move to top in EPG programme details Select red option in digital teletext
12
Page Down/Green
Move down a page through channel list Select green option in digital teletext Move to bottom in EPG programme details
13 Yellow
Scroll up through EPG programme details Select yellow option in digital teletext
14 Blue
Scroll down through EPG programme details Select blue option in digital teletext
15 Wide
Select screen format
16
i
Display menu help
17
Text
Start and stop digital teletext
18 Exit
YOUR DIGITAL RECEIVER
Front:

Rear:

EVERYDAY OPERATION
While using your Matsui DTR1 receiver to the full there are great many keys to use in different situations. Many of the menu screens displayed by the receiver have reminders as to which keys do what, at the base of the screen. In addition, many screens have further help available which is displayed when the [i] key is pressed, as prompted at the bottom right of the screen.
Providing your TV set SCART socket has switch control, pressing the [TV/DTV] key at any time while watching television programmes will switch the TV set between displaying the digital terrestrial television programme and its normal analogue television reception.
CHANGING CHANNELS
You can select the channel you wish to watch in one of four ways - stepping through the channel list, selection by number, from the on-screen channel list, and using the electronic programme guide (EPG).
To move through the channel list, press the [P+] or [P-] keys on the remote control. Pressing the [P+] key will select the channel next in the channel list. Pressing the [P-] key will select the previous channel in the list.
Pressing the [P+] key when the last channel in the list is being viewed will select the first channel. Similarly, pressing the [P-] key when the first channel is displayed will select the last channel in the channel list.
You can also select the required channel using its channel list number. Channel numbers are entered using the number keys on the remote control handset and can be up to three digits long.
Hint
The channel list numbers are assigned by the broadcasters. Because not all channels are broadcast free-to-air and stored by the receiver, the channel list numbers do not run continuously. The fifteenth channel in the list, for example, may not be channel number 15 but channel number 17.
When you press a number key on the remote control, a small box appears in the top left of the screen to show the entered number. After each digit is entered, the receiver will wait up to two seconds for the next digit to be pressed until either three digits have been entered or you do not press a digit in time. The channel corresponding to the entered number in the box will then be selected.
Hint
If you enter a number which does not correspond to a stored channel, the next valid channel number is selected instead. If you enter a number greater than the highest numbered channel in the channel list, the receiver will select the last channel in the list.
Information Banner
Whenever you change channel, using the [P+] and [P-] keys or the number keys, the receiver displays the channel picture along with an information banner at the bottom of the screen. This will remain on the screen for approximately three seconds. The information banner can also be displayed at any time while watching TV by pressing the [i] key on the remote control. Pressing the [i] key again removes the banner.

Hint
Not all channels broadcast the programme data. If the name and times of the programme is not available then 'Not available' is displayed in the information banner.
The information banner gives a number of facts on the channel selected and the programmes on it. The name of the channel is displayed, along with its channel list number and an indication of the strength of the signal received on this tuning channel.
The name and the start and finish time of the programme currently showing on the selected channel are given, and the current time.
Icons are also displayed in the information banner and if this channel is a favourite channel (see ADVANCED OPERATION - Favourite Channels).

favourite channel
If the channel selected is locked (see ADVANCED OPERATION - Channel Protection), you must enter the correct four digit code to view the channel.
Alternatively, the [P+] or [P-] keys are used to move to another, unlocked channel.

CHANNEL LIST
You can also select the required channel directly from the on-screen channel list. This is displayed using the Matsui DTR1 receiver's Main Menu. First bring up the menu with the [MENU] key on the remote control handset.

Using the [UP] or [DOWN] keys on the remote control, make sure that the first item, Channel List, is highlighted in yellow and press the [SELECT] key, to display the channel list.
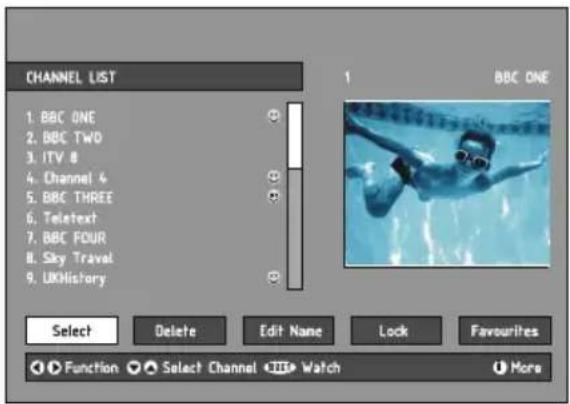
Here, you can preview any channel stored by the receiver before viewing it full screen. The complete list of channels is displayed in pages of 10 channels at a time, with their channel list number and a favourite channel icon if appropriate (see ADVANCED OPERATION - Favourite Channels). The name and a quarter-screen image of the channel last viewed is displayed in the top right of the screen.
Using the [UP] or [DOWN] keys, the highlight is moved through the list to the channel required. The [PAGE UP] and [PAGE DOWN] keys can also be used to move forward or back a complete page (ten channels) at a time. Pressing [SELECT] now changes the quarter-screen display to show the highlighted channel.
Hint
From the Channel List screen, it is possible to edit the channel list, including changing the name of stored channels or deleting them. Editing the list is covered in ADVANCED OPERATION - Editing The Channel List. When using the Channel List to select channels, use the [LEFT] or [RIGHT] keys to ensure that the highlighted button at the bottom of the screen is SELECT, so no editing functions are accidentally begun.
When you leave the Channel List screen, by pressing [MENU] the channel showing on the quarter screen is selected for normal viewing on the whole screen.
ELECTRONIC PROGRAMME GUIDE
The fourth way of selecting a channel is with the electronic programme guide, or EPG. The EPG is accessed by pressing the Guide key, [GUIDE]. Like the Channel List, the EPG screen displays a list of the stored channels (in pages of five channels) along with information on what programmes are being broadcast.

Current Programme
The channels are listed at the bottom of the screen, each with the 'current event' (the name of the programme showing at that time) and the 'next event' (the following programme). When the EPG screen is first displayed, the channel last watched is highlighted in the list of channels. A quarter-screen image of this channel is displayed at the top right of the screen along with the channel name and channel list number.
Details of the current programme on that channel (the name of the programme and, typically, a synopsis with details of the stars involved, the teams playing, or similar information) along with the start and finish times are displayed at the top left inside the dark blue text window.
Hint
If the channel you have been viewing is a digital teletext channel then no picture will appear in the quarter-screen window.
Moving the highlight through the list of channels using the [UP] and [DOWN] keys will change the programme details in the text window to reflect the channel highlighted. The quarter-screen window continues to show the channel last watched, so you can stay watching a programme while at the same time browse the details of what's on, on other channels.
You may then select the highlighted channel for viewing on the quarter-screen window by pressing the [SELECT] key.
You can leave the EPG screen, to enjoy normal full-screen viewing of the channel in the quarter-screen window by pressing the [GUIDE] key again, or the [MENU] key.
Hint
Not all channels broadcast all the programme information data. Some channels do not provide the current and next event data and/or the programme details. In this case the programme names and/or the details are not displayed. This is not a fault with your receiver.
Next Programme
While the EPG screen is displayed, pressing the [RIGHT] key highlights, in dark blue, the next event name in the list of channels and displays the highlighted channel's programme details for the next event (the programme following the current programme) in the text window. As before, you can browse through the list, checking the programmes coming up next on all the channels.
Hint
If the programme details text for the current or next event is too long to fit into the text window on the EPG screen, a scroll bar appears on the right hand side of the window and the text can be scrolled up or down using the [YELLOW] and [BLUE] keys on the remote control. Using [PAGE UP] or [PAGE DOWN] keys will display the next/previous 5 channels in the list.

Pressing the [SELECT] key while the next event details are displayed will set a reminder to watch that programme. See ADVANCED OPERATION - Programme Reminders And Timers.
You can return to the current programme display by pressing the [LEFT] key or to normal television viewing (to watch the channel last selected in the EPG screen) by pressing the [GUIDE] key again, or the [MENU] key.
AUDIO CONTROL
Volume Control
The volume level of the sound from your Matsui DTR1 receiver can be altered with the [V+] and [V-] keys on the remote control handset. Pressing either key displays a bar graph of the sound volume on the TV screen.

The volume level selected will remain set, even when the receiver is turned off and on again, until it is altered with the [V+] and [V-] keys.
Hint
The audio volume adjustment for the DTR 1 receiver is independent of the volume control on your TV set. Be careful that both volume controls are kept within reasonable levels so that when switching from analogue to digital television viewing, or when first turning on your TV set, the sound level is not suddenly very high.
You can silence the sound from the receiver by pressing the [MUTE] key. The sound remains muted until the [MUTE] key is pressed again, the [V+] or [V-] keys are pressed, or until the receiver is turned off and on again.
While the sound is muted in this way, the mute symbol is displayed in the top left of the TV screen. The symbol is removed after 3 seconds, but the sound will remain muted until the [MUTE] key is pressed for the second time, and the un mute symbol will display for 3 seconds.


Soundtrack Language
Some programmes are broadcast in two or more languages simultaneously. The language heard can be selected from the Language Menu. Press [MENU] to display the Main Menu and use the [UP] or [DOWN] keys to highlight the Language line and press [SELECT]. Use the [UP] or [DOWN] keys to highlight the soundtrack language required and press [SELECT]. Normal viewing, with the required language soundtrack, can be resumed by pressing the [MENU] key.
If the programme has no alternative language soundtrack broadcast, the Language Menu will not be available, but a message, 'No Multi Language Available' is displayed briefly.
DIGITAL TELETEXT
Many digital terrestrial television channels not only broadcast pictures and sound for programmes but also pages of information on the programmes, the weather, news and many other topics. This digital teletext can be displayed by the Matsui DTR1 receiver.
Some channels are entirely given over to digital teletext and carry no normal TV programme at all. These dedicated digital teletext channels will not give a quarter-screen image in the EPG or the Channel List screen. When such a channel is selected, after a brief pause, they will usually display the opening page of information automatically.
Other channels have digital teletext pages broadcast alongside the television programme and often include a reduced-size broadcast picture within digital teletext pages. These usually require the [TEXT] button to be pressed to activate the digital teletext pages.
In both cases, moving through the different pages of information is accomplished in a variety of ways, dependent on the individual broadcasters, but including use of the [UP], [DOWN], [LEFT], [RIGHT] and [SELECT] keys to select items from on-screen menus, and the coloured keys to jump directly to particular pages.
You can exit any digital teletext channel by changing channel in any of the normal ways. You can leave the digital teletext function of a combined digital teletext/programme channel, to return to normal television viewing of that channel, by pressing the [TEXT] key.
Hint
Calling for the information banner or any menu on-screen stops the receiver from displaying the digital teletext pages and they are temporarily replaced by a blank picture while the banner or menu is displayed.. Digital teletext cannot be accessed when the Subtitles are enabled (See ADVANCED OPERATION - Configuring Your Receiver.
WIDESCREEN
TV sets are available with screens of the standard (4:3) format and widescreen (16:9) format. When you first installed your DTR 1 receiver you specified the format of the connected TV (this can now be altered if necessary; see ADVANCED OPERATION - Configuring Your Receiver).
Digital terrestrial television broadcasts are also made in both standard and widescreen formats. In particular, films and dramas tend to be broadcast in widescreen format to closer emulate the cinema experience, but even some news bulletins are widescreen. To help get the most from both TV set and programme when a widescreen film is watched on a standard TV, or a standard broadcast is viewed on a widescreen set, your Matsui DTR1 receiver includes the [WIDE] key.
So long as the receiver has been correctly set up for the TV set connected, a widescreen programme will always be displayed correctly on a widescreen set, and a standard format programme will correctly fill the screen of a standard format TV.
With a widescreen TV set displaying a standard format programme, the [WIDE] key switches between displaying the picture with black bars down the sides, and enlarging the picture so that it fills the whole width of the screen but the top and bottom are cropped off.
With a standard format TV displaying a widescreen programme, the [WIDE] key switches between displaying the picture with black bars at the top and bottom of the screen, and filling the whole height of the screen but cropping the sides off according to instructions broadcast with the programme (called 'pan and scan').
The effect of the [WIDE] key on the picture display is cancelled by pressing [WIDE] again, changing channel or turning the receiver to standby.
Subtitle
Subtitle key Shows/hides subtitles of channel. When the subtitle key is pressed, subtitle ON/OFF message is displayed.
Subtitles ON
Subtitles OFF
TV / DTV Key
If there is no connected VCR device, The TV/DTV key is used to toggle TV and DIGITAL TV modes. When the set-top box is in TV mode, the TV scart is not switched and the TV operates in analog mode.
When the set-top box is in DIGITAL TV mode, this time the TV scart is switched on and the TV is switched to AV/RGB mode. And also, when there is no menu on the screen, pressing TV/DTV key will manually toggle the set top box between VCR mode and TV mode. In VCR mode set top box will display the output of VCR device, In TV mode set top box displays its own outputs. If box scart mode is not changed by pressing TV/DTV key, scart mode will be automatically detected. (For example if a dvd player is connected to VCR scart and powered on, then the set top box will immediately switch to VCR mode. The set top box will switch to TV mode if dvd player is switched off)
ADVANCED OPERATION
CONFIGURING YOUR RECEIVER
Many aspects of your Matsui DTR1 receiver can be set up to reflect your circumstances and preferences. The Configuration menu screen is accessed from the Main Menu. Press the [MENU] key to display the Main Menu and the [DOWN] key twice to highlight Configuration, then press [SELECT] to display the Configuration menu screen.

The various configuration functions are displayed in a list, along with a quarter-screen image of the currently selected channel. You can select a function by highlighting the corresponding menu line with the [UP] or [DOWN] keys. There are seven configuration functions.
Audio Language
Digital terrestrial television channels can broadcast simultaneous soundtracks in more than one language. This function selects which language soundtrack you will hear when switching to a channel broadcasting with multiple soundtracks. See also EVERYDAY OPERATION - Audio Control.
Highlight the Audio Language line in the Configuration menu and use the [LEFT] or [RIGHT] keys to cycle through the language options.
Return No Menu to normal TV viewing by pressing the [MENU] key.
SUBTITLE
Digital terrestrial television channels can broadcast with subtitles displayed on-screen for the hard-of-hearing. This function selects the desired subtitle language and enables the automatic display of subtitles whenever subtitle information is broadcast.
Highlight the Subtitle line in the Configuration menu and use the [LEFT] or [RIGHT] keys to cycle through the disable and language options.
Return NO MENU to normal TV viewing by pressing the [MENU] key.
TV TYPE
Digital terrestrial television channels can broadcast programmes in a widescreen format which must be output differently to normal and widescreen TV sets. This function tells the receiver the screen format of the TV connected so that broadcasts are displayed correctly.
Highlight the TV Type line in the Configuration menu and use the [LEFT] or [RIGHT] keys to select 4:3 if you have a standard TV set connected or 16:9 if it is a widescreen TV. This function duplicates the selection made at the time of first installation (see 1 - PREPARATION - Tuning In) and can be used if you change TV sets. Return NO MENU to normal TV viewing by pressing the [MENU] key.
TV OUT
The DVB-T. receiver can output either an RGB or CVBS signal from the TV SCART on the rear panel. Although the RGB format results in a better quality picture, not all equipment - particularly some VCRs - can cope with an RGB signal (see page 16 Connecting a VCR or DVD).
PARENTAL SETTINGS
This function enables or disables the menu protection system and allows the PIN code to be changed. See ADVANCED OPERATION - Channel And Menu Protection.
EDITING THE CHANNEL LIST
The digital terrestrial television channels found by the receiver when first installed are stored in its memory as a channel list. This list can be altered and amended to remove unwanted channels and to suit your own preferences.
First bring up the Main Menu with the [MENU] key on the remote control handset. Then, using the [UP] or [DOWN] keys on the remote control, make sure that the first item, Channel List, is highlighted in yellow and press the [SELECT] key, to display the Channel List.

The Channel List screen displays the list of channels in the receiver's memory, with a quarter-screen image window showing the selected channel, and can be used to change channels for viewing, delete channels from the memory, edit the name of the channel as it appears in the list and on-screen, lock a channel against viewing by younger members of the family, and set up favourite channels.
Channel List functions are carried out on one channel at a time. The channel to be affected is first highlighted in the list using the [UP] or [DOWN] keys. You can move faster through the list using the [PAGE UP] or [PAGE DOWN] keys to move up or down a complete page of 10 channels in one jump.
SELECT
This function selects a channel for viewing and is an alternative to using the [P+] and [P-] keys, channel number or EPG. Highlight the channel to be viewed, highlight the SELECT button at the base of the screen using the [LEFT] or [RIGHT] keys and press [SELECT]. The highlighted channel now appears in the image window and you can leave the Channel List to view the channel by pressing [MENU].
DELETE
The initial installation of the Matsui DTR1 receiver can produce duplicate entries in the channel list from transmitters operating at different frequencies in adjacent areas, and you may wish to delete these duplicate entries from the list. In addition, other channels which you do not want in the list.
Highlight the channel to be deleted, highlight the DELETE button at the base of the screen using the [LEFT] or [RIGHT] keys, and press [SELECT]. The highlighted channel is deleted from the list.
You can now perform further editing on the channel list, or return to normal broadcast viewing by pressing the [MENU] key.
EDIT NAME
The channel names which appear in the channel list and the information banner are assigned by the broadcasters and some longer names are abbreviated to become unrecognisable. You can edit the names to suit your preferences with the Edit Name function.
Highlight the channel to be renamed, highlight the EDIT NAME button at the base of the screen using the [LEFT] or [RIGHT] keys, and press [SELECT]. The highlighted channel name appears on the right of the screen with the first character highlighted by a cursor. Any of the 15 characters that make up a channel name can be highlighted using the [LEFT] or [RIGHT] keys and the highlighted character changed by pressing the [UP] or [DOWN] keys to cycle through the alphabet, numbers and other characters available.
When the required changes have been made, pressing [SELECT] stores the new name and returns to the Channel List screen. Alternatively, pressing [MENU] will abandon the name change and return to the previous name.
You can now perform further editing on the channel list, or return to normal broadcast viewing by pressing the [MENU] key.
Using the other two functions of the Channel List menu screen - LOCK and FAVOU.
Hint
You can also enter a channel name using the number keys on the remote control. Each key represents several letters and pressing a key several times will enter each letter (in both capitals and lower case), and the number, in turn, in the character position marked by the cursor. The zero key enters all the punctuation marks available and a blank space. With practise, this is a very quick means of entering the required letters into the channel name.
CHANNEL AND MENU PROTECTION
CHANNEL LOCK
Some channels broadcast material which you do not want younger members of the family to watch. Any channel can be 'locked' so that it cannot be selected for viewing without first a four-digit PIN code being entered. In this way any channel not suitable for younger viewers can be protected.
The channel lock is applied with the Channel List menu. Press the [MENU] key on the remote control handset to display the Main Menu and then, using the [UP] or [DOWN] keys on the remote control, make sure that the first item, Channel List, is highlighted in yellow and press the [SELECT] key.
Highlight the channel to be locked using the [UP] or [DOWN] keys. You can move through the list 10 channels in one jump using [PAGE UP] or [PAGE DOWN]. Now select the LOCK button at the base of the screen with the [LEFT] or [RIGHT] keys and press [SELECT].
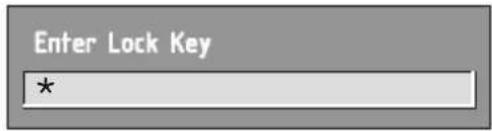
A window requesting the PIN code is displayed and the four-digit code should be entered using the number keys on the remote control, followed by the [SELECT] key. A lock icon is then displayed alongside the channel name in the channel list.
Hint
The PIN is factory set to 0000. This code should be reset (as described below) to another sequence of numbers, known only to you, when you have finished setting up the receiver.
You can now leave the Channel List screen and return to normal TV viewing by pressing [MENU]. Any attempt to change channel to the locked channel will now display the same window requesting the PIN code and the channel will only be displayed on entry of the correct code. To remove the lock on a channel, repeat the same process as to lock the channel.
MENU LOCK
Simply locking a channel will not deflect a determined would-be viewer. Re-installing the complete channel list, for example, will bypass the channel lock. However, the menus can be locked out of use too, to prevent this.
Display the Main Menu by pressing the [MENU] key, highlight Configuration, and press [SELECT] to display the Configuration menu screen. Highlight the Parental Settings line of the menu (press [DOWN] five times) and press [SELECT] to display the Parental Settings menu (after the PIN code has been entered). Here the menu lock-out can be set and the PIN code changed.
With the Menu Lock line highlighted, use the [LEFT] or [RIGHT] to cycle the menu lock setting through Disabled, Main Menu and Installation. The Main Menu setting will lock out the complete menu system; the Installation Menu setting locks only the Installation menu (see Section 3 - ADVANCED OPERATION - Re-installation); and the Disabled setting allows free access to any of the menus.
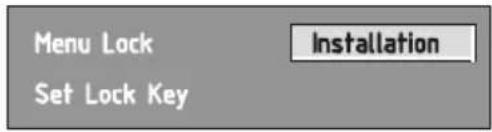
You must return to normal TV viewing by pressing the [MENU] key (three times) to activate the lock. Now any attempt to access the locked menus will display the PIN request window and the menus will only be displayed on entry of the correct PIN code.
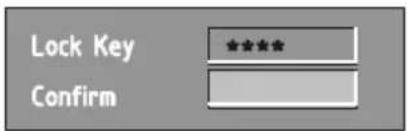
The same Parental Settings menu is used to change the PIN code. With the Set Lock Key line highlighted, press [SELECT] to display the Set Lock Key window. This requests the new four-digit code to be entered twice (for confirmation) and the new code comes in effect when you return to the Configuration menu by pressing [MENU].
Hint
If you want the channel and menu locks to work efficiently and actually protect channels from access, do change the PIN code from the factory default. Make sure that you choose a number that is not obvious to others but one that can be remembered by you.
FAVOURITE CHANNELS
There will be some channels that you tend to watch more often and some only occasionally. Although some duplicate channels you may want to delete from the channel list, others although not watched frequently, you will not want to do away with altogether. The favourite mode allows the most-watched channels to accessed more easily, leaving the less-watched channels accessible but out of the way.
When the favourite mode is activated, the [P+] and [P-] keys cycle through the favourite channels only and the EPG will list the favourite channels only (other channels can still be accessed by channel list number or from the Channel List menu screen).
Any channel can be a favourite channel and the Channel List menu is used to label those channels you want as favourites.
Display the Channel List menu screen by highlighting Channel List on the Main Menu and pressing [SELECT].
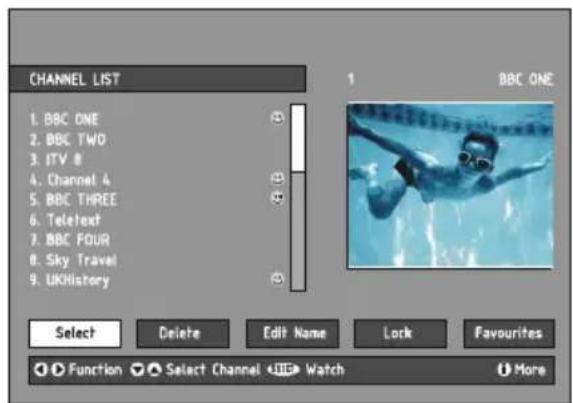
Use the [LEFT] or [RIGHT] keys to highlight the FAVOURITE button at the base of the screen and then, in turn, highlight each channel that is required to be a favourite channel, using the [UP] and [DOWN] keys (and the [PAGE UP] or [PAGE DOWN] keys), and press [SELECT]. A channel selected as a favourite appears in the main channel list with a favourites icon against the channel name.
A channel can have its favourites status removed by repeating this procedure, to remove the icon. Leave the Channel List menu by pressing [MENU].Once the required channels have been marked as favourite channels, the favourite mode can be activated to allow easy access to them. Press the [MENU] key to display the Main Menu, the [DOWN] key twice to highlight Configuration, and press [SELECT] to display the Configuration screen. Press the [DOWN] key four times to highlight the Favourite Mode line and using the [LEFT] or [RIGHT] keys change the setting from Off to On.
When you leave the Configuration menu by pressing [MENU] the favourite mode is activated. Now, changing channel using the [P+] or [P-] keys will switch to only those channels marked as favourites in the channel list. Similarly, the on-screen list in the electronic programme guide contains only the favourite channels.
You can still access all the channels in the channel list by keying in their channel list number or by selection from the Channel List screen. Alternatively you can switch off the favourite mode from the Favourite Mode line of the Configuration menu.
Hint
The favourite mode can only be activated if one or more channels in the channel list are marked as favourites. Similarly, if the favourite status is removed from all the channels in the Channel List, the favourite mode is turned off automatically.
PROGRAMME REMINDERS AND TIMERS
With the greatly extended channel choice that digital terrestrial television brings, it is all too easy to miss a favourite programme. The Matsui DTR1 receiver has two facilities built in to help you make sure you catch all the TV shows you want.
PROGRAMME REMINDERS
Programme reminders can be set to signal that a programme is about to start when you are watching another channel. A reminder is set from the Electronic Programme Guide screen.
Press the [GUIDE] key to display the EPG screen and press [RIGHT] to display the next programme details in the text window and highlight the name of the next programme in the list of channels. Press [SELECT] when a programme you want to watch is highlighted and the reminder icon is displayed against that programme's name.
You can exit the EPG screen in the normal way - pressing [GUIDE], [MENU]. Later, shortly before the programme is due to start, the receiver will display a reminder on the screen over the picture of the channel being viewed.
Use the [LEFT] or [RIGHT] keys to highlight the YES or NO buttons as appropriate and press [SELECT]. If you select the YES button, the receiver switches over to the reminder channel.
Note: Reminder events are ignored if any timer event is active at that time.
EVENT TIMER
You can also set a timer to switch the receiver to any channel without your intervention. This is intended for making video recordings of programmes when you are out. If a single programme is to be recorded, the receiver can be left switched to the required channel and the timer set on the VCR. However, if two or more programmes on different channels are to be recorded then the Matsui DTR1 receiver's own timer is set as well, to select the required channel when it is needed.
Display the Main Menu by pressing the [MENU] key and highlight and select the Timers line to display the Timer menu screen. Up to five separate timer events can be set and each is displayed in the Timer screen, showing the event number, the channel to be selected, the start time, end time, date and the mode - whether that event is active (and will be acted on) or not.
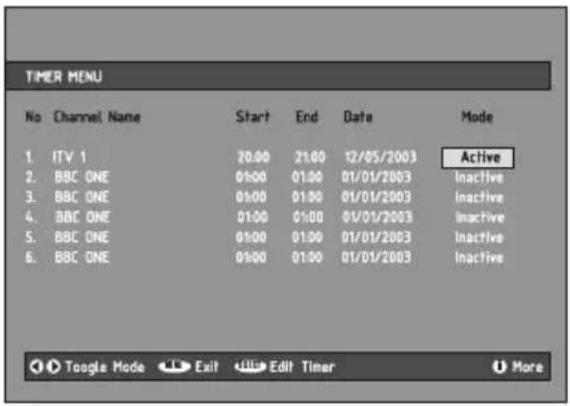
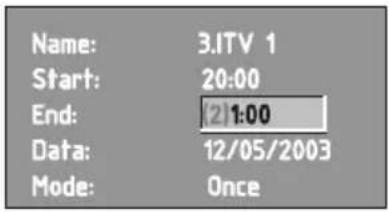
To set an event, highlight its mode button using the [UP] or [DOWN] keys and press [SELECT] to display the timer entry window. Here the five settings of channel name, start time, end time, date and frequency mode can be set. You can move freely between each setting using the [UP] and [DOWN] keys. The channel name is set using the [LEFT] or [RIGHT] keys to display the channel which broadcasts the programme to be recorded. The start time, end time and date are each set with the number keys on the remote control in 24-hour format. The frequency mode determines how often the receiver operates this event and is set with the [LEFT] or [RIGHT] keys to be either Once, Daily, or Weekly.
Hint
If an invalid number for the start or end times or the date is entered, the highest valid number is automatically entered in its place. So, entering 28:30 as the time will automatically change to 23:30, and a date of 15:14:2002 will change to 15:12:2002.
Pressing [MENU] or [SELECT] returns to the Timer screen with the settings in place in the timer event list. The event mode is automatically set to Active and you can now return to normal viewing (press the [MENU] keys) and at the appointed time the receiver will switch over to the required channel and at the end of the event, switch the receiver to standby.
When the Timer screen is displayed, any event can be set to be Inactive (so it will not occur) or the channel, times and frequency mode altered by highlighting the event's Mode button and pressing [SELECT] as before.
You can exit the Timer screen and return to normal TV viewing by pressing [MENU].
Hint
If you are watching digital terrestrial TV at the time the timer event starts, a message is flashed onto the screen announcing that the receiver is 'Switching to timer channel' so you understand what is happening.
RE-INSTALLATION
Although your DVB-T receiver will not lose its settings or stored channels when switched off, you may wish to re-install the receiver because you have moved to a different area with different broadcast frequencies, you wish to reinstate a channel previously deleted from the channel list, or you want to watch new channels which have started broadcasting.
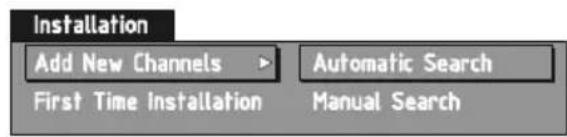
Press the [MENU] key to display the Main Menu and using the [UP] or [DOWN] keys, highlight the Installation line and press [SELECT] to display the Installation Menu.
You can either perform a First Time Installation, effectively resetting the receiver to its ex-factory condition, or just search for channels.
FIRST TIME INSTALLATION
To reset the receiver, highlight the First Time Installation line in the menu and press [SELECT]. A warning screen is displayed in case of accidental operation.

Highlight the YES button with the [LEFT] or [RIGHT] key and press [SELECT] to erase all the channels and settings and switch the receiver to standby. You can now start again as detailed in Section 1 - PREPARATION - Tuning In.
ADD CHANNELS
The Matsui DTR1 receiver can search for channels automatically (searching all the broadcast frequencies for free-to-air channels) or manually (searching one specified broadcast frequency only for any channels to be found there).
Press the [MENU] key to display the Main Menu and using the [UP] or [DOWN] keys, highlight the Installation line and press [SELECT] to display the Installation Menu. Highlight the Add New Channels line and press [RIGHT] to display the options. Select Automatic Search with the [UP] or [DOWN] keys and press [SELECT]. A warning message is displayed. This starts the automatic tuning process as described in Section 1 - PREPARATION - Tuning In, and searchthrough all the available broadcast frequencies for free-to-air channels. Previous channels will be replaced on automatic search.
If, alternatively, from the search options menu the Manual Search line is highlighted and [SELECT] pressed, the manual search screen is displayed.

Highlight the YES button with the [LEFT] or [RIGHT] key and press [SELECT] to start the automatic search.
This is for searching for digital channels on a single broadcast frequency. The frequency channel number (21-69) is entered in the box at the top left of the screen and the received signal level and signal quality can be observed on the two bar graphs at the bottom. When [SELECT] is pressed, the receiver searches that frequency and display a list of the channels found. Before returning to the Installation menu.
Hint
The bar graphs of signal quality and signal level give a good indication of whether any channels are likely to be found. If only the signal level graph shows a high value then it is likely that an analogue channel occupies that broadcast frequency. If the signal quality bar is high as well then it is a digital frequency and digital channels will probably be found.
Again, channels which duplicate those already in the channel list are ignored. However, the manual channel search will find all channels on the broadcast frequency.
When either search is finished, press the [MENU] key to return to normal broadcast viewing, to watch the new digital terrestrial television channels found.
OVER AIR DOWNLOAD
Over Air Download: To ensure that your digital receiver always has the most up to date information. Please ensure that after use it is set to its standby mode. The DTR 1 automatically powers up at 3AM each day and searches for any new information which may be broadcast and will download this to your box automatically. This operation will normally take approximately 30 seconds.
If you have an important recording to make at 3AM which must not have a 30 second interrupt then you can disable the auto OAD search by performing the following:
- Press Menu button and using the up / down buttons highlight CONFIG and press the SELECT button,
- Use the up and down buttons to highlight "RECEIVER UPGRADE" and press SELECT button.
- Using the left / right button change function from Enable to Disable.
- Press SELECT button then MENU and MENU to return to Normal I operation.
Do not forget to re enable the automatic OAD function after you have made your recording by repeating the above instructions but this time selecting ENABLE.
CONNECTING A VCR OR DVD (WITH ONE SCART SOCKET
If the VCR has only one SCART socket, you can connect the equipment as follows:
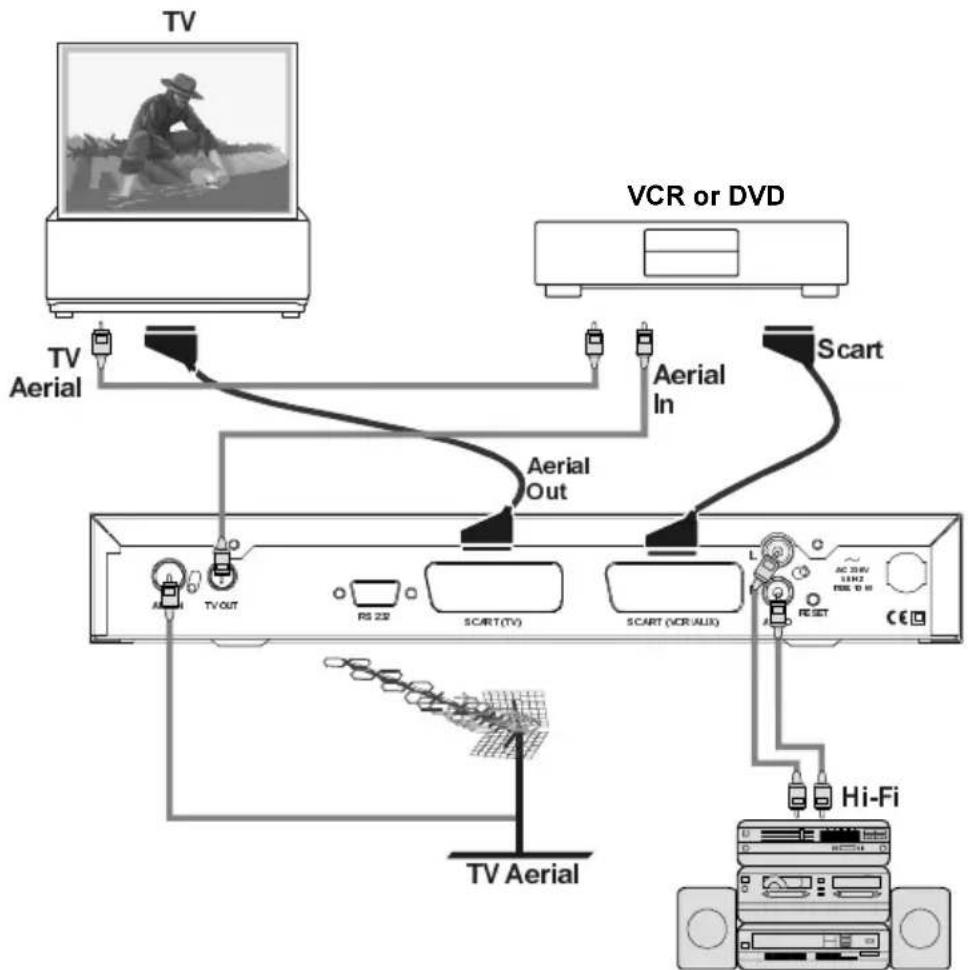
flowchart
graph TD
    A["TV"] --> B["TV Aerial"]
    B --> C["Aerial Out"]
    C --> D["SCART (VCR/UX)"]
    D --> E["Hi-Fi"]
    E --> F["Hi-Fi"]
    G["VCR or DVD"] --> H["Aerial In"]
    H --> I["Scart"]
    I --> J["Hi-Fi"]
    K["TV Aerial"] --> L["Hi-Fi"]
    M["Hi-Fi"] --> N["Hi-Fi"]
Both live and recorded digital terrestrial television programmes are watched at a lesser quality via the TV aerial input only. To view via SCART, press the AV button on your TV remote control.
CONNECTING A VCR AND DVD (WITH TWO SCART SOCKETS
If your TV and VCR both have two scart sockets you can connect as follows. Unplug the aerial lead and connect this to the ANT IN socket on the rear of your receiver. Connect the aerial lead (supplied) from the TV OUT on the receiver to the ANT IN on the rear of the VCR. Then connect an aerial lead from the TV OUT on the VCR to the ANT IN socket on the rear of your TV.
Connect a scart lead from the TV SCART socket on the rear of the receiver to the SCART 1 socket on the rear of the TV.
Connect a scart lead from the VCR SCART to the SCART 1 on the VCR, and connect a scart lead from the SCART 2 on the VCR to the SCART 2 on the rear of the TV.
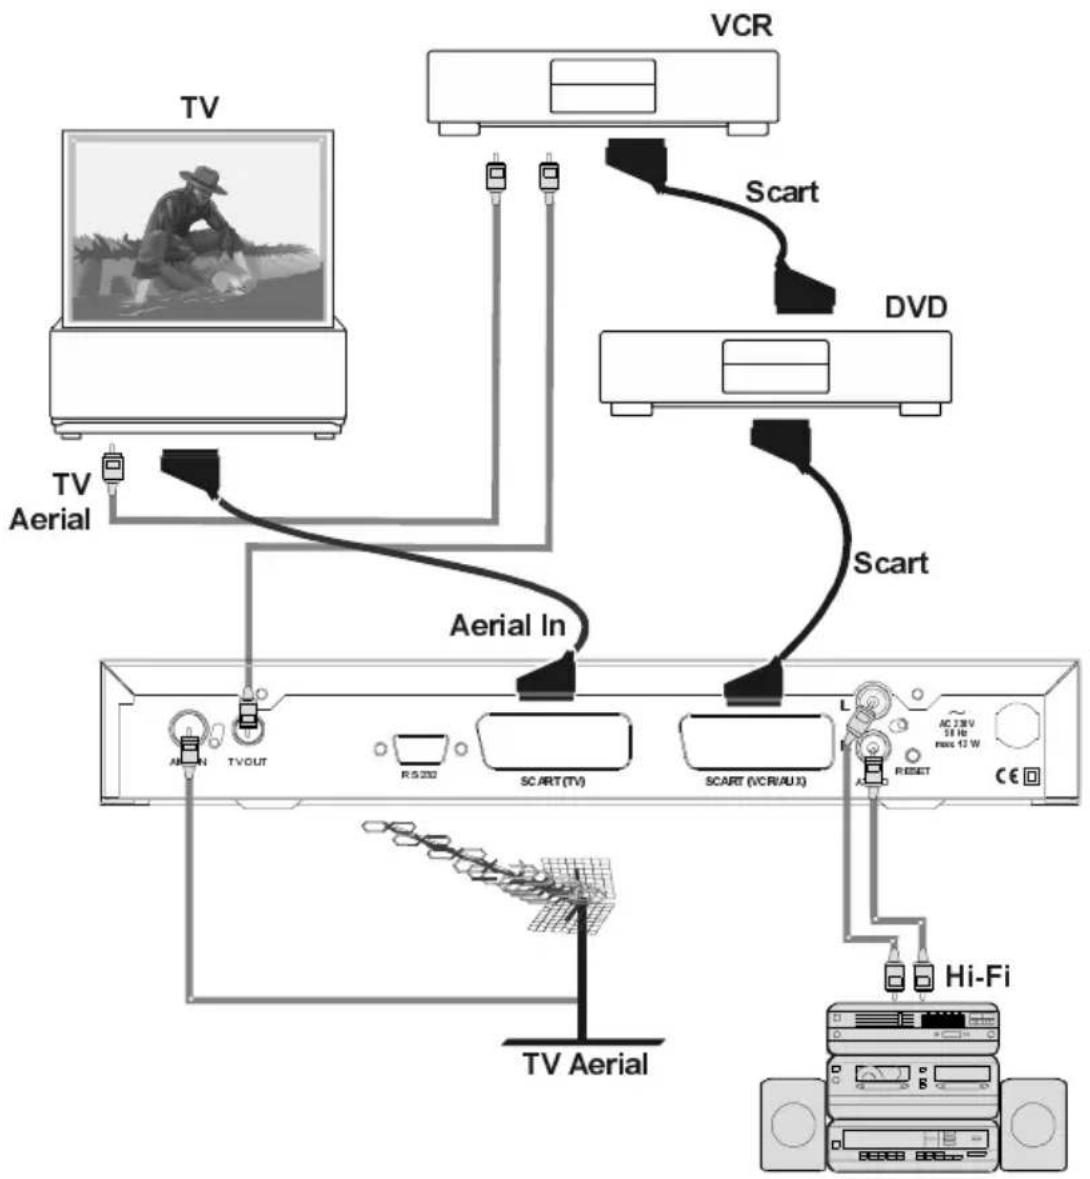
flowchart
graph TD
    A["TV"] -->|Aerial In| B["TV Aerial"]
    A -->|Aerial In| C["SCART (TV)"]
    A -->|Aerial In| D["SCART (VCR/AUX)"]
    A -->|Aerial In| E["Hi-Fi"]
    A -->|Aerial In| F["VCR"]
    A -->|Aerial In| G["VD"]
    A -->|Aerial In| H["Scart"]
    H -->|Scart| I["Scart"]
    I --> J["SCART (TV)"]
    I --> K["SCART (VCR/AUX)"]
    I --> L["Hi-Fi"]
    style A fill:#f9f,stroke:#333
    style B fill:#ccf,stroke:#333
    style C fill:#cfc,stroke:#333
    style D fill:#fcc,stroke:#333
    style E fill:#cff,stroke:#333
    style F fill:#ffc,stroke:#333
    style G fill:#fcc,stroke:#333
    style H fill:#ffc,stroke:#333
    style I fill:#cfc,stroke:#333
    style J fill:#fcc,stroke:#333
    style K fill:#cfc,stroke:#333
    style L fill:#fcc,stroke:#333
    style_M["Aerial"] --> N["TV Aerial"]
    M --> O["TV Aerial"]
    N --> P["TV Aerial"]
    O --> Q["TV Aerial"]
You can now record digital terrestrial television programmes by selecting SCART 1 on the VCR. The VCR will also be able to record analogue television channels in the usual way. Both live and recorded digital terrestrial television programmes can be viewed on the TV by selecting the TV's AV input.
TROUBLESHOOTING GUIDE
If you experience problems with your Matsui DTR1 receiver or its installation, in the first instance please read carefully the relevant sections of this User Guide and this Troubleshooting section.
| Problem | Possible cause | What to do |
| Standby light not lit | Mains lead unpluggedMains fuse blown | Check mains leadCheck fuse |
| No signal found | Aerial is disconnectedAerial is damaged/misalignedOut of digital signal area | Check aerial leadCheck aerialCheck with dealer |
| No picture or sound | Tuned to digital teletext channel | Retune to another channel |
| Scrambled channel message | Channel is scrambled | Select alternative channel |
| No response to remote control | Receiver offHandset not aimed correctlyFront panel obstructedHandset batteries exhausted | Plug in and turn on receiverAim handset at front panelCheck for obstructionsReplace handset batteries |
| Forgotten channel lock code | Re-install channels to cancel channel lock | |
| Forgotten menu lock code | Contact help line | |
| The remote control will not operate yourMatsui DTR1receiver | (1) The batteries in your remote control need replacing(2) There is an obstruction blocking the signal path between the remote control and the receiver | (1) Replace the batteries(2) Check that there is nothing in the way of the path between the remote control and the receiver |
| After moving theMatsui DTR1receiver to another room you find you are no longer able to receive the digital reception | The aerial feed former new point may come through a distribution system which may reduce the digital signal now received by yourMatsui DTR1receiver | Try a direct feed from the antenna |
SPECIFICATION
GENERAL
Size 307x210x46mm
Weight 1.7 kg
Power consumption 12 W max.
SYSTEM
Processor STI5518 32bit @ 81 MHz
Flash memory 2Mbyte
SDRAM 16Mbyte
EEPROM 32Kbit
MHEG-5 engine compliant with ISO/IEC 13522-5 and UK Engine Profile1
Object carousel support compliant with ISO/IEC 135818-6 and UK DTT Profile
RECEPTION
Frequency range 474-858MHz
Signal level -82dBm
Transmission standards DVB-T, MPEG-2
Demodulation COFDM with 2K/8K FFT mode
FEC all DVB modes
Video
MP@ML, PAL, 4:3/16:9
Audio
MPEG Layer I & II 32/44.148kHz
CONNECTIONS
UHF aerial input
UHF aerial loopthrough
TV SCART
Left/Right Audio
RS 232
- Free to View Digital TV Receiver
- SAFETY
- POWER
- LEADS
- TEMPERATURE AND MOISTURE
- VENTILATION
- CLEANING
- HEAT AND FLAMES
- LIGHTNING
- REPLACEMENT PARTS
- BATTERY DISPOSAL
- SERVICING
- CONTENTS
- Digital Teletext 7
- Operation
- REMOTE CONTROL HANDSET
- REMOTE BUTTONS
- Button Function
- YOUR DIGITAL RECEIVER
- EVERYDAY OPERATION
- CHANGING CHANNELS
- Hint
- Information Banner
- CHANNEL LIST
- ELECTRONIC PROGRAMME GUIDE
- Current Programme
- Next Programme
- AUDIO CONTROL
- Volume Control
- Soundtrack Language
- DIGITAL TELETEXT
- WIDESCREEN
- Subtitle
- TV / DTV Key
- ADVANCED OPERATION
- CONFIGURING YOUR RECEIVER
- Audio Language
- TV TYPE
- TV OUT
- PARENTAL SETTINGS
- EDITING THE CHANNEL LIST
- SELECT
- DELETE
- EDIT NAME
- CHANNEL AND MENU PROTECTION
- CHANNEL LOCK
- MENU LOCK
- FAVOURITE CHANNELS
- PROGRAMME REMINDERS AND TIMERS
- PROGRAMME REMINDERS
- EVENT TIMER
- RE-INSTALLATION
- FIRST TIME INSTALLATION
- ADD CHANNELS
- OVER AIR DOWNLOAD
- CONNECTING A VCR OR DVD (WITH ONE SCART SOCKET
- CONNECTING A VCR AND DVD (WITH TWO SCART SOCKETS
- TROUBLESHOOTING GUIDE
- SPECIFICATION
- GENERAL
- SYSTEM
- RECEPTION
- CONNECTIONS
Brand : MATSUI
Model : DTR1
Category : Receiver