Chronomaster El Primero Legend Of Cohiba 18.2041.400/76.C795 - Watch ZENITH - Free user manual and instructions
Find the device manual for free Chronomaster El Primero Legend Of Cohiba 18.2041.400/76.C795 ZENITH in PDF.

| Product Type | Watch |
| Brand | Zenith |
| Model | Chronomaster El Primero Legend Of Cohiba 18.2041.400/76.C795 |
| Movement | Automatic El Primero 400 (High-frequency 36,000 vph) |
| Case Material | Stainless steel |
| Case Diameter | 45 mm |
| Case Thickness | 14 mm |
| Crystal | Sapphire with anti-reflective coating |
| Water Resistance | 100 meters (10 ATM) |
| Dial Color | Brown (Cohiba theme) |
| Strap Material | Brown leather or alligator |
| Functions | Hours, minutes, small seconds, chronograph (12-hour, 30-minute, 60-second), date |
| Power Reserve | 50 hours |
| Jewels | 31 |
| Frequency | 36,000 vibrations per hour |
| Limited Edition | Yes, limited to 50 pieces |
| Origin | Swiss made |
| Warranty | 2 years international warranty |
| Care Instructions | Clean with a soft cloth; avoid exposure to strong magnetic fields; service every 3-5 years |
Frequently Asked Questions - Chronomaster El Primero Legend Of Cohiba 18.2041.400/76.C795 ZENITH
User questions about Chronomaster El Primero Legend Of Cohiba 18.2041.400/76.C795 ZENITH
0 question about this device. Answer the ones you know or ask your own.
Ask a new question about this device
Download the instructions for your Watch in PDF format for free! Find your manual Chronomaster El Primero Legend Of Cohiba 18.2041.400/76.C795 - ZENITH and take your electronic device back in hand. On this page are published all the documents necessary for the use of your device. Chronomaster El Primero Legend Of Cohiba 18.2041.400/76.C795 by ZENITH.
USER MANUAL Chronomaster El Primero Legend Of Cohiba 18.2041.400/76.C795 ZENITH

natural_image
Completely black image with no visible content, text, or symbols.Apple Store

↓ DOWNLOAD ↑

Google play
Experience the magic of Customer Service and download the Zenith Watches - The Experience app!
natural_image
Technical illustration of mechanical gears and a schematic diagram (no text or symbols)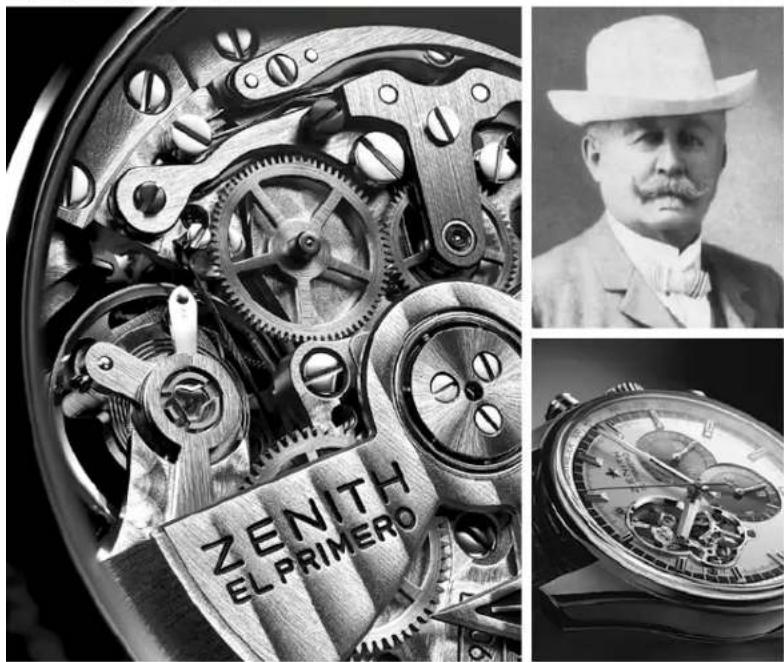
natural_image
Composite image showing a mechanical gear assembly, a portrait of a man in a hat, and a wristwatch with 'ZENITH EL PRIMERO' label (no readable text beyond branding)USER GUIDE
EL PRIMERO

→ ZENITH
THE PIONEER SPIRIT SINCE 1865
→ 1. THE EL PRIMERO MOVEMENT
→ 2. WINDING YOUR WATCH
→ 3. SETTING THE TIME AND DATE
→ 4. CHRONOGRAPH FUNCTIONS
→ 5. 24 TIME ZONES & ALARM FUNCTIONS
→ 6. SETTING THE DAY PHASE AND MOON PHASE
→ 7. SETTING THE ANNUAL CALENDAR
→ 8. SETTING THE PERPETUAL CALENDAR
→ 9. MINUTE REPEATER FUNCTION
→ 10. INTERNATIONAL ZENITH WARRANTY

You have invested in a Zenith timepiece: you are now wearing a Manufacture watch that has been crafted in our workshops.
Zenith is a member of a very select circle of authentic Swiss workshops which develop and produce their own movements from start to finish. We have been crafting our watches from the same location since 1865. Nestled in the heart of the mountainous valleys of Neuchâtel, our Manufacture is situated at number 34, Rue des Billodes in the town of Le Locle.
Zenith has received over 2,333 chronometry awards, making it one of the most widely-acknowledged Swiss brands in terms of precision. In order to explore our passion for fine craftsmanship in more detail, please visit our website at www.zenith-watches.com. We also invite you to sign up as a Zenith watch owner; this will provide you with a one-year extension on your warranty. Your chronograph contains a mechanical movement born from over 300 years of watchma king tr a ditio n. We as k that you loo k af ter i t at tenively and handle it with care throughout the setting process.
Over the following pages, you will find advice about using your watch and its functions. The functions available depend on the model.
1 → THE EL PRIMERO MOVEMENT
LOOK AT IT CAREFULLY!
Before you is the most famous movement in watchmaking history, one which every watch enthusiast around the world is capable of naming.
It is currently the world's most accurate series-produced movement. Its secret lies in the cadence of its balance. Whilst other movements generally perform 8 vibrations per second at best, the El Primero calibre beats 10 times in that same second. Its development has been accompanied by a number of breakthrough innovations, including dry lubrication that ensures excellent long-term stability, and the power reserve that had to be optimised to match the higher and more energy-consuming frequency. All Zenith watches are equipped with a proprietary Zenith movement.
Few brands in the world can lay claim to such a rigorous approach. When you opt for a Zenith timepiece, you enjoy the absolute certainty of owning a watch produced from start to finish in the Manufacture of Le Locle. This fundamental requirement entails a need for calibres that has resulted in the creation of more than 600 different movements.
natural_image
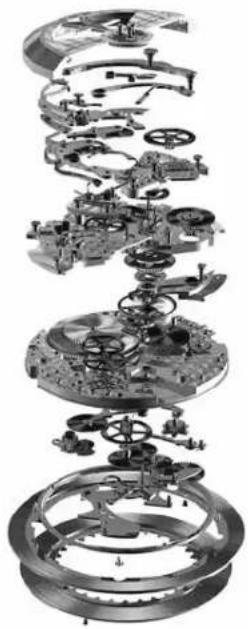
Exploded view of a mechanical gear assembly showing internal components and gears (no text or labels)IMPRESSIVE FIGURES
Making an El Primero
movement involves:
→ 9 months of work
→ 296 expert craftsman
→ 2,500 operations
→ 50 milling operations on the dial side
→ 77 other milling operations on the bridge side
→ 18 different metals in the classic version
Characteristics
→ 13-ligne calibre. 30 mm diameter
→ 36,000 vibrations/hour
→ Minimum 6.5 mm thickness.
→ Minimum of 280 components and 31 jewels
→ Index assembly with fine adjustment
→ Power reserve of over 50 hours
→ Central rotor with ball bearings
→ Automatic winding in both directions
→ Fast date adjustment
→ Chronograph function (except Synopsis models)
→ Column-wheel chronograph control centre
2 → WINDING YOUR WATCH
Your watch is equipped with a mechanical movement. The movement is wound either by the crown or via the action of the oscillating weight when worn on the wrist.
natural_image
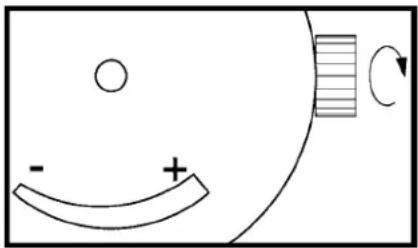
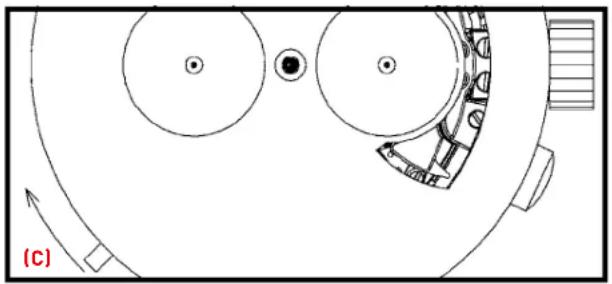
Simple diagram showing a curved arrow labeled '−' and plus sign inside a circle, with a striped rectangular element on the right (no text or symbols)Power-reserve-indicator
The graduated scale running from “-” to “+” displays the remaining power reserve.
Accuracy
Under normal conditions of use, the precision discrepancy for our automatic watches is a maximum of 4 to 5 minutes per month in comparison to the standards on the market. Personalised time-setting can however be carried out on request by an authorized Zenith representative.
When your watch has stopped
Note: For models equipped with a screwed-in crown, unscrew it to wind your watch.
Hold the watch in your hand and turn the crown at least thirty times. In this way, the barrel containing the mainspring is rewound. To ensure that the automatic winding mechanism functions correctly, the watch must be worn for at least 12 hours every day for several days. If the watch is not worn for long enough, it will stop. If you do not wear your watch during the night, you can give the crown a few turns in the morning before putting it on.
3 → SETTING THE TIME AND DATE
Time
Important for models with date: to avoid any risk of damaging the movement, the time should always be adjusted in a clockwise direction.
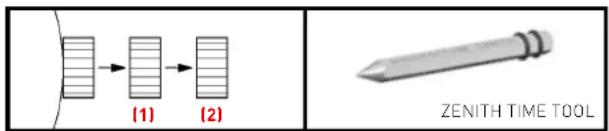
Pull out the crown one click (1). If your watch displays the date, ensure that you are setting the time during the correct part of the day, i.e. before or after midday. Turn the crown clockwise to place the hands on the desired hour. On the stroke of the time signal, press the crown back in.
Simple date, Month or Large date
Important: Before any change of date, position the hands between 2 o'clock and 6 o'clock, always moving them in a clockwise direction, except for annual calendar models, on which the hands must be positioned between 4 and 6 o'clock.
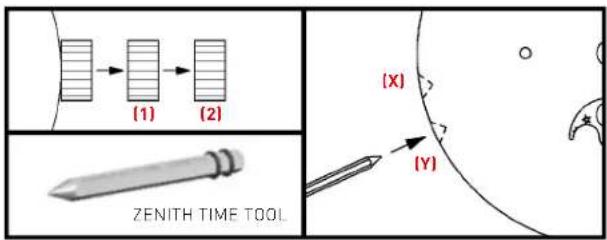
Pull out the crown two clicks (2) and turn it until the required date appears. For models displaying the month, scroll through the dates as far as the month required and then set the date. The month changes at midnight on the 31st. Push the crown back in.
Day of the week
Use the Zenith Time Tool to press the corrector (Y) until the required day appears. Do not use a pen or any other pointed object.
Hint: To ensure you set the correct time - before (a.m.) or after (p.m.) midday - with regards to date change, we advise that you set the date to the day before the desired date and then move the hours forwards until you reach the correct date and time, a.m. or p.m.
4 → CHRONOGRAPH FUNCTIONS
Chronograph & Striking 10 ^th chronograph
TO MEASURE DURATIONS OF TIME
Note: For models equipped with screwed-in chronograph pushpieces, unscrew them to use the chronograph functions.
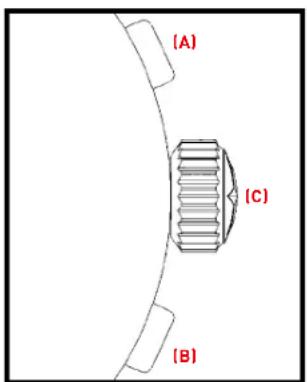
Start/Stop: Pressing button (A) once starts timing, and pressing it again stops it. To resume timing: Pressing button (A) again resumes timing. Resetting to zero: once the chronograph has been stopped, press button (B) to bring the chronograph hand and counters back to zero.
Fly-back chronograph
RESET AND INSTANT START
Pressing button (B) firmly while timing is in progress brings all the counters back to zero and a fresh timing operation will start the moment you release button (B). In this way, a single action stops the current timing operation and starts the next one.
Split-second chronograph
MEASURING INTERMEDIATE TIMES
Start/Stop: to start both chronograph hands, press button (A).
Stop/Restart of the fly-back hand: press the single push-button (C) once to stop the fly-back hand, and press it again to make the fly-back hand catch up with the first chronograph hand. Resetting to zero: once the chronograph has been stopped, press button (B) to bring both chronograph hands and the counters back to zero.
5 → 24 TIME ZONES AND ALARM FUNCTIONS

24 time zones
Choose the city that represents the time zone where you are. Turn the crown positioned at 11 o'clock to move the city on the scale to midday. Then set the time. Check the day/night (sun/star) display on the 24-hour disc. For example, when it is 10.10 a.m. in New York, it is 4.10 p.m. in Paris and 0.10 a.m. in Tokyo.
Alarm
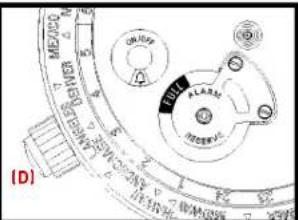
Turn the crown to 8 o'clock to wind the alarm until the white or red part of the alarm power reserve reaches the "+" sign or the "Full" indication appears in the green zone. The alarm is now wound. Pull out the crown one click (1) and set the blue or red hand of the alarm to show the required wake-up time by turning the crown in either direction. Push the crown back in. Press button (D) once to activate or deactivate the alarm function. The active state is shown by a little bell.

Active Inactive

6 → SETTING THE DAY PHASE AND MOON PHASE
Day phase
The day phase, shown by the picture of the sun for day time and the night sky for night time, is linked to the time of day. It can therefore be set in the same way as the time after pulling the crown out one click (1).
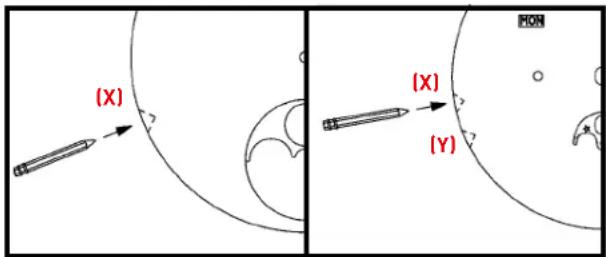
Moon phase
To adjust the moon phase without any risk of damaging the movement, it is essential to position the hands in the lower part of the dial between 3 and 9 o'clock. Position the full moon at the centre of its aperture by pressing the corrector (X) on the side of the case several times using the Zenith Time Tool. Using a moon calendar, identify the date of the last full moon and count the number of days between then and the present day. Press the corrector the same number of times.
Example
It is October 15th 2015. The last full moon was on October 5th. The corrector must thus be pressed 10 times. The moon phase is set.
Dates of the full moon between 2016 and 2020
| J | F | M | A | M | J | J | A | S | O | N | D | |
| 2016 | 24 | 22 | 23 | 22 | 21 | 20 | 19 | 18 | 16 | 16 | 14 | 14 |
| 2017 | 12 | 11 | 12 | 11 | 10 | 9 | 9 | 7 | 6 | 5 | 4 | 3 |
| 2018 | 2/31 | 2/31 | 30 | 29 | 28 | 27 | 26 | 25 | 24 | 23 | 22 | |
| 2019 | 21 | 19 | 21 | 19 | 18 | 17 | 16 | 15 | 14 | 13 | 12 | 12 |
| 2020 | 10 | 9 | 9 | 8 | 7 | 5 | 5 | 3 | 2 | 1/31 | 30 | 30 |
7 → SETTING THE ANNUAL CALENDAR
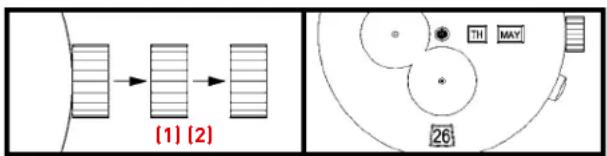
Example: it's Thursday May 26th.
1. Day of the week
Pull the crown out one click [1] . Turn the hands clockwise to set the day of the week. Then, place the hands in the lower part of the dial (for example at 7.25) the day before the one you desire (Example: Wednesday if you want Thursday). Press the crown back in.
flowchart
graph TD
    A["Input Block 1"] --> B["Process Unit"]
    C["Input Block 2"] --> B
    B --> D["Output Section"]
    style A fill:#f9f,stroke:#333
    style C fill:#f9f,stroke:#333
    style D fill:#ccf,stroke:#333
2. Date and Month
Pull the crown out two clicks (2) and scroll through the dates until the required month appears (Example: May) then set the date one day before the one you desire (Example: the 25th if you want the 26th). The final adjustment is made via the hands by setting the time clockwise. Once you pass through midnight, the day and date will change. Finally, you will be able to set correctly the time before (a.m.) or after (p.m.) midday.
The watch is now set according to our example: Thursday May 26th.
8 → ADJUSTING THE PERPETUAL CALENDAR
Important: first of all, turn the hands clockwise until the date changes and then adjust the day and the week afterwards. Please set the perpetual calendar in the following order:
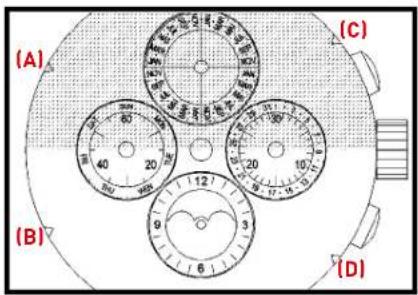
Setting the date
Using the Zenith Time Tool, correct the date (3 o'clock counter) by pressing on the corrector button (A) several times until the desired date appears. You will notice that the corrector button also automatically activates the days hand (9 o'clock counter).
Setting the day
In the same way, press the day corrector button [B] until the desired day appears.
Setting the month
Press the month corrector button [C] until the desired month appears, bearing in mind leap years shown on the 4th quarter of the month counter (12 o'clock counter). A leap year is easily identifiable since it is shown in a different colour.
Setting the moon phase
Press the moon-phase corrector button (D) until a full moon setting is reached (in the middle of the display window). Using the full moon calendar hereafter, select the last full moon and count the number of days until the present day, before pressing the same number of times on the corrector button (D).

The Zenith Time Tool will enable you to press all setting buttons (A), (B), (C), (D) and make the necessary corrections.
9 → MINUTE REPEATER FUNCTION
Setting the time
Do not attempt to set time when the striking mechanism is in operation as this might damage the movement.
Pull the crown out one click. Turn the crown in either direction to set the hands at the time required. Press the crown back in.
Minute Repeater mechanism
The Minute Repeater strikes to indicate the number of hours, the number of quarter hours since the last hour and the number of minutes since the last quarter.
This requires three different sound sequences to distinguish between hours, quarter hours, and minutes. It first sounds the hours in a low tone, then the quarter-hour in a two-tone sequence, and the remaining minutes in a high tone.
Example 1: 10.10 a.m.
1 - 10 times in a low tone for the hours
2 - No quarter sound
3 - 10 times in a high tone for the minutes
Example 2: 3.37 p.m.
1 - 3 times in a low tone for the hours
2 - 2 quarter sounds
3 - 7 times in a high tone for the remaining minutes
natural_image
Technical line drawing of a mechanical component with circular features and a gear mechanism (no text or symbols)Trigger the Minute Repeater
The spring which activates the repeating mechanism is wound by means of the slide piece (c) fitted on the side of the watch case.
To activate the striking mechanism, lift the slide (C) up and maintain the position for 2 seconds before release.
A locking device releases the repeating mechanism only when the slide has reached the end of its travel.
WARNING
Do not for any reason activate the slide piece when the crown has been pulled out (time-setting position). Always wait 30 seconds in between each complete chime to avoid damaging the movement.
10 → INTERNATIONAL ZENITH WARRANTY
Zenith watches are high-precision, high-technology Manufacture products. Before leaving the workshops, your watch has undergone a number of rigorous quality tests. An international warranty does, nonetheless, cover your watch for any manufacturing defects over a period of two years, taking effect from the date of purchase. Sign up on the www.zenith-watches.com website in order to obtain an extra year's warranty. This warranty is valid in all official Zenith service centers throughout the world, according to the following conditions:
→ The watch has been purchased from an exclusive Zenith authorized retailer; the name and address of the retailer, together with the date of purchase and reference for the watch are clearly marked on the warranty certificate
→ Your watch has been worn under the normal conditions of use and maintenance recommended by Zenith and has not been mishandled
→ The warranty certificate, the only valid proof of purchase, accompanies the watch when sent to an authorized Zenith service center
Please note that the Zenith international warranty does not cover the normal aging of your watch, the natural wear and tear of leather, fabric or rubber straps, or any scratches on the case and sapphire crystals incurred when the watch was worn.

NOTES :

Publisher:
Zenith Communication and Marketing Department
© Zenith Branch of LVMH Swiss Manufactures SA
Printed in Switzerland
Zenith reserves the right to modify at any time and without prior notice the specifications relating to the products shown in this publication.
ZTT1126, December 2015