
ES8901 - Razor PANASONIC - Free user manual and instructions
Find the device manual for free ES8901 PANASONIC in PDF.


| Product Type | Rechargeable Foil Shaver |
| Model | ES8901 |
| Brand | Panasonic |
| Dimensions (approx.) | 5.7 x 2.8 x 1.8 in (145 x 71 x 46 mm) |
| Weight (approx.) | 0.4 lbs (180 g) |
| Power Source | Rechargeable lithium-ion battery |
| Charging Time | 8 hours |
| Operating Time | 45 minutes (approx.) |
| Motor | Linear motor for high-speed cutting |
| Cutting System | Ultra-thin foil + raised trimmer |
| Wet/Dry Operation | Yes, can be used with shaving foam/gel or dry |
| Cleanable with Water | Yes, washable under running water |
| Pop-up Trimmer | Yes, for sideburns and mustache |
| LED Indicators | Battery level and charge status |
| Travel Lock | Yes, to prevent accidental operation |
| Replacement Foil | Panasonic WES0190P (sold separately) |
| Replacement Blade | Panasonic WES0206P (sold separately) |
| Country of Origin | China |
Frequently Asked Questions - ES8901 PANASONIC
User questions about ES8901 PANASONIC
0 question about this device. Answer the ones you know or ask your own.
Ask a new question about this device
Download the instructions for your Razor in PDF format for free! Find your manual ES8901 - PANASONIC and take your electronic device back in hand. On this page are published all the documents necessary for the use of your device. ES8901 by PANASONIC.
USER MANUAL ES8901 PANASONIC
Operating Instructions
Rechargeable Shaver
Model No. ES8249/ES8901
| English 2 | Português 72 | Magyar | 142 |
| Deutsch 12 | Norsk 82 | Română | 153 |
| Français 22 | Svenska 92 | Русский | 163 |
| Italiano 32 | Suomi 102 | Türkçe | 173 |
| Nederlands 42 | Polski 112 | Українська | 183 |
| Español 52 | Česky 122 | ||
| Dansk 62 | Slovensky 132 |

natural_image
Three electric shakers with different designs and accessories, shown from different angles (no visible text or symbols)Before operating this unit, please read these instructions completely.
Important
▶ Before use
This Wet/Dry shaver can be used for wet shaving with shaving lather or for dry shaving. You can use this watertight shaver in the shower and clean it in water. The following is the symbol of Wet shaver. The symbol means that the hand-held part may be used in a bath or shower.

Treat yourself to wet lather shaves for at least three weeks and notice the difference. Your Panasonic Wet/Dry shaver requires a little time to get used to because your skin and beard need about a month to adjust to any new shaving method.
▶ Using the shaver
Caution - The outer foil is very thin and can be damaged if not used correctly. Check that the foil is not damaged before using the shaver. Do not use the shaver if the foil etc. is damaged as you will cut your skin.
Persons using an implanted medical electronic device, such as a pacemaker, should not allow this unit to touch the skin where the medical electronic device is implanted because this may cause a malfunction.
▶ Charging the shaver
Do not use any power cord, AC adaptor or recharger other than one specifically designed for this model. Plug in the adaptor into a household outlet where there is no moisture and handle it with dry hands. The shaver and the recharger may become warm during use and charging. However, this is not a malfunction. Do not charge the shaver where it will be exposed to direct sunlight or other heat sources. Hold the adaptor when disconnecting it from the household outlet. If you tug on the power cord, you may damage it. Contact an authorized service center if the power cord gets damaged.
▶ Cleaning the shaver
Warning - Disconnect the power cord from the shaver before cleaning it to prevent electric shock.
Keep both the inner blades inserted. If only one of the inner blades is inserted, the shaver may be damaged. If you clean the shaver with water, do not use salt water or hot water. Do not soak the shaver in water for a long period of time. Wipe it with a cloth dampened with soapy water. Do not use thinner, benzine or alcohol.
▶ Storing the shaver
Disconnect the power cord when storing the shaver. Do not bend the power cord or wrap it around the shaver. Do not leave this shaver within the reach of small children. Keep these operating instructions in a safe place.
▶ Self-cleaning recharger
Do not clean the adaptor or the self-cleaning recharger in water as it will damage them or cause an electric shock. Do not remove the shaver from the self-cleaning recharger while using a course that includes the "Dry" function. A heater is used so the area around the blades becomes extremely hot and you may burn yourself.
Place the self-cleaning recharger on a level and stable surface. Otherwise the cleaning liquid may spill and discolor leather products or other surfaces. Wipe it immediately. The self-cleaning recharger cleans the inner blades and the system outer foil. Brush or wash with water to remove beard trimmings in other areas.
SPECIFICATIONS
Power source: 100-240 V AC, 50-60 Hz
(Automatic voltage conversion)
Motor voltage: 3.6 V DC
Charging time: 1 hour
This product is intended for household use only.
Airborne Acoustical Noise:
In shaving mode: 63 (dB (A) re 1 pW)
In trimmer mode: 66 (dB (A) re 1 pW)
Parts identification

① Protective cap
② System outer foil
③ Inner blades
④ System outer foil release buttons
⑤ Finger rest
⑥ Pivot action selector
⑦ OFF/ON switch
⑧ LCD panel
⑨ Appliance socket
⑩ Trimmer
⑪ Trimmer handle
⑫ Adaptor (RE7-40)
⑬ Power cord
⑭ Appliance plug
⑮ Self-cleaning recharger (Referred to as the
"Recharger".)
⑯ Detergent cartridge
⑰ Water tank
⑱ Socket
⑲ Water tank cap
⑳ Clean lamp
② Dry lamp
② Charge lamp
②3 Status lamp
⑳ Select button
⑲ Cleaning tray
②6 Water level
⑳ Soft case
⑳ Cleaning brush
⑲ Oil
Operating environment for the self-cleaning recharger
Operating temperature: 15-35 °C
Operating humidity: Less than 95%
- If you use the self-cleaning recharger in temperatures outside the above range, the following problems may occur.
- The time it takes to charge the shaver increases.
- The recharger stops functioning.
- The lifespan of the rechargeable battery shortens. (Only when you use the recharger in lower temperatures.) In this case, the indicators on the LCD panel will blink twice every second.
- If the indicators on the LCD panel do not glow, wait for a short while until it glows.
- Depending on the environment, the shaver may not dry even if you select a course that includes the "Dry" function. In this case, wipe off any drops of water with a dry cloth.
Charge
Charging with the self-cleaning recharger
Thoroughly wipe off any drops of water on or around the recharger so that it is dry before charging it.


1 Attach the detergent cartridge and the water tank to the self-cleaning recharger.
Page 6
2 Insert the appliance plug.
3 Plug in the adaptor.
4 Remove the protective cap and then attach the shaver.
- Turn the shaver off before attaching.
- Check that the outer foil is not deformed or damaged when you are attaching the shaver.
• The indicators on the LCD panel glow and charging starts. -
Charging is completed when the indicators on the LCD panel blink.
(Max. 1 hour later) -
You can keep the shaver attached to the recharger, or connected to the adaptor, when not using it to maintain full battery capacity. You cannot overcharge the shaver.
▶ Charging without the self-cleaning recharger
You can also charge without the recharger.
- Insert the appliance plug into the shaver.
- Plug in the adaptor into a household outlet.

About the LCD panel
The LCD panel shows the remaining battery capacity from 0% to 100%, in 10% increments.
While charging
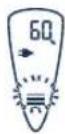
The indicators glow.
After charging is completed

The indicators blink once every second.
10 minutes after charging is completed

The indicators blink once every 2 seconds.
During use After use

The used time is shown.
- The shown time returns to [0'00"] after 10 minutes.

The used time and the remaining battery capacity are shown alternately after turning off the shaver.
When the battery capacity is low

- You can shave 1 to 2 times after "10%" appears. (This will differ depending on usage.)
"10%" appears and =links.
- A full charge will supply enough power for approx. 14 shaves of 3 minutes each.
Shave
Using the shaver

1
Press the OFF/ON switch.
2
Hold the shaver as illustrated above and shave.
- Start out shaving by applying gentle pressure to your face. Stretch your skin with your free hand and move the shaver back and forth in the direction of your beard. You may gently increase the amount of pressure as your skin becomes accustomed to this shaver. Applying excessive pressure does not provide a closer shave.
▶ Pivot action selector
Use to select "SOFT" (soft) or "LOCK" (lock). You can change the pivot action whether the shaver is turned on or off.


▶ Using the trimmer
Slide the trimmer handle up. Place at a right angle to your skin and move downwards to trim your sideburns.


Cleaning with the self-cleaning recharger
▶ Preparing the self-cleaning recharger
Remove the shaver and the appliance plug from the self-cleaning recharger.

flowchart
graph LR
    A["1: Body housing"] --> B["2: Rear assembly"]
    B --> C["3: Rear switch"]
    C --> D["4: Assembly box"]
    D --> E["5: Rear assembly with internal components"]
    E --> F["6: Final packaging"]
1 Remove the water tank and then open the water tank cap.
2 Wash away the old cleaning liquid and then rinse the water tank.
3 Pour tap water into the water tank.
- Do not let the water rise above the maximum water line. This may cause the cleaning liquid to spill.
4 Securely close the water tank cap and then attach the tank.
5 Peel off the seals from the new detergent cartridge. (2 seals)
- Hold the detergent cartridge horizontally. (The detergent may spill if the detergent cartridge is tilted too much.)
6 Attach the detergent cartridge.
- Replace the detergent cartridge when the status lamp is illuminated. Use the below chart as a guide.
| Shaving Cleaning Reusability | |
| 1 time/day | 1 time/day approx. 30 times |
| 1 time/3 days approx. 10 times | |
| 1 time/week approx. 4 times | |
The expiration date of the cleaning liquid is 6 months after it is opened. If you do not use the cleaning liquid for more than 6 months, throw
away the detergent cartridge and the cleaning liquid.
- Only use self-cleaning recharger detergent for Panasonic shavers.
- Always change the detergent cartridge and the cleaning liquid in the water tank at the same time. Adding water, or changing just the detergent cartridge or the water, will result in deteriorated cleaning functions.
- If you operate the self-cleaning recharger, the concentrated detergent in the detergent cartridge dilutes and the water inside the tank will become a cleaning liquid.

flowchart
graph LR
    A["Cleaning the shaver"] --> B["Step 1: Shaver is placed on top"]
    B --> C["Step 2: Shaver is placed on side arm"]
    C --> D["Step 3: Shaver is placed on side arm"]
    D --> E["Final inspection: Shaver is checked with a brush and presser, indicated by arrow"]

1 Insert the appliance plug.
2 Plug in the adaptor.
- Remove any soap or water on the shaver if it has been washed with hand soap or any other detergent.
3 Remove the protective cap and then attach the shaver.
- Turn the shaver off before attaching. - Check that the outer foil is not deformed or damaged when you are attaching the shaver.
4 Press [SELECT] to select the course.
- Each time you press [SELECT], the course changes from "Clean/Dry/Charge" → "Clean/Dry" → "Dry/Charge" → "Dry" → "Charge".
- The courses start approximately 6 seconds after they are selected.
- The course will be aborted if the power is cut off. In this case, perform the course again from the beginning.
- Do not detach the detergent cartridge or the water tank as the cleaning liquid may spill causing a malfunction.
| Course | Course selection indications | On shaver | Course completion summary | |||||||
| On recharger | Changeable course halfway through | On recharger On shaver | Time required (guide) [In the low temperature] | |||||||
| CLEAN | DRY | CHARGE | → | CLEAN | DRY | CHARGE | → | |||
| 1Charge | ○ | ○ | ●* | 2345 | Glows | ◆ | ○ | ○ | ○ | Blinks 1 hour |
| 2 Clean/Dry/ Charge | ● | ● | ● | 3 | Glows while charging | ◆ | ☀ | ☀ | ○ | Blinks 2 hours [+30 min] |
| 3Clean/Dry 2 | ● | ● | ○ | - | ◆ | ☀ | ☀ | ○ | -1 hour [+30 min] | |
| 4Dry/Charge 2 35 | ● | ● | ● | Glows while charging | ◆ | ○ | ☀ | ○ | Blinks 2 h 40 min | |
| 5Dry 234 | ○ | ● | ○ | - | ◆ | ○ | ☀ | ○ | -1 h 40 min | |
*The lamp goes out in 6 seconds.
▶▶▶▶ Cleaning with the self-cleaning recharger (continued)
▶ Follow the steps outlined below if the status lamp blinks or glows during the "Clean/Dry/Charge" course or the "Clean/Dry" course.
Blinks Glows
Correctly set the detergent cartridge and then restart a course.
If the status lamp goes out
Continue a course.
Remove the shaver from the self-cleaning recharger and then check that the [CLEAN] lamp has gone out. (Be careful as the blade may be hot or wet.) Check that the water tank is correctly attached, the water tank cap is securely closed and the self-cleaning recharger is placed horizontally.
When an abnormality has been corrected
Press and hold [SELECT] for approximately 2 seconds to turn off the status lamp and then restart a course.
When no abnormality was found
It is time to replace the detergent cartridge and cleaning liquid inside the water tank.
Drain the old cleaning liquid inside the water tank and then refill it with water. Replace the old detergent cartridge and then restart the course.
When the status lamp goes out
Continue a course. Contact an
When the status lamp glows again
authorized service center.
Cleaning the shaver without the self-cleaning recharger
3
4

natural_image
Illustration of hands using a handheld device to interact with a device (no text or symbols visible)
natural_image
Illustration of two hand-painted images showing a hand holding a device with a droplet, no text or symbols present.6
natural_image
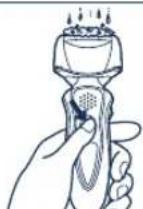
Line drawing of a pair of electric shakers, one emitting powder from the cup (no text or symbols)We recommend that you clean your shaver with the self-cleaning recharger or the "sonic" vibration turbo-cleaning mode when the faucet symbol appears on the LCD panel.
-
Disconnect the power cord from the shaver.
-
Apply some hand soap and some water to the outer foil.
-
Press the OFF/ON switch for more than 2 seconds to activate the turbo mode for "sonic" vibration cleaning.
• (1) appears on the LCD panel.
• After about 20 seconds, it will be automatically turned off, or you can turn it off by pressing the OFF/ON switch.
-
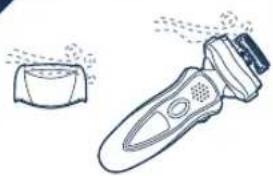
Remove the system outer foil and press the OFF/ON switch for more than 2 seconds to activate the turbo mode for "sonic" vibration cleaning and clean it with running water.
-
Wipe off any drops of water with a dry cloth.
-
Remove the system outer foil to allow it to dry completely.
Caution for turbo mode
- Shaving in turbo mode may damage your skin. Turn the shaver off and then on again to cancel turbo mode.
- Do not place your fingers on the OFF/ON switch while using the shaver. This may cause the shaver to turn off or enter turbo mode. Place your fingers on the finger rest while using the shaver.
Lubrication
To maintain shaving comfort for a long time, it is recommended that the oil provided with the shaver is used.
-
Switch off the shaver.
-
Apply one drop of oil to each of the outer foils.
-
Raise the trimmer and apply a drop of oil.
-
Switch the shaver on, and run it for approximately five seconds.
-
Switch off the shaver, and wipe off any excess oil from the outer foils with a soft cloth.
It is not necessary to oil the blades after using the self-cleaning recharger (lubricant is included in the cleaning detergent).
Replacing the system outer foil and the inner blades
appears on the LCD panel once a year. (This will differ depending on usage.) We recommend checking the system outer foil and the inner blades when it appears.
- Press the OFF/ON switch for more than 30 seconds to delete
system outer foil once every year
inner blade once every two years
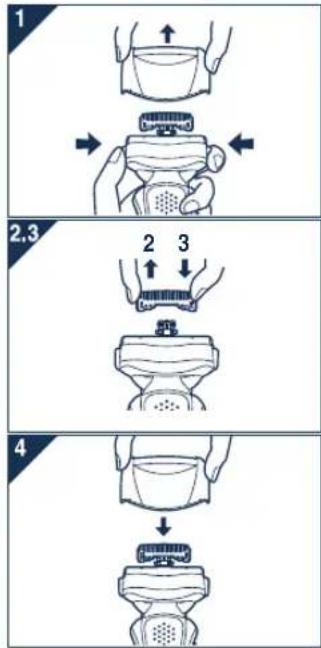
- Press the system outer foil release buttons and lift the system outer foil upwards as illustrated.
- Remove the inner blades one at a time as illustrated.
- Do not touch the edges (metal parts) of the inner blades to prevent injury to your hand.
- Insert the inner blades one at a time until they click as illustrated.
- Insert the system outer foil by pushing it downwards until it clicks.
Cleaning with the brush
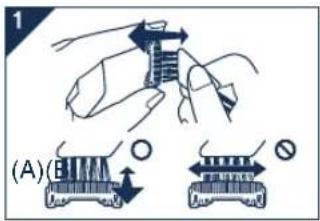
- Clean the inner blades using the short brush by moving it in direction (A).
Clean the system outer foil, the shaver body and the trimmer using the long brush.
- Do not move the short brush in direction (B) as it will damage the inner blades and affect their sharpness.
- Do not use the short brush to clean the outer foils.
Cleaning the self-cleaning recharger
Beard trimmings may become attached to the cleaning tray of the self-cleaning recharger. Follow the steps below to remove them. We recommend doing this each time you change the detergent cartridge.

natural_image
Diagram of a mechanical device with internal components and directional arrows indicating movement (no text or symbols)- Be sure to remove the water tank and the appliance plug from the self-cleaning recharger.
- Be careful not to spill the cleaning liquid.
- Gently wipe off any beard trimmings attached to the inside of the cleaning tray with a cloth or tissue paper dampened with water.
- Clean the corners and uneven parts of the cleaning tray with a cotton swab dampened with water.

natural_image
Two-step illustration of a device being inserted into a housing, showing the process (no text or symbols)- Do not pull hard on the rubber blade protector at the bottom of the cleaning tray. The rubber may come off if you pull hard on it. It is only necessary to pull it up slightly.
- Warning - Do not wash or apply water to the adaptor or self-cleaning recharger. Failure to observe this may cause electric shock or result in short circuits.
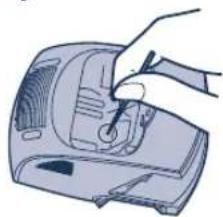
▶ When the water does not drain from the cleaning tray
natural_image
Illustration of a hand using a tool to press or install a device (no text or symbols visible)Beard trimmings may clog the drain at the bottom of the cleaning tray.
In this case, you cannot clean or dry the shaver.
Push the beard trimmings down through the drain with a tooth pick etc.
Removing the built-in rechargeable battery
Remove the built-in rechargeable battery before disposing of the shaver. Please make sure that the battery is disposed of at an officially designated location if there is one. Do not dismantle or replace the battery so that you can use the shaver again. This could cause fire or an electric shock. Replace it at an authorized service center.
- Disconnect the power cord from the shaver when removing the battery.
- Perform steps ① to ⑦ and lift the battery, and then remove it.

For environmental protection and recycling of materials
This shaver contains a Lithium-ion battery. Please make sure that the battery is disposed of at an officially assigned location, if there is one in your country.
Information on Disposal for Users of Waste Electrical & Electronic Equipment (private households)

This symbol on the products and/or accompanying documents means that used electrical and electronic products should not be mixed with general household waste.
For proper treatment, recovery and recycling, please take these products to designated collection points, where they will be accepted on a free of charge basis. Alternatively, in some countries you may be able to
return your products to your local retailer upon the purchase of an equivalent new product.
Disposing of this product correctly will help to save valuable resources and prevent any potential negative effects on human health and the environment which could otherwise arise from inappropriate waste handling. Please contact your local authority for further details of your nearest designated collection point.
Penalties may be applicable for incorrect disposal of this waste, in accordance with national legislation.
For business users in the European Union
If you wish to discard electrical and electronic equipment, please contact your dealer or supplier for further information.
Information on Disposal in other Countries outside the European Union
This symbol is only valid in the European Union. If you wish to discard this product, please contact your local authorities or dealer and ask for the correct method of disposal.
Matsushita Electric Works, Ltd.
1048, Kadoma, Osaka 571-8686, Japan
No.1 EN, GE, FR, IT, DU, SP, DA, PT, NW, SW, FI, PL, CZ, SK, HU, RO, RU, TK, UA (欧州)
Printed in Japan
- Important
- ▶ Before use
- ▶ Using the shaver
- ▶ Charging the shaver
- ▶ Cleaning the shaver
- ▶ Storing the shaver
- ▶ Self-cleaning recharger
- SPECIFICATIONS
- Operating environment for the self-cleaning recharger
- Charge
- Charging with the self-cleaning recharger
- About the LCD panel
- Shave
- Using the shaver
- 1
- 2
- ▶ Pivot action selector
- ▶ Using the trimmer
- Cleaning with the self-cleaning recharger
- ▶ Preparing the self-cleaning recharger
- Insert the appliance plug.
- Plug in the adaptor.
- Remove the protective cap and then attach the shaver.
- Press [SELECT] to select the course.
- ▶▶▶▶ Cleaning with the self-cleaning recharger (continued)
- Blinks Glows
- If the status lamp goes out
- When an abnormality has been corrected
- When no abnormality was found
- When the status lamp goes out
- When the status lamp glows again
- Cleaning the shaver without the self-cleaning recharger
- 3
- 4
- 6
- Caution for turbo mode
- Lubrication
- Replacing the system outer foil and the inner blades
- Cleaning with the brush
- Cleaning the self-cleaning recharger
- ▶ When the water does not drain from the cleaning tray
- Removing the built-in rechargeable battery
- For environmental protection and recycling of materials
- Information on Disposal for Users of Waste Electrical & Electronic Equipment (private households)
- For business users in the European Union
- Information on Disposal in other Countries outside the European Union
Brand : PANASONIC
Model : ES8901
Category : Razor