
DVI-RGB 200 - Audio/video converter Extron - Free user manual and instructions
Find the device manual for free DVI-RGB 200 Extron in PDF.


| Product Type | Audio/Video Converter |
| Brand | Extron |
| Model | DVI-RGB 200 |
| Input Signal | DVI-D (digital) |
| Output Signal | RGBHV, RGBS, RGsB (analog) |
| Supported Resolutions | Up to 1920x1200 @ 60 Hz |
| Input Connector | DVI-I (female) |
| Output Connector | 5 BNC (female) |
| Audio Support | Embedded audio pass-through |
| Power Supply | External, 12 VDC, 1 A |
| Power Consumption | 6 watts (max) |
| Dimensions (H x W x D) | 1.7 in x 4.3 in x 3.0 in (4.3 cm x 10.9 cm x 7.6 cm) |
| Weight | 0.5 lb (0.23 kg) |
| Operating Temperature | 32°F to 104°F (0°C to 40°C) |
| Mounting | Desk-top or under-desk with optional kit |
| EDID Management | Internal EDID mapper |
| Compliance | CE, FCC Class A, UL |
| Warranty | 3 years parts and labor |
| Cleaning Instructions | Wipe with dry cloth; no solvents |
| Maintenance | No user-serviceable parts; refer to manual |
| Package Contents | Converter unit, power supply, user manual |
Frequently Asked Questions - DVI-RGB 200 Extron
User questions about DVI-RGB 200 Extron
0 question about this device. Answer the ones you know or ask your own.
Ask a new question about this device
Download the instructions for your Audio/video converter in PDF format for free! Find your manual DVI-RGB 200 - Extron and take your electronic device back in hand. On this page are published all the documents necessary for the use of your device. DVI-RGB 200 by Extron.
USER MANUAL DVI-RGB 200 Extron
This guide provides instructions for an experienced installer to set up and operate Extron® DVI-RGB 200 DVI to Analog RGB Video Interface.
Installation
Step 1 — Mounting
Turn off or disconnect all equipment power sources and mount the interface as required.

Step 2 — Connections and Initial Settings
① DVI-D Input connector — Connect a single link of direct digital video to this DVI-I connector using the included cable.
② Buffered Loop-through connector — If desired, connect a direct digital local monitor to this DVI-I connector.

NOTE: Use only cables specifically intended for DVI interfaces. Use of non-DVI cables or modified cables can cause the DVI-RGB 200 to not operate correctly.
③ Output connectors — Connect an RGB display to these female BNC connectors. Connect the BNCs as shown at right for the desired RGB video format.
NOTE: Ensure that the SOG DIP switch (⑥) is turned off (down) for RGBHV and RGBS video.
Ensure that the SOG DIP switch is turned on (up) for RGsB video.
④ EDID Source switch —
Set this switch to the Monitor (up) position to connect the DDC channel between the direct digital video source and the local monitor.
Set this switch to the Selector (down) position to connect the DDC channel between the direct digital video source and the built-in DVI-RGB 200 EDID logic.
⑤ EDID Select — If the EDID Source switch (④) is in the Selector (down) position, set this switch to the appropriate position to select the desired video resolution. Use the Refresh DIP switch (⑥) to select the refresh rate. The table at right identifies the switch positions and the associated resolutions and vertical refresh rates. EDID Select Switch Refresh DIP Switch
⑥ DIP switches —
SOG (Sync on Green) On/Off switch — Set this switch to the On (up) position to enable SOG for RGsB video. Set this switch to the Off (down) position to disable SOG for RGBS or RGBHV video.
Refresh switch —
If the EDID Source switch (④) is in the Selector position (down) and the EDID select switch (⑤) is in position 1 through F position, set this switch either up or down to select the refresh rate of the selected output. See the table at right.

| EDID SelectSwitch | RefreshDIP Switch | EDID SelectSwitch | RefreshDIP Switch | |||||
| Pos. | Resolution | Dwn | Up | Pos. | Resolution | Dwn | Up | |
| 0 | User EDID | EDID capture | 8 | 1366x768 | 50 Hz 60 | |||
| 1 | 800x600 | 50 Hz 60 | 9 | 1400x1050 | 50 Hz 60 | |||
| 2 | 1024x768 | 50 Hz 60 | A | 1440x900 | 50 Hz 50 | |||
| 3 | 1280x720 | 50 Hz 60 | B | 1600x1200 | 50 Hz 60 | |||
| 4 | 1280x768 | 50 Hz 60 | C | 1680x1050 | 50 Hz 50 | |||
| 5 | 1280x800 | 50 Hz 60 | D | 1920x1080 | 50 Hz 60 | |||
| 6 | 1280x1024 | 50 Hz 60 | E | 1920x1200 | 50 Hz 60 | |||
| 7 | 1360x768 | 50 Hz 60 | F | N/A | ||||
If the EDID Source switch (④) is in the Selector (down) position and the EDID select switch is in position 0, set this switch up to capture the EDID data from the connected Buffered Loop-through monitor. See Capturing a User-recorder EDID.
⑦ AC power connector — Plug a standard IEC power cord into this connector to connect the interface to a 100 to 240 VAC, 50 Hz or 60 Hz power source.
Operation
Apply power to the devices in the following order: 1) DVI-RGB 200, 2) display device, 3) input device. After all devices are powered up, the system is fully operational.
If any problems are encountered, verify that the cables are routed and connected properly. If your problems persist, call the Extron S3 Sales & Technical Support Hotline that is closest to you, at the number shown below.
NOTES: • High-bandwidth Digital Content Protection (HDCP) is an encryption method that protects copyrighted digital entertainment material that uses DVI video.
- The DVI-RGB 200 cannot respond to the HDCP decryption key. When the DVI input is HDCP encrypted, the output of the DVI-RGB 200 RGB is blank.
- The computer reads the DDC on power up to determine the direct digital video resolution and refresh rate to output. Ensure that the local DVI monitor and the RGBHV monitor can both display the selected resolution and refresh rate, otherwise images may be distorted or missing.
- Ensure that the computer and local monitor are connected to the DVI-RGB 200, and the DVI-RGB 200 and local monitor have power applied, before applying power to the computer. If the other devices are not turned on before the computer is powered on, the image will not appear.
Front Panel Controls and Indicator
NOTE: Level Boost and Peaking have no affect on the DVI output of the Buffered Loop-through connector.

⑧ Power LED — The two-color Power LED lights amber or green:
Amber when the DVI-RGB 200 is receiving power but no DVI input signal is applied.
Green when the DVI-RGB 200 is receiving power and a DVI input is present.
⑨ Level Boost control — The Level Boost control alters the brightness of the picture on the RGB output. Judge the adjustment visually by looking at the display.
- At the minimum level setting (the counterclockwise limit of this control), the interface outputs video at 0.7 Vp-p.
- At the maximum level setting (the clockwise limit of this control), the interface outputs video at 1.45 Vp-p.
Select a level setting of 0.7 V and above to compensate for the signal level decrease that occurs with long cables. Set the level at the maximum setting for cable lengths over 500 feet.
10 Peak(ing) control — The Peaking control affects the sharpness of the RGB output. Increased peaking can compensate for detail (mid- and high-frequency) loss from low bandwidth or long cables. The minimum setting (counterclockwise limit) provides no peaking. The maximum setting (clockwise limit) provides 100 percent peaking.
Capturing a User-recorded EDID
Record the EDID from a display connected on the Buffered Loop-through connector as follows:
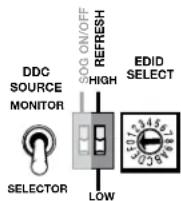
- Set the rear panel EDID Source switch to the Selector (down) position.
- Set the Output Resolution switch to the 0 position.
- Change the Refresh dip switch to on (up).
NOTE: The front panel Power LED lights amber whether the DVI-D Input connector is receiving a signal or not.
- Connect the unpowered display device to Buffered Loop-through connector.
- Power on the display device. The DVI-RGB 200 copies the EDID of the display connected in step 4 to its memory. After the EDID is successfully copied, the front panel Power LED lights green.
- Set the Refresh DIP switch to off (down).
| Extron USA - West Headquarters | Extron USA - East | Extron Europe | Extron Asia | Extron Japan | Extron China | Extron Middle East |
| +800.633.9876Inside USA/Canada Only | +800.633.9876Inside USA/Canada Only | +800.3987.6673Inside Europe Only | +800.7339.8766Inside Asia Only | +81.3.3511.7655+81.3.3511.7656 FAX | +400.833.1568Inside China Only | +971.4.2991800+971.4.2991880 FAX |
| +1.714.491.1500+1.714.491.1517 FAX | +1.919.863.1794+1.919.863.1797 FAX | +31.33.453.4040+31.33.453.4050 FAX | +65.6383.4400+65.6383.4664 FAX | +86.21.3760.1568+86.21.3760.1566 FAX |
68-1791-50
Rev A
10 10
Brand : Extron
Model : DVI-RGB 200
Category : Audio/video converter