
68365NP - Boat INTEX - Free user manual and instructions
Find the device manual for free 68365NP INTEX in PDF.


| Product Type | Inflatable Boat |
| Model | 68365NP (Challenger 1) |
| ISO Type | Type I |
| Maximum Persons | 1 |
| Maximum Load Capacity | 185 lbs (85 kg) |
| Recommended Working Pressure | 0.035 bar (0.5 psi) |
| Material | Heavy-duty PVC |
| Valve Type | Boston Valve with double cap and quick deflation |
| Inflation Method | Hand or foot pump (high-pressure compressors not recommended) |
| Floor Type | Inflatable floor |
| Oars Included | Yes, two-piece break-down oars with oar lock |
| Fishing Rod Holder | Included (certain models) |
| Grab Line | All-around grab line (installable) |
| Accessory Bag | Gear pouch or accessory bag |
| Safety Compliance | ISO 6185, NMMA (USA only) |
| Intended Use | Sheltered coastal waters, small lakes, rivers, canals (wind force ≤4, waves ≤0.3m) |
| Storage Temperature | 32°F to 104°F (0°C to 40°C) |
| Warranty | 90-day limited warranty |
| Repair Kit Included | Yes, repair patch provided |
Frequently Asked Questions - 68365NP INTEX
User questions about 68365NP INTEX
0 question about this device. Answer the ones you know or ask your own.
Ask a new question about this device
Download the instructions for your Boat in PDF format for free! Find your manual 68365NP - INTEX and take your electronic device back in hand. On this page are published all the documents necessary for the use of your device. 68365NP by INTEX.
USER MANUAL 68365NP INTEX
INTEX® OWNER'S MANUAL INFLATABLE BOAT
IMPORTANT THIS BOOKLET CONTAINS IMPORTANT SAFETY INFORMATION. READ IT THOROUGHLY BEFORE USING THIS PRODUCT AND KEEP IT FOR FUTURE REFERENCE.
ISO-6185 BOAT
Due to a policy of continuous product improvement, Intex reserves the right to change specifications and appearance, which may result in updates to the instruction manual, without notice.
TABLE OF CONTENTS
INTRODUCTION....3
MANUFACTURE'S CERTIFICATION....3
SAFETY & WARNING....3
MANUFACTURER'S RECOMMENDATION....4
DESCRIPTION....5
INFLATING INSTRUCTIONS....6
HOW TO USE BOSTON VALVE....6
FISHING ROD HOLDER USE....6
OAR ASSEMBLY....7
GRAB LINE INSTALLATION....8
ACCESSORY LINE INSTALLATION....8
SAFETY AND OPERATION INSTRUCTIONS....8-9
CARE AND MAINTENANCE....9
DISASSEMBLY AND STORAGE....10
TROUBLESHOOTING....10
REPAIRS....10
LIMITED WARRANTY....11
SAVE THESE INSTRUCTIONS
Introduction
This manual has been compiled to help you to operate your craft with safety and pleasure. It contains details of the craft, the equipment supplied or fitted, its systems, and information on its operation and maintenance. Please read it carefully, and familiarize yourself with the craft before using it.
If this is your first craft, or you are changing to a type of craft you are not familiar with, for your own comfort and safety, please ensure that you obtain handling and operating experience before assuming command of the craft. Your dealer or national sailing federation or yacht club will be pleased to advise you of local sea school, or competent instructors.
PLEASE KEEP THIS MANUAL IN A SECURE PLACE, AND HAND IT OVER TO THE NEW OWNER WHEN YOU SELL THE CRAFT. RECORD THE "HULL IDENTIFICATION NUMBER" (HIN) WHICH IS PRINTED ON THE BOAT'S HULL IN THE FOLLOWING BOX:
HIN:
Manufacture's Certification
Our boats comply with ISO 6185 standard established by the International Organization for Standardization.
NMMA (FOR USA ONLY) certification means that the boat, sold in the United States, has been judged by the National Marine Manufacture's Association to be in compliance with the U.S. Coast Guard Regulations and American Boat and Yacht Council (ABYC) standards and recommended practices.
Safety
Craft designed for voyages on sheltered coastal waters, small bays, small lakes, rivers and canals when conditions up to, and including, wind force 4 and significant wave heights up to, and including, 0.3 m may be experienced, with occasional waves of 0.5 m maximum height, for example from passing vessels.
WARNING
- This is not a life saving device. Use only under competent supervision. Never allow diving into this product. Never leave in or near the water when not in use. Never tow from any vehicle.
- Read the complete Owner's Manual before use and store this Manual in a safe place for future reference.
• Follow all the Safety and Operating Instructions on this Manual.
• TYPE I, boats propelled exclusively by manual means. - Never navigate alone. Beware of offshore winds and currents.
- Do not exceed the maximum recommended capacities. Overloading violates regulations.
• Everyone on board must wear a Personal Floatation Device (PFD). - Use caution when stepping or climbing aboard the boat. Step into the center of the boat for maximum stability.
- Distribute the weight of passengers, gear, tackle box, and accessories so that the boat sits level fore (front) to aft (back) and side-to-side.
- Do not use your boat if you suspect a puncture or leak.
• Adults should inflate the chambers in numbered sequence.
• Not for white water rafting or any other extreme sports activities. - Follow these rules to avoid drowning, paralysis or other serious injuries.
SAVE THESE INSTRUCTIONS
Manufacturer's Recommendation
93A
The total number of persons, motor power and total weight shall not exceed the limits printed on the boat. Please refer to the boat's hull label for the actual values of your boat. See Table A.
| TABLE A | ||||||||
| MODEL | ISO TYPE | [IMAGE] + [IMAGE] | → ● ⇔ | |||||
| Lbs kg | bar (psi) | |||||||
| CHALLENGER 1 68365 I 185 | 85 1 | 0 0.035(0.5) | ||||||
| CHALLENGER 2 68366 I 375 | 170 2 | 0 0.035(0.5) | ||||||
| SEAHAWK 1 68345 I 220 | 100 1 0 | 0.069(1.00) | ||||||
| EXPLORER PRO 100 58355 I | 176 80 1 | 0 0.03(0.43) | ||||||
| EXPLORER PRO 200 58356 I | 264 120 1 | 1 0.03(0.43) | ||||||
| EXPLORER PRO 300 58358 I | 441 200 2 | 1 0.03(0.43) | ||||||
BOAT LABEL FORMAT
① Manufacturer's recommended maximum load capacity.
② Maximum person's capacity.
③ Manufacturer's name and country of origin.
④ Model name and number.
⑤Manufacturer's recommended working pressure.
⑥ NMMA (for USA only) certification means that the boat, sold in the United States, has been judged by the National Marine Manufacture's Association to be in compliance with the U.S. Coast Guard Regulations and American Boat and Yacht Council (ABYC) standards and recommended practices.
⑦Hull identification number (HIN).
SAVE THESE INSTRUCTIONS
Description
Challenger Series and Explorer Pro Series
93A
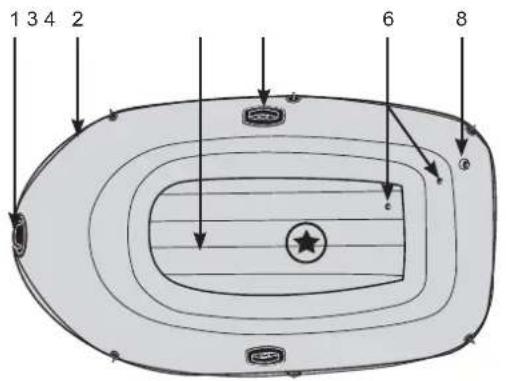
Challenger 1 and Explorer Pro 100 (58355)
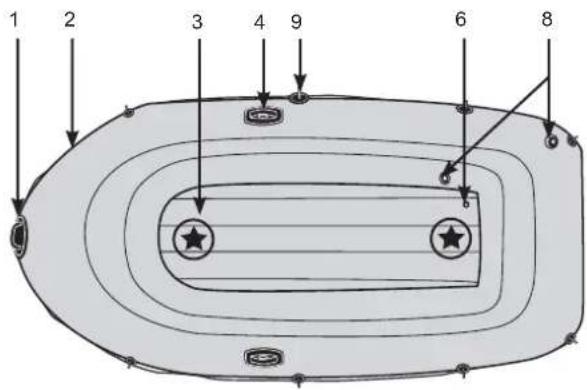
Challenger 2 and
Explorer Pro 200 (58356)

- Recommended seating arrangement of the occupants.
Seahawk Series
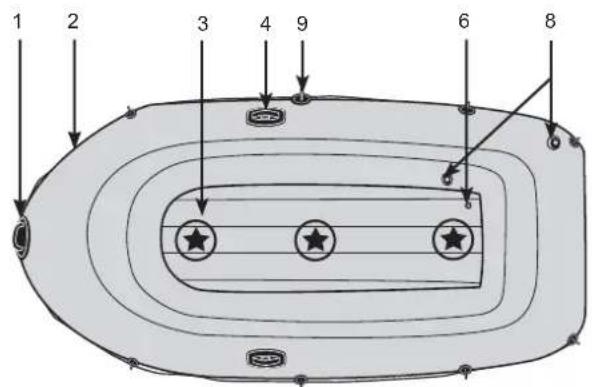
Explorer Pro300 (58358)
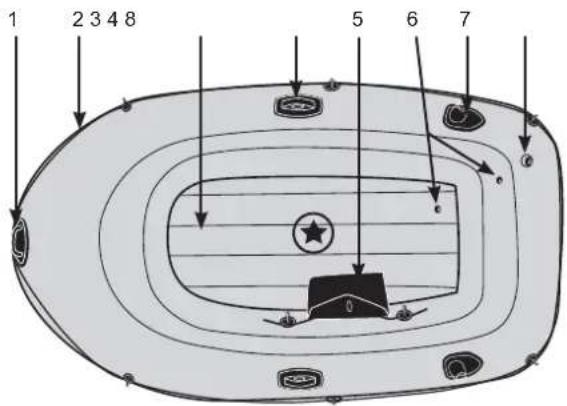
Seahawk 1

- Recommended seating arrangement of the occupants.
NOTE: Drawings for illustration purpose only. Actual product may vary. Not to scale.
| Descriptions | |||
| 1 | Grab handle | 6 | Inflation valve |
| 2 | All around grab line | 7 | Fishing rod holder |
| 3 | Inflatable floor or removable slats floor | 8 | Boston valve |
| 4 | Oar lock | 9 | Oar holder |
| 5 | Gear pouch or accessory bag | ||
SAVE THESE INSTRUCTIONS
Inflating Instructions
Before starting, locate a clean area free of stones or other sharp objects. Unroll the boat so it is laid out flat, and locate your pump.
Use a hand or foot operated air pump to inflate the boat. Do not use high-pressure air compressors. Adults should inflate the chambers following the numerical sequence marked on the valves. It is very important to follow the numerical sequence; failure to do so will result in an improperly inflated boat. Fill each chamber until it is stiff to the touch but NOT hard. Use the enclosed ruler to check the main chamber for proper inflation by leveling it with the gauges printed on the boat. DO NOT OVER INFLATE. Fill with cold air only.
IMPORTANT: Air temperature and weather condition do affect the internal air pressure of inflatable products. In cold weather the product will lose some pressure due to the fact that the air will contract. If this occurs, you may want to add a little air to the product. However, in hot weather, the air will expand. You must let some air out to prevent the product from failing due to overpressure.
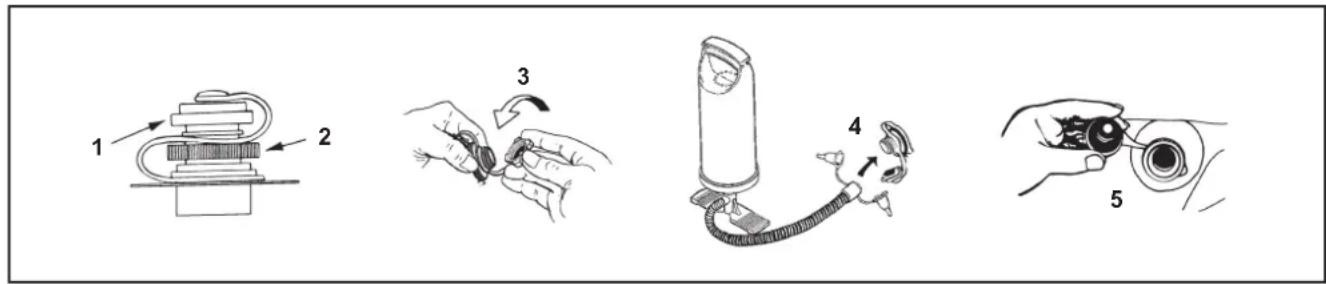
How to Use Boston Valve:
- Double valve cap (valve lets air in, not out).
- Quick deflation cap.
- Unscrew Double valve cap.
- Insert output end of air pump into valve and fill. Do not over inflate or use high pressure compressor.
- To deflate: Unscrew quick-deflation cap. CAUTION: Double valve does not operate when this cap is off. Do not unscrew this cap while boat or inflatable is in water.
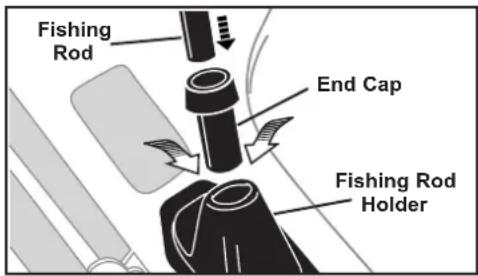
Fishing Rod Holder Use (Certain Models):
- Slide the end cap over the end of the fishing rod.
- Insert the fishing pole into the holder.
Fishing Rod Holder
SAVE THESE INSTRUCTIONS
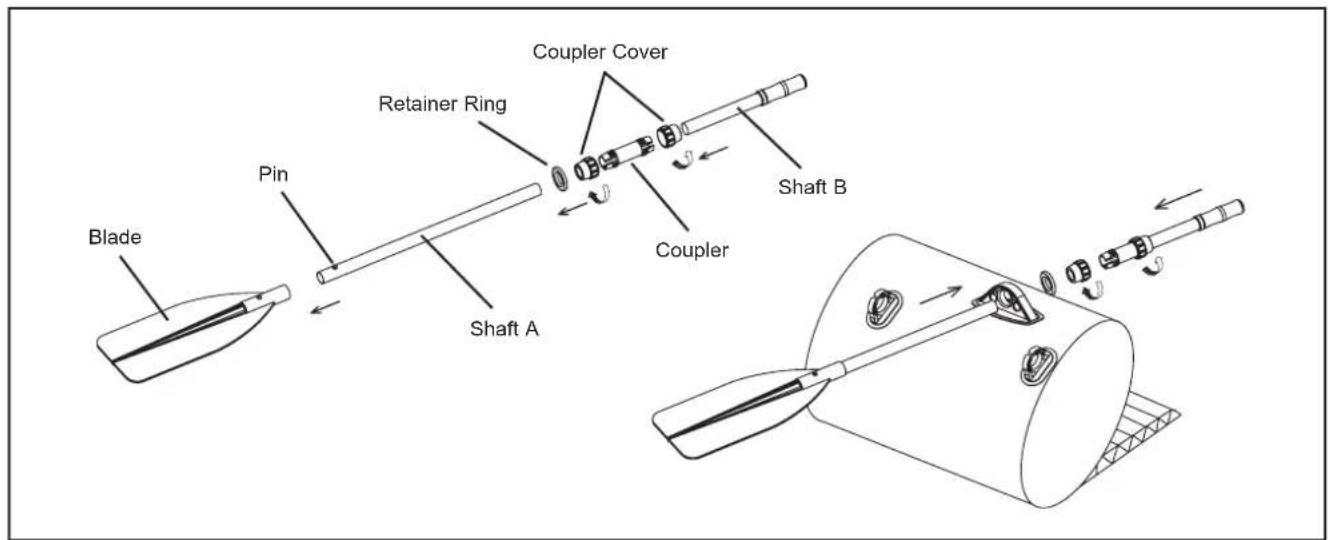
Oar Assembly (Certain Models):
- Insert "Shaft A" with the pin end first into the blade. Make sure the pin is securely fastened to the blade.
- Insert the assembled "Shaft A" through the oar-lock with the blade towards outboard (water).
- Place the retainer ring onto the other end of the assembled "Shaft A", from inside of the boat.
- Join "Shaft A" with "Shaft B" together by inserting them together into the coupler and tighten the coupler covers securely.
- When the oars are not in use secure the oars onto the oar holders located on each side of the boat.
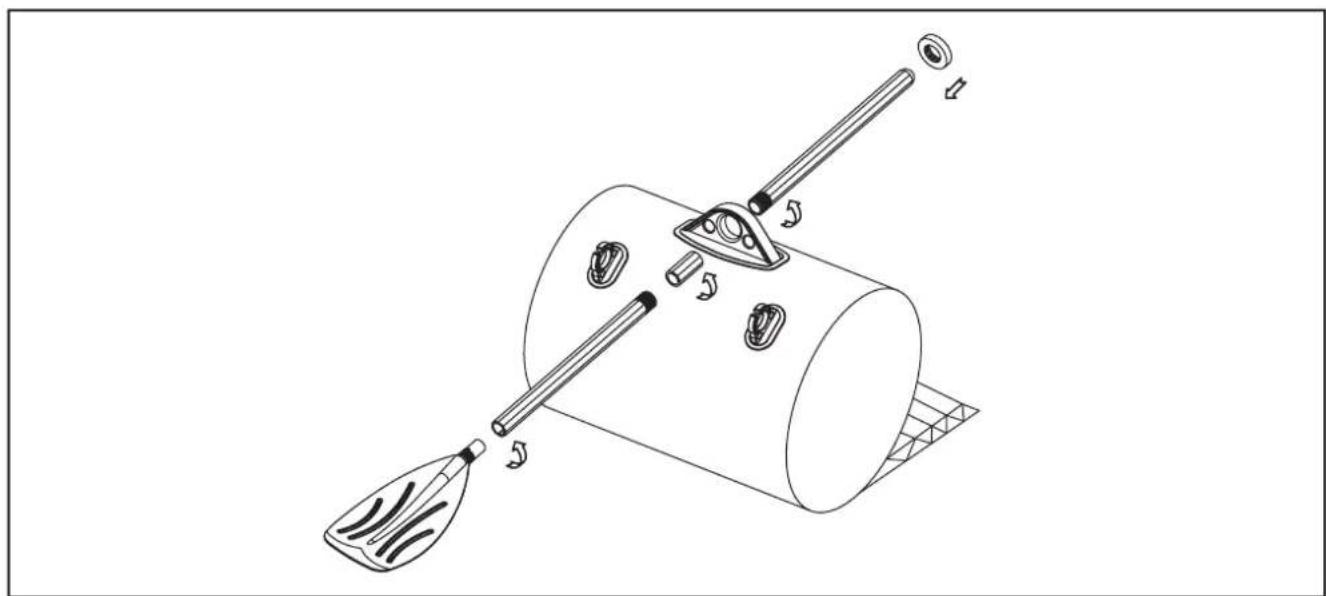
FRENCH OARS:
natural_image
Technical line drawing of a mechanical device with a lever and base, showing internal components (no text or symbols)SAVE THESE INSTRUCTIONS
Grab Line Installation:
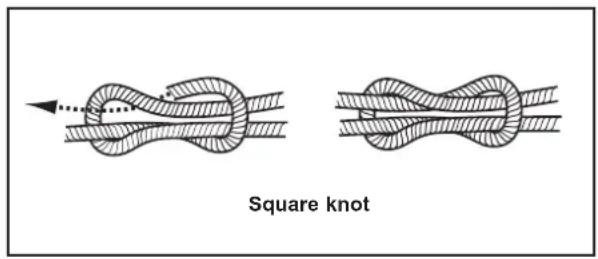
IMPORTANT: To properly install the inflatable boat's grab line and/or accessory lines, first inflate the boat. If is necessary, begin the grab line installation at the rear of the boat by threading it through the rope holders completely around the outside of the boat. Tie the two loose ends in a square knot at the rear end of the boat.
Accessory Line Installation (Certain Models):
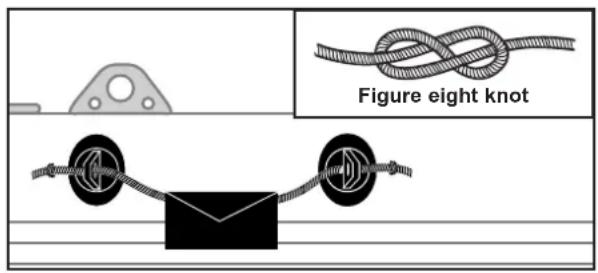
Your boat may have accessory lines to install. Tie a figure eight knot into one end of the accessory line and slide it through the rope holders. Tie a figure eight knot in the remaining end of the rope.
The accessory bags may or may not be attached to the accessory lines. Slide the rope through the accessory bags while installing the accessory lines, if desired.
93A
Safety and Operating Instructions
Before Departing from the Shore or Dock
Know all required information and inform your passengers:
- Take a boating safety course and get hands-on training from your boat dealer or local boating authorities.
- Know all local regulations and hazards related to water activities and boat operation.
- Check weather forecast, local currents, tides and wind conditions.
- Advise someone on land of the time you plan to be back at your starting point.
- Explain basic boat operation to all passengers.
- Children and non-swimmers need special instructions in the use of life jacket or personal floatation devices (PFD).
- Be sure that one of your passengers can operate the boat in case of emergency.
- Learn how to determine the distance you can cover, and remember that bad weather conditions can alter this.
• Review all safety requirements regularly.
Check the working condition of the boat and equipments:
• Check inflation pressure.
• Inspect the valves caps.
- Check the load is evenly distributed, fore (front) to aft (back) and side-to-side.
Make sure that all required safety equipment is on board (check the laws and regulations of the country or locality in which you are boating to see if additional equipment may be needed):
• One personal flotation device (PFD) per person.
• Air pump, oars, repair kit and tool kit.
• Any other mandatory equipment.
• The boat papers and your boating license (if applicable).
• Lights are required if operating after dark.
SAVE THESE INSTRUCTIONS
Rules to Observe During Navigation
- Be responsible, do not neglect the safety rules, this could jeopardize your life and the lives of others.
• Always keep control of your boat.
• Respect local regulations and practices.
• Near the shore, navigate in the designated boating area. - Remember that weather conditions can rapidly deteriorate. Always be sure that you can reach a shelter rapidly.
• Everyone on board must always wear a personal flotation device (PFD). - Do not drink alcohol or take drugs before or while operating your boat. Maintain passenger sobriety.
- Do not exceed the authorized number of persons or weight.
- Make sure your passengers remain seated at all times. At planning speeds, in rough water or during sharp turns, all passengers should position themselves in seats or on the floor.
- No bow riding. Bow riding is illegal in most areas and is extremely dangerous. In case of falling, the man overboard is in the way of the propeller.
- Be especially careful when docking. Arms and legs may be injured if they are outside the boat.
- Keep clear of swimmers and divers. Always avoid areas where divers/swimmers are in the water.
- Keep a sharp lookout especially when operating near beaches and launch sites. The Alpha flag indicates proximity of divers. You MUST maintain a safe distance as required by your local boating laws, which may range from 50 meters (164 feet) to 91 meters (300 feet).
- Avoid sharp turns at high speeds. You could get ejected from the boat.
- Do not make changes in direction without advising passengers.
- Avoid all contact between the buoyancy tubes and sharp objects or aggressive liquids (such as acid).
- Do not smoke on board.
Care and Maintenance
The boat is made of the highest quality materials and complies with ISO 6185 standards. Altering the construction of the boat will endanger your own safety, safety of the occupants and void the limited warranty!
There is very little that you have to do to keep your boat in good condition for many years. You may store it inflated or deflated. If you leave it outside, raise it up off the ground and do not place any heavy or sharp objects on it. If it is going to be in direct sunlight or exposed to leaves or rain, cover it with a tarp. We do not recommend hanging the boat. If you store it in a closet, basement or garage, we suggest you pick a cool, dry place, making sure the boat is clean and dry before you store it - or mold can accumulate.
Use as few cleaning agents as possible, do not discharge waste agents into water, and clean your boat preferably on land.
Clean your boat after a trip to prevent damage from sand, salt water or sun exposure.
Most dirt can be removed with a garden hose, a sponge and mild soap. Make sure the boat is completely dry before storing. Store the product and accessories in a dry, temperature controlled, between 32 degrees Fahrenheit (0 degrees Celsius) and 104 degrees Fahrenheit (40 degrees Celsius) storage location.
SAVE THESE INSTRUCTIONS
Disassembly and Storage
First clean your boat thoroughly following the Care and Maintenance instructions. Open all air valves and deflate boat completely. Remove all the accessories from the boat; seats, fishing rod holders, oars, gear pouch and battery pouch.
Flip the boat over. Fold the left side of the boat over and then fold the right side over the left. Fold the bow end twice to the middle of the boat tightly while forcing out any remaining air; repeat this procedure for the stern. With two opposing folded sides, fold one end over the other like closing a book. Your boat is ready for storage. Fold the boat loosely and avoid sharp bends, corners and creases which can damage the boat.
Troubleshooting
If your boat appears a bit soft, it might not be because of a leak. If the boat was inflated late in the day with 32 ^ ( 90 ^ ) air, that air might cool down to 25 ^ ( 77 ^ ) overnight. The cooler air exerts less pressure on the hull, so it could appear soft the next morning.
If there has been no temperature variation, you need to start looking for a leak:
• Take a good look at your boat from just a few feet away. Flip it over and closely check over the outside. Any large leaks should be clearly visible.
- If you have an idea where your leak is, use a mix of dishwashing liquid and water in a spray bottle, and spray over the suspicious areas. Any leak will produce bubbles that will pinpoint the location of the leak.
- Check valves for leak, if necessary, spray soapy water around the valve and the valve base.
Repairs
Through constant use you may occasionally puncture your boat. Most leaks only take a few minutes to repair. Your boat comes with a repair patch, and additional repair supplies can be ordered from Intex Consumer Service or from our website.
First locate the leak; soapy water will bubble out from the source of the leak. Thoroughly clean the area surrounding the leak to remove any dirt or grime.
Cut a piece of repair patch large enough to overlap the damaged area by approximately 1.5 cm (1/2"). Round off the edges, and place the patch on the damaged area and PRESS DOWN FIRMLY. You may want to use a weight on top to keep it in place.
Do not inflate in 30 minutes after patching.
If the patch does not hold, you can purchase a PVC or silicon based glue for repairing camping mats, tents or shoes from your local market to patch your boat, please refer to the instruction of the glue for patching.
SAVE THESE INSTRUCTIONS
Limited Warranty Intex Inflatable Boat
93A
Your Intex Inflatable Boat has been manufactured using the highest quality materials and workmanship. All Intex Inflatable Boats have been inspected and found free of defects prior to leaving the factory. This limited warranty applies to the Intex Inflatable Boat only.
This limited warranty is in addition to, and not a substitute for, your legal rights and remedies. To the extent that this warranty is inconsistent with any of your legal rights, they take priority. For example, consumer laws across the European Union provide statutory warranty rights in addition to the coverage you receive from this limited warranty: for information on EU-wide consumer laws, please visit the European Consumer Center website at http://ec.europa.eu/cosnumers/ecc/contact_en/htm.
The provisions of this limited warranty apply only to the original purchaser. This Limited Warranty is valid for a period of 90-days from the date of purchase. Keep your purchase information with this document, as proof of purchase will be required and must accompany warranty claims or the limited warranty will be invalid.
If you find a manufacturing defect in the Intex Inflatable Boat during the warranty period, please contact the appropriate Intex Service Center listed in the separate “Authorized Service Centers” sheet. If the item is returned as directed by the Intex Service Center, the Service Center will inspect the item and determine the validity of the claim. If the item is covered by the provisions of the warranty, the item will be repaired or replaced, with the same or comparable item (at Intex’s choice) at no charge to you.
Other than this warranty, and other legal rights in your country, no further warranties are implied. To the extent possibly in your country, in no event shall Intex be liable to you or any third party for direct or consequential damages arising out of the use of your Intex Inflatable Boat, or Intex or its agents' and employees' actions (including the manufacture of the product). If your country does not allow the exclusion or limitation of incidental or consequential damages, this limitation or exclusion does not apply to you.
You should note that this limited warranty does not apply in the following circumstances:
- If the Intex Inflatable Boat is subject to negligence, abnormal use or application, accident, improper operation, trailering or towing, improper maintenance or storage;
- If the Intex Inflatable Boat is subject to damage by circumstances beyond Intex's control, including but not limited to, punctures, tears, abrasions, or ordinary wear and tear;
- To parts and components not sold by Intex; and/or
- To unauthorized alterations, repairs or disassembly to the boat by anyone other than Intex Service Center personnel.
Read the owner's manual carefully and follow all instructions regarding proper operation and maintenance of your Intex Inflatable Boat. Always inspect your equipment prior to use. This limited warranty will be void if use instructions are not followed.
RECORD THE OWNER'S NAME, ADDRESS, PHONE NUMBER AND CRAFT HIN BELOW: ____
SAVE THESE INSTRUCTIONS
- INTEX® OWNER'S MANUAL INFLATABLE BOAT
- TABLE OF CONTENTS
- SAVE THESE INSTRUCTIONS
- Introduction
- HIN:
- Manufacture's Certification
- Safety
- WARNING
- Manufacturer's Recommendation
- BOAT LABEL FORMAT
- Description
- Challenger Series and Explorer Pro Series
- Inflating Instructions
- How to Use Boston Valve:
- Fishing Rod Holder Use (Certain Models):
- Oar Assembly (Certain Models):
- Grab Line Installation:
- Accessory Line Installation (Certain Models):
- Safety and Operating Instructions
- Before Departing from the Shore or Dock
- Rules to Observe During Navigation
- Care and Maintenance
- Disassembly and Storage
- Troubleshooting
- Repairs
- Limited Warranty Intex Inflatable Boat
Brand : INTEX
Model : 68365NP
Category : Boat