
D574D - Dishwasher UPO - Free user manual and instructions
Find the device manual for free D574D UPO in PDF.


| Product Type | Built-in Dishwasher |
| Brand | UPO |
| Model | D574D |
| Dimensions (HxWxD) | 85 cm x 60 cm x 60 cm |
| Weight | 50 kg |
| Power Supply | 220-240 V ~ 50 Hz, 10 A |
| Energy Class | A+ |
| Annual Energy Consumption | 270 kWh |
| Water Consumption per Cycle | 10 L |
| Capacity | 12 Place Settings |
| Noise Level | 49 dB(A) |
| Programs | Eco, Intensive, Normal, Quick, Rinse |
| Temperature Settings | 40°C, 50°C, 60°C, 65°C, 70°C |
| Drying System | Condensation Drying |
| Display Type | LED with Indicators |
| Delayed Start | Yes, up to 24 hours |
| Adjustable Racks | Height-adjustable upper basket |
| Security Features | Child lock, Overflow protection |
| Maintenance | Clean filters and spray arms regularly |
| Spare Parts Available | Filters, spray arms, racks, detergent dispenser |
| Manual Languages | English, Finnish, Swedish |
Frequently Asked Questions - D574D UPO
User questions about D574D UPO
0 question about this device. Answer the ones you know or ask your own.
Ask a new question about this device
Download the instructions for your Dishwasher in PDF format for free! Find your manual D574D - UPO and take your electronic device back in hand. On this page are published all the documents necessary for the use of your device. D574D by UPO.
USER MANUAL D574D UPO
natural_image
Black-and-white photo of a man and a baby playing together on a bed, smiling (no text or symbols visible)SVENSKA SE
Installation, use and maintenance instructions
SN ABBGUIDE
1. Fyll korgarna
IN N EHÅLLSFÖRTECKNING
Sid.
Snabbguide 1 1
INBYGGDA MODELLER


natural_image
Illustration of a multi-tiered electronic device with rows of modules and components, no visible text or symbols
natural_image
Technical diagram of a mechanical device with internal components and labeled parts (no readable text or symbols)natural_image
Technical diagram of a mechanical or electrical component with layered structure and spherical elements (no text or symbols)
natural_image
Technical diagram of a mechanical device with layered components and a central rotating component (no text or symbols)natural_image
Technical illustration of a mechanical assembly with gears and housing (no text or symbols)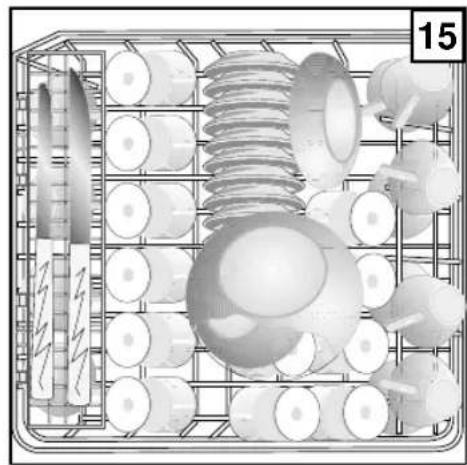
natural_image
3D rendered diagram of a mechanical assembly with gears and shafts arranged in a grid (no text or symbols)natural_image
Diagram of a mechanical or electrical assembly with labeled components and directional arrow (no readable text or symbols)
natural_image
Illustration of a hand using a toy car to adjust a component, with no visible text or symbols
natural_image
Illustration of a hand holding a tool over a mechanical component (no text or symbols visible)natural_image
Illustration of a hand operating a mechanical device with a valve and pump (no text or symbols)natural_image
Line drawing of a hand operating a mechanical device with numbered parts (no text or symbols)9.3 RENGÖRING AV AVLOPPSPUMP
natural_image
Black-and-white photo of a basket filled with various kitchen utensils (screw, spoon, etc.) on a plain surface.
a Ägg
b Spenat
c Köttfärs
d Havregryn
e Margarin
natural_image
Diagram of a mechanical or electrical component layout with circular elements and internal components, no visible text or symbols.
Lucksida
TESTDO SERING (12 KUVERT)
Testdosering
natural_image
Diagram of a mechanical or electrical component assembly with multiple cylindrical components and internal channels (no text or labels)

11 FELSÖKNINGSGUIDE
natural_image
Technical line drawing of a mechanical assembly with labeled parts A and C (no text or symbols beyond labels)KALUSTEISIIN SIJOITETTAVAT MALLIT


natural_image
Interior view of a multi-tiered storage unit with rows of circular components and labeled section 13 (no readable text or symbols)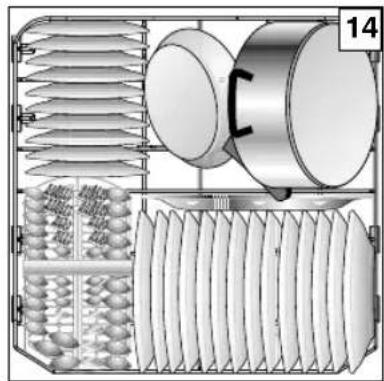
natural_image
Technical diagram of a mechanical device with internal components and labeled parts (no readable text or symbols)natural_image
Interior layout diagram of a storage or warehouse with rows, columns, and equipment (no visible text or symbols)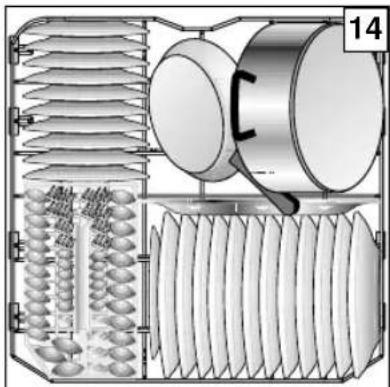
natural_image
Technical diagram of a mechanical device with internal components and labeled parts (no readable text or symbols)natural_image
Technical illustration of a mechanical assembly with springs and housing (no text or symbols)natural_image
3D rendered diagram of a mechanical assembly with gears and rods, no visible text or symbolsnatural_image
Technical diagram of an electrical circuit with components and wiring, no visible text or symbols
natural_image
Diagram of a mechanical or electrical assembly with numbered annotation (2), showing internal components and connections without readable text or symbols.
natural_image
Illustration of a hand using a toy cart to adjust or install a package, with no visible text or symbols.
flowchart
graph TD
    A["Component A"] --> B["1"]
    A --> C["2"]
    A --> D["3"]
    A --> E["6"]
    B --> F["1"]
    C --> G["2"]
    D --> H["3"]
    E --> I["4"]
    F --> J["Component B"]
    G --> K["Component B"]
    H --> L["Component B"]
    I --> M["Component B"]
    J --> N["Control Signals: Power, Alarm, Daily, Turbo, Delay, Load, Tabs, Start"]
    K --> O["Control Signals: 30°, 30' Daily, 60°, 2h 4h 8h"]
ASTIAN PESUKONEEN KÄYNNISTYS
natural_image
Simple line drawing of a container with a numbered label (9) on top, no text or symbols present.OHJELMAN VALINTA
natural_image
Illustration of a hand holding a tool inside a mechanical assembly (no text or symbols visible)natural_image
Illustration of a hand operating a mechanical device with a valve and adjustment knob (no text or symbols)natural_image
Line drawing of a hand operating a mechanical device with numbered parts (no text or symbols)9.3 POISTOPUMPUN PUHDISTUS
natural_image
Black and white photo of a metal basket filled with various kitchen utensils (screw, spoon, fish, etc.) on a plain surface.
natural_image
Illustration of eight different kitchen utensils arranged in a grid, including spoon, fork, fork, fork, spoon, fork, knife, and knife (no text or symbols)
natural_image
Diagram of a biological or mechanical system with circular components and internal structures, no visible text or symbols.
Luukun puoli
TESTIOHJELMAN ANNOSTELU (12 HENGEN PERUSASTIASTO)
Remove food residues and the most stubborn stains.
2. Add the detergent
The detergent compartment is divided into a smaller compartment for the pre-wash cycle and one for the main wash cycle.
- Check that the movement of the spray arms is not hampered.
- Switch the dishwasher on
- Select a wash programme and start the wash cycle
For crockery soiled due to normal use, use the Daily wash programme (see Programme Table).
- Close the dishwasher door
CONTENTS
Page
Quick reference guide 55
Content56 56
- Before using the appliance 5
1.1 Safety instructions
- Unpacking, disposal 58
2.1 Unpacking
2.2 Disposal of the appliance
- General 58
3.1 Ecological and low-consumption washing
3.2 Unsuitable crockery
- Description of the appliance 59
4.1 General view
4.2 Technical data
- Installation 60
5.1 Levelling
5.2 Plumbing connections
5.3 Lye drain connection
5.4 Electrical connection
- Before use 62
6.1 Preliminary operations
6.2 Adding dishwasher salt
6.3-6.4 Adjusting the water softener device
6.5 Language setting and water softener device adjustment
6.6 Adding rinse aid
6.7 Adjusting the amount of rinse aid
6.8 Adding the detergent and notes on the use of combined detergents
- How to load and position the crockery 67
7.1 The lower rack
7.2 The top rack
- Control panels and wash programmes 69
8.1-8.2-8.3 Description of control icons, indicators and options
- Maintenance 77
9.1 Cleaning the spray arms
9.2 Cleaning the filters
9.3 Cleaning the drain pump
9.4 Cleaning the external surfaces
- Performance data 79
- Troubleshooting 81
1 BEFORE USING THE APPLIANCE
1.1 SAFETY INSTRUCTIONS
Norms and regulations to be respected
- The dishwasher is intended for washing household crockery only and must be operated by adults according to the instructions outlined in this manual. Should the appliance be used for other reasons or in an incorrect manner, the manufacturer cannot assume liability for any subsequent damage.
- For safety reasons, do not modify the dishwasher or use it for anything other than its intended use.
- Before connecting the appliance to the electricity supply, ensure that the voltage and current information, as indicated on the data plate, correspond to that of the location where the appliance will be installed.
- Installation must be carried out by qualified personnel.
- Do not install the appliance under a cooking hob.
- Do not install the appliance outdoors in order to avoid exposure to rain.
Before running the appliance for the first time
- Check that the dishwasher has not been damaged during transportation. Do not install a damaged appliance for any reason. If the appliance is damaged contact your dealer.
For the safety of children
- This appliance is not intended for use by persons (including children) with reduced physical, sensory or mental capabilities, or lack of experience and knowledge, unless they have been given supervision or instruction concerning use of the appliance by a person responsible for their safety. Children should be supervised to ensure that they do not play with the appliance.
- Warning: dishwasher detergents are strongly alkaline, they can be extremely dangerous if swallowed. Avoid contact with skin and eyes and keep children away from the dishwasher when the door is open. Check that the detergent receptacle is empty after completion of the wash cycle.
- Detergents can cause permanent damage to eyes, mouth and throat.
- The water in the dishwasher is not drinkable. Any residues of detergent in the appliance constitute a source of danger for children. They must therefore be kept away from the open dishwasher.
They should therefore be kept outside the reach of children.
Daily use
- Do not turn on the dishwasher if the electric cable, or the water supply or water drainage pipes are damaged, or if the control board, the work surface or the base are in very bad condition.
- In case of a malfunction, shut off the water supply, then turn off the appliance and pull the electric plug from the outlet. If there is a permanent electric connection, turn off the service switch (if present) or remove the fuse (or fuses).
- To remove the plug from the electric outlet, hold the plug itself and pull; never pull the cable.
- All repairs of the dishwasher must be carried out by specialised personnel. Inappropriate repairs can create a severe danger for the user. For repairs, you should therefore contact our technical customer assistance service or a specialised vendor.
- The replacement of the supply cable must be carried out only by the technical service staff.
- If the pipes and tubes are deteriorated, substitute them with new original parts before hooking up the appliance.
- Do not use detergent substances that could lead to an explosion.
- Do not sit or lean on the open door. The appliance might otherwise tilt over.
- Before adding special dishwasher salt, detergent and rinse aid, make sure that the manufacturer of these substances recommends their use for household dishwashers.
- Always shut off the water supply when the dishwasher is not in use for longer periods of time, e.g., during your vacations.

The dishwasher door must remain open for the time strictly necessary to complete loading and unloading, in order to avoid damage to the dishwasher or any harm by stumbling over it.
2 UN PACKING - DISPOSAL
2.1 UNPACKING
Remove the external plastic packaging material, the corner re-enforcements, and the styrofoam base. Open the door and remove the styrofoam blocks from the inside baskets.
Collect and recycle the packaging materials. This will preserve primary materials and help reduce the amount of waste.
Take the packaging materials to specialised recycling centres.
When the appliance eventually has to be disposed of, it should be made non-functional before eliminating it.

Packaging material (e.g. plastic bags, polystyrene) may be harmful to children and must therefore be kept out of their reach.
2.2 FINAL DISPOSAL OF APPLIANCE
This appliance is marked according to European Directive 2002/96/EC on Waste Electrical and Electronic Equipment (WEEE).
By ensuring this product is disposed of correctly, you will help prevent potential negative consequences for the environment and human health, which could otherwise be caused by inappropriate waste handling of this product.
The symbol 📄 on the product, or on the documents accompanying the product, indicates that this appliance may not be treated as household waste. Instead it shall be handed over to the applicable collection point for the recycling of electrical and electronic equipment.
Disposal must be carried out in accordance with local environmental regulations for waste disposal.
For more detailed information about treatment, recovery and recycling of this product, please contact your local city office, your household waste disposal service or the shop where you purchased the product.
At the end of its life span, the appliance must be eliminated by a specialised company, respecting all existing laws and regulations.
This will make it possible to dispose of the old appliance while at the same time recuperating and sorting synthetic materials that are fit for recycling, thus contributing to the protection of the environment.
3 GENERAL ADVICE
3.1 WASHING DISHES IN AN ECONOMIC AND ECOLOGICAL WAY
- Don't rinse your dishes under running water before placing them in the dishwasher
- Run the appliance only when it is full, because only like this the process becomes economical and respects the environment.
• Always choose a programme that is adequate for the kind of dishes you want to wash and that corresponds to how dirty they are - For crockery soiled due to normal use, use the DAILY wash programme (see Programme Table) in order to save energy and water.
- You should avoid to use too much detergent, dishwasher salt, and rinse aid. Refer to the dosages recommended in the usage instructions provided by the manufacturers of these substances.
- Make sure that the water softness regulator is set correctly.
3.2 DISHES NOT TO BE WASHED IN THE DISHWASHER
You must not wash in this appliance:
- Cutting boards or small containers in wood
- Plastic objects that are not heat resistant
- Lead crystal
- Tin, copper, aluminium, brass, and pewter objects
- Objects made from tin or copper
- Dishes or cutlery with glued components
- Old cutlery with heat sensitive glue
- Steel objects that are oxidised easily
- Cutlery with handles in wood, horn, antler, porcelain, or mother of pearl
- Cutlery with handles made of wood, horn, porcelain and mother of pearl, handcrafts and decorated items.

When buying new cutlery, make sure that it is dishwasher safe.
4 DESCRIPTION OF THE APPLIANCE
4.1 GENERAL PARTS
Parts of the dishwasher\*
1) sattadobaitaen (if (in chuded) d)
2) rinse aid container
3) drying ventilator (if included)
4) container for detergent
5) date plate
6) filters
7) lower spray-rotor
8) upper spray-rotor
9) electric cable
10) water supply tube
11) water drainage tube
12) lower basket
13) upper basket
14) cutlery container
15) hook for door
closing mechanism
16) Drum handles (if provided)
17) Long knives basket (if provided)
* Details may differ depending on model and market!

4.2 TECHNICAL DATA
capacity (standard settings): --- pressure of water supply system minimum pressure: 0.05 Mpa maximum pressure: 1 Mpa

CAUTION: the electrical specifications are indicated on the data plate.
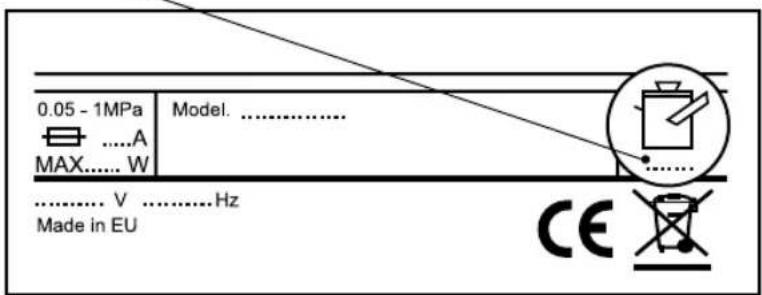
CE The product complies with the Low Voltage 2006/95/CE and Electromagnetic Compatibility 2004/108/CE European Directives.
5 INSTALLATION
5.1 LEVELLING
Note: Select a location for dishwasher installation close to the water supply and drain connections, and a power supply point.
- Before levelling, attach the plastic slides © supplied with the manual bag under the dishwasher feet.
- Once the appliance is in its final position, adjust the metal feetⒶ by rotating them in the required direction to adjust the dishwasher height.
- Proper levelling ensures the appliance functions correctly; max. error margin = 2 degrees tilt.

natural_image
Technical line drawing of a mechanical assembly with labeled parts A and C (no text or symbols beyond labels)BUILT-IN MODELS
The dishwasher must be fitted beneath a worktop 820-890 mm high.
The compartment housing the dishwasher must be at least 600 mm wide and 560 mm deep.
Built-in models with adjustable rear and front feet (only available on certain models)
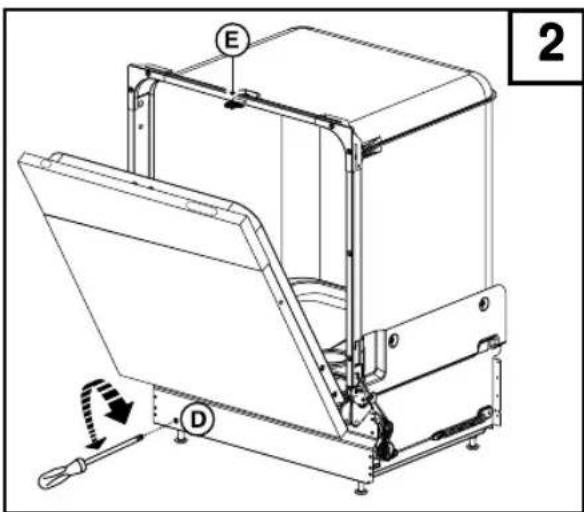
Firstly, check the dishwasher height with that of the lower edge of the worktop. After having mounted the plastic slides 📒 carry out an initial adjustment of the front and rear feet, tilt the dishwasher forward slightly to adjust the rear feet using a slotted screwdriver to turn the adjustment screw 🟢 on the front end of the base (see Fig. 2). Position the dishwasher in its place of installation making sure it adheres to the worktop.
Adjust the feet carefully and tighten the locking nuts of the front feet.


After having levelled the dishwasher, adjust the door closing catch (see Fig. 2 "E") until the door closes perfectly.
5.2 WATER CONNECTION
The water supply tube©, makes it possible to connect the appliance to a water tap with a 1/2" attachment.
During the installation, the following instructions must be followed:
- Attach tube Ⓐ to the cold water tap Ⓐ.
- If the piping that the dishwasher will be connected to is new or has been left unused for a long time, it is advisable to let the water run for a few minutes before connecting the water supply hose. This will prevent sand, rust or dirt deposits from blocking the water supply hose filter.
- Make sure that the water pressure corresponds to the range indicated on the data tag. The appliance may be connected to the cold water system. It must not be connected to the hot water system.
- The appliance must be connected to the water supply using a set of new hoses; previously used hoses are not recommended.
- Make sure the hoses are not excessively bent or bottlenecked.

5.3 CONNECTION OF DRAINAGE WATER
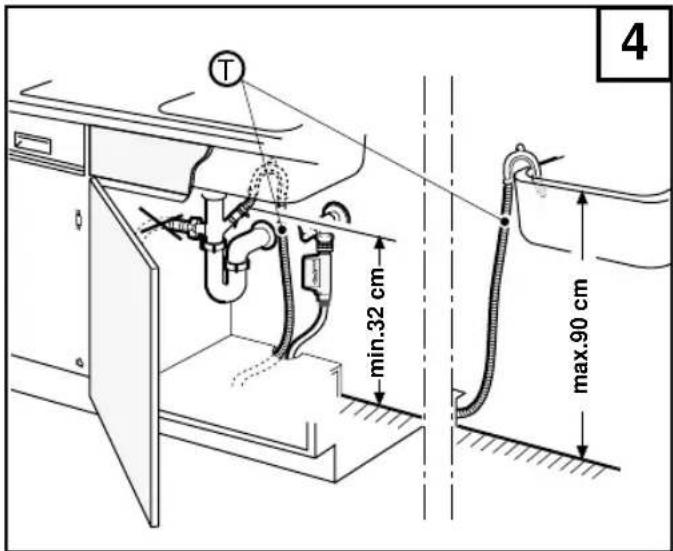
The curved end of drainage tube Ⓣ, which is being supplied with your appliance, should be hooked onto the edge of a sink or into a drainage pipe.
A special siphon should be used to prevent bad odours.
During the assembly, the following precautions should be taken:
- the drainage tube must not be bent to avoid blockages;
- the tube's end, relative to the top surface of the dishwasher (fig. 4), must be placed at a height between 32 and 90 cm;
- the end of the tube must never be immersed in water;
- the drainage tube must not be extended to more than a maximum length of 1 metre. The extension must have the same internal diameter. Furthermore, the maximum height at which the tube's end can be placed (in the case of an extended tube) must be reduced from 90 to 50 cm.
- If you use a drainage pipe, make sure its internal diameter is not inferior to 4 cm.
5.4 ELECTRIC CONNECTIONS
The appliance may only be connected to a properly installed electric outlet with an earth (ground) contact. The connection must be carried out in correspondence with existing laws and regulations and supplementary rules issued by the supplier of electric power.
The voltage indicated in the technical data must match that of the location where the appliance is installed.

Refer to the data plate for the correct size of the electrical plug.
If the appliance has no plug attached, it must be connected to the electricity supply by installing a switch which is directly connected to the mains. This switch must ensure omnipolar disconnection under overvoltage category III conditions.
6.1 PREWIMNARRYCOPEAATOUNSS
Before starting up the machine, ensure that:
- The supply cable plug is connected to the socket.
- The water supply hose is connected to the tap.
- The tap is open.
- he drain hose is connected according to instructions.
6.2 ADDING DISHWASHER SALT (only for models with softener)

WARNING!
If the dishwasher model is not equipped with a salt compartment, skip paragraph 6.2. Set the water softener device on setting D1 when using it for the first time, and follow the instructions below.
Door opening
Pull the handle towards you: the door opens easily. If this operation is done while the dishwasher is in function, a safety device switches the dishwasher off.
The dishwasher is equipped with a water softener device (Fig. 5) that automatically regenerates at regular intervals thanks to the salt solution. Dishwasher salt consumption therefore depends on the hardness of the local water supplied.
- Open the door and pull out the lower rack.
- Unscrew the salt compartment cap in an anticlockwise direction.
Using the dishwasher for the first time:
- Pour approximately 1/2 litre of water in the salt compartment.
- Pour the dishwasher salt into the compartment using the funnel (about 1-1.5 kg).
- Wipe off any spilt salt from the compartment opening.
- Screw the compartment cap back on in a clockwise direction.
- If washing does not take place soon after introducing the dishwasher salt, launch the SOAK programme in order to wash away any excess salt granules.

Dishwasher salt level indicator
The green indicator under the cap indicates that there is still a sufficient amount of dishwasher salt in the compartment.
If the green indicator is no longer visible, additional dishwasher salt must be introduced.
For safety reasons, we suggest topping up the salt compartment after 7 wash cycles.

Only use salt specifically intended for dishwashers; other types of salt (e.g. table salt) often contain insoluble substances that may clog the water softener and prevent it from working.
Soft water (poor in calcium) is recommended for washing, to prevent limescale deposits on crockery or in the dishwasher.
To determine the hardness of the water, contact the local water department or use the water hardness test kit supplied.
6.3 Adjusting the water softener device (control panel version A and B)

This dishwasher is equipped with touch control buttons. Gently touching the buttons is sufficient. A buzzer confirms activation.




For optimal regeneration of the water softener, the device D (Fig. 6) must be adjusted according to the hardness of the local water supply (see Table 1) and the salt compartment must always be filled completely with specific dishwasher salt.

The water softener is set to level D4 by default.

6.4 Adjusting the water softener device (control panel versions C, D, E and F)
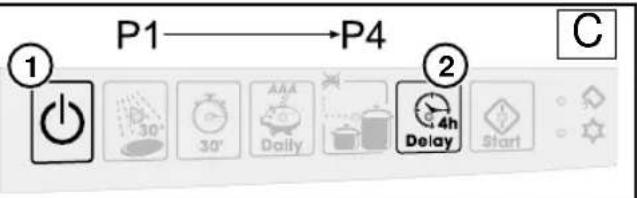
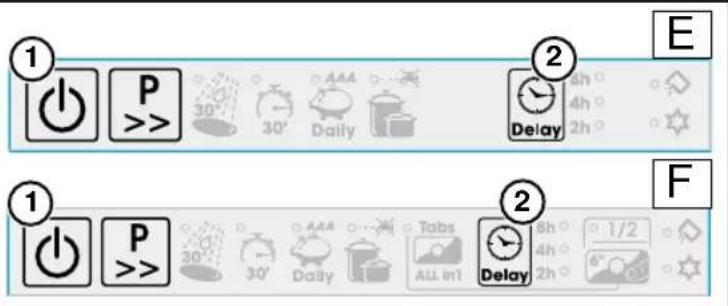
To adjust the water softener device settings, simultaneously press the On/Off button (1) and the DELAY button (2) for 5 seconds. Upon releasing, the LED corresponding to programme 4 lights up and a buzzer sounds; the menu can then be accessed to set the regeneration levels. To change the factory setting, proceed as follows:
- For control panel C, pressing programme buttons P1 to P4 will set the corresponding regeneration levels D1 to D4 (see Table 1).
- For control panel D, pressing programme buttons P1 to P5 will set the corresponding regeneration levels D1 to D5 (see Table 2).

- For control panels E and F, pressing the programme button will set the corresponding regeneration levels D1 to D4 (see Table 1).
Wait approximately 10 seconds without modifying the choice; a buzzer will signal the new level. Once the water hardness level has been set, the desired wash programme can be selected; the flashing LED will indicate the last programme carried out.
Table 1
| Regeneration levels | French degrees °fH | German degrees °dH |
| D1 | <11 | <6,16 |
| D2 | >11 <25 | >6,16 <14 |
| D3 | >26 <45 | >14,56 <25,2 |
| D4 | >46 <90 | >25,76 <50,4 |
| >=higher/<=lower | ||
Table 2
| Regeneration levels | French degrees °fH | German degrees °dH |
| D1 | <11 | <6,16 |
| D2 | >11 <25 | >6,16 <14 |
| D3 | >26 <40 | >14,56 <22,4 |
| D4 | >41 <60 | >22,96 <33,6 |
| D5 | >61 <90 | >34,16 <50,4 |
| >=higher/<=lower | ||
NOTE
The salt level indicator on the control panel is deactivated when setting D1 is used.
6.5 Settings: language and water hardness (control panel G version)

This dishwasher is equipped with touch control buttons. Gently touching the buttons is sufficient. A buzzer confirms activation.

At first start-up, the language and water hardness settings must be adjusted in the following manner:
- Keep the Menu / OK button ③ pressed while the appliance switches on; a buzzer signals access to the menu. The first setting refers to the language; it is set to English by default (the display visualises "Config. 1 English"). To select a different language, press the Menu / OK button ③ repeatedly until the desired language appears on the display.
- Other water hardness levels can be selected by pressing the navigation button (>)④. Water hardness is set to level D4 by default (the display will visualise “Config. 2 of Water Hardness”). To select a different setting, press the Menu / OK button ③ repeatedly until the display visualises the desired level corresponding to the water level hardness indicated in the relative Table, and measured using the supplied kit. A buzzer will signal the chosen setting.
Other settings are available:
□ Buzzer Off
- Pressing the navigation button ④ (>) visualises the next setting, "Buzzer Off". This setting is deactivated by default (the display visualises "Config. 3 NO Buzzer").
- Pressing the Menu / OK button ③ this setting is activated or deactivated (a check mark √ appears in the relevant box). Note: It remains active for all buttons.
□ External Display Off ⑥
- Pressing the navigation button ④ (>) , visualises the next setting, "External Display Off". This setting is deactivated by default (the display visualises "Config. 4 NO External Display") (Fig. 7).
- Pressing the Menu / OK button ③ this setting is activated or deactivated (a check mark☑ appears in the relevant box). When this setting is activated the external display/LEDs are turned off.
□ Automatic Off
- Pressing the navigation button ④ (> ) visualises the next setting, "Automatic Off". This setting is deactivated by default (the display visualises "Config. 5 Automatic Off").
- Pressing the Menu / OK button ③ this setting is activated or deactivated (a check mark √ appears in the relevant box). When this setting is activated, the dishwasher switches off after 30 min whether the programme has been completed or has not started.
Note To exit the menu without memorising the settings, press the On / Off button ① or wait 20 seconds for the dishwasher to switch off automatically.
Once all the settings have been adjusted, press the Start button⑤ to memorise them (they remain active unless modified) and proceed to the next functions.
Note To modify an incorrect setting, before confirming with the Start button ⑤, press the navigation button (>) ④ to access the setting to be modified. If instead the incorrect settings have been already confirmed with the Start button ⑤, repeat the setting procedure from the beginning.
NOTE
The salt level indicator on the control panel is deactivated when setting D1 is used.

6.6 Refilling of rinse aid
The rinse aid speeds up the drying process by facilitating water drainage from crockery, prevents spotting or limescale deposits; it is automatically added to the water during the last rinse.
The rinse aid container Ⓢ is located on the inside of the door.
- Fig. 8, remove the container cap① by turning it 1/4 revolution anticlockwise.
• Fig. 9, open cover T1 . - Fill container with rinse aid up to the broken line. Maximum quantity: about 140 ml.
- Close the rinse aid compartment again.
- Clean off possible residues of rinse aid with a cloth, otherwise too much foam might be produced during the rinsing process.
Indication of rinse aid level
• Electric (if included) (fig. 18-19-20)
The appliance is equipped with a level indicator for the rinse aid. When it lights up, more rinse aid needs to be added.
- Mechanical (fig. 8)
More rinse aid needs to be added when the indicator (located on the container Ⓕ) is clear (○).
When the container is full, the indicator has a dark coloration.
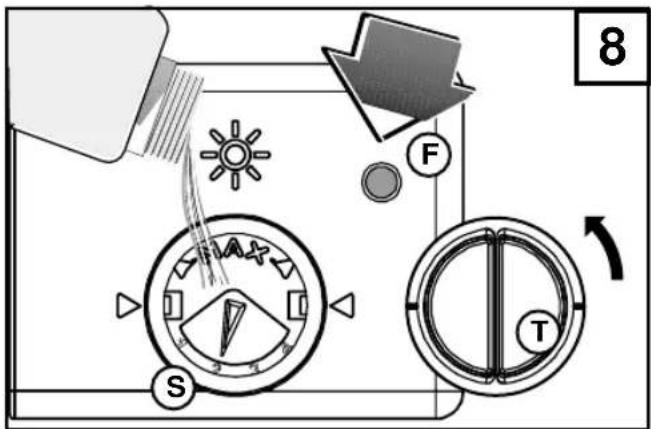

6.7 Regulation of rinse aid dosage
The regulation ® of the quantity of rinse aid that is released can be found in the refill opening of the rinse aid container.
A screwdriver may be used to adjust it from a minimum position to a maximum position, depending on which version has been fitted in the dishwasher; see figure 10 (A-B).
The numbers correspond to the amount of rinse aid added, i.e. the number 1 = 1 ml.
The amount of rinse aid in a completely full compartment lasts for about 50 wash cycles.
- Increase the amount of rinse aid should the crockery be opaque or show circular stains after a wash cycle.
- Reduce the amount of rinse aid in case the crockery presents white streaks.
• Always wipe off with a cloth any rinse aid that spilled over from the container.

It is important to check the level of rinse aid in the container periodically – if possible every 31 wash cycles.
6.8 Adding the detergent
Adding the detergent
IMPORTANT! Do not use detergents in this dishwasher that are made for dish washing by hand! These substances produce large quantities of foam but they do not clean the dishes in a dishwasher. They can even lead to a malfunctioning of the appliance.
You should therefore only use detergents that are specifically made for household dishwashers.
Keep your detergent containers closed and in a dry place.
Only when you use the pre-wash programme no detergent is needed.
During a programme the detergent is automatically taken from the detergent container.
We recommend the use of about 25 g of detergent.

Compact / combined 2-in-1, 3-in-1, All-in-& detergents etc.
These are detergents with integrated functions combining detergent/rinse aid and salt. Before using products of this kind, ensure that they compatible with the hardness levels of the water supply, in accordance with the indications of the detergent manufacturer (shown on the detergent packaging). These products must be used in strict accordance with the instructions provided by the manufacturer. It is advisable to contact the detergent manufacturer for information regarding the best conditions of use of the product. The dishwasher manufacturer is not held liable for damage caused by compact detergents and does not guarantee the outcome of their use.
NOTE
When using combined detergents such as 2-in-1, 3-in-1, All-in-1 tablets etc., remember to check whether the tablets are the suitable size for the relative dishwasher compartment and are comfortably housed without breaking the compartment.
Detergents vary in their strength and efficiency. You should therefore pay attention to the dosage recommendations of each manufacturer.
The container for the detergent is located on the inside of the door.
If the lid is closed:
- Push the closure lever Ⓛtowards the left-hand side.
• Fill the detergent into the container
- To close the lid, press until you hear a closing "click". If your dishes are exceptionally dirty, yoV an also fill some detergent into the indentation of the lid. In this case, fill the indentation up to the edge. This detergent will be available and active during the pre-wash phase.

7 HOW TO LOAD AND UNLOAD THE DISHWASHER
There are two dish baskets that allow you to store all different kinds of dishes.
- Remove from the dishes any larger pieces of food to avoid an obstruction of the filter and the development of bad odours.
- If pots and pans are particularly dirty and contain crusts of food (after frying or roasting), soak them in a water bath before washing them in the dishwasher.
• After having loaded the racks, ensure the rotation of the spray arm is not hampered.
7.1 Use of the lower basket
The lower rack is used for the larger and dirtiest crockery, and for the cutlery rack.
Dinner plates, soup bowls, pans, soup tureens, lids and serving dishes are also placed in the lower rack. They must always be placed vertically to enable the water to flow freely.
Pots and pans must be placed facing downwards. Make sure the crockery, pots and pans are placed so that the water jet can reach the dirty surfaces.
Fold-down racks (only available on certain models) increase loading versatility, as they enable very large crockery items to be washed as well.

natural_image
Diagram of a multi-tiered conveyor system with rollers and bushels, no text or symbols present
natural_image
Technical diagram of a mechanical assembly with rollers, gears, and housing (no text or labels)Dishwasher loading examples 14 settings
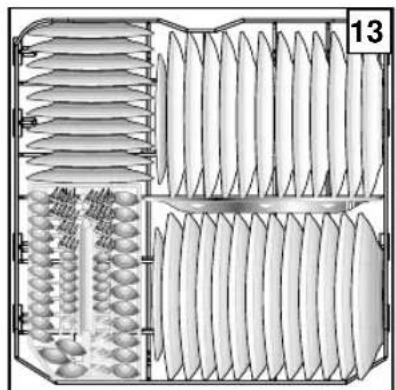
natural_image
Technical diagram of a multi-level mechanical or electrical component with layered structures and no visible text or symbols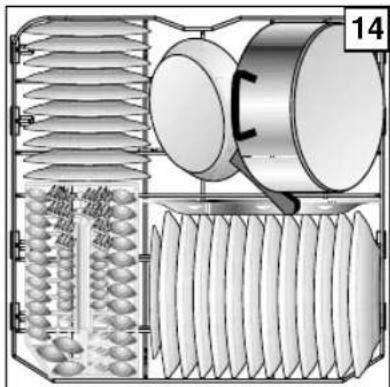
natural_image
Technical diagram of a mechanical device with layered components and a numbered label (14), no readable text or symbols present.Dishwasher loading examples 12 settings
Cutlery
WARNING: Knives and other utensils with sharp points must be loaded in the basket with their points down or placed in a horizontal position. Better cleaning results are normally obtained by placing cutlery with handles facing downwards, but this may cause injury to the person taking it out. Spoons, forks, and knives must be placed in the specific areas of the cutlery basket that are designed for them.

ATTENTION:
Particularly long cutlery, specifically “long knives”, should not be positioned pointing upwards but should be placed horizontally in the top tray or washed by hand. Be careful when handling sharp cutlery.
NOTE The top rack on some models is equipped with a special cutlery rack for knives and long cutlery (see Fig. 15).

! WARNING!
Make sure no crockery item touches the base of the dishwasher.
7.2 Use of the upper basket
The top rack is entirely removable and houses small and medium-sized crockery such as glasses, saucers, tea and coffee cups, shallow salad bowls, lightly soiled shallow pots and pans. Dessert plates must always be placed vertically; glasses, cups, pots and pans facing downwards. Light crockery must be adequately placed to avoid it from toppling.
An optimal arrangement of dishes inside the dishwasher will guarantee best washing results, allowing the appliance will be able to develop its full effectiveness.
Dishwasher loading examples 14 settings
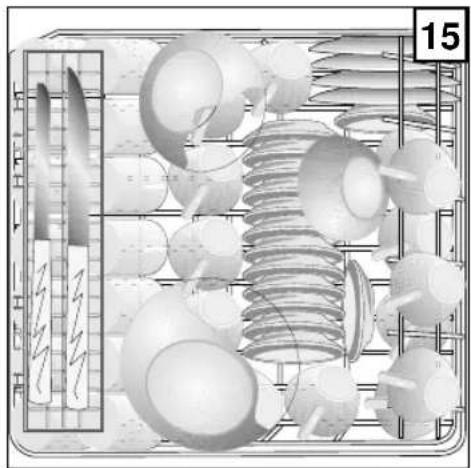
natural_image
3D rendered mechanical assembly with springs and housing (no visible text or symbols)Dishwasher loading examples 12 settings

natural_image
3D rendered diagram of a mechanical assembly with gears and shafts arranged in a grid (no text or symbols)Height regulation of the upper basket (if included)
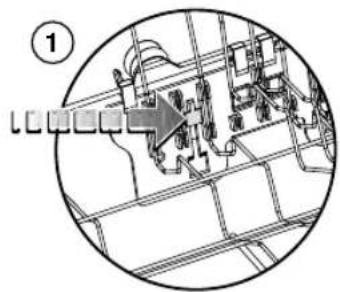
To save space and facilitate crockery loading, the rack position may be adjusted using the side handles (right and left).
1 Adjusting the lower position
2 Adjusting the upper position
natural_image
Technical diagram of an industrial machine with a directional arrow indicating motion (no text or symbols present)
natural_image
Diagram of an electrical circuit board with components and wiring, no visible text or symbols
natural_image
Illustration of a hand using a toy car to lift a vehicle, with no visible text or symbols
It is advisable to adjust the top rack height before loading it.
Do not lift or lower the rack from one side only.
Pulling out the upper basket
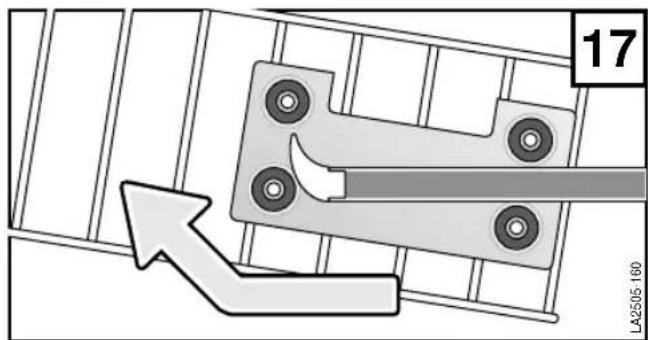
The upper basket can be pulled out and removed as shown in the figure.

CONTROL PANEL and WASH PROGRAMMES
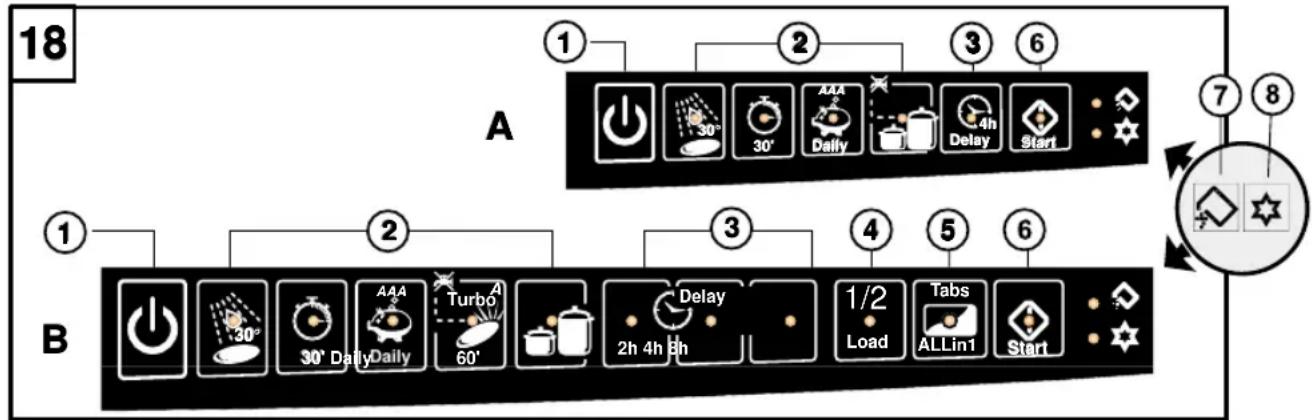
8.1 Description of the control options and indicators (fig. 18A-18B)
1) On/Off button
2) Programme buttons / LEDs
3) "Delay" button for delayed start
4) Half Load button
5) ALL-in-1 function button
6) Programme Pause/Start-Stop button
7) Low salt indicator icon (if fitted)
8) Low rinse aid indicator icon (if fitted)
9) "Functioning" LED
10) Start / End LED and possible malfunctions
11) Door handle
To open pull forward (an electric safety mechanism turns off the machine when the door is being opened).
flowchart
graph TD
    A["Component A"] --> B["Component B"]
    B --> C["1: Power icon"]
    B --> D["2: Alarm icon"]
    B --> E["3: Delay icon"]
    B --> F["4: Load icon"]
    B --> G["5: Tabs icon"]
    B --> H["6: Start icon"]
    style A fill:#f9f,stroke:#333
    style B fill:#ccf,stroke:#333
STARTING THE DISHWASHER
After checking the quantities of regeneration salt (only in the salt container version) and of rinse aid, open the water faucet completely, place the dishes in the baskets, fill detergent into the detergent container and add also detergent for the pre-wash (if necessary); then close the front door.
Now proceed as follows:
Press the "ON-OFF" button ①, "The LED corresponding to the last wash cycle performed lights up".

PROGRAMME SELECTION
Press the ② button to select the wash programme based on the amount of crockery and dirt content; a LED lights up confirming the selection.
START
Press the Start button⑥ and close the dishwasher door; a beep will signal the start of the wash program and LEDs⑨ and ⑩ will remain lit until the end of the programme.
ADDING MORE CROCKERY
To add more crockery items, the wash cycle can be interrupted in the following manner: open the dishwasher door slightly to avoid water spraying out and steam to exit the machine; the programme interrupts and the Start button LED flashes; at this point, crockery may be added. To resume the interrupted programme, press the Start button ⑥ and close the dishwasher door. The cycle resumes from the point it was interrupted and LED ⑩ moves from flashing to fixed.
MODIFYING OR RESETTING A RUNNING PROGRAMME
This operation should preferably be performed if the programme has only just recently begun otherwise some detergent may already have been used or washing water drained; in such case, additional detergent must be added (see paragraph "Adding the detergent").
To modify a running programme, open the dishwasher door slightly to avoid water spraying out and steam to exit the machine and keep the Start button ⑥ pressed for approx. 6 seconds (subsequently the LED corresponding to the programme previously selected starts flashing); after the beep signal close the door. The Start LED10 starts flashing indicating the RESET phase; once this is completed the LED switches off and a beep signal sounds. At this point a new programme can be selected.
In the event of a sudden power cut, all settings remain memorised; the wash programme will resume from the point at which it was interrupted.
PROGRAMME END
The dishwasher stops automatically once the wash cycle is terminated. The end of the wash programme is signalled by a 3-beep buzzer which sounds 3 times, and by the LED ⑩ switching off. Open the door and press the On/Off button ① to switch the dishwasher off. After each wash cycle, it is advisable to close the water supply tap to cut off the dishwasher from the water supply network.
SUGGESTIONS: After the beeps signalling the end of the cycle, the door may be left ajar to accelerate the drying phase. If the worktop above the dishwasher is delicate, open the dishwasher door completely or keep it shut until taking out the crockery, to prevent steam from coming out.
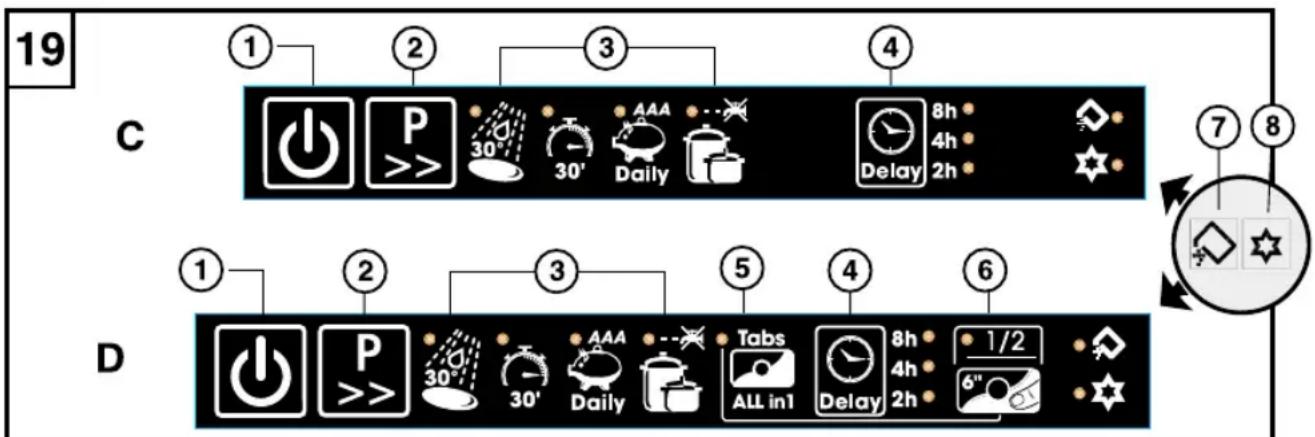
8.2 Description of the control options and indicators (fig. 19C-19D)
1) Off/Offbutton
2) Programme selection key
3) Programme indicator LEDs
4) "Delay" button for delayed start
5) ALL-in-1 function button
6) Half Load button
7) Low salt indicator icon (if fitted)
8) Low rinse aid indicator icon (if fitted)
9) Door handle
To open pull forward (an electric safety mechanism turns off the machine when the door is being opened).
STARTING THE DISHWASHER
After checking the quantities of regeneration salt (only in the salt container version) and of rinse aid, open the water faucet completely, place the dishes in the baskets, fill detergent into the detergent container and add also detergent for the pre-wash (if necessary); then close the front door.
Now proceed as follows:
Press the "ON-OFF" button ①, "The LED corresponding to the last wash cycle performed lights up".

natural_image
Simple line drawing of a container with a numbered label (9) on top, no text or symbols present.PROGRAMME SELECTION
Press the ② button and the LEDs corresponding to the programme selections will light up in succession. Select the wash programme according to the type of crockery loaded and the level of dirt.
START
Close the dishwasher door after selecting the wash programme; a buzzer (beep) will signal the start of the cycle.
ADDING MORE CROCKERY
To add more crockery items, the wash cycle can be interrupted in the following manner: open the dishwasher door slightly to avoid water spraying out and steam to exit the machine; the programme interrupts and other crockery may be added. To resume the interrupted programme, close the door; the cycle will resume from the point it was interrupted.
MODIFYING OR RESETTING A RUNNING PROGRAMME
This operation should preferably be performed if the programme has only just recently begun otherwise some detergent may already have been used or washing water drained; in such case, additional detergent must be added (see paragraph "Adding the detergent").
To modify a running programme, open the dishwasher door slightly to avoid water spraying out and steam to exit the machine and keep the Start button ② pressed for approx. 10 seconds (subsequently the LED corresponding to the programme previously selected starts flashing rapidly); after the beep signal, close the door to start the RESET phase which will finish AFTER the beep signal. At this point a new programme can be selected.
In the event of a sudden power cut, all settings remain memorised; the wash programme will resume from the point it was interrupted.
PROGRAMME END
The dishwasher stops automatically once the wash cycle is terminated. The end of the wash programme is signalled by a 3-beep buzzer which sounds 3 times. Open the door and press the On/Off button ① to switch the dishwasher off. After each wash cycle, it is advisable to close the water supply tap to cut off the dishwasher from the water supply network.
SUGGESTIONS: After the beeps signalling the end of the cycle, the door may be left ajar to accelerate the drying phase. If the worktop above the dishwasher is delicate, open the dishwasher door completely or keep it shut until taking out the crockery, to prevent steam from coming out.
Option (control panel fig. 18 B - fig. 19 D)
NOTES:
A. The options can be selected in the wash programmes in which they are available (refer to the "Options available" column in the Wash Programmes Table).
B. When the button corresponding to the desired option is pressed, the relative LED lights up confirming the selection; press the button again to deactivate the function (LED turns off).
C. Once all the desired options have been selected and the Start button ⑥ has been pressed (only for versions as in Fig. 18A and 18B), they can be cancelled or modified with the RESET function (see the paragraph entitled “Modifying or resetting a running programme”).
D. With a control panel (see Fig. 19D), the All-in-1 function is activated by keeping the 1/2 Load selection button ⑥ pressed for approx. 6 seconds; repeat the same operation to deactivate it.
E. With a control panel (see Fig. 19D), when the Delay button ④ is pressed, the relative LEDs scroll in succession (2h, 4h, 8h, further pressing after 8h LED deactivates the option).
□ Delayed Start (Delay) □ Delay
It is possible to delay the start of the programme by 2, 4 or 8 hours. After selecting the delay time, press the Start button ⑥ (only in versions as in Fig. 18A and 18B) and close the dishwasher door; the LED ⑩ will flash the entire duration of the delay time selected until the wash cycle starts automatically. If, during the delay time there is a power cut or the door is opened (e.g. to add more crockery), the counting down of the delay time is interrupted and will resume once the door is closed.
□ Half Load 1/2 Load
For small amounts of crockery, the half load function can be selected in order to reduce water and energy consumption as well as the wash time. The option is automatically deactivated at the end of the wash cycle.
□ All-in-1 function
This function enables to adapt the wash programme to the type of chosen detergent in order to attain optimal wash performance. This function can be activated with all wash programmes equipped with it (see Programme Table) and always remains active; the corresponding LED stays lit. The low rinse aid LED indicator is deactivated.
The use of combined detergents (such as “3-in-1” tablets or similar products) may make the use of dishwasher salt and rinse aid unnecessary.
NOTE
In any event, it is good practice to follow the indications on the product container regarding use of the above-mentioned products.
Practical advice: However, ideal washing results can be achieved using traditional detergents combined with dishwasher salt and rinse aid.
WARNING:
When traditional detergents are used the water softener device must be adjusted accordingly.
WASH PROGRAMME TABLE-CONTROL PANELS FIG. 18A, 19C AND 19D
| Programmes | Programme no. | DETERGENT | Recommended for | Programme description | Options available (see “Options” paragraph) page 71 | |
| Pre-wash | Wash cycle | |||||
Pre-wash30°C  | P1 | Removal of starch and rice residues from crockery until the dishwasher can be fully loaded. | Quick, hot wash | □Delayed Start | ||
| Quick [SBSK] | P2 | ● | Lightly soiled crockery. | Main wash cycle1 Hot rinse | □ALL-in-1□Delayed Start | |
| Daily [TWT8]Daily [CZBS] | P3 | ● | ● | Crockery soiled due to normal use, reduced energy consumption. The wash cycle lasts longer than other cycles but consumes less energy and is more environment-friendly. | 1 Cold pre-wash — Main wash cycle2 Rinses(1 cold – 1 hot) Drying | □ALL-in-1□Half Load□Delayed Start |
| Energetic65°C [IMAGE] | P4 | ● | ● | Very dirty crockery, pots and pans. | 1 Hot pre-wash — Main wash cycle3 Rinses (2 cold – 1 hot) Drying | □ALL-in-1□Half Load□Delayed Start |
WASH PROGRAMME TABLE-CONTROL PANELS FIG. 18B
| Programmes | Programme no. | DETERGENT | Recommended for | Programme description | Options available (see “Options” paragraph) page 71 | |
| Pre-wash | Wash cycle | |||||
| Pre-wash _30^ [ADOZ] | P1 | Removal of starch and rice residues from crockery until the dishwasher can be fully loaded. | Quick, hot wash | ☐Delayed Start | ||
| Quick[TEXC] | P2 | ● | Lightly soiled crockery. | Main wash cycle1 Hot rinse | ☐ALL-in-1☐Delayed Start | |
Daily A A A (*)  | P3 | ● | ● | Crockery soiled due to normal use, reduced energy consumption. The wash cycle lasts longer than other cycles but consumes less energy and is more environment-friendly. | 1 Cold pre-wash — Main wash cycle2 Rinses(1 cold – 1 hot) Drying | ☐ALL-in-1☐Half Load☐Delayed Start |
| Turbo ATurboA60' | P4 | ● | Crockery soiled due to normal use, barely 60' washing time. | 1 Main wash cycle1 Hot rinse - Drying | ☐ALL-in-1☐Half Load☐Delayed Start | |
| Energetic 65°C | P5 | ● | ● | Heavily soiled crockery, pots and pans. | 1 Hot pre-wash — Main wash cycle3 Rinses (2 cold – 1 hot) Drying | ☐ALL-in-1☐Half Load☐Delayed Start |
(*) Reference program for energetic class classification in accordance with EN50242 norm
(**) Reference program for institutes of testing
ERROR CODE TABLE
N.B.: Malfunctions are signalled in the following way:
a buzzer sounds, the two front LEDs flash quickly and the control panel visualises the type of error.
| Error | When this occurs | Checks to carry out | Action to be taken |
| E4 | At the beginning of the cycle | - Closed tap.- Supply hose filter clogged.- Water supply hose bent.- Insufficient operating water pressure.- Litre-counter valve does not work.- Safety float intervention. | - Reset the dishwasher.- Check.- Reset the dishwasher.- Check the water pressure.- Contact an authorised Technical Assistance Centre.- Contact an authorised Technical Assistance Centre. |
N.B.: Upon contacting the authorised technical assistance centre always communicate the type of error encountered.
8.3 Description of the control options and indicators
1) The On / Off button
2) Graphical display
3) Menu / OK button
4) Navigation buttons
5) Programme Pause/Start-Stop button
6) External display (refer to 20Å)
7) Door handle
8) "Functioning" LED (refer to 20B)
9) Start / End LED (refer to 20B)
10) Low salt indicator icon (if fitted)
11) Low rinse aid indicator icon (if fitted)
To open pull forward (an electric safety mechanism turns off the machine when the door is being opened).

STARTING THE DISHWASHER
After checking the dishwasher salt (only in versions with a salt compartment) and rinse aid quantities, open the water supply tap fully, load the crockery onto the racks, pour detergent in the relative compartment, add pre-wash detergent (if necessary) and close the dishwasher door.
Figure 20A: Version with external display⑥: it shows information regarding programme status and possible malfunctions.
Figure 20B: Version with external LEDs ^⑧ and ^⑨ : these show information regarding programme status and possible malfunctions.
Proceed as follows:
Press button① to switch on the appliance, the② display shows the last programme carried out.
PROGRAMME SELECTION
Each time the navigation buttons ④ (< / >) are pressed, the available programmes appear on the display. Select the wash programme according to the type of crockery loaded and the level of dirt.
START
Press the Start button ⑤ and close the dishwasher door; a beep sound signals the start of the wash cycle. Figure 20A: in versions with an external display, the running programme phases are graphically visualised. Figure 20B: in versions with external LEDs ⑧ and ⑨, these remain lit until the programme ends.
ADDING MORE CROCKERY
To add more crockery items, the wash cycle can be interrupted in the following manner: open the dishwasher door slightly to avoid water spraying out and steam to exit the machine; the programme interrupts and other crockery may be added. To resume the interrupted programme, follow the instructions appearing on the display ②. “press Start and close the door”. The cycle will resume from the point it was interrupted.
MODIFYING OR RESETTING A RUNNING PROGRAMME
Preferably, this operation should be performed if the programme has only just recently begun otherwise some detergent may already have been used or washing water drained; in such case, additional detergent must be added (see paragraph “Adding the detergent”).
To modify a running programme, open the dishwasher door slightly to avoid water spraying out and steam to exit the machine and keep the Start button ⑤ pressed for approx. 6 seconds (subsequently “programme cancelled” will appear on the display ②); after the beep signal, close the door to start the RESET phase which will finish AFTER the beep signal. At this point a new programme can be selected.
In the event of a sudden power cut, all settings remain memorised; the wash programme will resume from the point it was interrupted.
PROGRAMME END
The dishwasher stops automatically once the wash cycle is terminated. The end of the wash programme is signalled by a 3-beep buzzer sounding 3 times, and by the LED ⑨ switching off (in versions such as those in Fig. 20B) or by the text “programme ended” appearing on the front display ⑥ (in versions such as those in Fig. 20A). Open the door and press the On/Off button ① to switch the dishwasher off. After each wash cycle, it is advisable to close the water supply tap to cut off the dishwasher from the water supply network.
SUGGESTIONS: After the beeps signalling the end of the cycle, the door may be left ajar to accelerate the drying phase. If the worktop above the dishwasher is delicate, open the dishwasher door completely or keep it shut until taking out the crockery, to prevent steam coming out.

Options (control panel fig. 20)
NOTES:

Before setting the “options”, select the desired wash programme.
A. Pressing the Menu / OK button ③ enables access to the options menu. Press the navigation buttons ④ to visualise the desired option.
B. All the options are deactivated at the end of the wash programme (except the "All-in-1" function).
□ All-in-1 function

This function enables to adapt the wash programme to the type of chosen detergent in order to attain optimal wash performance. Pressing the Menu / OK③ button this setting is activated or deactivated (a check mark √ appears in the relevant box).
This function can be activated on all wash programmes equipped with it (see Programme Table) and remains active, the rinse aid icon is deactivated and the display visualises the 3-in-1 tablet icon.
The use of combined detergents (such as “3-in-1” tablets or similar products) may make the use of dishwasher salt and rinse aid unnecessary.
Note: In any event, it is good practice to follow the indications on the product container regarding use of the above-mentioned products.
Practical advice: However, ideal washing results can be achieved using traditional detergents combined with dishwasher salt and rinse aid.
WARNING: When traditional detergents are used the water softener device must be adjusted accordingly.
Pressing the navigation button ④ (>) visualises the next setting, "1/2 Load". This setting is deactivated by default (the display visualises the text "Option 2: 1/2 Load").
□ Half Load 1/2 Load
For small amounts of crockery, the half load function can be selected in order to reduce water and energy consumption as well as the wash time; the option is automatically deactivated at the end of the wash cycle.
Pressing the Menu / OK③ button this setting is activated or deactivated (a check mark √ appears in the relevant box).
Pressing the navigation button ④ (>) visualises the next setting, "Super Drying". This setting is deactivated by default (the display visualises the text "Option 3: Super Drying").
□ Super Drying
The Super Drying function can be selected for improved crockery drying.
Pressing the Menu / OK ③ button this setting is activated or deactivated (a check mark √ appears in the relevant box).
This option can be selected on all wash programmes that contain a drying phase (see Programme Table); activating this function increases the duration of the drying.
Pressing the navigation button ④(>) visualises the next setting, "Delayed Start". This setting is deactivated by default (the display visualises the text "Option 4: 0 h Delay").
□ Delayed Start □ Delay
The wash programme can be delayed by 1–12 hours. Each time the Menu / OK button③ is pressed, delay time increases by 1 hour; once the 12 hour delay time is reached, pressing the Menu / OK button③ deactivates the function (the display visualises the text "Option 4: 0 h Delay"). The delay time is set to "0 h" by default.
After having selected the delayed start function, press the Start button and close the dishwasher door.
FIGURE 20A: the text “Starts in ... hours” appears on the display and the countdown begins until the wash cycle begins automatically.
FIGURE 20B: LED 9 starts flashing for the entire duration of the set time until the wash cycle starts automatically.
If, during the delay time there is a power cut or the door is opened (e.g. to add more crockery), the counting down of the delay time is interrupted and will resume once the door is closed.
⚠️ To deactivate the delay time, the dishwasher must be RESET.
□ Sanitiser
Pressing the navigation button ④ (>) visualises the next setting, "Sanitiser". This setting is deactivated by default (the display visualises the text "Option 5: Sanitiser").

This option is not available on the following programmes: Toys & Plastic, Crystal and Automatic
Pressing the Menu / OK ③ button this setting is activated or deactivated (a check mark √ appears in the relevant box). With this function activated, the final rinse occurs at 75°C. The function is automatically deactivated at the end of the programme.
Pressing the navigation button③ (>) visualises the final menu option setting, "Option: Exit".
Press the Menu / OK button ④ to return to programme selection; all the selected options are now visible as icons on the display.
Warning:
☐ To modify the selected options from within the options menu, press the navigation (<) button④ and access the setting to be changed.
☐ To modify selected options, before confirming with the Start button ⑤, press the Menu / OK navigation button ③ to access the options menu again and modify the desired option.
☐ If the options to be modified have already been confirmed with the Start button⑤, use the RESET function to modify them (see paragraph entitled “Modifying or resetting a running programme”).
CONTROL PANEL WASH PROGRAMMES TABLE (Fig. 20)
| Programmes | Programme no. | DETERISIVO | Recommended for | Programme description | Options available (see “Options” paragraph) page 74-75 | ||
| Pre-wash | Wash cycle | ||||||
Pre-wash30°C  | P1 | Removal of starch and rice residues from crockery until the dishwasher can be fully loaded. | Quick, hot wash | □Delayed Start | |||
Quick  | P2 | ● | Lightly soiled crockery. | Main wash cycle1 Hot rinse | □ALL-in-1□Delayed Start□Sanitiser | ||
Daily A A A (*)  | P3 | ● | ● | Crockery soiled due to normal use, reduced energy consumption. The wash cycle lasts longer than other cycles but consumes less energy and is more environment-friendly. | 1 Cold pre-wash — Main wash cycle2 Rinses(1 cold – 1 hot) Drying | □ALL-in-1□Half Load□Super Drying□Delayed Start□Sanitiser | |
Turbo A  | P4 | ● | Crockery soiled due to normal use, barely 60' washing time. | 1 Main wash cycle1 Hot rinse - Drying | □ALL-in-1□Half Load□Super Drying□Delayed Start□Sanitiser | ||
Energetic 65°C  | P5 | ● | ● | Heavily soiled crockery, pots and pans. | 1 Hot pre-wash — Main wash cycle3 Rinses (2 cold – 1 hot) Drying | □ALL-in-1□Half Load□Super Drying□Delayed Start□Sanitiser | |
Crystal  | P6 | ● | Lightly soiled fragile crockery and glass sensitive to high temperatures. | 1 Main wash cycle2 Rinses (1 cold – 1 hot) Drying | □ALL-in-1□Half Load□Super Drying□Delayed Start | ||
Toys & Plastic(if available  | P7 | ● | ● | Crockery, containers and small plastic toys. | 1 Cold pre-wash — Main wash cycle2 Rinses (1 cold – 1 hot) Drying | □ALL-in-1□Half Load□Super Drying□Delayed Start | |
(*) Reference program for energetic class classification in accordance with EN50242 norm
(**) Reference program for institutes of testing
ERROR CODE TABLE
N.B.: Malfunctions are signalled in the following way:
a buzzer sounds and the display visualises the type of error.
| Error | When this occurs | Checks to carry out | Action to be taken |
| E4 | At the beginning of the cycle | - Closed tap.- Supply hose filter clogged.- Water supply hose bent.- Insufficient operating water pressure.- Litre-counter valve does not work.- Safety float intervention. | - Reset the dishwasher.- Check.- Reset the dishwasher.- Check the water pressure.- Contact an authorised Technical Assistance Centre.- Contact an authorised Technical Assistance Centre. |
N.B.: Upon contacting the authorised technical assistance centre always communicate the type of error encountered.

MAIN TENANCE
9.1 OCEANINGCOFFS&PAY-PROTORS

CAUTION: Before performing any cleaning or maintenance work on the dishwasher, disconnect it from the power supply and shut off the water supply tap.
The spray-rotors can easily be removed for the periodic cleaning of the jets in order to prevent possible obstructions. If necessary, use a pointed tool to remove any residues from the nozzles.
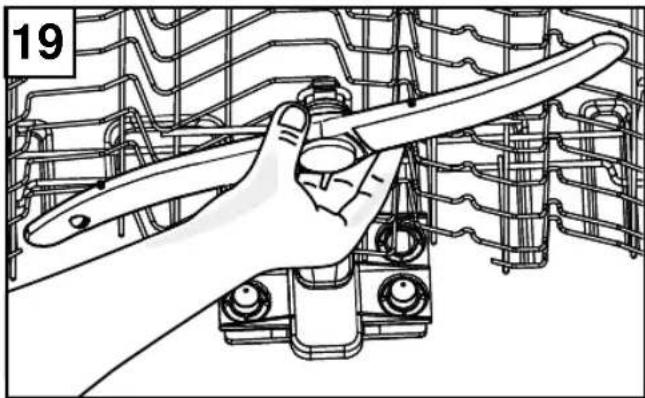
natural_image
Illustration of a hand holding a tool inside a mechanical assembly (no text or symbols visible)To remove the upper spray-rotor: Unscrew anticlockwise the support of the spray-rotor.
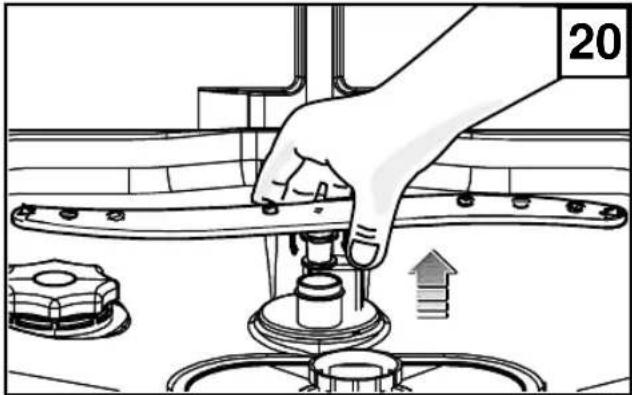
natural_image
Illustration of a hand operating a mechanical device with a valve and pump (no text or symbols)To remove the lower spray-rotor: Pull the spray-rotor upwards and take it out.
9.2 CLEANING OF FILTERS
After each wash the filter group should be checked in order to remove possible dirt residues. Proceed as follows:
- Unscrew the external filter 1 by turning it in an anticlockwise direction.
• Take out the central filter 2
- Remove the fine filter 3.
All the components must be carefully cleaned in running water. Before starting a new wash cycle, ensure that all the filters have been put in their proper place to avoid damaging the wash pump.

WARNING! Dirty filters may hamper wash performance and proper dishwasher functioning.


natural_image
Line drawing of a hand pressing down on a mechanical component (no text or symbols)9.3 CLEANING THE DRAINAGE PUMP
The pump may be accessed from inside the dishwasher.
- Always disconnect the plug from the mains socket before cleaning the pump.
- Unscrew the external filter 1 by turning it in an anticlockwise direction (fig. 21).
- Remove the stainless steel filter 3 (Fig. 23).
- Finally, remove the small insert Z from the left part of the drainage hole in the base of the appliance.
- By placing your finger inside the hole, it is possible to rotate the pump propeller and eliminate any blockages which may have occurred.
- Replace the insert and the filters.
- Plug the appliance back into the mains socket.

CAUTION: Do not forget to replace insert Z.

9.4 CDEANINGGTRIE EXTERNIAA IDDBGWVASCHEERSSURRACESS
The external dishwasher surfaces (metal and plastic) must be cleaned regularly with a damp, soft cloth. Never use acidic substances or abrasive detergents.
If you don't use the appliance for long periods of time
In the event the dishwasher will not be used for a long period, proceed as follows:
• run the pre-wash programme twice
- remove the electric plug from the outlet
- disconnect the water supply tube
- leave the door slightly open to avoid the formation of bad odours.
10 PERFORMANCE DATA
TEST MEASURES (14 SETTINGS)
Test measures
Pre-wash using 9 grams of detergent, which should be poured onto the internal door.
Main wash using 25 grams of standard detergent, which should be poured into the container. (Type B)
Rinse aid dosage: maximum setting position. (Type III)
Remove cutlery container handle.
Height-adjustable top-basket must be inserted in the uppermost position.
Energy class
Europe: EN 50242
Standard programme (*) programme no. 3
Connection: Cold water

Frontal door side
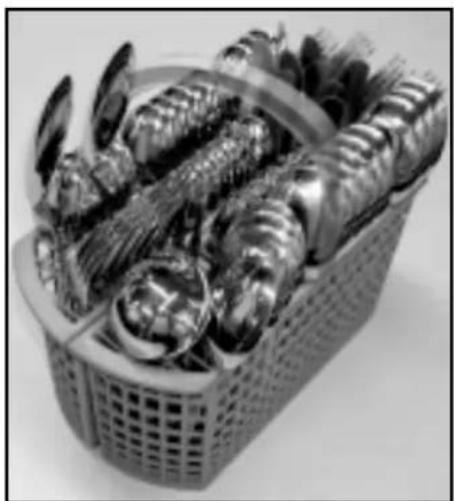
natural_image
Black-and-white photo of a basket filled with various kitchen utensils (screw, spoon, knife) on a white surface.
12

3 4

56

7 8
a Egg
b Spinach
c Minced meat
d Oatflakes
e Margarine
Dishwasher loading examples

natural_image
Diagram of a multi-layered electronic circuit board with circular components and labeled terminals (no readable text or symbols)EN 50242

Door side
TEST MEASURES (12 SETTINGS)
Test measures
Pre-wash using 9 grams of detergent, which should be poured onto the internal door.
Main wash using 25 grams of standard detergent, which should be poured into the container. (Type B)
Rinse aid dosage: maximum setting position. (Type III)
Height-adjustable top-basket must be inserted in the uppermost position.
Energy class
Europe: EN 50242
Standard programme (*) programme no. 3
Connection: Cold water
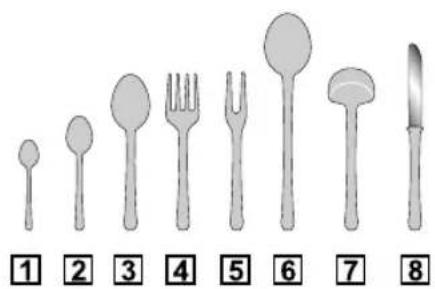
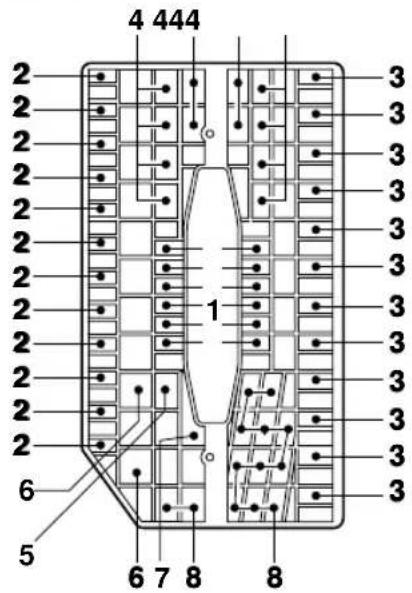
Dishwasher loading examples

natural_image
Diagram of mechanical components arranged in rows and columns, showing shafts, gears, and a central circular component (no text or labels)a Egg
b Spinach
c Minced meat
d Oatflakes
e Margarine

11 TROUBLESHOOTING
You should first check whether it is possible to rectify some minor problems yourself. Follow these instructions. If you are unable to identify or remove the problem, you should contact the technical client assistance service.
• The dishwasher does not switch on.
- The door is not properly closed.
- The appliance is not connected to the electrical socket.
- No electricity passes through the socket.
• The dishwasher fails to load water.
- The water supply tap is closed. Open the tap.
- Water supply network failure.
- The water supply hose is bottlenecked. Reposition the hose correctly.
- The water supply hose filter is clogged. Close the tap, unscrew the hose and clean the filter.
• The dishwasher fails to drain water.
- The drain hose is bent. Reposition the drain hose correctly.
- The wash basin drain pipe is clogged. Unclog it.
- The dishwasher is noisy while in function. Dishes knock against each other.
- The spray arm hits the crockery. Place the crockery correctly.
• The door closes with difficulty.
- The dishwasher is badly levelled or incorrectly installed.
- Check the door closing catch.
- Visible limescale deposits or whitish glaze on crockery.
- Dishwasher salt is lacking or the water softener device is not adequately adjusted to the water hardness level.
• The crockery is not perfectly dry.
- The rinse aid is finished or insufficient dosage.
• The crockery is not clean.
- The racks are too packed.
- The crockery is not properly placed.
- The spray arm does not properly rotate due to incorrectly placed crockery.
- The spray arm holes are clogged.
- The filters are clogged.
- The filters are incorrectly placed.
- The detergent dosage is not suitable, has hardened or has lost its effectiveness due to prolonged disuse.
- The salt compartment lid is not properly closed.
- The selected wash programme is unsuitable.
Granted that the dishwasher has been thoroughly tested and checked in the factory, small drops of water may appear inside the tub but will disappear after the first wash cycle.
NOTES
- SVENSKA SE
- SN ABBGUIDE
- Fyll korgarna
- IN N EHÅLLSFÖRTECKNING
- INBYGGDA MODELLER
- RENGÖRING AV AVLOPPSPUMP
- TESTDO SERING (12 KUVERT)
- Testdosering
- FELSÖKNINGSGUIDE
- KALUSTEISIIN SIJOITETTAVAT MALLIT
- ASTIAN PESUKONEEN KÄYNNISTYS
- OHJELMAN VALINTA
- POISTOPUMPUN PUHDISTUS
- TESTIOHJELMAN ANNOSTELU (12 HENGEN PERUSASTIASTO)
- Add the detergent
- CONTENTS
- BEFORE USING THE APPLIANCE
- SAFETY INSTRUCTIONS
- Norms and regulations to be respected
- Before running the appliance for the first time
- For the safety of children
- They should therefore be kept outside the reach of children.
- Daily use
- UN PACKING - DISPOSAL
- UNPACKING
- FINAL DISPOSAL OF APPLIANCE
- GENERAL ADVICE
- WASHING DISHES IN AN ECONOMIC AND ECOLOGICAL WAY
- DISHES NOT TO BE WASHED IN THE DISHWASHER
- DESCRIPTION OF THE APPLIANCE
- GENERAL PARTS
- Parts of the dishwasher\*
- TECHNICAL DATA
- INSTALLATION
- LEVELLING
- BUILT-IN MODELS
- Built-in models with adjustable rear and front feet (only available on certain models)
- WATER CONNECTION
- CONNECTION OF DRAINAGE WATER
- ELECTRIC CONNECTIONS
- PREWIMNARRYCOPEAATOUNSS
- Before starting up the machine, ensure that:
- ADDING DISHWASHER SALT (only for models with softener)
- WARNING!
- Door opening
- Using the dishwasher for the first time:
- Dishwasher salt level indicator
- Adjusting the water softener device (control panel version A and B)
- Adjusting the water softener device (control panel versions C, D, E and F)
- Settings: language and water hardness (control panel G version)
- □ Buzzer Off
- □ External Display Off ⑥
- □ Automatic Off
- NOTE
- Refilling of rinse aid
- Indication of rinse aid level
- Regulation of rinse aid dosage
- Adding the detergent
- Adding the detergent
- Compact / combined 2-in-1, 3-in-1, All-in-& detergents etc.
- Detergents vary in their strength and efficiency. You should therefore pay attention to the dosage recommendations of each manufacturer.
- HOW TO LOAD AND UNLOAD THE DISHWASHER
- Use of the lower basket
- Cutlery
- ATTENTION:
- ! WARNING!
- Use of the upper basket
- Height regulation of the upper basket (if included)
- Pulling out the upper basket
- CONTROL PANEL and WASH PROGRAMMES
- Description of the control options and indicators (fig. 18A-18B)
- 1) On/Off button
- STARTING THE DISHWASHER
- Now proceed as follows:
- PROGRAMME SELECTION
- START
- ADDING MORE CROCKERY
- MODIFYING OR RESETTING A RUNNING PROGRAMME
- PROGRAMME END
- Description of the control options and indicators (fig. 19C-19D)
- Option (control panel fig. 18 B - fig. 19 D)
- NOTES:
- □ Delayed Start (Delay) □ Delay
- □ Half Load 1/2 Load
- □ All-in-1 function
- WARNING:
- ERROR CODE TABLE
- Description of the control options and indicators
- Options (control panel fig. 20)
- □ Super Drying
- MAIN TENANCE
- OCEANINGCOFFS&PAY-PROTORS
- CLEANING OF FILTERS
- CLEANING THE DRAINAGE PUMP
- CDEANINGGTRIE EXTERNIAA IDDBGWVASCHEERSSURRACESS
- If you don't use the appliance for long periods of time
- PERFORMANCE DATA
- TEST MEASURES (14 SETTINGS)
- Test measures
- Energy class
- TEST MEASURES (12 SETTINGS)
- TROUBLESHOOTING
- NOTES
Brand : UPO
Model : D574D
Category : Dishwasher