43UHDADNVVGE - Television NOKIA - Free user manual and instructions
Find the device manual for free 43UHDADNVVGE NOKIA in PDF.


| Product Type | 4K UHD Smart Television |
| Brand | Nokia |
| Model | 43UHDADNVVGE |
| Screen Size | 43 inches (109 cm) |
| Resolution | 3840 x 2160 (4K UHD) |
| Display Technology | LED LCD |
| HDR Support | HDR10, HLG |
| Refresh Rate | 60 Hz |
| Smart Platform | Android TV |
| Wi-Fi | Built-in 802.11 b/g/n |
| Bluetooth | Version 4.2 |
| HDMI Ports | 3 x HDMI 2.0 |
| USB Ports | 2 x USB 2.0 |
| Ethernet Port | 1 x RJ45 |
| Audio Output | Optical, 3.5mm jack |
| Speaker Power | 16W (2 x 8W) |
| Power Consumption | 65 W (typical), 0.5 W standby |
| Dimensions (with stand) | 967 x 613 x 204 mm |
| Dimensions (without stand) | 967 x 565 x 79 mm |
| Weight (with stand) | 7.5 kg |
| Weight (without stand) | 7.3 kg |
| VESA Mount | 200 x 200 mm |
| Remote Control | Nokia RC-104 (incl.) |
Frequently Asked Questions - 43UHDADNVVGE NOKIA
User questions about 43UHDADNVVGE NOKIA
0 question about this device. Answer the ones you know or ask your own.
Ask a new question about this device
Download the instructions for your Television in PDF format for free! Find your manual 43UHDADNVVGE - NOKIA and take your electronic device back in hand. On this page are published all the documents necessary for the use of your device. 43UHDADNVVGE by NOKIA.
USER MANUAL 43UHDADNVVGE NOKIA
NOKIA 43,50,55 UHD USER MANUAL SIZE-140x210mm
NOKIA
natural_image
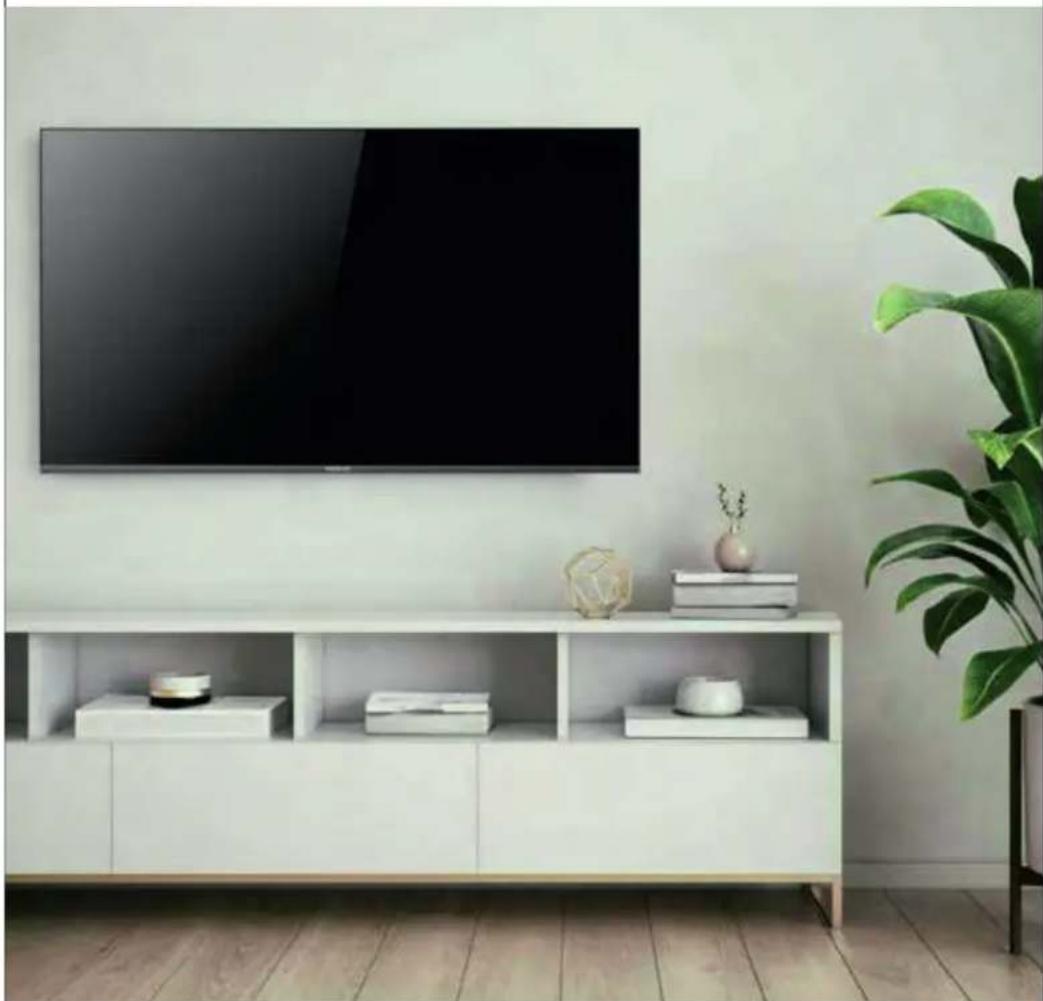
Modern home TV set with a large black monitor on a white wall, accompanied by decorative items including a vase and a potted plant (no text or symbols visible)Nokia-43" /50" /55" UHD

Table of Contents
- Warning and Precautions 1-4
- Standard Accessories 5
- Base Installation 5
- Controls & Connections 6-7
- Remote Control 8
- Operating Your TV 9-17
- Specifications 18
- Troubleshooting 19
- License 20
- Warranty Terms & Conditions 21-22

Figures and illustrations in this Operation Manual are provided for reference only and may differ from actual product appearance. Product design and specifications may be changed without notice.
Help
The Help feature offers a lot of information about your TV operation. To use the Help feature, you can find how to troubleshoot from the list or keyword search. If you update APK, the Help feature and information will be updated.
Warning and Precautions
Read all of the instructions before operating the television. Keep these instructions handy for later use.
Important Safety Instructions
- Read these instructions -All the safety and operating instructions should be read before this television is operated.
- Keep these instructions - The safety and operating instructions should be retained for future reference
- Importance of all warnings -All warnings on the television and in the operating instructions should be adhered to.
- Follow all instructions -All operating and usage instructions should be followed.
- Do not use this television near water - The television should not be used near water or moisture - for example, in a wet basement or near a swimming pool etc.
- Use only dry cloth for cleaning.
- Do not block any ventilation openings. Install according to the manufacturer's instructions.
- Do not install near any heat sources such as radiators, heat registers, stoves, or other apparatus (including amplifiers) that produces heat.
- Do not defeat the safety purpose of the polarized or grounding plug. A polarized plug has two blades with one wider than the other. A grounding plug has two blades and a third grounding prong. The wide blade or the third prong is provided for your safety. If the provided plug does not fit into your outlet, consult an electrician for replacement.
- Protect the power cord from being walked on or pinched particularly at the plugs and at the point where they exit from the television.
- Only use attachments/accessories specified by the manufacturer.
• Use only with the cart, stand, tripod, bracket, or table specified by the manufacturer, or sold with the television. When a cart or rack is used, use caution when moving the cart/television combination to avoid injury from tip-over.
- Unplug the television during lightning storms or when unused for long periods of time.
- Get your servicing from qualified personnel, Servicing is required when the television has been damaged in any form, such as power supply cord or damaged plug, liquid has been spilled or objects have fallen on the television, the television has been exposed to rain or moisture and hence does not operate normally, or has been stopped working.
- Caution: These servicing instructions are for use of qualified service personnel only. To reduce the risk of electric shock, do not perform any servicing other than that contained in the operating instructions unless you are qualified to do so.
- Do not install this equipment in a closed space. Keep it in well ventilated conditions at open site. The ventilation should not be impeded by covering the ventilation openings with items such as newspaper, table-cloths, curtains etc.
- Caution - To prevent electric shock hazard, please replace grille.
- Please refer the information on rear enclosure for electrical and safety information before installing or operating the television.
• To reduce the risk of fire or electric shock, do not expose this television to rain or moisture.
- The television shall not be exposed to dripping or splashing and that no objects filled with liquids, such as vases, shall be placed on the television.
- For the terminals marked with symbol of “ 12 ” may be of sufficient magnitude to constitute a risk of electric shock. The external wiring connected to the terminals require installation by an instructed person or the used of ready-made leads or cords.
- To prevent injury, use the stand/ wall- mount bracket to securely install this television on the table/wall in accordance with the installation instructions.
- Danger of explosion if battery is incorrectly replaced. Replace only with the same or equivalent type. The battery (battery or batteries or battery pack) shall not be exposed to excessive heat such as sunshine, fire or the like
- Excessive sound pressure from earphones and headphones can cause hearing loss. Listening to music at high volume levels and for extended durations can damage one's hearing. In order to reduce the risk of damage to hearing, one should lower the volume to a safe, comfortable level, and reduce the amount of time listening at high levels.
- The appliance coupler is used as disconnect device, the disconnect device shall remain readily operable.
- When not in use and during movement, please take care of the power cord set, e.g. tie up the power cord set with cable tie. It shall be free from sharp edges and the like that can cause abrasion of the power cord set. When put into use again, please make sure the power cord set being not damaged, if any damages found, please look for the service person to replace the power cord set specified by the manufacturer or have the same characteristics as the original one.
- Attention should be drawn to environmental aspects of battery disposal.
- No fire objects such as lighted candles should be placed on the television. To prevent the spread of fire, keep fire objects or other open flames away from the television at all times.
- If the television has the symbol ☐ in its rating label and the power plug has two pins, it means that the equipment is a Class II or double insulated electrical appliance. It has been designed in such a way that it does not require a safety connection to electrical earth .(Only for Class II appliance)
• The following information are recommended to be included as far as applicable where applicable:
| ~ Refers to alternating current(AC). | ∅ Refers to stand-by. |
| == Refers to direct current(DC). | I Refers to power ON. |
| 回 Refers to Class II equipment. | ‡ Refers to dangerous voltage. |
• Warning for television containing Coin / Button
Cell Batteries (Below instruction only used for the television containing a user-replaceable coin/button cell battery)
Warning:
Refrain to ingest battery which can lead to chemical burn hazard. If the coin/button cell battery is swallowed, it can cause severe internal burns in just 2 hours and can lead to death. Keep new and used batteries away from children. If the battery compartment does not close securely, stop using the product and keep it away from children. If you think batteries might have been swallowed or placed inside any part of the body, seek immediate medical attention
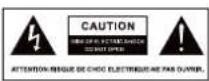
The lightning flash with arrowhead symbol within an equilateral triangle is intended to alert the user to the presence of non-insulated "dangerous voltage" within the product's enclosure that may be of sucient magnitude to constitute a risk of electric shock.
• To reduce the risk of electric shock, do not remove cover (or back). Refer to qualified service personnel to open it.
- The exclamation point within an equilateral triangle is intended to alert the user to the presence of important operating and maintenance instructions in the literature accompanying the television.
This product is RoHS Compliant
Disposal of used Electrical & Electronics Equipment

Packaging and electrical goods should be recycled appropriately, and not treated as household waste. Please dispose of this equipment at your applicable collection point for the recycling of electrical & electronic equipment
waste. By ensuring the correct disposal of this product, you will help prevent potentially hazardous to the environment and to human health, which could otherwise caused by unsuitable waste handling of this product. The recycling of materials will help conserve natural resource. Please do not therefore dispose of your old electrical and electronic equipment with your household waste. For more detailed information about recycling of this product, Please contact your local city office, your household waste service or the shop where you purchased the product.
Positioning the TV
- Install Display on solid horizontal surface such as a table or desk. For ventilation, leave a space of at least 10cm free all around the set. To prevent any fault and unsafe situations, please do not place any objects on top of the set. This apparatus can be used in tropical and/or moderate climates.
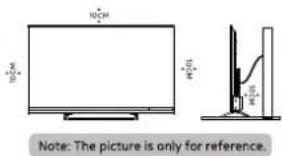
• Fix the rear of enclosure to wall (only for some countries)
- Warning: Never place a television set in an unstable location. A television set may fall, causing serious personal injury or death. Many injuries, particularly to children, can be avoided by taking simple precautions such as:
- Using cabinets or stands recommended by the manufacturer of the television.
- Only using furniture that can safely support the television.
- Ensuring the television is not overhanging the edge of the supporting furniture.
- Not placing the television on tall furniture (for example, cupboards or bookcases) without anchoring both the furniture and the television set to a suitable support.
- Not placing the television set on cloth or other materials that may be located between the television set and supporting furniture.
- Educating children about the dangers of climbing on furniture to reach the television or its controls.
If your existing television set is being retained and relocated, the same considerations as above
should be applied. (Only for the TV with mass exceeds 7 kg).
Mounting on a Wall
- An optional wall mount can be used with your television. Consult with your local dealer to purchase the recommended wall mount bracket. Carefully attach the wall mount bracket at the rear of the TV. Install the wall mount bracket on a solid wall perpendicular to the floor. If you are attaching the TV to other building materials, please contact qualified personnel to install the wall mount. Detailed instructions will be included with the wall mount. Please use a wall mount bracket where the device is adequately secured to the wall with enough space to allow connectivity to external devices.
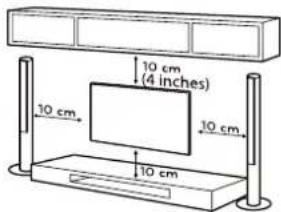
Note: The picture is only for reference.
- Disconnect the power before moving or installing the TV. Other wise electric shock may occur. Remove the stand before installing the TV on a wall mount by performing the stand attachment in reverse.
- If you install the TV on a ceiling or slanted wall, it may fall and result in severe injury. Use an authorized wall mount and contact the local dealer or qualified personnel. Otherwise it is not covered by the warranty.
-
Do not over tighten the screws as this may cause damage to the TV and void your warranty.
-
To prevent injury, this apparatus must be securely attached to the floor/ wall in accordance with the installation instructions.
- Use the screws and wall mounts that meet the following specification s. Any damage s or injuries buy misuse or using an improper accessory are not covered by the warranty.
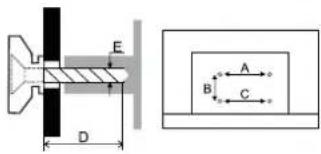
| Model Size | 43" | 50" | 55" | ||||
| Top | Down | Top | Down | Top | Down | ||
| Screw | Diameter(mm) "E" | M6 | M6 | M6 | M6 | M6 | M6 |
| Size In(mm) | 6x10 | 6x15 | 6x10 | 6x10 | 6x10 | 6x10 | |
| Quantity | 2 | 2 | 2 | 2 | 2 | 2 | |
| A*B*C | 200x200mm | 200x200mm | 200x200mm | ||||
Note:
- The Pictures are only for reference.
- For the TV sets with terminals towards the wall, in order to leave enough space to use the terminals, a rubber cushion is needed together with each screw to fix the wall mount. It is a small hollow pillar whose internal diameter is 8mm, external diameter is 18mm and height is >30mm.
Positioning the TV
Improper using of the battery will cause leakage. So please do as the following methods and use carefully.
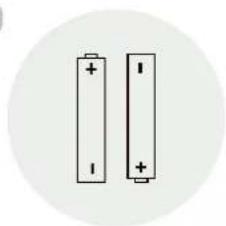
- Please note the batteries' polarity, to avoid short circuit.
- When the battery's voltage is insufficient which affect the use range, you should replace new battery. Remove the batteries from the remote control unit if you do not intend to use it for a long time.
- Do not use different types of batteries (for example, Manganese and Alkaline batteries) together.
- Do not put the battery into fire, and charge or decompose the battery.
- Please dispose batteries abide by relevant environmental protection regulation.
- WARNING: The batteries (battery pack or batteries installed) shall not be exposed to excessive heat such as sunshine, fire or the like.
Buttons on the TV
natural_image
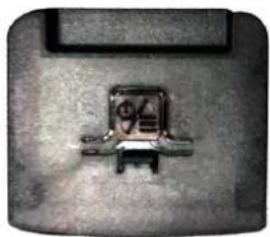
Close-up of a metallic mechanical component with a central percentage symbol (no readable text or numbers)1. button
Power on the TV, when TV is on, short press it to enter into standby mode, and long press it to shut down the TV.
Standard Accessories
Note: The Pictures are only for reference
natural_image
Two cylindrical batteries with positive and negative terminals, no text or symbols presentBatteries/2
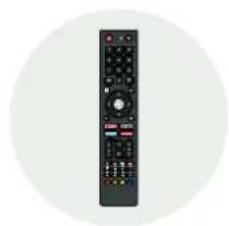
natural_image
Black remote control device with multiple buttons and a circular background (no text or symbols visible)Remote Control
Operation Manual
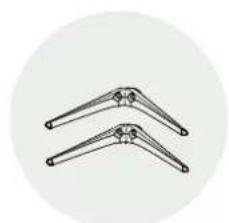
natural_image
Two identical mechanical arms with flanges, shown against a plain circular background (no text or symbols)Base Stands/2
Note: Table mounting using standard stand supplied as accessory with TV, Extra charges are applicable for standard wall mounts
Base Installation
To fix the base stand by screws, and complete the installation
Note: Illustrations below are provided for reference only and may differ from actual product appearance.
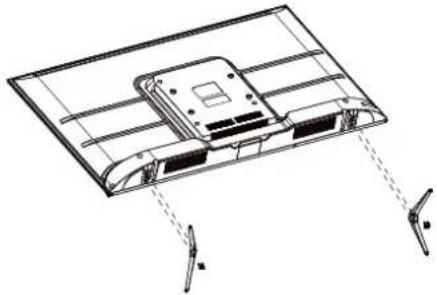
natural_image
Technical line drawing of a mechanical assembly with no visible text or symbolsControls and connections

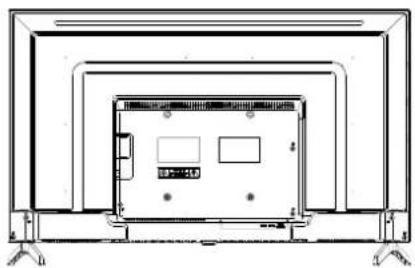
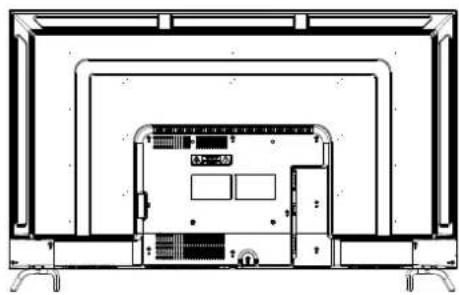
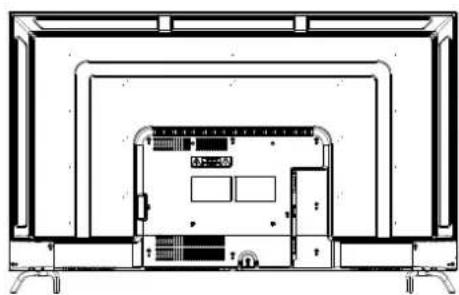
Caution: Before connecting or disconnecting any cables, switch off all related devices (also the TV). Otherwise you could damage the device
43UHDADNVVGE
natural_image
Line drawing of a flat-screen TV unit with multiple screens and ventilation grilles (no text or symbols)

50UHDADNVVGE
natural_image
Technical line drawing of a flat-screen TV unit with internal components and no visible text or symbols
55UHDADNVVGE
natural_image
Technical line drawing of a flat-screen TV unit with internal components and mounting brackets (no text or symbols)
Sockets Note: The location and names of the sockets on the TV may vary according to TV model, and some sockets may not available for some models.
LAN - Lan
RJ45 plug for connecting to external modem or network access equipment.
OPTICAL /SPDIF -- Optical /SPDIF Socket
SOCKET
This output can be used to connect a compatible digital audio receiver.
AV AUDIO SOCKETS ... AV Audio Sockets (Input)
(INPUT)
The AV IN sockets can be used to connect a range of equipment, including video recorders, camcorders, decoders, satellite receivers, DVD players, or games consoles.
ANTENNA/RF IN — Antenna/RF In Socket (Input)
SOCKET (INPUT)
This socket can be used to connect the outside aerial or cable network.
HDMI - HDMI Socket (Input)
The HDMI (High-Definition Multimedia Interface) socket can be used to connect a HDMI PC with a compatible video card installed, certain DVD players or a high-definition compatible digital satellite decoder. This socket provides an uncompressed digital connection that carries both video and audio data by way of an integrated mini-plug cable.
USB - USB Sockets (Input)
These sockets can be used to connect an USB device.
Note: The number of USB sockets on the TV may vary according to TV model. TV Supports FAT32 file formatted USB Storage devices only up-to 1TB. TV won't support NTFS file formatting system
HEADPHONE - Headphone Socket (Output)
Allow you to connect earphones to listen to the sound coming from the TV. Note: Excessive sound pressure from earphones can cause hearing loss.
Remote Control
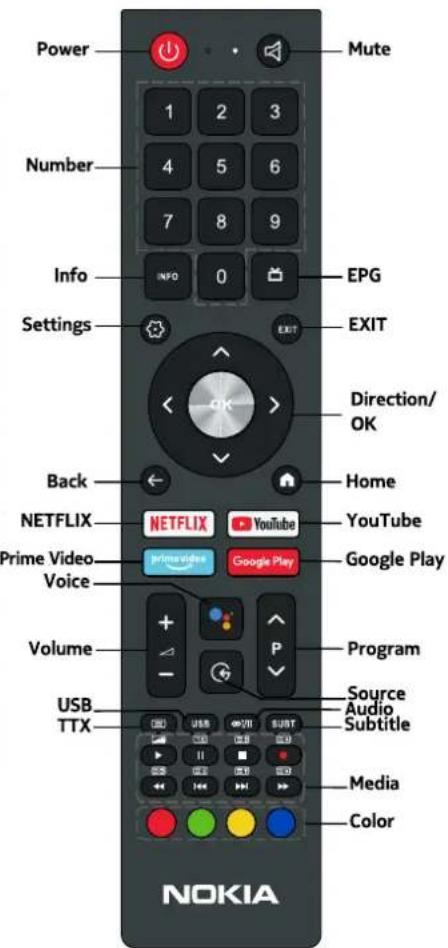
Definition of the buttons on remote control:
| Buttons | Description |
| Power | Turn on the TV, when TV is on short press it to enter into standby mode, and long press it to shut down the TV |
| Mute | Mute or restore sound |
| Number | Number buttons |
| Info | Display program information |
| EPG | Launch Electronic Program Guide |
| Settings | Display System Setting Menu |
| EXIT | Quit the current interface |
| Direction/OK | Press the direction buttons to select menu options or settings. Press OK to select or confirm menu items |
| Back | Return to previous menu or setting |
| Home | Open Android TV Homepage |
| NETFLIX | Goes to NETFLIX homepage |
| YouTube | Open YouTube App |
| Prime Video | Goes to prime video homepage |
| GooglePlay | Goes to Google Play homepage |
| Google Assistant | (Mic) Click to interact with Google Assistant of the TV. Note: Available only when the network connection is normal and RC is paired with TV. |
| Volume | Adjust the volume |
| Program | Select programs inascending or descending order |
| Source | Select signal source |
| USB | Press to enter USB mode |
| Audio | Select audio languages and Audio channels |
| TTX | Show or hide Teletext |
| Subtitle | Select subtitle |
| Media | Control media playback in Media mode |
| Color | Use in accordance with the Operation interface instructions |
How To Pair Remote?
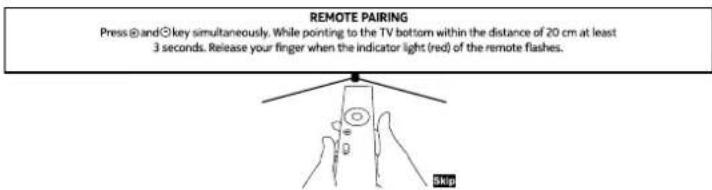
Go to ⚙ Setting > ⓘ Remote & Accessories then check TVCOGWBT is showing or not. If it is showing this means a remote is already paired. If you want you can unpair it by selecting it.
If not then go to Add accessory option then press ⊕ "Back" key & ¬ "Vol-" key together until a red light on top is not start blinking. When red light start blinking put remote close to TV and wait for + TVCOGWBT show on TV. When it shows select it now your remote is paired with TV.
Operating your TV
Switching on
Switching on Follow the instructions on this page on how to switch on your TV set and the remote control before going on to following pages describing how to use the channel set-up procedure.
- Insert two batteries in the remote control.
Precautions on using batteries:
- Only use the battery types specified.
- Make sure you use the correct polarity.
- Do not mix new and used batteries.
- Do not use rechargeable batteries.
- Do not expose batteries to excessive heat such as sunshine, fire or the like, throw them in a fire, recharge them or try to open them, as this could cause them to leak or explode.
- Remove the batteries from the remote control if you are not using it for a long period of time.
-
Connect an outside aerial to the ANTENNA IN socket at the back of the TV set.
-
Connect the power cable firstly to the television, then to a mains socket.
-
Now the TV set is in off mode with power indicator.
Press the ⏻ button on the remote control or on the TV set to turn on the TV.
Switching off
- When TV is on, short press the power button to enter into standby mode, and long press the power button to shutdown the TV.
Installing Channels
This section describes how to search and store channels automatically. This may be done in any of the cases below:
- You have skipped the channel installation step in the initial setup;
- You are prompted that there are no channels in TV mode;
- You want to update channels list;
- In TV mode, press ⚙ Setting key on the remote control and select Settings > Channel.
- Go into Channels and select Channel Scan, press OK button to start.
- The channel scan may take a few minutes. After the automatic search, channels are arranged in a preset order.
- You can also select update scan & analog manual scan in the channels menu if your only requirement is to update specific channel.
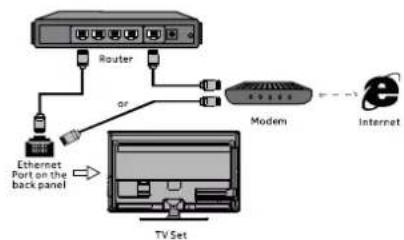
Network Connection
To access the Internet, you must subscribe high speed broadband internet service from your internet service provider. Your TV can be connected to your home network in two ways:
- Wired, using the RJ45 (LAN) connector on the back panel.
- Wireless, using the internal wireless or external wireless USB adapter and your home wireless network.
Note: This function is not available for certain models. Instructions below are just the usual ways to connect your TV to the wired or wireless network. The connection method may be different depending on your actual network configuration. If you have any questions about your home network, please refer to your ISP (Internet Service Provider).
Connecting to a wired network
To connect to a wired network:
- Ensure you have:
• An ethernet cable long enough to reach your TV
• A router or modem with an available Ethernet port
• A high-speed internet connection
• An Ethernet (LAN) port on the back of the TV - Connect your ethernet cable to the router and to the Ethernet port on the back of the TV.
- Use the Network Settings to configure the TV.
Connecting to a wireless network
To connect to a wireless network
-
Ensure you have:
-
A router broadcasting a high-speed wireless signal
• A high-speed internet connection - The TV set with Wi-Fi Module.
- Use the Network menu to configure the TV.
flowchart
graph TD
    A["TV Set"] --> B["Ethernet Port on the back panel"]
    B --> C["Modem"]
    C --> D["Internet"]
    A --> E["Router"]
    E --> F["Switch"]
    style A fill:#f9f,stroke:#333
    style B fill:#ccf,stroke:#333
    style C fill:#cfc,stroke:#333
    style D fill:#fcc,stroke:#333
    style E fill:#ffc,stroke:#333
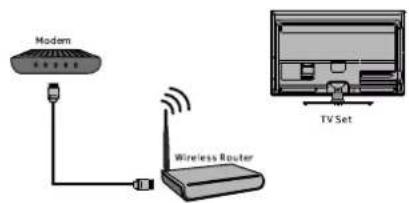
Note: Some models may have internal wireless module, then the wireless USB adapter is unnecessary. Some external wireless adapters cannot be compatible with the TV.
Initial setup
The first time you switch the set on, the Initial setup screen appears, which guides you through the initial setup process. Follow the on-screen instructions to finish the initial setup process such as selecting the language, connecting to the network, scanning channels, and more. During each step, either make a choice or skip the step. If you skip a step, you can perform the setup later from the settings menu.
Note: If the channel search retrieved only the analogue channels it could be caused by poor broadcasting and therefore is not covered by manufacturer warranty. Manufacturers cannot be held responsible for lack of or poor broadcasting in some areas.
Help Function
The Help function offers a lot of information about your TV operation.
- Press the home button on the remote control. Select "AI PONT" from the options.
- Select 'Help' from the options.
- Select the desired Help topic.
You can use the arrow and OK buttons to make a selection.
The Help function explains how to use this TV. Additionally, you can also refer to playback, the Setup Guide for descriptions about TV installation, and the Reference Guide for description of parts and specifications of this TV.
USB function (Media Player)
Press 'USB' button to open the media player.
- You can enjoy photos/ music/ movies stored on a USB device on the TV screen.
- Select device on the media player main menu.
- Select folder from the menu that is displayed, browse the files and select the desired files to playback. While playing the file, press OK button to check the file information and other functions. You can press menu button to set up play mode and other settings. The media control buttons can be found on the bottom of remote.
Google Assistant
Quickly find and play your favourite shows, get answers and control your home. Your Assistant is now ready to help.
- Press the Google assistant button on your remote to get started.
- An introduction will appear on your TV screen, follow the steps to get started.
- While giving a command or asking a question, please bring the top of the remote control close to your mouth for better reception.
Note: The remote has a Mic function. Please pair the remote to the TV if you skip it on initial setup. Google sign-in is required for the service.
Chromecast Built-in
Chromecast built-in delivers multi-screen TV and audio experiences with speakers. Casting is as simple as pressing a button from your favourite app. Watch your favourites on the TV while switching to another app. Listen to your top tunes while taking a phone call or sending a text, all without interrupting what's playing on the speakers. With Chromecast built-in, your phone is your personalized remote control that you can use to browse, play, pause, and even make playlists.
How To Cast
To set up your Chromecast built-in, visit chromecast.com/built-in/setup
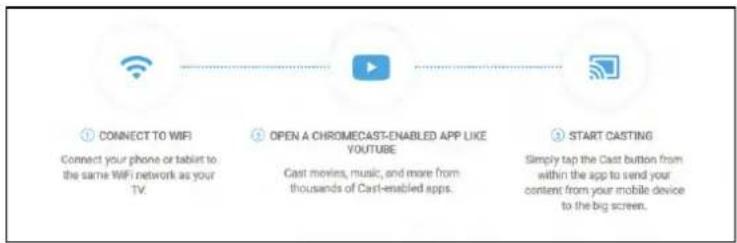
flowchart
graph LR
    A["CONNECT TO WIFI\nConnect your phone or tablet to the same WIFI network as your TV."] --> B["OPEN A CHROMECAST-ENABLED APP LIKE YOUTUBE\nCast moves, music, and more from thousands of Cast-enabled apps."]
    B --> C["START CASTING\nSimply tap the Cast button from within the app to send your content from your mobile device to the big screen."]
Screen Cast
To cast your TV mobile phone to your TV first you must connect both your mobile phone & TV at same network, now go to your phone setting > connected device > cast then select your TV name. You can also change TV name through setting > device preference > about > device name > change.
Accessing Smart TV Homepage
- Press home button on the remote control to display the homepage.
- To quit homepage, press input source button to access TV and other input mode. The homepage allows you to enjoy Internet Applications (apps) and specially adapted Internet website, and perform system settings for your TV. You can control all that with the TV remote control.
- Press ▲/▼/◄/► and OK to enter the desired apps, functions or settings.
- To change the Favourites apps order, select an app, press OK button and hold, a menu will appear and you can press Au. and OK to change.
- Press ← button to return to the homepage.
Indicators and Icons on the top of the Home screen
Google Assistant: You can search movies, TV, and more by speaking.
Google Search: You can search movies. TV, and more by typing.
Notifications: Notifications can come from the system, an external device. an application, the media player etc.
Inputs Source: Select the Input source depending on the device you have connected to your TV.
Network & Internet: You can set up the Network & Internet.
Settings: Settings let you configure TV, the set app options, add accounts, and change other preferences.
Time: You can always view the current time at the top right corner of the Home screen.
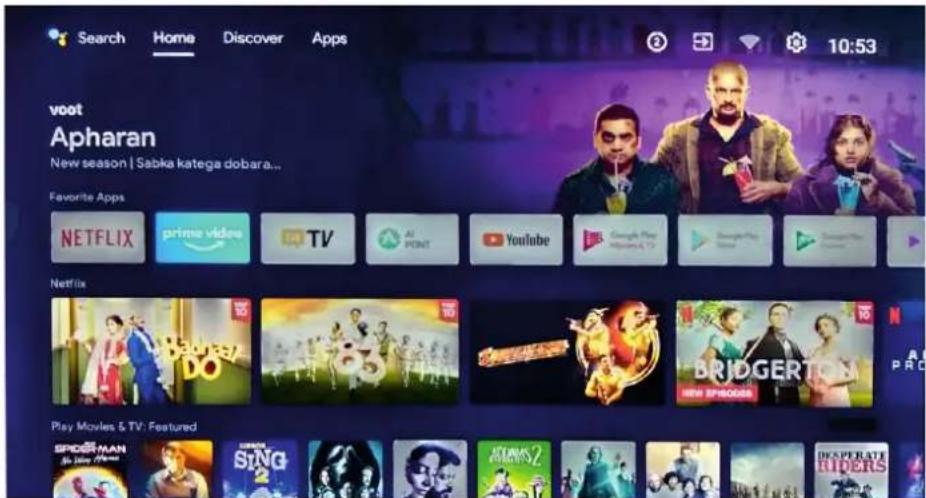
Name of sections that appear on the Home screen
The Home screen displays the following section names:
Home
Discover
Apps
Note: Name of sections will change according to Google's software.
Settings
Using Menu
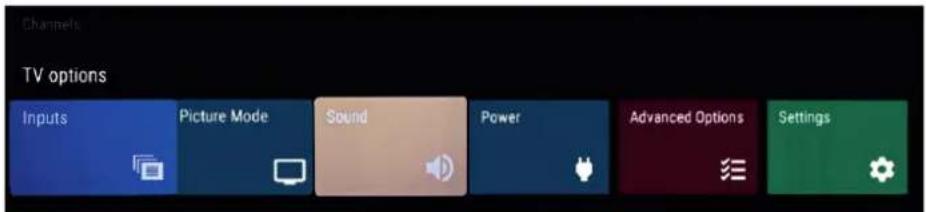
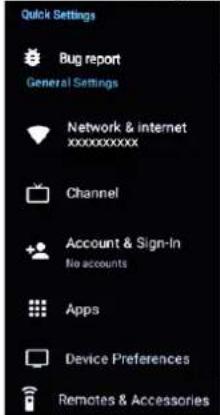
You can press the setting button on home screen to access the Setting menu. Also, you can press the 'Setting key' to access the settings menu in TV mode. The Menu consists of the following
settings:
- Bug Report We can capture bug report
• Network & Internet - Channel
• Accounts & Sign In - Apps
• Device Preferences
• Remotes & accessories
In each menu, you can: - Press the (UP/Down) Navigation buttons to select an item.
- Press the (OK) button to enter the sub-menu.
- Press the ← button to return to the previous menu.
Network & Internet
Network Privacy Policy: Here you can read the network privacy policy.
- Wi-Fi: Turn on the Wi-Fi to access the Internet via a wireless network connection. Select an available network, press (OK) to confirm. A screen will appear prompting you to enter the password if necessary
• See all/See fewer: Press (OK) to view all available network or fewer. - Add new network: You can add a new wireless network.
- Data Usage and alerts: You can check your data usage and get data alert.
- Scanning always available: Check to scan for networks even when Wi-Fi is turned off.
• WOW: Wake on wireless network.
• WOL: Wake on LAN.
• WOC: Wake on Chromecast.
Connected/ Not connected: Show whether the Ethernet is connected.
- Proxy settings: You can set the proxy server.
Note: HTTP proxy is used by the browser but may not be used by other apps.
- IP settings: Configure the IP settings for your network connection.
Channel
- Channels: Set up your channels. Get started by setting up the channel sources already installed.
• Auto Channel Update: Automatically update channels - Channel Update Message: To receive channel update.
- Parental Controls: The Parental Controls setting allows you to block content that is not appropriate for children to watch.
- Open Source licenses: Click to read the licenses details.
Accounts & Sign In
Make the most of your TV. Choose account type and sign in to get new apps. movies recommendations and more from Google.
Apps
You can view details about an app or other item listed. The information and controls available vary among different types of apps.
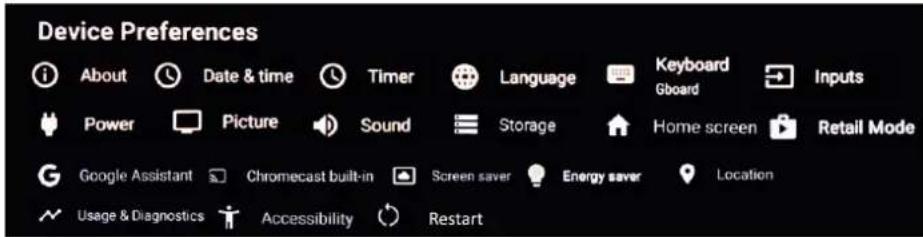
Device Preferences
See other chapters for more information about these settings.
About
System update: We will provide software updates to continuously enhance your TV and fix any issues that may impact your user experience; therefore, we recommend that you keep your TV connected to the Internet to automatically receive updates when they are available.
Device name: Change the name of your TV, also you can choose "Don't change". The name will be shown to devices that are available for sharing data.
Factory Reset: Reset your tv back to the factory default.
Status: View system messages, including IP address, Device Mac address, Serial number, Up time.
Legal information: You can read open source Licenses, Google legal, system. WebView Licenses and Ads.
Model Android TV OS Version / Software Version Netflix ESN / Android TV OS Security patch level Kernel Version Android TV OS build: View related menu information.
Date & Time
Automatic date & time: Use the time provided by the network. You can also set the current time manually by turning it Off.
Set date: Set the date.
Set time: Set the time.
Set time zone: Select your time zone.
Use 24-hour format: Set the time to display in a 12-hour or 24-hour format.
Timer
Auto Power-On Type: Set the type Off. On or Once.
Auto Power-On Time: Set the clock for the time you want the TV to turn on automatically.
Auto Power-Off Type: Set the type Off, On or Once.
Auto Power-Off Time: Set the clock for the time you want the TV to turn off automatically.
Language
Adjust the default language settings for the TV.
Keyboard
Adjust the default settings for the keyboard.
Inputs
You can see the status of the devices that are connected with the TV: Connected Input, Standby Inputs and not connected Input etc.
Consumer Electronic Control (CEC)
HDMI control: Allow the TV to control HDMI devices.
Device auto power off: Power off HDMI devices with the TV.
TV auto power on: Power on the TV with HDMI device.
Note:
- HDMI cables must be used to connect HDMI CEC-compatible devices to your TV.
- The HDMI CEC feature of the connected device must be turned on.
- If you connect an HDMI device that is not HDMI CEC-compatible, all the HDMI-CEC Control features do not work.
- Depending on the connected HDMI device, the HDMI-CEC Control feature may not work.
CEC Device List: You will see the CEC device list of the TV accesses the CEC device.
Power
Sleep Timer: Set the sleep timer to automatically turn the TV off within a specified time.
Picture Off: When you select this option, the screen will not display the picture. You can only listen the audio. Press any button except the power button and volume buttons to restore operation.
Switch Off Timer: Set the timer to automatically turn the TV off within a specified lime. You could set fixed time that counts from TV power on to make TV power off.
No Signal Auto Power Off: You can set how long after No Signal, the TV will automatically shut down.
Auto Sleep: You can select the amount of time you would like the TV to stay before powering itself off.
Picture
Picture Mode: If you'd like to configure the settings for your picture, then there are seven types of picture modes (User, Standard, Vivid, Sport, Movie, Game, Energy Saving) available.
Dolby Vision Notification: You can set Dolby Vision Notification.
Backlight: Adjust Backlight Level, to change the overall brightness of the screen.
Brightness: Adjust the Brightness level to generate fighter or darker images.
Contrast: Adjust the Contrast level to increase or decrease how bright images appear.
Saturation: Adjust the saturation of colour settings.
HUE: Adjust the hue of colour settings.
Sharpness: Adjust how sharp or soft edges of images appear.
Gamma: Adjust gamma type.
Colour Temperature: Select a preset colour temperature. Adjust how an image appears.
Advanced Video: Advanced settings for video.
Colour Tuner: Adjust the Colour tuner settings.
11 Point White Balance Correction: Adjust the intensity Of red. green and blue lights to view the true colours of all images in the picture
Reset to Default: Reset current picture settings to factory mode.
Sound
System Sounds: You can ON/OFF system sound which normally comes while using remote.
Sound Style: There are eight style (USER, STANDARD, VIVID, SPORTS, MOVIE, MUSIC, NEWS, AUTO) available to give you the suitable sound experience for various situations.
Balance: Adjust the left and right speaker strength to optimize audio for a specific location.
Bass: Allow you to adjust bass.
Treble: Allow you to adjust treble.
Sound Surround: It improves the directionality of sound effects & helps you feel more of your entertainment.
Equalizer Detail: Boost the volume at different frequencies.
Speakers: Select to play audio TV speaker or external audio system.
Speakers Delay: Adjust speaker Delay.
e-ARC: Enhanced audio return channel is the next generation of ARC. This ensures the simplicity of the connectivity and that the original audio can be experienced.
Digital Output: Select the digital audio output format that best suits the audio device type. Choose PCM if you have an amplifier that does not support Dolby Digital technology.
SPDIF Delay: Adjust SPDIF Delay.
Auto Volume Control: This feature keeps the volume of your TV constant by automatically lowering the sound output when the sound modulation signal is high or vise versa.
DownMix Mode: It combines the channels in some what logical manner to drive stereo speakers.
Dolby Audio Processing: Dolby Audio uses advanced processing technologies to create a dynamic audio experience that connects you more deeply to your favourite entertainment.
Reset to Default: Reset your TV sound setting to default.
Storage
See the information of the Internal shared storage.
Home Screen
Channels: You can Customize channels / Enable video previews / Enable audio previews in channel available in "Home" at home screen.
Discover: You can Customize services / Content preferences View permissions / Sign Out in "Discover" at Home screen.
Apps: You can Reorder apps / Recorder games in "Apps" at screen.
Open Source Licenses: You can view licenses of android TV home & android TV core services.
Retail Mode
Turn on or off Retail Mode.
Google Assistant
You can ON / OFF & Set accounts for your google assistant and you can also view permissions about account and limit the search results.
Chromecast Built-in
Remote Control Notification: Choose an option to show a notification on all android devices connected to your Wi-Fi and let them control media casting to this device
About: You can view open source licences version number & serial number.
Screen Saver
Enable and set Screen saver when the TV is idle.
Energy Saver
The energy saving feature help to save energy by turning off display
Location
Your TV can use different modes to access location information. Each mode uses different sources to estimate the TV's location.
Usage & Diagnostics
Help improve Android performance by automatically sending diagnostics information.
Accessibility
Your TV comes with various accessibility setting to make it easier to use.
Restart
Restart your TV
Remotes & Accessories
To connect various Wireless devices & remote to TV.
Specifications
| Model: | 43UHDADNVVGE | 50UHDADNVVGE | 55UHDADNVVGE |
| Working voltage: | 100-240V~50/60Hz | 100-240V~50/60Hz | 100-240V~50/60Hz |
| Rated power consumption: | 95W | 125W | 140W |
| Dimensions without stand (WXHXD): | 960x565x87mm | 1115x603x90mm | 1230x715x90mm |
| Dimensions with stand (WXHXD): | 960x603x190mm | 1115x695x215mm | 1230x760x215mm |
| Net weight without stand: | 7.0 kg | 9.0 kg | 12.6 kg |
| Net weight with stand: | 7.1 kg | 9.4 kg | 12.9 kg |
| Ram Capacity | 2 GB | 2 GB | 2 GB |
| Storage Memory | 8 GB | 8 GB | 8 GB |
| RF aerial input: | 75ohm unbalanced | 75ohm unbalanced | 75ohm unbalanced |
| Language of OSD: | Multiple options | Multiple options | Multiple options |
| System: Video Sound | PAL, SECAM, NTSC, AUTO BG, I, DK, L, M | PAL, SECAM, NTSC, AUTO BG, I, DK, L, M | PAL, SECAM, NTSC, AUTO BG, I, DK, L, M |
| Channel coverage: | ATV: 47.25MHz~859.25MHz | ||
| Environment (only for Tropical climates zone): | Working temperature: 5°C~4.5°CWorking humidity: 20%~80% | ||
| Environment (only for Moderate climates zone): | Storage temperature: -15°C~45°CStorage humidity: 10%~90% | ||
Note:
Some specifications may vary by different regions or model and please take your actual TV set as standard. Internal memory capacity may vary depending on pre-installed software.
Troubleshooting
Most problems you encounter with your TV can be corrected by consulting the following troubleshooting list.
No picture, no sound
- Check if the fuse or circuit breaker is working.
- Plug another electrical device into the outlet to make sure it is working or turned on.
- Power plug is in a bad contact with the outlet.
- Check the signal source.
No Color
- Change the color system.
- Adjust the saturation.
- Try another channel. Black-white program may be received.
Remote control does not work
- Change the batteries.
- Batteries are not installed correctly.
- Main power is not connected.
No picture, normal sound
- Adjust the brightness and contrast.
- Broadcasting failure may happen.
Normal picture, no sound
- Press the Vol+ button to increase volume.
- Volume is set to mute, press the mute button to restore sound.
- Change the sound system.
- Broadcasting failure may happen.
Unorderly ripples on the picture
It is usually caused by local interference, such as cars, daylight lamps and hair driers. Adjust the antenna to minimize the interference.
Blank screen when connected computer system
Perhaps the TV can not recognize the resolution set by the PC. Suggest to change to the best resolution or other standard resolutions of the Windows system.
Snowy dots and interference
If the antenna is located in the fringe area of a television signal where the signal is weak, the picture may be marred by dots. When the signal is extremely weak, it may be necessary to install a special antenna to improve the reception.
- Adjust the position and orientation of the indoor/outdoor antenna.
- Check the connection of antenna.
- Fine tune the channel.
- Try another channel. Broadcasting failure may happen.
Ignition
Black spots or horizontal streaks appear, or the picture flutters or drifts. This is usually caused by interference from car ignition system, neon lamps, electric drills, or other electrical appliance.
Factory reset:
Home -> Settings -> Device Preference -> About -> Factory Reset
Network Failure:
Check if the router works well. Make sure the TV has connected to the router successfully. sometimes unsynchronized time can impact network connection. In that case, manually change the time in settings menu via below path Home -> Settings Device Preference -> Date & Time Disable the automatic date and time, and set the date and time manually.
Multimedia Player / Solution
Due to differences in programming tools and other factors, some of the file formats that are listed may or may not work
| Medium | File Format |
| Video | MPG, MPEG, MP4, MKV, AVI, FLV |
| Picture | JPEG, PNG, BMP |
| Music | MP3, M4A, AAC, FLAC |
License
androidtv
Android TV, Google Play, Chromecast and Youtube are trademarks of Google LLC.

The Adopted Trademarks HDMI, HDMI High-Definition Multimedia Interface, and the HDMI Logo are trademarks or registered trademarks of HDMI Licensing Administrator, Inc. in the United States and other countries.
Manufactured under license from Dolby Laboratories. Dolby, Dolby Atmos and Vision and the double-D symbol are trademarks of Dolby Laboratories.
VISION · ATMOS
Note:
- The information in this document is subject to change without notice. The manufacturer accepts no liability for damage resulting directly or indirectly from faults, incompleteness or discrepancies between the user manual and the product described.
- In dry environment due to static electricity, the product may restart and return to the main OSD interface, USB player interface or the previous source mode. It is normal and please continue to operate the TV as you will.
Warranty Terms & Conditions:
Flipkart India Private Limited ("Company") warranties the product to be free from manufacturing defects or any other specific defect as may be specified in the Specific Terms and Conditions below. The warranty is for a period mentioned in the Specific Terms and Conditions below, the invoice (if not specified in the Specific Terms and Conditions below), as well as the product listing page, and such period shall commence from the date of purchase of the product by the first end user. This is a nontransferable warranty, valid only in the territory of India and extended only to the first end user customer ("Customer") basis the following terms and conditions, which the Customer is deemed to have accepted upon purchase of the product:
- The warranty period of the product is 1 year, commencing from the date of purchase, Warranty service which includes replacement or repairs, will be carried out through the Authorised Service Centers ("ASC/s") only.
- Warranty will be valid only when the original purchase invoice is presented at the time of service. Company reserves the right to decline warranty service, if the purchase invoice is not presented.
- In case of commercial usage of the product, warranty period would be limited to 90 days only.
- Warranty will cover only functional parts, issues having manufacturing defects and does not cover damages to the product resulting from unauthorised adaptations/ adjustments/ tampering/ repair, improper installation or placement, mishandling, improper use, deviation from the instructions set out in the user manual (if applicable) normal wear and tear caused due to use of the product.
- Warranty does not cover any external accessories and fittings to the product.
- All plastic, rubber, glass, or aesthetic parts and consumable replacements will be on a chargeable basis.
- Warranty shall not apply to damages caused to the product by accident, voltage fluctuations, lightening, ingress of water (beyond certified limits, if any), fire or any other natural calamity, improper ventilation, dropping or excessive shock, or any external cause beyond Company's control.
- Company shall retain all products or spare parts which are replaced and the ownership of the same shall vest with the Company.
- Company is not liable to provide repair services or spare parts after the period of warranty expires and the same if provided will be on a chargeable basis.
- Whilst the Company, through its ASC, shall make every effort to carry out the service at the earliest, it is expressly clarified that the Company is under no obligation to do so within a certain time period.
- Whilst Company would take all necessary steps to repair the product under warranty and maintain sufficient stock of the spare parts of the products, in certain cases, at its sole discretion, Company may due to non-availability of spare parts of the product or product being in a state which is beyond economic repair, offer a replacement scheme to the Customer. The terms of such replacement offer is subject to change from year to year and shall also be applicable on the maximum retail price of the product.
- All transportation & handling expenses incurred while replacing or repairing will be payable by the Customer.
- For any warranty claim requested by the Customer from the region beyond municipal limits of the jurisdiction of the ASC, a visit by an authorised service personnel may be arranged by the Company through its ASC, on a case to case basis, at its sole discretion and the charges towards such visit will be borne by the Customer.
- Warranty shall be void if:
- The type or serial no. on the product has been altered, removed or defaced.
- The product is not operated as per the instructions given in the User Guide, if any.
-
The defects are caused by household pets, rats, cockroaches or any other animals or insects.
-
The warranty automatically expires after the period of time stated in the product invoice even if the product may not be in use for any time for whatever reasons.
-
This Warranty shall not affect Customer's statutory rights under any applicable law
-
Customer agrees to indemnify and keep Company harmless against all damages, liabilities, costs, expenses, claims, suits and proceedings (including reasonable attorney's fee) that may be suffered by the Company as a consequence of:
(i) violation of these terms and condition by the Customer;
(ii) violation of applicable laws by the Customer;
(iii) any action or inaction resulting in willful misconduct or negligence on the Customer's part.
- In the event of repairs of any part (s) of the product, the Warranty will thereafter continue and remain in force only for the unexpired period of the Warranty. Moreover, the time taken for repair and in transit whether under the Warranty or otherwise shall not be excluded from the Warranty period.
- This panel is made up of sub pixels which require sophisticated technology to produce. There may be, however, a few (upto 5) bright or dark pixels on the screen. These pixels will have no impact on the performance of the product.
- Company takes no legal responsibility whatsoever for any interruption of app services caused by the service provider for any reason.
- None of the employees, sellers, dealers or ASCs of the Company have the authority to vary these terms and conditions.
- Customer agrees that the courts at Bangalore shall have the exclusive jurisdiction to settle any dispute that may arise in relation to this Warranty or these terms and conditions.
- COMPANY SHALL NOT BE LIABLE FOR ANY INDIRECT, SPECIAL, PUNITIVE, EXEMPLARY, SPECULATIVE OR CONSEQUENTIAL DAMAGES, INCLUDING, BUT NOT LIMITED TO, ANY LOSS OF USE, BUSINESS INTERRUPTION, AND LOSS OF INCOME OR PROFITS, IRRESPECTIVE OF WHETHER IT HAD AN ADVANCE NOTICE OF THE POSSIBILITY OF ANY SUCH DAMAGES.
- For any further information / assistance please contact our customer Redressal cell at:
FLIPKART INDIA PRIVATE LIMITED.
BUILDING ALYSSA, BEGONIA & CLOVER, ETV,
OUTER RING ROAD, DEVARABEESANAHALLI VILLAGE
BENGALURU-560103. KARNATAKA INDIA.
TEL. NO.: 080-46331010
Email: support.nokia@flipkart.com

Nokia Smart TV 43" /50" /55" UHD
Enjoy an extraordinary theater like experience with 24 Watt speakers. Delight your senses by watching your favorite content on Nokia's android 11 powered smart TV.
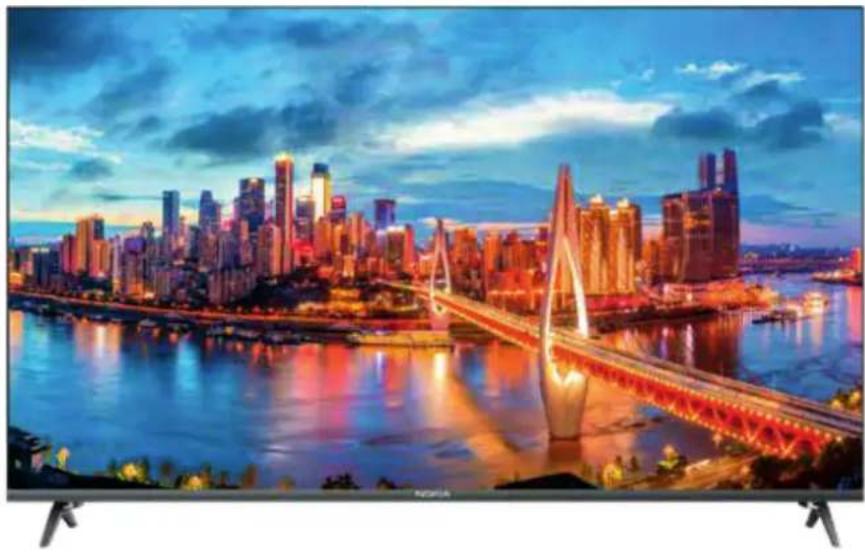
natural_image
Modern cityscape with illuminated bridge over river at dusk, no visible text or symbols
24W Speakers
Dolby VISION·ATMOS

Ok Google
Flipkart India Private Limited is a licensee of the Nokia brand in India. Nokia is a registered trademark of Nokia Corporation.
- NOKIA
- Table of Contents
- Help
- Warning and Precautions
- Important Safety Instructions
- Warning:
- This product is RoHS Compliant
- Disposal of used Electrical & Electronics Equipment
- Positioning the TV
- Mounting on a Wall
- Note:
- Buttons on the TV
- button
- Standard Accessories
- Base Installation
- Controls and connections
- Remote Control
- Operating your TV
- Switching on
- Precautions on using batteries:
- Switching off
- Installing Channels
- Network Connection
- Connecting to a wired network
- Connecting to a wireless network
- Initial setup
- Help Function
- USB function (Media Player)
- Google Assistant
- Chromecast Built-in
- How To Cast
- Screen Cast
- Accessing Smart TV Homepage
- Indicators and Icons on the top of the Home screen
- Name of sections that appear on the Home screen
- Settings
- Using Menu
- Network & Internet
- Channel
- Accounts & Sign In
- Apps
- Device Preferences
- About
- Date & Time
- Timer
- Language
- Keyboard
- Inputs
- Consumer Electronic Control (CEC)
- Power
- Picture
- Sound
- Storage
- Home Screen
- Retail Mode
- Screen Saver
- Energy Saver
- Location
- Usage & Diagnostics
- Accessibility
- Restart
- Remotes & Accessories
- Troubleshooting
- No picture, no sound
- No Color
- Remote control does not work
- No picture, normal sound
- Normal picture, no sound
- Unorderly ripples on the picture
- Blank screen when connected computer system
- Snowy dots and interference
- Ignition
- Factory reset:
- Network Failure:
- Multimedia Player / Solution
- License
- androidtv
- Warranty Terms & Conditions:
- FLIPKART INDIA PRIVATE LIMITED.
Brand : NOKIA
Model : 43UHDADNVVGE
Category : Television