MXA-UENET - Cables for Computers and Peripherals AMX - Free user manual and instructions
Find the device manual for free MXA-UENET AMX in PDF.


| Product Type | Network Cable |
| Brand | AMX |
| Model | MXA-UENET |
| Category | Computer Cables & Peripherals |
| Cable Length | 2 m (estimated) |
| Cable Type | Ethernet (RJ45) |
| Conductor Material | Copper |
| Connector Type | RJ45 Male to RJ45 Male |
| Shielding | UTP (Unshielded Twisted Pair) |
| Data Transfer Speed | Up to 1 Gbps (Gigabit Ethernet) |
| Frequency | 100 MHz |
| Compliance | CAT5e |
| Operating Temperature | 0°C to 50°C |
| Storage Temperature | -20°C to 70°C |
| Connector Durability | Minimum 750 mating cycles |
| Power Over Ethernet (PoE) | Not supported (passive cable) |
| Color | Black (typical) |
| Weight | Approx. 80 g |
| Warranty | 1 year limited |
Frequently Asked Questions - MXA-UENET AMX
User questions about MXA-UENET AMX
0 question about this device. Answer the ones you know or ask your own.
Ask a new question about this device
Download the instructions for your Cables for Computers and Peripherals in PDF format for free! Find your manual MXA-UENET - AMX and take your electronic device back in hand. On this page are published all the documents necessary for the use of your device. MXA-UENET by AMX.
USER MANUAL MXA-UENET AMX
The MXA-UENET Video Acceleration accessory cable (FG5968-75) plugs into a USB port of the Modero X Series® Touch Panel and routes Ethernet traffic into the Modero X Series USB subsystem, which has been optimized to further accelerate streaming video performance (FIG. 1).
Within the Modero X Series touch panels, streaming video is optimized via the use of the MXA-MPL Multi Preview Live (FG5968-10). If using an MXA-MPL is not an option, the MXA-UENET video acceleration cable may be used to connect streaming video feeds to the MXT/D-1000 and MXT/D-700 touch panels.
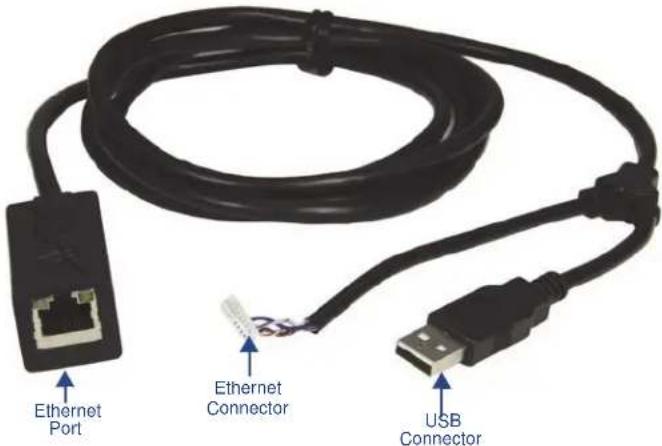
FIG. 1 MXA-UENET
Specifications
| MXA-UENET (FG5968-75) Specifications | |
| Length: 6.10 ft (1.86 m) | |
| Weight: 0.25 lbs (113.40 g) | |
| Included Accessories: | MXA-UENET Installation Guide (93-5968-75) |
| Other AMX Equipment: • MXT-1000 10.1" Modero X® Series Tabletop Touch Panel (FG5968-03)• MXT-700 7" Modero X® Series Tabletop Touch Panel (FG5968-04)• MXD-1000-L 10.1" Modero X® Series Wall/Flush Mount Touch Panel, Landscape (FG5968-13)• MXD-1000-P 10.1" Modero X® Series Wall/Flush Mount Touch Panel, Portrait (FG5968-07)• MXD-700-L 7" Modero X® Series Wall/Flush Mount Touch Panel, Landscape (FG5968-14)• MXD-700-P 7" Modero X® Series Wall/Flush Mount Touch Panel, Portrait (FG5968-08) | |
Installation for Tabletop Touch Panels
To connect your MXT-1000 or MXT-700 tabletop touch panel to the network via the MXA-UENET:
- On a soft surface, turn the touch panel face-down to access the bottom of the device.
- Remove the clamp holding the Ethernet cable (FIG. 2) until the Ethernet cable moves freely.
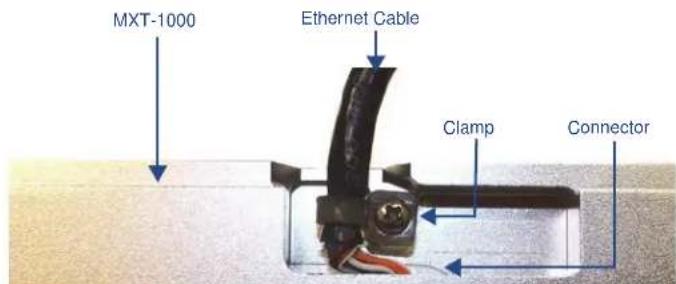
FIG. 2 Touch panel bottom, displaying the Ethernet cable.
- Remove the Ethernet cable connector and pull the cable out of the clamp. Discard this cable.
-
Press the Ethernet connector cable on the MXA-UENET (FIG. 1) into the clamp. Do NOT tighten the clamp at this time.
-
Using a nonconductive item such as a wooden stick, insert the Ethernet cable connector into the device. Use the stick to ensure that the connector is properly seated.
- Tighten the clamp to secure the Ethernet cable. Make sure the clamp is around the bundled black cable, not the individual wires.
- Insert the USB connector into one of the USB ports on the rear of the touch panel.
- Connect the RJ45 connector to its incoming Ethernet cable.
- Turn the touch panel upright and apply power.
NOTE: For more information on installing your touch panel, please refer to the MXT/D-1000 Operation Reference Guide or the MXT/D-700 Operation Reference Guide, available at www.amx.com.
Installation for Wall/Flush Mount Touch Panels
To connect your MXD-1000 or MXD-700 wall/flush mount touch panel to the network via the MXA-UENET:
NOTE: If the touch panel has already been installed in the wall or mounting surface, the touch panel and the back box must be removed from the mounting surface to install the MXA-UENET. Thread the connecting CAT5 Ethernet cable through the back box hole before installing the MXA-UENET. In new installations, separate the back box from the touch panel, as the back box must have the MXA-UENET threaded through it before the touch panel can be installed.
NOTE: In solid-wall installations, make sure to have clearance within the wall for the Ethernet port jack and the excess cable before starting the installation.
- The USB connector on the MXA-UENET must be connected to the USB port on the top of the touch panel (one on the MXD-1000 and two on the MXD-700). To facilitate this, when looking at the front of the back box as it installs into the wall, remove the top left knockout in the back box (FIG. 3).
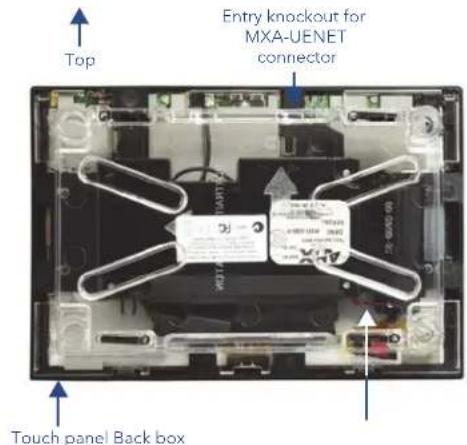
FIG. 3 Rear of MXD-700 touch panel, showing back box
- Thread the MXA-UENET through the knockout hole, and install the back box into the wall or mounting surface (FIG. 4). Lock down the back box using the back box's locking tabs for drywall installations or with screws (not included) for solid-wall or rough-in box installations.
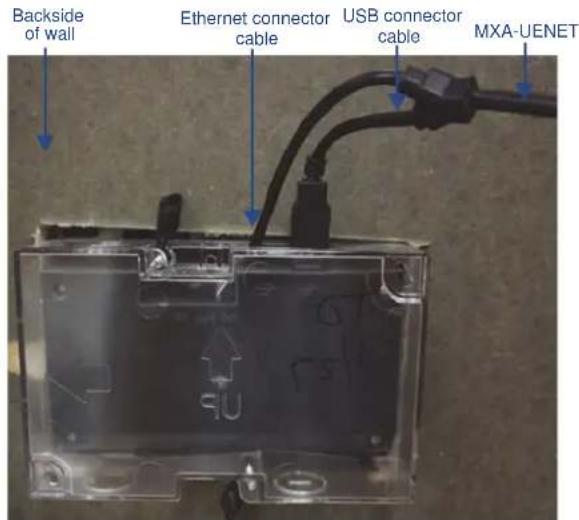
FIG. 4 Installation of the MXA-UENET into an MXD-700 back box
- In order to install the Ethernet connector, the current touch panel connector must be removed and the MXA-UENET connector installed in its place. Carefully unplug the touch panel's connector from its port. With the touch screen facing you, the connector is located to the right of the Micro-USB port (FIG. 5) on both the MXD-1000 and the MXD-700.
- Using a nonconductive item such as a wooden stick, insert the MXA-UENET's Ethernet cable connector into the touch panel. Use the stick to ensure that the connector is properly seated. Leave the panel's original connector within the device; do NOT remove it.
- With the touch panel still outside of the back box, insert the USB connector into the touch panel's USB port (FIG. 5).
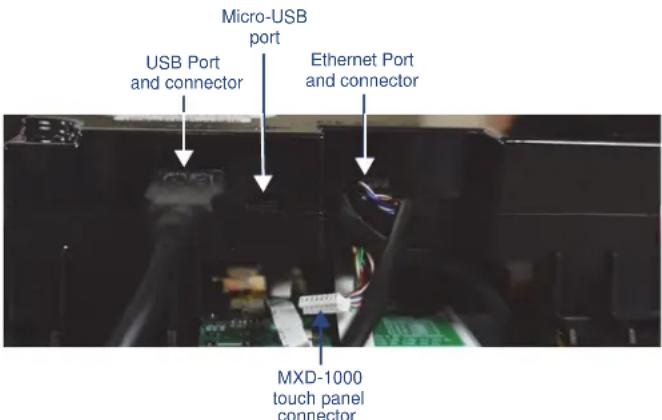
FIG. 5 MXD-1000 touch panel connections
- Carefully install the touch panel into the back box, hooking the panel at the top of the back box. Make sure that the cords for the USB and Ethernet connectors pass through the knockout holes in the top of the back box without interference.
- Connect the Ethernet port on the MXA-UENET (FIG. 1) to the network via CAT5 Ethernet cable and apply power.
NOTE: For more information on installing your touch panel, please refer to the MXT/D-1000 Operation Reference Guide or the MXT/D-700 Operation Reference Guide, available at www.amx.com.
Configuring the Touch Panel to Receive the Video Stream
To receive streaming video from a network source:
- In the touch panel's Settings Pages, select Configuration > Advanced Config > Streaming Video, entering the touch panel's password if necessary.
- From the Streaming Video page, select Enter URL to open the Set URL keyboard.
- Enter the URL for the video stream and click OK.
NOTE: For more information on configuring your touch panel for streaming video, please refer to the Modero X Series Programming Guide, available at www.amx.com.
Brand : AMX
Model : MXA-UENET
Category : Cables for Computers and Peripherals