VIP-5060PT - Telephone Planet - Free user manual and instructions
Find the device manual for free VIP-5060PT Planet in PDF.


| Product Type | Telephone |
| Brand | Planet |
| Model | VIP-5060PT |
| Display | LCD with backlight |
| Keypad | Numeric keypad with function keys |
| Connectivity | RJ11 (telephone line), RJ45 (network) |
| Power Supply | AC adapter, input 100-240V, output 9V DC |
| Dimensions | Approx. 220 x 180 x 80 mm |
| Weight | Approx. 0.8 kg |
| Caller ID | Supported |
| Call Hold | Yes |
| Mute Function | Yes |
| Redial | Last number redial |
| Speakerphone | Full-duplex |
| Phonebook | Up to 100 entries |
| Ringtone | Polyphonic, selectable |
| Volume Control | Handset and ringer |
| Installation | Desktop or wall-mountable |
| Maintenance | Clean with dry cloth, avoid liquids |
| Safety | Use only provided power adapter |
| Spare Parts | Handset, coiled cord, power adapter available |
| Reparability | Modular design for easy repair |
| Certifications | CE, FCC |
Frequently Asked Questions - VIP-5060PT Planet
User questions about VIP-5060PT Planet
0 question about this device. Answer the ones you know or ask your own.
Ask a new question about this device
Download the instructions for your Telephone in PDF format for free! Find your manual VIP-5060PT - Planet and take your electronic device back in hand. On this page are published all the documents necessary for the use of your device. VIP-5060PT by Planet.
USER MANUAL VIP-5060PT Planet
natural_image
Black Planet 3.0 phone with keypad and cabling, no visible text or symbols on device bodyProfessional HD PoE IP Phone (6-Line)
VIP-5060PT

natural_image
Group of five business professionals in a meeting around a conference table, reviewing documents (no visible text or symbols)Copyright
Copyright (C) 2013 PLANET Technology Corp. All rights reserved.
The products and programs described in this User's Manual are licensed products of PLANET Technology, This User's Manual contains proprietary information protected by copyright, and this User's Manual and all accompanying hardware, software, and documentation are copyrighted.
No part of this User's Manual may be copied, photocopied, reproduced, translated, or reduced to any electronic medium or machine-readable form by any means by electronic or mechanical including photocopying, recording, or information storage and retrieval systems, for any purpose other than the purchaser's personal use, and without the prior written permission of PLANET Technology.
Disclaimer
PLANET Technology does not warrant that the hardware will work properly in all environments and applications, and makes no warranty and representation, either implied or expressed, with respect to the quality, performance, merchantability, or fitness for a particular purpose.
PLANET has made every effort to ensure that this User's Manual is accurate; PLANET disclaims liability for any inaccuracies or omissions that may have occurred.
Information in this User's Manual is subject to change without notice and does not represent a commitment on the part of PLANET. PLANET assumes no responsibility for any inaccuracies that may be contained in this User's Manual. PLANET makes no commitment to update or keep current the information in this User's Manual, and reserves the right to make improvements to this User's Manual and/or to the products described in this User's Manual, at any time without notice.
If User find information in this manual that is incorrect, misleading, or incomplete, we would appreciate User comments and suggestions.
CE mark Warning
The is a class B device, In a domestic environment, this product may cause radio interference, in which case the user may be required to take adequate measures.
Energy Saving Note of the Device
This power required device does not support Stand by mode operation. For energy saving, please remove the DC-plug or push the hardware Power Switch to OFF position to disconnect the device from the power circuit.
Without removing the DC-plug or switching off the device, the device will still consume power from the power circuit. In
view of Saving the Energy and reducing the unnecessary power consumption, it is strongly suggested to switch off or remove the DC-plug from the device if this device is not intended to be active.
WEEE Warning

To avoid the potential effects on the environment and human health as a result of the presence of hazardous substances in electrical and electronic equipment, end users of electrical and electronic equipment should understand the meaning of the crossed-out wheeled bin symbol. Do not dispose of WEEE as unsorted municipal waste and have to collect such WEEE separately.
Trademarks
The PLANET logo is a trademark of PLANET Technology. This documentation may refer to numerous hardware and software products by their trade names. In most, if not all cases, their respective companies claim these designations as trademarks or registered trademarks.
Revision
User's Manual for PLANET Professional HD PoE IP Phone:
Model: VIP-5060PT
Rev: 1.0 (2013, Oct)
Part No. EM-VIP-5060PT_v1.0
Table of Contents
1 INTRODUCTION....7
1.1 FEATURES....10
1.2 APPLICATION....13
1.3 PRODUCT SPECIFICATIONS....14
1.4 PHYSICAL SPECIFICATIONS AND PACKAGING....18
1.5 KEYPAD....19
1.6 ICON INTRODUCTION 22
1.7 LED INTRODUCTION 22
2 INITIAL CONNECTION AND LOGIN 24
3 BASIC FUNCTIONS....26
3.1 MAKING A CALL 26
3.1.1 Call Device 26
3.1.2 Call Methods 26
3.2 ANSWERING A CALL 26
3.3 DND 27
3.4 CALL FORWARD....27
3.5 CALL HOLD 27
3.6 CALL WAITING 27
3.7 MUTE 28
3.8 CALL TRANSFER 28
3.9 3-WAY CONFERENCE CALL 28
3.10 MULTIPLE-WAY CALL....29
4 ADVANCED FUNCTIONS....30
4.1 CALL PICKUP 30
4.2 JOINT CALL....30
4.3 REDIAL/UN-REDIAL 30
4.4 CLICK TO DIAL....31
4.5 CALL BACK....31
4.6 AUTO ANSWER....31
4.7 HOTLINE....31
4.8 APPLICATIONS 31
4.8.1 SMS....31
4.8.2 Memo....32
4.8.3 Ping....32
4.8.4 Voice Mail 32
4.9 PROGRAMMABLE KEY CONFIGURATION....33
5 OTHER FUNCTIONS....36
5.1 AUTO HANDDOWN 36
5.2 BAN ANONYMOUS CALL 36
5.3 DIAL PLAN 36
5.4 DIAL PEER 36
5.5 AUTO REDIAL....37
5.6 CALL COMPLETION....37
5.7 RING FROM HEADSET....37
5.8 POWER LIGHT....37
5.9 HIDE DTMF 37
5.10 BAN OUTGOING....38
5.11 PRE DIAL....38
5.12 PASSWORD DIAL....38
5.13 ACTION URL & ACTIVE URI 38
5.14 PUSH XML....38
6 BASIC SETTINGS....39
6.1 KEYBOARD....39
6.2 SCREEN SETTINGS....39
6.3 RING SETTINGS 39
6.4 VOICE VOLUME....39
6.5 TIME & DATE 39
6.6 GREETING WORDS 40
6.7 LANGUAGE....40
7 ADVANCED SETTINGS....41
7.1 ACCOUNTS 41
7.2 NETWORK 41
7.3 SECURITY....41
7.4 MAINTENANCE....41
7.5 FACTORY RESET 41
8 WEB CONFIGURATION....42
8.1 INTRODUCTION OF CONFIGURATION 42
8.1.1 Ways to configure....42
8.1.2 Password Configuration 42
8.2 SETTING VIA WEB BROWSER 42
8.3 CONFIGURATION VIA WEB 43
8.3.1 BASIC 43
8.3.2 NETWORK 48
8.3.3 VOIP 56
8.3.4 PHONE 68
8.3.5 FUNCTION KEY 81
8.3.6 Maintenance....84
8.3.7 SECURITY 92
8.3.8 LOGOUT....96
9 APPENDIX....97
9.1 DIGIT-CHARACTER MAP TABLE 97
9.2 FREQUENTLY ASKED QUESTIONS LIST 97
1 Introduction
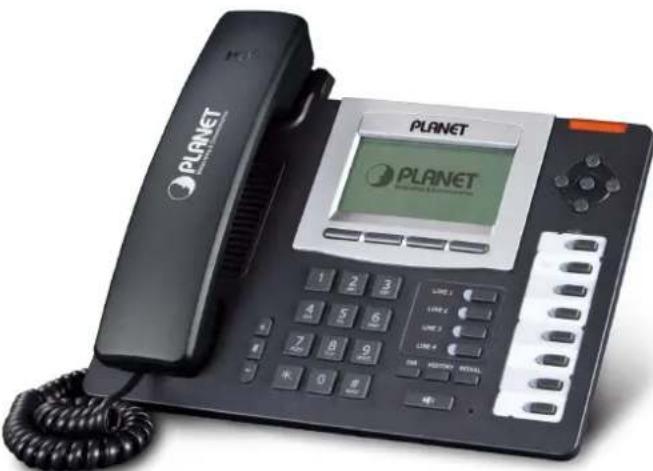
Cost-effective, High-performance PoE VoIP Phone
To build high-performance VoIP communications at a low cost, PLANET has launched a new member of its IP Phone family, the VIP-5060PT enterprise-class 6-Line PoE IP Phone. It complies with IEEE 802.3af PoE interface for flexible deployment. The VIP-5060PT makes it simple for the enterprise featuring voice and data system or expanding voice system to new locations. It helps the company to save money on long distance calls; for example, the remote workers can dial in through a Unified VoIP Communication System just like an extension call but no long distance call charge would occur. The VIP-5060PT also allows call to be transferred to anyone at any location within the voice system, which enables the enterprise to communicate more effectively and is helpful to streamline business processes.

natural_image
Illustration of a coffee phone with various gold coins (euro, euro, yen) scattered around it, symbolizing financial or currency exchange (no text or symbols on the main image)High Quality HD VoIP Voice
The VIP-5060PT delivers HD voice (High-Definition Voice) which is the next generation of voice quality for telephony audio, making the quality of voice better than that (toll quality) of the standard digital telephony and even close to that of a room conversation. HD voice is transmitted in the audio frequency range of 50 Hz to 7 kHz or higher over telephone lines, resulting in higher quality voice and clearer communication.
Standard Compliance
The VIP-5060PT supports Session Initiation Protocol 2.0 (RFC 3261) for easy integration with general voice over IP system. The VIP-5060PT is able to broadly interoperate with equipment provided by VoIP infrastructure providers, thus enabling them to provide their customers with better multi-media exchange services.
Compliant with standard SIP RFC 3261
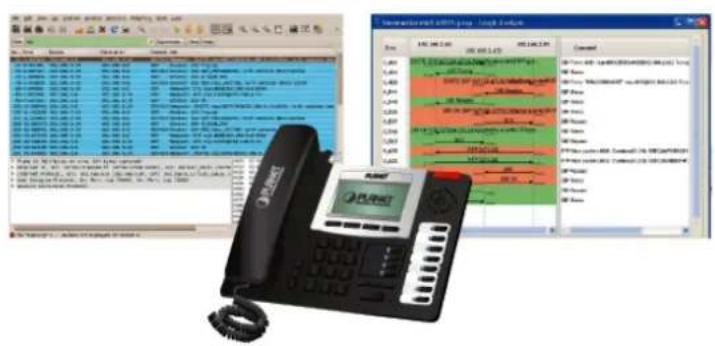
Enhanced, Full-Featured Business IP Phone
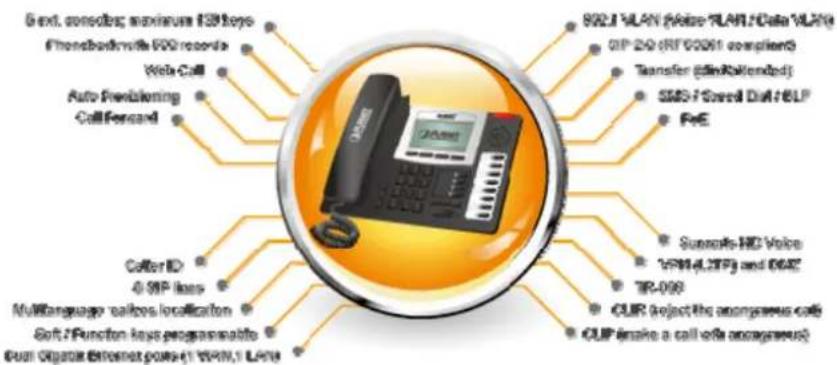
The VIP-5060PT is a full-featured enhanced business IP Phone that addresses the communication needs of the enterprises. It provides 6 voice lines and dual 10/100/1000 Mbps Ethernet. Furthermore, the VIP-5060PT delivers user-friendly design containing a 128 x 64 LCD with white backlight, 4 Line keys and 4 soft keys. It supports 5 extension consoles with each consisting of 26 keys.
The VIP-5060PT supports all kinds of SIP based phone features including Call Waiting, Auto Answer, Music on Hold, Caller ID and Call Waiting ID, 3-way Conferencing, Call Hold, Call Forwarding, Black List, DTMF Relay, In-Band, Out-of-Band (RFC 2833) and SIP INFO, among others. Besides office use, the VIP-5060PT is also the ideal solution for VoIP service offered by Internet Telephony Service Provider (ITSP).
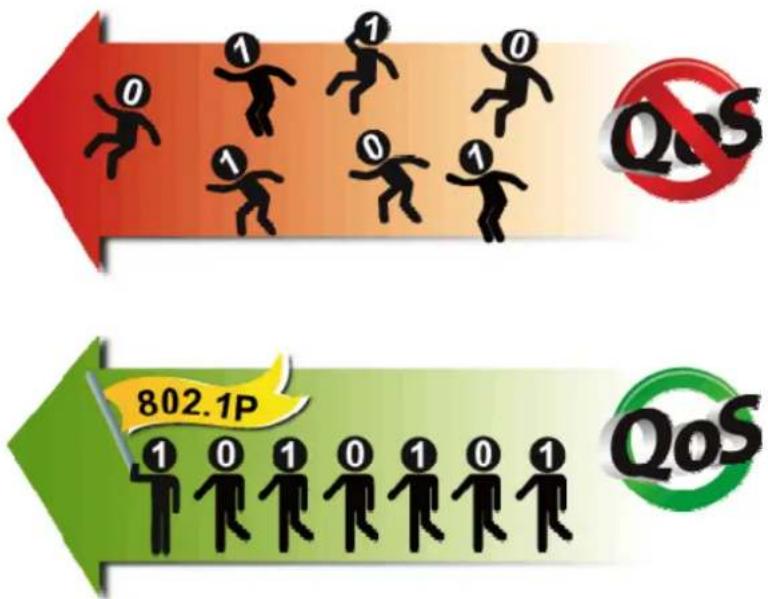
Secure, High-Quality VoIP Communication
The VIP-5060PT can effortlessly deliver secured toll voice quality by utilizing cutting-edge 802.1p QoS (Quality of Service), 802.1Q VLAN tagging, and IP TOS (Type of Service) technology. Using voice and data VLAN can easily separate the data and voice, thus maintaining the best quality.
Professional Application
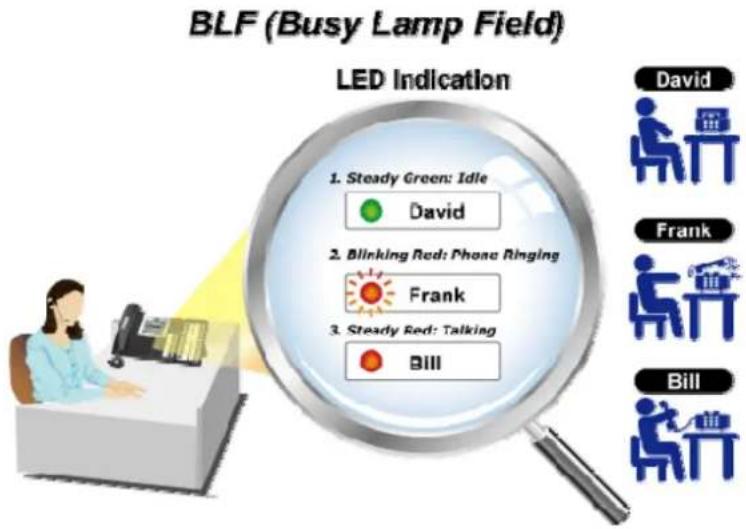
The VIP-5060PT supports Busy Lamp Field (BLF) function that, via the lights on the phone, enables users to easily identify the status of other phones which are connected to the same IP PBX, such as busy, idle, ringing, etc. The connected IP PBX must also support BLF feature. The BLF function is helpful for a receptionist on the front desk to route all incoming calls smoothly.
1.1 Features
1.1 Features
Highlights
■ Dual 10/100/1000 Gigabit Ethernet (WAN, LAN)
■ Supports SIP 2.0 (RFC3261)
■ Supports six SIP voice lines
■ IEEE 802.3af Power over Ethernet compliance
■ Supports multiple road calls waiting in line
■ Supports HD voice
■ Supports SRTP and Busy Lamp Field (BLF)
■ Supports 5 extension consoles; max. 130 definable keys
Advanced Features
■ SIP supports SIP domain, SIP authentication (none, basic, MD5), DNS name of server, Peer to Peer/ IP call
■ Inband, SIP info, RFC2833 DTMF Relay
■ 9 kinds of ring types and 3 user-defined music rings
■ Large dot matrix LCD display and soft keys make user easier to use
■ Soft keys and function keys programmable
■ Multilanguage realizes localization
■ Echo cancellation: Supports G.168, and hands-free can support 96ms
■ Full duplex hands-free speaker phone
■ Hands-free headset ringing choice
■ Supports Voice Gain Setting, VAD, CNG
■ Voice codec setting for each SIP line
SIP Applications
■ Call forward / Transfer (blind/attended)
■ Call Holding / Waiting
■ 3-way conference
■ Paging and Intercom
■ Call park / Call pickup / Join call
■ Redial and click to dial
■ Secondary dialing automatically
■ Incoming calls / outgoing calls / missed calls (Each supports 100 records)
■ SMS and Speed Dial
■ Phonebook up to 500 records
■ XML phonebook / browser
Call Control Features
■ Flexible dial map / Hotline / Empty calling no.
■ Reject service / Black list for reject authenticated call
■ White list / Limit cal
■ Do not disturb (DND)
- Caller ID / CLIR (reject the anonymous call) / CLIP (make a call with anonymous)
■ Dial without register
Network Features
■ Route and Bridge modes
■ PPPoE / DHCP client on WAN
■ 802.1 VLAN (voice VLAN / data VLAN)
■ VPN (L2TP) and DMZ
■ Main DNS and secondary DNS server
■ DNS Relay, SNTP Client, Firewall, openVPN
Maintenance and Management
■ Integrated web server provides web-based administration and configuration
■ Telephone keypad configuration via display menu/navigation
■ Automated provisioning and upgrade via HTTPS, HTTP, TFTP
■ User Authentication for configuration pages
■ Local and Remote Syslog (RFC 3164)
■ SNTP Time Synchronization
TR069
1.2 Application
1.2 Application
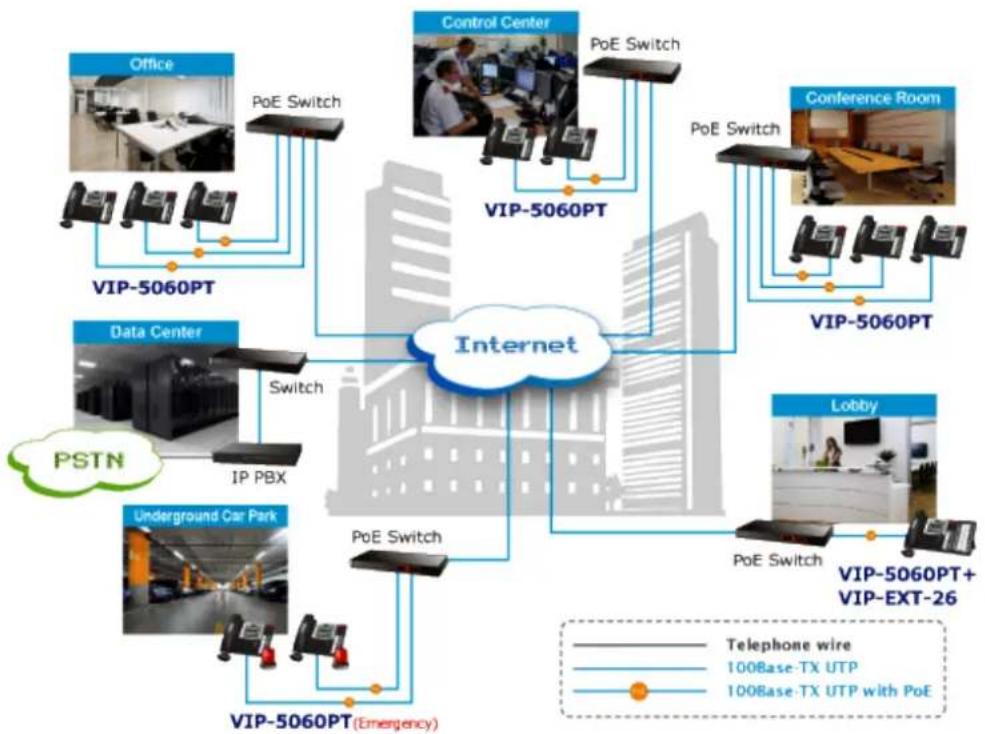
flowchart
graph TD
    A["Office"] -->|PoE Switch| B["VIP-5060PT"]
    C["Control Center"] -->|PoE Switch| D["VIP-5060PT"]
    E["Conference Room"] -->|PoE Switch| F["VIP-5060PT"]
    G["Data Center"] -->|Switch| H["PSTN"]
    I["Underground Car Park"] -->|IP PBX| J["Switch"]
    K["Lobby"] -->|PoE Switch| L["VIP-5060PT+ VIP-EXT-26"]
    M["VIP-5060PT"] -->|PoE Switch| N["VIP-5060PT"]
    O["VIP-5060PT (Emergency)"] --> P["Switch"]
    Q["VIP-5060PT"] --> R["VIP-5060PT"]
    S["Telephone wire"] --> T["100Base-TX UTP"]
    S --> U["100Base-TX UTP with PoE"]
Enterprise IP PBX Deployment of VIP-5060PT
1.3 Product Specifications
1.3 Product Specifications
| Product | VIP-5060PT |
| Hardware | |
| Lines (Direct Numbers) | 6-Line enterprise-class IP phone |
| Display | 80 x 43mm/ 128 x 64 pixel LCD with blue backlight |
| Feature Keys | 4 line keys8 DSS keys4 Soft Keys12 dialing buttons (0~9, *, #)12 fixed function buttons |
| WAN | 10/100/1000Base-T RJ-45 for WAN |
| LAN | 10/100/1000Base-T RJ-45 for LAN |
| Protocols and Standard | |
| Data Networking | MAC Address (IEEE 802.3)IPv4 (RFC 791)Address Resolution Protocol (ARP)DNS: A record (RFC 1706), SRV record (RFC 2782)Dynamic Host Configuration Protocol (DHCP) client (RFC 2131)Internet Control Message Protocol (ICMP) (RFC 792)TCP (RFC 793)User Datagram Protocol UDP (RFC 768)Real Time Protocol RTP (RFC 1889, 1890)Real Time Control Protocol (RTCP) (RFC 1889)Differentiated Services (DiffServ) (RFC 2475)Type of service (ToS) (RFC 791, 1349)VLAN tagging 802.1p Layer 2 quality of service (QoS)Simple Network Time Protocol (SNTP) (RFC 2030)Backward compatible with RFC 2543Session Timer (RFC 4028)SDP (RFC 2327)NAPTR for SIP URI Lookup (RFC 2915) |
| Voice Gateway | SIP version 2 (RFC 3261, 3262, 3263, 3264)SIP supported STUN (RFC 3489)Message Waiting Indicator (RFC 3842)Voice algorithms:- G.711 (A-law and μ-law)- G.7231 high/low- G.729a/b- G.722.1- G.726Dual-Tone Multi-Frequency (DTMF), In-Band and Out-of-Band (RFC 2833) (SIP INFO)Voice Activity Detection (VAD) with Silence SuppressionAdaptive Jitter Buffer ManagementComfort Noise GenerationEcho Cancellation Message |
| Provisioning, Administration, and Maintenance | Integrated web server provides web-based administration and configurationTelephone keypad configuration via display menu/navigationAutomated provisioning and upgrade via HTTPS, HTTP, TFTPUser Authentication for configuration pagesLocal and Remote Syslog (RFC 3164)SNTP Time SynchronizationTR069 |
| Features | |
| Advantageous Applications | Supports SIP 2.0 (RFC3261)SIP supports 6 SIP lines.IEEE 802.3af Power over Ethernet (PoE) compliantSupports multiple road call waiting in lineSupports HD voiceSupports SRTP and BLFSIP supports SIP domain, SIP authentication (none, basic, MD5), DNS name of server, Peer to Peer/ IP callDTMF Relay: support inband, SIP info, RFC28339 kinds of ring types and 3 user-defined music ringsLarge dot matrix LCD display and soft keys make user easier to useSupports headset jack- RJ94 DSS KeySupport 5 ext. consoles with each consisting of 26 keysSoft keys programmable; function keys programmableMultilanguage realizes localizationEcho cancellation: Supports G.168, and Hands-free can support 96ms,Hands-free Speaker PhoneSupports Voice Gain Setting, VAD, CNGFull duplex hands-free speaker phoneHands-free headset ringing choiceVoice codec setting for each SIP line |
| SIP Applications | Call forwardTransfer (blind/attended)HoldingWaiting3-way conferencePaging and IntercomCall parkCall pickupJoin callRedial and click to dialSecondary dialing automaticallyIncoming calls /outgoing calls / missed calls. Each supports 100 records.Support Phonebook 500 recordsSupport SMS and Speed DialSupport XML phonebook/browser |
| Call Control Features | Flexible dial mapHotlineEmpty calling no.Reject serviceBlack list for reject authenticated callWhite listLimit calDo not disturbCaller IDCLIR (reject the anonymous call)CLIP (make a call with anonymous)Dial without register |
| Network Features | WAN/LAN: 10/100M Ethernet ports, supports Bridge modes.Supports bridge working as hubSupports PPPoE for xDSL and PoESupports 802.1 VLAN(voice VLAN/data VLAN)Supports DHCP client on WANSupports main DNS and secondary DNS server.Supports DNS Relay, SNTP Client, Firewall, openVPNSupports VPN (L2TP) and DMZNetwork tools in telnet server: including ping, trace route, telnet client |
| Maintenance and Management | Web, telnet and keypad managementManagement with different account rightUpgrade firmware through POST mode and HTTP, FTP or TFTPSupports DHCP option66 auto provisioningTelnet remote management/upload/ download setting fileSafe mode provide reliabilitySupports Auto Provisioning to upgrade firmware or configuration file with HTTPSSupports TR-069(optional) and Syslog |
| Environments | |
| Power Requirements | 5V DC, 1AIEEE 802.3af |
| Operating Temperature | 0 ~ 40 degrees C |
| Operating Humidity | 10 ~ 65% (non-condensing) |
| Weight | 990 g |
| Dimensions (W x D x H) | 290 x 260 x 60 mm |
| Emission | CE, FCC, RoHS |
| Connectors | Two 10/100/1000 BASE-T RJ-45 Ethernet portsHandset: RJ-9 connectorHeadset: RJ-9 connectorRJ-11 EXT connectorDC power jackBuilt-in speakerphone and microphone |
1.4 Physical specifications and packaging
Physical Specifications

imensions
| Dimensions | 290 (L) x 260 (W) x 60 (H) mm |
| Net Weight | 950g (without package) |
BASIC PACKAGING
■ SIP IP Phone unit
■ Power Adapter
■ Quick Installation Guide
■ CD-ROM containing the on-line manual.
■ RJ-45 cable x 1
■ Stand x 1
1.5 Keypad
eypad, LED, and function key definitions
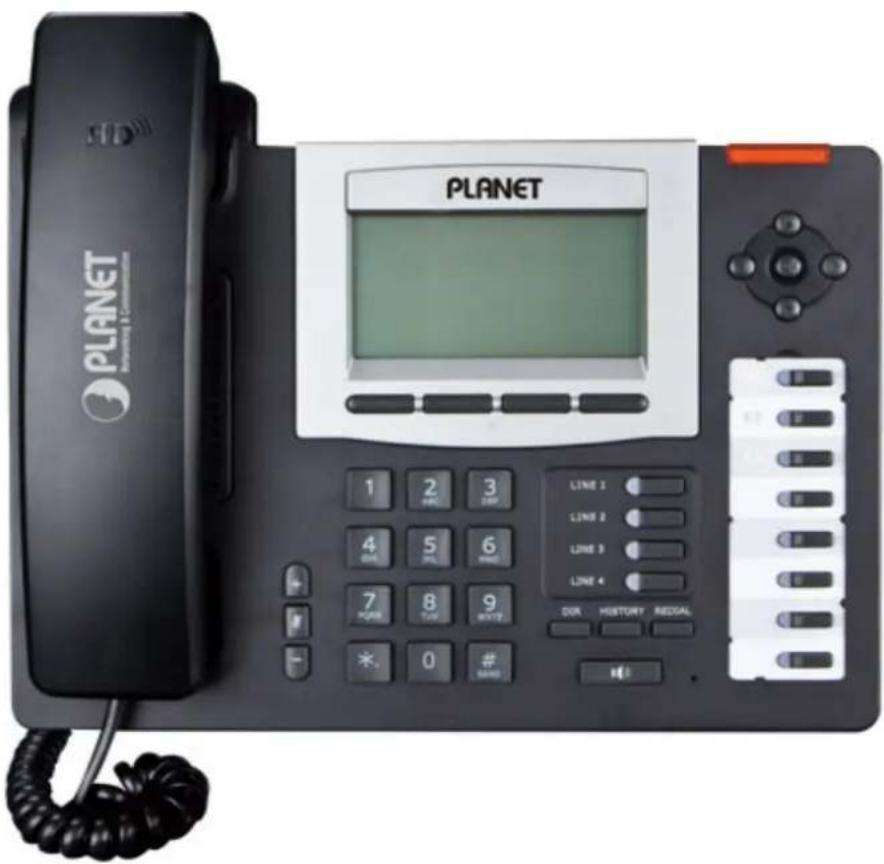
Keypad Description
| Key Key | Name Function | Description |
 | Navigation | Assists you in selecting an item that you want to process under the menu by pressing the Up, Down, Right or Left button. Press the center button to save. |
 | Directory | Access to phone book by checking the record list, adding new records or revising the record. When checking the phone book record, press this key again to return to idle |
| mode. | ||
| [B3TY] | Mute | Press this key in calling mode and you can hear the other side, but the other side cannot hear you. |
 | Volume -/+ | Turn down or turn up the volume by pressing the “-” key or the “+” key. |
 | Redial | 1. In the hook off /hands-free mode, use the key to dial the last call number;2. In stand-by mode, it has a function to check the Outgoing Call. |
 | Hands-free | Make the phone into hands-free mode. |
 | Indicator light | Blinking light indicates there is an incoming call. |
| [ZZZ8H]Soft key 1/2/3/4 | Key combination includes functions such as History/Directory/DND/Menu/Del/Redial/Send/Quit/Answer/Divert/Reject/Hold/Transfer/Conf/Close and so on. | |
 | History | View the Missed Calls, Incoming Calls and Dialed Calls. |
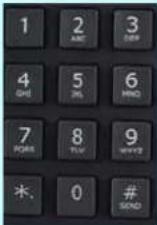 | Digital keyboard | Inputting the phone number or DTMF. |
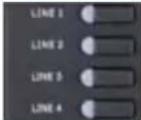 | Line Keys | Switch to different lines |
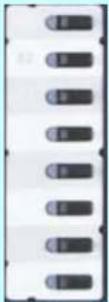 | DSS keys | You can configure them on the web page. |

Rear view and panel descriptions
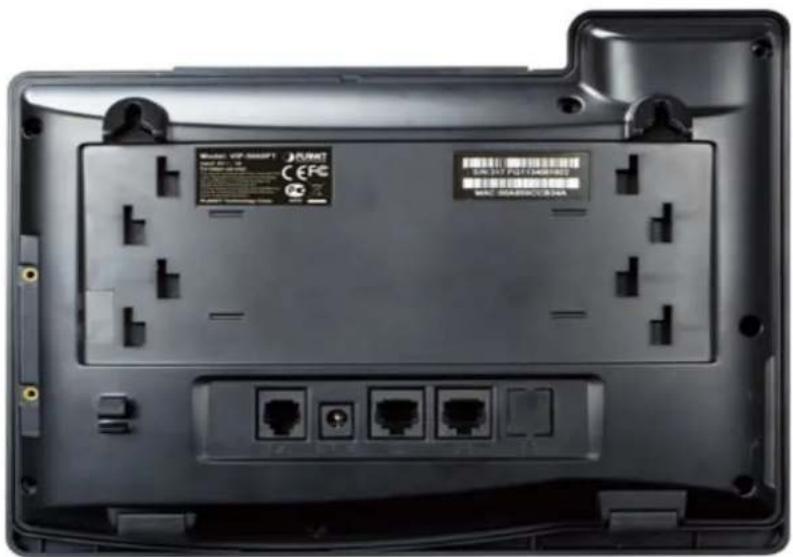

eypad Description
| Port Port name Description | ||
 | Power switch | Input: 5V AC, 1A |
 | WAN | 10/100/1000M Connect it to Network |
 | LAN | 10/100M/1000 Connect it to PC |
 | External console interface | Port type: RJ-11 direct connector |
 | Headset | Port type: RJ-9 connector |
 | Handset | Port type: RJ-9 connector |
1.6 Icon introduction
| Icon Description | |
 | Call out |
 | Call in |
 | Call hold |
| KKX4] | Auto answer |
 | Call mute |
 | Contact |
 | DND(Do not Disturb) |
 | In hand-free mode |
 | In handset mode |
 | In headset mode |
 | SMS |
 | Missed call |
 | Call forward |
1.7 LED introduction
Table 1 Programmable Key LED for BLF
| LED Status Description | |
| Steady green | The object is in idle status. |
| Slow blinking red | The object is ringing. |
| Steady red | The object is active. |
| Fast blinking red | The object failed. |
| Off | No subscription |
Table 2 Programmable key LED for Presence
| LED Status Description | |
| Steady green | The object is online. |
| Slow blinking red | The object is ringing. |
| Steady red | The object is active. |
| Fast blinking red | The object failed. |
| Off | No subscription |
Table 3 Programmable key LED for line
| LED Status Description | |
| Steady green | The account is active. |
| Fast Blinking green | There is an incoming call to the account. |
| Slow Blinking green | The call is on hold. |
| Slow Blinking red | Registration is unsuccessful. |
| Off | The line is not applied or is idle. |
Table 4 Programmable key LED for MWI
| LED Status Description | |
| Blinking green | There are new voice mails. |
| Off | There is no new voice mail. |
Table 5 Power Indication LED
| LED Status Description | |
| Steady red Power on. | |
| Fast Blinking red There is an incoming call. | |
| Off | Power off. |
2 Initial Connection and Login
Step 1. Handset Connection
Plug one end of the handset cord into the handset and the other end into the handset jack
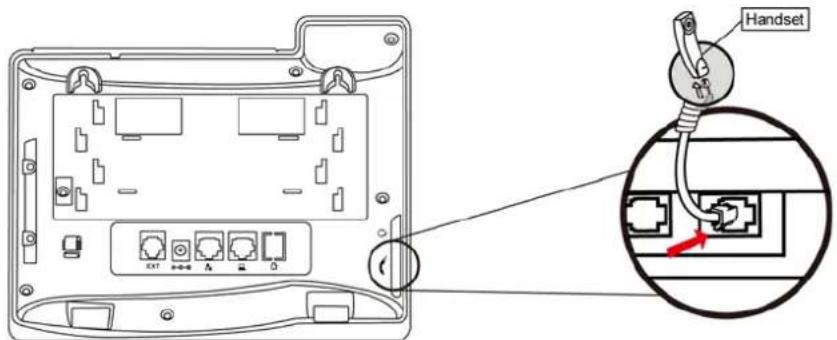
Step 2. Connecting Power System
The VIP-5060PT can be powered either by external AC/DC adapter or by connecting to an IEEE802.3af/at PSE device such as 802.3af Injector / Hub or 802.3af/at POE switch.
Once the VIP-5060PT is powered, the LCD screen will prompt for POST.
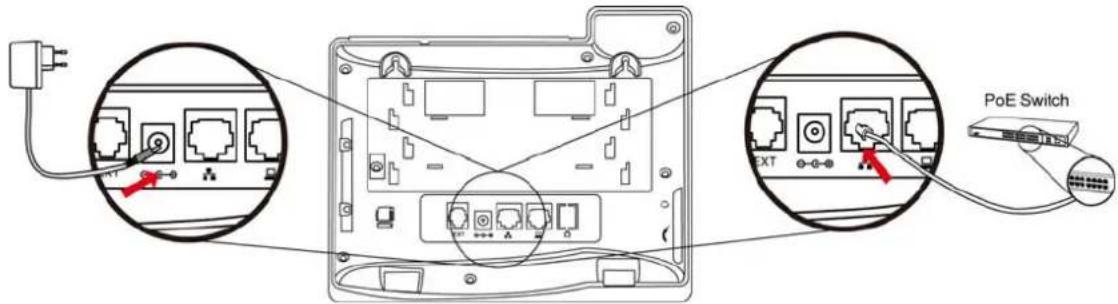
Note1: Use only the power adapter shipped with the unit to ensure correct functionality
Note2: Only WAN supports POE.
Step 3. Connecting Network
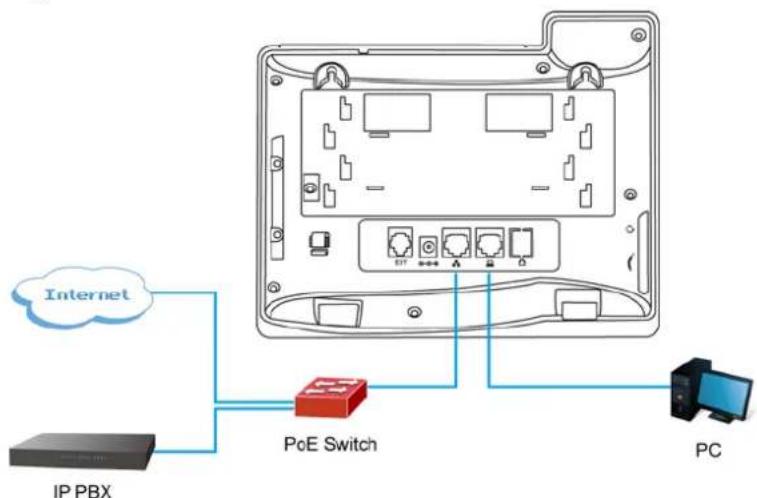
Step 4. Computer Network Setup
Set your computer's IP address to 192.168.0.x, where x is a number between 2 to 254 (except 1 where is being used for the phone by default). If you don't know how to do this, please ask your network administrator. Connect your PC to VIP-5060PT PC port.
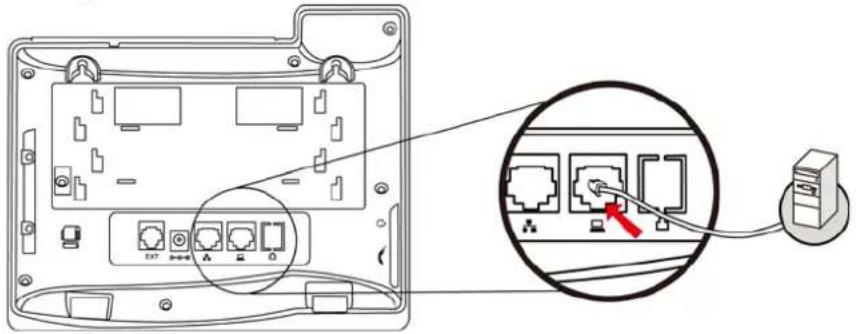
Step 5. Login Prompt
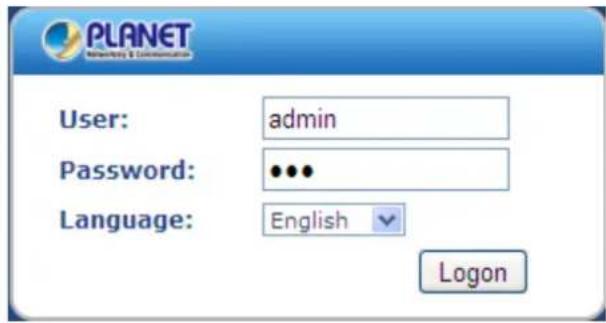
Use web browser (Internet Explorer 6.0 or above) to connect to 192.168.0.1 (type this address in the address bar of web browser).
You'll be prompted to input user name and password: admin and 123
3 Basic Functions
3.1 Making a call
3.1.1 Call Device
User can make a phone call via the following devices:
-
Pick up the handset, icon will be shown on the idle screen.
-
Press the Speaker button, 📄 icon will be shown on the idle screen.
-
Press the Headset button if the headset is connected to the Headset Port in advance. The icon will be shown on the idle screen.
User can also dial the number first, and then choose the method user will use to speak to the other party.
3.1.2 Call Methods
User can press an available line button if there is more than one account, then
-
Dial the number User wants to call.
-
Press History softkey. Use the navigation buttons to highlight User choice (press Left/Right button to choose Missed Calls, Incoming Calls and Outgoing Calls.
-
Press the R/SEND button to call the last number called.
-
Press the programmable keys which are set as speed dial button. Then press the Send button or Dial softkey to make the call if necessary.
3.2 Answering a call
Answering an incoming call
-
If User is not on another phone, lift the handset to use, or press the Speaker button/ Answer softkey to answer using the speaker phone, or press the headset button to answer the headset.
-
If User is on another call, press the answer softkey.
During the conversation, User can alternate between Headset, Handset and Speaker phone by pressing the corresponding buttons or picking up the handset.
3.3 DND
- Then press the Save to save the changes.
3.7 Mute Press DND softkey to activate DND Mode. Further incoming calls will be rejected and the display shows: DND icon. Press DND softkey twice to deactivate DND mode. User can find the incoming call record in the Call History. Press Mute button during the conversation, icon
3.4 Call Forward
This feature allows User to forward an incoming call to another phone number. The display shows icon.
The following call forwarding events can be configured:
Off: Call forwarding is deactivated by default.
Always: Incoming calls are immediately forwarded.
Busy: Incoming calls are immediately forwarded when the phone is busy.
No Answer: Incoming calls are forwarded when the phone is not answered after a specific period.
To configure Call Forward via Phone interface:
-
Press Menu → Features → Enter → Call Forwarding → Enter.
-
There are 4 options: Disabled, Always, Busy, and No Answer.
-
If User chooses one of them (except Disabled), enter the phone number User wants to forward to receiving party. Press Save to save the changes.
3.5 Call Hold
-
Press the Hold button or Hold softkey to put User active call on hold.
-
If there is only one call on hold, press the hold softkey to retrieve the call.
-
If there are more than one call on hold, press the line button, and the Up/Down button to highlight the call, and then press the Un-hold button to retrieve the call.
3.6 Call Waiting
-
Press Menu → Features → Enter → Call Waiting → Enter.
-
Use the navigation keys to activate or deactivate call waiting.
will be shown on the LCD. Then the called will not
hear User, but User can hear the called. Press it again to get the phone to normal conversation.
3.8 Call transfer
1. Blind Transfer
During talking, press the key "Transf", and then dial the number that User wants to transfer to, and finish by pressing "#". Phone will transfer the current call to the third party. After finishing transfer, the call User talks to will be hanged up. User cannot select SIP line when phone transfers call.
2. Attended Transfer
During talking, press the key "Transf", then input the number that User wants to transfer to and press Send. After that third party answers, then press Transfer to complete the transfer. (User needs to enable call waiting and call transfer first). If there are two calls, User can just talk to one, and keep hold to the other one. The one who is keeping hold cannot speak to User or hear from User. In other words, if user wants to invite the third party during the call, they can press Conf to make calls mode in conference mode. If user wants to stop conference, user can press Split. (User must enable call waiting and three way call first).

The server that user uses must support RFC3515 or it might not be used.
3. Alert Transfer
During the talking, press Transf first, and then press Send after inputting the number that User wants to transfer. Users are waiting for connection, now, press Transf and the transfer will be done. (To use this feature, User needs to enable call waiting and call transfer first).
3.9 3-way conference call
- Press the Conf softkey during an active call.
- The first call is placed on hold. Then User will hear a dial tone. Dial the number to conference in, and then press Send key.
- When the call is answered, press Conf and add the first call to the conference.
3.3 DND
Press DND softkey to activate DND Mode. Further incoming calls will be rejected and the display shows: icon. Press DND softkey twice to deactivate DND mode. User can find the incoming call record in the Call History.
3.4 Call Forward
This feature allows User to forward an incoming call to another phone number. The display shows icon.
The following call forwarding events can be configured:
Off: Call forwarding is deactivated by default.
Always: Incoming calls are immediately forwarded.
Busy: Incoming calls are immediately forwarded when the phone is busy.
No Answer: Incoming calls are forwarded when the phone is not answered after a specific period.
To configure Call Forward via Phone interface:
-
Press Menu → Features → Enter → Call Forwarding → Enter.
-
There are 4 options: Disabled, Always, Busy, and No Answer.
-
If User chooses one of them (except Disabled), enter the phone number User wants to forward to receiving party. Press Save to save the changes.
3.5 Call Hold
-
Press the Hold button or Hold softkey to put User active call on hold.
-
If there is only one call on hold, press the hold softkey to retrieve the call.
-
If there are more than one call on hold, press the line button, and the Up/Down button to highlight the call, and then press the Un-hold button to retrieve the call.
3.6 Call Waiting
-
Press Menu → Features → Enter → Call Waiting → Enter.
-
Use the navigation keys to activate or deactivate call waiting.
-
Then press the Save to save the changes.
3.7 Mute
Press Mute button during the conversation, icon 📄 will be shown on the LCD. Then the called will not hear User, but User can hear the called. Press it again to get the phone to normal conversation.
3.8 Call transfer
1. Blind Transfer
During talking, press the key "Transf", and then dial the number that User wants to transfer to, and finish by pressing "#". Phone will transfer the current call to the third party. After finishing transfer, the call User talks to will be hanged up. User cannot select SIP line when phone transfers call.
2. Attended Transfer
During talking, press the key "Transf", then input the number that User wants to transfer to and press Send. After that third party answers, then press Transfer to complete the transfer. (User needs to enable call waiting and call transfer first). If there are two calls, User can just talk to one, and keep hold to the other one. The one who is keeping hold cannot speak to User or hear from User. In other words, if user wants to invite the third party during the call, they can press Conf to make calls mode in conference mode. If user wants to stop conference, user can press Split. (User must enable call waiting and three way call first).

The server that user uses must support RFC3515 or it might not be used.
3. Alert Transfer
During the talking, press Transf first, and then press Send after inputting the number that User wants to transfer. Users are waiting for connection, now, press Transf and the transfer will be done. (To use this feature, User needs to enable call waiting and call transfer first).
3.9 3-way conference call
-
Press the Conf softkey during an active call.
-
The first call is placed on hold. Then User will hear a dial tone. Dial the number to conference in, and then press Send key.
-
When the call is answered, press Conf and add the first call to the conference.
| Number | Destination | Port | Mode | Alias | Suffix | Del Length |
| *3*T | 0.0.0.0 | 5060 | SIP | rep:redial | no suffix | 3 |
| *4*T | 0.0.0.0 | 5060 | SIP | rep:unredial | no suffix | 3 |
*3* is appointed prefix code. After making the above configuration, A can dial
*3* plus B's phone number to make the redial function.
*4* is appointed prefix code. After configuration, A can dial *4* to cancel redial function.
User can set prefix at random, in case it does not affect the current dialing rules.
4.4 Click to dial
When user A browses on an appointed Web page, user A can click to call user B via a link (this link to user B), then user A's phone will ring, after A hooks off, the phone will dial to B.

It needs an external software that supports click to dial.
4.5 Call back
This function allows User to dial out the last phone call User receives.
4.6 Auto answer
When there is an incoming call unanswered, the phone will answer the call automatically.
4.7 Hotline
User can set hotline number for every sip, and then enter the dialer interface and after Warm Line Time, the phone will call out the hotline number automatically.
4.8 Applications
4.8.1 SMS
- Press Menu → Applications → Enter → SMS → Enter.
-
Use the navigation keys to highlight the options. User can read the message in the Inbox/Outbox.
-
After viewing the new message, User can press Reply to reply the message, and use the 2aB softkey to change the Input Method. When entering the reply message, press OK, and then use the navigation keys to select the line from which User wants to send, then Send.
-
If User wants to write a message, User can press New and enter message. Use the 2aB softkey to change the Input Method. When User inputs the message User wants to send, press OK, then use the navigation keys to select the line from which User wants to send, then Send.
-
If User wants to delete the message, after viewing the message, press Del, then User has three options to choose from: Yes, All, No.
4.8.2 Memo
User can add some memos to record some important things to remind User.
Press Menu → Application → Memo → Enter → Add.
There are some options to configure: Mode, Date, Time, Text, Ring. When the configuration is completed, press Save.
4.8.3 Ping
-
Input the IP User wants, then User press "start". User can also press "delete" for modifying IP and change the input method when User inputs errors.
-
User waits till "OK" is shown on LCD, meaning Ping is successful, when User finishes entering the IP. Otherwise, Ping fails.
4.8.4 Voice Mail
-
Press Menu → Application → Voice Mail → Enter.
-
Use the navigation keys to highlight the line for which User wants to set, press Edit, and use the navigation key to turn on the mode, and then input the number. Press 2aB softkey to choose the proper input method.
-
Press Save to save the change.
-
To view the new voicemail, press the Voicemail softkey directly. Press Dial, and then User may be prompted to enter the password. User can listen to new and old messages.
4.9 Programmable Key Configuration
The phone has 4 programmable keys which are able to set up many functions. The following list shows the functions User can set on the programmable keys and provides a description for each function. The default configuration for each key is N/A which means the key hasn't been set for any functions.
Set the type as Memory Key
Press Menu → Settings → Basic Settings → Enter → Keyboard → DSS Key Settings
User have two options: Line Key Settings and Function Key Settings. Choose one User wants to make the assignment. Use the navigation key to choose the type as memory key. In the Dial field, User has some options, such as Normal, Speed Dial, Intercom, BLF, Presence, MWI and Call Park.
Speed dial
User can configure the key as a simplified speed dial key. This key function allows User to easily access User most dialed numbers.
Intercom
User can configure the key for Intercom code and it is useful in an office environment as a quick access to connect to the operator or the secretary.
BLF (Busy Lamp Field)
BLF is also called "Busy lamp field", and it is used to prompt the user to pay attention to the state of the object that has been subscribed, and used to cooperate with the server to pick up the phone call. User can configure the key for Busy Lamp Field (BLF) which allows User to monitor the status (idle, ringing, or busy) of other SIP accounts. User can dial out on a BLF configured key. Please refer to "LED Instructions" for more details about the LED status in different situations.

In the Web interface, User can also set the pickup number to activate the pickup function. For example, if User sets the BLF number as 212, and the pickup number is 189, then when there is an incoming call to 212, press the BLF key, it will call out the 189 automatically to pick up the incoming call on 212.
Presence
Presence is called present, and compared to the BLF, it can also check whether object is online.

User can subscribe to the BLF and presence station of the same number at the same time.
MWI (Message-Waiting Indicator)
When the key is configured as MWI, User is allowed to access voicemail quickly by pressing this key.
Call Park
-
User needs to set a server number when User has set what represents Call park. If User has a call but busy to receive the call, User can press the key and hear a number. Then User can choose another phone and input this number, so User can directly recover call.
-
Set the type as Line
User can set these keys as line keys. When pressing it, it will enter dialer interface.
- Set the type as Key Event
User can set these keys as Key Event, and the subtype has many options.
Choose one and it will have corresponding function.
- None
- Auto Redial Off
- Auto Redial On
- Call Back
- Call Forward
DND
- Flash
- Headset
- History
Hold
● Hot Desking: Pressing the key, User can clear all sip information and register your sip information.
- Join
- Lock: Pressing the key, User can lock the keyboard.
- Memo
MWI
- Phonebook
- Pickup
- Prefix
- Redial
- Release: Pressing the key, User can end the call.
- SMS
- Transfer
- Power Light
- Hot Desking
- Set the type as DTMF
User can configure the key as DTMF. This key function allows User to easily dial or edit dial number.
- Set the type as URL
User needs to match an XML Phonebook address. By pressing the button, User can directly access the corresponding remote phonebook.
6. Set the type as BLF List Key
It needs the cooperation with the Broadsoft server. The traditional BLF is that every number will need to be subscribed, so if the numbers that are subscribed are so many, it will cause obstruction. However, BLF List Key will put the numbers that are needed to be subscribed in a group. The phone uses the URL of the group to subscribe and analyze the specific information of each number such as number, name, state and so on according to the notifications from the server. Then set the idle Memory key as BLF List Key, later if the state of an object changes, the corresponding LED will change.
5 Other Functions
5.1 Auto Handdown
-
Press Menu → Features → Enter → Auto Handdown → Enter.
-
Set the Mode Enable through the navigation key, then set Time, unit is minute, then press Save.
-
When the call ends, after the time that User has set, the phone will return to the idle mode.
5.2 Ban Anonymous Call
-
Press Menu → Features → Enter → Ban Anonymous Call → Enter.
-
Choose which sip User want to enable Ban Anonymous Call, and then press Enter, choose Enabled or disabled through navigation key.
-
If User chooses Enabled, the others can't call the phone by anonymous. If User chooses Disabled, the others can call the phone by anonymous.
5.3 Dial Plan
-
Press Menu → Features → Enter → Dial Plan → Enter.
-
The following plans User can set: Press # to Send, Timeout to Send, Timeout, Fixed Length Number, Press # to Do BXFER, BXFER On-hook, AXFER On-hook. User can enable or disable each dial plan.
5.4 Dial Peer
-
Press Menu → Features → Enter → Dial Peer → Enter.
-
Press Add to enter the Edit interface, and then input some information. For example, Number: 1T, Dest.: 0.0.0.0, Port: 5060, Mode: SIP, Alisa: all:3333, Suffix: no suffix, Del Len: 0. Then press Save.
-
Input 1+number (1234) in the dial interface, User can dial out 3333. User can refer to 8.3.3.4 DIAL PEER.
5.5 Auto Redial
-
Press Menu → Features → Enter → Auto Redial → Enter.
-
Choose Mode Enabled or Disabled through the navigation key. If User chooses Enable, User also needs to set Interval and Times, and then press Save.
-
After enabling auto redial to call out someone, if he is in busy, it will pop up a prompt box whether to auto redial. Press OK and the phone will call out to him according the Interval and Time that User has set.
5.6 Call completion
-
Press Menu → Features → Enter → Call Completion → Enter.
-
Enable the function through the navigation key, and then save.
-
Call out others. If he is in busy, it will pop up a prompt Call Completion Waiting number. Press OK, when he is in idle. It will pop up a prompt Call Completion Call number. Press OK and the phone will call out the number automatically.
5.7 Ring From Headset
-
Press Menu → Features → Enter → Ring From Headset → Enter.
-
Enable this function through the navigation key. The phone connects to the headset. When the phone has an incoming call, it will ring from the headset.
5.8 Power Light
-
Press Menu → Features → Enter → Power Light → Enter.
-
Enable this function through the navigation key.
5.9 Hide DTMF
-
Press Menu → Features → Enter → Hide DTMF → Enter.
-
Through the navigation key, choose: Disabled, All, Delay, Last Show. When User set up a call with
others and need to input the DTMF, the DTMF will show as User has set.
5.10 Ban Outgoing
-
Press Menu → Features → Ban Outgoing → Enter.
-
Enable this function; User cannot call any number.
5.11 Pre Dial
-
Press Menu → Features → Pre Dial → Enter.
-
Enable this function and User will realize Pre-Dial function.
5.12 Password Dial
-
Press Menu → Features → Enter → Password Dial → Enter.
-
Enable this function and User can also set Prefix and Length. For example, User wants to call out 1234567 and User sets Password Dial Prefix 123 and Password Length 3, then enter the dial interface and input 1234567, and then the screen will show 123***7.
5.13 Action URL & Active URI
-
Action URL: The action that the phone carries out. For example, opening DND can produce one URL, and then the phone can send the HTTP to get the URL to PC. The phone can report the action to the PC.
-
Active URI: Enter the web page of the phone, PHONE → FEATURE, input Active URI Limit IP. User can input internet server (e.g. PC'IP), PC can send one URL to the phone. The phone will produce one action; for example, open DND, so PC can control the phone.
5.14 Push XML
Enter the web page of the phone → PHONE → FEATURE, input Push XML Server(e.g. PC'IP), then PC can push text, SMS, phonebook, advertisement, execute, etc. To phone to update the message or the phone makes an action.
6 Basic settings
6.1 Keyboard
-
Press Menu → Settings → Enter → Basic Settings → Enter → Keyboard → Enter.
-
There are four items: DSS Key settings, Programmable Keys, Desktop Long Pressed, SoftKey, and User can set up respectively on them. Press the key Enter to the interface, then use the navigation keys to choose the function for the key according to User's requirements.
-
Press the key OK to save.
6.2 Screen Settings
-
Press Menu → Settings → Enter → Basic Settings → Enter → Screen Settings → Enter.
-
User can set Contrast, Contrast Calibration and Backlight by pressing Enter and use the navigation keys to set, and then press the key Save.
6.3 Ring Settings
-
Press Menu → Settings → Enter → Basic Settings → Enter → Ring Settings → Enter.
-
User can set Ring Volume and Ring Type by pressing Enter and use the navigation keys to set, and then press the key Save. In the Ring Type, the default system rings have nine and the custom ringtones have three that can be set through the web page.
6.4 Voice Volume
-
Press Menu → Settings → Enter → Basic Setting → Enter → Voice Volume → Enter.
-
Use the navigation keys to turn down or turn up the voice volume, and then press the key Save.
6.5 Time & Date
-
Press Menu → Settings → Enter → Basic Settings → Enter → Time & Date → Enter.
-
User has two options to choose from: Auto and Manual. Use the navigation keys to choose, and then press Save.
6.6 Greeting Words
-
Press Menu ->Settings → Enter → Basic Settings → Enter → Greeting Words → Enter.
-
User can enter the message and press Save. It will display on the phone screen when the phone starts up.
6.7 Language
-
Press Menu → Settings → Enter → Basic Settings → Enter → Language → Enter.
-
The VIP-5060PT supports three languages. User can use the navigation keys to choose. The default two languages are English and Chinese.
7 Advanced Settings
7.1 Accounts
Press Menu → Enter → Advanced settings, and then input the password to enter. The default password is 123. User can set it through the web page. Then choose Account and then press Enter. User can do some sip settings.
7.2 Network
Press Menu → Enter → Advanced settings, and then input the password to enter. Then choose Network and press Enter. User can do network settings by referring to 2.2.1 Network settings.
7.3 Security
Press Menu → Enter → Advanced settings, and then input the password to enter. Then choose Security to configure Menu Password, Key lock Password, Key lock Status and whether to ban Outgoing.
7.4 Maintenance
Press Menu → Enter → Advanced settings, and then input the password to enter the interface. Then choose Maintenance and press Enter. User can configure Auto Provision, Backup, and Upgrade.
7.5 Factory Reset
Press Menu → Enter → Advanced settings, and then input the password to enter the interface. Then choose Factory Reset and press Enter. User can choose Yes or No.
8 Web Configuration
8.1 Introduction of configuration
8.1.1 Ways to configure
The VIP-5060PT has three different ways for different users.
- Use phone keypad.
- Use web browser (recommended way).
- Use telnet with CLI command.
8.1.2 Password Configuration
There are two levels to access to phone: root level and general level. User with root level can browse and set all configuration parameters, while user with general level can set all configuration parameters except SIP (1-2) that some parameters cannot be changed, such as server address and port. User will have a different access level with different user name and password.
- Default user with root level:
◆ User Name: admin
◆ Password: 123
The default password of phone screen menu is 123.
8.2 Setting via web browser
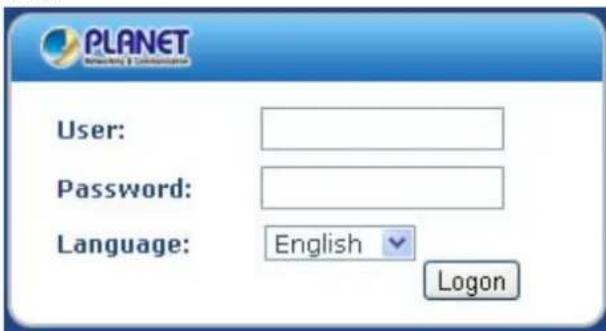
When this phone and PC are connected to network, enter the IP address of the WAN or LAN port in this phone as the URL e.g. http://192.168.0.X/
If User does not know the IP address, User can look it up on the phone's display by pressing Status button. The login page is shown below:
After User configures the IP phone, User needs to click Save button in config under Maintenance on the
left side of the screen to save User configuration. Otherwise, the phone will lose User modification after power is off and on.
8.3 Configuration via WEB
8.3.1 BASIC
8.3.1.1 STATUS
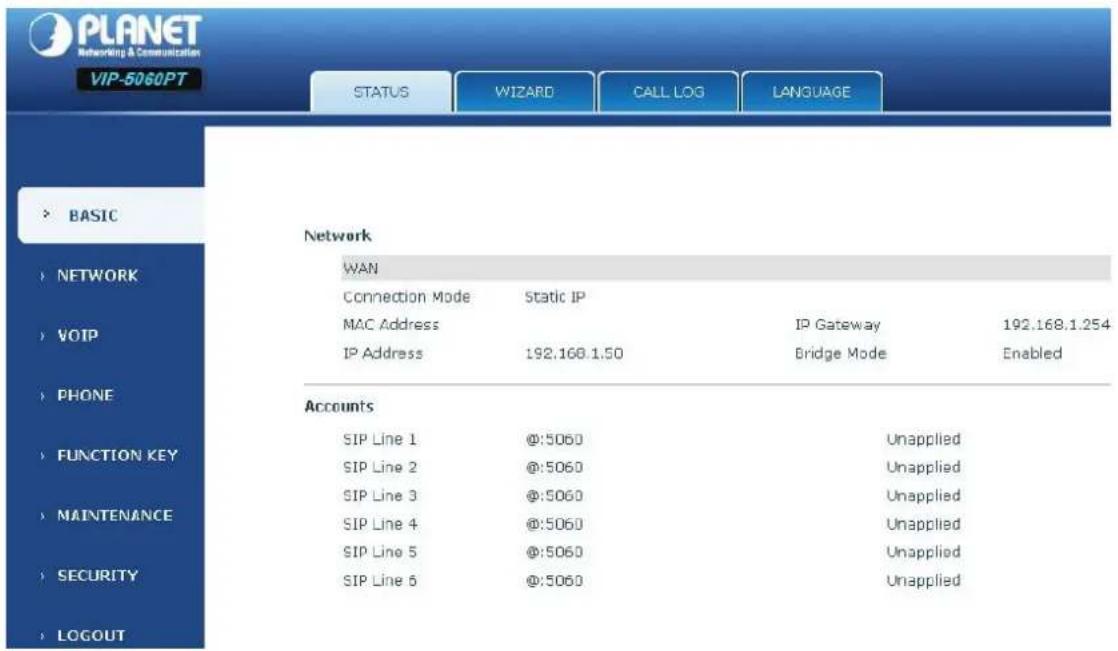
Status
| Field name Explanation | |
| Network Shows the conf | guration information on WAN port, including the connect mode of WAN port (Static, DHCP, PPPoE), MAC address, the IP address of WAN port |
| Accounts | Shows the phone numbers provided by the SIP LINE 1-6 servers The last line shows the version number and issued date. |
8.3.1.2 WIZARD
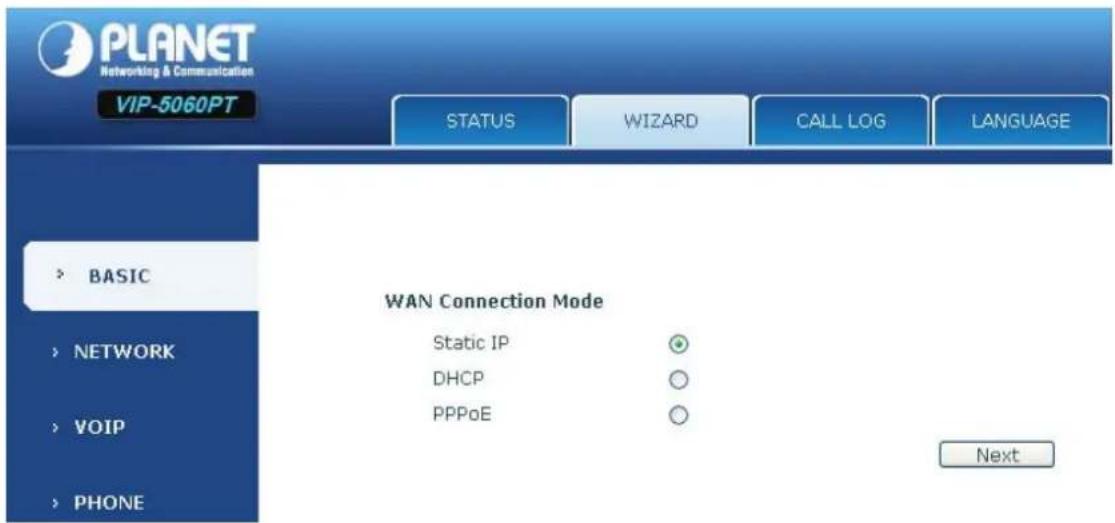
Wizard
Please select the proper network mode according to the network condition. The VIP-5060PT provides three different network settings:
- Static: If User ISP server provides User with the static IP address, please select this mode, and then finish Static Mode setting. If User doesn't know about parameters of Static Mode setting, please refer to User ISP.
- DHCP: In this mode, User will get the information from the DHCP server automatically; need not have to input this information artificially.
- PPPoE: In this mode, User must input User ADSL account and password.
User can also refer to 2.2.1 Network setting to speedily set User network.
Choose Static IP mode and click 【NEXT】 to config the network and SIP (default SIP1)
simply. Click 【BACK】 to return to the last page.
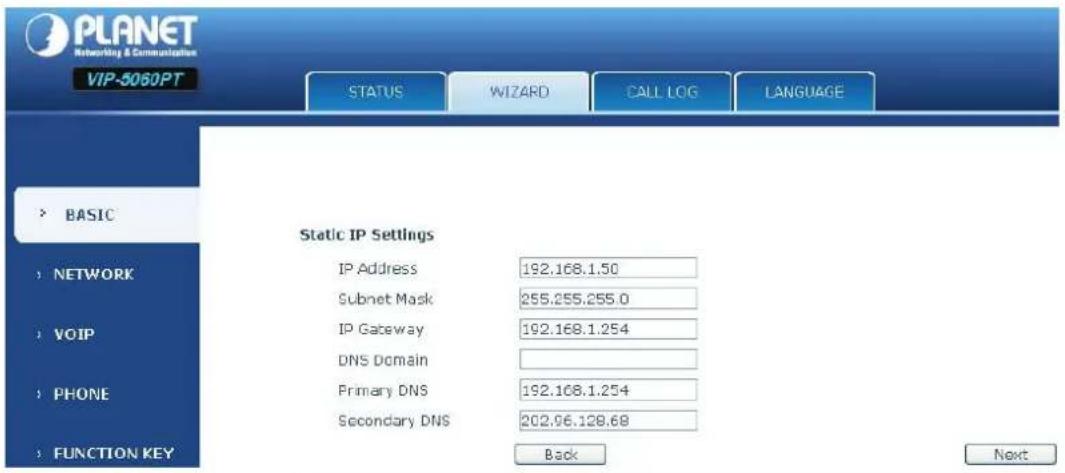
| IP Address Input the IP address distributed to User. | |
| Subnet Mask Input the subnet mask distributed to User. | |
| IP Gateway Input the Gateway address distributed to User. | |
| DNS Domain | Set DNS domain postfix. When the domain which User input cannot be parsed, phone will automatically add this domain to the end of the domain which User input before and parse it again. |
| Primary DNS Input User primary DNS server address. | |
| Secondary DNS Input User standby DNS server address. | |
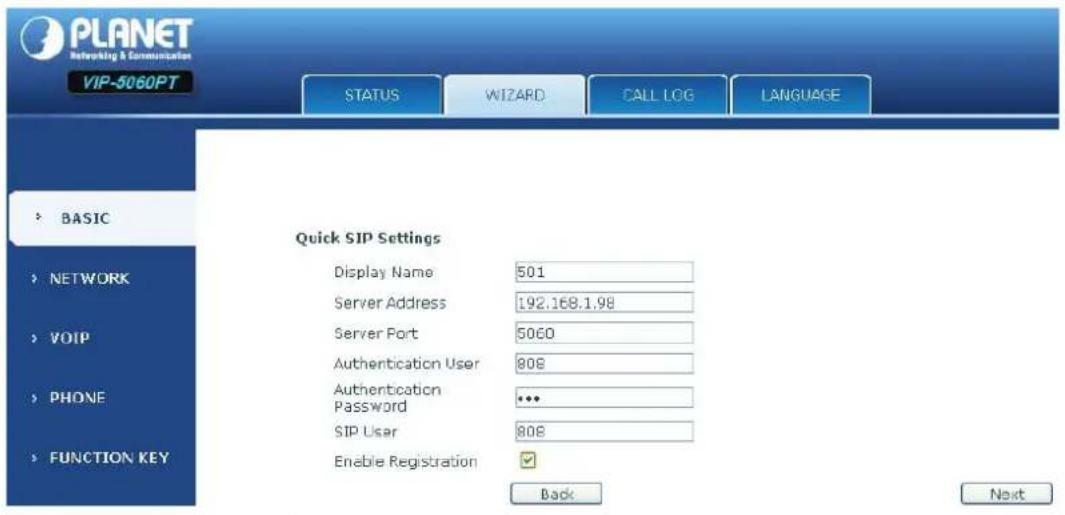
| Display Name Set the display name. | |
| Server Address Input User SIP server address. | |
| Server Port Set User SIP server port. | |
| Authentication User Input User SIP register account name. | |
| Authentication Password | Input User SIP register password. |
| SIP User | Input the phone number assigned by User VOIP service provider. |
| Enable Registration Start to register or not by selecting it or not. | |
STATUS
WIZARD
CALL LOG
LANGUAGE
WAN
| Connection Mode | Static IP |
| Static IP Address | 192.168.1.179 |
| IP Gateway | 192.168.1.1 |
SIP
| Server Address | 192.168.1.98 |
| Account | 804 |
| Phone Number | 804 |
| Registration | Enabled |
Back
Finish
Display detailed information about User manual config.
Choose DHCP mode and click Next to config SIP (default SIP1) simply. Click Back to return to the last page, like static IP mode.
Choose PPPoE mode and click Next to config the PPPoE account/password and SIP (default SIP1) simply. Click Back to return to the last page, like static IP mode.
STATUS
WIZARD
CALL LOG
LANGUAGE
PPPoE Settings
Service Name
ANY
User
user123
Password
●●●●●●●●
Back
| Service Name | It will be provided by ISP. |
| User | Input User ADSL account. |
| Password | Input User ADSL password. |

Note
Click 【Finish】 button after User setting is done. IP Phone will save the setting automatically and reboot. After reboot, User can dial with the SIP account.
8.3.1.3 CALL LOG
User can check all the outgoing calls on this page shown below:
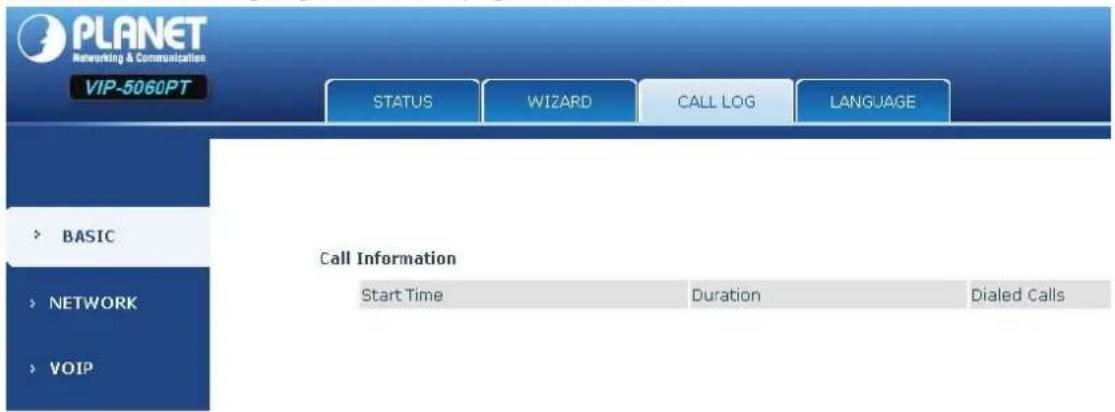
| Call Log | |
| Field name Explanation | |
| Start Time Display the start time of the outgoing record. | |
| Duration Display the conversation time of the outgoing record. | |
| Dialed Calls Display the account/protocol/line of the outgoing record. | |
8.3.1.4 LANGUAGE
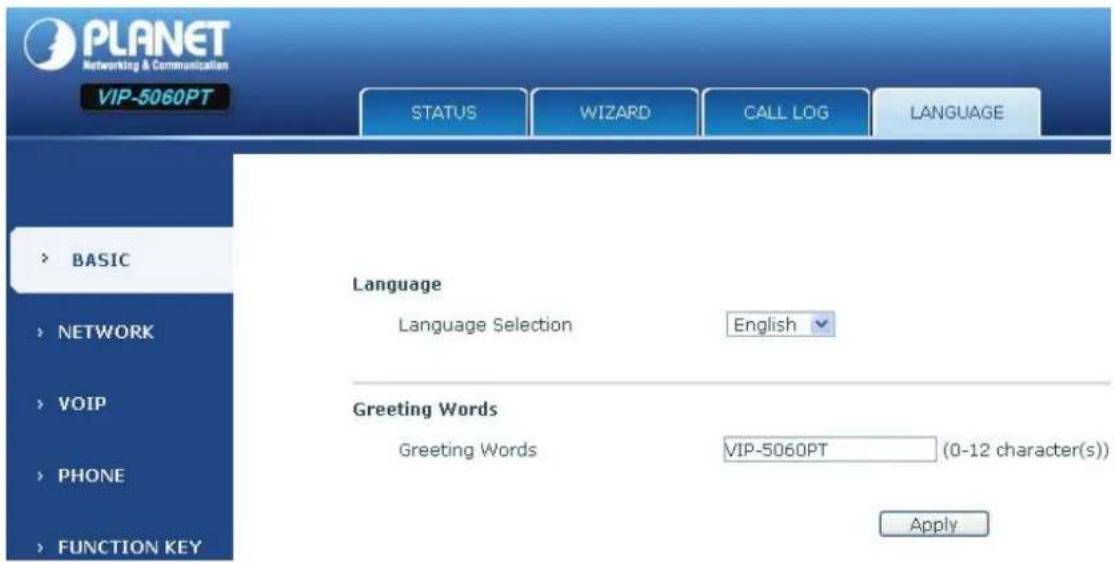
| LANGUAGE | |
| Field name Explanation | |
| Language | Set the language of phone. English is default. |
| Greeting Words | The greeting words will display on LCD when phone is idle. It can support 12 chars.; the default chars are VOIP PHONE. |

Note
The maximum length of the greeting message is 12 English characters and 5
Chinese characters.
8.3.2 NETWORK
8.3.2.1 WAN
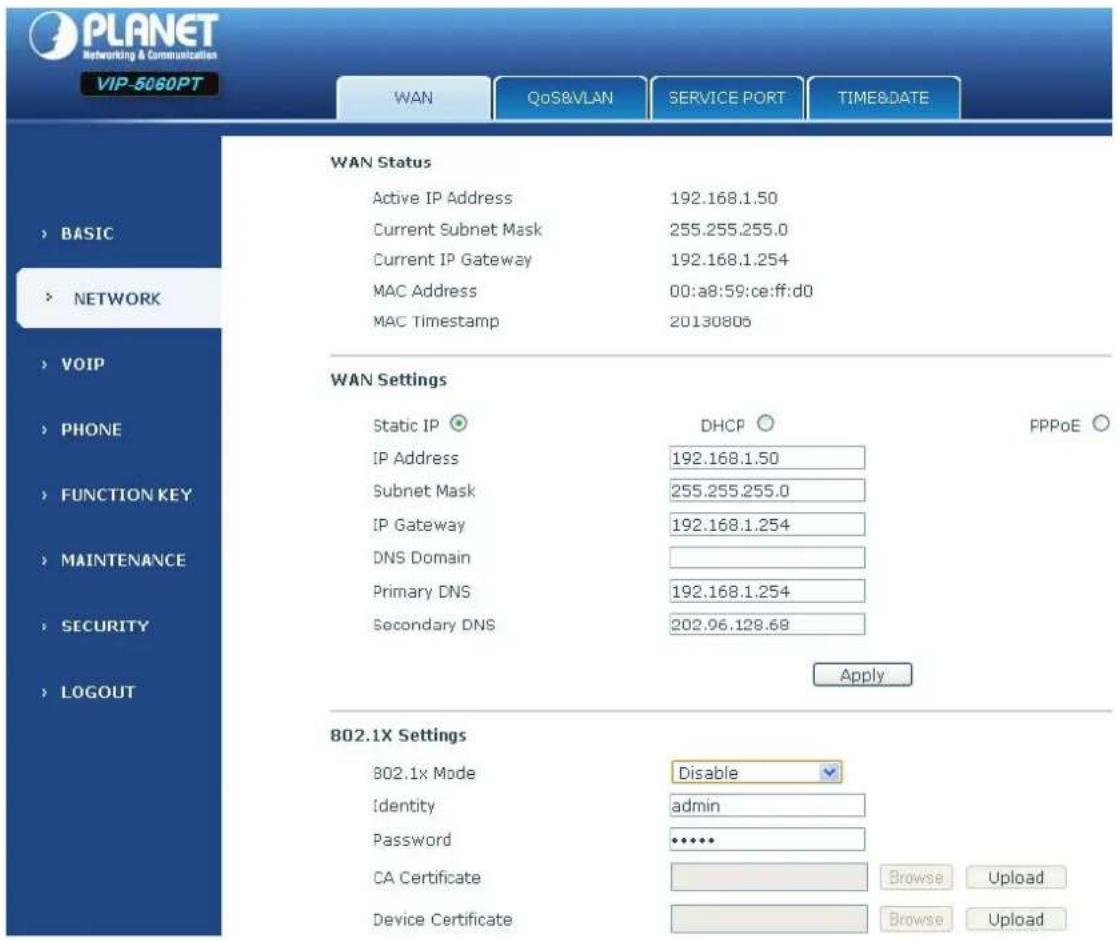
WAN Status
WAN Status
| Active IP Address | 192.168.1.50 |
| Current Subnet Mask | 255.255.255.0 |
| Current IP Gateway | 192.168.1.254 |
| MAC Address | |
| MAC Timestamp | 20130806 |
| Active IP Address | The current IP address of the phone. |
| Current Subnet Mask | The current Network mask address. |
| MAC Address | The current MAC address of the phone. |
| Current IP Gateway | The current Gateway IP address. |
| MAC Timestamp | Shows the time of getting MAC address |
WAN Settings
| Static IP | DHCP | PPPoE |
| IP Address | 192.168.1.50 | |
| Subnet Mask | 255.255.255.0 | |
| IP Gateway | 192.168.1.254 | |
| DNS Domain | ||
| Primary DNS | 202.96.134.133 | |
| Secondary DNS | 202.96.128.68 |
Please select the proper network mode according to the network condition. The VIP-5060PT provides three different network settings:
- Static: If User ISP server provides User with the static IP address. Please select this mode, and then finish Static Mode setting. If User doesn't know about parameters of Static Mode setting, please refer to User ISP.
- DHCP: In this mode, User will get the information from the DHCP server automatically; need not have to input this information artificially.
- PPPoE: In this mode, User must input User ADSL account and password. User can also refer to 2.2.1 Network setting to speedily set User network.
| Obtain DNS server automatically | Select it to use DHCP mode to get DNS address. If User does not select it, User will use static DNS server. The default is selecting it. |
| IP Address | 192.168.1.179 |
| Subnet Mask | 255.255.255.0 |
| IP Gateway | 192.168.1.1 |
| DNS Domain | |
| Primary DNS | 202.96.134.133 |
| Secondary DNS | 202.96.128.68 |
| If User uses static mode, User needs to set it. | |
| IP Address | Input the IP address distributed to User. |
| Subnet Mask | Input the Network mask distributed to User. |
| IP Gateway | Input the Gateway address distributed to User. |
| Set DNS domain postfix. When the domain which User input | |
| DNS Domain | cannot be parsed, phone will automatically add this domain to the end of the domain which User input before and parse it again. |
| Primary DNS | Input User primary DNS server address. |
| Secondary DNS | Input User standby DNS server address. |
| Static IP ○ Service Name User Password | DHCP ○ ANY user123 ········ PPPoE |
| If User uses PPPoE mode, User need to make the above setting. | |
| Service Name It will be provided by ISP. | |
| User Input User ADSL account. | |
| Password Input User ADSL password. | |

1) Click "Apply" button after setting is done. IP Phone will save the setting automatically and new setting will take effect.
2) If User modifies the IP address, the web will not response by the old IP address. User needs to input new IP address in the address column to logon in the phone.

VIP-5060PT LAN is fixed to bridge mode, so it doesn't have programming page.
8.3.2.2 QoS&VLAN
The VOIP phone supports 802.1Q/P protocol and DiffServ configuration. VLAN functionality can use different VLAN IDs by setting signal/voice VLAN and data VLAN. The VLAN application of this phone is very flexible.
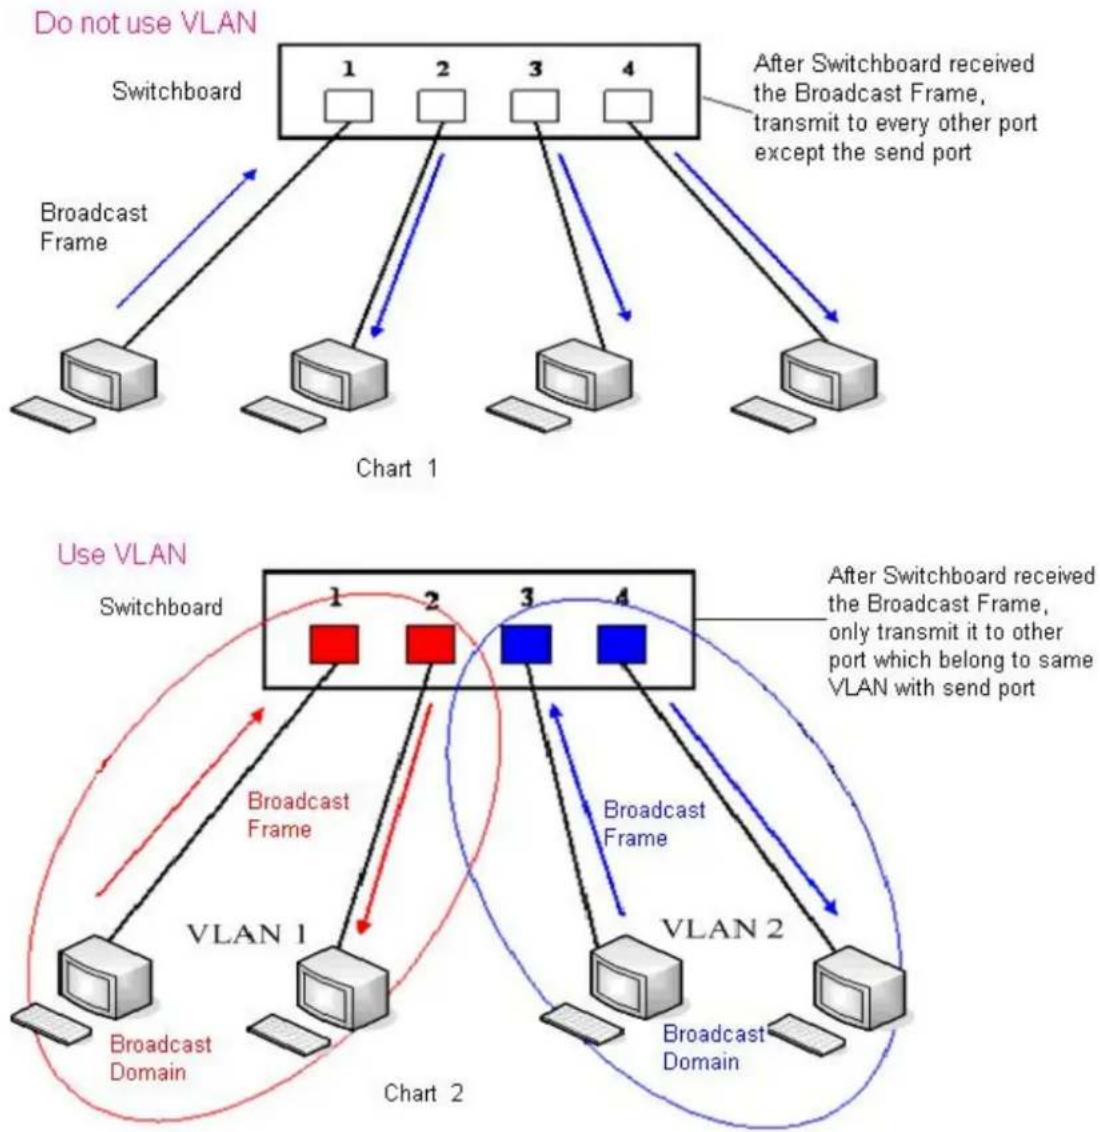
flowchart
graph TD
    subgraph "Do not use VLAN"
        A["Switchboard"] --> B["1"]
        A --> C["2"]
        A --> D["3"]
        A --> E["4"]
        F["After Switchboard received the Broadcast Frame, transmit to every other port except the send port"] --> A
    end

    subgraph "Use VLAN"
        G["Switchboard"] --> H["1"]
        G --> I["2"]
        G --> J["3"]
        G --> K["4"]
        L["After Switchboard received the Broadcast Frame, only transmit it to other port which belong to same VLAN with send port"] --> G
    end

    M["VLAN 1"] --> N["1"]
    M --> O["2"]
    M --> P["3"]
    M --> Q["4"]
    R["Broadcast Domain"] --> S["1"]
    R --> T["2"]
    R --> U["3"]
    R --> V["4"]
    W["Broadcast Domain"] --> X["1"]
    W --> Y["2"]
    W --> Z["3"]
    W --> AA["4"]
    AB["Chart 1"] --> AC["Computer"]
    AD["Chart 2"] --> AE["Computer"]
    AF["After Switchboard received the Broadcast Frame, transmit to every other port except the send port"] --> AG["Computer"]
    AH["After Switchboard received the Broadcast Frame, only transmit it to other port which belong to same VLAN with send port"] --> AI["Computer"]
In chart 1, there is a layer 2 that switches go without setting VLAN. Any broadcast frame will be transmitted to the other ports except the send port. For example, a broadcast information is sent out from port 1 then transmitted to ports 2, 3 and 4.
In chart 2, red and blue indicate two different VLANs in the switch, and port 1 and port 2 belong to red VLAN, port 3 and port 4 belong to blue VLAN. If a broadcast frame is sent out from port 1, switch will transmit it to port 2, the other port in the red VLAN and not transmit it to port3 and port 4 in blue VLAN. By this means, VLAN divides the broadcast domain via restricting the range of broadcast frame transition.

Chart 2 uses red and blue to identify the different VLANs, but in practice, VLAN uses different VLAN IDs to identify.
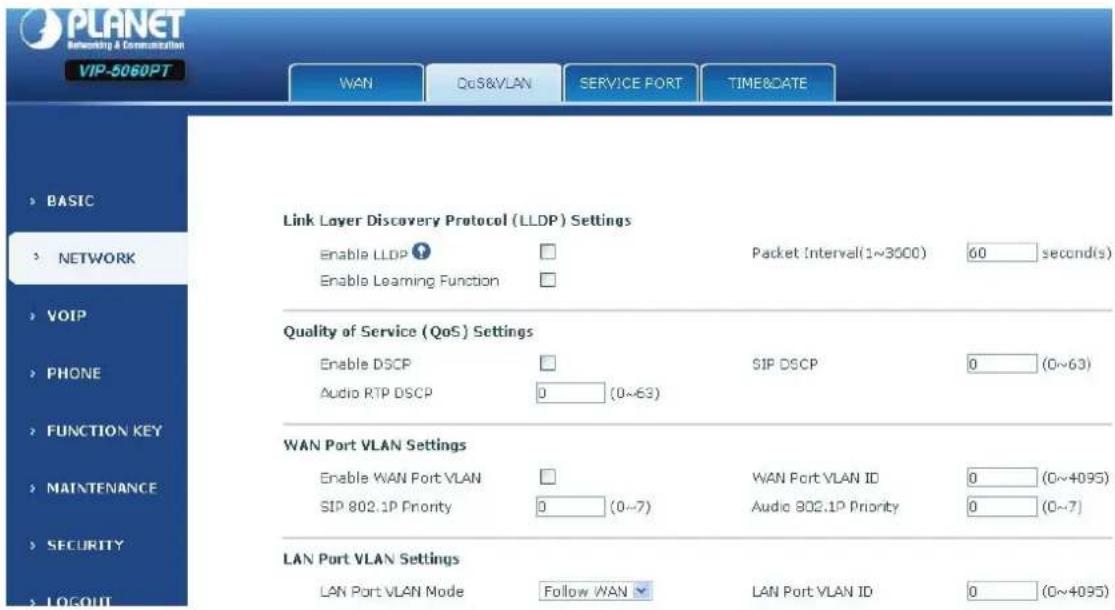
| QoS Configuration | |
| Link Layer Discovery Protocol (LLDP) Settings | |
| Enable LLDP Enable LLDP by selecting it. | |
| Enable Learning Function | After enabling LLDP Learn, telephone can automatically learn the data of DSCP, 802.1p, VLAN ID from the switch. If the data is different from the data of the LLDP server, telephone will change its own value as the value of the switch (Synchronous with VLAN in switch). |
| Package Interval(1-3600) | The time interval of sending LLDP Packet. |
| Quality of Service (Qos) Settings | |
| Enable DSCP Enable DSCP by selecting it. | |
| SIP DSCP Specify the value of the SIP DSCP. | |
| Audio RTP DSCP Specify the value of the Audio RTP DSCP. | |
| WAN Port VLAN Settings | |
| Enable WAN Port VLAN | Enable WAN Port VLAN by selecting it. |
| WAN Port VLAN ID | Specify the value of the WAN Port VLAN ID, the range of the value is 0-4095. |
| SIP 802.1p Priority | Specify the value of the sip 8021.p priority, the range of the value is 0-7. |
| Audio 802.1p Priority | Specify the value of the audio 802.1p priority, the range of the value is 0-7. |
| LAN Port VLAN Settings | |
| LAN Port VLAN Mode | Follow WAN: Follow the WAN ID. Disable: Disable Port VALN. Enable: Enable Port VLAN and specify the Port VLAN IDdifferent from WAN ID. |
| LAN Port VLAN ID | Specify the value of the Port VLAN ID different from WAN ID, the range of the value is 0-4095. |
8.3.2.3 SERVICE PORT
User can set the port of telnet/HTTP/RTP on this page.
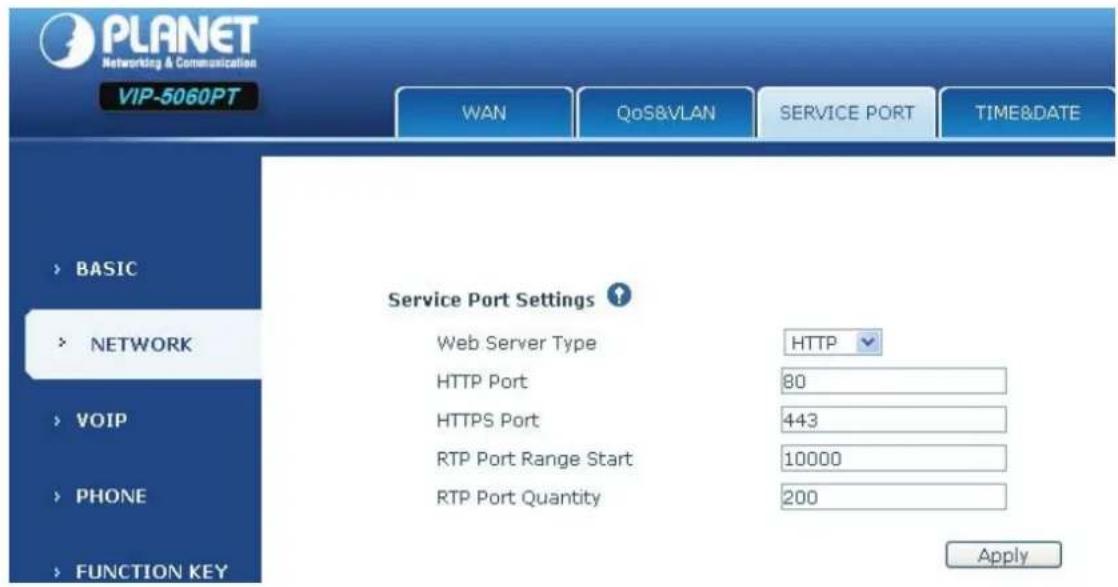
| SERVICE PORT | |
| Field name Explanation | |
| Service Port Settings | |
| Web Server Type Specify Web Server Type. | |
| HTTP Port | Set web browser port, the default is 80 port, if User want to enhance system safety, User would be better change it into non-80 standard port;Example: The IP address is 192.168.1.70, and the port value is 8090, the accessing address is http://192.168.1.70:8090. |
| HTTPS Port | Before using the https, User must download https authentication certification into the phone, thenSet web browser port, the default is 443 ports; if User want to enhance system safety, User would be better change it into non-443 standard port. User can access to the web in https after rebooting the phone. |
| Telnet Port | Set Telnet Port, the default is 23. User can change the value into others.Example: The IP address is 192.168.1.70. The telnet port value is 8023; the accessing address is telnet 192.168.1.70 8023. |
| RTP Port Range Start Set the RTP Start Port. It is dynamic allocation. | |
| RTP Port Quantity Set the maximum quantity of RTP Port, the default is 200. | |

Note
1) User needs to save the configuration and reboot the phone after setting this page.
2) Please reboot the system if User modifies the HTTP or telnet port number (the new number should be greater than 1024).
3) If User sets 0 for the HTTP port, it will disable HTTP service.
8.3.2.4 TIME&DATE
Setting time zone and SNTP (Simple Network Time Protocol) server according to User location, User can also manually adjust date and time in this web page.
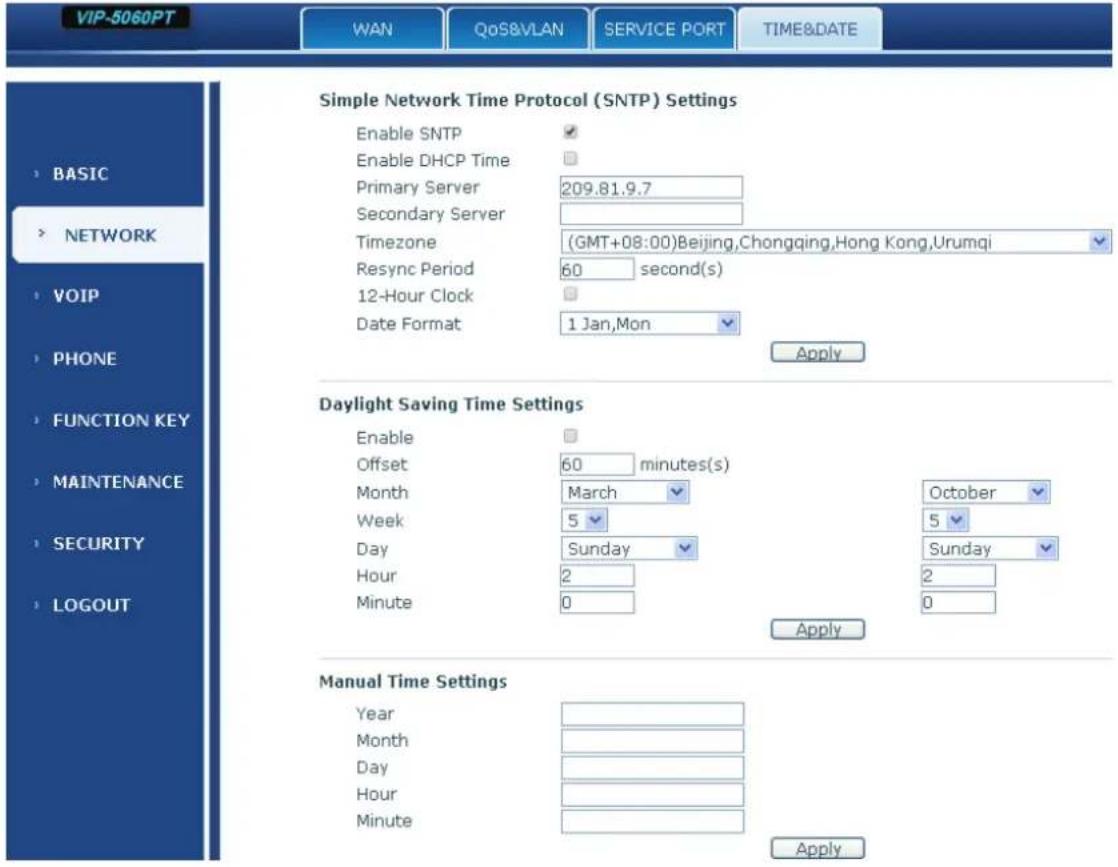
TIME&DATE
| Field name Explanation | |
| Simple Network Time Protocol (SNTP) Settings | |
| Enable SNTP | Enable SNTP by selecting it. |
| Enable DHCP Time | Enable DHCP Time by selecting it, then thephone will automatically synchronize the standard time. |
| Primary Server | Set SNTP Primary Server IP address. |
| Secondary Server | Set SNTP Secondary Server IP address. |
| Time Zone | Select the Time zone according to User location. |
| Resync Period | Set the time out, the default is 60 seconds. |
| 12 -Hour Clock | Switch the time mechanism between 12 hours and 24 hours.Default is 24 hours mode. |
| Date format | Specify the date format. |
| Daylight Saving Time Settings | |
| Enable | Enable daylight saving time. |
| Offset(minutes) | Setup the variety length. |
| Month | Setup start and end month. |
| Week | Setup start and end week. |
| Day | Setup start and end day. |
| Hour | Setup start and end hours. |
| Minute | Setup start and end minutes. |
| Manual Time Settings | |
Manual Time Settings
Year
Month
Day
Hour
Minute
natural_image
Five horizontal gray rectangular bars arranged vertically (no text or symbols)Apply

Note
First of all, User needs to disable the SNTP service, and the date hour minute each of which is required to complete and submit to make manual.
8.3.3 VOIP
8.3.3.1 SIP
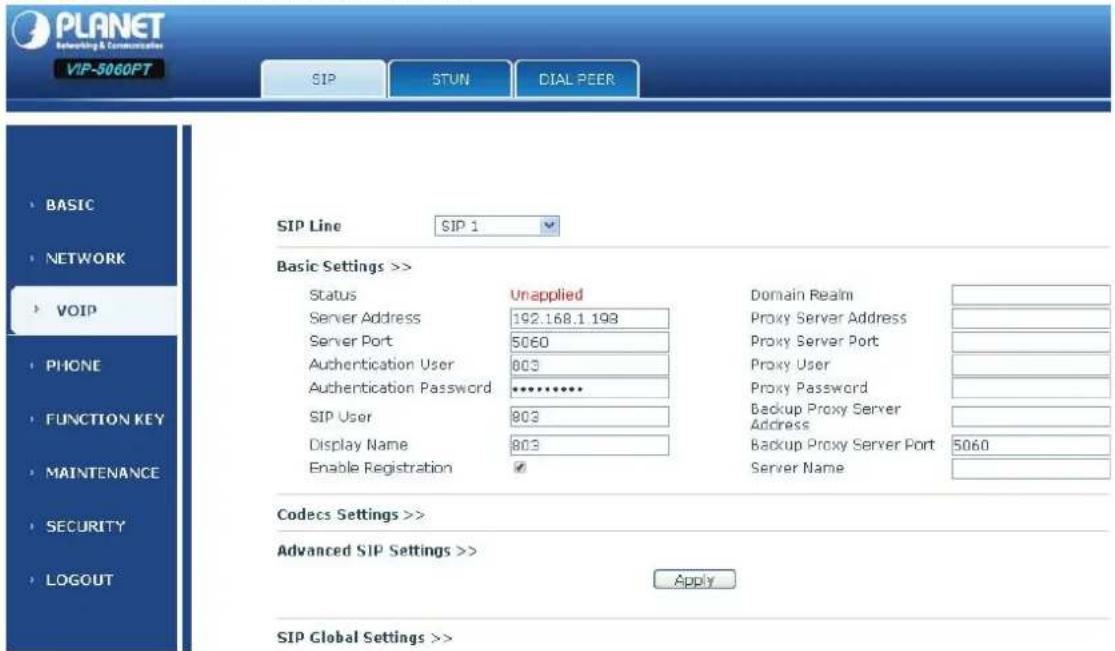
Set User SIP server in the following interface.
Codecs Settings >>
Disabled Codecs
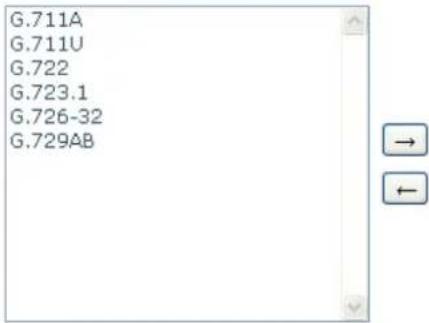
Enabled Codecs
natural_image
Blank white canvas with two directional buttons (up and down) on the right side, no text or symbols present.Advanced SIP Settings >>
Forward Type
Forward Number
No Ans. Fwd Wait Time
Transfer Timeout
Disabled
60 (0\~120)second(s)
0 second(s)
Enable Hotline
Hotline Number
Warm Line Wait Time
BLF Server
□
0 (0\~9)second(s)
The Ground Truth image displays a single, solid horizontal line, which is a stylistic or background element (like a rule line on paper). According to Rule 2, such lines must be ignored by the OCR result. The provided OCR content is "____", which consists of underscores. Underscores are not equivalent to a solid line and are not permitted under the “Stylistic/Background Lines (Ignore)” rule. Outputting underscores for a stylistic line is incorrect because it misinterprets the line as a placeholder fill-in-the-blank area. Hence, the OCR result is inconsistent with the Ground Truth.
SIP Encryption
SIP Encryption Key
RTP Encryption
RTP Encryption Key
□
[Non-Text]
□
The Ground Truth image displays a single, solid horizontal line. According to Rule 2 (UNDERSCORE & LINE RULES), this is a stylistic or background line, not a placeholder underscore. Therefore, the OCR result must ignore it and output nothing or only meaningful text. The provided OCR content is "____", which consists of four underscores. This is an incorrect interpretation of the line as a placeholder, violating the rule that stylistic lines must be ignored. The OCR has hallucinated underscores where none should exist based on the GT's visual context. Hence, the OCR result is inconsistent with the Ground Truth.
Enable Auto Answer
Auto Answer Timeout
Enable Session Timer
Session Timeout
□
60 second(s)
□
0 second(s)
Subscribe For MWI
MWI Number
Subscribe Period
□
The Ground Truth image displays a single, solid horizontal line. According to Rule 2 (UNDERSCORE & LINE RULES), this is a stylistic or background line, not a placeholder underscore. Therefore, the OCR result must ignore it and output nothing or only meaningful text. The provided OCR content is "____", which consists of four underscores. This is an incorrect interpretation of the line as a placeholder, violating the rule that stylistic lines must be ignored. The OCR has hallucinated underscores where none should exist based on the GT's visual context. Hence, the OCR result is inconsistent with the Ground Truth.
3600 second(s)
Conference Type
Conference Number
Registration Expires
Local
The Ground Truth image displays a single, solid horizontal line. According to Rule 2 (UNDERSCORE & LINE RULES), this is a stylistic or background line, not a placeholder underscore. Therefore, the OCR result must ignore it and output nothing or only meaningful text. The provided OCR content is "____", which consists of four underscores. This is an incorrect interpretation of the line as a placeholder, violating the rule that stylistic lines must be ignored. The OCR has hallucinated placeholder underscores where none exist in the GT, violating the rule to ignore such lines. Hence, the OCR result is inconsistent with the Ground Truth.
3600 second(s)
Enable Service Code
DND On Code
Always CFwd On Code
Busy CFwd On Code
No Ans. CFwd On Code
Ban Anonymous On Code
□
The Ground Truth image displays a single, solid horizontal line. According to Rule 2 (UNDERSCORE & LINE RULES), this is a stylistic or background line, not a placeholder underscore. Therefore, the OCR result must ignore it and output nothing or only meaningful text. The provided OCR content is "____", which consists of four underscores. This is an incorrect interpretation of the line as a placeholder, violating the rule that stylistic lines must be ignored. The OCR has hallucinated placeholder underscores where none should exist in the GT. Hence, the OCR result is inconsistent with the Ground Truth.
The Ground Truth image displays a single, solid horizontal line. According to Rule 2 (UNDERSCORE & LINE RULES), this is a stylistic or background line, not a placeholder underscore. Therefore, the OCR result must ignore it and output nothing or only meaningful text. The provided OCR content is "____", which consists of four underscores. This is an incorrect interpretation of the line as a placeholder, violating the rule that stylistic lines must be ignored. The OCR has hallucinated placeholder underscores where none should exist. Hence, the result is inconsistent with the Ground Truth.
The Ground Truth image displays a single, solid horizontal line. According to Rule 2 (UNDERSCORE & LINE RULES), this is a stylistic or background line, not a placeholder underscore. Therefore, the OCR result must ignore it and output nothing or only meaningful text. The provided OCR content is "____", which consists of four underscores. This is an incorrect interpretation of the line as a placeholder, violating the rule that stylistic lines must be ignored. The OCR has hallucinated placeholder underscores where none should exist. Hence, the result is inconsistent with the Ground Truth.
The Ground Truth image displays a single, solid horizontal line. According to Rule 2 (UNDERSCORE & LINE RULES), if the GT contains lines used for stylistic emphasis or as background elements (like ruled paper), the OCR result must ignore them. The provided OCR content is "____", which consists of four underscores. This is incorrect because underscores are not equivalent to a solid line and are not permitted under the “Stylistic/Background Lines (Ignore)” rule. Outputting underscores for a stylistic line violates the rule and constitutes an error. Therefore, the OCR result is inconsistent with the Ground Truth.
The Ground Truth image displays a single, solid horizontal line. According to Rule 2 (UNDERSCORE & LINE RULES), this is a stylistic or background line, not a placeholder underscore. Therefore, the OCR result must ignore it and output nothing or only meaningful text. The provided OCR content is "____", which consists of four underscores. This is an incorrect interpretation of the line as a placeholder, violating the rule that stylistic lines must be ignored. The OCR has hallucinated placeholder underscores where none should exist. Hence, the result is inconsistent with the Ground Truth.
DND Off Code
Always CFwd Off Code
Busy CFwd Off Code
No Ans. CFwd Off Code
Ban Anonymous Off Code
The Ground Truth image displays a single, solid horizontal line. According to Rule 2 (UNDERSCORE & LINE RULES), if the GT contains lines used for stylistic emphasis or as background elements (like ruled paper), the OCR result must ignore them. The line in the GT is clearly a stylistic or background line, not a placeholder for text. Therefore, the OCR should not have output any underscores. Outputting `____` constitutes an error under Rule 2, as it hallucinates placeholder symbols where none are semantically intended. Hence, the OCR result is inconsistent with the Ground Truth.
The Ground Truth image displays a single, solid horizontal line. According to Rule 2 (UNDERSCORE & LINE RULES), if the GT contains lines used for stylistic emphasis or as background elements (like ruled paper), the OCR result must ignore them. The line in the GT is clearly a stylistic or background line, not a placeholder for text. Therefore, the OCR should not have output any underscores. Outputting `____` constitutes an error under Rule 2, as it hallucinates placeholder symbols where none are semantically intended. Hence, the OCR result is inconsistent with the Ground Truth.
The Ground Truth image displays a single, solid horizontal line. According to Rule 2 (UNDERSCORE & LINE RULES), this is a stylistic or background line, not a placeholder underscore. Therefore, the OCR result must ignore it and output nothing or only meaningful text. The provided OCR content is "____", which consists of four underscores. This is an incorrect interpretation of the line as a placeholder, violating the rule that stylistic lines must be ignored. The OCR has hallucinated placeholder underscores where none should exist in the GT. Therefore, the OCR result is inconsistent with the Ground Truth.
The Ground Truth image displays a single, solid horizontal line. According to Rule 2 (UNDERSCORE & LINE RULES), this is a stylistic or background line, not a placeholder underscore. Therefore, the OCR result must ignore it and output nothing or only meaningful text. The provided OCR content is "____", which consists of four underscores. This is an incorrect interpretation of the line as a placeholder, violating the rule that stylistic lines must be ignored. The OCR has hallucinated placeholder underscores where none should exist in the GT. Therefore, the OCR result is inconsistent with the Ground Truth.
The Ground Truth image displays a single, solid horizontal line. According to Rule 2 (UNDERSCORE & LINE RULES), this is a stylistic or background line, not a placeholder underscore. Therefore, the OCR result must ignore it and output nothing or only meaningful text. The provided OCR content is "____", which consists of four underscores. This is an incorrect interpretation of the line as a placeholder, violating the rule that stylistic lines must be ignored. The OCR has hallucinated underscores where none should exist based on the GT's visual context. Hence, the OCR result is inconsistent with the Ground Truth.
Keep Alive Type
User Agent
DTMF Type
DTMF SIP INFO Mode
Ring Type
Enable Rport
Enable PRACK
Enable Long Contact
Convert URI
Dial Without Registered
Ban Anonymous Call
Enable DNS SRV
Enable Missed Call Log
BLF List Number
Enable BLF List
Respond 182 when Call
waiting
SIP Option
The Ground Truth image displays a single, solid horizontal line. According to Rule 2 (UNDERSCORE & LINE RULES), this is a stylistic or background line, not a placeholder underscore. Therefore, the OCR result must ignore it and output nothing or only meaningful text. The provided OCR content is "____", which consists of four underscores. This is an incorrect interpretation of the line as a placeholder, violating the rule that stylistic lines must be ignored. The OCR has hallucinated underscores where none should exist based on the GT's visual context. Hence, the OCR result is inconsistent with the Ground Truth.
AUTO
Send 10/11
Default
□
□
□
√
□
□
□
√
The image contains no text or characters. The horizontal line is a stylistic or background element and must be ignored according to the rules.
□
□
Keep Alive Interval
Server Type
RFC Protocol Edition
Local Port
Anonymous Call Edition
Keep Authentication
Ans. With a Single Codec
Auto TCP
Enable Strict Proxy
Enable GRUU
Enable Displayname Quote
Enable user=phone
Click To Talk
Transport Protocol
Use VPN
Enable DND
60 second(s)
COMMON
RFC3261
5060
None
□
□
□
□
□
□
√
□
UDP
√
□
SIP Global Settings >>
Strict Branch
□
Enable Group
Registration Failure Retry Time
32 second(s)
SIP Config
Field name Explanation
SIP Line
Choose line to set info about SIP, there are 4 lines to choose. User can switch by [Load]
button.
Basic Settings
Status Shows if the phone has been registered the SIP server or not;
| or so, show Unapplied. | |
| Server Address Input User | SIP server address. |
| Server Port | Set User SIP server port. |
| Authentication User | Input User SIP register account name. |
| Authentication Password | Input User SIP register password. |
| SIP User Input the phone number | number assigned by User VoIP service provider. Phone will not register if there is no phone number configured. |
| Display Name Set the display name. | |
| Proxy Server Address | Set proxy server IP address (Usually, Register SIP Server configuration is the same as Proxy SIP Server. But if User VoIP service provider gives different configurations between Register SIP Server and Proxy SIP Server, User need make different settings). |
| Proxy Server Port Set User | Proxy SIP server port. |
| Proxy User Input User Proxy | SIP server account. |
| Proxy Password Input User | Proxy SIP server password. |
| Domain Realm | Set the sip domain if needed, otherwise this VoIP phone will use the Register server address as sip domain automatically. (Usually it is same with registered server and proxy server IP address). |
| Backup Server Address Input | the Backup Server Address, if the primary server is unavailable, then the phone will enable the Backup Server Address. |
| Backup Server Port Specify | the Backup Server Port. |
| Enable Registration Start to | register or not by selecting it or not. |
| Codecs Settings | |
| Disable Codecs/Enable Codecs | Use the navigation keys to highlight the desired one in the Enable/Disable Codecs list, and press the desired to move to the other list. |
| Advanced SIP Setting | |
| Forward Type | Select call forward mode, the default is Off.Off:Close down calling forward.Busy:If the phone is busy, incoming calls will be forwarded to the appointed phone.No answer:If there is no answer, incoming calls will be forwarded to the appointed phone after a specific.Always:Incoming calls will be forwarded to the appoint phone immediately.The phone will prompt the incoming while doing forward. |
| Forward Number | Specify the number User want to forward. |
| No Answer Forward Wait | Specify the No Answer Forward Delay Time, if the Forward |
| Time | Type is No answer, incoming calls will be forwarded after the no answer forward wait time. |
| Enable Hot Line Specify Hot Line by selecting it. | |
| Hot Line Number | Specify Hot Line Number, the phone dial the hot line number automatically at hands-free mode or handset mode after warm line time. |
| Warm Line Wait Time Specify the Warm Line Time. | |
| Transfer Timeout | For the phone supports the transfer of certain special features server, set interval time between sending “bye” and hanging up after the phone transfers a call. |
| BLF Server | The registered server will be gotten subscription package from ordinary application of BLF phone, please enter the BLF server, when the sever dose not support subscription package. then the registered server and subscription server will be separate |
| SIP Encryption Enable/Disable SIP Encryption. | |
| SIP Encryption Key Set the key for sip encryption. | |
| RTP Encryption Enable/Disable RTP encryption. | |
| RTP Encryption Key Set the key for RTP encryption. | |
| Enable Auto Answer Enable Auto Answer by selecting it. | |
| Auto Answer Timeout | Specify Auto Answer Time, the phone auto answers the incoming call after Auto Answer Time. |
| Enable Session Timer | Set Enable/Disable Session Timer, whether support RFC4028.It will refresh the SIP sessions. |
| Session Timeout Set the session timeout. | |
| Subscribe for MWI | Enable the Subscribe for MWI by selecting it, the phone will send subscribe message for MWI to the SIP Server. |
| MWI Number | Specify the MWI Number; Please contact User system administrator for the connecting code. Different systems have different codes. |
| Subscribe Period(s) | Overtime of resending subscribe packet. Suggest using the default configuration. |
| Conference Type | Specify the Conference Type, if User select the local, User needn’t input the conference number. |
| Conference Number | Specify the network conference number, please contact User system administrator for the network conference number. |
| Registration Expire(s) | Set expire time of SIP server register, default is 60 seconds. If the register time of the server requested is longer or shorter than the expired time set, the phone will change automatically the time into the time recommended by the server, and register again. |
| Enable Service Code | If User want to realize the following function by the server,please enter the On Code and Off Code option, then when User choose to enable/disable following function on User IP phone, it will send message to the server, and the server will turn on/off the function immediately. |
| DND On Code | Set the DND On Code, When User press the DND hot key, the phone will send a message to the server, and the server will turn on the DND function. Then any calls to the extension will be rejected by the server automatically. And the incoming call record will not be displayed in the Call History. |
| DND Off Code | Set the DND Off Code, When User press the DND hot key, the phone will send a message to the server, and the server will turn off the DND function. |
| Always CFwd On Code | Set the Always CFwd On Code, when User choose to enable the always forward function on User phone, it will send message to the server, and the server will turn on the function immediately. When there are calls to the extension, the server will always forward it to the set number automatically. And the IP phone will not show the record in the call history anymore. |
| Always CFwd Off Code | Set the Always CFwd Off Code, when User choose to disable the always forward function on User phone, it will send message to the server, and the server will turn off the function immediately. |
| Busy CFwd On Code | Set the Busy CFwd On Code, when User choose to enable the busy forward function v on User phone, it will send message to the server, and the server will turn on the function immediately. When there are calls to the extension, the server will forward it to the set number automatically based the forward type. And the IP phone will not show the record in the call history anymore. |
| Busy CFwd Off Code | Set the Busy CFwd Off Code, when User choose to disable the busy forward function on User phone, it will send message to the server, and the server will turn off the function immediately. |
| No Answer CFwd On Code | Set the No Answer CFwd On Code, when User choose to enable the on answer forward function on User phone, it will send message to the server, and the server will turn on the function immediately. When there are calls to the extension, the server will forward it to the set number automatically based the forward type. And the IP phone will not show the record in the call history anymore. |
| No Answer CFwd Off Code | Set the No Answer CFwd Off Code, when User choose to disable the busy forward function on User phone, it will send message to the server, and the server will turn off the function immediately. |
| Anonymous On Code | Set the Anonymous On Code, When User choose to enable the anonymous call function on User IP phone, it will send information to the server, and the server will enable the anonymous call function for User IP phone automatically. |
| Anonymous Off Code | Set the Anonymous Off Code, When User chooses to disable the anonymous call function on User IP phone, it will send information to the server, and the server will disable the anonymous call function for User IP phone automatically. |
| Keep Alive Type | Specify the keep alive type, if the type is option, the phone will send option sip message to server every NAT Keep Alive Period(s), then the server responses with 200 to keep alive. If the type is UDP, the phone will send UDP message to server to keep alive every NAT Keep Alive Period(s). |
| Keep Alive Interval Set examining interval of the server, default is 60 seconds. | |
| User Agent Set the user agent if have, the default is VoIP Phone 1.0. | |
| DTMF Type | Select DTMF sending mode, there are three modes:DTMF_RELAYDTMF_RFC2833DTMF_SIP_INFODifferent VoIP Service providers may provide different modes. |
| Local Port Set sip port of each line. | |
| Ring Type Set ring type of each line. | |
| Enable Via Rport | Enable/Disable system to support RFC3581. Via rport is special way to realize SIP NAT. |
| Enable PRACK | Enable or disable SIP PRACK function, suggest use the default config. |
| Enable Long Contact | Set more parameters in contact field; connection with SEM server. |
| Convert URI Convert # to %23 when send the URI. | |
| Dial Without Registered Set call out by proxy without registration. | |
| Ban Anonymous Call Set to ban Anonymous Call. | |
| Enable DNS SRV Support DNS looking up with _sip.udp mode. | |
| Server Type | Select the special type of server which is encrypted, or has some unique requirements or call flows. |
| RFC Protocol Edition | Select SIP protocol version to adapt for the SIP server which uses the same version as User select. For example, if the server is CISCO5300, User need to change to RFC2543; else phone may not cancel call normally. System uses RFC3261 as default. |
| Transport Protocol | Set transport protocols, TCP or UDP. |
| Anonymous call Edition | Set Anonymous call out safely; Support RFC3323and RFC3325. |
| Keep Authentication | Enable/Disable Keep Authentication System will take the last authentication field which is passed the authentication by server to the request packet. It will decrease the server's repeat authorization work, if it is enable. |
| Answer With A Single Codec | Enable/Disable the function when call is incoming, phone replies SIP message with just one codec which phone supports. |
| Auto TCP | Set to use automatically TCP protocol to guarantee usability of transport as message is above 1300 byte |
| Enable Strict Proxy | Support the special SIP server-when phone receives the packets sent from server, phone will use the source IP address, not the address in via field. |
| Enable GRUU Set to support GRUU | |
| Enable Display name Quote | Set to make quotation mark to display name as the phone sends out signal, in order to be compatible with server. |
| Enable user = phone | Enable user = phone by selecting it, it is contained in the invite sip message, in order to be compatible with server. |
| Enable Missed Call Log | Enable the missed call log by it, the phone will save the missed call log into the call history record and display the missed calls on the idle screen, or won't save the missed call log into the call history record and display the missed calls on the idle screen. |
| Click to talk Set click to Talk (need practical software support). | |
| Enable BLF List | Enable BLF List by selecting it, BLF list is a function which can monitor the group status, it is not one to one monitoring, but the information feedback from the server to decide which BLF list will monitor. |
| BLF List Number Specify the BLF List Number. | |
| SIP Global Settings | |
| Strict Branch | Enable the Strict Branch, the value of the branch must be in the beginning of z9hG4k in via field of the invite sip message received, or the phone won't response to the invite sip message.Notice: the deployment will become effective in all sip lines. |
| Enable Group | Enable Group by selecting it, then the phone enable the sip group backup function.Notice: the deployment will become effective in all sip lines. |
| Registration Failure Retry Time | Specify the registration failure retry time, if the phone register failed, the phone will register again after registration failure retry time.Notice: the deployment will become effective in all sip lines. |
8.3.3.2 STUN
In this web page, Users can config SIP STUN.
STUN: By STUN server, the phone in private network could know the type of mapping IP and port of SIP. The phone might register itself to SIP server with global IP and port to realize the device both calling and being called in private network.
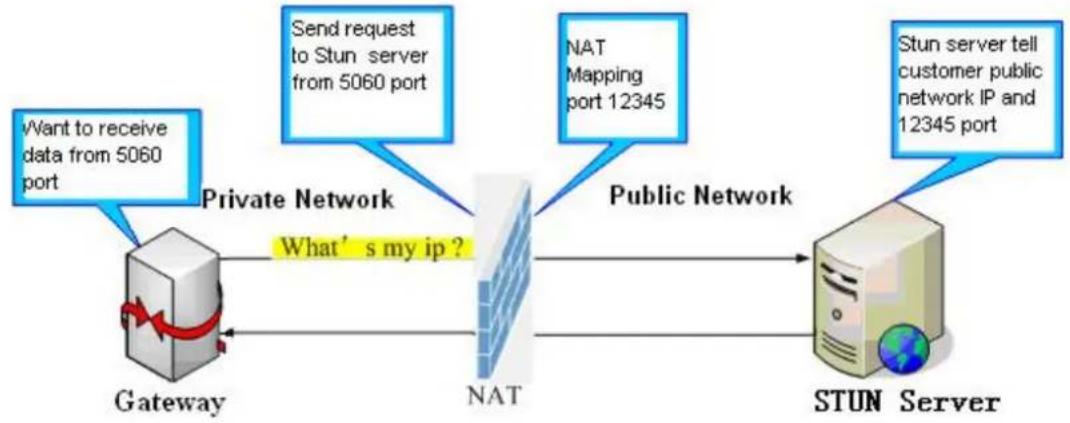
flowchart
graph LR
    A["Gateway"] -->|What's my ip ?| B["NAT"]
    B --> C["STUN Server"]
    D["Private Network"] -->|Send request to Stun server from 5060 port| E["NAT Mapping port 12345"]
    F["Public Network"] --> C
    G["Want to receive data from 5060 port"] --> A
    H["Stun server tell customer public network IP and 12345 port"] --> C
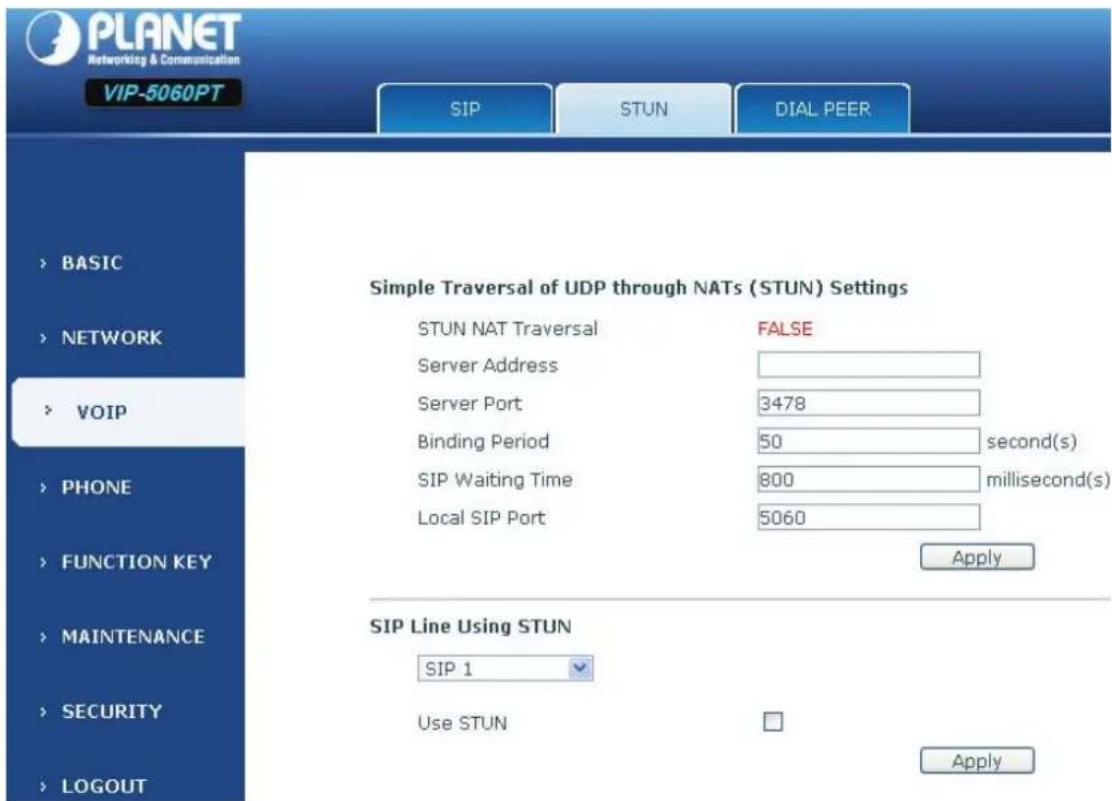
STUN
Field name Explanation
Simple Traversal of UDP through STUN Settings
STUN Traversal Shows STUN Transverse estimation, true means STUN can
| penetrate NAT, while False means not. | |
| Server Address Set User SIP | STUN Server IP address. |
| Server Port Set User SIP STUN | UN Server Port. |
| Blinding Period(s) | Set STUN blinding period(s). If NAT server finds that a NAT mapping is idle after time out, it will release the mapping and the system need send a STUN packet to keep the mapping effective and alive. |
| SIP Waiting Time | Specify the sip wait stun time; User can input the time depended on User network condition. |
| Local SIP Port | Configure the local SIP port, default port is 5060 (the port with immediate effect, after revision, SIP calls will use the modified port. |
| SIP Line Using STUN | |
SIP Line Using STUN

Use STUN

Apply
Choose line to set info about SIP, There are 2 lines to choose. User can switch by 【Load】button.
Use STUN Enable/Disable SIP STUN.

Note
SIP STUN is used to realize SIP penetration to NAT. If User phone configures STUN Server IP and Port (default is 3478), and enable SIP Stun, User can use the ordinary SIP Server to realize penetration into NAT.
8.3.3.3 DIAL PEER
This functionality offers User more flexible dial rule; User can refer to the following content to know how to use this dial rule. When User wants to dial an IP address, the entry of IP addresses is very cumbersome, but by this functionality, User can set number 156 to replace 192.168.1.119 here.
| Dial Peer Table | ||||||
| Number | Destination | Port | Mode | Alias | Suffix | Deleted Length |
| 156 | 192.168.1.119 | 5060 | SIP | no alias | no suffix | 0 |
When User want to dial a long distance call to Beijing, User need dial an area code 010 before local phone number, but User can also dial number 1 instead of 010 after we make a setting according to this dial rule. For example, User want to dial 01062213123, but User need dial only 162213123 to realize User long distance call after User make this setting.
Dial Peer Table
| Number | Destination | Port | Mode | Alias | Suffix | Deleted Length |
| IT | 0.0.0.0 | 5060 | SIP | no alias | no suffix | 0 |
To save the memory and avoid abundant input of user, add the follow functions:
Dial Peer Table
| Number | Destination | Port | Mode | Alias | Suffix | Deleted Length |
| IT | 0.0.0.0 | 5060 | SIP | no alias | no suffix | 0 |
| 13xxxxxxxxx | 0.0.0.0 | 5060 | SIP | add:0 | no suffix | 0 |
| 13[5-9]xxxxxxxxx | 0.0.0.0 | 5060 | SIP | add:0 | no suffix | 0 |
| 156 | 192.168.1.119 | 5060 | SIP | no alias | no suffix | 0 |
1.* Match any single digit that is dialed.
If user makes the above configuration, after user dials 11 digit numbers started with 13, the phone will send out 0 plus the dialed numbers automatically.
- [ ] Specifies a range that will match digit. It may be a range, a list of ranges separated by commas, or a list of digits.
If user makes the above configuration, after user dials 11 digit numbers started with from 135 to 139, the phone will send out 0 plus the dialed numbers automatically.
Use this phone User can realize dialing out via different lines without switch in web interface.
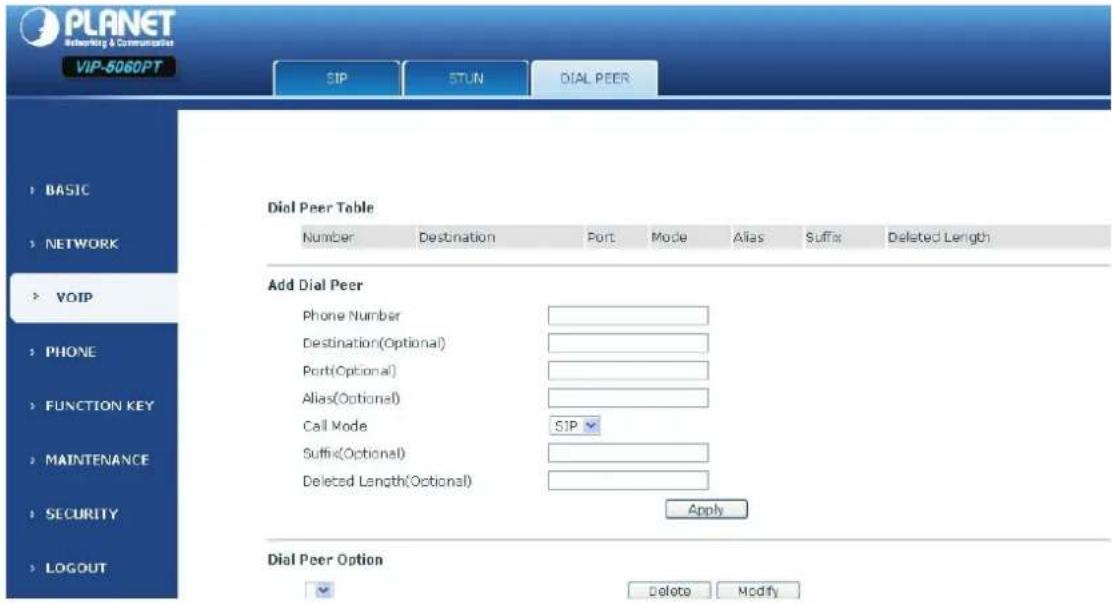
| DIAL PEER | |
| Field name Explanation | |
| Phone number | There are two types of matching conditions: one is full matching, the other is prefix matching. In the Full matching, User need input User desired phone number in this blank, and then User need dial the phone number to realize calling to what the phone number is mapped. In the prefix matching, User need input Userdesired prefix number and T; then dial the prefix and a phone number to realize calling to what User prefix number is mapped. The prefix number supports at most 30 digits. |
| Destination | Set Destination address. This is optional config item. If User want to set peer to peer call, please input destination IP address or domain name. If User want to use this dial rule on SIP2 line, User need input 255.255.255.255 or 0.0.0.2 in it.SIP3 into 0.0.0.3 |
| Port Set the Signal port, | the default is 5060 for SIP. |
| Alias | Set alias. This is optional config item. If User don’t set Alias, it will show no alias. |

There are four types of aliases.
1) Add: xxx, it means that User need dial xxx in front of phone number, which will reduce dialing number length.
1) All: xxx, it means that xxx will replace some phone number.
2) Del: It means that phone will delete the number with length appointed.
3) Rep: It means that phone will replace the number with length and number appointed.
4) User can refer to the following examples of different alias application to know more how to use different aliases and this dial rule.
| Call Mode Select different signal protocol, SIP | |
| Suffix | Set suffix, this is optional config item. It will show no suffix if User don't set it. |
| Delete Length | Set delete length. This is optional config item. For example: if the delete length is 3, the phone will delete the first 3 digits then send out the rest digits. User can refer to examples of different alias application to know how to set delete length. |
Examples of different alias applications
| Set by web Explanation Example | ||
| Add Dial PeerPhone Number BTDestination(Optional) 255.255.255.255Port(Optional)Alias(Optional) delCall Mode SIPSuffix(Optional)Deleted Length(Optional) 1Apply | User need set phone number, Destination, Alias and Delete Length.Phone number is XXXT; Destination is 255.255.255.255 (0.0.0.2) and Alias is del.This means any phone No. that starts with User set phone number will be sent via SIP2 line after the first several digits of User dialed phone number are deleted according to delete length. | If User dials “93333”, the SIP2 server will receive “3333”. |
| Phone Number 2Destination(Optional)Port(Optional)Alias(Optional) all:33334444Call Mode SIPSuffix(Optional)Deleted Length(Optional) | This setting will realize speed dial function, after User dialing the numeric key “2”, the number after all will be sent out. | When User dial “2”, the SIP1 server will receive 33334444. |
| Phone Number BTDestination(Optional)Port(Optional)Alias(Optional) add:0755Call Mode SIPSuffix(Optional)Deleted Length(Optional) | The phone will automatically send out alias number adding User dialed number, if User dialed number starts with User set phone number. | When User dial “8309”, the SIP1 server will receive “07558309”. |
| Phone Number 010TDestination(Optional)Port(Optional)Alias(Optional) rep:0066Call Mode SIPSuffix(Optional)Deleted Length(Optional) 3 | User need set Phone Number, Alias and Delete Length.Phone number is XXXT and Alias is rep: xxxIf User dialed phone number starts with User set phone number, the first digits same as User set phone number will be replaced by the alias number specified and New phone number will be send out. | When User dial “0106228”, the SIP1 server will receive “86106228”. |
| Phone Number Destination(Optional) Port(Optional) Alias(Optional) Call Mode Suffix(Optional) Deleted Length(Optional) | 147 rep:0086 SIP 0011 | If User dialed phone number starts with User set phone number. The phone will send out User dialed phone number adding suffix number. | When User dial “147”, the SIP1 server will receive “1470011”. |
8.3.4 PHONE
8.3.4.1 AUDIO
On this page, User can configure voice codec, input/output volume and so on.
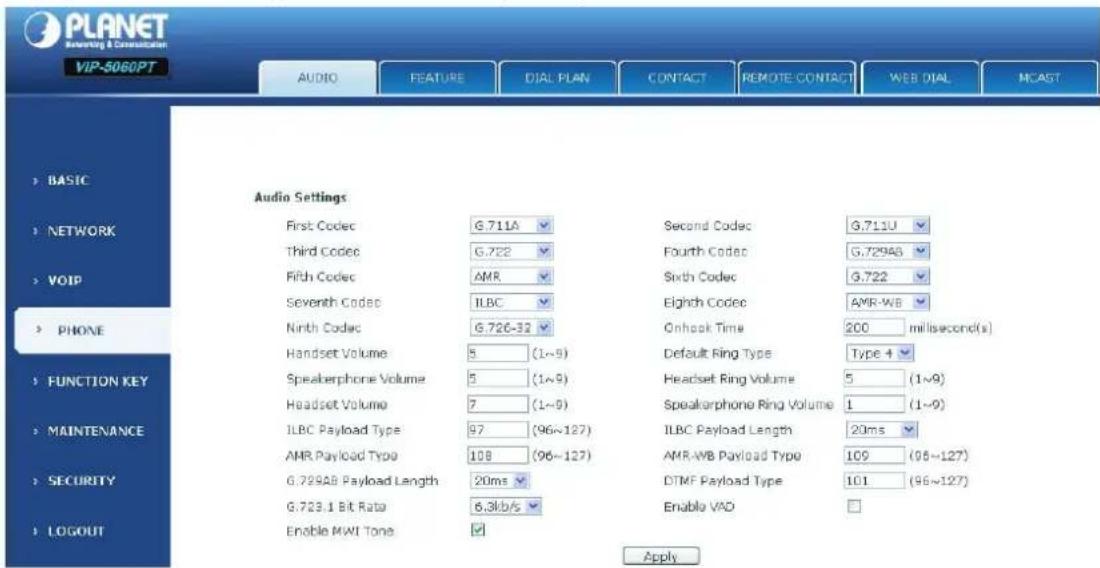
| AUDIO Configuration | |
| Field name Explanation | |
| First Codec | The first preferential DSP codec: G.711A/u, G.722, G.723.1,726-32 G.729AB,None. |
| Second Codec | The second preferential DSP codec: G.711A/u, G.722, G.723.1,726-32 G.729AB,None. |
| Third Codec | The third preferential DSP codec: G.711A/u, G.722, G.723.1,726-32 G.729AB,None. |
| Fourth Codec | The forth preferential DSP codec: G.711A/u, G.722, G.723.1, 726-32 G.729AB, None. |
| Fifth Codec | The fifth preferential DSP codec: G.711A/u, G.722, G.723.1, 726-32 G.729AB, None. |
| Sixth codec | The sixth preferential DSP codec: G.711A/u, G.722, G.723.1, 726-32 G.729AB, None. |
| Handset Input Volume | Specify Input (MIC) Volume grade. |
| G729AB Payload Length | Set G729 Payload Length. |
| Onhook Time | Specify the least reflection time of Hand down, the default is 200ms. |
| Default Ring Type Select | Ring Type. |
| Handset Output Volume | Specify Output (receiver) Volume grade. |
| Speakerphone volume | Specify Speakerphone Volume grade. |
| Ring Volume Specify Ring Volume grade. | |
| G722 Timestamps 160/20ms or 320/20ms is available. | |
| G723.1 Bit Rate 5.3 kb/s or 6.3 kb/s is available. | |
| Tone Standard Select Tone Standard. | |
| Enable VAD | Select it or not to enable or disable VAD. If enable VAD, G729 Payload length could not be set over 20ms. |
| DTMF Payload Type Set | DTMF Payload Type. |
8.3.4.2 FEATURE
In this web page, User can configure Hotline, Call Transfer, Call Waiting, 3 Ways Call, Black List, white list Limit List and so on.
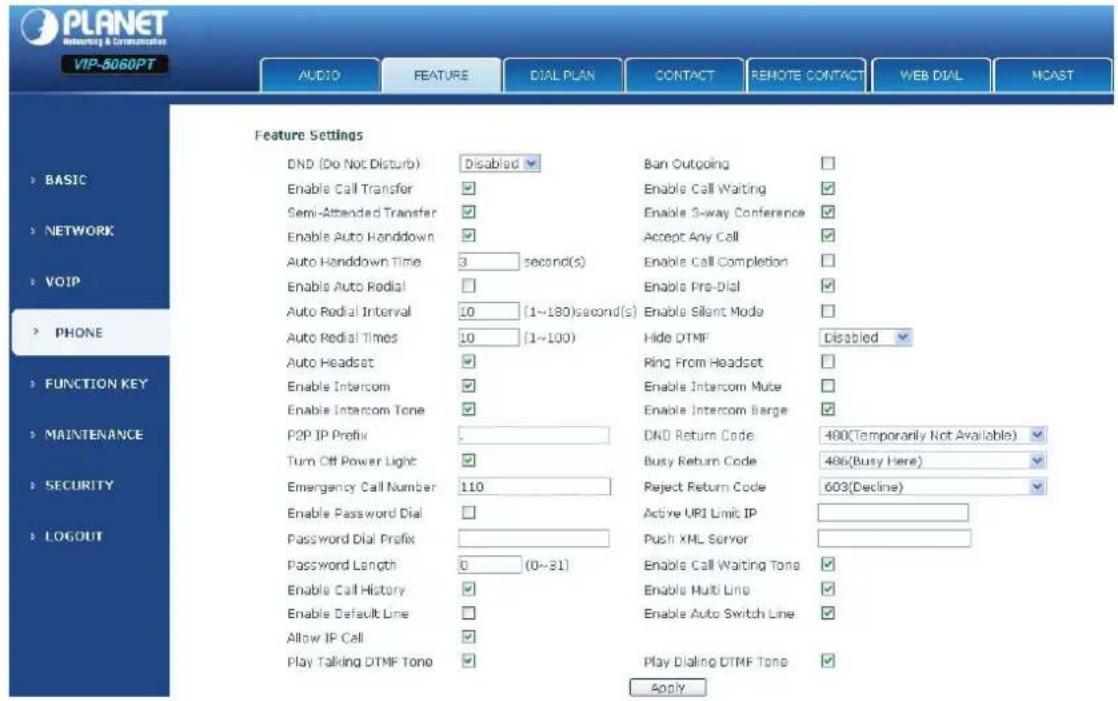
Action URL Settings
| Setup Completed | |
| Registration Success | |
| Registration Disabled | |
| Registration Failed | |
| Off Hook | |
| On Hook | |
| Incoming Call | |
| Outgoing Call | |
| Call Established | |
| Call Terminated | |
| DND Enabled | |
| DND Disabled | |
| Always Forward Enabled | |
| Always Forward Disabled | |
| Busy Forward Enabled | |
| Busy Forward Disabled | |
| No Ans. Forward Enabled | |
| No Ans. Forward Disabled | |
| Transfer Call | |
| Blind Transfer Call | |
| Attended Transfer Call | |
| Hold | |
| Resume | |
| Mute | |
| Unmute | |
| Missed Call | |
| P Changed | |
| Idle To Busy | |
| Busy To Idle |
Block Out Settings
| Block Out | ||
| Add | Delete | |
FEATURE
| Field name Explanation | ||
| Do Not Disturb | Select DND, the phone will reject any incoming call, the callers will be reminded by busy, but any outgoing call from the phone will work well. | |
| Ban Outgoing | If User select Ban Outgoing to enable it, and User cannot dial out any number. | |
| Enable Call Transfer | Enable Call Transfer by selecting it. | |
| Semi-Attended Transfer | Enable Semi-Attended Transfer by selecting it. | |
| Enable Auto Redial | Enable Auto Redial by selecting it, then the phone reminds whether redial, when the caller is busy or rejects. | |
| Auto Redial interval | Specify the Auto Redial interval. | |
| Auto Redial Times | Specify the Auto Redial interval. | |
| Auto Headset | Open this function, if there is a headphones in VIP-5060PT, User can press “answer” key or line key to answer a call with the headset | |
| Enable Call Completion | Enable Call Completion by selecting it. | |
| Enable Pre-Dial | Enable Pre-Dial | |
| Enable Call Waiting | Enable Call Waiting by selecting it. Then the phone reminds whether redial, when the caller is busy or rejects. if it's ok and the phone finds out that the caller is idle by sip message, it will reminds whether redial. | |
| Enable Call Waiting Tone | Turn off this feature, User will not hear issued a " beep" sound with more calls. | |
| Enable 3-way Conference | Enable 3-way conference by selecting it. | |
| Accept Any Call | If select it, the phone will accept the call even if the called number is not belong to the phone. | |
| Enable Auto Hand down | The phone will hang up and return to the idle automatically at hands-free mode. | |
| Auto Hand down Time | Specify Auto Hand down Time, the phone will hang up and return to the idle automatically after Auto Hand down Time at hands-free mode, and play dial tone Auto Hand down Time at handset mode. | |
| Ring From Headset | Enable Ring From Handset by selecting it, the phone plays ring tone from handset. | |
| Enable Intercom | Enable Intercom Mode by selecting it. | |
| Enable Intercom Mute | Enable mute mode during the intercom call. | |
| Enable Intercom Tone | If the incoming call is intercom call, the phone plays the intercom tone. | |
| Enable Intercom Barge | Enable Intercom Barge by selecting it, the phone auto answers the intercom call during a call. If the current call is intercom call, the phone will reject the second intercom call. | |
| Enable Silent Mode | Enable Silent Mode by selecting it, the phone light will red blink to remind that there is a missed call instead of playing ring tone. | |
| Turn Off Power Light | Enable Turn Off Power Light by selecting it. | |
| Emergency Call Number | Specify the Emergency Call Number. Despite the keyboard is locked, User can dial the emergency call number. | |
| Enable Password Dial | Enable Password Dial by selecting it, When number entered is beginning with the password prefix, the following N numbers | |
| After the password prefix will be hidden as *, N stand for the value which User enter in the Password Length field. For example: User set the password prefix is 3, enter the Password Length is 2, then User enter the number 34567, it will display 3**67 on the phone. | ||
| Password Dial Prefix | Specify the prefix of the password call number. | |
| Password Length | Specify the Password length. | |
| DND Return Code | Specify DND Return code. | |
| Busy Return Code | Specify Busy Return Code. | |
| Reject Return Code | Specify Reject Return Code. | |
| Hide DTMF Specify the hide DTMF mode. | ||
| Push XML Server | Specify the Push XML Server, when phone receives request, it will determine whether to display corresponding content on the phone which sent by the specified server or not. | |
| P2P IP Prefix | Set Prefix in peer to peer IP call. For example: what User want to dial is 192.168.1.119, If User define P2P IP Prefix as 192.168.1., User dial only #119 to reach 192.168.1.119. Default is “.”. If there is no “.” Set, it means to disable dialing IP. | |
| Active URI Limit IP | Specify the server IP that remote control phone for corresponding operation. | |
| Action URL Settings | ||
| Action URL Settings | Specify the Action URL that Record the operation of phone; send this corresponding information to server, url: http://InternalServer/FileName.xml? (Internal Server is server IP. Filename is name of xml that contains the action message). | |
| Block Out Settings | ||
| Block out | Set Add/Delete Limit List. Please input the prefix of those phone numbers which User forbid the phone to dial out. For example, if User want to forbid those phones of 001 as prefix to be dialed out, User need input 001 in the blank of limit list, and then User cannot dial out any phone number whose prefix is 001.X and are wildcard x means matching any single digit. For example, 4xxx expresses any number with prefix 4 which length is 4 will be forbidden to dialed out means matching any arbitrary number digit. For example, 6 expresses any number with prefix 6 will be forbidden to dialed out. | |
 | Black List and Limit List can record at most 10 items respectively. | |
8.3.4.3 DIAL PLAN
This system supports 4 dial modes:
1) End with “#”: dial User desired number, and then press #.
2) Fixed Length: the phone will intersect the number according to User specified length.
3) Time Out: After User stop dialing and waiting time out, system will send the number collected.
4) User defined: User can customize digital map rules to make dialing more flexible. It is realized by defining the prefix of phone number and number length of dialing.
In order to keep some users' secondary dialing manner when dialing the external line with PBX, phone can be added a special rule to realize it. So user can dial a number as external line prefix and get the secondary dial tone to keep dial the external number. After finishing dialing, phone will send the prefix and external number totally to the server.
For example, there is a rule 9, xxxxxxxx in the digital map table. After dialing 9, phone will send the secondary dial tone, user may keep going dialing. After finished, phone will call the number which starts with 9; actually the number sent out is 9-digit with 9.
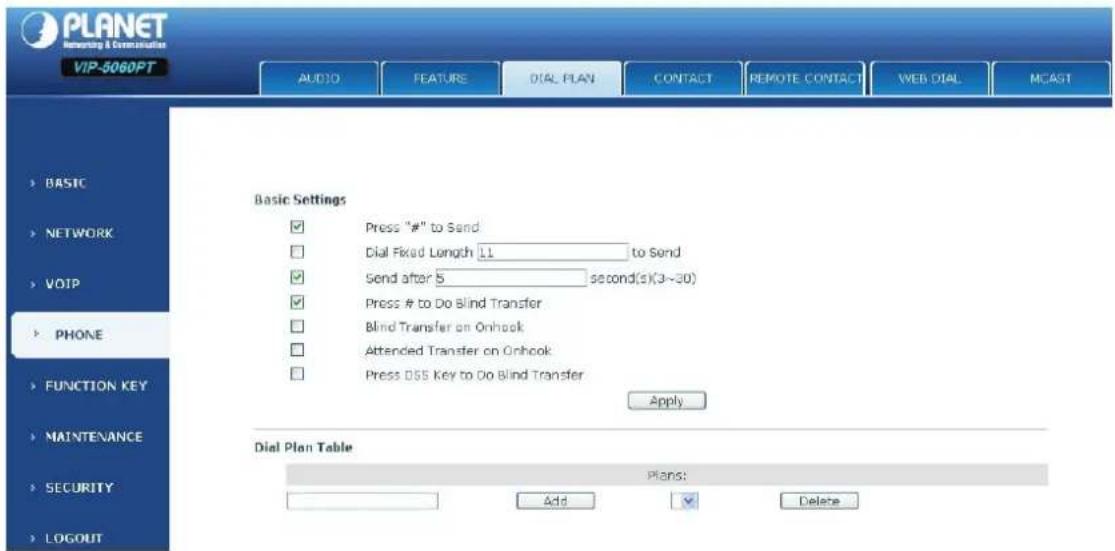
DIAL PLAN Configuration
Field name Explanation
Basic Setting
Press "#" to Send Set Enable/Disable the phone ended with "#" dial.
Dial Fixed Length Specify the Fixed Length of phone ending with.
| Send after (3-30) seconds | Set the timeout of the last dial digit. The call will be sent after timeout. |
| Press # to Do Blind Transfer | Enable Blind Transfer On Hook, when executing Blind Transfer End with #, press # after inputting the number that User want to transfer, the phone will transfer the current call to the third party. |
| Blind Transfer on OnHook | Enable Blind Transfer on On Hook, when executing Blind Transfer, hang up after inputting the number that User want to transfer, the phone will transfer the current call to the third party. |
| Attend Transfer on OnHook | Enable Attend Transfer on On Hook, when executing Attended Transfer, hang up after the third party answers, the phone will transfer the current call to the third party. |
Dial Plan Table

Below is user-defined digital map rule:
[ ] Specifies a range that will match digit. May be a range, a list of ranges separated by commas, or a list of digits.
* Match any single digit that is dialed.
. Match any arbitrary number of digits including none.
Tn Indicates an additional time out period before digits are sent of n seconds in length. n is mandatory and can have a value of 0 to 9 seconds. Tn must be the last 2 characters of a dial plan. If Tn is not specified it is assumed to be T0 by default on all dial plans.
| Plans: |
| "[1-8]xxx" |
| "9xxxxxxxxx" |
| "911" |
| "99T4" |
| "9911x.T4" |
Cause extensions 1000-8999 to be dialed immediately.
Cause 8 digit numbers started with 9 to be dialed immediately.
Cause 911 to be dialed immediately after it is entered.
Cause 99 to be dialed after 4 seconds.
Cause any number started with 9911 to be dialed 4 seconds after dialing ceases.

Note
End with “#”, Fixed Length, Time out and Digital Map Table can be used simultaneously. System will stop dialing and send number according to User set rules.
8.3.4.4 CONTACT
User can input the name, phone number and select ring type for each name here.
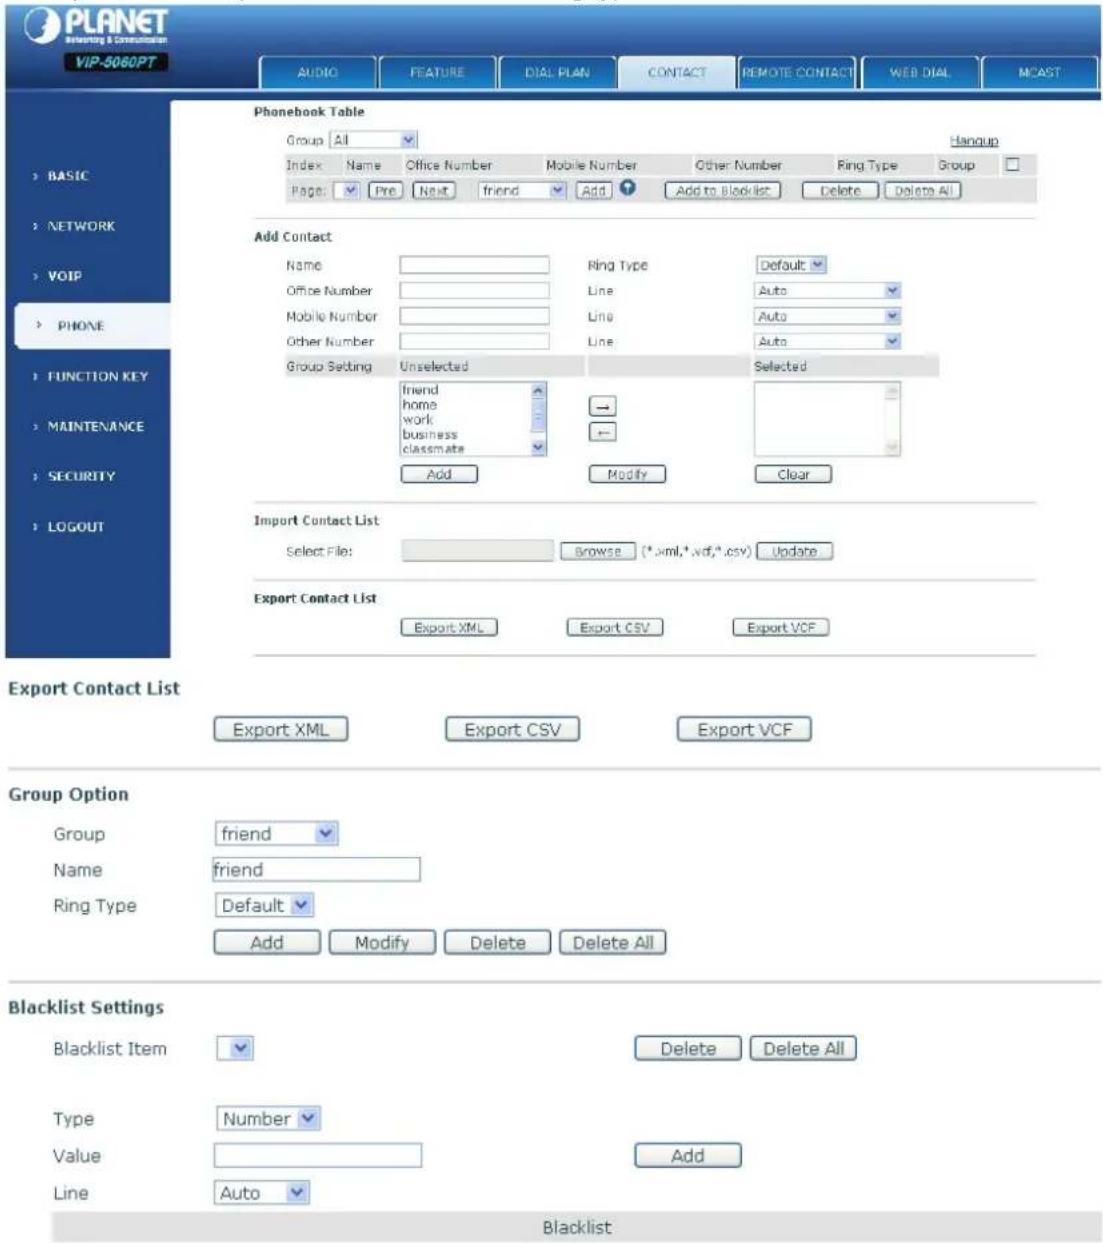
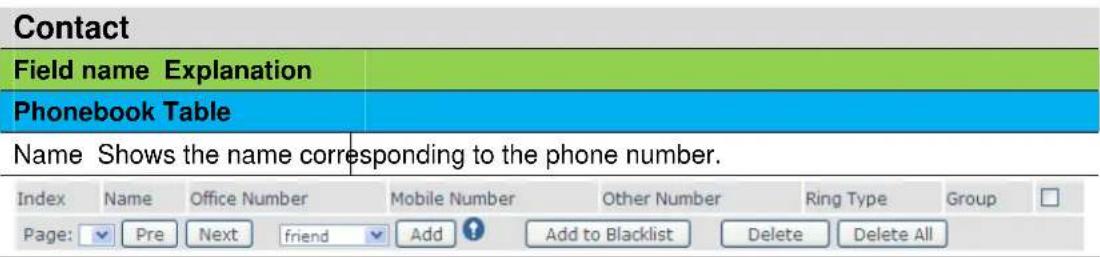
| Send after (3-30) seconds | Set the timeout of the last dial digit. The call will be sent after timeout. |
| Press # to Do Blind Transfer | Enable Blind Transfer On Hook, when executing Blind Transfer End with #, press # after inputting the number that User want to transfer, the phone will transfer the current call to the third party. |
| Blind Transfer on OnHook | Enable Blind Transfer on On Hook, when executing Blind Transfer, hang up after inputting the number that User want to transfer, the phone will transfer the current call to the third party. |
| Attend Transfer on OnHook | Enable Attend Transfer on On Hook, when executing Attended Transfer, hang up after the third party answers, the phone will transfer the current call to the third party. |
Dial Plan Table

Below is user-defined digital map rule:
[ ] Specifies a range that will match digit. May be a range, a list of ranges separated by commas, or a list of digits.
* Match any single digit that is dialed.
. Match any arbitrary number of digits including none.
Tn Indicates an additional time out period before digits are sent of n seconds in length. n is mandatory and can have a value of 0 to 9 seconds. Tn must be the last 2 characters of a dial plan. If Tn is not specified it is assumed to be T0 by default on all dial plans.
| Plans: |
| "[1-8]xxx" |
| "9xxxxxxxxx" |
| "911" |
| "99T4" |
| "9911x.T4" |
Cause extensions 1000-8999 to be dialed immediately.
Cause 8 digit numbers started with 9 to be dialed immediately.
Cause 911 to be dialed immediately after it is entered.
Cause 99 to be dialed after 4 seconds.
Cause any number started with 9911 to be dialed 4 seconds after dialing ceases.

Note
End with “#”, Fixed Length, Time out and Digital Map Table can be used simultaneously. System will stop dialing and send number according to User set rules.

Note
The add button for adding a new blacklist, the delete button for deleting one item, the delete all button for deleting all items.
If user does not want to answer some phone calls, add these phone numbers to the Black List, and these calls will be rejected x and are wildcard x means matching any single digit. For example, 4xxx expresses any number with prefix 4 which length is 4 will be forbidden to be responded.
DOT (.) means matching any arbitrary number digit. For example, 6. Expresses any number with prefix 6 will be forbidden to be responded.
If user wants to allow a number or a series of number incoming, he may add the number(s) to the list as the white list rule. The configuration rule is -number, for example, -123456, or -1234xx.
Blacklist
-4119
Means any incoming number is forbidden except for 4119
Note: End with DOT (.) when set up the white list.
8.3.4.5 REMOTE CONTACT
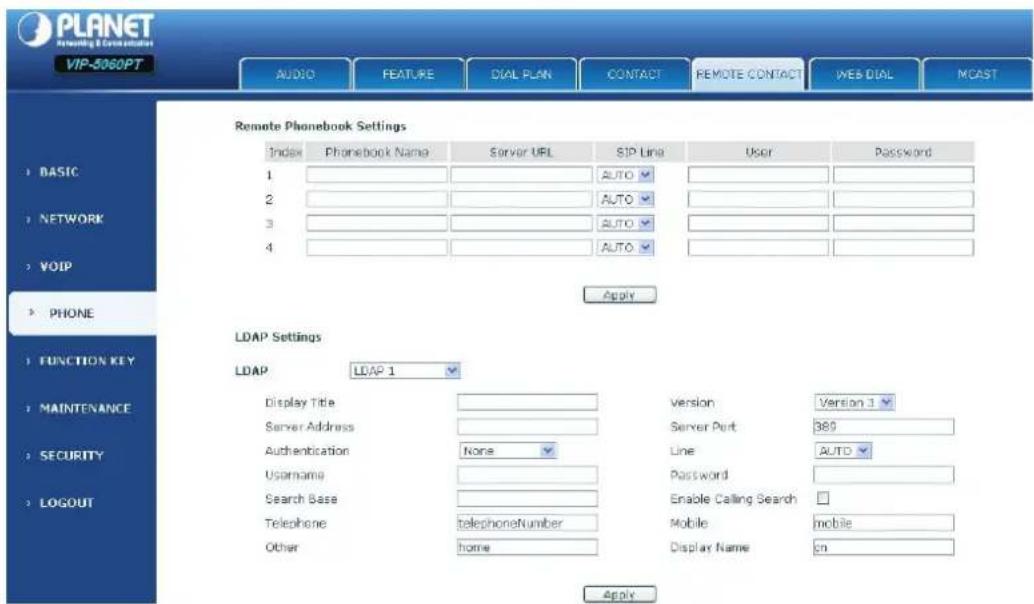
User needs to match a XML Phonebook address and User can directly access to the corresponding remote phonebook on the phone.
For example: Set the Phonebook Name as Planet, Server URL is
tftp://192.168.1.3/admin/phonebook/index.xml.
Or Set the Phonebook Name as Idap, Server URL is Idap://192.168.1.3/dc=winline,dc=com.
| Remote Phonebook Setting | |
| Phonebook Name Custom the phonebook name displayed on the phone. | |
| Server URL Specify the server url of the remote phonebook. | |
| SIP Line Specify the sip line for the remote phonebook. | |
| Authentication Specify the authentication mode for remote phonebook. | |
| User/password Input the authentication username and password. |
8.3.4.6 WEB DIAL
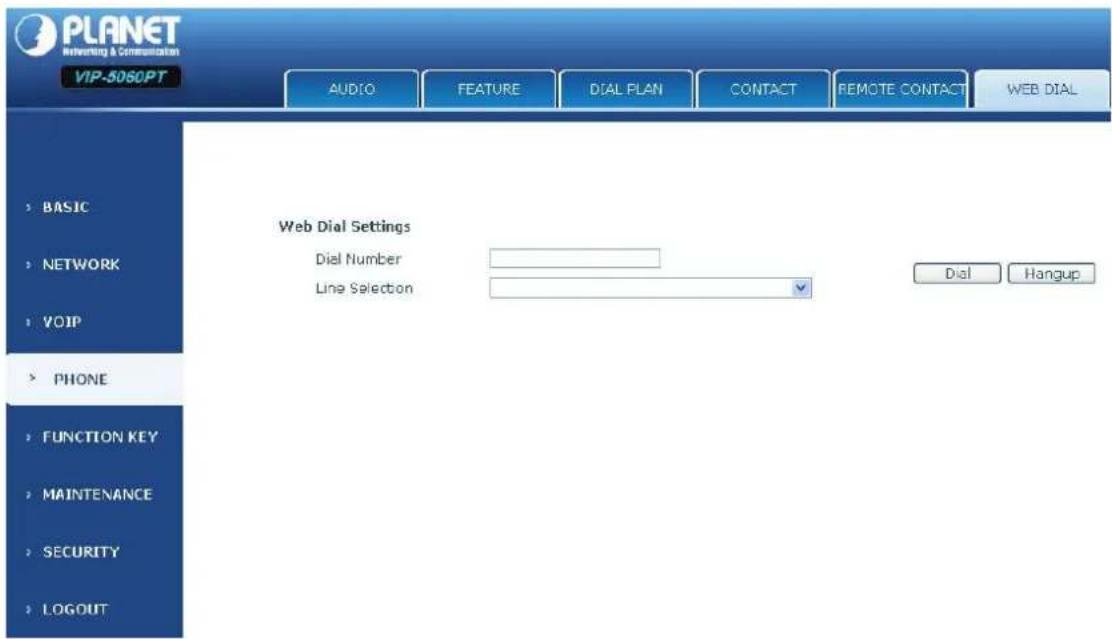
User can make a call through the WEB DIAL, enter the Dial Number then press Dial, if User wants to finish the talk, press Hang-up.
8.3.4.7 MCAST Setting
Use the multicast function to send notice to every member of the multicast is simple and easy. By setting the multicast key on your phone, you can send multicast RTP flow to the pre-configured multicast address. By listening multicast address is configured on the phone, listen and play the multicast address to send the RTP stream.
Send multicast setting
On the phone web page, function key-function key, set a function key, as shown
DSS Key 8
Multicast

239.1.1.1:1366
AUTO

G.711A


Value format IP: Port, the IP address of multicast is range from 224.0.0.0 to 239.255.255.255.port is
greater than 1024
If multicast codec is G722, the LCD screen will displays "HD", which means the phone is sending high-definition voice stream
Operate steps:
- When the phone is idle, press multicast key
Multicast RTP stream is send to pre-configured multicast address (IP: Port). The phone which listens to multicast address in the local network can receive the RTP stream. Multicast function key LED lights yellow.
LCD screen displays the following:
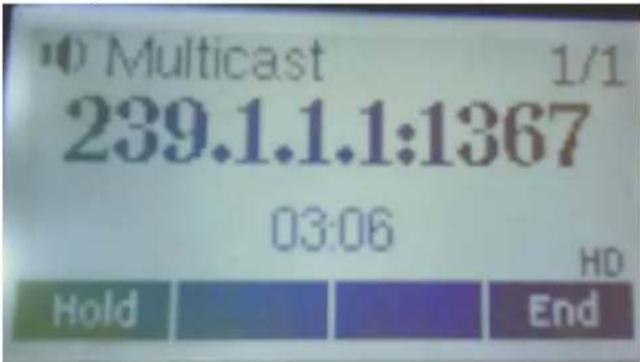
- Press the hold softkey to hold the current multicast session
- Press the end softkey again or multicast function key, multicast session can be stopped
Notice: RTP stream is one side that is from a sender to a receiver. When the phone initiates a multicast RTP session in a call, the current call is on hold.
Receive multicast setting
You can set up the phone monitoring 10 different multicast addresses to receive these multicast RTP stream.
You have two methods to receive RTP stream of multicast that can be set up through the web page:
Enable priorities of normal calls and Enable page Priority:
Enable priorities of normal call by select it, if the incoming RTP stream priority of multicast lower than the priority of current for normal calls, the phone will ignore the RTP stream of multicast. If the incoming RTP stream priority of multicast higher than the priority of current for normal calls, the phone will receive the RTP stream of multicast, and hold the current call.
Disabled priorities of normal call by select disable, the phone will ignore all local networks RTP stream of multicast.
Options as follows:
1-10: the priority defined for normal calls, 1 the highest level, 10 the lowest level
Disabled: Ignore all RTP stream of multicast
Enable Page Priority
Page priority determines the phone how to handle the newly received multicast RTP stream when in a multicast session. Enabled page priority, the phone will automatically ignore the low priority multicast RTP stream and receive the high priority multicast RTP stream and hold the current multicast session; If not
enabled, the phone will automatically ignore all incoming multicast RTP stream.
Web page is set as follows:
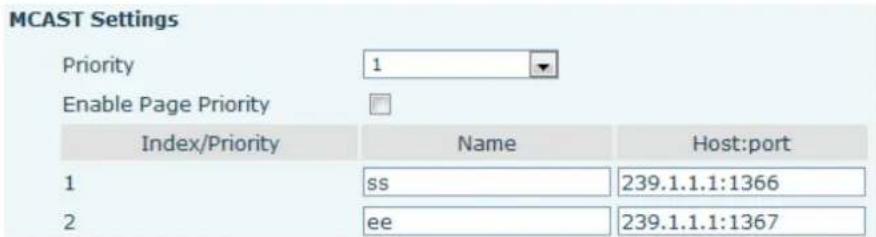
Now multicast "ss" has higher priority than multicast "ee", the highest priority is for normal calls. Notice: When a multicast session begins, multicast sender and receiver will beep
8.3.4.8 Tone
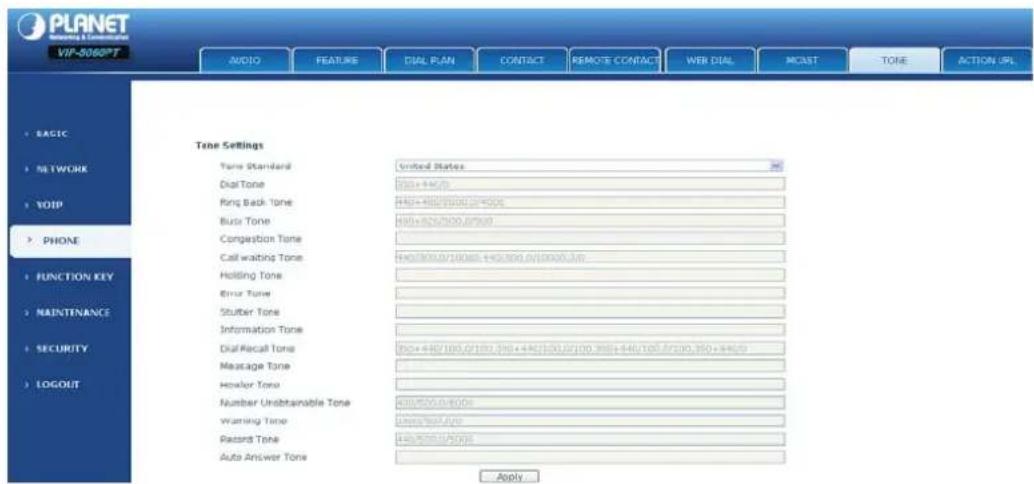
User can select the desired tone standard, also can customize the settings
8.3.4.9 Action URL
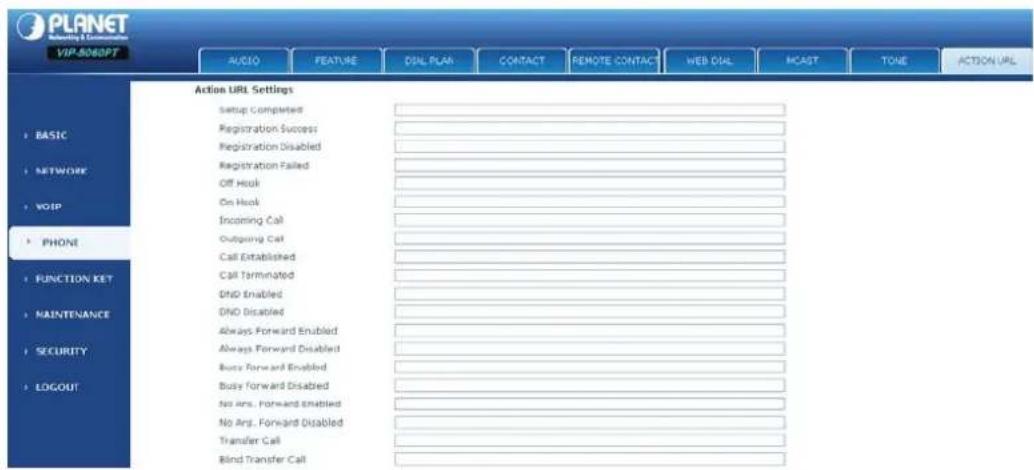
Specify the Action URL that Record the operation of phone, send these corresponding information to server, url:http://InternalServer /FileName.xml?(Internal Server is server ip, FileName is name of xml that contains the action message)
8.3.5 FUNCTION KEY
8.3.5.1 FUNCTION KEY
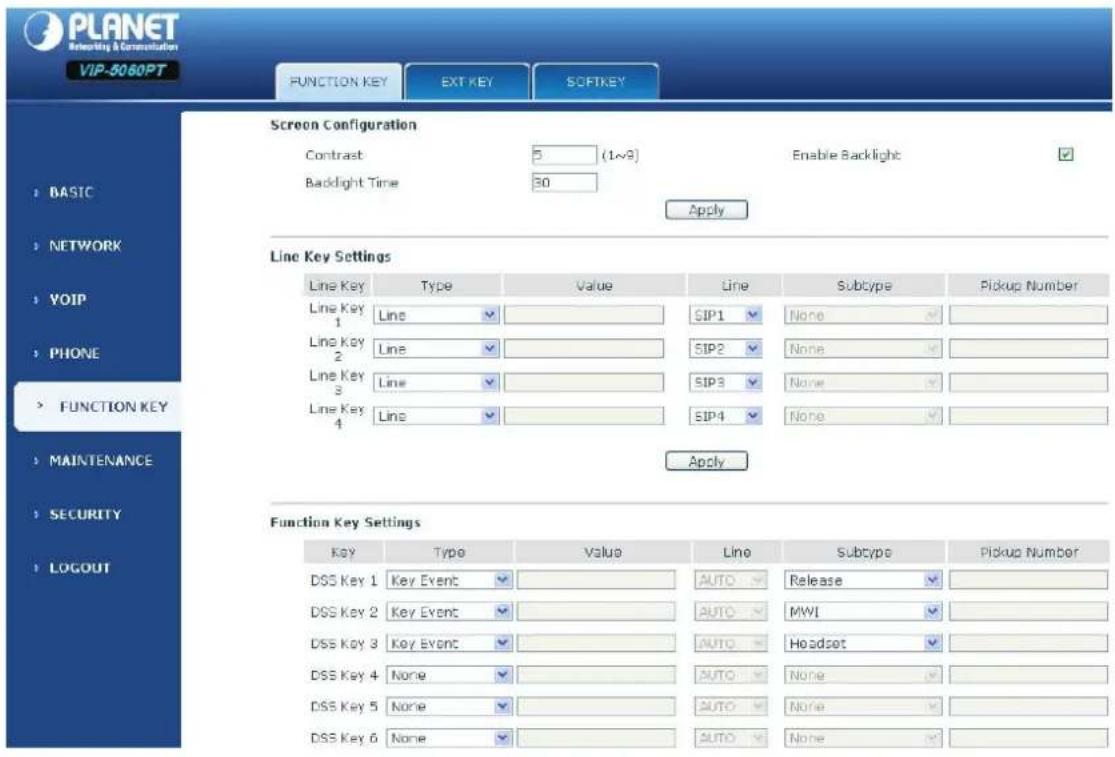
Function Key
Field name Explanation
Contrast Set contrast of screen.
Enable Backlight Set enable/disable backlight.
Line Key Settings
Line: select Auto, SIP1 - SIP6 in function key type. After User set it, User pick up handset or hands-free, press this function key, and then User can use the corresponding SIP line.
Function Key Settings
| key Show the function key's serial number. | |
| Type | Memory Key: settings can be stored in key storage for each number, the standby or off-hook, select the function keys on the keyboard can call this number.Line, set the dial mode (Auto, SIP1 to SIP6).Key Event functions, monitor state.DTMF: In the call, send DTMF.URL: User can input remote book url. |
| Value Set the type parameter values. | |
| Line Choose which lines to use this feature. | |
| Subtype Select the function parameters Key Event and Memory Event. | |
| Pickup Number | Please input the pickup number When SubType is BLF or presence. |
NOTICE :
● Memory keys can be configured through the following:
Speed Dial function, through the configuration of the key corresponding to the number of ways as shown below.
| Key | Type | Value | Line | Subtype | Pickup Number |
| DSS Key 1 | Memory Key | 4111 | SIP1 | Speed Dial |
User can press the F1 key to allocate this number by line1 line.
Intercom function, User can press this key in standby to automatically answer the call and make each other.
Function Key Settings
| Key | Type | Value | Line | Subtype | Pickup Number |
| DSS Key 1 | Memory Key | 4111 | SIP1 | Intercom |
User can be configured in accordance with push to talk function the way: 4116 was the other number; Then press the standby button and make it automatically answer the call 4116.
● key can be configured through the following events:
For example:
| Key | Type | Value | Line | Subtype | Pickup Number |
| DSS Key 1 | Key Event | SIP1 | DND |
8.3.5.2 EXIT KEY
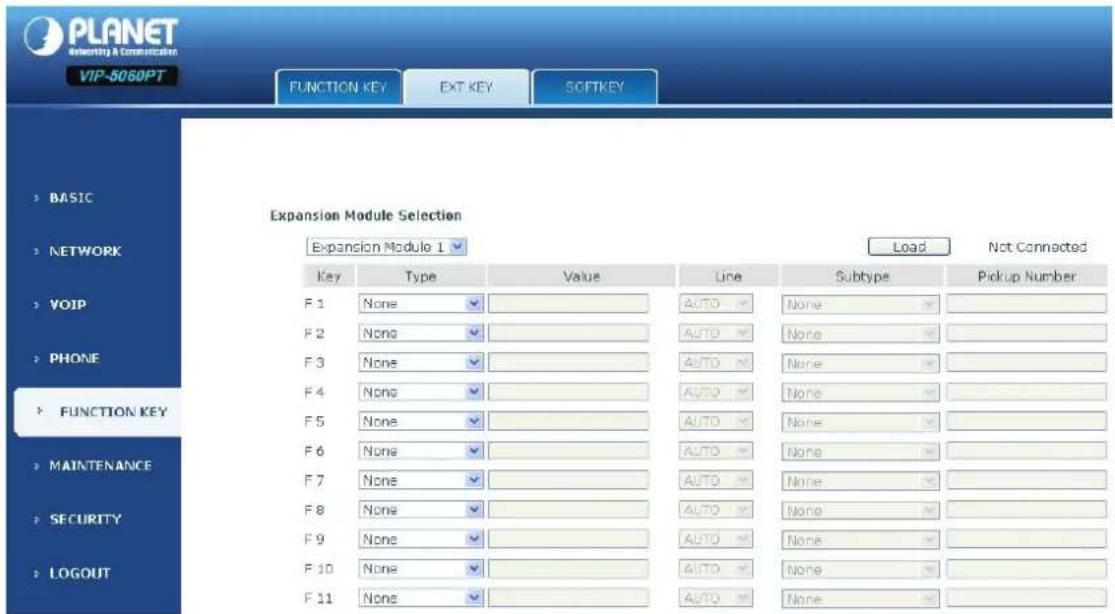
EXT KEY has the same usage with the Function key. "In" port connects the phone, "Out" port connects the next one, if there is only, User don't need for power supply, if there are more than one, User need supply 5V power for the first one, and use RJ-45 direct connector.
8.3.5.3 SOFTKEY
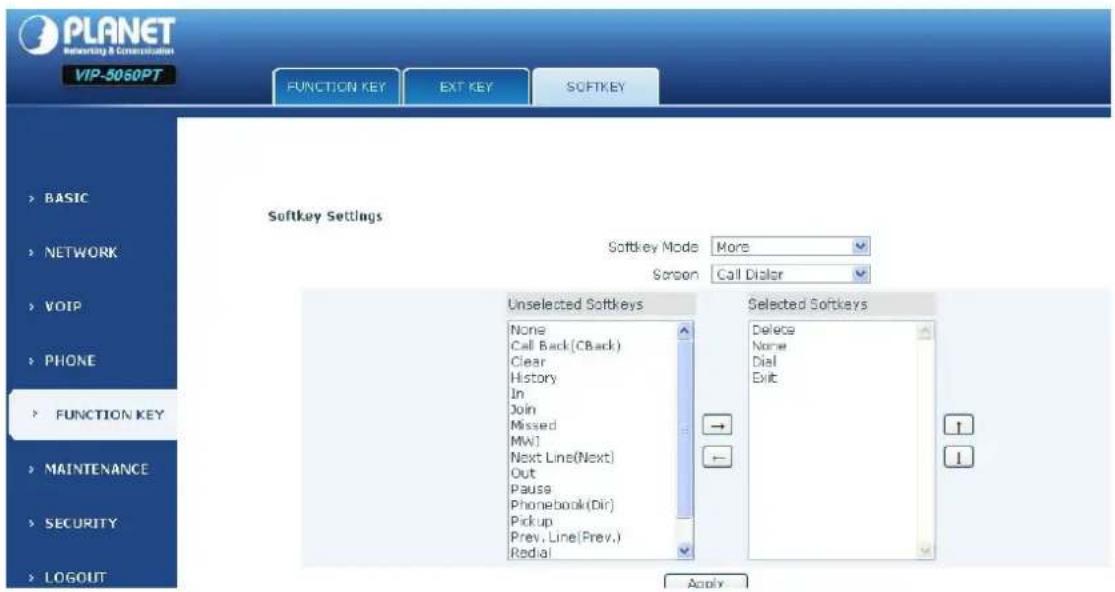
SOFTKEY
User can configure different functions in different screens for every softkey.
8.3.6 Maintenance
8.3.6.1 Auto Provision
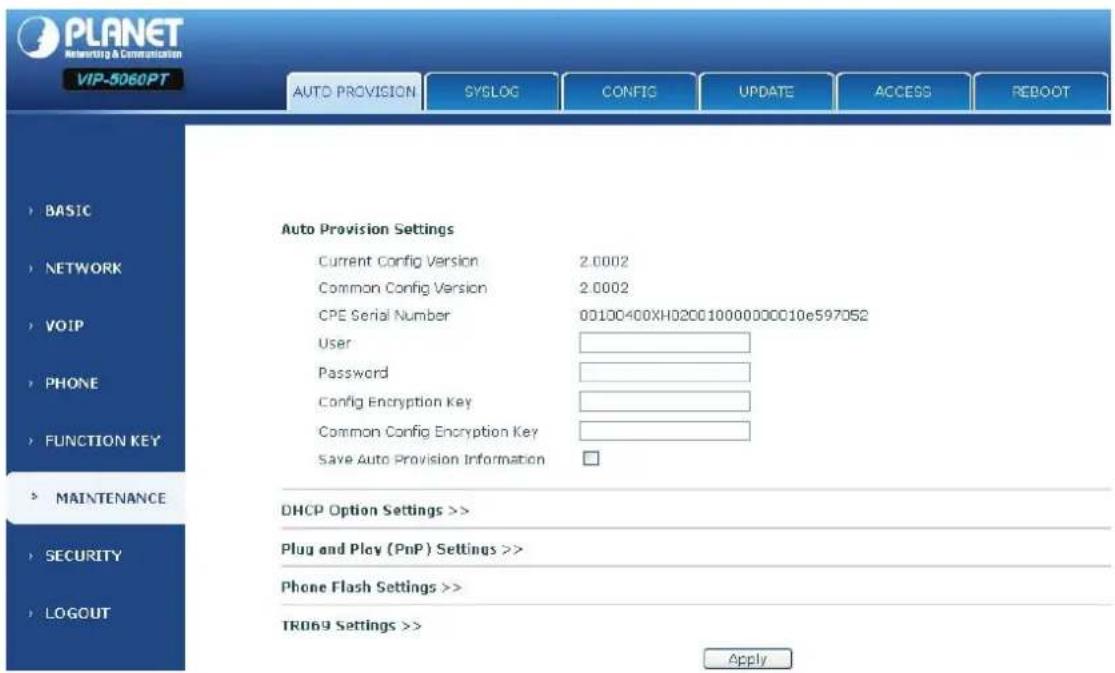
Plug and Play (PnP) Settings >>
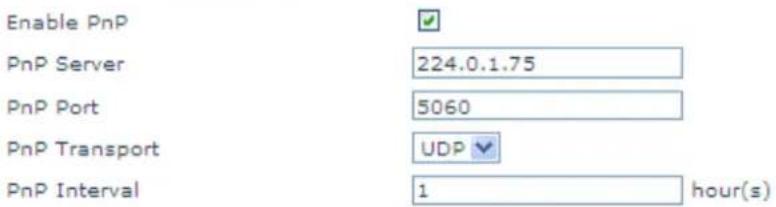
Phone Flash Settings >>
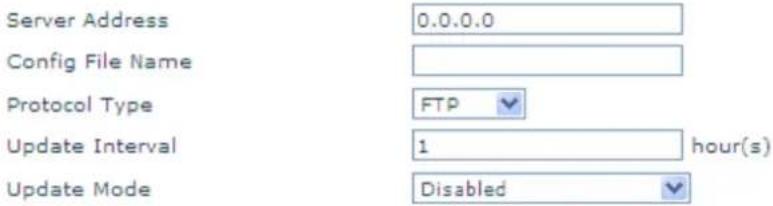
Planet endpoint supports PnP and DHCP and Phone Flash to obtain the parameters. The PnP and DHCP and Phone Flash are all deployed, endpoint will go by the following process to try to obtain the server address and other parameters, when it boots up:
DHCP option → PnP server → Phone Flash
Auto Provision
| Field name Explanation | |
| Auto Provision Setting | |
| Current Config Version | Show the current config file's version. If the version of the configuration downloaded is higher than the version of the running configurations, the auto provision would upgrade, or stop here. If the endpoints confirm the configuration by Digest method, the endpoints wouldn't upgrade configuration unless the configuration in the server is different with the running configuration. |
| Common Config Version | Show the common config file's version. If the configuration downloaded and the running configurations are the same, the auto provision would stop here. If the endpoints confirm the configuration by Digest method, the endpoints wouldn't upgrade configuration unless the configuration in the server is different with the running configuration. |
| CPE Serial Number Show CPE Serial Number. | |
| User | Specify FTP/HTTP/HTTPS server Username. System will use anonymous if username keep blank. |
| Password | Specify FTP/HTTP/HTTPS server Password. |
| Config Encrypt Key | Input the Encrypt Key, if the configuration file is encrypted. |
| Common Config Encrypt Key | Input the Common Encrypt Key, if the Common Configuration file is encrypted. |
| Save Autoprovision Information | Save the username and password authentication message of http/https/ftp and input ID message in the phone until the url in the server changes. |
| DHCP Option Setting | |
| DHCP Option Setting | Specify DHCP Option. DHCP option supports DHCP custom option and DHCP option 66 and DHCP option 43 to obtain the parameters. User could choose one method among them; the default is DHCP option disable. |
| Custom DHCP Option | A valid Custom DHCP Option is from 128 to 254. The Custom DHCP Option must be in accordance with the one defined in the DHCP server. |
| Plug and Play | |
| Enable PnP | Enable PnP by selecting it, than the phone will send SIP SUBSCRIBE messages to a multicast address when it boots up. Any SIP server understanding that message will reply with a SIP NOTIFY message containing the Auto Provisioning Server URL where the phones can request their configuration. |
| PnP Server Specify the PnP Server. | |
| PnP Port Specify the PnP Server. | |
| PnP Transport Specify the PnP Transfer protocol. | |
| PnP Interval Specify the | Interval time, unit is hour. |
| Phone Flash | |
| Server Address | Set FTP/TFTP/HTTP server IP address for auto update. The address can be IP address or Domain name with subdirectory. |
| Config File Name | Set configuration file's name which need to update. System will use MAC as config file name if config file name keep blank. For example, 000102030405. |
| Protocol Type Specify the | Protocol type FTP, TFTP or HTTP. |
| Update Interval Specify | update interval time, unit is hour. |
| Update Mode | Different update modes:1. Disable: means no update.2. Update after reboot: means update after reboot.3. Update at time interval: means periodic update. |
| TR069 Settings | |
| Enable TR069 Enable TR069 by selecting it. | |
| ACS Server Type Specify the ACS Server Type. | |
| ACS Server URL Specify the ACS Server URL. | |
| ACS User Specify ACS User. | |
| ACS Password Specify ACS Password. | |
| TR069 Auto Login Enable TR069 Auto Login by selecting it. | |
| "Inform" Sending Period Specify the "inform" Sending Period, unit is second. | |
8.3.6.2 SYSLOG
Syslog is a protocol which is used to record the log messages with client/server mechanism. Syslog server receives the messages from clients, and classifies them based on priority and type. Then these messages will be written into log by some rules which administrator can configure. This is a better way for log management.
8 levels in debug information:
Level 0---emergency: This is highest default debug info level. User system cannot work.
Level 1---alert: User system has deadly problem.
Level 2---critical: User system has serious problem.
Level 3---error: The error will affect User system working.
Level 4---warning: There are some potential dangers. But User system can work.
Level 5---notice: User system works well in special condition, but User need to check its working environment and parameter.
Level 6---info: the daily debugging info.
Level 7---debug: the lowest debug info Professional debugging info from R&D person.
At present, the lowest level of debug information is info; debug level only can be displayed on telnet.
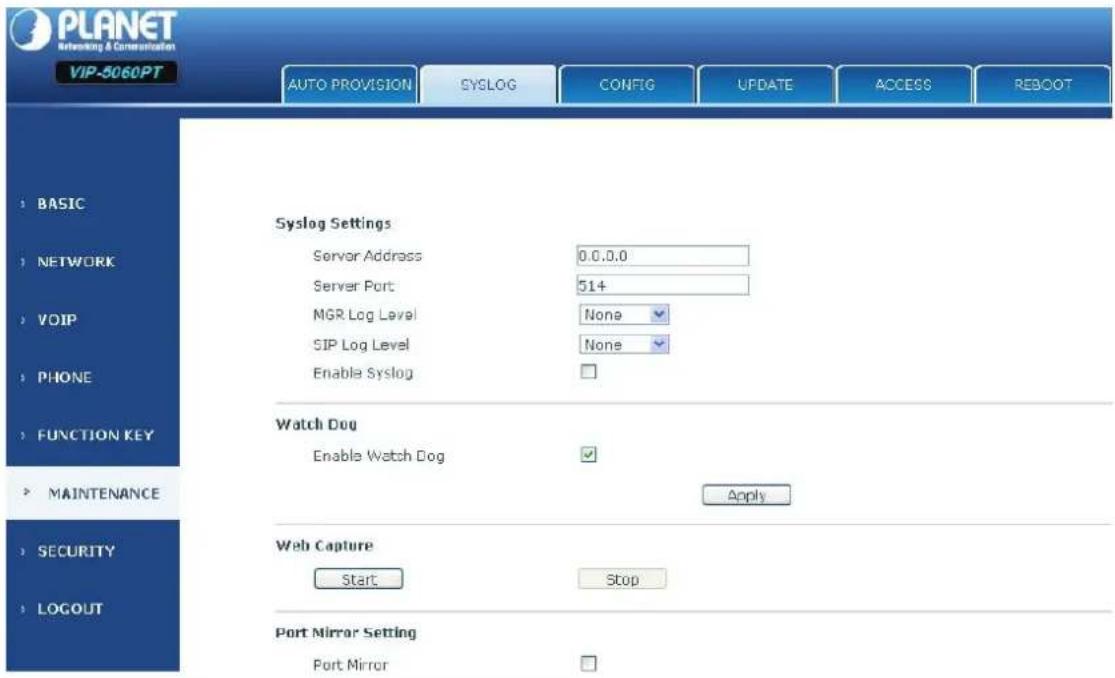
| Syslog Configuration | |
| Field name Explanation | |
| Syslog Setting | |
| Server Address Set Syslog server IP address. | |
| Server Port Set Syslog server port. | |
| MGR Log Level Set the level of MGR log. | |
| SIP Log Level Set the level of SIP log. | |
| Enable Syslog Select it or not to enable or disable syslog. | |
| Web Capture | |
| Start | Click the start button when User need capture the WAN packet stream of the phone, then open or save the file as the interface. |
| Stop Click the end button to stop capturing the packet stream. | |
8.3.6.3 CONFIG
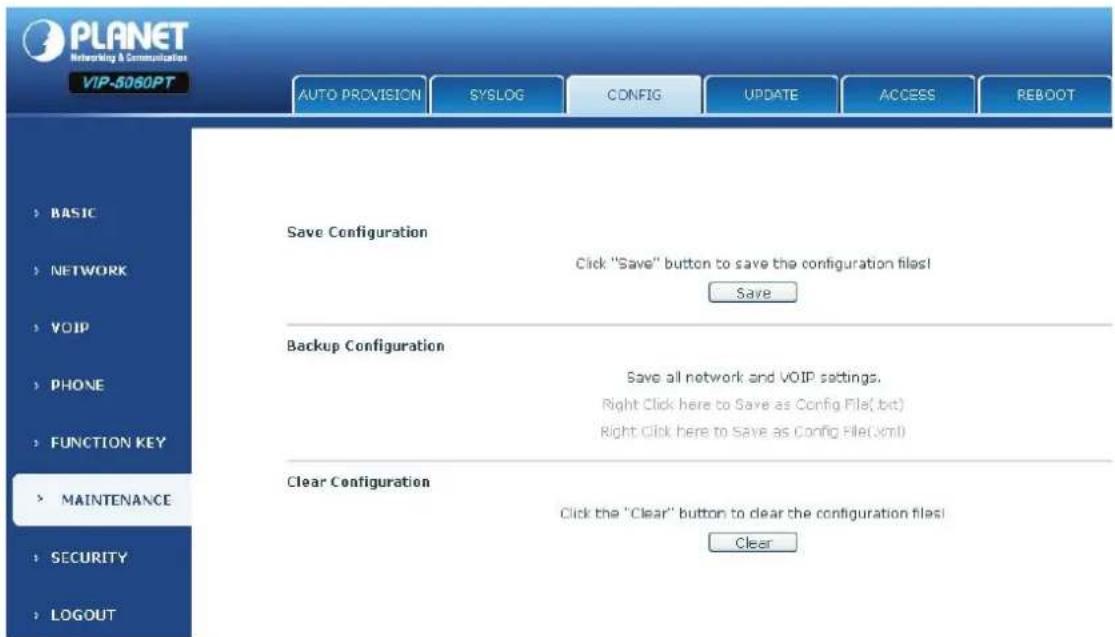
Config Setting
| Field name Explanation | |
| Save Configuration | User can save all changes of configurations. Click the Save button, all changes of configuration will be saved, and be effective immediately. |
| Backup Configuration | Right clicks on “Right click here...” and select “Save Target As config File(.txt)” then User will save the config file in .txt format, or select “Save Target As config File(.xml)” then User will save the config file in .xml format. |
| Clear Configuration | User can restore factory default configuration and reboot the phone.If User login as Admin, the phone will reset all configurations and restore factory default; if User login as Guest, the phone will reset all configurations except for VoIP accounts (SIP1-6) and version number. |
8.3.6.4 UPDATE
User can update User configuration with User config file in this web page.
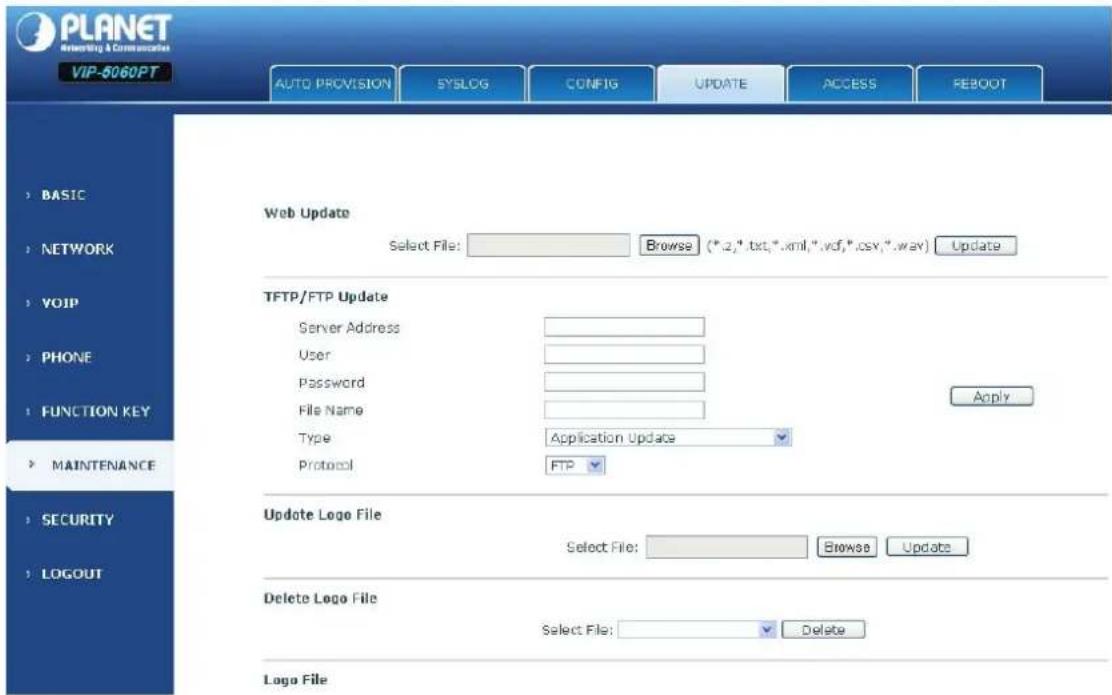
| Update | |
| Field name Explanation | |
| Web Update | |
| Web Update | Click the browse button, find out the config file saved before or provided by manufacturer, download it to the phone directly, press “Update” to save. User can also update downloaded update file, logo picture, ring, mmiset file by web. |
| TFTP/FTP Update | |
| Server Address | Set the FTP/TFTP server address for download/upload. The address can be IP address or Domain name with subdirectory. |
| User Set the FTP server Username for download/upload. | |
| Password Set the FTP server password for download/upload. | |
| File name | Set the name of update file or config file. The default name is the MAC of the phone, such as 000102030405. |
 | User can modify the exported config file. And User can also download config file which includes several modules that need to be imported. For example, User can download a config file just to keep with SIP module. After reboot, other modules of system still use the previous setting and are not lost |
Type Action type that system wants to execute:
| 1. Application update: download system to update file.2. Config file export: Upload the config file to FTP/TFTP server, name and save it.3. Config file import: Download the config file to phone from FTP/TFTP server. The configuration will be effective after the phone is reset.4. Phone book export (.vcf): Upload the phonebook file to FTP/TFTP server, name and save it.5. PhoneBook import (.vcf): Download the phonebook file to phone from FTP/TFTP server. | |
| Protocol | Select FTP/TFTP server. |
| Update Logo File | |
| Select File Specify the URL of the logo file. | |
| Delete Logo File | |
| Select File Select the logo that User wants to delete. | |
| Logo File | |
| Logo File Show the logo file. | |
8.3.6.5 ACCESS
User can add or delete user account, and change the authority of each user account in this web page.
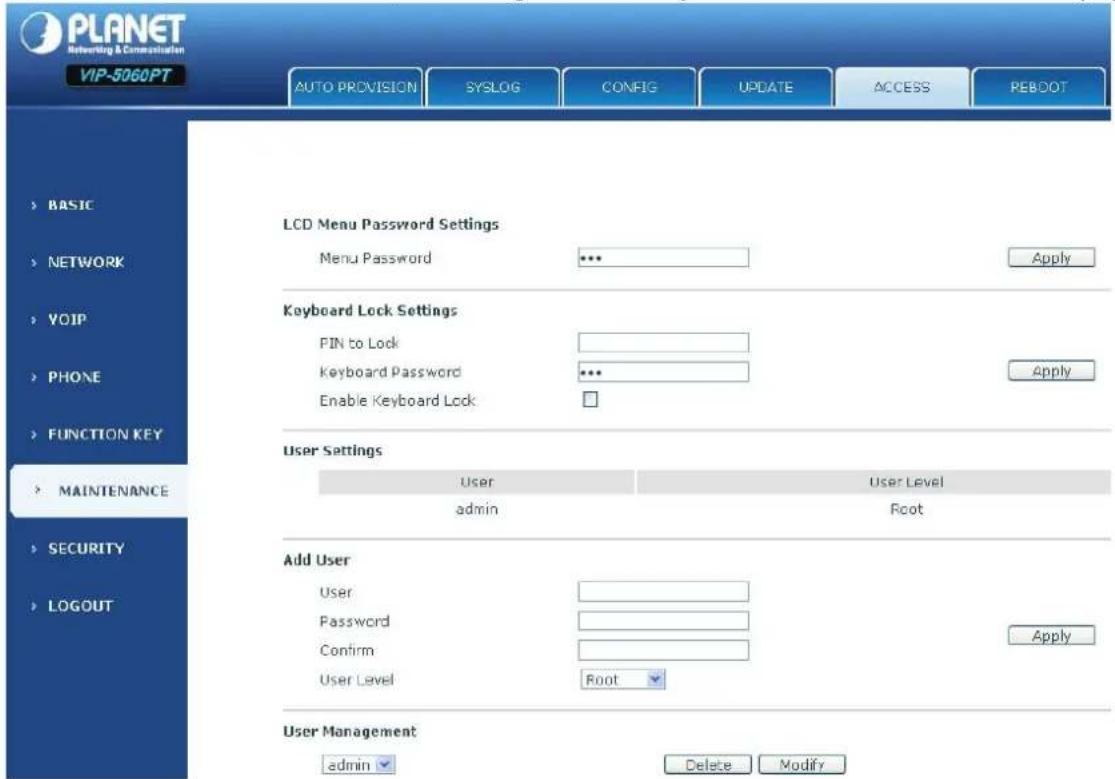
Access Configuration
| Field name Explanation | |
| Keyboard Password | Set the password for entering the setting menu of the phone by the phone's key board. The password is digit. |
User Settings
| User | User Level |
| admin | Root |
| root | General |
This table shows the current user existed.
| User Set account user name. | |
| User Level | Set user level, Root user has the right to modify configuration, General can only read. |
| Password Set the password. | |
| Confirm Confirm the password. | |
| Select the account and click the Modify to modify the selected account, and click the Delete to delete the selected account.General user only can add the user whose level is General. | |
8.3.6.6 REBOOT
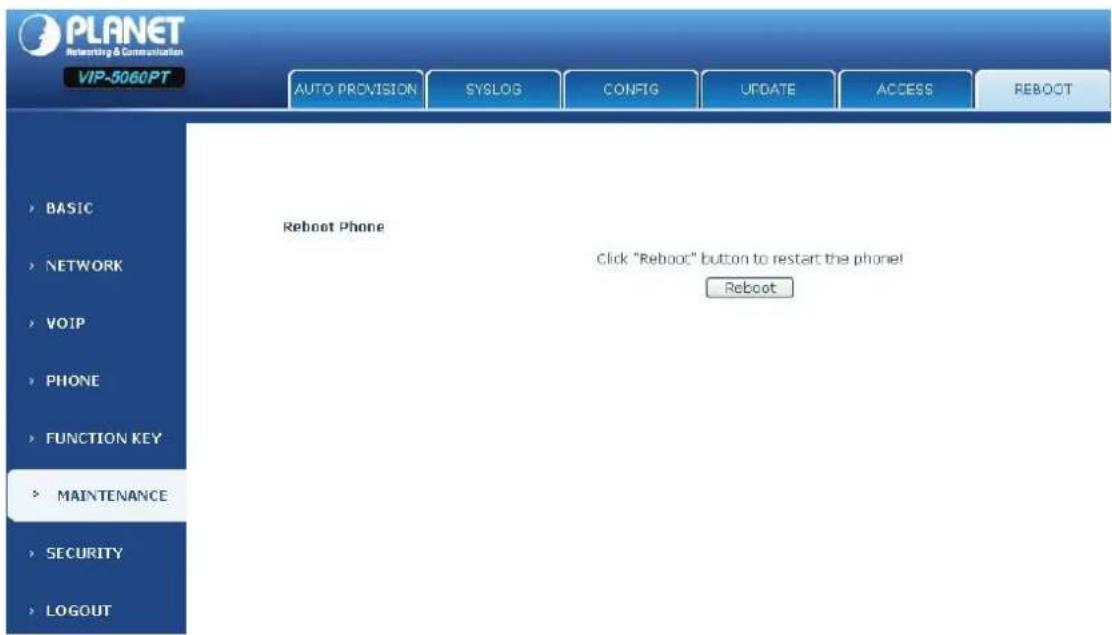
If User modified some configurations which need the phone's reboot to be effective, User need click the Reboot, then the phone will reboot immediately.

Before reboot, User needs to confirm that User has saved all configurations.
8.3.7 SECURITY
8.3.7.1 WEB FILTER
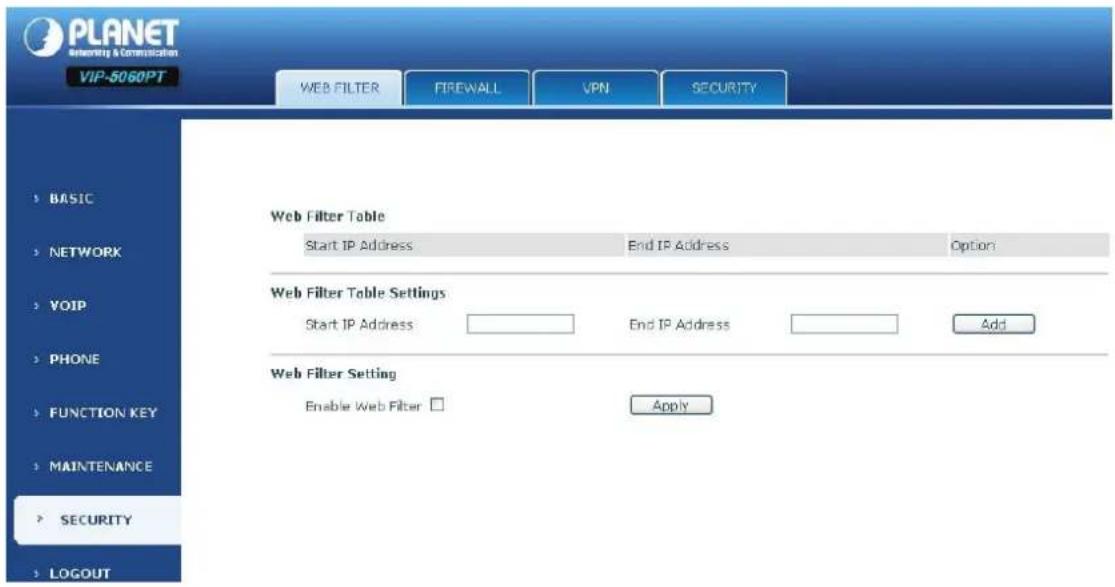
WEB Filter
User could make some device own IP, which is pre-specified, access to the MMI of the phone to config and manage the phone.
Field name Explanation
Web Filter Table Settings:
Add or delete the IP address segments that access to the phone.
Set initial IP address in the Start IP column, Set end IP address in the End IP column, and click Add to add this IP segment. User can also click Delete to delete the selected IP segment.
| Web Filter setting | Select it or not to enable or disable Web Filter. Click Apply to make it effective. |

Note
Do not set User visiting IP outside the Web filter range; otherwise, User cannot logon to the web.
8.3.7.2 FIREWALL
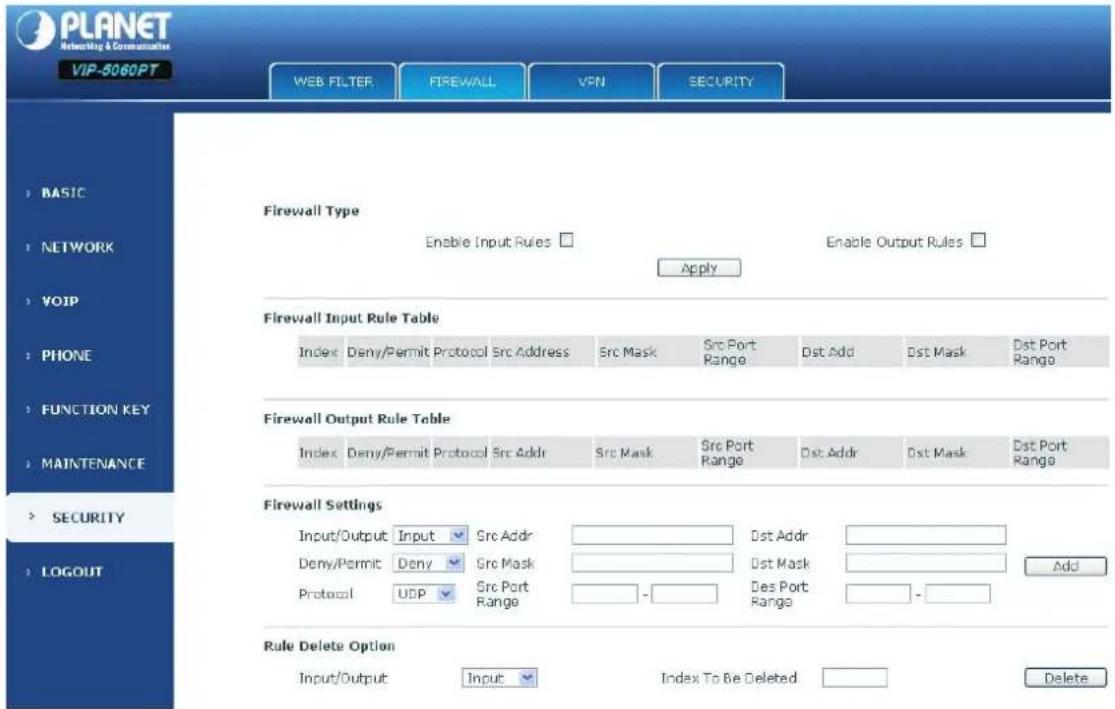
Firewall Configuration
In this web interface, User can set up firewall to prevent unauthorized Internet users from accessing private networks connected to the Internet (input rule), or prevent unauthorized private network devices from accessing the Internet (output rule).
Firewall supports two types of rules: input access rule and output access rule. Each type supports at most 10 items.
Through this web page, User could set up and enable/disable firewall with input/output rules. System could prevent unauthorized access, or access other networks set in rules for security. Firewall, is also called access list, is a simple implementation of a Cisco-like access list (firewall). It supports two access lists: one for filtering input packets, and the other for filtering output packets. Each kind of list could be added 10 items.
We will give User an instance for User reference.
Field name Explanation
| Enable Input Rules Select it to Enable Input Rules. | |
| Enable Output Rules Select it to Enable Output Rules. | |
| Input / Output Specify current adding rule by selecting input rule or output rule. | |
| Deny / Permit Specify current adding rule by selecting Deny rule or Permit rule. | |
| Protocol Filter protocol type. User can select TCP, UDP, ICMP, or IP. | |
| Port Range Set the filter | Port range. |
| Src Address | Set source address. It can be single IP address, network address, complete address 0.0.0.0, or network address similar to *.*.*.0. |
| Des Address | Set the destination address. It can be IP address, network address, complete address 0.0.0.0, or network address similar to *.*.*.*. |
| Src Mask | Set the source address' mask. For example, 255.255.255.255 means just point to one host; 255.255.255.0 means point to a network which network ID is C type. |
| Dest Mask | Set the destination address' mask. For example, 255.255.255.255 means just point to one host; 255.255.255.0 means point to a network which network ID is C type. |
Click the Add button if User wants to add a new output rule.
Then enable out access, and click the Apply button.
So when devices execute to ping 192.168.1.118, system will deny the request to send icmp request to 192.168.1.118 for the out access rule. But if devices ping other devices which network ID is 192.168.1.0, it will be normal.
Click the Delete button to delete the selected rule.
8.3.7.3 VPN
This web page provides us a safe connect mode by which we can make remote access to enterprise inner network from public network. That is to say, User can set it to connect public networks in different areas into inner network via a special tunnel.
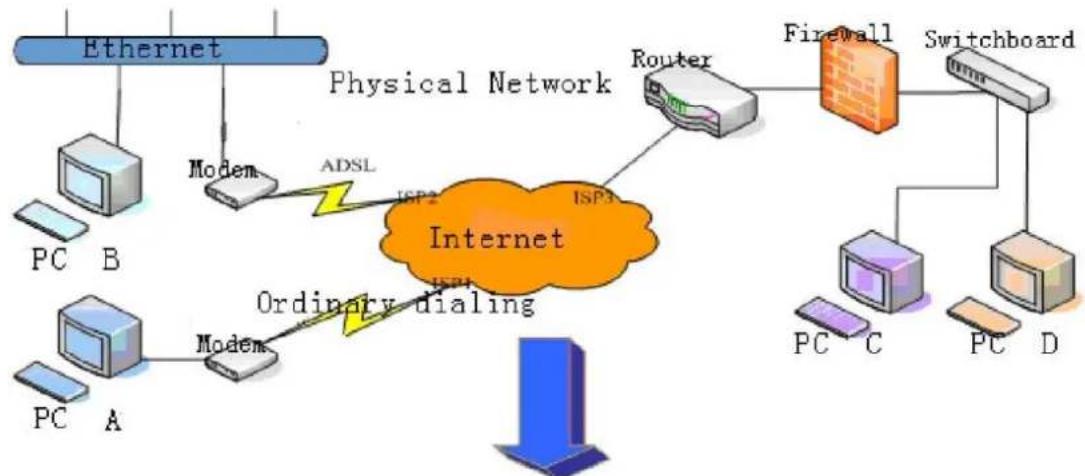
flowchart
graph TD
    A["Ethernet"] --> B["Modem"]
    B --> C["Physical Network"]
    C --> D["Router"]
    D --> E["Firewall"]
    E --> F["Switchboard"]
    G["PC A"] --> H["Modem"]
    H --> I["Internet"]
    J["PC B"] --> K["Modem"]
    K --> L["ADSL"]
    M["PC C"] --> N["Switchboard"]
    O["PC D"] --> P["Switchboard"]
    Q["Down arrow"] --> R["Down arrow"]
    style C fill:#ffcccc,stroke:#333
    style D fill:#ffcccc,stroke:#333
    style E fill:#ffcccc,stroke:#333
    style F fill:#ffcccc,stroke:#333
    style G fill:#ccffcc,stroke:#333
    style H fill:#ccffcc,stroke:#333
    style I fill:#ccffcc,stroke:#333
    style J fill:#ccffcc,stroke:#333
    style K fill:#ccffcc,stroke:#333
    style L fill:#ccffcc,stroke:#333
    style M fill:#ccffcc,stroke:#333
    style N fill:#ccffcc,stroke:#333
    style O fill:#ccffcc,stroke:#333
    style P fill:#ccffcc,stroke:#333
    style Q fill:#ccffcc,stroke:#333
Realizes the logical special line through VPN

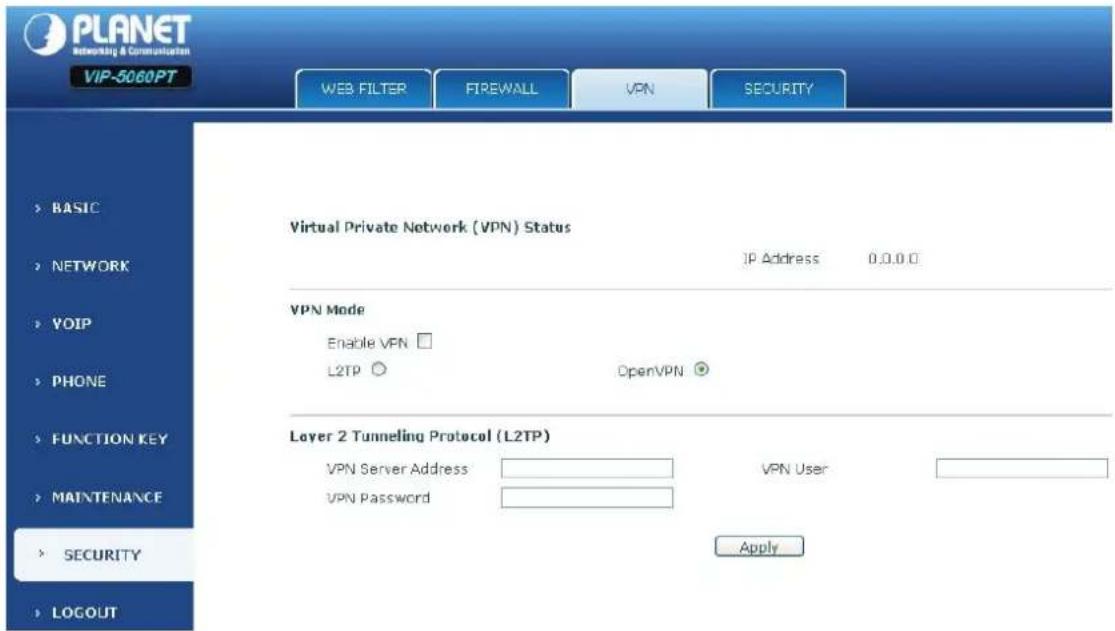
| VPN Configuration | |
| Field name Explanation | |
| VPN IP Shows the current VPN IP address. | |
| Select L2TP. User can choose only one for current state. After User select it, User's better save configuration and reboot User phone. | |
| Enable VPN Select it or not to enable or disable VPN. | |
| VPN Server Address Set VPN L2TP Server IP address. | |
| VPN User Set User Name access to VPN L2TP Server. | |
| VPN Password Set Password access to VPN L2TP Server. | |
8.3.7.4 SECURITY
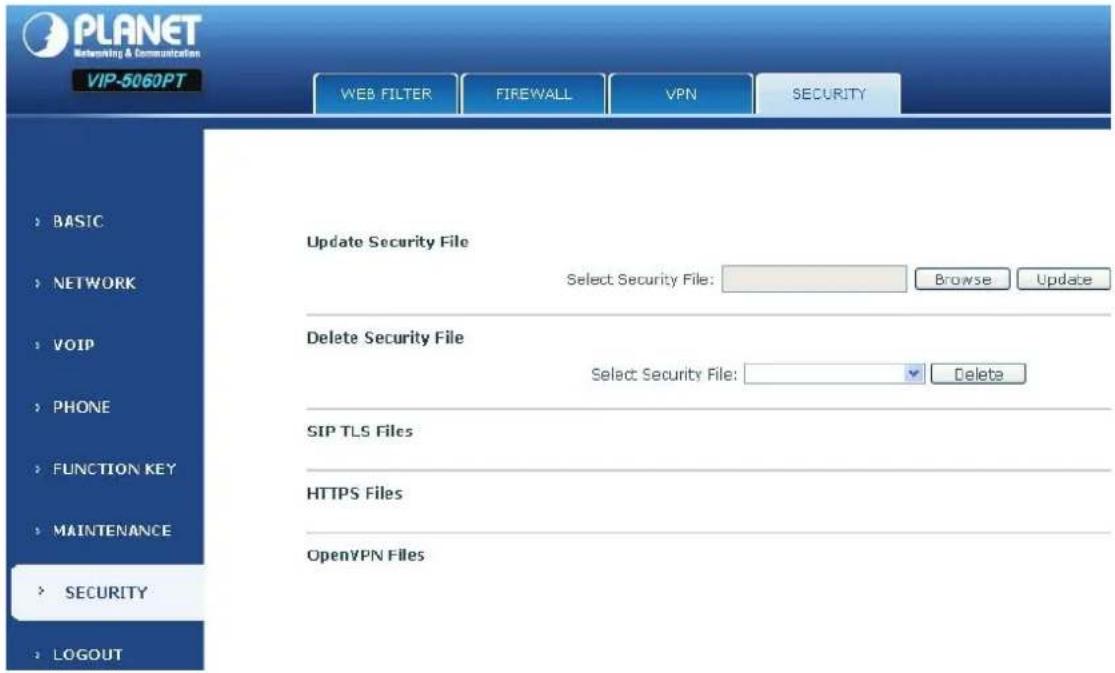
| Security | |
| Field name Explanation | |
| Update Security File | |
| Select Security File | Select the security file User want to update, then click Update button to update. |
| Delete Security File | |
| Select Security File | Select the security file User want to delete, then click Delete button to update. |
| SIP TLS File Show SIP TLS authentication certification file. | |
| HTTPS File Show HTTPS authentication certification file. | |
| Open VPN Files Show Open VPN File authentication certification file. | |
8.3.8 LOGOUT
Logout
Click "Logout" button to logout the system!
Logout
Click Logout, and User will exit web page. If User want to enter it next time, User need input user name and password again.
9 Appendix
9.1 Digit-character map table
| Keypad Character Keypad Character | |||||
 | 1 @ |  | 7 P Q R S p q r s | ||
 | 2 A B C a b c |  | 8 T U V t u v | ||
 | 3 D E F d e f |  | 9 W X Y Z w x y z | ||
 | 4 G H I g h i |  | */. | ||
 | 5 J K L j k l |  | 0 | ||
 | 6 M N O m n o |  | #/SEND | ||
9.2 Frequently Asked Questions List
| Q1: No operation after power on? |
| A1: Check if the power adapter is properly connected.If applicable, check if the PoE (Power over Ethernet) switch behind the IP phone is set correctly. |
| Q2: No dial tone? |
| A2: Check if the handset cord is properly connected. |
| Q3: Cannot make a call? |
| A3: Check the status of your SIP registration status or contact your administrator, supplier, or ITSP for more information or assistance. |
| Q4: Cannot receive any phone call? |
| A4: Check the status of your SIP registration status, or contact your administrator, supplier, or ITSP for more information or assistance |
| Q5: No voice during an active call? |
| A5: Check if the servers support the current audio codec type, or contact your administrator, supplier, or |
ITSP for more information or assistance.
Q6: Cannot connect to the configuration website?
A6: Check if the Ethernet cable is properly connected.
Check if the URL is right; the format of URL is: http:// the Internet port IP address.
Check if your firewall/NAT settings are correct.
Check if the version of IE is IE8, or use other browser such as Firefox or Mozilla, or contact your administrator, supplier, or ITSP for more information or assistance.
Q7: Forget the password?
A7: Default password of website and menu is null.
If user changes the password and then forget it, or you cannot access to the configuration website or the menu items need password.
Solution:
Factory default: press Menu button and choose 16Factory Default and then a notice will appear, choose OK by using the corresponding softkey button.
If you choose factory default, you will return the phone to the original factory settings and will erase ALL current settings, including the directory and call logs.
Q7: How to switch to different line to dial out?
A7: Before dialing out, press the correspondence line number you want to use. For example, if User wants to use Line 2 to dial out, please press Line 2.
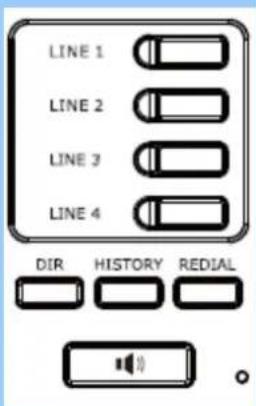

VIP-5060PT physical line is only 4 lines, the 5^th and 6^th line must use the Function Key Settings, to set it up.
Function Key Settings
| Key | Type | Value | Line | Subtype | Pickup Number |
| DSS Key 1 | Key Event | AUTO | Release | ||
| DSS Key 2 | Key Event | AUTO | MWI | ||
| DSS Key 3 | Key Event | AUTO | Headset | ||
| DSS Key 4 | Line | SIP5 | None | ||
| DSS Key 5 | Line | SIP6 | None | ||
| DSS Key 6 | None | AUTO | None | ||
| DSS Key 7 | None | AUTO | None |
Q8: How to set up the BLF function in the VIP-5060PT?
A8: Before we start, please be reminded your IPPBX must also support BLF function.
In Function key / EXT Key.
Type: please chose Memory Key
Value: your BLF extension
Line: choose which line you want to use BLF function
Subtype: BLF
Pick up Number: choose your IPPBX to pick up code + Extension number
Expansion Module Selection
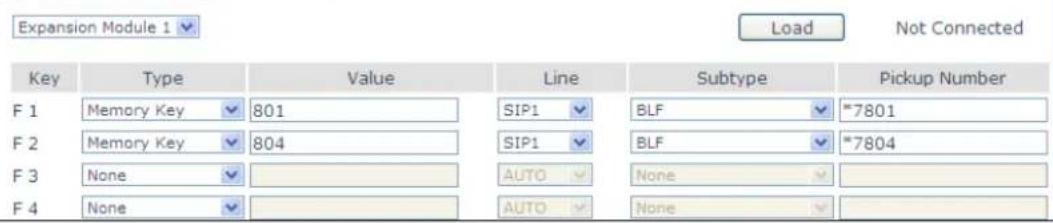
Q9: How to register VIP-5060PT to IPX-2100?
A9:
[In IPX-2100]
For extensions, please create a new account and remember their user name and password.
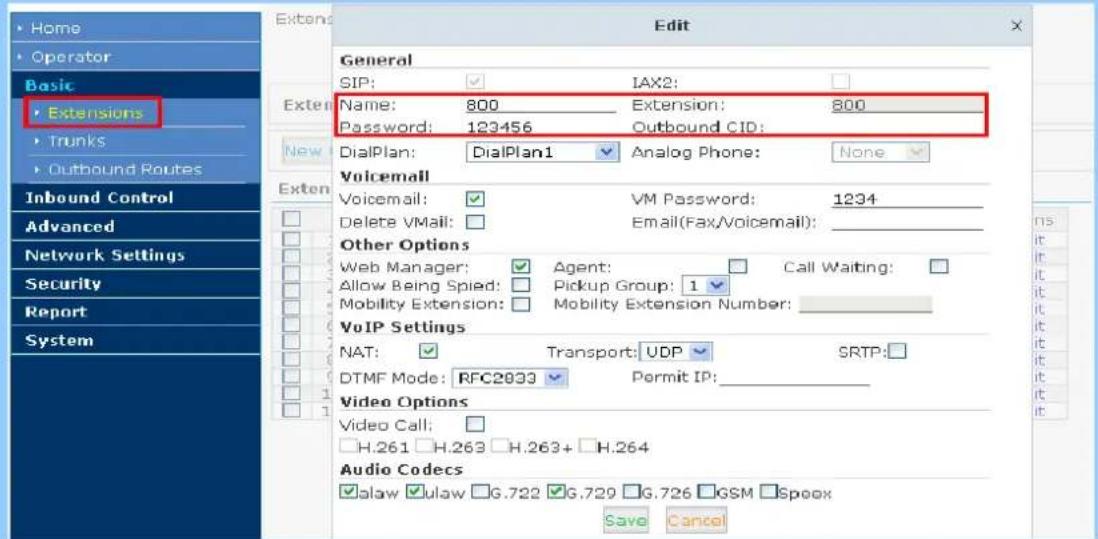
[In VIP-5060PT]
On VoIP / SIP page, please follow the messages below:
SIP line: choose the line you want to register
Server address: the IPX-2100 IP address
Server port: Server register port default is 5060
Authentication user: 800 (the extension you create in IPX-2100)
SIP user: (the extension you create in IPX-2100)
Display name: the name you want to display on phone screen when pressing the line button.
After saving the modification, the "successfully registered" status will be displayed.
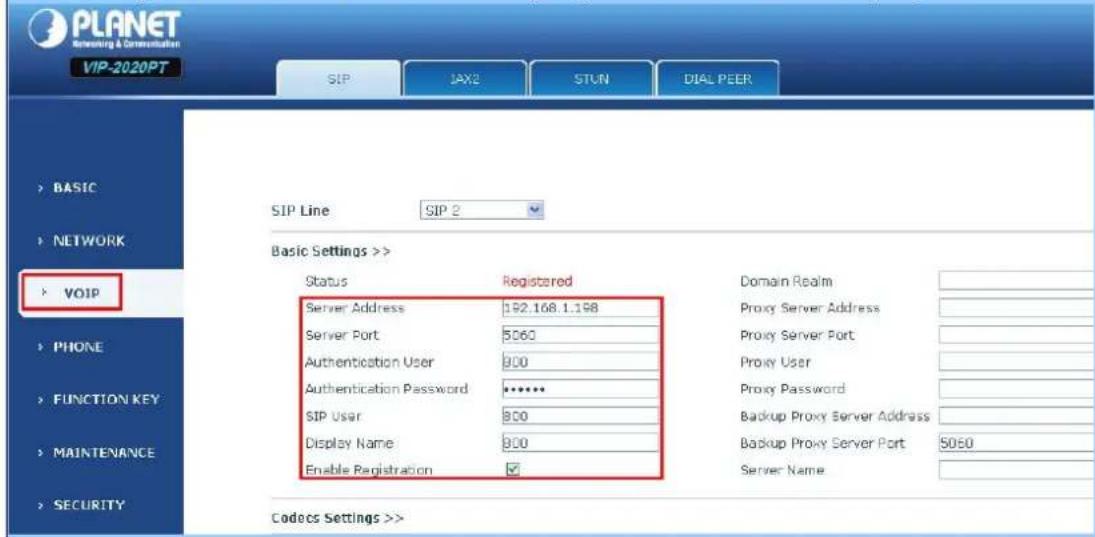
- Professional HD PoE IP Phone (6-Line)
- Copyright
- Disclaimer
- CE mark Warning
- Energy Saving Note of the Device
- WEEE Warning
- Trademarks
- Revision
- Table of Contents
- INTRODUCTION....7
- INITIAL CONNECTION AND LOGIN 24
- BASIC FUNCTIONS....26
- ADVANCED FUNCTIONS....30
- OTHER FUNCTIONS....36
- BASIC SETTINGS....39
- ADVANCED SETTINGS....41
- WEB CONFIGURATION....42
- APPENDIX....97
- Introduction
- Cost-effective, High-performance PoE VoIP Phone
- High Quality HD VoIP Voice
- Standard Compliance
- Enhanced, Full-Featured Business IP Phone
- Secure, High-Quality VoIP Communication
- Professional Application
- Features
- Highlights
- Advanced Features
- SIP Applications
- Call Control Features
- Network Features
- Maintenance and Management
- Application
- Product Specifications
- Physical specifications and packaging
- Physical Specifications
- imensions
- BASIC PACKAGING
- Keypad
- eypad, LED, and function key definitions
- Keypad Description
- Rear view and panel descriptions
- eypad Description
- Icon introduction
- LED introduction
- Initial Connection and Login
- Step 1. Handset Connection
- Step 2. Connecting Power System
- Step 3. Connecting Network
- Step 4. Computer Network Setup
- Step 5. Login Prompt
- Basic Functions
- Making a call
- Call Device
- Call Methods
- Answering a call
- Answering an incoming call
- DND
- Call Forward
- Call Hold
- Call Waiting
- Call transfer
- Blind Transfer
- Attended Transfer
- Alert Transfer
- 3-way conference call
- Mute
- Click to dial
- Call back
- Auto answer
- Hotline
- Applications
- SMS
- Memo
- Ping
- Voice Mail
- Programmable Key Configuration
- Speed dial
- Intercom
- BLF (Busy Lamp Field)
- Presence
- MWI (Message-Waiting Indicator)
- Call Park
- Set the type as BLF List Key
- Other Functions
- Auto Handdown
- Ban Anonymous Call
- Dial Plan
- Dial Peer
- Auto Redial
- Call completion
- Ring From Headset
- Power Light
- Hide DTMF
- Ban Outgoing
- Pre Dial
- Password Dial
- Action URL & Active URI
- Push XML
- Basic settings
- Keyboard
- Screen Settings
- Ring Settings
- Voice Volume
- Time & Date
- Greeting Words
- Language
- Advanced Settings
- Accounts
- Network
- Security
- Maintenance
- Factory Reset
- Web Configuration
- Introduction of configuration
- Ways to configure
- Password Configuration
- Setting via web browser
- Configuration via WEB
- BASIC
- STATUS
- Status
- WIZARD
- Wizard
- CALL LOG
- LANGUAGE
- WAN
- SIP
- PPPoE Settings
- CALL LOG
- LANGUAGE
- NETWORK
- WAN
- WAN Status
- QoS&VLAN
- SERVICE PORT
- TIME&DATE
- VOIP
- SIP
- Advanced SIP Settings >>
- SIP Global Settings >>
- SIP Config
- Field name Explanation
- SIP Line
- Basic Settings
- STUN
- STUN
- DIAL PEER
- PHONE
- AUDIO
- FEATURE
- DIAL PLAN
- DIAL PLAN Configuration
- CONTACT
- REMOTE CONTACT
- WEB DIAL
- MCAST Setting
- Send multicast setting
- Receive multicast setting
- Tone
- Action URL
- FUNCTION KEY
- FUNCTION KEY
- Function Key
- Line Key Settings
- Function Key Settings
- NOTICE :
- EXIT KEY
- SOFTKEY
- Maintenance
- Auto Provision
- SYSLOG
- CONFIG
- UPDATE
- ACCESS
- REBOOT
- SECURITY
- WEB FILTER
- WEB Filter
- Web Filter Table Settings:
- FIREWALL
- Firewall Configuration
- VPN
- SECURITY
- LOGOUT
- Appendix
- Digit-character map table
- Frequently Asked Questions List
- Q8: How to set up the BLF function in the VIP-5060PT?
- Q9: How to register VIP-5060PT to IPX-2100?
Brand : Planet
Model : VIP-5060PT
Category : Telephone