
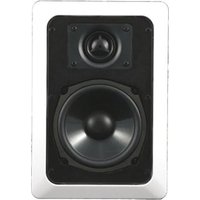
AC5C - Loudspeaker AudioSource - Free user manual and instructions
Find the device manual for free AC5C AudioSource in PDF.


| Product Type | In-ceiling Speaker |
| Brand | AudioSource |
| Model | AC5C |
| Speaker Type | 2-way In-wall / In-ceiling |
| Woofer Size | 5.25 inches (133 mm) |
| Woofer Material | Carbon Filled Poly Cone with Butyl Rubber Surround |
| Tweeter Size | 19 mm (0.75 inches) |
| Tweeter Type | Pivoting Elastomer Deposited Silk |
| Frequency Response | 50 Hz - 25 kHz |
| Impedance | 8 ohms |
| Sensitivity | 89 dB (2.83V @ 1m) |
| Power Handling | 10 - 150 Watts |
| Outer Diameter | 8 inches (203 mm) |
| Cut-Out Diameter | 6.63 inches (168 mm) |
| Mounting Depth | 2.75 inches (70 mm) |
| Grill Removal | Pry off with hook tool or clamps; gentle to avoid distortion |
| Paintable Frame and Grill | Yes, with included paint shields |
| Tweeter Aiming | Pivoting, adjustable for optimal soundstage |
| Recommended Wire Gauge | 16 AWG (≤50 ft), 12 AWG (50-150 ft), 10 AWG (150-200 ft) |
| New Construction Bracket | Available separately (Part # BC5) |
| Warranty | 2 years limited (parts and labor for defects) |
Frequently Asked Questions - AC5C AudioSource
User questions about AC5C AudioSource
0 question about this device. Answer the ones you know or ask your own.
Ask a new question about this device
Download the instructions for your Loudspeaker in PDF format for free! Find your manual AC5C - AudioSource and take your electronic device back in hand. On this page are published all the documents necessary for the use of your device. AC5C by AudioSource.
USER MANUAL AC5C AudioSource
Congratulations on your purchase of the AudioSource AC Series Ceiling Speaker System. This product is designed to reproduce the audio portion of your home entertainment environment with accuracy and detail that will satisfy the most discriminating listener.
Please read this Installation Manual to ensure the proper installation and performance of your AC Series speakers.
Preparing for your Installation
Gather the necessary tools for your installation.
You will need the following tools:
1) A Keyhole or Drywall Saw
2) A Phillips Screwdriver
3) Masking Tape
4) A Pencil
5) A Tape Measure
6) A Stud Finder (recommended)
7) Your AC Series speakers
Placement
Plan your speaker placement carefully. Make certain that electrical, plumbing and any other services will not interfere within the ceiling where you plan to install your speakers. The AC Series speakers can be mounted in walls, but are typically used in ceilings. The speakers should be located so that they provide even coverage at your listening position. The distance between the speakers should not be greater than the distance from the speakers to the listening position (See Figure 1). If the room's dimensions or furniture placement prevent adhering to this requirement, the tweeters in the AC Series speakers can be swiveled to aim them at the desired listening position.
New Construction
If you are installing your speakers in new construction before the finished walls go up, AudioSource offers New Construction Brackets, which provide a stable frame that can be fastened to the wall studs or ceiling joists on 16" or 24" centers. This allows the sheet rock or other surface covering to be installed and provides a template to cut the opening for the AC Series speakers.
natural_image
Circular diagram with concentric rings and a central radial component, no text or symbols presentExisting Construction
In most modern buildings ceiling joists are positioned on 16" centers, providing a space between the studs of approximately 14 3/8". The specifications chart shows the appropriate cut out sizes (p. 4). Additionally, you should allow an extra 3/4" in all directions behind the ceiling surface to allow room for the screw clamps that mount the speaker to the ceiling to swing into position.
Use a stud finder to locate the joists behind the ceiling surface. Also, you should now check for obstructions like cross bracing in front of and behind the desired speaker location.

Figure 1
After selecting the mounting location, mark the hole to be cut out. A template is provided in the speaker box. Locate and align the template, then mark with pencil on the ceiling surface. If you are unsure whether there are obstructions behind the ceiling surface where the speakers are to be mounted, cut a small hole in the center of your marked mounting location. Holding your drywall saw at a 45 degree angle (See Figure 2), cut a square hole that you can use to locate any obstructions, should they exist.

The 45 degree wedge shape of the removed surfacing material will make replacement, if necessary, a much easier task and yield a better finish when patching the work.
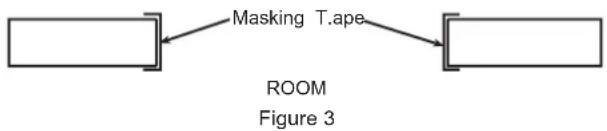
Once it has been determined that there are no obstructions, cut the hole to mount the speaker using the drywall saw at a 90 degree angle to the ceiling surface. Cover the raw edges of the wallboard with masking tape (Figure 3). This will prevent the back pressure of the speaker from blowing loose gypsum dust out and onto the painted ceiling surface after installation. Do not allow the tape to extend more than 1/4" beyond the edge of the hole into the room. The frame of the speaker will cover and hide the tape.
flowchart
graph TD
    A[" "] -->|Masking T.ape| B[" "]
    style A fill:#fff,stroke:#000
    style B fill:#fff,stroke:#000
    note right of A ROOM
    note right of B FIGUEM 3
Next run your speaker wire to your speaker locations. A UL rated CL3 speaker wire is recommended when running wire inside your walls. In many areas it may be required by code. When running your speaker wire you should avoid having the speaker wire run parallel to the 120V power lines to avert picking up hum and interference from the power service. If the speaker wire needs to cross a 120V power line at a right angle this is acceptable and will not create a problem.
If you are uncomfortable with running the speaker wire yourself in existing construction, it is recommended that you retain a qualified custom home installation specialist or electrician.
Installing the Speakers
Installation Tip! To further enhance the performance of your AC Series speakers, the ceiling joist cavity where you plan to place your speakers can be stuffed with a generous quantity of fiberglass insulation. Stuff the area in front of and behind the speaker opening with 6" thick insulation to a depth of approximately 2 feet beginning 1 foot in front and 1 foot behind the speaker opening. If the insulation is foil or paper backed, face the backing away from the AC Series speaker. The addition of this insulation will help prevent unwanted transfer of sound into the otherwise large and resonant cavity of the uninsulated ceiling.
Grill Removal for Installation
CAUTION! The grill is held in place by contact pressure around the edges where it attaches to the speaker frame. To avoid difficulty reinstalling the grill, care should be taken to not distort its shape while removing it.
While looking at the rear of the speaker assembly, rotate two of the adjacent mounting clamps outward and then evenly press them towards the grill. The clamp screws contact the inner surface of the grill, pushing it gently out of its mounting groove (Figure 4). Only lift the grill 1/4" (6mm) at this location. Next use the other mounting clamps to further loosen the grill. Use care to not distort the grill shape.
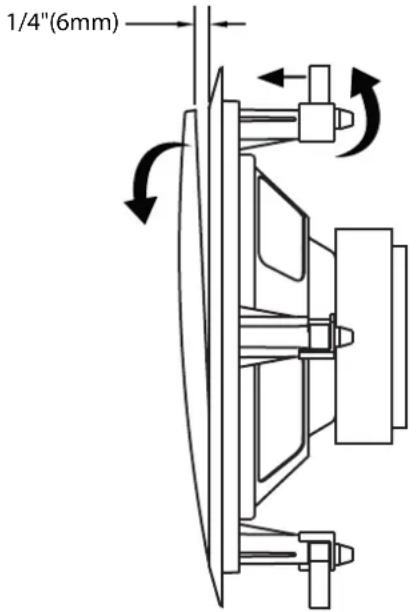
Figure 4
It is now time to connect the speaker wire to the speaker. Your speaker wire is usually coded to identify each conductor as either positive or negative. This can be by color coding, or one conductor may have a printed marking or at least a rib along one edge that you will not find on the other. Identify which type of polarity coding that your wire is using. You must carefully observe that the positive terminal of the speaker output on your amplifier is connected to the positive terminal of the AC Series speaker. Likewise, the negative terminal of the amplifier's speaker output should be connected to the negative terminal of the AC Series speaker (Figure 5).

Figure 5
Next make sure that the clamps are positioned inside the frame of the speaker.

With the grill removed, place the speaker in the ceiling opening. Make sure that the speaker wire is not hanging against the speaker where it can vibrate and rattle as the speaker reproduces your audio program.
Next, one at a time, turn each of the four screws that operate the clamps counter clockwise a few turns until you feel the clamp is loose from its resting position. Now turn the screw clockwise until you feel the clamp contact the ceiling surface.

Tighten all four of the mounting screws in the same manner until the speaker is properly aligned and held tight to the ceiling surface. Caution: Do not over tighten!
Aiming the Tweeter
Carefully place your fingertips at the plastic edges of the tweeter housing.

Using gentle pressure, swivel the tweeter to aim the axis of the tweeter toward the listening area. You can use a piece of music with a solid center-imaged vocalist to assist in correctly aiming the tweeter. When the tweeters are properly aligned, you will hear a coherent and stable center image from your listening position. Usually, it is sufficient to aim the tweeter only, as it handles the frequencies that control the direction of individual sounds in your audio program material.
Painting the Speaker
Two paint shields are included in each AC Series speaker package. Place the paint shield inside the frame to protect the speakers. You can now safely paint the speaker frames to match your wall surface if you desire.
When painting the grill caution should be taken to ensure that paint does not clog or congest the perforated openings in the grill. This would prevent proper operation of the grill by restricting the airflow from the individual drivers in the speaker.
Removing the AC Series Speaker
Should it ever become necessary to remove the AC Series speaker from the ceiling, simply remove the grill and turn the four mounting screws counterclockwise until you feel the clamps lock out of position in their resting flange. The speaker should easily come out of the wall for service or replacement.
Grill Removal (if installed)
Locate a small hook tool (available at most auto parts stores or home improvement shops, resembling a dentist's pick- a bent paper clip or stiff wire will work as well), hook the metal mesh of the grill near a corner or edge and gently pull it towards you. Only lift the grill 1/4" (6mm) at this location. Move the tool 1-2" (25-50mm) and repeat until the grill can be removed without damaging it (Figure 6).

Figure 6
Recommended Speaker Wire Gauges
The resistance of the speaker wire in your installation can cause your speakers to perform at less than their optimum quality level. Excess resistance caused by using an undersized speaker wire can result in loss of detail and definition in the bass region of your audio program, as well as loss of dynamic range. Over extremely long wire runs you may even experience a loss of high frequency content in the audio signal.
To prevent sonic degradation in your AC Series speaker installation, total speaker wire resistance should be kept below 0.5 ohms. The following table lists recommended speaker wire gauge versus wire run length.
50' or less - 16 Gauge 2-Cond. CL3 Rated 50' - 150' - 12 Gauge 2-Cond. CL3 Rated 150' - 200' - 10 Gauge 2-Cond. CL3 Rated
| AC5C Specifications | Woofer | 5.25" Carbon Filled Poly Cone with Butyl Rubber Surround |
| Tweeter | Pivoting 19mm Elastomer Deposited Silk | |
| Frequency Response | 50Hz to 25kHz | |
| Impedance | 8 ohm | |
| Sensitivity | 89dB, 2.83v @ 1m | |
| Power Capacity | 10 to 150 Watts | |
| Outer Dimension | 8" (203mm) diameter | |
| Cut Out Dimension | 6.63" (168mm) diameter | |
| Mounting depth | 2.75" (70mm) | |
| New Construction Bracket Order Part Number: BC5 | ||
| AC6C Specifications | Woofer | 6.5" Carbon Filled Poly Cone with Butyl Rubber Surround |
| Tweeter | Pivoting 25mm Elastomer Deposited Silk | |
| Frequency Response | 40Hz to 20kHz | |
| Impedance | 8 ohm | |
| Sensitivity | 90dB, 2.83v @ 1m | |
| Power Capacity | 10 to 150 Watts | |
| Outer Dimension | 9" (229mm) diameter | |
| Cut Out Dimension | 7.75" (197mm) diameter | |
| Mounting depth | 3.38" (86mm) | |
| New Construction Bracket Order Part Number: BC6 | ||
| AC8C Specifications | Woofer | 8" Carbon Filled Poly Cone with Butyl Rubber Surround |
| Tweeter | Pivoting 25mm Elastomer Deposited Silk | |
| Frequency Response | 38Hz to 22kHz | |
| Impedance | 8 ohm | |
| Sensitivity | 90dB, 2.83v @ 1m | |
| Power Capacity | 10 to 150 Watts | |
| Outer Dimension | 10.75" (273mm) diameter | |
| Cut Out Dimension | 9.60" (236mm) diameter | |
| Mounting depth | 3.63" (92mm) | |
| New Construction Bracket Order Part Number: BC8 | ||
Two Year Limited Warranty
AudioSource, a division of Peak Audio Group, warrants this product against defects in materials and workmanship for a limited period of time. For a period of two (2) years from date of original purchase, we will repair or replace the product, at our option, without charge for parts. Customer must pay for all labor charges associated with the removal and re-installation of speakers for the limited period and all parts and labor charges after the limited warranty period expires. The limited warranty period for factory refurbished products expires after ninety (90) days from date of original purchase. This limited warranty applies only to purchases from authorized AudioSource Retailers or Distributors. This limited warranty is extended only to the original purchaser and is valid only to consumers in the United States.
Consumers are required to provide a copy of the original sales invoice from an authorized AudioSource Retailer or Distributor when making a claim against this limited warranty. This limited warranty only covers failures due to defects in materials or workmanship that occur during normal use. It does not cover failures resulting from accident, fire, flood, misuse, abuse, neglect, mishandling, misapplication, alteration, faulty installation, modification, service by anyone other than AudioSource, or damage that is attributable to Acts of God. It does not cover costs of transportation to AudioSource or damage in transit. The customer should return their defective product, freight prepaid and insured, to AudioSource only after receiving a Return Authorization.
Repair or replacement under the terms of this warranty does not extend the term of this warranty. Should a product prove to be defective in workmanship or material, the consumer's sole remedies will be repair or replacement as provided under the terms of this warranty. If the defective product is discontinued AudioSource may replace the product with an equivalent or superior product at its option. Any cost of re-installation or repair of wall or ceiling surface is the sole responsibility of the customer and that cost shall not be the responsibility of AudioSource. Under no circumstances shall AudioSource be liable for loss or damage, direct, consequential or incidental, arising out of the use of or inability to use the product. There are no express warranties other than described above.

AudioSource®
13970 SW 72nd Avenue ■ Portland, Oregon 97223
503.914.4688 ■Fax: 503.746.5224 ■Support: 877.715.5439
www.audiosource.net■support@audiosource.net

- Preparing for your Installation
- Placement
- New Construction
- Existing Construction
- Installing the Speakers
- Grill Removal for Installation
- Aiming the Tweeter
- Painting the Speaker
- Removing the AC Series Speaker
- Grill Removal (if installed)
- Recommended Speaker Wire Gauges
- Two Year Limited Warranty
- AudioSource®
Brand : AudioSource
Model : AC5C
Category : Loudspeaker