
19461 - Memory reader Vimar - Free user manual and instructions
Find the device manual for free 19461 Vimar in PDF.


| Product Type | Memory Card Reader |
| Brand | Vimar |
| Model | 19461 |
| Weight | Approx. 200 g |
| Power Supply | USB bus-powered (5 V) |
| Dimensions (L x W x H) | 10 x 5 x 2 cm |
| Supported Memory Cards | SD, microSD, MMC, MS |
| Data Transfer Speed | USB 2.0 (up to 480 Mbps) |
| Operating System Compatibility | Windows, macOS, Linux |
| Main Functions | Read, write, transfer data from memory cards to computer |
| LED Indicator | Power/activity light |
| Material | Plastic casing |
| Color | Black or white |
| Cable Length | 15 cm (integrated USB cable) |
| Maintenance & Cleaning | Wipe with dry soft cloth; do not use liquids |
| Safety Precautions | Avoid exposure to moisture, extreme temperatures, and physical shock |
| Spare Parts & Repairability | No spare parts available; device is not user-serviceable |
| General Information | Portable memory card reader for easy data access |
Frequently Asked Questions - 19461 Vimar
User questions about 19461 Vimar
0 question about this device. Answer the ones you know or ask your own.
Ask a new question about this device
Download the instructions for your Memory reader in PDF format for free! Find your manual 19461 - Vimar and take your electronic device back in hand. On this page are published all the documents necessary for the use of your device. 19461 by Vimar.
USER MANUAL 19461 Vimar
Smart card device and access control
BUILDING AUTOMATION

VIMAR
ITALIANO

INDICE
Legenda....2
natural_image
Exterior view of a mechanical or electronic component with ports and connectors (no visible text or symbols)1.1

2. Smart card 16452/16452.H
5.4.8
5.4.9
5.5.1
5.5.5
5.5.10
6.1.7
natural_image
Diagram of a device control panel with a dial indicator and two buttons (no text or symbols)6.1.8

VIMAR
6.2.2
6.2.4
6.3.3
6.3.5
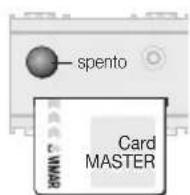
Togliere la smart card MASTER.
6.4.2
6.5.2
6.5.3
6.5.4
6.5.7
6.6.4
6.6.5
6.6.6
Togliere la smart card MASTER.
6.7.7
6.7.11
6.8.1
6.8.3
6.8.5
Togliere la smart card MASTER.
6.8.8
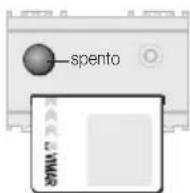
Togliere la smart card.
Il led torna verde.
6.8.9
6.8.10
6.8.12
6.8.14
natural_image
Diagram of a device rear panel showing front and side views with no visible text or symbols7.1.2
7.1.4
7.1.6
Togliere la smart card.
7.2.3
7.2.5
Togliere la smart card MASTER.
7.2.7
7.3.3
7.3.4
7.3.7
7.3.5
7.4.15
natural_image
Diagram of an electronic device showing front panel and internal components (no readable text or symbols)8.1.2
8.1.4
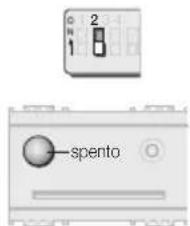
8.1.7
Togliere la smart card.
-
Technical Specifications 3
-
Smart card 16452/16452.H 4
-
Installation 5
-
Dip-switches....6
Operation 7
Device and access control in the residential and services sectors
- Operation without a MASTER smart card 8
5.1 Initialising the reader and programming smart cards 8
5.2 Duplicating smart cards 10
5.3 Changing the reader and smart card codes 12
5.4 Cancelling smart cards 14
5.5 Synchronising readers 16
- Operation with a MASTER smart card.... 20
6.1 Initialising the reader and programming MASTER smart cards. 21
6.2 Initialising the reader and programming SLAVE smart cards..... 23
6.3 Duplicating SLAVE smart cards 25
6.4 Changing the reader and MASTER smart card codes...... 27
6.5 Changing the reader and SLAVE smart card codes 29
6.6 Cancelling SLAVE smart cards.... 31
6.7 Synchronising readers with MASTER smart cards.... 33
6.8 Synchronising readers with SLAVE smart cards.... 37
Device and access control in the hotel sector
- Operation with a MASTER smart card.... 42
7.1 Initialising the reader and programming MASTER smart cards . 43
7.2 Initialising the reader and programming SLAVE smart cards..... 44
7.3 Changing the reader and SLAVE smart card codes 47
7.4 Synchronising readers with MASTER smart cards.... 49
Use as an electronic power switch in the hotel, residential and services sector
- Operation as an electronic power switch with MASTER smart card....53
8.1 Initialising the reader as an electronic switch and programming MASTER smart cards.... 53
-
Installation requirements.... 56
-
Conformity to regulations....56

VIMAR
Key

Operations to be performed exclusively by a qualified technician

Operations that can also be carried out by the user
Dip-switch in OFF position
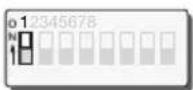
Dip-switch in ON position
off

LED off
green

LED illuminated green
yellow

LED illuminated yellow
red

LED illuminated red

natural_image
Three identical sun icons with radiating lines, no text or symbols presentLED blinking green, yellow or red
green yellow red
2 - ENGLISH

VIMAR

1. Technical Specifications
• Supply voltage:
- 12 V\~ 50-60 Hz +25% -15%
- 12 V d.c. +10% -10%
- 24 V\~ 50-60 Hz +25% -15%
- 24 V d.c. +10% -10%
• Typical current draw:
- 12 V\~ 50-60 Hz: 55 mA
- 12 V d.c.: 45mA
- 24 V\~ 50-60 Hz: 80 mA
- 24 V d.c.: 35 mA
- potential-free single changeover relay output 24 V\~/24 V d.c. 8 A cos 1 configurable for:
- pulse operation (monostable timer - flash mode): insertion of the smart card causes the relay contact to close for about 3 seconds
- latching operation (bistable - toggle mode): insertion of the smart card causes the relay contact to open/close in a cyclical sequence
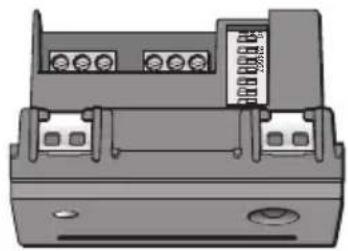
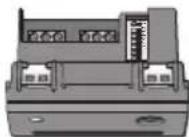
- dip-switches at the rear of the device (figure 1.1) for
selecting the address and operating mode (see "Dip switches" and "Address selection" tables on page 6).
- operation as an electronic switch with smart card insertion causing the relay contact to close; the contact re-opens when the smart card is removed (choice of immediate opening, or with 50-second delay).
- Operating temperature range: -5^ - +45^ .
natural_image
Exterior view of a mechanical or electronic component with ports and connectors (no visible text or symbols)1.1

2. Smart card 16452/16452.H
The “smart card” is an electronic key with 15 distinct memory addresses, in which it can store 15 different codes that are randomly generated at the time of programming, out of a total of 4.29 billion possible combinations. The 4 dip-switches at the rear of the reader/programmer are used to select the desired address. This allows the smart card to be associated with 15 separate addresses (or access points). Different readers can share the same address and the same code: in this case, several access points can be enabled using a single address.
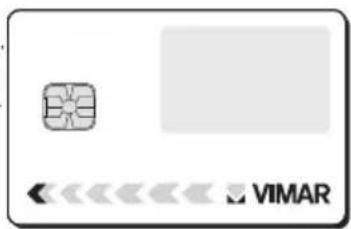
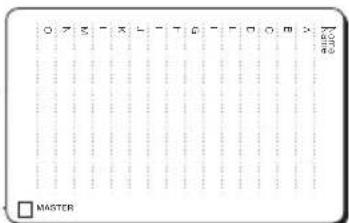
The available types of cards are: 16452 (figures 2.1a - 2.1b) and 16452.H (figures 2.1a - 2.1c).

VIMAR
Writable area for smart card personalisation
Chip
2.1a
Writable areas for specifying the name of the smart card holder and the addresses used
Select only in the case of use as a MASTER smart card
2.1b
Rear of the smart card personalised on request

natural_image
Empty rectangular frame with rounded corners (no text or symbols)2.1c
4 - ENGLISH

VIMAR

3. Installation
Connections
• Supply voltage:
- 12 V d.c. (figure 3.1)
- 12 V\~ (figure 3.2)
- 24 V d.c. (figure 3.2)
- 24 V\~ (figure 3.2)
- Outputs (figure 3.3)
Note
Before completing the installation by fixing the support and attaching the plate:
- configure the device using the dip-switches at the rear (see the "Dip-switches" section on pg. 6)
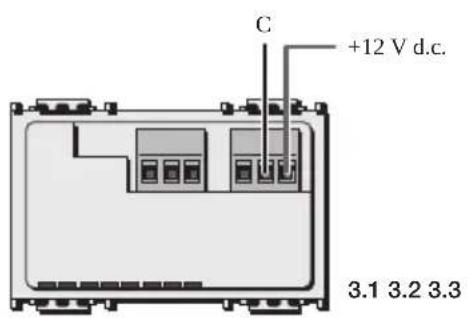
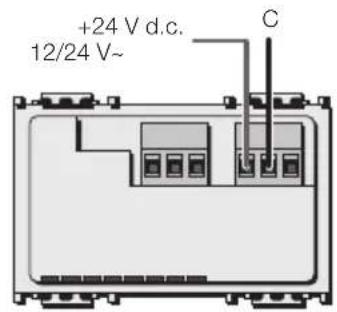
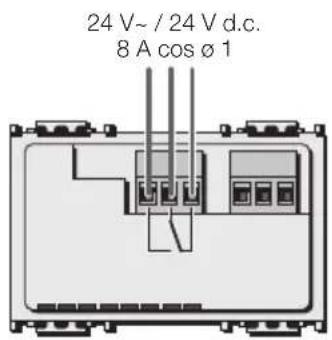

VIMAR

4. Dip-switches
The reader/programmer is provided with dip-switches at the rear for selecting the addresses and operating modes.
Dip-switches
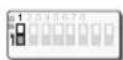
Programming
SLAVE card
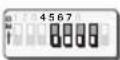
Address selection
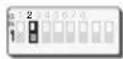
Programming MASTER card
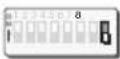
Relay output with latching operation
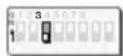
Operation without MASTER card
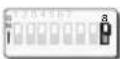
Relay output with pulse operation
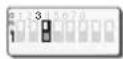
Operation with MASTER card
Address selection
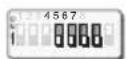
Address A
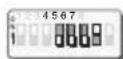
Address B
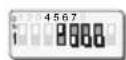
Address I
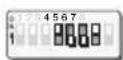
Address J
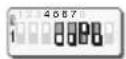
Address C
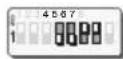
Address D
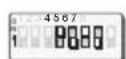
Address K
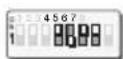
Address L
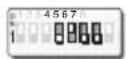
Address E
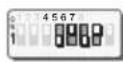
Address F
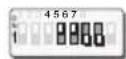
Address M
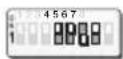
Address N
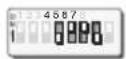
Address G Address H
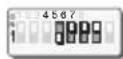
[Non-Text]
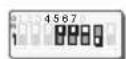
Address O
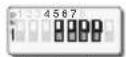
Hotel sector
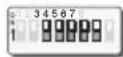
Electronic power switch

Operation
The system has three operating modes:
Device and access control in the residential and services sectors:
- Chapter 5
Operation without a MASTER smart card (1 level) - see pg. 8:
all enabled smart cards can be used to perform any operation (initialising, programming, duplicating, cancelling, changing the code, synchronising readers).
- Chapter 6
Operation with a MASTER smart card (2 levels) - see pg. 20: it is necessary to have a smart card programmed as a MASTER to perform any operation (initialising, programming, duplicating, cancelling, changing the code, synchronising readers).
Device and access control in the hotel sector:
- Chapter 7
Operation with a MASTER smart card (2 levels) - see pg. 42: it is necessary to have a MASTER smart card to perform any operation (initialising, programming, duplicating, cancelling, changing the code, synchronising readers).
Use as an electronic power switch in the residential and services sectors and in the hotel sector:
- Chapter 8
Operation as an electronic power switch with a MASTER smart card (2 levels) - see pg. 53:
it is necessary to have a MASTER smart card to perform any operation (initialising, programming, duplicating, cancelling, changing the code, synchronising readers).

VIMAR
Device and access control in the residential and services sectors:
5. Operation without a MASTER smart card

5.1 Initialising the reader and programming the smart cards
This procedure generates a code, associates it with a selected address in the memory of the reader/programmer being initialised, and copies it to the desired smart cards.
5.1.1
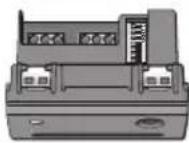
Power up the reader.
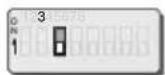
5.1.2
Place dip-switch 3 in the OFF position.
5.1.3
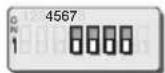
Select the desired address (see "Address selection" table on page 6).
In the example, address A was used.

5.1.4
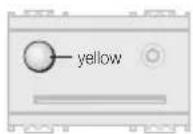
Place dip-switch 1 in the ON position. The LED lights up yellow.

VIMAR
5.1.5
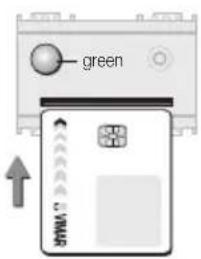
When the LED turns green (after about 10 seconds), insert the smart card to be programmed.
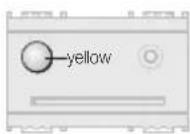
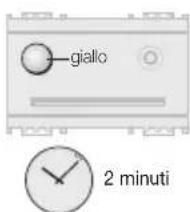
If no smart cards are inserted for about 2 minutes, the LED turns yellow and no further commands are accepted.
To resume normal operation, replace dip-switch 1 in the OFF position.
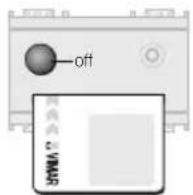
5.1.6
When the LED turns off, the smart card has been programmed.
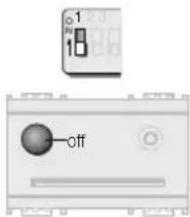
5.1.8
To exit the procedure, place dip-switch 1 in the OFF position.
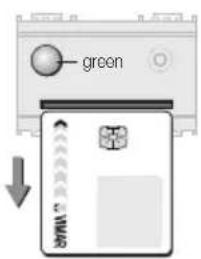
5.1.7
Remove the smart card.
The LED turns green again, waiting for other smart cards to program.
To program additional smart cards, repeat the procedure from step 5.1.5.

VIMAR

5.2 Duplicating smart cards
This procedure can be used to make copies of smart cards at any time.
Note: When duplicating smart cards that are enabled for several readers/programmers, the procedure must be carried out on each reader/programmer.
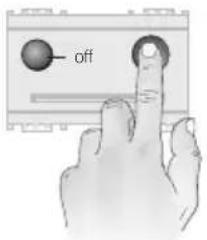
5.2.1
Press the front button.
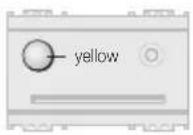
5.2.2
The LED lights up yellow.
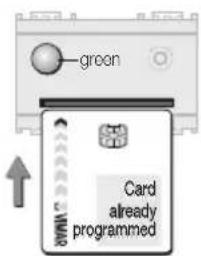
5.2.3
When the LED turns green (after about 10 seconds), insert an already-programmed smart card within 10 seconds.
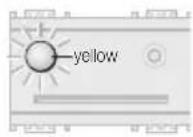
The device waits for an already programmed smart card for about 10 seconds, after which it exits the procedure.
Exiting the procedure is signalled by the LED blinking yellow 3 times.
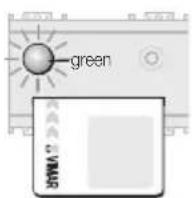
5.2.4
If the smart card is recognised, the LED blinks green for the remaining time that it is left inside the reader/programmer.
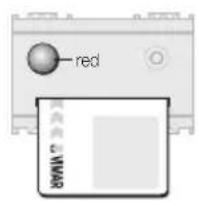
If the smart card is not recognised, the LED turns red and remains illuminated until the card is removed.
If a succession of unrecognised smart cards are inserted, the device exits the "Duplicate Smart Card" procedure about 10 seconds after insertion of the last unrecognised card. To resume duplicating cards, repeat the procedure from step 5.2.1.
If the LED turns off, repeat the procedure from step 5.2.1.
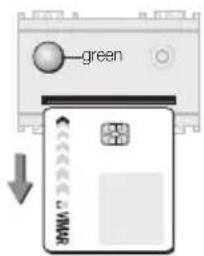
5.2.5
Remove the smart card. The LED turns green.
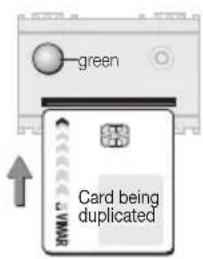
5.2.6
Insert the smart card to be programmed.
The device waits for the smart card to be programmed for about 2 minutes, after which it exits the procedure. Exiting is signalled by the LED blinking yellow 3 times.
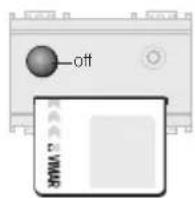
5.2.7
When the LED turns off, the duplicate smart card has been programmed.
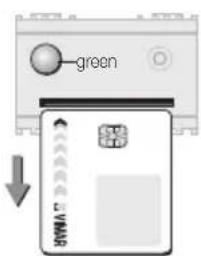
5.2.8
Remove the smart card.
The LED turns green again, waiting for other smart cards to program.
To duplicate additional smart cards, repeat the procedure from step 5.2.6.

VIMAR

VIMAR
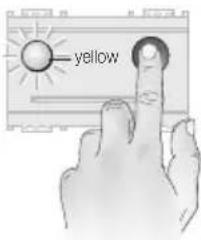
5.2.9
To exit the procedure, press the front button.
The LED blinks yellow 3 times, and then turns off.
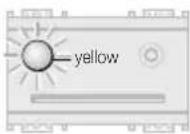
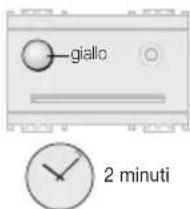
2 minutes
If no smart cards are inserted for about 2 minutes, the procedure automatically terminates.
Exiting the procedure is signalled by the LED blinking yellow 3 times.


5.3 Changing the reader and smart card codes
This procedure changes the code assigned to the address of the reader/programmer, and saves it to the smart card.

5.3.1
Place dip-switch 1 in the ON position.
The LED lights up yellow.
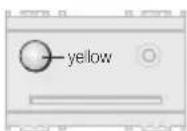
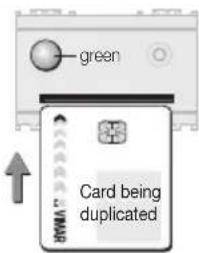
5.3.2
When the LED turns green (after about 10 seconds) insert the smart card with the code currently in use.

VIMAR
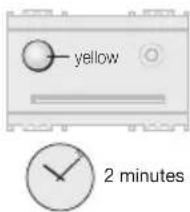
The device waits for the smart card for about 2 minutes, after which the LED turns yellow and no further commands are accepted. To resume normal operation, place dip-switch 1 in the OFF position.
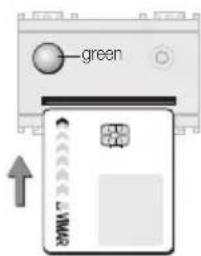
5.3.5
Insert the smart card again.
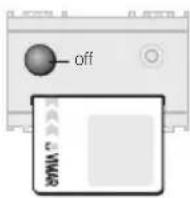
5.3.3
When the LED turns off, the smart card has been recognised.
If the smart card is not recognised, the LED turns red and remains illuminated until the card is removed.
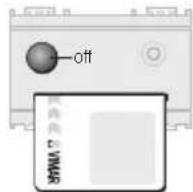
5.3.6
When the LED turns off, the code in the reader/programmer has been changed and written to the inserted smart card.
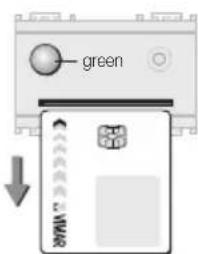
5.3.4
Remove the smart card. The LED turns green.
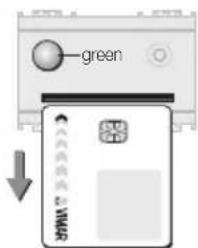
5.3.7
Remove the smart card.
The LED turns green again, waiting for other smart cards to reprogram.
To reprogram additional smart cards, repeat the procedure from step 5.3.5.

VIMAR
Warning!
Any additional smart cards containing the old code must be reprogrammed with the new code, otherwise they can no longer be used.

5.4 Cancelling smart cards
This procedure is used for cancelling smart cards.
Warning! At least one smart card must be left enabled, in order to continue accessing the operating procedures.
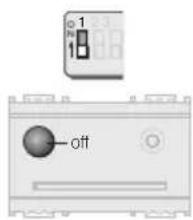
5.3.8
To exit the procedure, place dip-switch 1 in the OFF position.
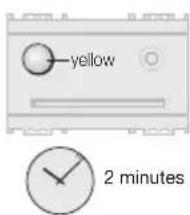
If no smart cards are inserted for about 2 minutes, the LED turns yellow and no further commands are accepted.
To resume normal operation, replace dip-switch 1 in the OFF position.
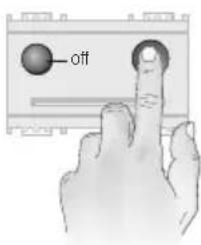
5.4.1
Press the front button.
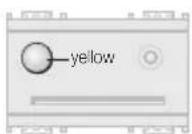
5.4.2
The LED lights up yellow.
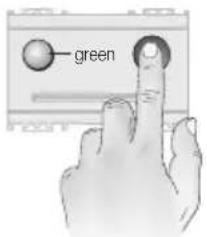
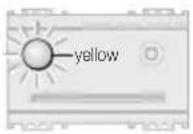
5.4.3
Press the front button again within 9 seconds. The LED turns green.
Warning!
If the button is not pressed within 9 seconds, the LED turns green and the device switches to the "Duplicate Smart Card" procedure.
Wait 10 seconds to exit the procedure. Exiting is signalled by the LED blinking yellow 3 times.
Repeat the procedure from step 5.4.1.
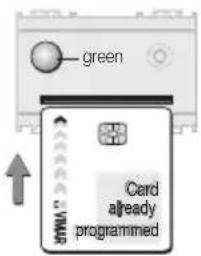
5.4.4
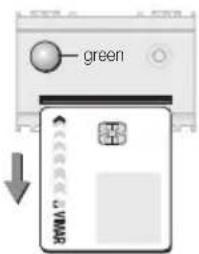
Insert an already-programmed smart card.
Warning!
It is necessary to keep at least one smart card enabled.
The device waits for an already programmed smart card for about 10 seconds, after which it exits the procedure.
Exiting is signalled by the LED blinking yellow 3 times.

VIMAR
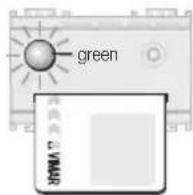
5.4.5
The LED blinks green for as long as the smart card remains inserted, indicating that it has been recognised.
If the smart card is not recognised, the LED turns red and remains illuminated until the card is removed.
5.4.6
Remove the smart card.
The LED turns green.
5.4.7
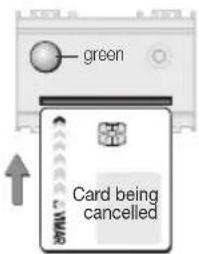
Insert the smart card to be cancelled.
The device waits for the smart card to be cancelled for about 2 minutes, after which it exits the procedure. Exiting is signalled by the LED blinking yellow 3 times.

VIMAR
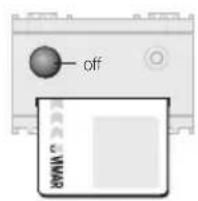
5.4.8
When the LED turns off, the smart card has been cancelled.
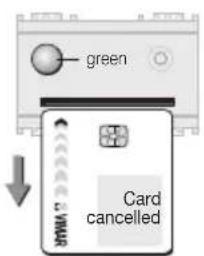
5.4.9
Remove the cancelled smart card.
The LED turns green again, waiting for other smart cards to cancel.
To cancel additional smart cards, repeat the procedure from step 5.4.7.
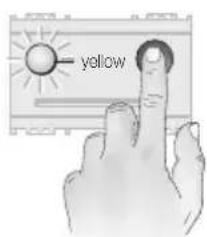
5.4.10
To exit the procedure, press the front button.
The LED blinks yellow 3 times, and then turns off.

5.5 Synchronising readers
The "Synchronising Readers" procedure configures several different readers to work using the same smart card, the same address and the same code.
Synchronising a non-initialised reader
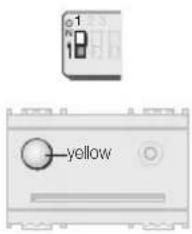
5.5.1
Place dip-switch 1 on the reader being synchronised in the ON position.
The LED lights up yellow.
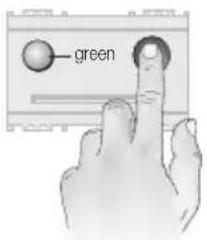
5.5.2
Press the front button within 9 seconds. The LED turns green.
Warning!
If the button is not pressed within 9 seconds, the LED lights up green and the system switches to the "Initialise reader and program smart cards" procedure.
To exit the procedure, place dip-switch 1 in the OFF position.
Repeat the procedure from step 5.5.1.
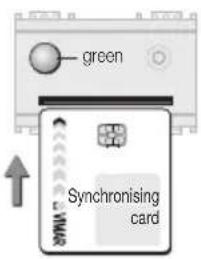
5.5.3
Insert a smart card already programmed by the synchronising reader/programmer, into the reader being synchronised.

VIMAR
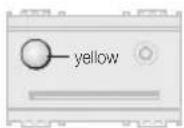

2 minutes
The device waits for a synchronising smart card for about 2 minutes, after which the LED turns yellow and no further commands are accepted. To resume normal operation, place dip-switch 1 in the OFF position.
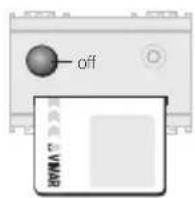
5.5.4
The LED switches off to signal that the smart card code has been copied, and the reader/programmer synchronised.
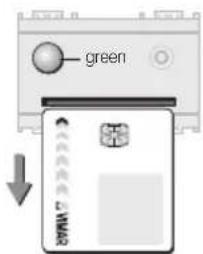
5.5.5
Remove the smart card. The LED turns green.
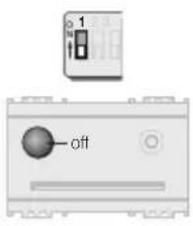
5.5.6
To exit the procedure, place dip-switch 1 in the OFF position
If dip-switch 1 is not placed in the OFF position within 2 minutes, the LED turns yellow and no further commands are accepted. To resume normal operation, place dip-switch 1 in the OFF position.
Synchronising an already-initialised reader
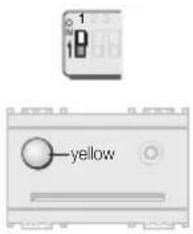
5.5.7
Place dip-switch 1 on the reader being synchronised in the ON position. The LED lights up yellow.
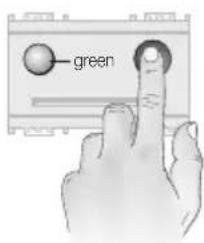
5.5.8
Press the front button within 9 seconds. The LED turns green.
Warning!
If the button is not pressed within 9 seconds, the LED turns green and the system switches to the "Change the reader and smart card codes" procedure.
To exit the procedure, place dip-switch 1 in the OFF position.
Repeat the procedure from step 5.5.7.
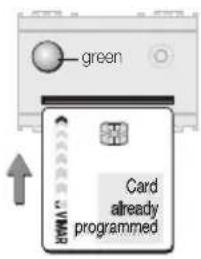
5.5.9
Insert into the reader a smart card programmed by that same reader, to enable continuation of the procedure.
The device waits for a programmed smart card for about 2 minutes, after which the LED turns yellow and no further commands are accepted. To resume normal operation, place dip-switch 1 in the OFF position.

VIMAR

VIMAR
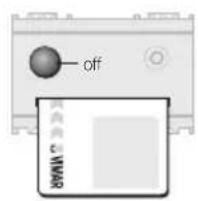
5.5.10
When the green LED turns off, the smart card has been recognised.
If the smart card is not recognised, the LED turns red and remains illuminated until the card is removed.
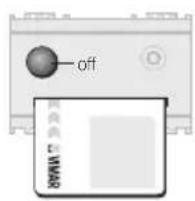
5.5.13
The LED switches off to signal that the smart card code has been copied, and the reader/programmer synchronised.
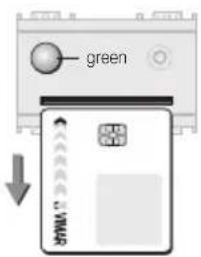
5.5.11
Remove the recognised smart card.
The LED turns green again.
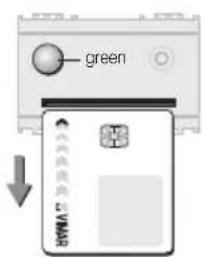
5.5.14
Remove the smart card.
The LED turns green again.
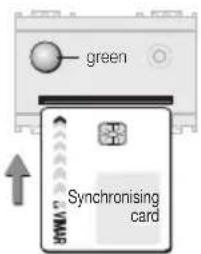
5.5.12
Insert a smart card programmed by the synchronising reader.
If no synchronising smart card is inserted within 2 minutes, the LED turns yellow and no further commands are accepted. In this case it is necessary to place the dip-switch 1 in the OFF position to exit the procedure.
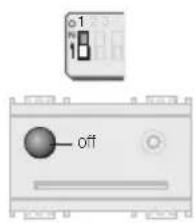
5.5.15
To exit the procedure, place dip-switch 1 in the OFF position
If dip-switch 1 is not placed in the OFF position within 2 minutes, the LED turns yellow and no further commands are accepted. To resume normal operation, place dip-switch 1 in the OFF position.

VIMAR
Device and access control in the residential and services sectors:
6. Operation with a MASTER smart card
- a MASTER smart card is required to perform any operation (initialising, programming, duplicating, cancelling, changing the code, synchronising readers).
- To operate with a MASTER smart card, dip-switch 3 must be placed in the ON position (see pg. 6).
• Reprogramming MASTER smart cards
It is not possible to cancel MASTER smart cards, but only to reprogram them.
To effect a complete reprogramming, a MASTER smart card containing the code to be cancelled is needed to enable the procedure. When reprogramming is complete, this smart card will no longer be recognised.
• Reprogramming SLAVE smart cards
In order to duplicate, cancel or reprogram SLAVE smart cards, it is necessary to have the MASTER smart card which generated them.
- Cancelling SLAVE smart cards
Use the procedure for cancelling SLAVE smart cards (see pg. 31).

6.1 Initialising the reader and programming MASTER smart cards
This procedure generates a MASTER code, associates it with the address selected by the dip-switches on the reader/programmer being initialised, and copies it to the desired MASTER smart cards.
Important!
During this phase, always program several copies of the MASTER smart card (to be kept in a safe place), because it will not be possible to make duplicates at a later time.

VIMAR
6.1.1
Power up the reader.
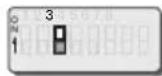
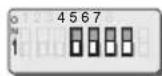
6.1.2
Place dip-switch 3 in the ON position.
6.1.3
Select the desired address (see "Address selection" table on page 6).
In the example, address A was used.

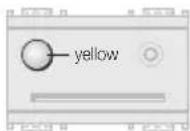
6.1.4
Place dip-switch 2 in the ON position. The LED lights up yellow.

VIMAR
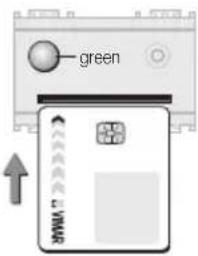
6.1.5
When the LED turns green (after about 10 seconds), insert the smart card to be programmed as the MASTER.
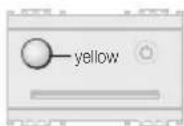
The device waits for the smart card for about 2 minutes, after which the LED turns yellow and no further commands are accepted. To resume normal operation place dip-switch 2 in the OFF position.

2 minutes
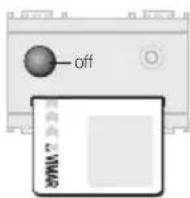
6.1.6
When the LED turns off, the MASTER smart card has been programmed.
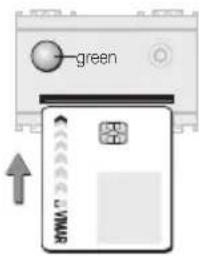
6.1.7
Remove the smart card.
The LED turns green again, waiting for other smart cards to program.
To duplicate additional smart cards, repeat the procedure from step 6.1.5.
If no smart cards are inserted for about 2 minutes, the LED turns yellow and no further commands are accepted.
To resume normal operation, replace dip-switch 2 in the OFF position.
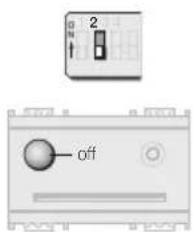
6.1.8
To exit the procedure, place dip-switch 2 in the OFF position.

6.2 Initialising the reader and programming SLAVE smart cards
This procedure generates a SLAVE code, associates it with the address selected by the dip-switches on the reader/programmer being initialised, and copies it to the desired smart cards.
To carry out this procedure it is necessary to have the MASTER smart card (see paragraph 6.1).
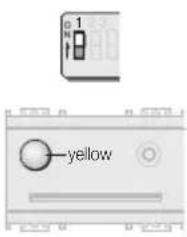
6.2.1
Place dip-switch 1 in the ON position.
The LED lights up yellow.

VIMAR
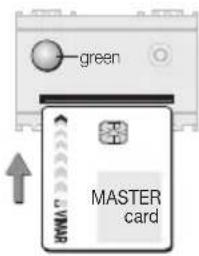
6.2.2
When the LED turns green (after about 10 seconds), insert the MASTER smart card to enable the procedure.
If the LED turns red, it means that a SLAVE smart card or a non-enabled MASTER smart card was inserted.
Remove the smart card and insert the correct one.
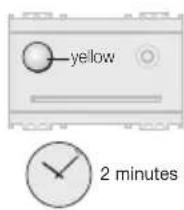
If no smart cards are inserted for about 2 minutes, the LED turns yellow and no further commands are accepted.
To resume normal operation, replace dip-switch 1 in the OFF position.
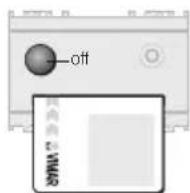
6.2.3
If the MASTER smart card is recognised, the LED switches off.

VIMAR
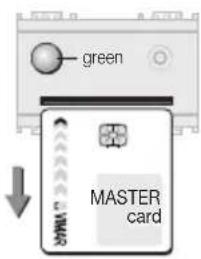
6.2.4
Remove the MASTER smart card.
The LED turns green again, waiting for a SLAVE smart card to program.
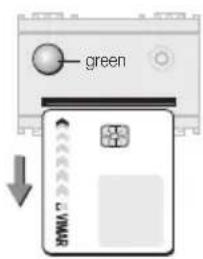
6.2.7
Remove the SLAVE smart card, the LED turns green again, waiting for other SLAVE smart cards to program.
To program additional SLAVE smart cards, repeat the procedure from step 6.2.5.
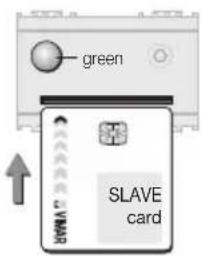
6.2.5
Insert the SLAVE smart card to be programmed.
Warning! If the MASTER smart card is re-inserted at this point, the SLAVE code will also be written to it. To delete this card, use the "Cancelling SLAVE smart cards" procedure described on pg. 31.
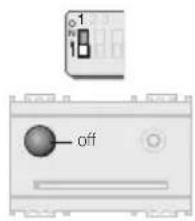
6.2.8
To exit the procedure, place dip-switch 1 in the OFF position.
If no synchronising smart card is inserted the LED turns yellow and no further commands are accepted. In this case it is necessary to place the dip-switch 1 in the OFF position to exit the procedure.
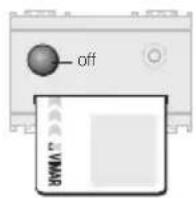
6.2.6
When the LED turns off, the SLAVE smart card has been programmed.

6.3 Duplicating SLAVE smart cards
This procedure can be used to create new SLAVE smart cards at any time.
To carry out this procedure it is necessary to have the MAS-TER smart card.
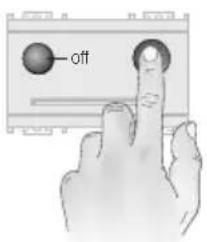
6.3.1
Press the front button.
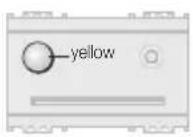
6.3.2
The LED lights up yellow.

VIMAR
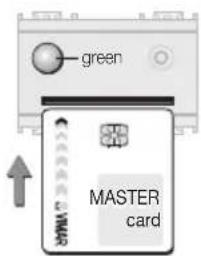
6.3.3
When the LED turns green (after about 10 seconds), insert the MASTER smart card within 10 seconds to enable the procedure.
If the MASTER smart card is not inserted within 10 seconds:
• the LED blinks yellow 3 times
• the device exits the procedure
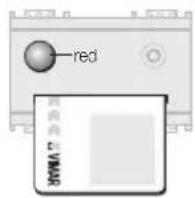
If the LED turns red, it means that a SLAVE smart card or a non-enabled MASTER smart card was inserted.
Remove the smart card and insert the correct one.
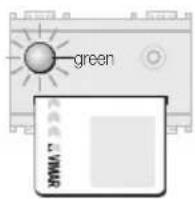
6.3.4
If the MASTER smart card is recognised, the LED blinks green for the remaining time that it is left inside the reader/programmer.

VIMAR
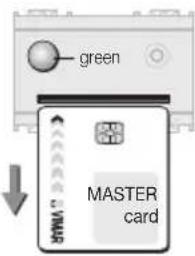
6.3.5
Remove the MASTER smart card.
The LED turns green again, waiting for a SLAVE smart card to program.
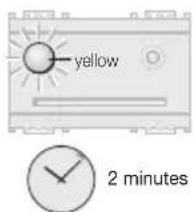
The device waits for a SLAVE smart card to program for about 2 minutes, after which it automatically exits the procedure.
Exiting is signalled by the LED blinking yellow 3 times.
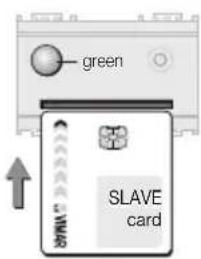
6.3.6
Insert the SLAVE smart card to be programmed.
The device waits for a SLAVE smart card to program for about 2 minutes, after which it automatically exits the procedure.
Exiting is signalled by the LED blinking yellow 3 times.
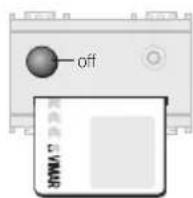
6.3.7
When the LED turns off, the duplicate SLAVE smart card has been programmed.
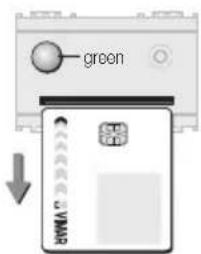
6.3.8
Remove the SLAVE smart card.
The LED turns green again, ready to program other SLAVE smart cards.
To program additional SLAVE smart cards, repeat the procedure from step 6.3.6.
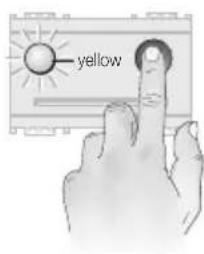
6.3.9
To exit the procedure, press the front button. The LED will blink yellow 3 times, and then turn off.
If no smart cards are inserted for about 2 minutes, the procedure automatically terminates.
Exiting is signalled by the LED blinking yellow 3 times.

6.4 Changing reader and MASTER smart card codes
This procedure changes the MASTER code assigned to the address of the reader/programmer, and saves it to the smart card.
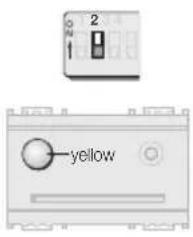
6.4.1
Place dip-switch 2 in the ON position. The LED lights up yellow.
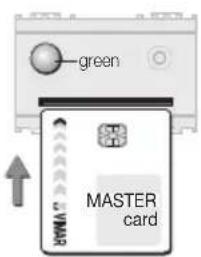
6.4.2
When the LED turns green (after about 10 seconds), insert the currently active MAS-TER smart card to enable the procedure.

VIMAR
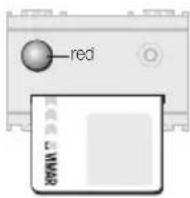
If the LED turns red, it means that a SLAVE master card or a non-enabled MASTER smart card was inserted. Remove the smart card and insert the correct one.
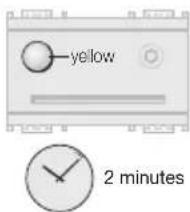
If no smart cards are inserted for about 2 minutes, the LED turns yellow and no further commands are accepted. To resume normal operation, place dip-switch 2 in the OFF position.
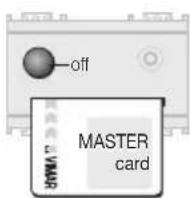
6.4.3
If the MASTER smart card is recognised, the LED switches off.

VIMAR
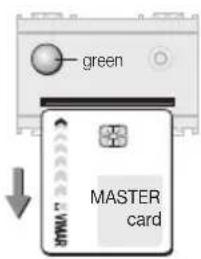
6.4.4
Remove the MASTER smart card. The LED turns green again.
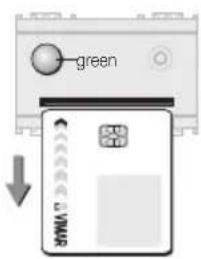
6.4.7
Remove the smart card.
The LED turns green again, waiting for other MASTER smart cards to reprogram. To reprogram additional MASTER smart cards, repeat the procedure from step 6.4.5.
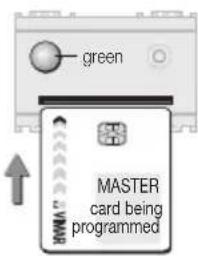
6.4.5
Insert the MASTER smart card again.
Warning!
Any additional smart cards containing the old code must be reprogrammed with the new code, otherwise they can no longer be used.
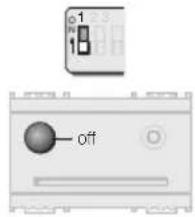
6.4.8
To exit the procedure, place dip-switch 2 in the OFF position.
If no smart cards are inserted for about 2 minutes, the LED turns yellow and no further commands are accepted.
To resume normal operation, place dip-switch 2 in the OFF position.
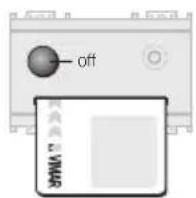
6.4.6
When the LED turns off, the MASTER smart card has been reprogrammed.

6.5 Changing the reader and SLAVE smart card codes
This procedure changes the SLAVE code assigned to the address of the reader/programmer, and saves it to the smart card.
To carry out this procedure it is necessary to have the MAS-TER smart card.
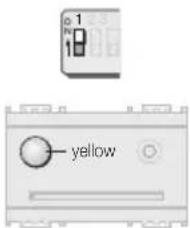
6.5.1
Place dip-switch 1 in the ON position. The LED lights up yellow.

VIMAR
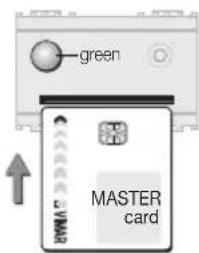
6.5.2
When the LED turns green (after about 10 seconds), insert the MASTER smart card to enable the procedure.
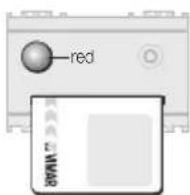
If the LED turns red, it means that a SLAVE smart card or a non-enabled MASTER smart card was inserted.
Remove the smart card and insert the correct one.
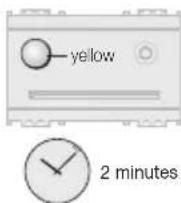
If no smart cards are inserted for about 2 minutes, the LED turns yellow and no further commands are accepted.
To resume normal operation, replace dip-switch 1 in the OFF position.

VIMAR
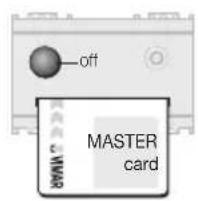
6.5.3
If the MASTER smart card is recognised, the LED switches off.
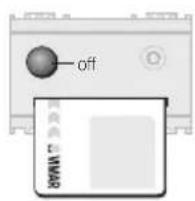
6.5.6
When the LED turns off, the SLAVE smart card has been reprogrammed.
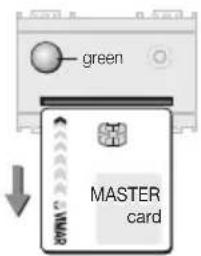
6.5.4
Remove the MASTER smart card.
The LED turns green again, waiting for a SLAVE card to reprogram.
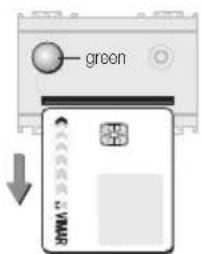
6.5.7
Remove the smart card, the LED turns green again, waiting for other smart cards to reprogram.
To reprogram additional smart cards, repeat the procedure from step 6.5.5.
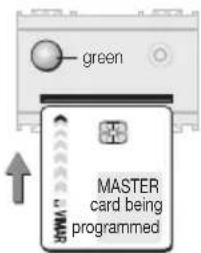
6.5.5
Insert the SLAVE smart card to reprogram. Any other SLAVE smart cards containing the old code must be reprogrammed in order to continue being used.
If no smart card is inserted for about 2 minutes, the LED turns yellow and no further commands are accepted.
To resume normal operation place dip-switch 1 in the OFF position.
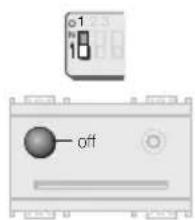
6.5.8
To exit the procedure, place dip-switch 1 in the OFF position.
If no smart cards are inserted for about 2 minutes, the LED turns yellow and no further commands are accepted.
To resume normal operation, replace dip-switch 1 in the OFF position.

VIMAR

6.6 Cancelling SLAVE smart cards
This procedure can be used to cancel SLAVE smart cards, or to cancel the slave code from a MASTER smart card. The MASTER codes is not removed.
To carry out this procedure, it is necessary to have the MAS-TER smart card.
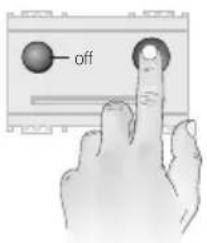
6.6.1
Press the front button.
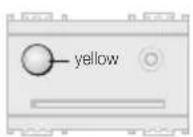
6.6.2
The LED lights up yellow.
6.6.3
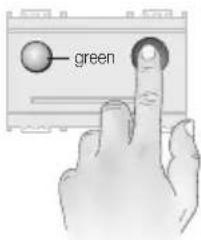
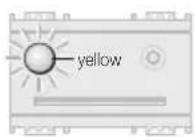
Press the front button within 9 seconds. The LED turns green.
Warning!
If the button is not pressed within 9 seconds, the LED turns green and the device switches to the "Duplicate SLAVE smart card" procedure.
Wait 10 seconds to exit the procedure. Exiting is signalled by the LED blinking yellow 3 times.
Repeat the procedure from step 6.6.1.
6.6.4
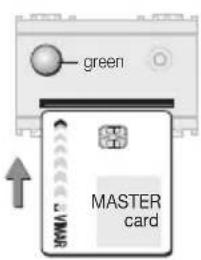
Within 10 seconds, insert the MASTER smart card containing the MASTER code currently in use.
If the MASTER smart card is not inserted within 10 seconds:
• the LED blinks yellow 3 times
• the device exits the procedure

VIMAR
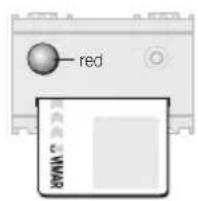
If the LED turns red, it means that a SLAVE master card or a non-enabled MASTER smart card was inserted.
Remove the smart card and insert the correct one.
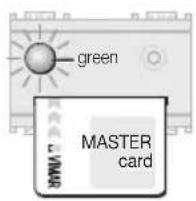
6.6.5
If the MASTER smart card is recognised, the LED blinks green for the remaining time that it is left inside the reader/programmer.
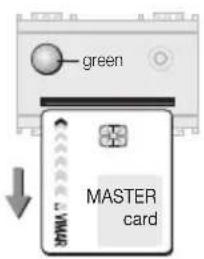
6.6.6
Remove the MASTER smart card.
The LED turns green again, waiting for other smart cards to cancel.
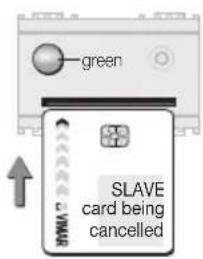
6.6.7
Insert the SLAVE smart card to be cancelled.
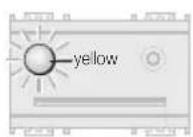

If no smart cards are inserted for about 2 minutes, the procedure automatically terminates.
Exiting the procedure is signalled by the LED blinking yellow 3 times.
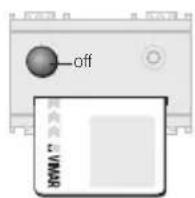
6.6.8
When the LED turns off, the SLAVE smart card has been cancelled.
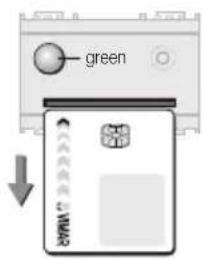
6.6.9
Remove the SLAVE smart card.
The LED turns green again, waiting for other smart cards to cancel.
To cancel additional SLAVE smart cards, repeat the procedure from step 6.6.7.
If no smart cards are inserted for about 2 minutes, the procedure automatically terminates.
Exiting is signalled by the LED blinking yellow 3 times.
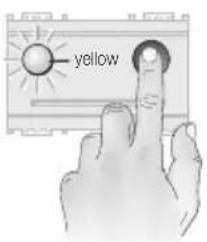
6.6.10
To exit the procedure, press the front button.
The LED blinks yellow 3 times, and then turns off.

VIMAR

6.7 Synchronising readers with MASTER smart cards
The "Synchronise readers with MASTER smart card" procedure programs several readers to work with the same MASTER smart card, the same address and the same MASTER code.
Synchronising a non-initialised reader
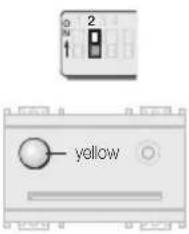
6.7.1
Check that dip-switch 3 is in the ON position.
Place dip-switch 2 on the reader being synchronised in the ON position.
The LED lights up yellow.

VIMAR
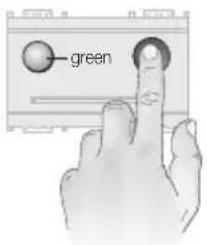
6.7.2
Press the front button within 9 seconds. The LED turns green.
Warning!
If the button is not pressed within 9 seconds, the LED turns green and the system switches to the "Initialise reader and program MASTER smart cards" procedure.
To exit the procedure, place dip-switch 2 in the OFF position.
Repeat the procedure from step 6.7.1.
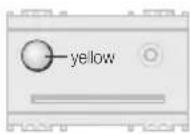

2 minutes
The device awaits the synchronising smart card for about 2 minutes, after which the LED turns yellow and no further commands are accepted. To resume normal operation, place dip-switch 2 in the OFF position.
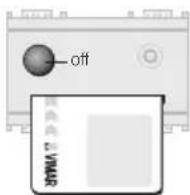
6.7.4
The LED switches off to signal that the smart card code has been copied, and the reader/programmer synchronised.
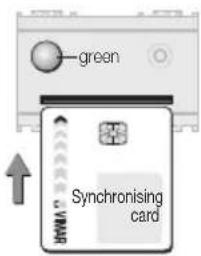
6.7.3
Insert a MASTER smart card, already programmed by the synchronising reader/programmer, into the reader being synchronised.
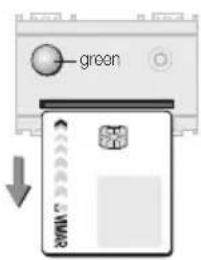
6.7.5
Remove the smart card. The LED turns green again.
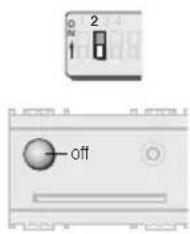
6.7.6
To exit the procedure, place dip-switch 2 in the OFF position
If dip-switch 1 is not placed in the OFF position within 2 minutes, the LED turns yellow and no further commands are accepted. To resume normal operation, place dip-switch 2 in the OFF position.

VIMAR
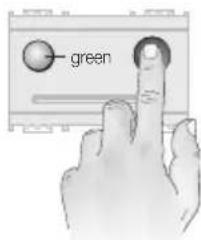
6.7.8
Press the front button within 9 seconds. The LED turns green.
Warning!
If the button is not pressed within 9 seconds, the LED turns green and the system switches to the "Change reader and MASTER smart card codes" procedure.
To exit the procedure, place dip-switch 2 in the OFF position.
Repeat the procedure from step 6.7.7.
Synchronising an already-initialised reader
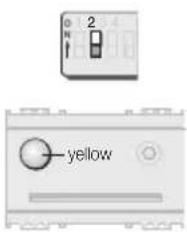
6.7.7
Place dip-switch 2, on the reader being synchronised, in the ON position. The LED lights up yellow.
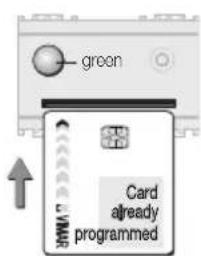
6.7.9
Insert into the reader a MASTER smart card programmed by that same reader, to enable continuation of the procedure.

VIMAR
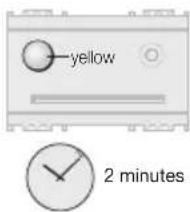
The device waits for the currently active MASTER smart card for about 2 minutes, after which the LED turns yellow and no further commands are accepted.
To resume normal operation, place dip-switch 2 in the OFF position.
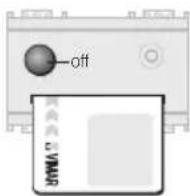
6.7.10
The LED turns off to indicate that the smart card has been recognised.
If the smart card is not recognised, the LED turns red and remains illuminated until the card is removed.
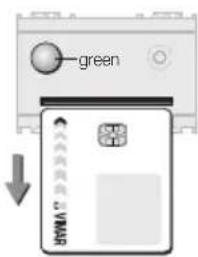
6.7.11
Remove the smart card which has been recognised.
The LED turns green.
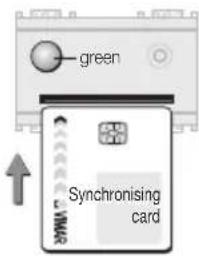
6.7.12
Insert a MASTER smart card, already programmed by the synchronising reader/programmer, into the reader being synchronised.
If no synchronising MASTER smart card is inserted within 2 minutes, the LED turns yellow and no further commands are accepted. In this case it is necessary to place dip-switch 2 in the OFF position to exit the procedure.
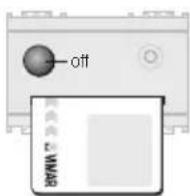
6.7.13
The LED switches off to signal that the MASTER smart card code has been copied, and the reader/programmer synchronised.
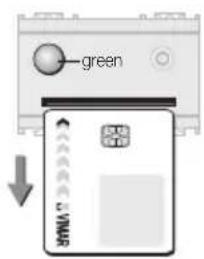
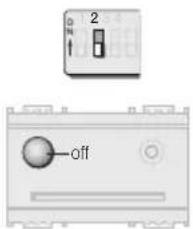
6.7.14
Remove the smart card.
The LED turns green again.
6.7.15
To exit the procedure, place dip-switch 2 in the OFF position
If dip-switch 2 is not placed in the OFF position within 2 minutes, the LED turns yellow and no further commands are accepted. To resume normal operation, place dip-switch 2 in the OFF position.

VIMAR

6.8 Synchronise readers with SLAVE smart cards
This procedure allows several readers to operate using the same SLAVE smart card, the same address and the same SLAVE code.
Synchronising a non-initialised reader
Before synchronising it is necessary to:
- initialise the reader being synchronised with a MASTER code (procedure 6.1)
or
- synchronise the reader with the MASTER code (procedure 6.7).
6.8.1
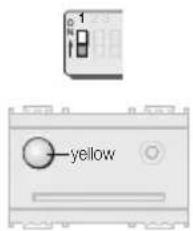
Place dip-switch 1 on the reader being synchronised in the ON position.
The LED lights up yellow.
6.8.2
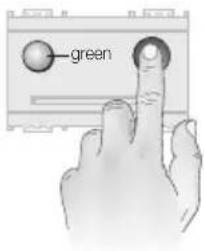
Press the front button within 9 seconds. The LED turns green.
Warning!
If the button is not pressed within 9 seconds, the LED turns green and the system switches to the "Initialise reader and program SLAVE smart card" procedure. To exit the procedure, place dip-switch 1 in the OFF position.
Repeat the procedure from step 6.8.1.

VIMAR
6.8.3
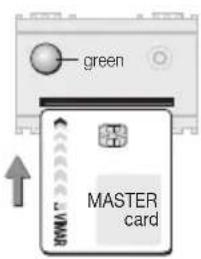
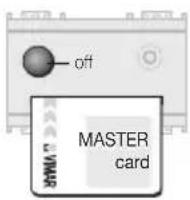
Insert the MASTER smart card already programmed by the reader/programmer.

2 minutes
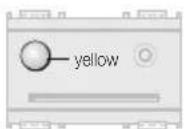
The device waits for the currently active MASTER smart card for about 2 minutes, after which the LED turns yellow and no further commands are accepted.
To resume normal operation, place dip-switch 1 in the OFF position.
6.8.4
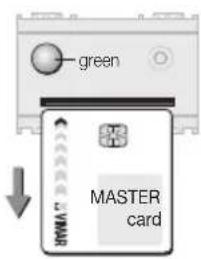
The LED turns off to indicate that the MASTER smart card has been recognised.
If the smart card is not recognised, the LED turns red and remains illuminated until the card is removed.
6.8.5
Remove the MASTER smart card.
The LED turns green again, waiting for a synchronising SLAVE smart card.
6.8.6
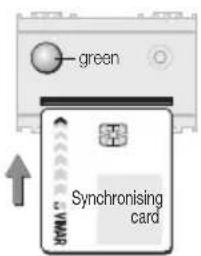
Insert a SLAVE smart card, that has already been programmed by the synchronising reader/programmer, into the reader being synchronised.
The device waits for the synchronising smart card for about 2 minutes, after which the LED turns yellow and no further commands are accepted.
To resume normal operation, place dip-switch 1 in the OFF position.

VIMAR
6.8.7
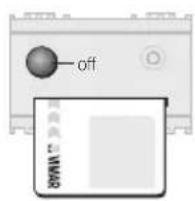
The LED switches off to signal that the smart card code has been copied, and the reader/programmer synchronised.
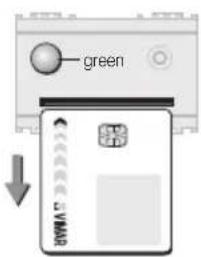
6.8.8
Remove the smart card.
The LED turns green again.
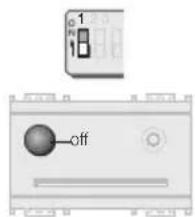
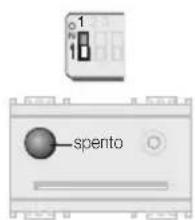
6.8.9
To exit the procedure, place dip-switch 1 in the OFF position.
If dip-switch 1 is not placed in the OFF position within 2 minutes, the LED turns yellow and no further commands are accepted. To resume normal operation, place dip-switch 1 in the OFF position.
Synchronising an already-initialised reader
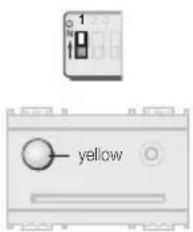
6.8.10
Place dip-switch 1 on the reader being synchronised in the ON position. The LED lights up yellow.
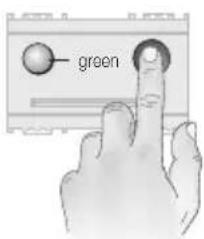
6.8.11
Press the front button within 9 seconds. The LED turns green.
Warning!
If the button is not pressed within 9 seconds, the LED turns green and the system switches to the "Initialise reader and program SLAVE smart card" procedure. To exit the procedure, place dip-switch 1 in the OFF position. Repeat the procedure from step 6.8.10.

VIMAR
6.8.12
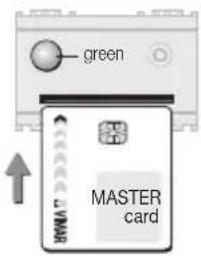
Insert a MASTER smart card already programmed by the reader/programmer.
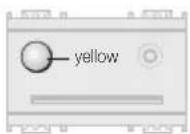

The device waits for the MASTER smart card for about 2 minutes, after which the LED turns yellow and no further commands are accepted. To resume normal operation place dip-switch 1 in the OFF position.
6.8.13
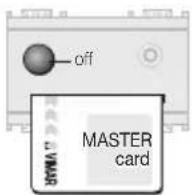
The LED turns off to indicate that the MASTER smart card has been recognised.
If the smart card is not recognised, the LED turns red and remains illuminated until the card is removed.
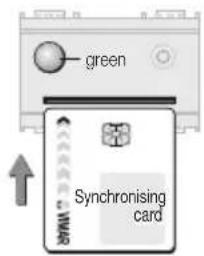
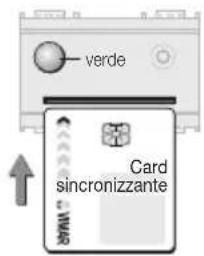
6.8.14
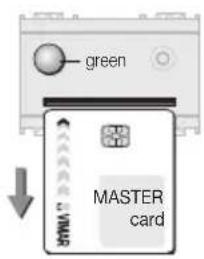
Remove the MASTER smart card.
The LED turns green again, waiting for a synchronising SLAVE smart card.
6.8.15
Insert a SLAVE smart card, already programmed by the synchronising reader/programmer, into the reader being synchronised.
The device will await the synchronising smart card for about 2 minutes, after which the LED turns yellow and no further commands are accepted.
To resume normal operation, place dip-switch 1 in the OFF position.

VIMAR
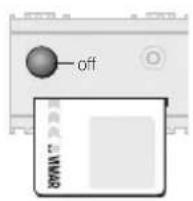
6.8.16
The LED switches off to signal that the smart card code has been copied, and the reader/programmer synchronised.
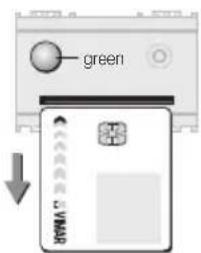
6.8.17
Remove the smart card.
The LED turns green again.
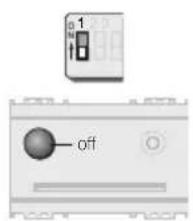
6.8.18
To exit the procedure, place dip-switch 1 in the OFF position.
If dip-switch 1 is not placed in the OFF position within 2 minutes, the LED turns yellow and no further commands are accepted. To resume normal operation, place dip-switch 1 in the OFF position.
Device and access control in the hotel sector:
7. Operation with a MASTER smart card
- a MASTER smart card is required to perform any operation (initialising, programming, duplicating, cancelling, changing the code, synchronising readers).

VIMAR
• Reprogramming MASTER smart cards
It is not possible to cancel MASTER smart cards, but only to reprogram them.
To effect a full reprogramming, a MASTER smart card containing the code being cancelled is needed to enable the procedure. When reprogramming is complete, this smart card will no longer be recognised.
• Reprogramming SLAVE smart cards
In order to duplicate, cancel or reprogram a SLAVE smart card, it is necessary to have the MASTER smart card which generated it.

7.1 Initialising the reader and programming MASTER smart cards
This procedure generates a MASTER code in the memory of the reader/programmer being initialised, and copies it to the desired MASTER smart cards.
Important! During this phase, always program several copies of the MASTER smart card (to be kept in a safe place), because it will not be possible to make duplicates at a later time.
natural_image
Diagram of a device rear panel with labeled ports and internal components (no readable text or symbols)7.1.1
Power up the reader.
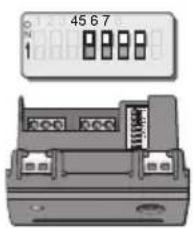
7.1.2
Select the "Hotel" address

VIMAR
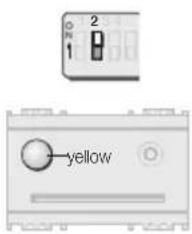
7.1.3
Place dip-switch 2 in the ON position. The LED lights up yellow.
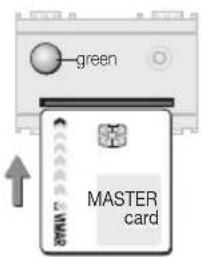
7.1.4
When the LED turns green (after about 10 seconds), insert the smart card to be programmed as the MASTER.
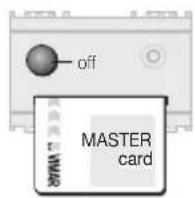
7.1.5
When the LED turns off, the MASTER smart card has been programmed.

VIMAR
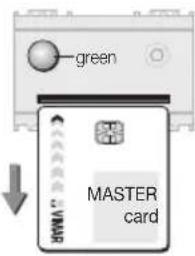
7.1.6
Remove the smart card.
The LED turns green again, waiting for other MASTER smart cards to program.
To program additional MASTER smart cards, repeat the procedure from step 7.1.4.
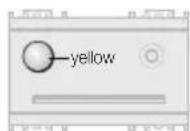
If no smart cards are inserted for about 2 minutes, the LED turns yellow and no further commands are accepted.
To resume normal operation, place dip-switch 2 in the OFF position.

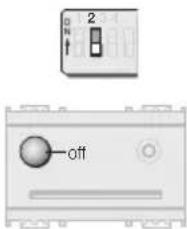
7.1.7
To exit the procedure, place dip-switch 2 in the OFF position.

7.2 Initialising the reader and programming SLAVE smart cards
This procedure generates a SLAVE code in the memory of the reader/programmer being initialised, and copies it to the desired smart cards.
Each time the "Initialise reader and program SLAVE smart card" procedure is invoked, a different code will be generated.
To carry out this procedure it is necessary to have the MAS-TER smart card (see paragraph 7.1).
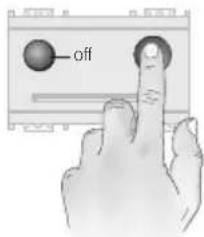
7.2.1
Press the front button.

VIMAR
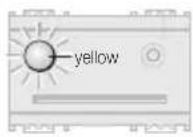
7.2.2
The LED blinks yellow 3 times.
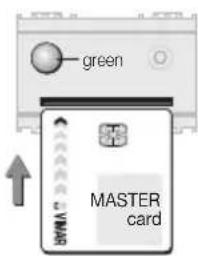
7.2.3
When the LED stops blinking and turns green, insert the MASTER smart card to enable the procedure.
If the MASTER smart card is not inserted within 2 minutes:
• the LED blinks yellow 3 times
• the device exits the procedure
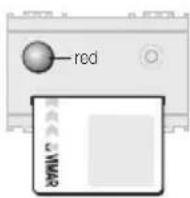
If the LED turns red, it means a SLAVE master card or a non-enabled MASTER smart card was inserted.
Remove the incorrect smart card and insert the correct one.
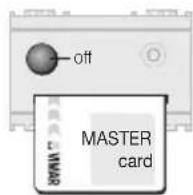
7.2.4
If the MASTER smart card is recognised, the LED switches off.
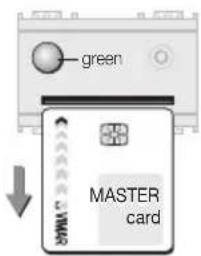
7.2.5
Remove the MASTER smart card.
The LED turns green again, waiting for a SLAVE card to program.
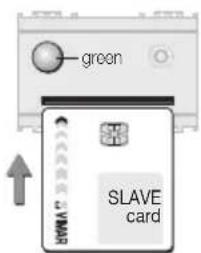
7.2.6
Insert the SLAVE smart card to be programmed.
If the SLAVE smart card is not inserted within 2 minutes:
• the LED blinks yellow 3 times
• the device exits the procedure

VIMAR
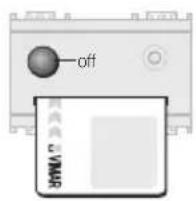
7.2.7
When the LED turns off, the SLAVE smart card has been programmed.
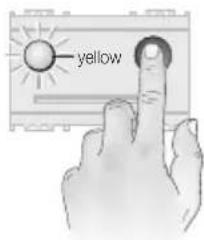
7.2.9
To exit the procedure, press the front button.
The LED blinks yellow 3 times, and then turns off.
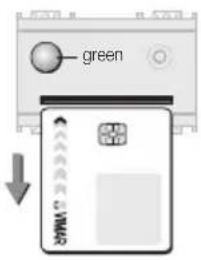
7.2.8
Remove the SLAVE smart card.
The LED turns green again, waiting for other SLAVE smart cards to program.
To program additional SLAVE smart cards, repeat the procedure from step 7.2.6.
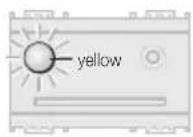
If no smart cards are inserted for about 2 minutes, the procedure automatically terminates.
Exiting the procedure is signalled by the LED blinking yellow 3 times.

2 minutes

VIMAR

7.3 Changing the reader and SLAVE smart card codes
This procedure assigns a new SLAVE code to the memory of the reader/programmer and copies it to the desired SLAVE smart cards.
Each time the “Change reader and SLAVE smart card codes” procedure is invoked, a different code will be generated.
To carry out this procedure it is necessary to have the MAS-TER smart card (see paragraph 7.1).
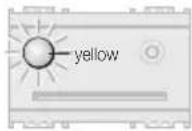
7.3.2
The LED blinks yellow 3 times.
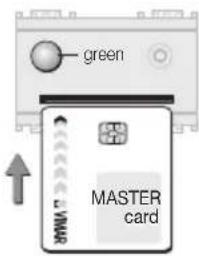
7.3.3
When the LED stops blinking and turns green, insert the MASTER smart card to enable the procedure.
If the MASTER smart card is not inserted within 2 minutes:
• the LED blinks yellow 3 times
• the device exits the procedure
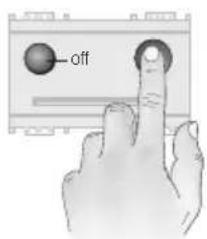
7.3.1
Press the front button.
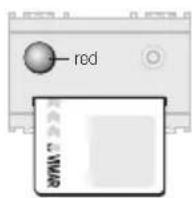
If the LED turns red, it means a SLAVE master card or a non-enabled MASTER smart card was inserted.
Remove the incorrect smart card and insert the correct one.

VIMAR
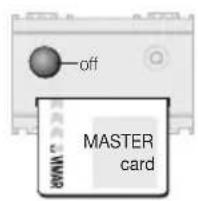
7.3.4
If the MASTER smart card is recognised, the LED switches off.
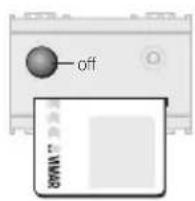
7.3.7
When the LED turns off, the SLAVE smart card has been programmed.
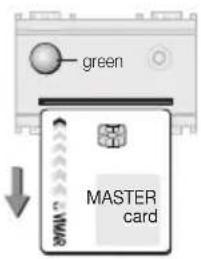
7.3.5
Remove the MASTER smart card. The LED turns green again, waiting for a SLAVE card to reprogram.
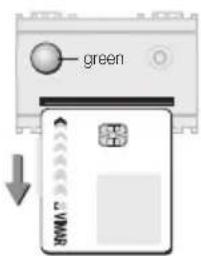
7.3.8
Remove the SLAVE smart card. The LED turns green again, waiting for other SLAVE smart cards to program. To program additional SLAVE smart cards, repeat the procedure from step 7.3.6.
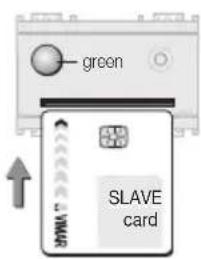
7.3.6
Insert the SLAVE smart card to be programmed.
If the SLAVE smart card is not inserted within 2 minutes:
• the LED blinks yellow 3 times
• the device exits the procedure
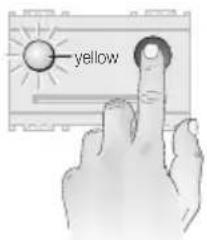
7.3.9
To exit the procedure, press the front button.
The LED blinks yellow 3 times, and then turns off.

2 minutes
If no smart cards are inserted for about 2 minutes, the procedure automatically terminates.
Exiting the procedure is signalled by the LED blinking yellow 3 times.

7.4 Synchronising readers with MASTER smart cards
The "Synchronise Readers with MASTER smart card" procedure allows several readers to operate using the same MASTER smart card and the same MASTER code.
Synchronising a non-initialised reader

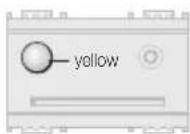
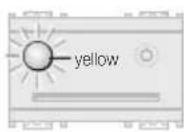
7.4.1
Place dip-switch 2 on the reader being synchronised in the ON position.
The LED lights up yellow.

VIMAR
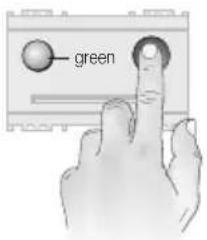
7.4.2
Press the front button within 9 seconds. The LED turns green.
Warning!
If the button is not pressed within 9 seconds, the LED turns green and the system switches to the "Initialise reader and program MASTER smart cards" procedure.
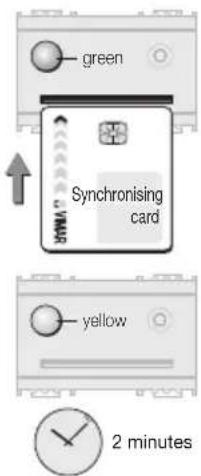
7.4.3
Insert a MASTER smart card, already programmed by the synchronising reader/programmer, into the reader being synchronised.
The device waits for the synchronising smart card for about 2 minutes, after which the LED turns yellow and no further commands are accepted.
To resume normal operation, place dip-switch 2 in the OFF position.
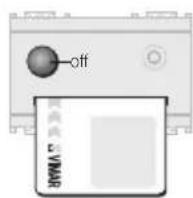
7.4.4
The LED switches off to signal that the smart card code has been copied, and the reader/programmer synchronised.
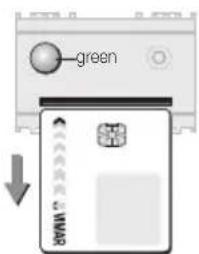
7.4.5
Remove the smart card.
The LED turns green again.
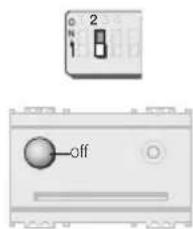
7.4.6
To exit the procedure, place dip-switch 2 in the OFF position.
If dip-switch 2 is not placed in the OFF position within 2 minutes, the LED turns yellow and no further commands are accepted. To resume normal operation, place dip-switch 2 in the OFF position.
Synchronising an already-initialised reader
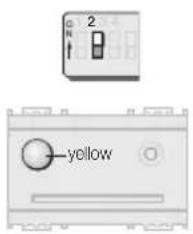
7.4.7
Place dip-switch 2 on the reader being synchronised in the ON position. The LED lights up yellow.
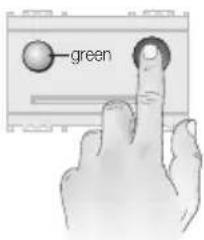
7.4.8
Press the front button within 9 seconds. The LED turns green.
Warning!
If the button is not pressed within 9 seconds, the LED turns green and the system prepares for the "Initialise reader and program MASTER smart cards" procedure.
To exit the procedure, place dip-switch 2 in the OFF position.
Repeat the procedure from step 7.4.7.

VIMAR
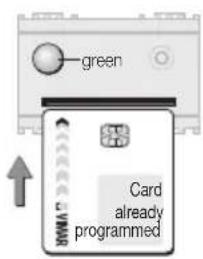
7.4.9
Insert into the reader a MASTER smart card programmed by that same reader, to enable continuation of the procedure.
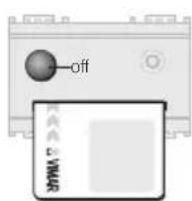
7.4.10
The LED turns off to indicate that the smart card has been recognised.
If the smart card is not recognised the LED turns red. Remove the incorrect smart card and insert the correct one.
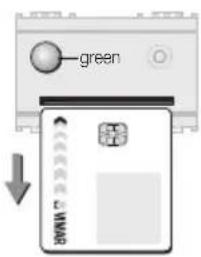
7.4.11
Remove the smart card which has been recognised. The LED turns green again.

VIMAR
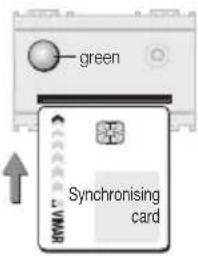
7.4.12
Insert a MASTER smart card, already programmed by the synchronising reader/programmer, into the reader being synchronised.
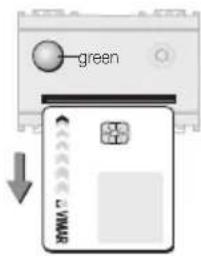
7.4.14
Remove the smart card.
The LED turns green again.
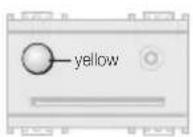
If no synchronising MASTER smart card is inserted within 2 minutes, the LED turns yellow and no further commands are accepted. In this case it is necessary to place dip-switch 2 in the OFF position to exit the procedure.
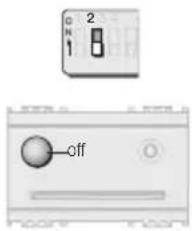
7.4.15
To exit the procedure, place dip-switch 2 in the OFF position.
If dip-switch 2 is not placed in the OFF position within 2 minutes, the LED turns yellow and no further commands are accepted. To resume normal operation, place dip-switch 2 in the OFF position.

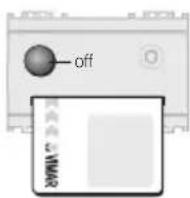
7.4.13
The LED switches off to signal that the MASTER smart card code has been copied, and the reader/programmer synchronised.
Use as an electronic power switch in the residential and services sectors, and in the hotel sector:
8. Operation as an electronic power switch with MASTER smart card
• Operation as an electronic power switch
Insertion of a MASTER or SLAVE smart card causes the relay contact to close; the contact then reopens when the smart card is removed (it is possible to choose between immediate opening of the contact, or after a 50-second delay).

VIMAR

8.1 Initialising the reader as an electronic switch, and programming MASTER smart cards
This procedure configures the reader as an electronic power switch, generates a MASTER code and copies it to the desired MASTER smart cards, including those already programmed for access control.
Important!
During this phase, always program several copies of the MASTER smart card (to be kept in a safe place), because it will not be possible to make duplicates at a later time.

VIMAR
8.1.1
Power up the reader.
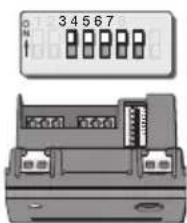
8.1.2
Select the "Electronic power switch" address (see table on page 6).
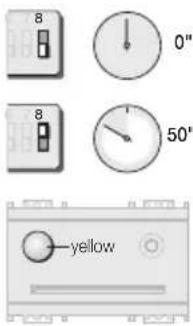
8.1.3
Place dip-switch 8 in the OFF position for instantaneous opening of the contact, or in the ON position for opening after a 50-second delay.

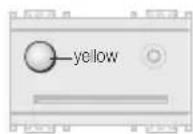
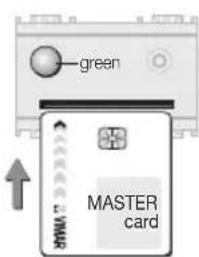
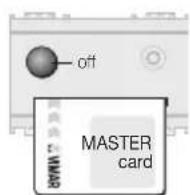
8.1.4
Place dip-switch 2 in the ON position.
8.1.5
When the LED turns green (after about 10 seconds), insert the smart card to be programmed as the MASTER.
8.1.6
When the LED turns off, the MASTER smart card has been programmed.
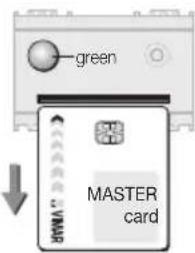
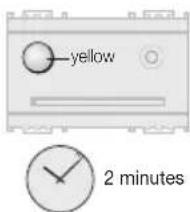
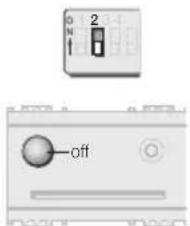
8.1.7
Remove the smart card.
The LED turns green again, waiting for other MASTER smart cards to program.
To program additional MASTER smart cards, repeat the procedure from step 8.1.5.
If no smart cards are inserted for about 2 minutes, the LED turns yellow and no further commands are accepted.
To resume normal operation, place dip-switch 2 in the OFF position.
8.1.8
To exit the procedure, place dip-switch 2 in the OFF position.

VIMAR
To program SLAVE smart cards for use with the reader in electronic switch mode, see:
7.2 Initialising the reader and programming SLAVE smart cards (pg. 44)
To change the code of the reader in electronic power switch mode and that of the SLAVE smart cards, see:
7.3 Changing the codes of the reader and SLAVE smart cards (pg. 47)
To synchronise the reader in electronic switch mode with MASTER smart cards, see:
7.4 Synchronising readers with MASTER smart cards (pg. 49)

VIMAR
9. Installation requirements
Installation must be carried out in compliance with the electrical regulations in force in the country where the products are installed.
10. Conformity to Regulations
EMC Directive.
EN 61000-6-1, EN 61000-6-3 Standards.
REACH (EU) Regulation no. 1907/2006 – Art.33. The product may contain traces of lead.

WEEE - Information for users
If the crossed-out bin symbol appears on the equipment or packaging, this means the product must not be included with other general waste at the end of its working life. The user must take the worn product to a sorted waste center, or return it to the retailer when purchasing a new one. Products for disposal can be consigned free of charge (without any new purchase obligation) to retailers with a sales area of at least 400 m², if they measure less than 25 cm. An efficient sorted waste collection for the environmentally friendly disposal of the used device, or its subsequent recycling, helps avoid the potential negative effects on the environment and people's health, and encourages the re-use and/or recycling of the construction materials.

VIMAR

49400447A0 05 2009

VIMAR
Viale Vicenza, 14
36063 Marostica VI - Italy
www.vimar.com
- ITALIANO
- INDICE
- Smart card 16452/16452.H
- 5.4.8
- 5.4.9
- 5.5.1
- 5.5.5
- 5.5.10
- 6.1.7
- 6.1.8
- VIMAR
- 6.2.2
- 6.2.4
- 6.3.3
- 6.3.5
- 6.4.2
- 6.5.2
- 6.5.3
- 6.5.4
- 6.5.7
- 6.6.4
- 6.6.5
- 6.6.6
- 6.7.7
- 6.7.11
- 6.8.1
- 6.8.3
- 6.8.5
- 6.8.8
- 6.8.9
- 6.8.10
- 6.8.12
- 6.8.14
- 7.1.2
- 7.1.4
- 7.1.6
- 7.2.3
- 7.2.5
- 7.2.7
- 7.3.3
- 7.3.4
- 7.3.7
- 7.3.5
- 7.4.15
- 8.1.2
- 8.1.4
- 8.1.7
- Device and access control in the hotel sector
- Use as an electronic power switch in the hotel, residential and services sector
- Key
- - ENGLISH
- Technical Specifications
- - ENGLISH
- Installation
- Connections
- Note
- Dip-switches
- Operation
- Operation without a MASTER smart card
- Initialising the reader and programming the smart cards
- 5.1.1
- 5.1.2
- 5.1.3
- 5.1.4
- 5.1.5
- 5.1.6
- 5.1.8
- 5.1.7
- Duplicating smart cards
- 5.2.5
- 5.2.6
- 5.2.7
- 5.2.8
- 5.2.9
- Changing the reader and smart card codes
- 5.3.1
- 5.3.2
- 5.3.5
- 5.3.3
- 5.3.6
- 5.3.4
- 5.3.7
- Warning!
- Cancelling smart cards
- 5.3.8
- 5.4.1
- 5.4.2
- 5.4.3
- 5.4.4
- 5.4.5
- 5.4.6
- 5.4.7
- 5.4.10
- Synchronising readers
- Synchronising a non-initialised reader
- 5.5.2
- 5.5.3
- 5.5.4
- 5.5.6
- Synchronising an already-initialised reader
- 5.5.7
- 5.5.8
- 5.5.9
- 5.5.13
- 5.5.11
- 5.5.14
- 5.5.12
- 5.5.15
- Device and access control in the residential and services sectors:
- Operation with a MASTER smart card
- • Reprogramming MASTER smart cards
- • Reprogramming SLAVE smart cards
- - Cancelling SLAVE smart cards
- Initialising the reader and programming MASTER smart cards
- Important!
- 6.1.1
- 6.1.2
- 6.1.3
- 6.1.4
- 6.1.5
- 6.1.6
- Initialising the reader and programming SLAVE smart cards
- 6.2.1
- 6.2.3
- 6.2.7
- 6.2.5
- 6.2.8
- 6.2.6
- Duplicating SLAVE smart cards
- 6.3.1
- 6.3.2
- 6.3.4
- 6.3.6
- 6.3.7
- 6.3.8
- 6.3.9
- Changing reader and MASTER smart card codes
- 6.4.1
- 6.4.3
- 6.4.4
- 6.4.7
- 6.4.5
- 6.4.8
- 6.4.6
- Changing the reader and SLAVE smart card codes
- 6.5.1
- 6.5.6
- 6.5.5
- 6.5.8
- Cancelling SLAVE smart cards
- 6.6.1
- 6.6.2
- 6.6.3
- 6.6.7
- 6.6.8
- 6.6.9
- 6.6.10
- Synchronising readers with MASTER smart cards
- 6.7.1
- 6.7.2
- 6.7.4
- 6.7.3
- 6.7.5
- 6.7.6
- 6.7.8
- 6.7.9
- 6.7.10
- 6.7.12
- 6.7.13
- 6.7.14
- 6.7.15
- Synchronise readers with SLAVE smart cards
- 6.8.2
- 6.8.4
- 6.8.6
- 6.8.7
- 6.8.11
- 6.8.13
- 6.8.15
- 6.8.16
- 6.8.17
- 6.8.18
- Device and access control in the hotel sector:
- Operation with a MASTER smart card
- Initialising the reader and programming MASTER smart cards
- 7.1.1
- 7.1.3
- 7.1.5
- 7.1.7
- Initialising the reader and programming SLAVE smart cards
- 7.2.1
- 7.2.2
- 7.2.4
- 7.2.6
- 7.2.9
- 7.2.8
- Changing the reader and SLAVE smart card codes
- 7.3.2
- 7.3.1
- 7.3.8
- 7.3.6
- 7.3.9
- Synchronising readers with MASTER smart cards
- 7.4.1
- 7.4.2
- 7.4.3
- 7.4.4
- 7.4.5
- 7.4.6
- 7.4.7
- 7.4.8
- 7.4.9
- 7.4.10
- 7.4.11
- 7.4.12
- 7.4.14
- 7.4.13
- Operation as an electronic power switch with MASTER smart card
- • Operation as an electronic power switch
- Initialising the reader as an electronic switch, and programming MASTER smart cards
- 8.1.1
- 8.1.3
- 8.1.5
- 8.1.6
- 8.1.8
- Installation requirements
- Conformity to Regulations
- WEEE - Information for users
Brand : Vimar
Model : 19461
Category : Memory reader