
VO0026 - Fan Volteno - Free user manual and instructions
Find the device manual for free VO0026 Volteno in PDF.


| Brand | Volteno |
| Model | VO0026 |
| Product Category | Uncategorized |
| Manual Language | English |
| Number of Pages | 38 |
| File Format | |
| Download Availability | Yes (Free) |
| User Rating | 9.0 / 10 |
| User Questions | 0 |
| Translation Service | Available upon request |
| Safety Information | Included in manual |
| Maintenance Instructions | Included in manual |
| Cleaning Instructions | Included in manual |
| Troubleshooting Guide | Included in manual |
| Diagrams and Illustrations | Included |
| Parts List | Included |
| Repairability Score | Not rated |
| Warranty Information | Standard warranty applies |
| Customer Support | Via website or email |
| Document Type | User Manual |
Frequently Asked Questions - VO0026 Volteno
User questions about VO0026 Volteno
0 question about this device. Answer the ones you know or ask your own.
Ask a new question about this device
Download the instructions for your Fan in PDF format for free! Find your manual VO0026 - Volteno and take your electronic device back in hand. On this page are published all the documents necessary for the use of your device. VO0026 by Volteno.
USER MANUAL VO0026 Volteno
natural_image
Line drawing of a standard electric fan with a stand (no text or symbols)MODELE :
| WENTYLATOR PODŁOGOWY BIAŁY | VO0026 | 40W | 5901508164896 |
| WENTYLATOR PODŁOGOWY CZARNY | VO0027 | 40W | 5901508164902 |
| WENTYLATOR PODŁOGOWY Z PILOTEM | VO0029 | 40W | 5901508164926 |
| WENTYLATOR PODŁOGOWY CHROM | VO0245 | 50W | 5901508172457 |
| WENTYLATOR PODŁOGOWY Z PILOTEM | VO0606 | 40W | 5902409218602 |
| WENTYLATOR PODŁOGOWY CHROM | VO0649 | 50W | 5902409219036 |
| WENTYLATOR PODŁOGOWY Z PILOTEM | VO0920 | 40W | 5901508187345 |
| WENTYLATOR PODŁOGOWY CHROM | VO0670 | 50W | 5902409219241 |
| WENTYLATOR PODŁOGOWY CHROM | VO0650 | 50W | 5902409219043 |
Użytkowanie
Please read these instructions carefully before use and retain for future reference.
IMPORTANT SAFETY INFORMATION
- When using electrical appliances basic safety precautions should always be followed.
- Check that the voltage indicated on the rating plate corresponds with that of the localnetwork before connecting the appliance to the mains power supply.
- This appliance is intended for domestic use only. It should not be used for commercial purposes.
- This appliance can be used by children aged from 8 years and above and personswith reduced physical, sensory or mental capabilities or lack of experience andknowledge if they have been given supervision or instruction concerning the use ofthe appliance in a safe way and understands the hazards involved.
• Children shall not play with this appliance. - Cleaning and maintenance shall not be made by children without supervision.
- There are no user-serviceable parts in this product. Refer servicing to qualifiedpersonnel.
- Do not operate this fan with a damaged plug or cord, after a malfunction or afterbeing dropped or damaged in any way.
- If the supply cord is damaged, it must be replaced by the manufacturer, its service agent or similarly qualified persons in order to avoid a hazard.
- Ensure that the fan is switched off before removing the guard.
- Do not insert anything through the grille when the fan is in use.
- Make sure that the fan is on a stable surface when operating.
- It is recommended to unplug the fan from the mains socket when not in use.
ASSEMBLY VO0026, VO0027

- Set the base on a level surface and insert the end caps then remove the four screws.
• Using these four screws, fix the stand outer tube to the base and securely tighten the screws.
• Temporarily remove the height adjustment collar then slide the base cover trim down the tube to cover the fixing with the base. Refit the adjustment collar. - With the height adjustment collar loosened off, extend part of the inner tube. Retighten the height adjustment collar.
- Loosen the locking screw at the bottom of the switch/motor assembly and insert the inner tube of the stand into it and push home. Re-tighten the screw.
• Unscrew the rear guard retaining nut from the motor shaft. - Fit the rear guard onto the body of the fan. Use the two pegs provided to align with the two holes in the rear guard.
- Lock into position by firmly tightening the rear guard retaining nut.
- If fitted remove the protective sleeve then push the fan blades onto the motor shaft aligning the slots. Lock into position by firmly tightening the retaining ring.
- If not already attached, fit the decorative cap to the front guard using the screws supplied.
- Mount the Front Safety Grill onto the Rear Grill by hanging the top hook clip of front grille over the top of the Rear Grill. Close the clasps all around the grill, finally fit the nut and screw through the hole in the bottom edge of the front grill and tighten.
-
Connect the mains plug to a suitable outlet.
• Select the desired speed using the speed control:
0 = Device off
1 = Low speed
2 = Medium speed
3 = High speed -
The inclination of the fan head can be adjusted by tilting it forwards and backwards. The fan head can then be locked into position, which is indicated by an audible click.
- Oscillation: to make the fan oscillate, push down the oscillation knob. To stop the fan head from oscillating, pull up the oscillation knob.
• To adjust the height, slacken the height adjustment collar and slide the upper section to the required height. Re-tighten the height adjustment collar.
CLEANING & STORAGE
• Before cleaning, turn the fan off and unplug from the power supply.
• Use a soft cloth to wipe off any dust. If the fan is very dirty, use a damp cloth and wipe dry.
• Do not use any chemicals, abrasives or solvents that could damage the fan.
• Store the fan in its original packaging in a ventilated dry area.
• The motor bearings are permanently sealed and do not require additional lubrication.
- 3 SPEED OPTIONS, to activate the corresponding speed press the ON/SPEED button once, twice or three times respectively
- Oscillation function, to activate the oscillation function press the corresponding button on the back of the fan - TIMER function, activated by the remote control or the button, press the appropriate number of times to set the desired time
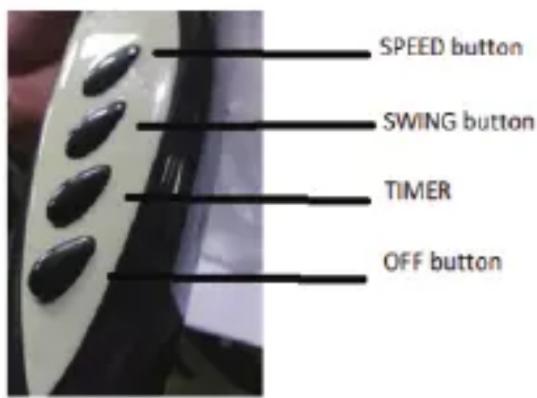
OPERATION OF VO0245
- Front Guard
- Locking screw
- Fan Blade
- Rear Guard
- Front Guard Nut
- Telescopic Stand
- Pivot Adjustment Thumb wheel
- Pivot Screw
- Motor Housing
- On/Off/Speed Control
- Oscillating Control
- Motor Spindle
- Fan Blade
Retaining Screw - Guard Retaining Clips
- Stand Base
- Weight
- Clamping Washer
- Locking Screw


ASSEMBLY
• Assemble the stand by inserting the outer tube into the base, fit the weight and secure in place using the locking screw. Place the assembly upright.
- Place the motor housing on the top of the stand and thread the large pivot bolt through the bracket
- Screw in the small retaining screw and tighten (but do not over tighten).
• Fit the large pivot knob onto the end of the pivot bolt and lightly tighten.
- Screw in the tilt adjustment thumb wheel and tighten.
• If fitted remove the protective sleeve then slide the fan blade onto the shaft and fix into place with the locking screw on the centre boss.
- Remove the bolt and nut from the bottom of the front guard and rotate all clips to an open position.
- Attach the front fan guard, lining up the top notch with the rear guard and ensuring the bolt hole is aligned for the two halves.
- Close the clips and replace the nut and bolt locking the two halves together.

natural_image
Mechanical assembly diagram showing a motor with wheels and a switch, no text or symbols presentOPERATION
- Connect the mains plug to a suitable outlet.
• Select the desired speed using the speed control:
$$ 0 = \text { Off } $$
$$ 1 = \text { Low speed } $$
$$ 2 = \text { Medium speed } $$
$$ 3 = \text { High speed } $$
- Oscillation: In order to make the fan oscillate, push down the oscillation control. To stop the fan head from oscillating, pull up the oscillation control.
- The incline of the ventilator head can be adjusted by loosening the tilt adjustment thumb wheel and tilting it forwards or backwards.
• To adjust the height, slacken the height adjustment wheel, slide the upper section to the required height and re-tighten the adjustment wheel.
CLEANING & STORAGE
• Before cleaning, turn the fan off and unplug from the power supply.
- Use a soft cloth to wipe off any dust. If the fan is very dirty, use a damp cloth and wipe dry.
• Do not use any chemicals, abrasives or solvents that could damage the fan.
PADLÓ VENTILÁTOR
KEZELÉSI ÚTMUTATÓJA

natural_image
Line drawing of a standard electric fan with radial blades and stand (no text or symbols)
MODELLEK:
| FEHÉR, PADLÓ VENTILÁTOR | VO0026 | 40W | 5901508164896 |
| FEKETE, PADLÓ VENTILÁTOR | VO0027 | 40W | 5901508164902 |
| PADLÓ VENTILÁTOR TÁVIRÁNYÍTÓVAL | VO0029 | 40W | 5901508164926 |
| KRÓMOZOTT, PADLÓ VENTILÁTOR | VO0245 | 50W | 5901508172457 |
| PADLÓ VENTILÁTOR TÁVIRÁNYÍTÓVAL | VO0606 | 40W | 5902409218602 |
| KRÓMOZOTT, PADLÓ VENTILÁTOR | VO0649 | 50W | 5902409219036 |
| PADLÓ VENTILÁTOR TÁVIRÁNYÍTÓVAL | VO0920 | 40W | 5901508187345 |
| KRÓMOZOTT, PADLÓ VENTILÁTOR | VO0670 | 50W | 5902409219241 |
| KRÓMOZOTT, PADLÓ VENTILÁTOR | VO0650 | 50W | 5902409219043 |
natural_image
Line drawing of a standard 16-inch electric fan with a stand (no text or symbols)

MODELY:
| PODLAHOVÝ VENTILÁTOR, BÍLÝ | VO0026 | 40W | 5901508164896 |
| PODLAHOVÝ VENTILÁTOR, ČERNÝ | VO0027 | 40W | 5901508164902 |
| PODLAHOVÝ VENTILÁTOR S DÁLKOVÝM OVLADAČEM | VO0029 | 40W | 5901508164926 |
| CHROMOVANÝ PODLAHOVÝ VENTILÁTOR | VO0245 | 50W | 5901508172457 |
| PODLAHOVÝ VENTILÁTOR S DÁLKOVÝM OVLADAČEM | VO0606 | 40W | 5902409218602 |
| CHROMOVANÝ PODLAHOVÝ VENTILÁTOR | VO0649 | 50W | 5902409219036 |
| PODLAHOVÝ VENTILÁTOR S DÁLKOVÝM OVLADAČEM | VO0920 | 40W | 5901508187345 |
| CHROMOVANÝ PODLAHOVÝ VENTILÁTOR | VO0670 | 50W | 5902409219241 |
| CHROMOVANÝ PODLAHOVÝ VENTILÁTOR | VO0650 | 50W | 5902409219043 |
natural_image
Line drawing of a standard electric fan with radial blades and a stand (no text or symbols)

MODELY:
| BIELY PODLAHOVÝ VENTILÁTOR | VO0026 | 40 W | 5901508164896 |
| ČIERNY PODLAHOVÝ VENTILÁTOR | VO0027 | 40 W | 5901508164902 |
| PODLAHOVÝ VENTILÁTOR S DIALKOVÝM OVLÁDAČOM | VO0029 | 40 W | 5901508164926 |
| CHRÓMOVÝ PODLAHOVÝ VENTILÁTOR | VO0245 | 50W | 5901508172457 |
| PODLAHOVÝ VENTILÁTOR S DIALKOVÝM OVLÁDAČOM | VO0606 | 40 W | 5902409218602 |
| CHRÓMOVÝ PODLAHOVÝ VENTILÁTOR | VO0649 | 50W | 5902409219036 |
| PODLAHOVÝ VENTILÁTOR S DIALKOVÝM OVLÁDAČOM | VO0920 | 40 W | 5901508187345 |
| CHRÓMOVÝ PODLAHOVÝ VENTILÁTOR | VO0670 | 50W | 5902409219241 |
| CHRÓMOVÝ PODLAHOVÝ VENTILÁTOR | VO0650 | 50W | 5902409219043 |
Popis komponentov:
1/ Predný kryt
2/ Vrtuła
3/ Blokovacia matica
4/ Skrutka vrtule
5/ Upevňovacia
skrutka
6/ Zadný kryt
7/ Hriadel motora
8/ Tlačidlo oscilácie
9/ Motor
10/ Napájací kábel
11/ Koliesko
12/ Rürka
13/ Nastavenie výšky
14/ Rúrka
15/ Podstavec
16/ Závažie
17/ Spojka
18/ Skrutka
Používanie
Základné
nastavenia
Brand : Volteno
Model : VO0026
Category : Fan