W1240 - Sewing machine White - Free user manual and instructions
Find the device manual for free W1240 White in PDF.


| Product Type | Sewing Machine |
| Brand | White |
| Model | W1240 |
| Dimensions (approx.) | 40 x 20 x 30 cm |
| Weight | 7.5 kg |
| Power Supply | 220-240 V, 50/60 Hz |
| Power Consumption | 90 W |
| Stitch Types | Basic, zigzag, blind hem, buttonhole, stretch |
| Stitch Length | Adjustable, up to 4 mm |
| Stitch Width | Adjustable, up to 5 mm |
| Needle Positions | Center, left, right |
| Bobbin Type | Top drop-in, transparent |
| Threading System | Automatic needle threader |
| Speed Control | Foot pedal with variable speed |
| Lighting | LED work light |
| Free Arm | Yes, for sleeves and cuffs |
| Maintenance | Clean lint; oil moving parts after 8 hours of use |
| Safety Features | Unplug when not in use; secure needle plate |
| Accessories Included | Needles, bobbins, seam ripper, screwdriver, dust cover |
| Repairability | Spare parts available (e.g., needles, bobbins, belts) |
Frequently Asked Questions - W1240 White
User questions about W1240 White
0 question about this device. Answer the ones you know or ask your own.
Ask a new question about this device
Download the instructions for your Sewing machine in PDF format for free! Find your manual W1240 - White and take your electronic device back in hand. On this page are published all the documents necessary for the use of your device. W1240 by White.
USER MANUAL W1240 White
natural_image
Line drawing of a vintage sewing machine with no visible text or symbolsWHITE
MODEL 1240
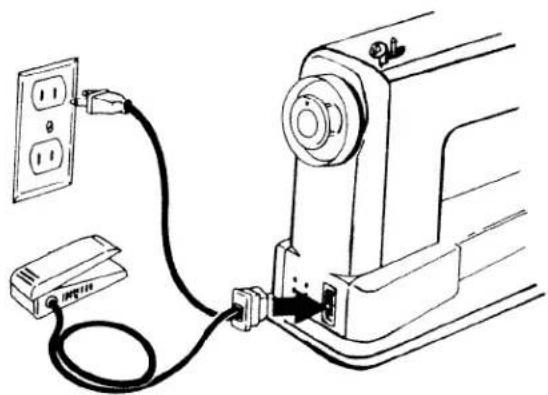
USING THE FOOT CONTROL
natural_image
Line drawing of a cable being inserted into a washing machine (no text or symbols)TO CONNECT THE FOOT CONTROL WIRES:
- Connect special plug to block on machine as shown in diagram above.
- Connect outlet plug to electrical outlet.
- When sewing, keep children's hands away from foot control and wiring.
• After sewing, disconnect plug from electrical outlet.
natural_image
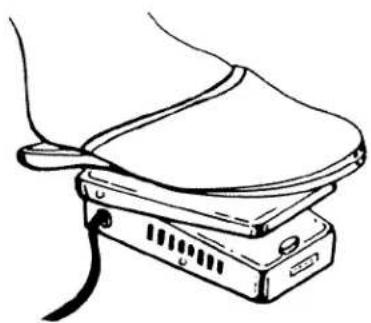
Line drawing of a device with a curved top and base, connected by wires (no text or symbols)TO USE THE FOOT PEDAL:
- Begin sewing by turning the hand wheel toward you and apply gradually increasing pressure to foot pedal.
- Sewing at a constant speed will give best results.
USING THE EXTENSION PLATE
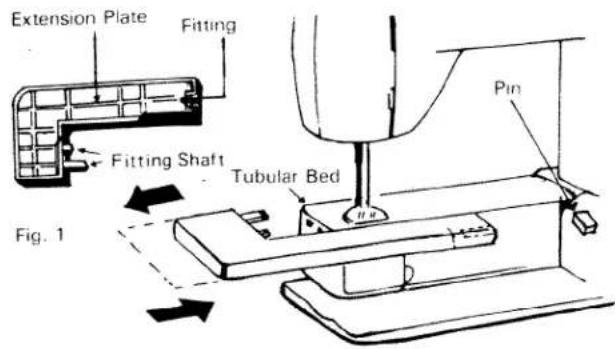
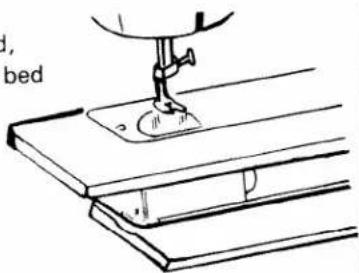
Fig. 2
TO ATTACH AND REMOVE THE EXTENSION PLATE:
- By sliding extension plate on tubular bed, as shown in Fig. 2, engage fittings on plate with pin on tubular bed, and pull to the left to remove the extension plate.
natural_image
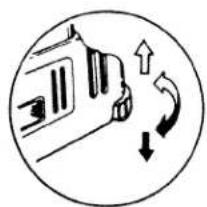
Circular diagram showing a vehicle with directional arrows indicating movement (no text or symbols)LEVELING THE MACHINE
- Level your sewing machine when you use it on the table or install it into the cabinet.
UP: Counter-Clockwise
DOWN: Clockwise
FREE ARM FEATURES
natural_image
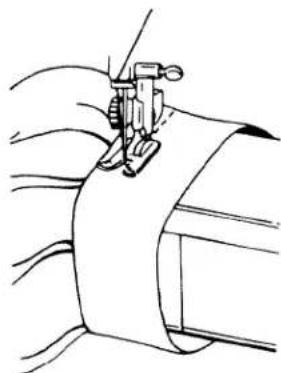
Line drawing of a sewing machine needle stitching fabric (no text or symbols)TUBULAR SEWING
- The free arm design simplifies the sewing of tubular items such as pant cuffs, shirt and blouse cuffs and socks.
Simply position these items over the tubular bed of the machine and sew.
FLAT BED SEWING
- When the extension plate is attached, you have all the advantages of a flat bed machine for sewing flat items, and for sewing large tubular items such as flared pant legs.
CHANGING THE PRESSER FOOT
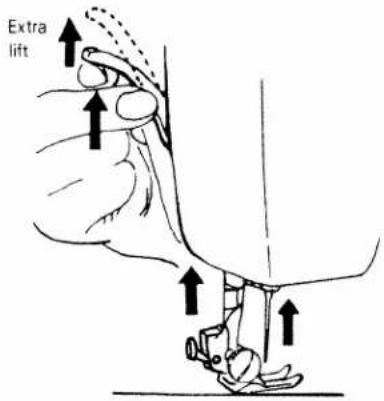
- Raise needle bar to highest position and raise presser foot as shown. - The extra lift for heavy fabric makes it easier to place fabric under the presser foot.
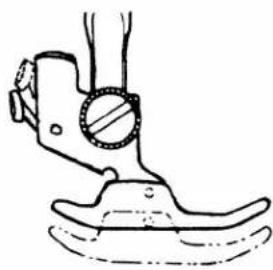
TO REMOVE THE PRESSER FOOT:
- Press button on back of presser foot shank and foot will drop from shank as shown above. - It is not necessary to loosen the thumb screw to change presser foot.

natural_image
Technical line drawing of a mechanical component with no visible text or symbols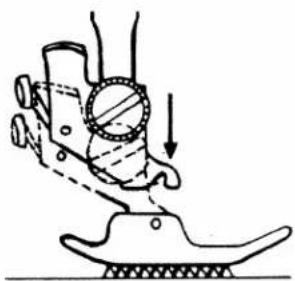
natural_image
Diagram of a mechanical device with a circular component and downward arrow indicating motion (no text or symbols)TO ATTACH THE PRESSER FOOT:
- Align desired presser foot to shank as shown above. - Lower presser foot lever and shank will automatically attach to foot as shown above.
CHANGING THE NEEDLE
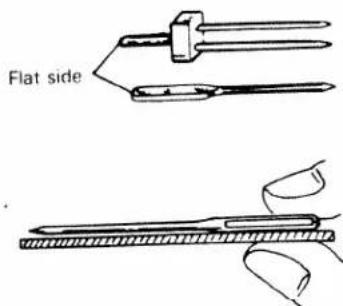
• Always make sure needle is straight.
- To check straightness of needle, lay needle on a flat surface and see that needle is straight and parallel as shown in above diagram.
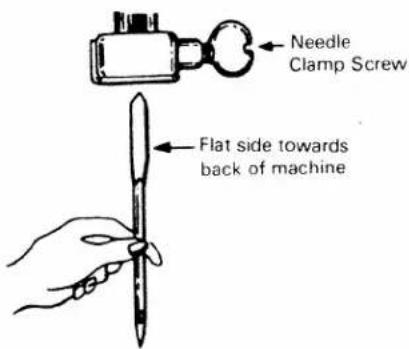
- Turn hand wheel toward you to raise needle bar to its highest position.
- Loosen needle clamp screw and insert needle upward as far as it will go, making sure flat side of needle is towards back of machine as shown in the above diagram.
- Tighten needle clamp screw with screwdriver.
- Follow the same procedure for insertion of twin needle.
natural_image
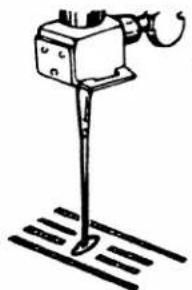
Simple line drawing of a mechanical device with a lever and base, no text or symbols present.- To make sure that needle has been inserted correctly, turn hand wheel toward you and see that needle comes down through the center of the needle hole in the needle plate as shown in the above diagram.
- Stitch selector dial must be set in straight stitch needle position when checking needle alignment.
- If skipped stitches occur, needle may be incorrectly inserted.
WINDING THE BOBBIN
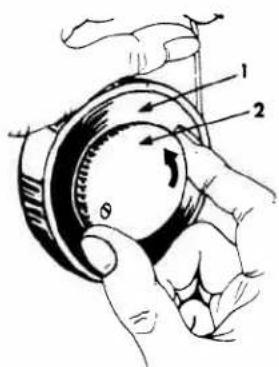
TO DISENGAGE THE HAND WHEEL:
- Hold the hand wheel (1) with left hand, turn clutch (2) counterclockwise with right hand to disengage as shown.
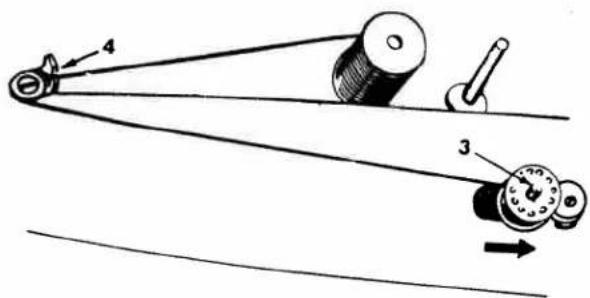
TO WIND THREAD ONTO BOBBIN:
- Lead thread through spring thread guide (4) and through the hole in your bobbin from the inside out.
- Place the bobbin onto the bobbin winder shaft (3).
- Push the bobbin winder to the right.
- Hold loose end of thread firmly and turn hand wheel to make thread tight. Apply gradual pressure on foot pedal until automatic shut off disengage bobbin winder.
• Cut off loose end of thread.
CHANGING THE BOBBIN
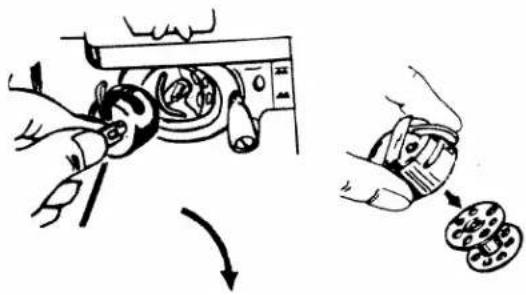
TO REMOVE THE BOBBIN FROM BOBBIN CASE:
- Raise needle bar to its highest position. Bobbin case cannot be removed when needle bar is at low position.
- Open shuttle race cover, pull bobbin case latch with two fingers and remove bobbin case as shown above.
- Remove bobbin from bobbin case by releasing latch.
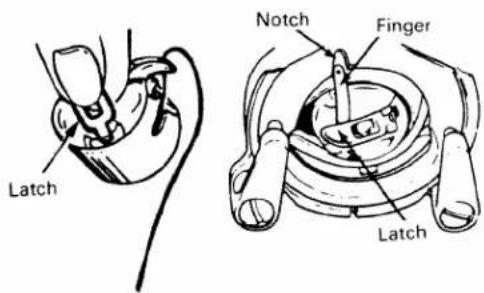
TO ATTACH THE BOBBIN CASE:
• Pull thread at least 3 inches from bobbin.
- Thread bobbin as shown on page(7).
- Making sure that needle bar is at its highest position, insert bobbin case into shuttle race by holding bobbin case latch. Make sure bobbin case finger is inside shuttle notch. Press bobbin case into shuttle as far as possible until latch catches on center post of the shuttle.
THREADING THE BOBBIN CASE
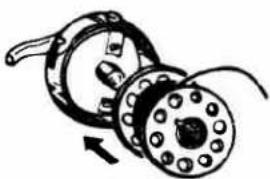
Pull thread at least 3 inches from bobbin. Insert bobbin in bobbin case so that thread will unravel clockwise.
natural_image
Diagram of a mechanical component with two rotating parts and a curved arrow indicating rotation (no text or symbols)Fig. 1
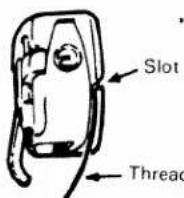
Fig 2
Pull thread into slot of bobbin case as shown in Fig. 2.
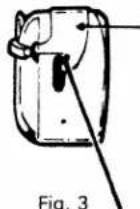
Draw thread under the tension spring and into the fork-shaped opening of the spring as shown in Fig. 3.
Tension Spring
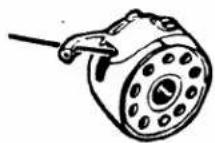
Fig. 4
Pull thread through hole in bobbin case finger as shown in Fig. 4. (Recommended for zigzag sewing only)
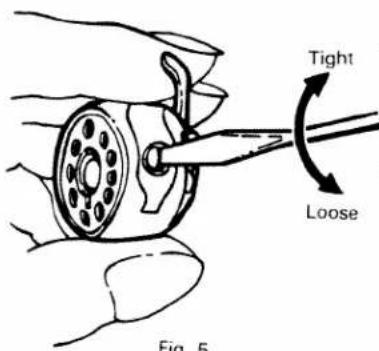
TO ADJUST BOBBIN TENSION:
- Turn screw on side of bobbin case clockwise to increase tension.
- Turn screw on side of bobbin case counterclockwise to decrease tension.
CORRECT
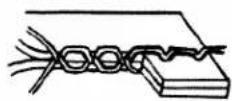
INCORRECT TOP TENSION TIGHT BOTTOM TENSION LOOSE
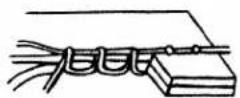
INCORRECT TOP TENSION LOOSE BOTTOM TENSION TIGHT
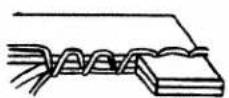
UPPER THREADING
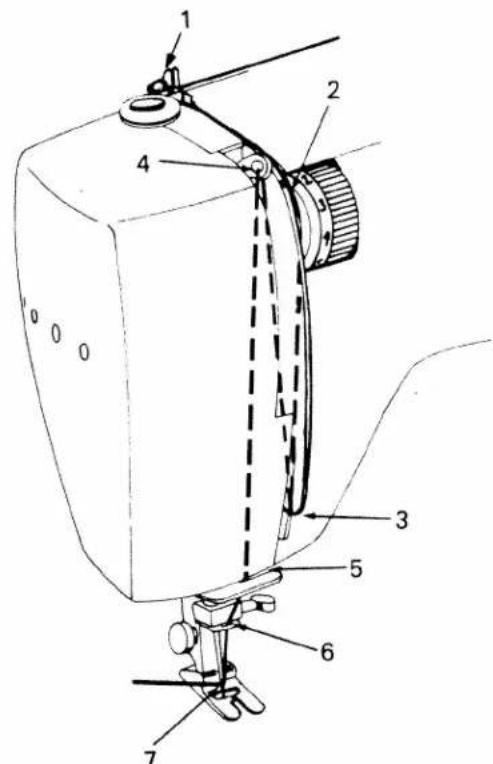
- Raise needle bar to its highest position.
- Raise presser foot.
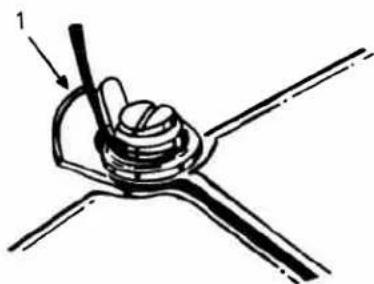
- Lead thread through top plate thread guide (1) and between tension discs (2).
- Pull thread down around arm thread guide (3) and up to take-up lever (4).
- Lead thread through eyelet on take-up lever from right to left and down through face plate guide (5), hooking thread into guide.
- Pull thread down through needle clamp guide (6) and through needle hole from front to rear (7).
natural_image
Mechanical component diagram showing a lever and pin assembly (no text or symbols)- Always use the same type of thread on top and bottom as different sizes or types of thread will cause tension problems.
Example: Polyester thread on the bobbin and cotton thread on top will result in poor tension quality.
TWIN NEEDLE UPPER THREADING
natural_image
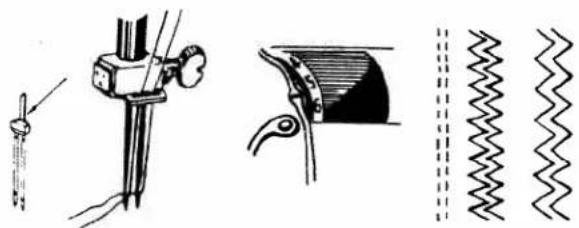
Technical line drawings of mechanical components and spring-like springs (no text or symbols)- Follow threading instruction for single needle with these exception.
- Place thread, matching or contrasting in color, on both spool pins.
- Draw threads through thread guides as normal, but separate the threads at the tension.
- Pass on thread through the left disc and one thread through the right disc.
- Now treat both threads as one until you reach the needle eyes.
ZIGZAG DIAL: Set at desired width between "0" and "3," if you set dial higher than 3, the needle will hit the needle plate and break.
STITCH LENGTH: Set at desired stitch length.
ADJUSTING FEED DOG HEIGHT
natural_image
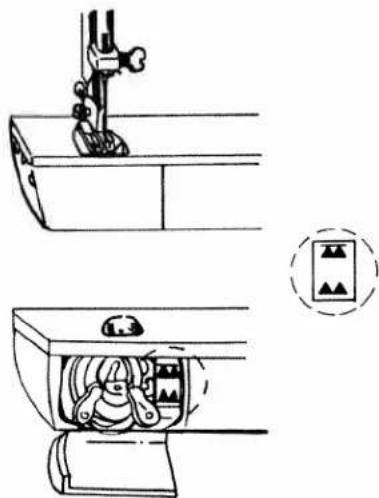
Technical line drawing showing a sewing machine with a handle and internal components, plus an inset diagram of the same part (no text or symbols present)• Upper position of feed dog is used for normal sewing. To raise feed dog.
- Press drop feed button "▲" located under shuttle cover to upper position.
- Lower position is used for Embroidering, Mending or Sewing on Button. Press drop feed button "▲" to lower position.
PICKING-UP LOWER BOBBIN THREAD
- Raise presser foot.
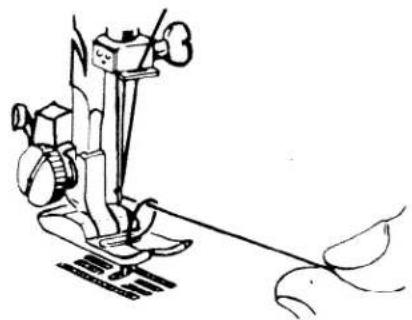
- Holding upper thread, turn hand wheel toward you one rotation.
When take-up lever is at its highest position, pull thread to pick up loop of lower bobbin thread.
natural_image
Line drawing of a sewing machine with a hand pulling a string (no text or symbols)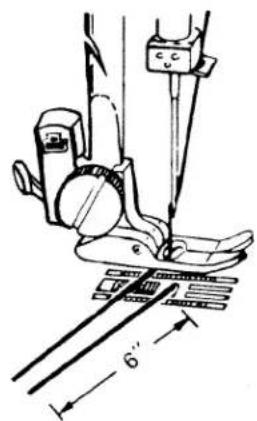
Pull both upper and lower thread "to the left of" presser foot approximately 6 inches. This will prevent jamming.
REGULATING PRESSURE
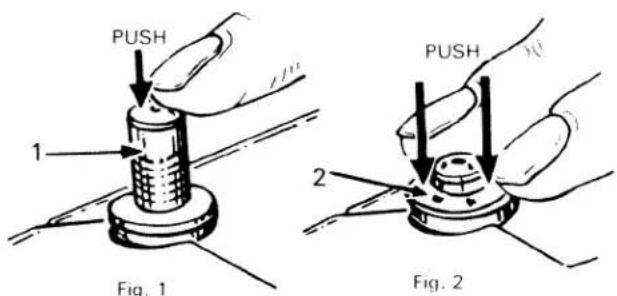
- The amount of pressure that is applied to the fabric by the presser foot is adjusted by the pressure cap (1). The upper position gives the least amount of pressure while the lowest position gives maximum pressure.
- To increase the pressure, push down on the pressure cap to obtain the desired setting. To decrease the pressure, press down on the snap lock ring (2) to allow the pressure cap to return to its maximum height. Then reset to the proper pressure.
- Normally the pressure cap will be in the lowest position. If the top layer of fabric tends to push out further than the bottom layer of fabric, Pressure should be decreased. This often happens on bulky fabrics, such as wools, and on knits.
ADJUSTING UPPER TENSION
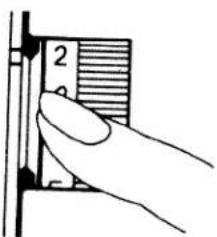
- To increase upper tension, turn upper tension regulator to a higher number.
- To decrease upper tension, turn upper tension regulator to a lower number.
- Turning tension regulator from "0" to "9" will increase tension. Normal sewing is performed between "4" and "5"
Note: Normal stitches will be performed on the red zone at 4, 5 and 6 for regular cotton threads.
Fig. 1.

Proper Tension
Fig. 2
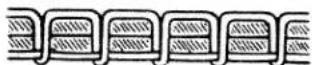
Upper Thread Tension Too Loose
Fig. 3
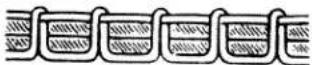
Upper Thread Tension Too Tight
• A perfect straight stitch will be formed with both threads interlocking in fabric.
- When using the zigzag stitch for embroidery (satin stitching), decrease upper tension so that top surface will look smooth at the expense of the bottom surface.
FABRIC, THREAD AND NEEDLE CHART
| FABRIC | NEEDLE (Long Scarf)HA x 1 130/705H European | THREAD | STITCHLENGTH |
| DELICATE - tulle, chiffon, voile, fine lace, organdy, lawn, crepe, taffetaKnits - sheer tricot | 3 70 | Fine mercerized 60European 50 - 70"A" SilkFine Synthetics | 1-1/4 - 1-3/4 |
| light ball point | |||
| LIGHTWEIGHT - batiste, organdy, voile, taffeta, silk, crepe, chiffon, velvetKNITS - tricot, brushed tricot, jerseys, synthetic leathers, power net | 11 80 | Fine mercerized 60European 50 - 70Fine Synthetics"A" Silk | 1-3/4 - 2 |
| light ball point | |||
| LEATHERS - plastic film, vinyls | Wedge point | 2-1/2 -3 | |
| MEDIUM WEIGHT - gingham, percale, linen, chintz, faille, satin, corduroy, velvet, suitings, wools, pique, terryKNITS - jersey, double knit power net, bathing suits | 14 90 | Mercerized 50European 30"A" SilkSynthetic | 1-3/4 - 2 |
| light or mediumball point | |||
| LEATHERS - vinyls, plastic film | Wedge point | 2-1/2 - 3 | |
| MEDIUM HEAVY - gabardine, tweed sailcloth, denim, duck, coatings, wools, drapery.KNITS - double knit, power net | 16 100 | Mercerized 50Heavy Duty MercerizedEuropean 30"A" SilkSynthetic | 2 - 2-1/2 |
| heavy ball point | |||
| LEATHER - vinyl, rubber backed drapery fabric | Wedge point | 2-1/2 - 3 | |
| HEAVY - overcoatings, canvas, upholstery, awningKNITS - fake furs, velours, sweater | 18 110 | Heavy Duty MercerizedEuropean 30Synthetic | 2-1/2 - 4 |
| heavy ball point | |||
| LEATHERS - vinyls, plastics | Wedge point |
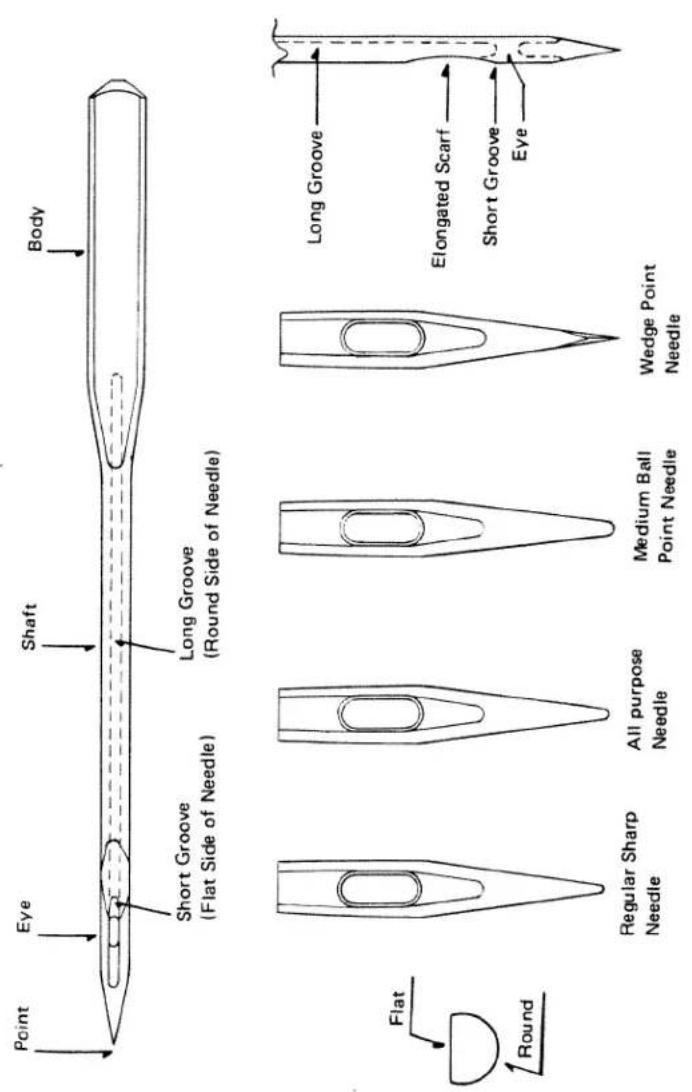
FUNCTIONS OF CONTROLS
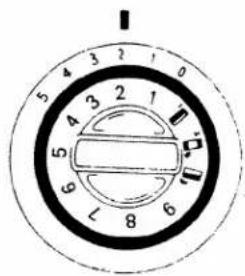
NEEDLE POSITION AND PATTERN SELECTOR DIAL
- Raise needle bar to highest position by turning hand wheel toward you.
- Select desired pattern and needle position.
- Selector dial can be turned either clockwise or counterclockwise.
ZIGZAG WIDTH CONTROL DIAL
- For wider zigzag stitch, select a higher number.
- When twin needle is used, zigzag must be limited between positions "0" and "3" on the dial (use of twin needle in position higher than "3" will result in needle striking needle plate).
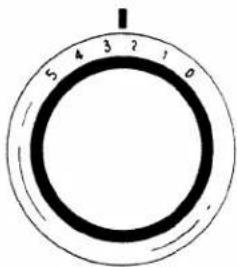
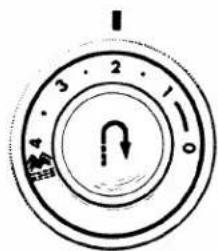
STITCH LENGTH CONTROL DIAL
- Numbers on dial denote length of stitches.
• To increase length of stitch, turn dial to higher number.
STITCH LENGTH GUIDE
| Numbers on dial | 0 | 1 | 2 | 3 | 4 |
| Stitches per inch | No Feed | 24 | 12 | 8 | 6 |
REVERSE STITCH BUTTON:
- Use for reverse stitching or tacking.
- Keeping button pressed in will allow you to sew reverse stitch at same length as forward stitch.
APPLICATIONS OF THE STRAIGHT STITCH
SEAMS
The normal stitch length for most fabrics is 3, but the length chosen should depend on the fabric and area of usage. Usually, heavier fabrics require longer stitches, and lighter weight fabrics require shorter stitches.
For curved seams and bias cut areas use a shorter stitch length to add strength and elasticity to the seam.
Pattern:
Length: 2-4
Width: 0
Feed Dog:
Pressure: Normal
Foot: All Purpose
Needle Position: 2
natural_image
Pure geometric diagram showing a curved line with dashed segments, no text or symbols presentBASTING/TOPSTITCHING
Sewing a seam with a longer stitch is useful for temporary seams prior to fitting. Basting stitches also may be used when gathering in fullness. Topstitching can be done very effectively with the long straight stitch. For a bolder stitch, two threads of the same type can be threaded through one needle (size 14 or 16). A heavier thread such as buttonhole twist may be used for topstitching, but be sure to use a larger needle (size 16 or 18). Left needle position may be used for more support of fabric.
Pattern:
Length: 4
Width: 0
Feed Dog:

Pressure: Normal
Foot: All Purpose
Needle Position: 2 or 1
DARNING
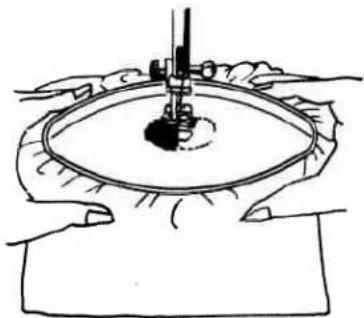
Worn spots or small holes can be darned very easily. Use of an embroidery hoop is optional depending on the fabric. A fine thread is recommended so that the fabric and thread will blend together invisibly. Trim the ragged edges from the area to be darned, Hold the threads to start, then move the fabric slowly back and forth while running the machine very fast to fill the area. More professional results will be attained by moving the fabric in a figure eight pattern while sewing. After filling in the area lengthwise, reweave with crosswise stitches in the same manner.
Pattern:----
Length: 0
Width: 0
Feed Dog:
Pressure: Darn
Foot: None or All
Purpose
Needle Position: 2
natural_image
Illustration of hands operating a sewing machine on a circular base (no text or symbols)ELASTIC THREAD SHIRRING
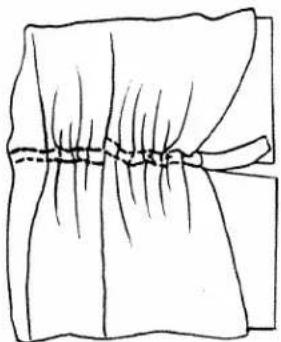
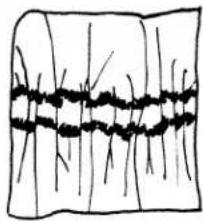
Wind elastic thread onto bobbin, as shown, letting the thread pass through your fingers. The thread should be wound smoothly without stretching. Place bobbin in case as usual, being sure that the elastic is drawn through the tension. Use regular thread on the top of the machine. Do a trial run on the chosen fabric to test length of stitch. Lay a piece of paper under the fabric to keep it from gathering up as you sew. This will enable you to sew many parallel rows of stitching without difficulty. Afterwards tear out the paper and the fabric will be gathered.
natural_image
Simple line drawing of a fabric or material cross-section with no text or symbolsPattern:----
Length: 3 - 4
Width:0
Feed Dog:
Pressure: Normal
Foot: All Purpose
Needle Position: 2
natural_image
Technical line drawing of a mechanical assembly with no visible text or symbols• HOLDING THE FABRIC
For most fabrics, it is not necessary to hold the fabric in both front and back. Merely guide the fabric with one hand from the front.
For the fine delicate fabrics, such as chiffon, geogrette, and tricot, the best reslts will be attained by holding the fabric in front and back of the needle without pulling on it.
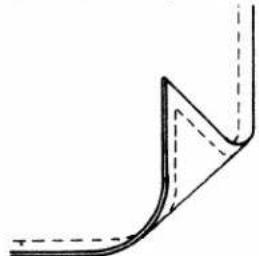
• TURNING CORNERS
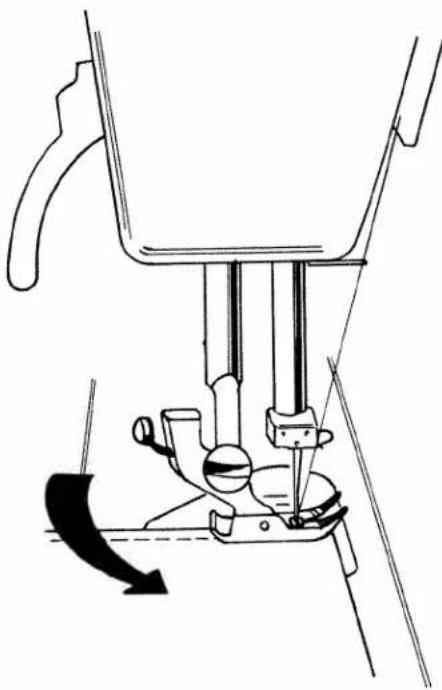
To pivot at a corner, leave the needle in the fabric while on the upswing so that the stitch is almost completed, thus preventing the possibility of skipped stitches in the corner. Lift the presser foot and pivot the fabric. Then, lower the presser foot and continue sewing.
• CURVED SEAMS
On a curved seam use a slightly shorter stitch length than you are using for the rest of the seams. For example, if length 2 is being used for the seams, a 1-1/2 stitch length would be preferred for curves. A smaller stitch length will add strength and elasticity to the seam.
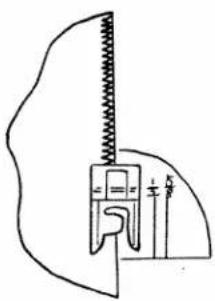
When guiding the fabric, keep your fabric edge on the etched seam guide line directly across from the needle rather than on the forward part of the line. The seam guide may be used on an angle as shown.
• ENDING SEAM/REMOVAL OF FABRIC
Stitch to the edge of the fabric, then press the reverse stitch button and backstitch for a few stitches to reinforce the end of the seam.
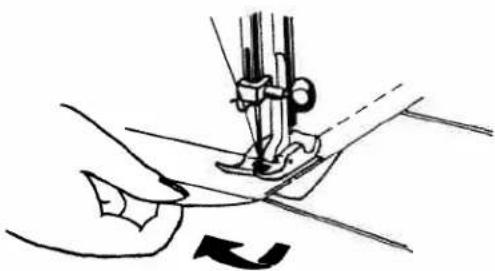
Turn the hand wheel until the take-up lever is in its highest position so that the stitch is completed and the threads will pull freely. Lift the presser foot and remove the fabric by drawing the threads to the left and back, keeping them under the foot so as not to bend the needle. Cut the threads with the thread cutter on the back of the presser bar. Leave the thread ends three to four inches long.
natural_image
Line drawing of a sewing machine needle stitching fabric (no text or symbols)APPLICATIONS OF THE ZIGZAG STITCH
OVERCASTING
Place the edge of the material underneath the opening of the sewing foot and guide raw edge along the center groove of the foot, allowing stitch to form half on and half off the fabric.
The multiple stitch zigzag is a wiser choice for most fabrics. See page(21).
Pattern: M
Lenght: 2-4
Width: 4.5
Feed Dog: ▲
Pressure: Normal
Foot: All Purpose
Needle Position: 2
natural_image
Pure mechanical diagram showing a spring-loaded component and a curved base, without any text, numbers, or symbols.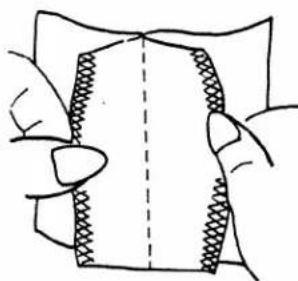
natural_image
Illustration of hands holding a folded garment with a dashed seam (no text or symbols)SEAMING KNITS
The narrow zigzag can be used in seams of firm knits for added strength. After sewing, open seam and press flat. Tiny zigzag stitches can hardly be seen and the seam will give when stretched.
Pattern: MM
Lenght: 2
Width: 1-2
Feed Dog:
Pressure: Normal
Foot: All Purpose
Needle Position: 2
SEWING ON BUTTONS
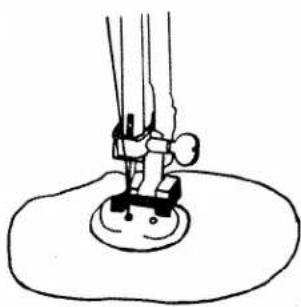
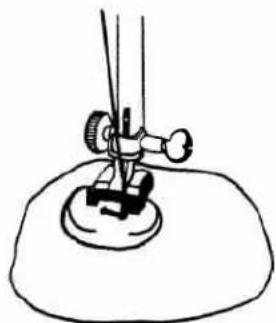
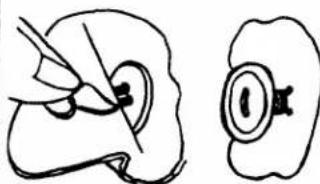
Zigzag stitching is a very easy and convenient method of sewing on button without a shank. Place the button so its left hole comes directly under the needle, then gently lower the button sewing foot. Take a stitch in the hole.
Raise the needle and move zigzag width dial to the right until the needle comes down exactly over the right hole in the button.
Note: Be sure the needle clears the holes of the button by moving the hand wheel by hand before running the machine fast.
Usually 6 to 8 stitches are adequate for securing a button in place. Stop with the needle in the left hole. To lock the threads, set the stitch width at 0, and take a few stitches in the left hand hole.
natural_image
Simple line drawing of a sewing machine needle and base mount (no text or symbols)Pattern:
Lenght: 0
Width: 2-5
Feed Dog:
Pressure: Normal
Foot: Button Foot
Needle Position: 1
natural_image
Simple line drawing of a sewing machine needle and base (no text or symbols)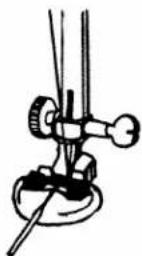
natural_image
Diagram showing two abstract shapes with internal lines and a central circular feature, no text or symbols present.FORMING THREAD SHANK ON BUTTON
Buttons sewn on coats or jackets should have a thread shank to make them stand away from the fabric. To form a thread shank, sew over a pin or rounded toothpick which can be inserted directly into the button sewing foot.
After stitching the button to the fabric, remove work from under the presser foot leaving threads about six inches from fabric. Remove pin or toothpick. Pull the threads to back of button and form a shank between button and fabric by winding threads tightly around the attaching stitches. Pull threads to back of the fabric and then tie thread ends securely.
SATIN STITCHING
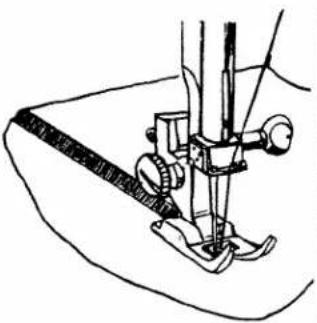
This is useful for decoration such as tapering, manual designed embroidery, monogramming, and applique.
The satin stitch, which is a very close zigzag stitch, is obtained by setting the stitch length as near to "0" as possible without stopping the feeding action. The setting will vary for different fabrics. It may be desirable to loosen the upper tension slightly to cause the threads to lock underneath, in order to make the top surface look especially smooth. For lightweight fabrics, place paper underneath the fabric while sewing for best results.
natural_image
Line drawing of a sewing machine needle and foot (no text or symbols)Pattern:
Length: ¼ - ½
Width: 1-5
Feed Dog

Pressure: Normal
Foot: All Purpose
Needle Position: 2
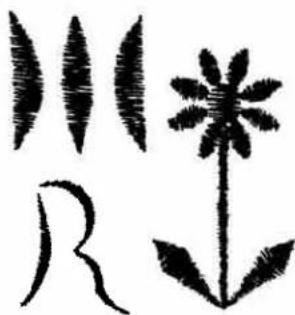
Tapering is done by gradually increasing and decreasing the stitch width while sewing. By this method, tapered monograms and other interesting designs can be created. For tapered monograms run the machine fast while turning the width dial slowly from narrow to wide and back.
First, learn this stroke by letting the fabric guide straight. Then, learn to pivot the fabric as you are tapering by holding the fabric at one point. Various strokes can be combined to form letters and designs. Variegated thread can give attractive results.
natural_image
Abstract black-and-white graphic with stylized shapes (no text or symbols)Pattern:
Lenght: 12-13
Width: 0-5
Feed Dog:
Pressure: Normal
Foot: All Purpose
Needle Position: 2,1 or 3
natural_image
Abstract black-and-white line patterns with no text or symbolsMANUAL EMBROIDERY DESIGNS
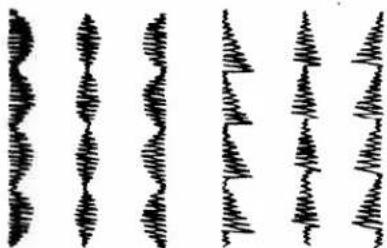
Different designs can be made by turning the stitch width dial between 0 and 5. By running the machine at a constant speed and turning the dial in a definite rhythm, various designs can be created.
Pattern: M
Length: 12-13
Width: 0-5
Feed Dog:

Prssure: Normal
Foot: All Purpose
Needle Position: 2, 1 or 3
natural_image
Illustration of hands operating a sewing machine on a circular base (no text or symbols)Pattern:
Length: 0
Width: 1.5
Feed Dog:
Pressure: Darn
Foot: None
Needle: 2, 1 or 3
FREE HAND MONOGRAMMING
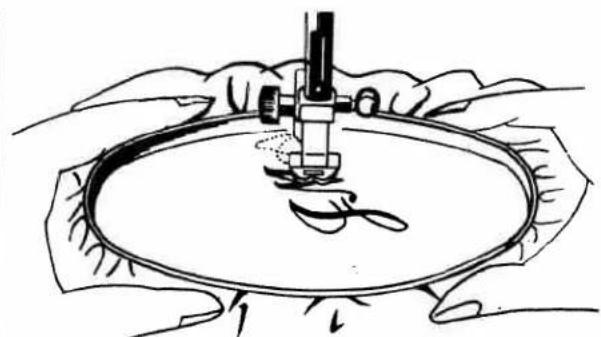
For giving garments and linens a personalized touch, first transfer the design to the right side of the fabric. An embroidery hoop is recommended especially for soft fabrics and toweling. In order to monogram, you must move the fabric slowly and run the machine rapidly. Monogramming is like writing by moving the paper under a stationary pen. Guide the fabric slowly so that the zigzag falls close together like a satin stitch, but be careful that the stitches do not pile up. When guiding from side to side, move fabric slightly faster to avoid a heavy area.
Practice by forming loops. Once this is accomplished any letter is easy. Sometimes the use of paper or non-woven interfacing under the fabric may make guiding the fabric easier. The paper or interfacing may be torn or cut away at the completion of the monogram. When monogramming towels, cellophane placed on the top will help cover loops and make the monogram smooth. Pull or cut away remaining cellophane when finished.
Step 1
Pattern:
Length: 1
Width: 0-1
Feed Dog:
Pressure: Normal
Foot: All Purpose
Needle Position: 2
natural_image
Line drawing of a hand cutting a piece of scissors into a curved mechanical part (no text or symbols)Step 2
Pattern:
Length: 1/4 - 1/3
Width: 2-4
Feed Dog:
Pressure: Normal
Foot: All Purpose
Needle Positi n: 2
natural_image
Simple line drawing of an elephant with a dot on its head (no text or symbols)APPLIQUE
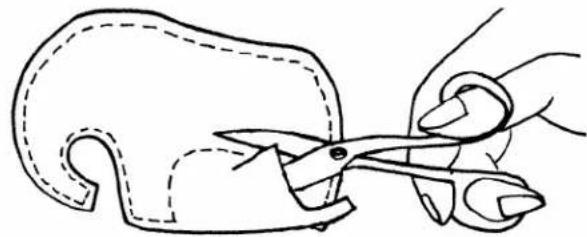
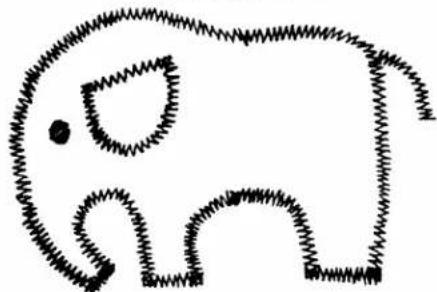
Applying decorative shapes of fabric scraps to household articles and clothing is a very interesting way of trimming an otherwise plain article. First, trace the design on fabric to be appliqued, then pin or baste it securely in place on garment. With a small straight stitch or narrow zigzag, sew around the transferred design. After excess fabric is trimmed away, sew around the applique with a satin stitch. For a smooth curve, stop frequently at the inside edge of the curve to pivot the fabric slightly. Corners look much better when the point is stitched by pivoting rather than just turned.
As with all decorative stitches, paper may be used to give more body to the fabric when stitching and can be torn away when the applique is completed.
GATHERING OVER CORD
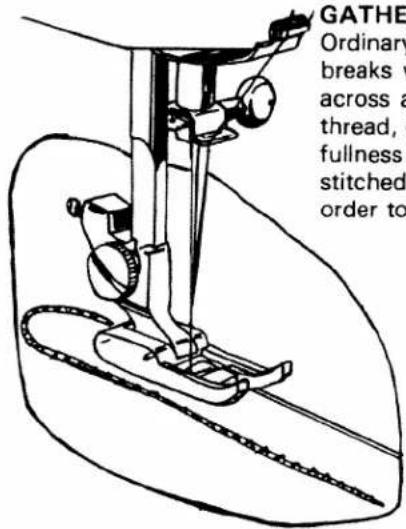
Ordinary gathering with a basting stitch often breaks while pulling in fullness. A small zigzag across a cord such as crochet thread or carpet thread, gives a much stronger cord for gathering fullness into fabrics. Once the gathers have been stitched in place, the cord can be pulled out in order to eliminate bulk.
Pattern:
Length: 2
Width: 3
Feed Dog:
Pressure: Normal
Foot: All Purpose
Needle Position: 1
natural_image
Abstract line drawing with intersecting black lines on a wavy background (no text or symbols)APPLICATIONS OF THE MULTIPLE STITCH ZIGZAG
OVERCASTING
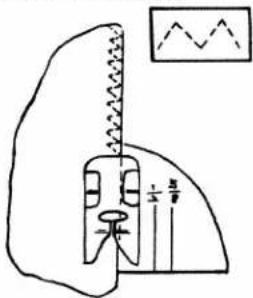
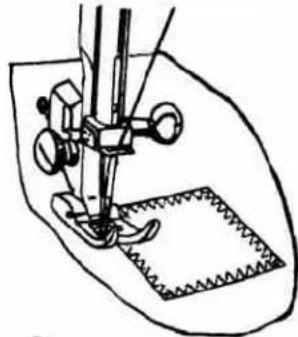
The multiple stitch zigzag is an excellent choice for overcasting. It keeps the fabric flat and prevents raveling. For most fabrics, this stitch is better than the zigzag stitch for overcasting.
The stitch should fall right at the raw edge of the fabric. Feed the fabric under the presser foot by guiding the raw edge along the right hand side of the hole in the presser foot.
natural_image
Line drawing of a sewing machine needle stitching fabric (no text or symbols)Pattern:
Length: 1/2 -1½
Width: 4-5
Feed Dog:
Pressure: Normal
Foot: All Purpose
Pattern Selector: 4
PATCHING
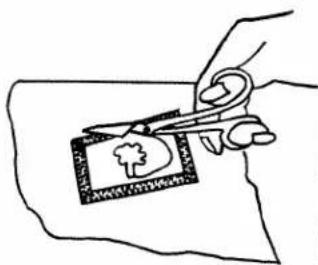
The multiple stitch zigzag is an excellent stitch for patching. It is stronger than the zigzag and the tiny stitches bury into the fabric to make an almost invisible stitch when using matching thread.
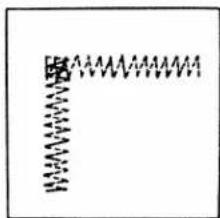
Place the patch over the right side of the worn or damaged area. Sew around the patch with the multiple stitch zigzag letting the last stitch to the right overcast the edge of the patch. When turning corners leave the needle in the fabric at the corner. Usually this will be the furthest stitch to the right or left. In this way, the corners are doubly stitched and very strong. When the patch is stitched in place, trim away the excess worn fabric on the wrong side of the patch.
Note: Try_Smocking Stitch for knits.
natural_image
Pure diagram of a spring-mass system without any text, numbers, or symbolsPattern: Length: Near 0- 1/2 Width: 4-5
Feed Dog: ▲ Pressure: Normal Foot: All Purpose Pattern Selector: 4
MENDING A TEAR OR INSTANT DARNING
The multiple stitch zigzag provides a strong and easy repair for torn garments. It gives an almost invisible mend, especially when a fine darning thread is used.
To mend a tear, hold the torn edges close together and stitch down the middle.
If the tear is guided under the slot in the middle of the presser foot, stitching will be equal on both sides. If necessary, sew again on either side of the first row of stitching making sure the needle catches the stitch in the center. With very worn or frayed fabric, place a piece of lightweight interfacing or cotton batiste under the tear for reinforcement.
Note: Try Smocking Stitch for knits.
natural_image
Decorative floral border pattern with no text or symbols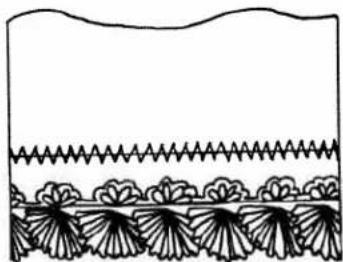
natural_image
Decorative border pattern with floral motifs and wavy line (no text or symbols)LACE APPLICATIONS
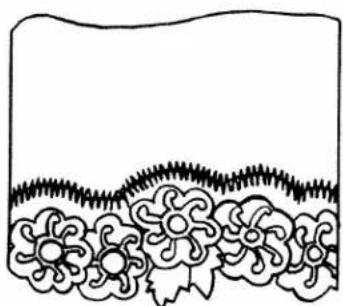
Attaching laces or trims adds a special touch to lingerie, dresses, or linens. Pin or baste laces in place easing or mitering corners where necessary.
A straight edged lace or braid has a convenient line to follow when sewing. When using a scalloped edged lace follow the design of the lace for an almost invisible application.
Note: Try Multiple Stitch Zigzag, Overlock, Elastic Edge Stitch, Smocking stitch or Rick-Rack for different effects.
Pattern:
Length: 1
Width: 1-2
Feed Dog:
Pressure: Normal
Foot: All Purpose
Needle Position: 2
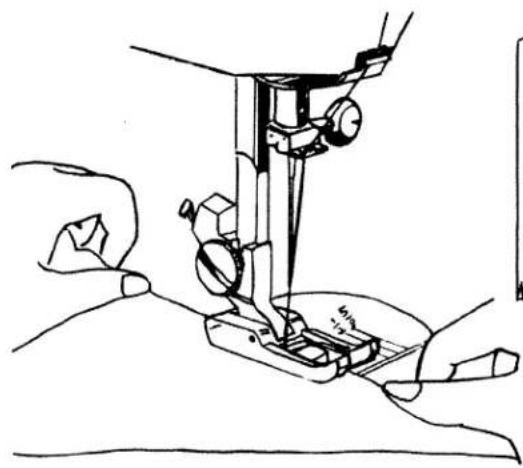
natural_image
Line drawing of a sewing machine needle stitching fabric, showing hands operating the component (no text or symbols)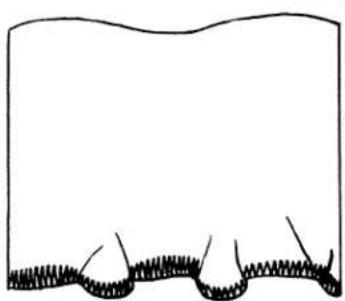
natural_image
Simple line drawing of a rectangular shape with wavy top and wavy bottom, no text or symbols present.Pattern:
Length: 12
Width: 4-5
Feed Dog:
Pressure: Normal
Foot: All Purpose
Needle Position: 2
FLUTTER HEM
An unusual way of hemming or finishing edges of tricot or soft knits is by a flutter edge. Hemming in this manner is just like overcasting an edge, but the fabric is stretched in back and in front of the needle as you sew. For best results, pull the fabric equally, making sure the needle goes over the edge. When you stop to reposition your hands, keep the needle in the fabric.
natural_image
Line drawing of hands operating a sewing machine with fabric and tools (no text or symbols)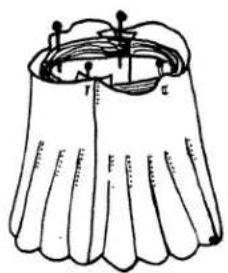
natural_image
Illustration of a sleeveless skirt with a strap and clasp (no text or symbols)Pattern:
Length: 3% · 1½
Width: 4-5
Feed Dog:
Pressure: Normal
Foot: All Purpose
Pattern Selector: 4
ELASTIC APPLICATION
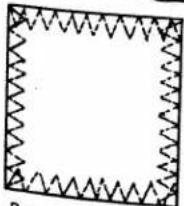
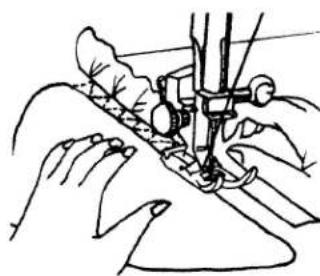
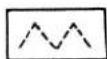
Applying elastic to lingerie or soft knit fabrics is easy when using the multiple stitch zigzag. Cut the elastic 2 inches smaller than your waist measurement. Overlap the raw ends to form a circle and stitch with a tiny zigzag to form a box as shown. Fold the elastic into quarters or eighths and mark with pins. Do the same with the waist-line of the garment. Place the elastic about 1/2 inch from the top edge of the fabric, matching the pins. Place under the presser foot and begin stitching. As you stitch, place the forefinger of each hand on the fabric at either side of the presser foot. Pull the fabric out exactly at the point where the needle is sewing over the elastic and the fabric. This will ease your fabric and elastic together as you sew. The amount of ease is dependent on how much you ease the fabric. In this way you never need to stretch the elastic, which can be damaged and stretched out of shape. Trim off excess fabric above elastic near the stitches.
Note: Try Smocking stitch for girdles.
UNDERSTITCHING FACINGS
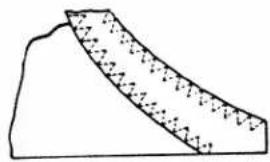
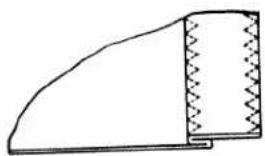
The multiple stitch zigzag is an excellent choice for understitching and eliminating bulk in facing seam allowances.
After attaching the facing to the garment, trim and clip the seam allowance as usual. Press the seam allowances toward the facing and use the multiple stitch zigzag close to the seam, stitching through the facing and the seam allowances. Using a matching thread, the stitch will blend into the fabric and prevent excess bulk. This is much more successful than a straight stitch for understitching. It really helps to keep the facings from rolling.
Note: Try Smocking Stitch for knits.
natural_image
Simple line drawing of a sloped terrain with a shaded triangular area (no text or symbols)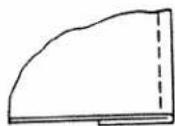
Step 1
Pattern:
Length: 1-2
Width: 4-5
Feed Dog
Pressure: Normal
Foot: All Purpose
Pattern Selector: 4
natural_image
Simple line drawing of a curved object with a textured rectangular section on the right side (no text or symbols)Step 2
natural_image
Two abstract geometric line patterns: one with diamond shapes and one with zigzag lines (no text or symbols)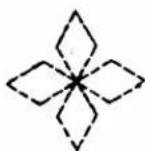
DECORATIVE EFFECTS
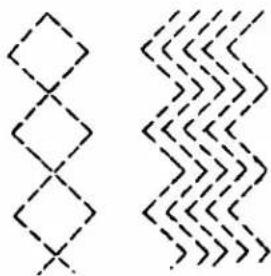
As with the blind hem stitch, the multiple stitch zigzag can be used for many decorative combinations. If the stitch is pivoted when the needle reaches the far left or right of its swing, and the points are carefully matched, a tracery diamond shape results.
On the other hand, if rows of the multiple stitch zigzag are sewn with the points falling directly under each other, a wavy pattern is produced.
Flowers may also be produced. Start in center; pivot at points shown. Add four more petals if desired.
Pattern:
Length: 1-2½
Width: 3-5
Feed Dog: ▲▲
Pressure: Normal
Foot: All Purpose
Pattern Selector: 4
APPLICATIONS OF THE BLIND HEM STITCH
BLIND HEMMING
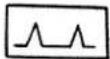
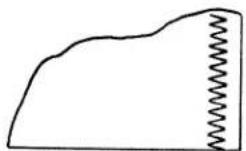
The blind hem stitch provides a durable hem finish that is almost invisible on garments, drapes, and curtains. It is done easily with straight or slightly curved hems. With a little practice it will be a very quick and easy hem application and the hem will never need repairing.
Procedure:
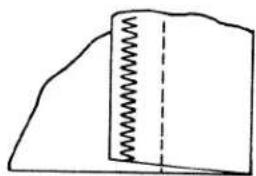
• Prepare raw edge of hem in desired manner, such as overcast, 1/4 inch stitched under, pinked, hem tape, or just plain. (Step 1)
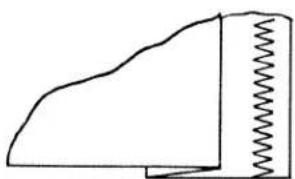
- Fold hem up desired length. Baste or pin 1/2 inch from upper edge. Press in place. (Step 2)
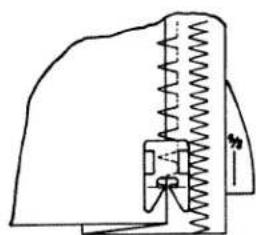
- Fold hem back toward right side of fabric leaving about 1/4 inch extended. (Step 3)
- Adjust your stitch width and needle position so that the zigzag bite of the stitch just slightly catches the fold of the fabric. The straight stitches should be formed on the single thickness of fabric, and the zigzag bite should catch just barely into the fold of the fabric at the left.
- When stitching is completed, remove fabric from machine and turn to right side. Press completed hem.
When hemming an A-line skirt, place a machine basting stitch along the raw edge of the hem. At an ironing board, fold up the hem, matching the seams. Ease in the excess fabric by pulling on basting thread. Press with steam, then apply hem tape. Baste or pin hem 1/2 inch from taped edge, then continue into step 3.
Pattern:
Length: 1-2
Width: 3-5
Feed Dog
Pressure: Normal
Foot: All Purpose
Pattern Selector: 5
Step 1
natural_image
Simple line drawing of a spring attached to a rectangular block, with no text or symbols present.Step 2
natural_image
Simple line drawing of a mechanical component with spring and curved edge (no text or symbols)Step 3
natural_image
Pure mechanical diagram showing spring and housing components without any text or symbols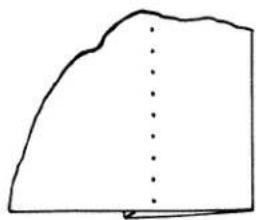
natural_image
Simple line drawing of a curved shape with a vertical dotted line, no text or symbols presentSHELL TUCK
The blind hem stitch gives a very effective and easy way to make a shell tuck for lingerie, pillowcases, and decorative finishes. This works well on knits or on the bias of soft, woven fabrics. A single folded bias tape may be tucked in this manner, and then applied under a fold for a decorative hem on pillowcases or applied with the facings at the neckline or armhole for a decorative finish.
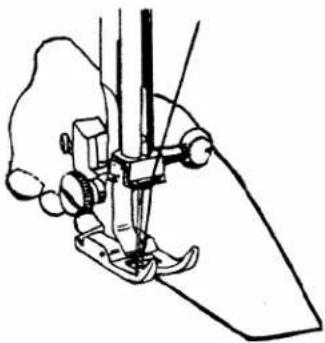
Set the upper tension dial to a little bit tighter position than normal. Fold under the edge where the shell tuck is to be created. Place the bulk of the fabric to the right of the needle with the folded edge to the left. Place the fabric so that the folded edge will be guiding into the center cut of the foot. The straight stitches will form on the fabric, and the zigzag bite will swing to the left off of the folded edge. The shell edge is created as the needle swings back onto the fabric. The size of the "shell" can be varied by changing the stitch length.
natural_image
Line drawing of a sewing machine needle and fabric (no text or symbols)Pattern:
Length: 2-3
Width: 4-5
Feed Dog:
Pressure: Normal
Foot: All Purpose
Pattern Selector: 5


natural_image
Line drawing of a human hand wearing a bandage (no text or symbols)DECORATIVE EFFECTS
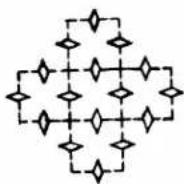
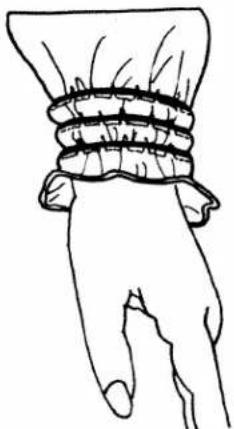
By sewing two adjacent rows of blind hem stitching on lace or ribbon attractive decorations are created. The stitch may be pivoted when the zigzag bite swings to the left and the points matched in the second row.
Another variation alternates the zigzag bites in the center of the straight stitched segment. The stitch may also be pivoted after two straight stitches to form a snowflake-like pattern.
Pattern:
Length: 1-2
Width: 4-5
Feed Dog:
Pressure: Normal
Foot: All Purpose
Pattern Selector: 5
TOPSTITCHING EFFECTS
A new kind of topstitching effect can be produced by couching a strand or two of pearl cotton embroidery floss, or yarn with the blind hem stitch. Simply guide the cord through the left groove of the embroidery foot so that the blind hem stitch sews over the cord and not through it. The straight stitches of the blind hem stitch will bury themselves along the right side of the cord. The sewing thread should match as closely as possible to blend into the fabric.
Pattern
Length: 1-2
Width: 2-4
Feed Dog:
Pressure: Normal
Foot: All Purpose
Pattern Selector: 5

natural_image
Pure electrical circuit lines without any symbolsDECORATIVE STITCHES
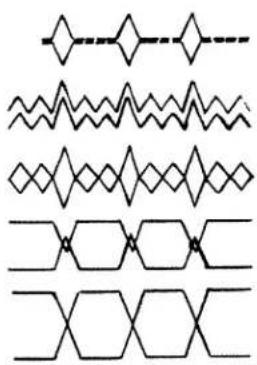
Combining rows of decorative stitch patterns is an easy, inexpensive way to create your own braids and trims for garments and household articles. Blending or contrasting colors of thread may be used to compliment the color of the fabric. Illustrations will give some of the attractive stitch combinations.
Pattern: As desired
Length: As desired
Width: As desired
Feed Dog: ▲▲
Pressure: Normal
Foot: All Purpose
Needle Position: 2
APPLICATIONS OF THE STRETCH BLIND HEM
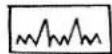
HEMMING
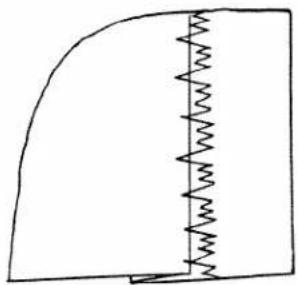
The stretch blind hem stitch gives a stretchy, durable hem finish to knit fabrics. The two tiny zigzag stitches enable the hem to stretch with the fabric. It may also prevent woven fabrics from raveling. Proceed as for the regular blind hem stitch on page (25).
natural_image
Simple line drawing of a curved surface with a vertical spring inside, no text or symbols present.Pattern:
Length: 1-2
Width: 4-5
Feed Dog:
Pressure: Normal
Foot: All Purpose
Pattern Selector: 6
EDGING
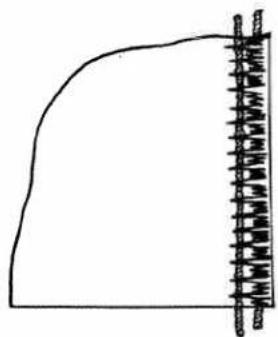
The stretch blind hem stitch can be used as an edging, like the blanket stitch done by hand. By using a fairly short stitch length, the stitches lie very close together. It can be used for over-casting and finishing the edges of tablecloths, napkins and ruffles. The edge may be turned up about 1/2 inch and then overcast with the stretch blind hem. Cord or pearl cotton may be used to give a raised effect to the stitches. Simply place 2-4 strands of pearl cotton or embroidery floss under the foot and stitch over it.
natural_image
Simple line drawing of a curved boundary with vertical grid lines (no text or symbols)Pattern:
Length: 12
Width: 4-5
Feed Dog:
Pressure: Normal
Foot: All Purpose
Pattern Selector: 6
EYELASH BUTTONHOLE
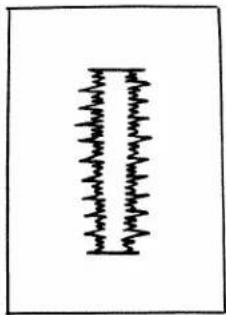
A unique way of reinforcing buttonholes on loosely woven fabrics or buttonholes in which the stitches have been accidentally cut, is to overcast them with a short stretch blind hem stitch. Overcast each side of the buttonhole so the far right stitch falls into the opening of the buttonhole and the small zigzag stitches cover the previous buttonhole side. On completion of one side of the buttonhole, pivot the fabric with the needle at the far right in the opening of the buttonhole at the bartack. Sew up the other side in the same manner.
natural_image
Pure electrical circuit lines without any symbolsPattern:
Length: 12
Width: 4-5
Feed Dog:
Pressure: Normal
Foot: All Purpose
Pattern Selector: 6
BUTTONHOLES
Various fabrics require various methods of sewing buttonholes. Four different methods are given below, with suggested uses. If you are in doubt as to which method is best for your fabric, test the methods in question and choose the best according to the finished appearance.
PREPARATION
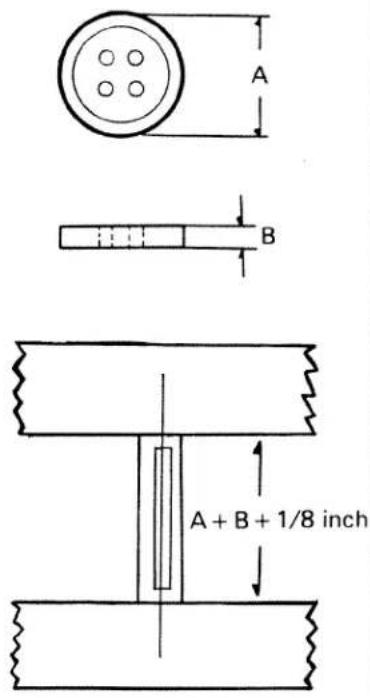
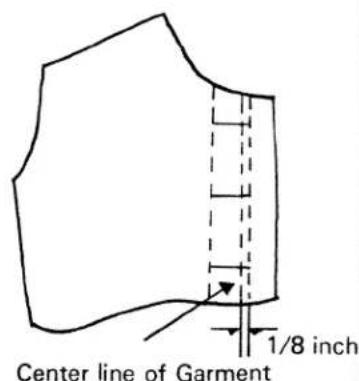
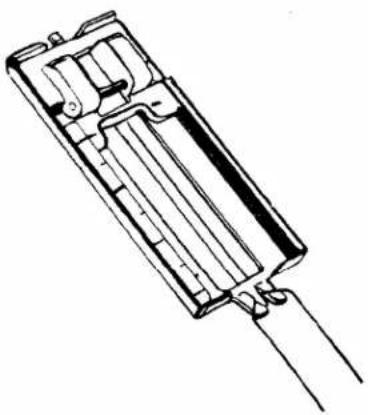
For the best results, a good quality mercerized cotton thread should be used. Polyester threads often result in puckered or heavy unattractive buttonholes. The finer your fabric is, the finer your cotton thread should be. An interfacing should be used under the buttonholes to give body, to strengthen, and to help them withstand wear. To establish the correct length of the buttonhole, add the diameter of the button (A), plus the thickness of the button (B), plus 1/8 inch for the bartacks. The length may be marked on the garment with a basting stitch, tailors chalk, or transparent tape, as shown. Another way to make sure that all buttonholes will be the same size is to cut a piece of cardboard as wide as the buttonhole foot and long enough to make the distance between the toe of the white slide and the cardboard the size buttonhole needed. This method works for buttonholes up to 1-1/8 inches long. Horizontal buttonholes should extend 1/8 inch beyond the center line of the garment.
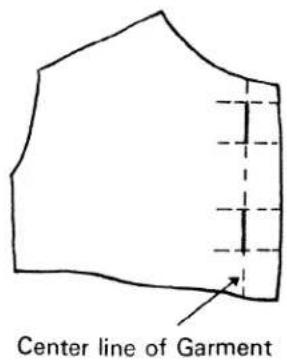
Vertical buttonholes are placed so that the cutting space of the buttonhole is directly on the center line. Always make a practice buttonhole on a scrap of the garment fabric before making any buttonholes on your garment. On your test sample, duplicate the thickness found in the garment and be sure to include the interfacing. The test sample should help determine the length needed for the button to pass through easily, and the stitch length for the particular fabric. As with the satin stitch, the stitches should be close together, but not so close that they pile up. Be sure to use the buttonhole foot.
Pattern Selector and Zigzag Width Control Dial
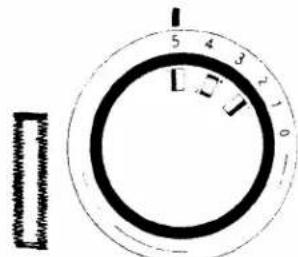
Pattern Selector and Zigzag Width Control Dial
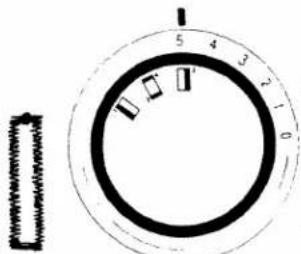
Pattern Selector and Zigzag Width Control Dial
tern: 🌿 gth: 📄 ith: 4–5
d Dog: ▲▲ ssur: Normal
t: Buttonhole
tern Selector:0-0-0
BUILT-IN BUTTONHOLER
This buttonhole eliminates the need for pivoting the fabric. It is used most often on light and medium woven fabrics.
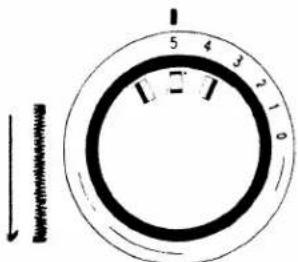
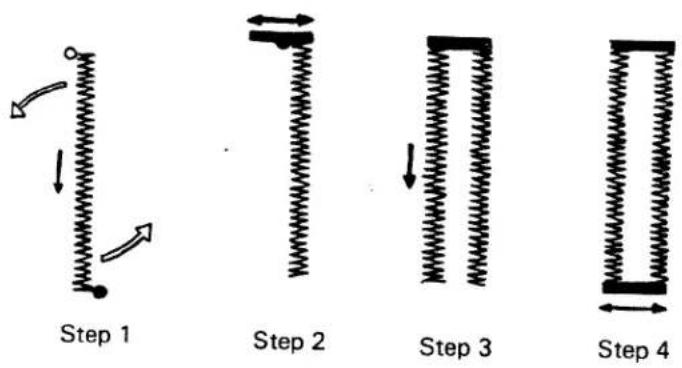
- Set the buttonhole control dial at the (#2) buttonhole picture. Lower the needle into the mark at the top end of the buttonhole. Lower the presser foot. A few stitches will be made for the bartack, #2, turn to #1 than the stitching will sew the left side in forward.
Stop when the stitching reaches the bottom end of marked buttonhole. At this position the machine will be sewing in forward.
- With the needle up, select the (#4) four buttonhole picture. A few bartack stitches will be made, turn to 3 than the stitching will sew the right side in reverse.
If using cardboard the white nylon slide will run into the cardboard to prevent sewing into the bartack.
-
To lock the stitch, make sure the needle is out of the fabric. Make sure the pattern control dial is at straight stitch and take a few stitches.
-
Score the buttonhole with the back edge of the seam ripper several times. To prevent cutting through the bartack, insert a straight pin through the bartack. Cut buttonhole open with the seam ripper.
Note: Stitch Width Control should always be at "0" while sewing this button-hole.
Adjustment of stitch density:
Check the stitch density on a scrap of fabric. If density is too open or too close, re-adjust by turning stitch length dial.
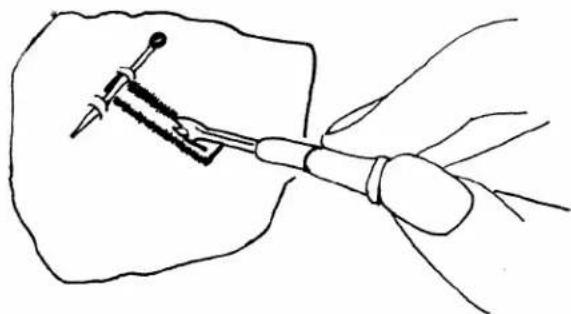
natural_image
Line drawing of a hand holding a tool interacting with a mechanical component (no text or symbols)TURN-AROUND BUTTONHOLES
It is possible to make small and dainty buttonholes if you desire or repair damaged buttonholes. This entails a slight shifting of the cloth but with some practice, good buttonholes can be achieved.
- Mark the length of the buttonhole on the cloth as shown in figure.
- Set the needle position to the left and your stitch length dial near "1/4" or the density your desire.
- Choose the desired width of your botton-hole.
Example: if you want a buttonhole with a width of #3 setting on the stitch width dial, divide this setting in half, or 1½ - Start at your marked position, sew down on the left side of buttonhole to the other end of marking. Leave the needle in the cloth at the right side of stitches and rotate your cloth. Lift the presser foot and slide the bottom of the foot back to the front.
- Lower the foot and raise the needle. Reset your stitch width dial to bartack, in this case the #3 setting, set your feed to sew several stitches.
- Raise the needle, raise feed to, ▲▲ reset the zigzag width to the initial setting, in this case #1½ and sew the other side of buttonhole to your mark, then repeat your bartack (5).
- Lock threads by stitching a few stitches at 0 width. Cut buttonhole as indicated previously.
When using this method over a buttonhole which has already been slit or damaged, be sure to hold the buttonhole open and allow the needle to go off the edge of the fabric. Step 4 is all that may be needed to repair damaged buttonholes.
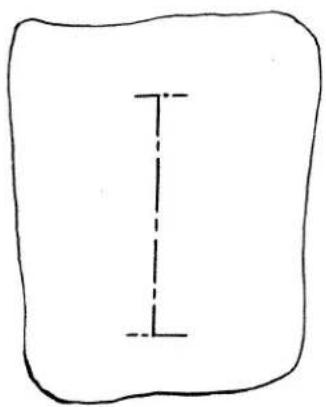
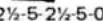
Pattern:
Length:
Width: 2½-5-2½-5-0
Feed Dog: ▲-□-□-□
Pressure: Normal
Foot: Buttonhole
Needle Position: 1
CORDED BUTTONHOLES
natural_image
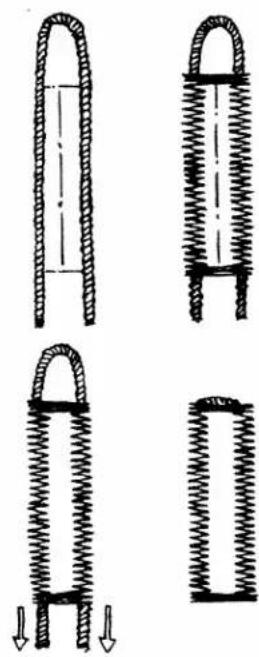
Technical line drawing of a mechanical component with internal channels and connectors (no text or symbols)Cording gives a reinforced raised button-hole. It is excellent for use on bulky, woven fabric, or knits in which the stitching often gets buried and makes cutting difficult. On knits, a corded buttonhole will help keep the fabric from stretching out of shape.
Choose a heavy cotton crochet thread or buttonhole twist to use for the cording. Proceed as for either built-in buttonhole (page 30) or the turnaround buttonhole (page 31), having the cord under the presser foot in such a way that the zigzag stitch covers the cord. When pivoting the buttonhole, also swing the cord around to follow under the second side.
At the completion of the buttonhole snip the excess cord close to the bartack on woven fabrics. For knitted garments, always pull the cords to the wrong side by using a darn-ing needle or needle threader, and knot the cord ends before clipping.
natural_image
Four diagrams showing different spring or coiled spring structures with arrows indicating downward motion (no text or symbols)Built-in Buttonholer:
Pattern:
Length:

Width: 4-5
Feed Dog

Pressure: Normal
Foot: Buttonhole
Pattern Selector:

Turn-around Buttonhole:
Pattern:

Length:

Width:
Feed Dog

Pressure: Normal
Foot: Buttonhole
Needle Position: 1
APPLICATIONS OF THE STRAIGHT TRIPLE STRETCH STITCH
SEAMS
This stitch may be used on knits and woven fabrics, in areas of stress as a reinforcement stitch. It is excellent for curved seams such as armholes and crotch seams. For active wear such as ski pants and girdle fabrics which endure a lot of stress in bending and stretching, this stitch may be used for seaming throughout the garment.
CAUTION: It is difficult to remove this stitch from fabric. Pre-fit garment before using this stitch.
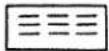
Pattern: ≡ ≡ ≡
Length: 4
Width: 0
Feed Dog:
Pressure: Normal
Foot: All Purpose
Pattern Selector: 7
natural_image
Line drawing of a decorative sleeve with floral patterns and a side panel (no text or symbols)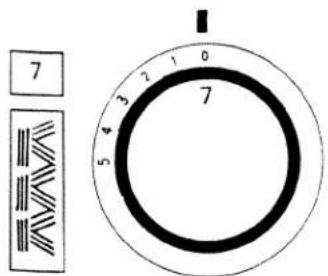
Pattern Selector and Zigzag Width Control Dial
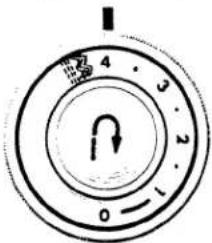
Stitch Length Control Dial
TOPSTITCHING (STRETCH STITCHES)
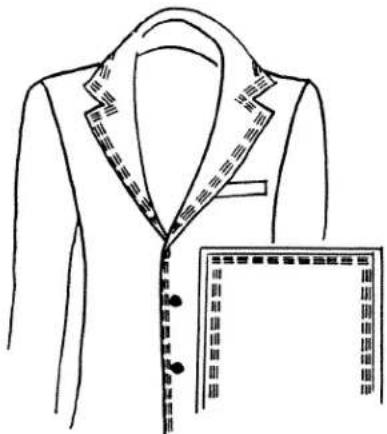
Because this stitch is heavier than an ordinary straight stitch, it is ideal for topstitching, particularly on knits.
Pattern: 三三三
Length: 4
Width: 0
Feed Dog:
Pressure: Normal
Foot: All Purpose
Pattern Selector: 7
natural_image
Line drawing of a suit jacket with patterned collar and zipper, shown in side profile (no text or symbols)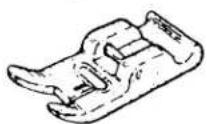
Zigzag Foot
PROCEDURE:
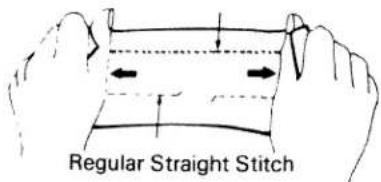
- The elastic triple straight stitch is used when a straight line of stitching is desired so that seams may be pressed open (slacks for example).
- This stitch is especially useful where the tiny zigzag seam will not hold its shape and the straight stitch will break.
- Apply this stitch to areas of stress on both wovens and knits (crotch seam and under arm for example).
- Use this stitch for tightly fitted garments that need a lot of stretch, such as ski pants, girdles and bathing suits.
- If puckering becomes a problem, use the straight stitch foot.
Elastic Triple Straight Stitch
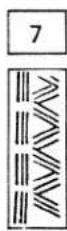
APPLICATION OF THE RICK-RACK
||V||V||
TOPSTITCHING/RICK-RACK
A decorative topstitch can be produced with the rick-rack stitch. Stitch around the structural lines of the garment for a special effect. Topstitch braid or a decorative inset to add an additional creative flair.
Pattern: //V//
Length: 4
Width: 4-5
Feed Dog:
Pressure: Normal
Foot: All Purpose
Pattern Selector: 7
natural_image
Five-pointed star shape formed by intersecting lines forming a fractal pattern (no text or symbols)TAPERING/RICK-RACK
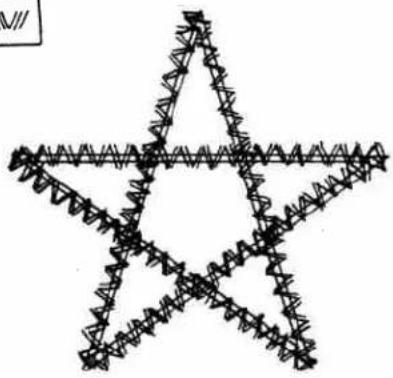
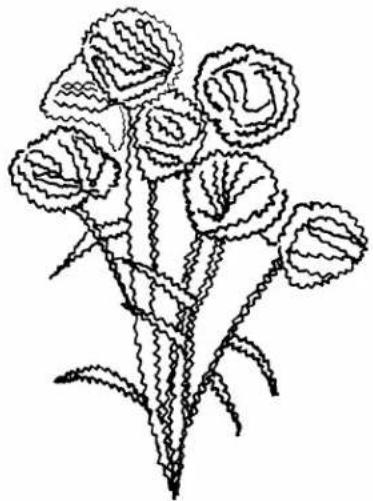
The rick-rack stitch may be tapered to form creative stems and petals of flowers, embroidered pictures and wall hangings. As in tapering the zigzag, See Page (19), slowly turn the stitch width dial from 0 to 5 and back to 0. A group of these tapered rick-rack stitch will from a bouquet-like effect.
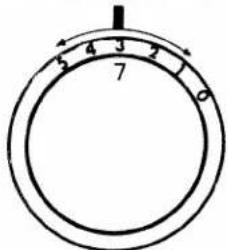
Pattern Selector and Zigzag Width Control Dial
Pattern: MIVAll
Length: 4
Width: 0-5-0
Feed Dog: ▲
Pressure: Normal
Foot: All Purpose
Pattern Selector: 7
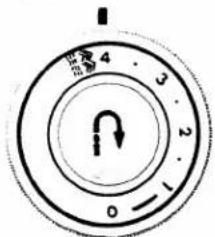
Stitch Length Control Dial
natural_image
Line drawing of a flowering plant with multiple blooms and stems (no text or symbols)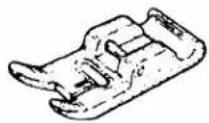
Zigzag Foot
PROCEDURE:
- The elastic rick-rack stitch is a zigzag line of stitching that is desired so that seams may be pressed open.
- Apply this stitch to areas of stress on both wovens and knits.
- Use narrow width of zigzag as a heavy duty triple stitch for seams.
- Use medium and wide widths of zigzag for over-casting edges of seams, facings and hems of heavier weight fabrics such as terrycloth, and for attaching elastic. Use also for decorative stitching.
Elastic Triple Zigzag Stitch
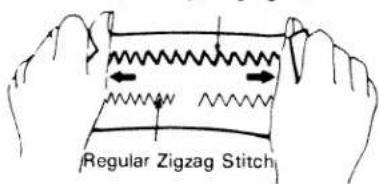
- Guide your fabric from the front. Do not pull or push as it will cause poor stitching.
APPLICATIONS SMOCKING STITCH
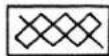
This stitch is very versatile and can be corded or used as a topstitch as other reverse stitch patterns.
SEAMING SMOCKING STITCH
The smocking stitch can be used to seam fine gauze type fabrics or bulky sweater knits, this results in less bulk for a finished 1/4 inch seam.
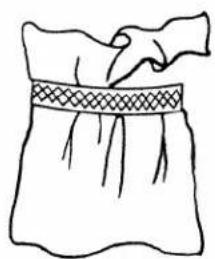
natural_image
Simple line drawing of a draped fabric with a woven strap (no text or symbols)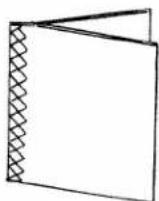
Pattern:

Length: 4
Width: 4-5
Feed Dog:
Pressure: Normal
Foot: All Purpose
Pattern Selector: 8
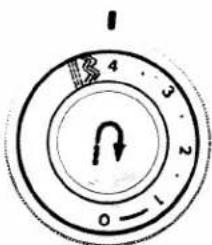
Stitch Length
Control Dial
ELASTIC THREAD SHIRRING
Cuffs and bodices of little girls dresses can be shirred easily with the smocking stitch. Place the right side of the garment down on the bed of the machine. Place two strands of elastic thread under the foot. Stretch the elastic thread while sewing with the smocking stitch to gather cuffs or bodice for a feminine effect.
PROCEDURE:
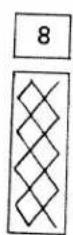
- The smocking stitch is a very useful special ultra-stretch stitch.
- Lingerie or tricot seams should only be about 1/8 inch finished width.
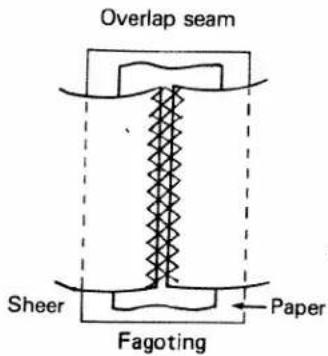
- Fagoting can be achieved by joining the folded edge of two piece of fabric together with a gap between them. Use a sheer flesh colored piece of fabric underneath to make the fagoting much stronger and prettier.
- Do the fagoting with a piece of paper underneath and remove the paper by hand washing.
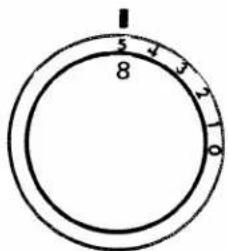
Pattern Selector and Zigzag Width Control Dial
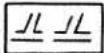
APPLICATIONS ULTRA STRETCH
SEAMING ULTRA STRETCH
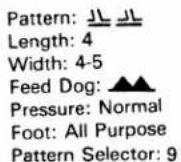
On most knits, a 1/4 inch finished seam, such as stitch and overcast or the overlock stitch, is more desirable than a 5/8 inch opened seam allowance. These stitches can create a neater, more professional finish, eliminate bulky seams, prevent curling, permit the garment to "give" under stress, and at the same time they cut down on the amount of work involved in making a garment. If ever in doubt as to which of the two stitches to use, test both on the particular fabric in question and choose according to their performance.
The stitch and overcast stitch is excellent for stretch fabrics such as sweater knits, bathing suit knits, and cotton knits. It has the greatest strength and elasticity of all.
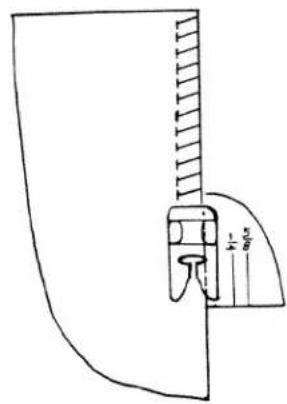
For patterns with 1/4 inch seam allowances: Feed the fabric such that the needle goes over the raw edge of the fabric when it swings to the right.
For patterns with 5/8 inch seam allowances: Feed the raw edge of the fabric along the etched guide line "1/2", then trim away the excess fabric close to the stitching.
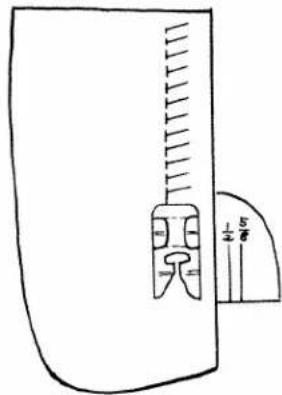
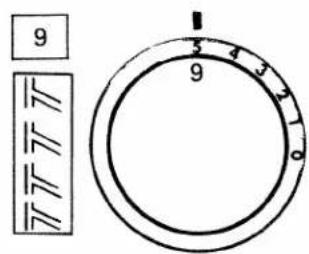
Pattern Selector and Zigzag Width Control Dial
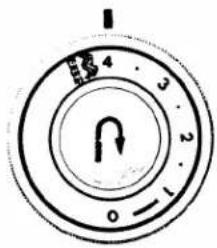
Stitch Length Control Dial
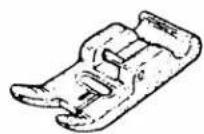
Zigzag Foot
natural_image
Simple line drawing of a vertical ladder leaning against a curved wall (no text or symbols)Overcasting
PROCEDURE:
• Overlock stitching is used for seaming and finishing the cut edge of knit fabrics, all in one operation.
- This overlock stitch is especially good for stretch fabrics such as double knit and jersey and will give a firm, neat edge finish.
PARTS DESCRIPTION
- Thread Take-up Lever
- Pressure Release (Darning)
- Top Plate Thread Guide
- Tension Regulator
- Top Plate
- Handle
- Needle Position and Pattern Selector Dial
- Zigzag Width Control Dial
- Bobbin Winder
-
Fly Wheel Clutch
-
Fly Wheel
- Stitch Length Control Dial
- Reverse Button
- Drop Feed (under Shuttle Cover)
- Shuttle Race Cover
- Feed Dog
- Needle Plate
- Thread Guide
- Thread Guide
- Face Plate
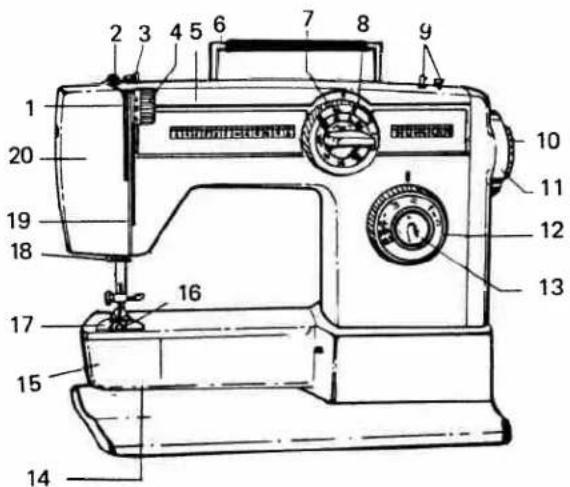
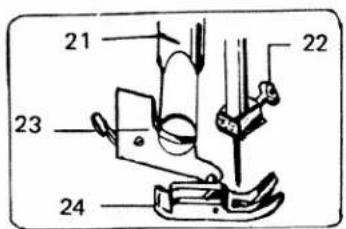
- Thread Cutter
- Needle Clamp
- Presser Foot Thumb Screw
- Presser Foot
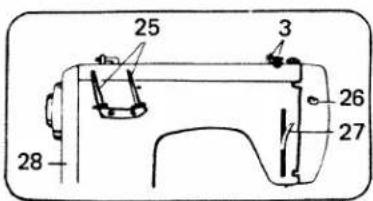
- Spool Pins
- Light Switch
- Presser Bar Lifter
- Motor and Belt Cover
ACCESSORIES
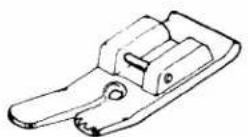
Straight Stitch Foot
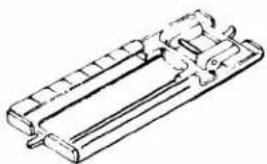
natural_image
Technical line drawing of a mechanical component with no visible text or symbolsButtonhole Foot
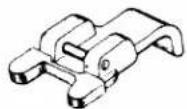
Button Foot
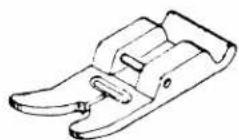
Zigzag Foot (In Machine)


Felts
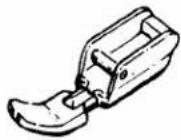
Regular Zipper Foot
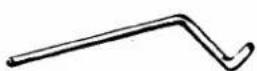
Quilting Guide
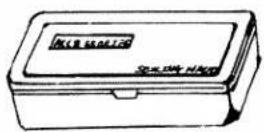
Accessory Box
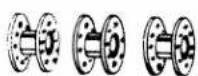
Bobbins

Seam Ripper
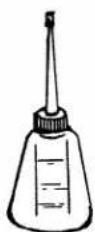
Oiler
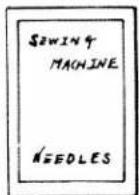
Needles
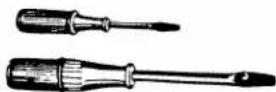
Screw Drivers
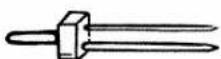
Twin Needle
TWIN NEEDLE SWING
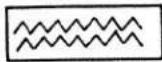
TWIN NEEDLE SEWING EFFECTS
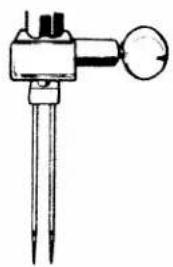
To use a twin needle in the machine, remove the single needle, and insert the twin needle into clamp with the flat side to the back. Threading of the machine when using a twin needle is the same as normal with these exceptions:
- Place thread, matching or contrasting in color, on each spool pin.
-
Hold both threads together as you follow through thread guides as normal, but separate the threads at the tension. Pass on thread through the left disc and one thread through the right disc.
-
Then pass threads through arm thread guide.
When using a twin needle, set the stitch width dial at 2 or less to prevent needle breakage with a wide stitch.
Be sure to use the Middle Needle Position.
Note: Be sure zigzag needle plate and zigzag presser foot are in place.
natural_image
Simple line drawing of a mechanical device with a handle and two vertical pins (no text or symbols)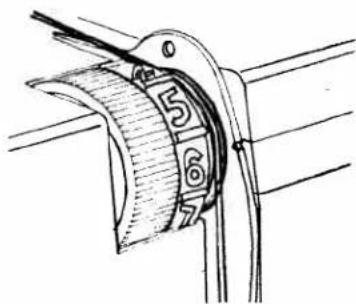
Pattern: Any
Length: 12 -5
Width: 0-2
Feed Dog:
Pressure: Normal
Foot: All Purpose
Needle Position: 2
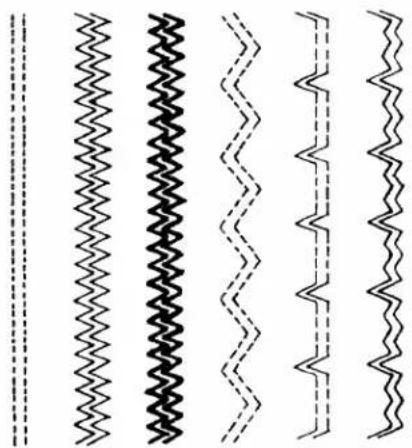
DECORATIVE TUCKS OR DESIGNS
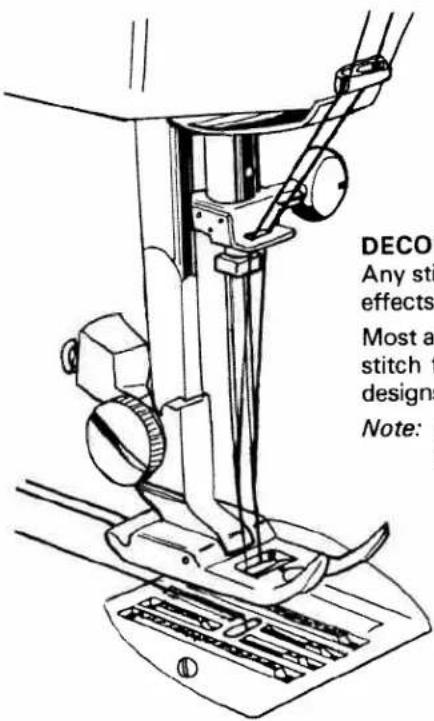
Any stitch can be used with the twin needle for decorative effects.
Most attractive are the multiple stitch zigzag and blind hem stitch for fancy tucks. The satin stitch or tapered zigzag designs in two colors are effective for creative trims.
Note: Remember to use no more than a 2 zigzag width for twin needle sewing.
natural_image
Five wavy line patterns with dashed extensions, no text or symbols presentPIN TUCKS
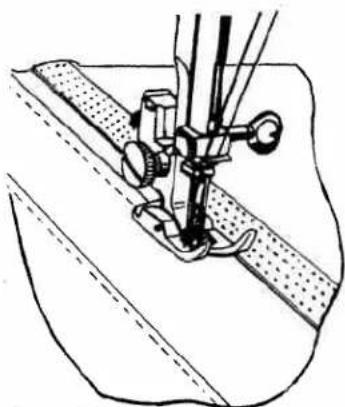
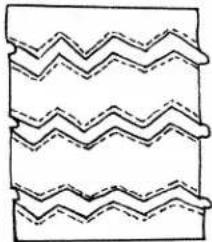
Narrow tucks, sewn with thread that matches the fabric, produce subtle decoration on plain fabrics. Using the twin needle, sew straight lines on the fabric guiding the edge of the presser foot along each successive tuck to make parallel rows. Soft fabrics will be pulled to form a soft crease. To achieve a tuck on a fabric, increase the lower tension slightly. Heavier fabrics will produce two lines of straight stitching. Attractive pin tucks are made with the multiple stitch zigzag as well as with a straight stitch.
Note: Transparent tape makes straight lines easy to sew. Just sew with the presser foot guiding along the edge of the tape. When sewing is completed peel off tape.
natural_image
Technical line drawing of a sewing machine needle stitching fabric (no text or symbols)Pattern: ----
Length: 2-4
Width: 0-2
Feed Dog:
Pressure: Normal
Foot: All Purpose
Needle Position: 2
Pattern Selector: 4
natural_image
Pure diagram of layered zigzag structures without any text, numbers, or symbols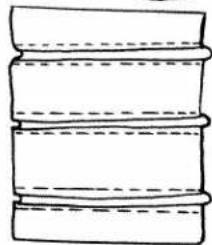
natural_image
Simple line drawing of three stacked rectangular blocks with dashed lines indicating horizontal and vertical edges (no text or symbols)FREE-ARM SEWING
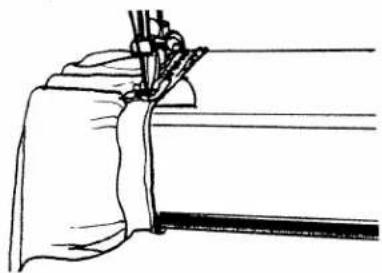
For sewing tubular and hard-to-reach areas, use your machine as a free-arm. Stitching buttonholes or sewing buttons on a cuff or neckband; topstitching a sleeve; edge finishes on sleeves, pantlegs and waistlines; darning and patching knees, elbows; and other areas of wear on children's clothing become as easy as sewing a common seam when you have the free-arm at your fingertips. Illustrations show some examples of sewing with the free-arm.
natural_image
Line drawing of a sewing machine needle stitching fabric (no text or symbols)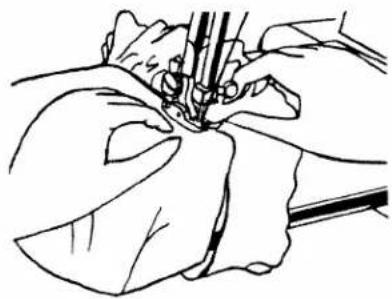
natural_image
Line drawing of hands performing a sewing or sewing process with tools (no text or symbols)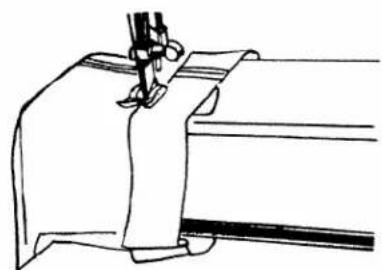
natural_image
Line drawing of a sewing machine needle stitching fabric (no text or symbols)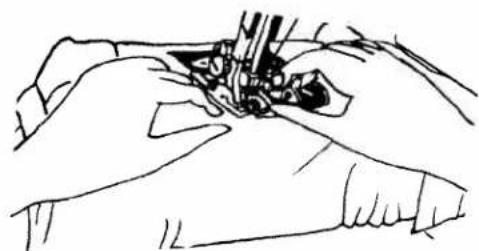
natural_image
Line drawing of a medical procedure with surgical tools (no text or symbols)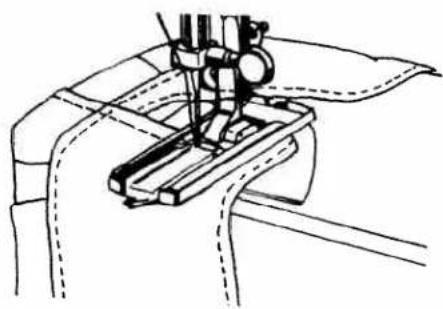
natural_image
Technical line drawing of a sewing machine needle and fabric (no text or symbols)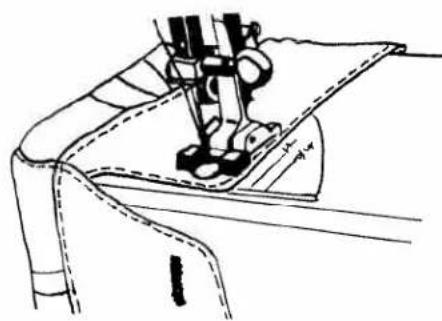
natural_image
Line drawing of a sewing machine needle stitching fabric (no text or symbols)USE OF THE ACCESSORIES
CORDING AND ZIPPER FOOT
The cording and zipper foot is used to sew in zippers and insert cording.
Zipper:
Set the needle position at "1" or "3" as needed to sew the right side or the left side of zipper respectively, so that the foot sews very close to the zipper teeth.
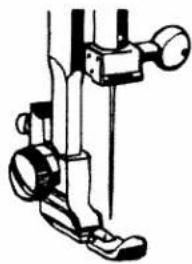
natural_image
Technical line drawing of a mechanical device with no visible text or symbols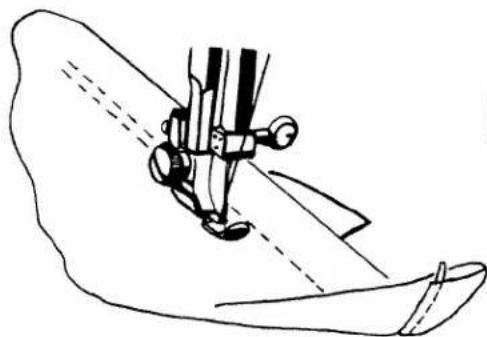
natural_image
Line drawing of a sewing machine needle stitching fabric (no text or symbols)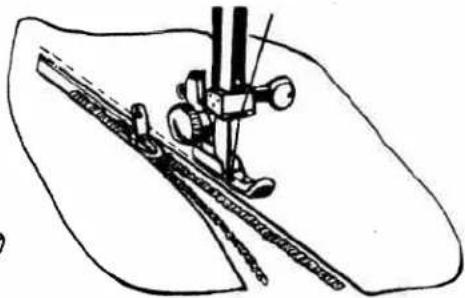
natural_image
Line drawing of a sewing machine needle stitching fabric (no text or symbols)To insert cording:
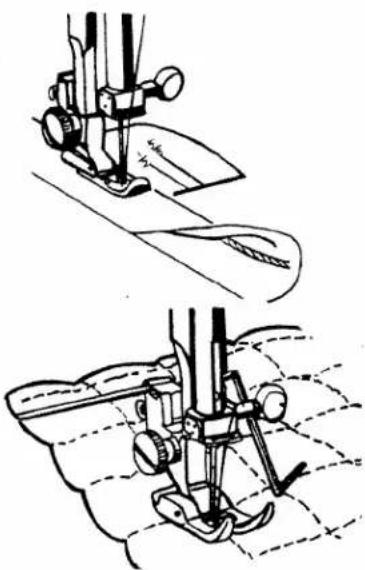
- Set the needle position at "3" and make the welting by sandwiching the cord into a bias strip of fabric. Stitch close to cord.
- Set the needle position at "1". Sandwich the welting between two layers of fabric with right sides together. Stitch a second time. The needle stitches close to the cord through all thicknesses.
QUILTING GUIDE
Parallel straight lines are easy to sew with the quilting guide. To attach the guide, slide it into the black clip at the back of the presser foot shank. Adjust the curved bar to the desired distance from the needle. Sew the first line of stitching as desired, and then for the succeeding rows let the guide follow along the previous line of stitching. A straight stitch, zigzag, or any other stitch may be used.
natural_image
Technical line drawing of a sewing machine with two views (top and side), no text or symbols present.• The All Purpose Foot
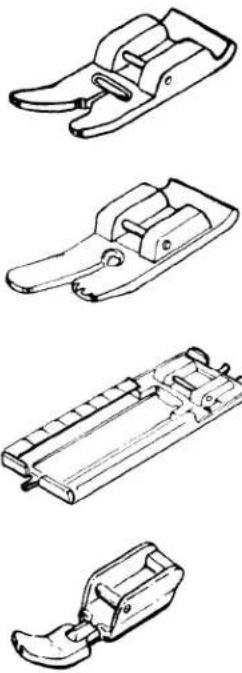
This foot is flat on the bottom and has a wide hole to accommodate wide stitches. This foot should be used for all normal sewing.
• The Straight Stitch Foot
This foot is flat on the bottom and has only a small hole to accommodate only straight stitching. It may be used on sheer or soft fabrics for more control when the all purpose foot allows the fabric to be pulled with the needle.
• The Buttonhole Foot
This foot has a frame which holds the fabric taut enough to produce a good buttonhole. The markings on the side allow exact buttonhole length to be made.
• Cording and Zipper Foot
This foot is very narrow, with needle opening cuts at its right and left sides to sew in zippers and insert cording.
• CHANGING THE FOOT
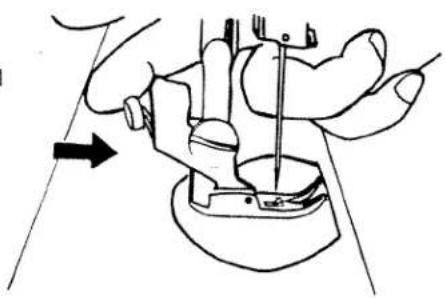
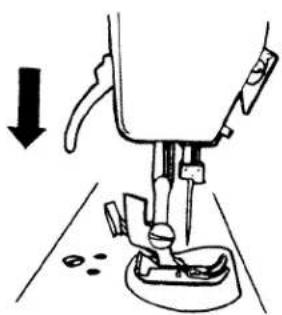
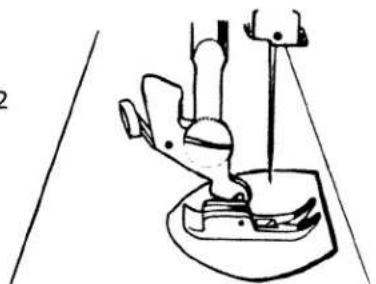
Press the presser foot shank button toward you to remove the foot (Step 1). To attach place the desired foot under the shank and lower the presser bar (Step 2). Foot will be locked automatically (Step 3).
Step 1
natural_image
Line drawing of a sewing machine needle insertion into a slot, with no text or symbols presentStep 3
natural_image
Line drawing of a sewing machine needle stitching fabric, with a downward arrow indicating the process (no text or symbols)Step 2
natural_image
Line drawing of a sewing machine needle and base (no text or symbols)ADDITIONAL SPECIAL ACCESSORIES
ROLLER FOOT
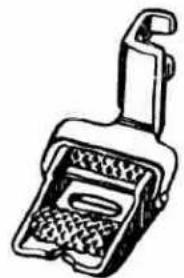
Ideal for use on vinyls, imitation leathers, jerseys, synthetics, velvets and denim. This foot helps keep both layers of fabric feeding the same. On very slippery fabrics, the roller foot helps prevent skipped stitches.
natural_image
Line drawing of a mechanical device with a handle and internal compartments (no text or symbols)353701
OVERCAST FOOT
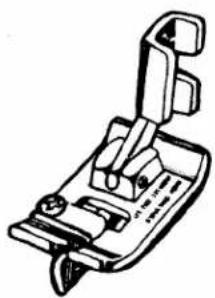
Zigzag overcasting may tend to roll the edge of some fabrics causing bulky edge. The overcast foot helps to produce a flat edge. The bar behind the needle hole holds the threads firmly in a full width zigzag or overlock stitch to keep the stitches from drawing tightly together.
natural_image
Technical line drawing of a mechanical clamp or bracket device (no text or symbols)79634
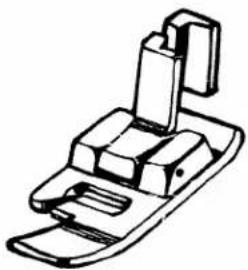
BLIND HEM FOOT
For all those who find machine blind hemming difficult, this foot gives a clear guide for the fold of fabric to follow. The blind hem foot is a fine accessory for those who like the strength and durability of machine hemming.
natural_image
Technical line drawing of a mechanical clamp or bracket component (no text or symbols)3710
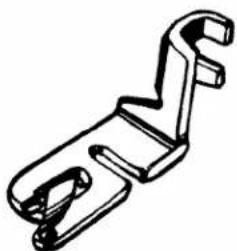
ROLLED HEM FOOT
Recommended for narrow rolled hems on scarves, shirts, linens, and linings. This foot makes a very tedious hand sewing job very easy to do on a sewing machine.
natural_image
Line drawing of a mechanical clamp or bracket component (no text or symbols)7066
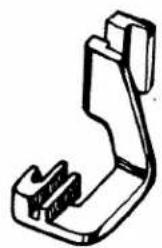
FRINGE-FOOT
Thick chenille type loops can add interest to appliqued flowers and animals. Used with a satin stitch this foot gives a plush texture to a design. Also used for hemstitching and tailor tacking.
natural_image
Pure mechanical bracket diagram without any text, numbers, or symbols10570
Caution: Before cleaning the machine, be sure to disconnect the power cord from the wall outlet.
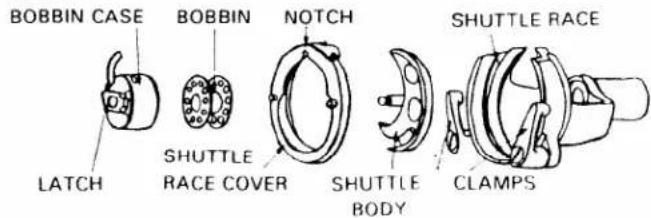
CLEANING HOOK ASSEMBLY
- With take-up lever in highest position, and remove bobbin case.
- Turn clamps outward and remove shuttle race cover.
- Remove shuttle body.
- Clean thread and lint from all parts, including shuttle race.
- Run a drop of oil along rim of shuttle body.
- Replace shuttle body, then shuttle race cover. Snap clamps into place.
- Grasp threaded bobbin case by latch and replace, fitting tongue into notch of shuttle race cover.
natural_image
Line drawing of a sewing machine with a handle and base (no text or symbols)CLEANING FEED DOGS
- Lint or dust accumulated between the needle plate and the feed dogs must be removed to maintain good operation of the machine.
- Raise the needle bar to the highest position and remove the needle and presser foot.
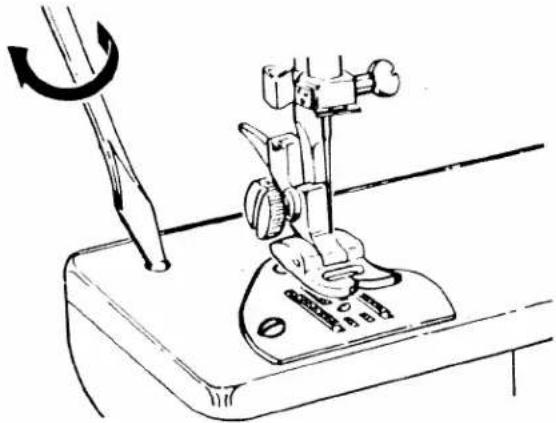
- Loosen screw on the bed cover plate and remove the plate.
- Clean lint and dust from the bottom of the needle plate and the feed dogs with a lint brush.
- Turn the hand wheel slowly and be sure to clean all areas.
- Replace the removed plate.
Check the needle plate area, if there are scratches and marks around the needle hole opening, your machine is not being cleaned properly. Always remove the needle plate and clean the feed dogs periodically. Improper and lack of cleaning will cause an accumulation of lint which hampers the feeding mechanism, this in turn will cause the operator to impatiently pull or push the cloth causing the needle to bend and strike the plate, foot or hook, causing a slip in the timing mechanism. Continuous striking will cause defects making it necessary to call a serviceman.
CHANGING LIGHT BULB
Open the face plate by pulling towards the left. Turn the light bulb counterclockwise to remove. Replace the bulb by turning clockwise.
A majority of service calls could be avoided by following these procedures and by first checking to see that the machine is:
- Threaded properly top and bottom.
- That the bobbin is wound evenly.
- That the needle is in the machine correctly.
- Proper cleaning and oiling.
natural_image
Technical line drawing of a mechanical device with no visible text or symbolsOILING (GENERAL)
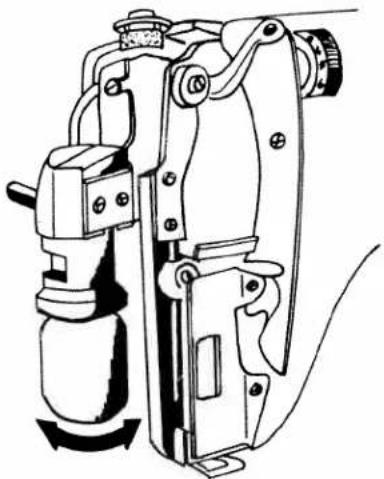
Using the large screw driver in the accessory box, remove the two screws on the top plate and remove plate.
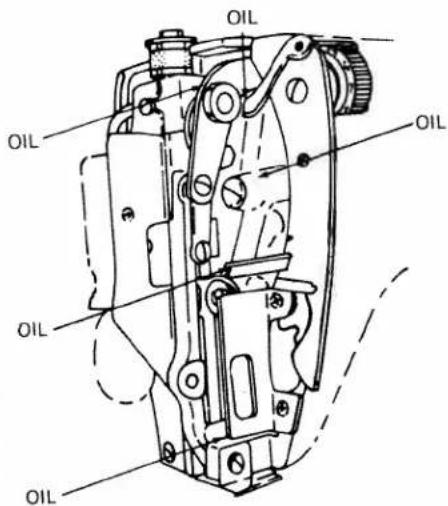
Swing open hinged face plate. Apply one drop of oil at all points indicated by arrows.
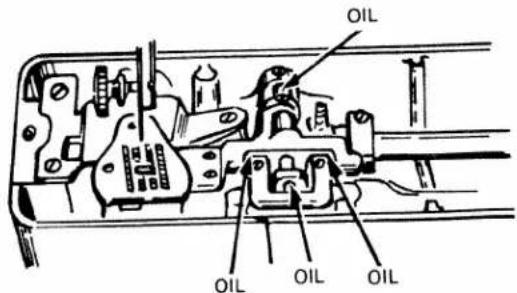
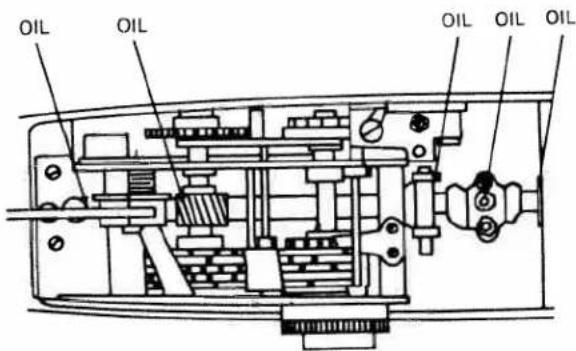
Remove screw on the bed cover plate and apply oil while turning the hand wheel.
MINOR PROBLEMS AND SOLUTIONS
1. SKIPPED STITCHES
Skipped stitches have become a problem in recent years, especially with the appearance of knit fabrics and polyester threads on the market. Skipped stitches normally can be traced to four basic causes:
A. The Needle
(1) The needle is dull or bent. Change it.
(2) The needle is placed incorrectly in the needle clamp. It is either backwards or is not up in the needle clamp all the way.
(3) The wrong type of needle is being used for the fabric. Use ball point needle on knits and wedge point needles for leathers and vinyls.
(4) the thread is too thick for the size of needle being used. Use a large needle.
B. The Thread
(1) The machine is threaded incorrectly.
(2) Many brands of polyester thread are too stiff and coarse thus making loop formation difficult or impossible. Change brands or use a cotton thread.
C. The Presser Foot
(1) The foot being used is not holding the fabric taut enough over the needle plate hole, thus the fabric is being pulled up and down while stitching. Use the foot which gives the most control possible for the particular job being done.
(2) There is not enough pressure on the presser bar to hold the fabric firmly. Increase pressure on the pressure control
D. The Fabric
The fabric has a heavy finish on it which deters stitch formation. Wash the fabric thoroughly before sewing.
natural_image
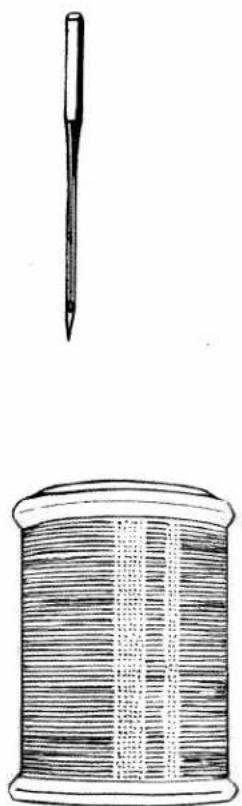
Illustration of a needle and a spool of thread, no text or symbols present2. THREAD BREAKING
A. Machine improperly threaded.
B. Thread is caught in a slit of the spool or under the spool
C. Thread is dry or of poor quality.
D. Tension is too tight.
E. Starting the machine with take-up lever in the wrong position. Always start and end sewing with take-up lever in highest position.
F. Needle is bent, blunt, or has a burr on it.
G. Needle is not inserted correctly.
H. Thread is too coarse for needle being used.
I. Needle plate has been nicked by the needle, thus is sharp and cuts the threads.
natural_image
Line drawing of a mechanical clamp or bracket assembly (no text or symbols)- NEEDLE COMES UNTHREADED
A. Take-up lever is not in correct position as you start sewing. Always start and end your take-up lever in its highest position.
- NEEDLE BREAKS
A. Pulling on fabric while sewing bends the needle, this may cause breaking down the plate.
B. Needle is inserted incorrectly.
C. Needle is too fine for the type of fabric.
C. Needle is too fine for D. Needle is hitting pins.
E. Presser foot is improperly fastened.
E. Machine is improperly threaded.
5 MATERIAL PUCKERS
A Tensions are too tight.
B. Improper threading.
C. Thread is too heavy for fabric.
D. Stitch is too long for fabric.
5. Needle is dull so it is difficult to seam fabric.
E. The presser foot being used is not holding the fabric taut through
G. If all else fails, try sewing over paper.
-
THREADS JAM AT START OF SEWING
-
Threads slightly for the threads tightly for the first few stitches.
A. Hold the threads slightly for the side of presser foot under and to the side of presser foot instead of to the back.
B. Place thread ends under and to the edge of the thread.
C. Be sure the presser foot is down on thick fabric. -
MACHINE IS NOISY
A. Clean and oil it.
B. If it is a punching sound, changing the needle.
C. Stitch length dial is not at 4 when stretch
- ROBBIN DOES NOT WIND PROPERLY
A. Machine is improperly threaded.
B. Rubber wheel on bobbin winder is worn or not making contact.
B. Rubber wheel on bottom.
C. Robin winder tension disc is not in position.
enjoy your new
WHITE
INDEX
GETTING READY TO SEW
Using the Foot Control 1
Using the Extnesion Plate 2
Free Arm Features 2
Changing the Presser Foot 3
Changing the Needle 4
Winding the Bobbin 5
Changing the Bobbin 6
Threading the Bobbin Case 7
Upper Threading 8
Twin Needle Upper Threading 9
Adjusting Feed Dog Height 9
Picking Up Lower Bobbin Thread 10
Regulating Pressure 10
Adjusting Upper Tension 11
Fabric/Thread/Needle Chart 12/13
Functions of Controls 14
STRAIGHT AND ZIGZAG
Seams 15
Basting/Topstitching 15
Darning 15
Elastic Thread Shirring 16
Holding the Fabric 16
Turning Corners 16
Curved Seams 16
Ending Seams/Removal of Fabric 17
Overcasting....17
Seaming Knits 17
Sewing on Buttons 18
Forming Thread Shank on Button 18
Satin Stitching 19
Tapering/Creative Embroidery 19
Manual Embroidery Designs 19
Free Hand Monogramming 20
Applique 20
Gathering Over Cord 21
Overcasting....21
Patching 21
Mending a Tear or Instant Darning 22
-ace Applications....22
Flutter Hem....23
Elastic Application 23
Understitching Facings 24
Decorative Effects 24
Blind Hemming....25
Shell Tuck 26
Decorative Effects 26
Topstitching Effects....26
Decorative Stitches 27
Hemming 28
Edging 28
Eyelash Buttonhole 28
BUTTONHOLES
Buttonhole Preparation 29
Built In Buttonholer 30
Turn Around Buttonholes 31
Corded Buttonholes....32
STRETCH UTILITY STITCHES
Seams 33
Topstitching (Stretch Stitches) 33
Topstitching/Rick Rack 34
Tapering/Rick Rack 34
Application Smocking Stitch 35
Seaming Smocking Stitch 35
Elastic Thread Shirring 35
Application Ultra Stretch 36
Seaming Ultra Stretch....36
FEATURES AND PARTS
Parts Description 37
Accessories....38
Twin Needle Sewing Effects 39
Decorative Tucks or Designs 39
Pin Tucks 40
Free Arm Sewing 40
Cording and Zipper Foot 41
Quilting Guide 41
All purpose-Straight Stitch-Buttonhole-Zipper
Foots 42
Changing the Foot 42
Additional Special Accessories....43
CARE OF YOUR MACHINE
Cleaning Hook Assembly 44
Cleaning Feed Dogs 44
Changing Light Bulb 45
Oiling (General) 45
Minor Problems and Solutions 46/47
- WHITE
- USING THE FOOT CONTROL
- TO CONNECT THE FOOT CONTROL WIRES:
- TO USE THE FOOT PEDAL:
- TO ATTACH AND REMOVE THE EXTENSION PLATE:
- LEVELING THE MACHINE
- TUBULAR SEWING
- FLAT BED SEWING
- CHANGING THE PRESSER FOOT
- TO REMOVE THE PRESSER FOOT:
- TO ATTACH THE PRESSER FOOT:
- CHANGING THE NEEDLE
- WINDING THE BOBBIN
- TO DISENGAGE THE HAND WHEEL:
- TO WIND THREAD ONTO BOBBIN:
- CHANGING THE BOBBIN
- TO REMOVE THE BOBBIN FROM BOBBIN CASE:
- TO ATTACH THE BOBBIN CASE:
- THREADING THE BOBBIN CASE
- TO ADJUST BOBBIN TENSION:
- UPPER THREADING
- TWIN NEEDLE UPPER THREADING
- ADJUSTING FEED DOG HEIGHT
- PICKING-UP LOWER BOBBIN THREAD
- REGULATING PRESSURE
- ADJUSTING UPPER TENSION
- FUNCTIONS OF CONTROLS
- NEEDLE POSITION AND PATTERN SELECTOR DIAL
- ZIGZAG WIDTH CONTROL DIAL
- STITCH LENGTH CONTROL DIAL
- REVERSE STITCH BUTTON:
- APPLICATIONS OF THE STRAIGHT STITCH
- SEAMS
- BASTING/TOPSTITCHING
- DARNING
- ELASTIC THREAD SHIRRING
- • HOLDING THE FABRIC
- • TURNING CORNERS
- • CURVED SEAMS
- • ENDING SEAM/REMOVAL OF FABRIC
- APPLICATIONS OF THE ZIGZAG STITCH
- OVERCASTING
- SEAMING KNITS
- SEWING ON BUTTONS
- FORMING THREAD SHANK ON BUTTON
- SATIN STITCHING
- MANUAL EMBROIDERY DESIGNS
- FREE HAND MONOGRAMMING
- APPLIQUE
- GATHERING OVER CORD
- APPLICATIONS OF THE MULTIPLE STITCH ZIGZAG
- PATCHING
- MENDING A TEAR OR INSTANT DARNING
- LACE APPLICATIONS
- FLUTTER HEM
- ELASTIC APPLICATION
- UNDERSTITCHING FACINGS
- DECORATIVE EFFECTS
- APPLICATIONS OF THE BLIND HEM STITCH
- BLIND HEMMING
- Procedure:
- SHELL TUCK
- TOPSTITCHING EFFECTS
- DECORATIVE STITCHES
- APPLICATIONS OF THE STRETCH BLIND HEM
- HEMMING
- EDGING
- EYELASH BUTTONHOLE
- BUTTONHOLES
- PREPARATION
- BUILT-IN BUTTONHOLER
- Adjustment of stitch density:
- TURN-AROUND BUTTONHOLES
- CORDED BUTTONHOLES
- Built-in Buttonholer:
- Turn-around Buttonhole:
- APPLICATIONS OF THE STRAIGHT TRIPLE STRETCH STITCH
- TOPSTITCHING (STRETCH STITCHES)
- APPLICATION OF THE RICK-RACK
- TOPSTITCHING/RICK-RACK
- TAPERING/RICK-RACK
- APPLICATIONS SMOCKING STITCH
- SEAMING SMOCKING STITCH
- APPLICATIONS ULTRA STRETCH
- SEAMING ULTRA STRETCH
- PARTS DESCRIPTION
- ACCESSORIES
- TWIN NEEDLE SWING
- TWIN NEEDLE SEWING EFFECTS
- DECORATIVE TUCKS OR DESIGNS
- PIN TUCKS
- FREE-ARM SEWING
- USE OF THE ACCESSORIES
- CORDING AND ZIPPER FOOT
- Zipper:
- To insert cording:
- QUILTING GUIDE
- • The All Purpose Foot
- • The Straight Stitch Foot
- • The Buttonhole Foot
- • Cording and Zipper Foot
- • CHANGING THE FOOT
- ADDITIONAL SPECIAL ACCESSORIES
- ROLLER FOOT
- 353701
- OVERCAST FOOT
- 79634
- BLIND HEM FOOT
- 3710
- ROLLED HEM FOOT
- 7066
- FRINGE-FOOT
- 10570
- CLEANING HOOK ASSEMBLY
- CLEANING FEED DOGS
- CHANGING LIGHT BULB
- MINOR PROBLEMS AND SOLUTIONS
- SKIPPED STITCHES
- THREAD BREAKING
- INDEX
- GETTING READY TO SEW
- STRAIGHT AND ZIGZAG
- STRETCH UTILITY STITCHES
- FEATURES AND PARTS
- CARE OF YOUR MACHINE
Brand : White
Model : W1240
Category : Sewing machine