
GAF03BK - Oven GEMINI - Free user manual and instructions
Find the device manual for free GAF03BK GEMINI in PDF.


| Product Type | Electric Oven |
| Brand | Gemini |
| Model | GAF03BK |
| Color | Black |
| Dimensions (WxDxH) | 595 x 595 x 550 mm |
| Weight | 30 kg |
| Power Supply | 220-240 V, 50/60 Hz |
| Power Consumption | 2500 W |
| Number of Functions | 8 |
| Main Functions | Convection, Grill, Defrost, Fan Forced, Top Heat, Bottom Heat, Rotisserie, Light |
| Temperature Range | 50°C - 250°C |
| Timer | Digital, up to 120 minutes |
| Interior Material | Enamel |
| Cleaning | Manual, enamel interior easy clean |
| Safety Features | Child lock, auto shut-off, overheat protection |
| Spare Parts Availability | Yes, through Gemini service centers |
| Repairability Index | 7.5/10 |
| Warranty | 2 years |
| Energy Class | A |
| Net Capacity | 71 L |
| Number of Glass Layers | 3 |
Frequently Asked Questions - GAF03BK GEMINI
User questions about GAF03BK GEMINI
0 question about this device. Answer the ones you know or ask your own.
Ask a new question about this device
Download the instructions for your Oven in PDF format for free! Find your manual GAF03BK - GEMINI and take your electronic device back in hand. On this page are published all the documents necessary for the use of your device. GAF03BK by GEMINI.
USER MANUAL GAF03BK GEMINI
Please read this manual carefully before any using of the appliance as dangers may occur under incorrect operations.
SAFETY
- Do not immersed the housing in water or rinse under the tap due to the electronic and heating components.
- Avoid any liquid entered the appliance to prevent from electric shock or short-circuit.
- Keep all ingredients in the basket to prevent any contact from heating elements.
- Do not cover the air inlet and the air outlet when the appliance is working.
- Fill the pot with oil may cause a fire hazard.
- Do not touch the inside of the appliance while it is operating.
IMPORTANT SAFEGUARD
- Do not touch hot surfaces. Use handles or knobs.
- To protect against electrical shock do not immerse cord, plugs, or (state specific part or parts in question) in water or other liquid.
- Close supervision is necessary when any appliance is used by or near children.
- Unplug from outlet when not in use and before cleaning. Allow to cool before putting on or taking off parts.
- Do not operate any appliance with a damaged cord or plug or after the appliance malfunctions or has been damaged in any manner. Return appliance to the nearest authorized service facility for examination, repair, or adjustment.
- The use of accessory attachments not recommended by the appliance manufacturer may cause injuries.
- Do not use outdoors.
- Do not let cord hang over edge of table or counter, or touch hot surfaces.
- Do not place on or near a hot gas or electric burner, or in a heated oven.
- Extreme caution must be used when moving an appliance containing hot oil or other hot liquids.
- Always attach plug to appliance first, then plug cord into the wall outlet. To disconnect, turn any control to "off", then remove plug from wall outlet.
- Do not use appliance for other than intended use.
Caution
- Ensure the appliance in placed on a horizontal, even and stable surface.
- This appliance is designed for household use only. It may not suitable to be safely used in environments such as staff kitchens, farms, motels, and other non-residential environments.
- The guarantee is invalid if the appliance is used for professional or semi-professional purposes or it is not used according to instructions.
- Always unplug the appliance while not using.
- The appliance needs approximately 30 minutes to cool down for handle or cleaning safely.
Automatic switch-off
The appliance is equipped with a build in timer; the appliance will automatically shut off when the timer counts down to zero. You can manually switch off the appliance by pressing on/off button; it will automatically shut down in 20 seconds.
Before using
- Remove all packaging materials and stickers or labels.
- Clean the fried plate and pot with hot water, washing liquid and a non-abrasive sponge. These parts are safe to be cleaned in dishwasher.
- Wipe inside and outside of the appliance with a clear cloth. And there is no need to fill the pan with oil and frying fat as the appliance works on hot air.
Using the appliance
- Connect the main plug into an earthed wall socket.
- Carefully pull the pot out of the air fryer
- Place the food/ingredients in the pot.
- Slide the pot back into the AIR FRYER
Note: Do not exceed the MAX indication (see 'Settings' section), as it may affect the quality of the cooked food.
Caution: Do not touch the basket during and in short-time after use, as it gets very hot. Only hold the basket by the handle.
Do not fill the basket with oil or any other liquid.
- Finger touch Power on/off
- Finger touch Menu to choose functions (totally 8 functions).
Menu presetting:
| Menu | Icon Button | Default Temp | Default Time | Shake |
| Default | / | 185°C | 15min | Shake |
| Fries | / | 200°C | 23min | Shake |
| Wings | / | 200°C | 25min | Shake |
| Steak | / | 200°C | 12min | Shake |
| Fish | / | 195°C | 10min | / |
| Shrimps | / | 195°C | 10min | / |
| Cake | / | 160°C | 20min | / |
| Egg Tart | / | 180°C | 12min | / |
| Cookies | / | 170°C | 15min | / |
| Temp Range | 80°C~200°C | / | / | / |
| Time Range | 1min~60min | / | / | / |
After touching menu button, you can choose menu you like. After choosing function, Please press Start/Pause button ▶II to start cooking.
During the cooking process, if you want to adjust time or temperature, kindly press the Time/Temp toggle (Time) button to choose time or temperature first. When the display on screen shows time, then press the arrow button (▲) / (▼) to increase/decrease 1 minute per press. When the display on screen shows the temperature, then press the arrow button (▲) / (▼) to increase/decrease 5 degree per press.
Note: Start/Pause button ▶II): During the hot air frying process, the fan indicator light will be running, then if press this button, the fan indicator light will be off, the Start/Pause button ▶II will be blink. Here, this button acts as pause function. In the pause state, you can change menu to choose other presetting. Then, you press this button again, the air fryer will continue cooking. Here, this button acts as re-start function.
Menu button ☐: Touch this button to choose different cooking functions. After you choose the menu, press the start button. When during the cooking period, for example, if you want to change fries to cake, then first press the Pause button ▶II, then touching the menu button to switch to different cooking function.
Shake indicator SHAKE : The shake indicator will be blink when the cooking cycle has reached its halfway point. This halfway time gives you the opportunity to shake or flip your food in appliance, which helps ensure cooking evenly.
Note: If you do not remove the basket and shake the food, the shake light on the control panel will remain blinked for one minute then light on.
-
Some food/ingredients require shaking halfway during the preparation time (See 'Settings' section). By this way, pull the basket out of the appliance by the handle and shake it. Then slide the basket back into the air fryer.
-
Machine will have Auto ready bell after cooking. When you hear bell for 5 times, this means the cooking cycle is finished. Pull the basket out of the appliance and place it on the heat-resistant holder.
Note: After the set time ends, the heat/cooking function will stop working, but the fan will continue to run for about 20 seconds to blow away the hot air for safety. The timer bell will ring 5 times to indicate the completion of the cooking process.
- Check if the food/ingredients are ready.
Note: If the food/ingredients are not ready yet, simply slide the basket back into the appliance. Press the temperature control to adjust Temperature setting, and press the Timer control to adjust time setting. And then press the Start to turn on the appliance again.
- To remove food/ingredients, use longs to pick up food/ingredients. (e.g., oily meat such as beef, fish or chicken)
Tips
- Food/Ingredients that can be prepared in an oven can also be prepared in the air fryer.
- Smaller food/ingredients usually require a slightly shorter preparation time than larger food/ingredients.
- A larger amount of food/ingredients only requires a longer preparation time,
- Shaking smaller food/ingredients halfway during the preparation time optimizes the end result and can help prevent uneven fried food/ingredients.
- Spray oil to fresh potatoes and fry your food/ingredients for another few minutes for a crispy result.
- Do not prepare extremely greasy food/ingredients such as sausages in the air fryer.
- The optimal amount for cooking crispy fries is 500 grams.
- Use pre-made dough to cook snacks quickly and easily. Pre-made dough also requires a shorter preparation time than homemade dough.
- Please use a baking tin or oven dish in the fryer basket if you want to bake a cake or quiche or if you want to fry fragile ingredients or filled ingredients.
- You can also use the air fryer to reheat food/ingredients. To reheat food/ingredients, set the temperature to 150°C for up to 10 minutes.
Making homemade potato fries
To make homemade potato fries, follow the steps below:
- Peel and slice the potatoes.
- Wash the potato slice thoroughly and dry them with kitchen paper.
- Pour 1/2 tablespoon of oil in a bowl, put the potato slice on top and mix until the potato slice are coated with oil.
- Remove the potato slice from the bowl with your fingers or a kitchen utensil so that excess oil stays behind in the bowl. Put the potato slice in the basket.
- Fry the potato slice according to the instructions.
Settings
This table below suggest you to select the basic settings for the ingredients.
Note: Keep in mind that these settings are indications only, as ingredients differ in origin, size, shape and brand, we cannot guarantee the best setting for your ingredients.
Because the Rapid Air technology reheats the air inside the appliance instantly, pull the pan briefly out of the appliance during hot air frying barely disturbs the process.
| Menu | Min-Max(g) | Time (Min) | Temp °C | Shake | Remark |
| French fries | |||||
| Thin frozen fries | 300-700 | 9-16 | 200 | Y | |
| Thick frozen fries | 300-700 | 11-20 | 200 | Y | |
| Home-made fries (8X8mm) | 300-800 | 10-16 | 200 | Y | Add 1/2 tbsp of oil |
| Homemade potato wedges | 300-800 | 18-22 | 180 | Y | Add 1/2 tbsp of oil |
| Home-made potato cubes | 300-750 | 12-18 | 180 | Y | Add 1/2 tbsp of oil |
| 250 | 15-18 | 180 | Y | ||
| Potato gratin | 500 | 15-18 | 200 | Y | |
| Steak | 100-500 | 8-12 | 180 | ||
| Meat chops | 100-500 | 10-14 | 180 | ||
| Hamburger | 100-500 | 7-14 | 180 | ||
| Sausage roll | 100-500 | 13-15 | 200 | ||
| Drumsticks | 100-500 | 18-22 | 180 | ||
| Chicken breast | 100-500 | 10-15 | 180 | ||
| Snacks | |||||
| Spring rolls | 100-400 | 8-10 | 200 | Y | Use oven-ready |
| Frozen chicken nuggets | 100-500 | 6-10 | 200 | Y | Use oven-ready |
| Frozen fish fingers | 100-400 | 6-10 | 200 | Use oven-ready | |
| Frozen bread crumbed | 100-400 | 8-10 | 180 | Use oven-ready | |
| Stuffed vegetables | 100-400 | 1-10 | 160 | ||
| Cake | 300 | 20-25 | 160 | Use baking tin | |
| Quiche | 400 | 20-22 | 180 | Use baking in/over dish | |
| Muffins | 300 | 15-18 | 200 | Use baking tin | |
| Sweet snacks | 400 | 1-20 | 160 | Use baking in/over dish |
Cleaning
Clean the appliance after every use.
Do not clean the frying trivet, basket and the inside of the appliance by metal kitchen utensils or abrasive cleaning materials, as this may damage the non-stick coating.
- Unplug the plug from the wall socket to let the unit cool down.
Note: Remove the basket to let the fryer cool down more quickly. - Wipe the outside of the appliance with a moist cloth.
- Clean the frying trivet and basket with water, liquid soap and a non-abrasive sponge. You can remove any remaining dirt by using a liquid soap that removes grease.
Tip: If dirt is stuck to the basket or the bottom of the basket, fill the basket with hot water put some dishwashing liquid soap. Put the frying trivet in the basket and let them soak for about 10 minutes. - Clean the heating components with a cleaning brush to remove any food residues.
Storage
- Unplug the appliance and let it cool down thoroughly.
- Make sure all parts are clean and dry.
Environment
Do not throw away the appliance with the normal household waste when it is damaged bring to the nearest/local center for recycling. By doing this, you can contribute to the environmental protection.
Troubleshooting
| Problem | Possible cause | Solution |
| The AIR FRYER does not work | The appliance is not plugged in | Put the mains plug in an earthed wall socket |
| You haven't pressed the start button | Press the start/power button after you set the temperature & time or choose the quick recipe | |
| The ingredients fried with the AIR FRYER are not done | The amount of ingredients in the basket is too big. | Put smaller batches of ingredients in the basket Smaller batches are fried more evenly |
| The set temperature is too low. | Turn the temperature to the required Temperature setting | |
| The ingredients are fried unevenly in the AIR FRYER | Certain types of ingredients need to be shaken halfway through the preparation time | Ingredients that lie on top of or across each other (e.g. fries) need to be shaken halfway through the preparation time. |
| Fried snacks are not crispy when they come out of the AIR FRYER | You used a type of snacks meant to be prepared in a traditional deep fryer. | Use oven snacks or lightly brush some oil onto the snacks for a crisper result. |
| I can't slide the basket into the appliance properly | There are too much ingredients in the basket. | Do not fill the basket beyond the MAX indication |
| White smoke Comes out from the Appliance. | You are preparing greasy ingredients. | When you fry greasy ingredients in the AIR fryer, a large amount of oil will leak into the basket. The oil produces while smoke and the basket may heat up More than usual. This does not affect the appliance Or the end result. |
| The basket still contains grease residues from previous use | White smoke is caused by grease heating up in the basket. Make sure you clean the basket properly after each use. | |
| Fresh fries are fried Unevenly in the AIR FRYER | You did not use the right potato type. | Use fresh potatoes and make sure that they slay firm during frying. |
| You did not rinse the potato sticks properly before you fried them. | Rinse the potato sticks properly to remove starch from the outside of the sticks. | |
| Fresh fries are not crispy when they come out of the AIR FRYER | The crispiness of the fries depends on the amount of oil and water in the fries. | Make sure you dry the potato sticks properly before you add the oil. |
| Cut the potato sticks smaller for a crispier result | ||
| Add slightly more oil for a crisper result. |
Product Specification
| Product Name | 3L DIGITAL AIR FRYER |
| Product model | GAF03BK |
| Power | 1350W |
| Voltage | 220-240V~ |
| Rated frequency | 50-60Hz |
| Dimension (mm) | 255 (H) x 246 (W) x 329 (L) |
安全注意事項
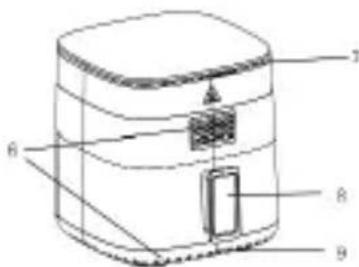
4.炸锅
5.手柄
6. 出風口
購買日期 Date of Purchase:
單據編號 Invo ice No.:
The product specifications may be changed without prior notice.
Please contact customer service for details if necessary.
說明書內容以英文版本為準
If there is any inconsistency or ambiguity
between the English version and the Chinese version,
the English version shall prevail.
保養登記
Warranty Registration

於網上登記新產品保養
Register your product online
www.dchtoolbox.com
小電維修服務 - 自攜點
Repair Service - Collection Points

Gilman
since 1841

DCHToolBox
大昌行電器維修中心
4/F, DCH Building, 20 Kai Cheung Road, Kowloon Bay, Hong Kong
Brand : GEMINI
Model : GAF03BK
Category : Oven