MX1680 Gen2 - Receiver OSD Audio - Free user manual and instructions
Find the device manual for free MX1680 Gen2 OSD Audio in PDF.


| Product Type | Multi-Zone Amplifier (Receiver) |
| Brand | OSD Audio |
| Model | MX1680 Gen2 |
| Channels / Zones | 16 channels, 8 zones |
| Power Output (Stereo) | 80W per channel into 4 ohms, 50W per channel into 8 ohms (one zone driven) |
| Power Output (Bridged) | 160W into 8 ohms |
| Frequency Response | 20 Hz - 20 kHz (+1.7/-1 dB at 1W into 8 ohms) |
| Signal-to-Noise Ratio | >90 dB (A-weighted) |
| Input Sensitivity | 600 mV for 80W @ 4 ohms, 700 mV for 50W @ 8 ohms |
| Input Impedance | >22 k ohms (Line Input) |
| Trigger Inputs/Outputs | Bus and Zone @ 12 VDC |
| Zone Line Input Selection | Line In, Bus 1, Bus 2 per zone |
| Bridge Mode | Selectable per zone (minimum 8 ohm load) |
| Speaker Connectors | Detachable terminals, supports up to 14 AWG wire |
| Auto Standby Delay | 5 minutes after audio signal stops |
| Power Requirements (Switchable) | 100-120 VAC 60 Hz (1200W max) or 220-240 VAC 50 Hz (1200W max) |
| Fuse Rating | T10A 250V (100-120V) / T5A 250V (220-240V) |
| Dimensions (L x W x H) | 16.81 x 16.14 x 3.46 inches |
| Weight | 22.8 lbs |
| Protection Features | Thermal overload protection, short circuit protection |
| Warranty | 2 years limited |
| Included Accessories | User manual |
Frequently Asked Questions - MX1680 Gen2 OSD Audio
User questions about MX1680 Gen2 OSD Audio
0 question about this device. Answer the ones you know or ask your own.
Ask a new question about this device
Download the instructions for your Receiver in PDF format for free! Find your manual MX1680 Gen2 - OSD Audio and take your electronic device back in hand. On this page are published all the documents necessary for the use of your device. MX1680 Gen2 by OSD Audio.
USER MANUAL MX1680 Gen2 OSD Audio
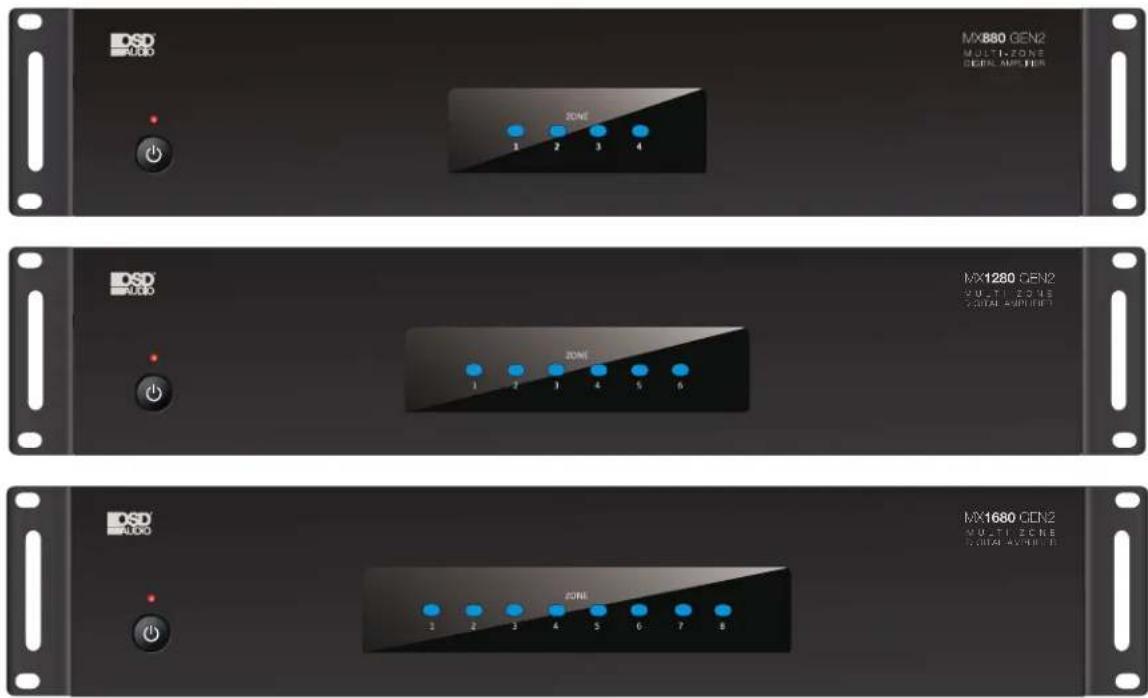
MX GEN2 SERIES MULTI ZONE AMPLIFIER OWNER'S MANUAL
MX880 GEN2 | MX1280 GEN2 | MX1680 GEN2
WARNING
• TO PREVENT FIRE OR SHOCK HAZARD, DO NOT USE THIS PLUG WITH AN EXTENSION CORD, RECEPTACLE OR OTHER OUTLET UNLESS THE BLADES CAN BE FULLY INSERTED TO PREVENT BLADE EXPOSURE.
• TO PREVENT FIRE OR SHOCK HAZARD, DO NOT EXPOSE THIS APPLIANCE TO RAIN OR MOISTURE.
• TO PREVENT ELECTRICAL SHOCK, MATCH WIDE BLADE PLUG TO WIDE SLOT, FULLY INSERT.
IMPORTANT SAFTEY INSTRUCTIONS
- Read these instructions.
- Keep these instructions.
3 Read all warnings.
4 Follow all Instruction. - Do not use this apparatus near water.
- Clean only with dry cloth.
- Do not block any ventilation openings. Install in accordance with the manufacturers instructions.
-
Do not install near heat sources such as radiators, heat registers, stoves, or other apparatus (including amplifiers) that produce heat.
-
Do not defeat the safety purpose of the polarized or grounding type plug. A polarized plug has two blades with one wider than the other. A grounding type plug has two blades and a third grounding prong. If the provided plugs does not fit into your outlet, consult an electrician for replacement of the obsolete outlet.
-
Protect the power cord from being walked on or pinched particularly at the plugs, convenience receptacles, and at the point where they exit form the appliance.
-
Only use attachments or accessories specified by the manufacturer.
-
Unplug the apparatus during lightning storms or when unused for long periods of time.
-
Refer all servicing to qualified personnel. Servicing is required when the apparatus has been damaged in anyway, such as power supply cord or plug is damaged, liquid has been spilled or objects have fallen into the apparatus, the apparatus has been exposed to rain or moisture, does not operate normally, or has been dropped.
Introduction
The OSD Audio MX GEN2 Multi-Zone Amplifiers are ideal for adding additional power in distributed audio applications or combining with home theater systems. The MX880 GEN2 provides 8 channels, MX1280 GEN2 provides 12 channels and MX1680 GEN2 provides 16 channels of digital amplification. All MX GEN2 models incorporate features such as bridge mode operation, global and independent zone triggering, audio sense circuitry with delay time per zone, two Bus Inputs/Outputs and independent line inputs per zone to meet the wide range of audio applications and projects. All MX GEN2 amplifiers are rated at 50 watts per channel into 6 ohms and 80 watts per channel into 4 ohms. With the Stereo/Bridge switch in Bridge mode, each zone of channels are combined for a higher powered mono output of 160 watts into 8 ohms. With high performance and ultra-low distortion output, the MX GEN2 Multi-Zone Amplifiers provide unmatched sound quality for any audio system.
Thermal Protection
All MX GEN2 amplifiers are designed with special circuitry to safeguard the amplifier under a thermal overload condition. Thermal protection mode will only engage when the unit has been run at high volume for extended periods of time without adequate ventilation and/or when speaker impedances are below the minimum levels for the amplifier. In thermal protection mode the amplifier will automatically stop output. If this fault occurs, turn off the amplifier, and check that the speaker impedance rating is above the minimum rating. Also check for adequate ventilation around the amplifier and make adjustments if necessary. Once the unit has cooled to safe operating temperatures, the amplifier may be powered back on.
Protection Circuitry
Special circuitry has been designed into the MX GEN2 Multi-Zone Amplifier to safeguard under a short-circuit condition. A faulty speaker can also cause a short circuit condition. The Zone LED indicator will blink rapidly between red and blue. If this fault condition occurs, turn off the amplifier and check speakers for short circuit conditions when appropriate.
Installation
Note: the default gain is set to zero volume. Please adjust for each channel to set the max volume level for each zone. Typically, once you set it you forget it. Instead relying on your source device to control the master volume.
The MX GEN2 Multi-Zone Amplifiers can be placed on a shelf, as part of an equipment rack, or on a table or cabinet. During installation, keep in mind that the amplifiers require proper clearances for ventilation and heat dissipation. The amplifier will take two rack spaces with the feet removed.
Front Panel
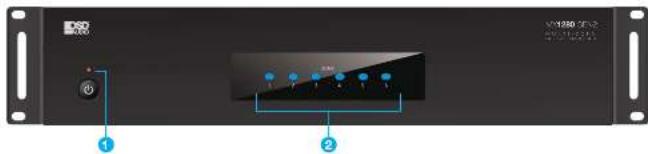
- Power/Standby LED
This LED lights red when any zone is active or the amplifier is in standby mode. - Zone Button LED - Tums Zones On/Off
Blue: This LED lights Blue when Corresponding Zone Button is depressed, and stays lit while an audio signal is present.
Standby: After the audio signal is paused or turned off for 5 minutes the zone will go into standby, The Blue LED will turn off and will remain in standby if the corresponding Zone Button is depressed. The zone will come out of standby when Audio Signal becomes active again and Blue LED comes back on.
Red: The corresponding Zone LED will be Red if there is a Short Circuit Present on the Speaker Output.
Rear Panel
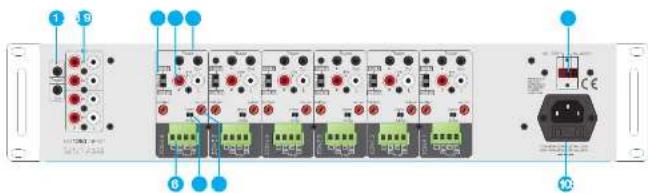
- Bus 12VDC Trigger In/Out
The Bus 12VDC Trigger In is used to activate all zones that are using the Bus Input and disables other zone triggers or signal sensing on those zones when it is used. When the Bus12VDC Trigger is used, all Bus-controlled zone LEDs will be blue and active. If the Bus Trigger In has 12V applied to it, only the 12V Bus Trigger Out will have 12V and the Zone Trigger Outputs will not. - Bus Inputs/Outputs
The Bus Line Inputs are optional inputs that can be used to connect a single source to multiple zones. The Bus Line Outputs are passive, and pass through the corresponding of the Bus Inputs. These can be used to delay chain the source to other amplifiers in the system. - Line/Bus Switch
Switches the input to local Line In, to Bus 1 or Bus 2. - Line Input
The Line audio input for each zone is a dedicated sensing input that will activate the zone when an audio signal from a source is present. - 12VDC Trigger In/Out (Each Zone)
The Zone 12V Trigger In is used to activate a specific zone. The Zone Trigger Out can be used to trigger other 12V devices. The
delay and audio sensing are bypassed when the 12V Zone Trigger Input is used. When a Zone Trigger is active, the zone LED will be blue. If no voltage is present in the Zone Trigger, the Zone LED will be off. Standby Mode The amplifier will go into Standby mode when there is no 12V signal present. - Speaker Outputs
The minimum speaker impedance is 4 ohms for Stereo Mode and 8 ohms for Bridge Mode. - Stereo/Bridge Switch
Selects the output mode of each zone for stereo or Bridge operation. - Gain Controls
Left and Right gain control for each zone adjust the sound independently; Only using the Left control to adjust the sound level when used in Bridge Mode. Note: the default gain is set to zero volume. Please adjust for each channel to set the max volume level for each zone. Typically, once you set it you forget it, Instead relying on your source device to control the master volume. - Voltage Switch
AC 115V or AC 230V dual voltage selector. - AC Input
Apply the correct voltage before operate the amplifier.
Specifications
Power Output:
80W /Channel, 1KHz into 4 Ohms, One Zone Driven
50W /Channel, 1KHz into 8 Ohms, One Zone Driven 160W, 1KHz into 8 ohms, Bridge
Amplifier Channels:
MX880 GEN2: 8 Channels, 4 Zones
MX1280 GEN2: 12 Channels, 6 Zones
MX1680 GEN2: 16 Channels, 8 Zones
Signal-to-Noise Ratio: >90dB A-weighted
Frequency Response: 20Hz to 20KHz + 1.7/-1dB at 1W output into 8 Ohms
Input Sensitivity: 600 mV for 80W @ 1 KHz 4 Ohm One Zone 700 mV for 50W @ 1 KHz 8 Ohm One Zone
Input Impedance: >22K Ohms Line Input
Trigger Inputs / Outputs: Bus and Zone @12VDC
Zone Line Input: Line In, Bus In 1, Bus In 2 select switch per zone
Bridge Mode: Select Stereo or Bridge mode per zone B Ohm only
Speaker Connectors: Detachable speaker terminals support up to 14awg wire
Delay Time: When audio signal is not present after 5 minutes.
Power Requirements (Switchable):
MX880 GEN2: 100-120VAC 60Hz 600W Max 220-240VAC 50Hz 600W Max
MX1280 GEN2: 100-120VAC 60Hz 900W Max 220-240VAC 50Hz 900W Max
MX1680 GEN2: 100-120VAC 60Hz 1200W Max 220-240VAC 50Hz 1200W Max
Fuse Rating:
MX080 GEN2: 100-120V/T5A, 250V 220-240V/T2.5A, 250V
MX1280 GEN2: 100-120V/T8A, 250V 220-240V/T4A, 250V
MX1680 GEN2: 100-120V/T10A, 250V 220-240V/T5A, 250V
Dimensions (L x W x H): 16.81" x 16.14" x 3.46"
Weight:
MX880 GEN2: 19 lbs. MX1280 GEN2: 20.5 lbs. MX1680 GEN2: 22.8 lbs.
System Configuration
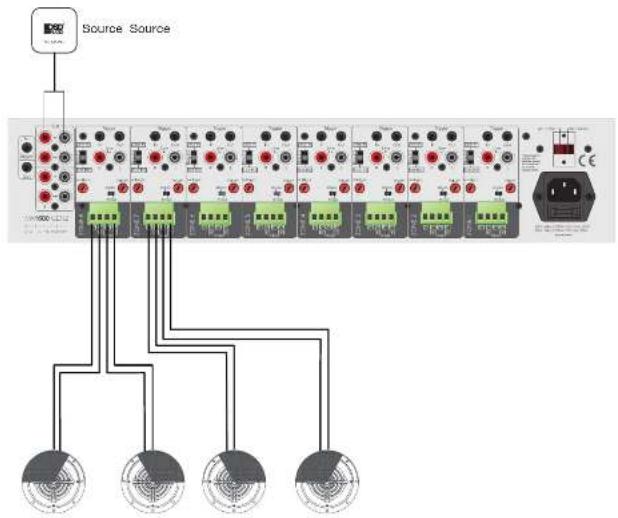
Typical Mode
MX GEN2 amplifiers can be configured as the main amplifier for an audio distribution system or home theater system. When used with an audio distribution preamp or matrix processor, each zone can independently drive one of several different sources by using each zone's individual line audio inputs. If the specific zone needs a higher power, please just use Bridged mode.
When MX1280 GEN2 or MX1680 GEN2 is working as a home theater amplifier, the amplifier could support up to a 7.1 or 5.1 surround systems, and we recommend using the Bridged mode to have higher output:
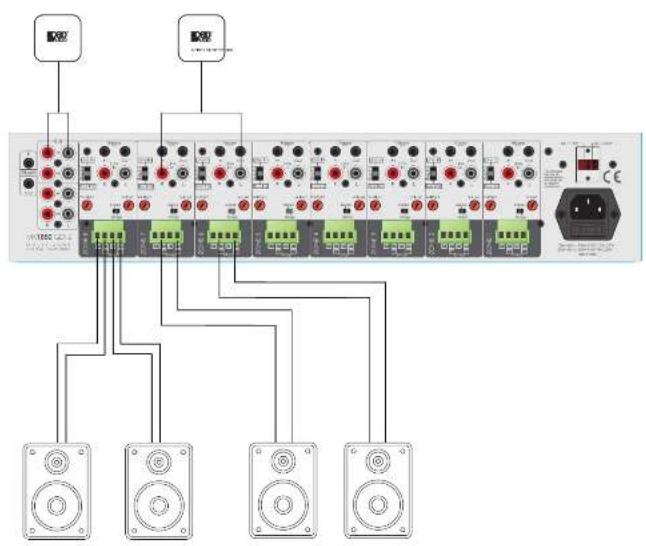
Bridged Mode
When the amplifier is in Bridged Mode operation, a single channel (the left) is used to provide a higher power mono output. Use one channel pair to amplify the left channel by connecting the left audio signal to the L input of a channel pair, setting the Stereo/Bridge switch to "Bridge" and connecting the speaker as indicated below. Use a second channel pair for the right channel by connecting the right audio signal to the L input of a second channel pair, setting the Stereo/Bridge switch to "Bridge" and connecting the speaker as indicated above. Note: The three position switch needs to be set to "Line In" on both zones that are wired for Bridged Mode.
Wiring Instructions - Bridged Mode
- Turn off the amplifier and connect an 8-ohm minimum load.
- Set the Stereo/Bridge switch to Bridged Mode.
- Follow the Bridge mode markings on the back of the amplifier:
Connect the negative lead (-) of the speaker cable to the R- terminal.
Connect the positive lead (+) of the speaker cable to the L+ terminal. - Apply the Line In from audio source to the Left Line In connector.
• Power on the amplifier.
OSD Audio electronics have (2) year Limited Warranty against defects in materials and workmanship. Proof of purchase must accompany all claims. During the warranty period OSD Audio will replace any defective part and correct any defect in workmanship without charge for either parts or labor.
OSD Audio may replace returned electronics with a product of equal value and performance. In such cases, some modifications to the mounting may be necessary and are not OSD Audio's responsibility.
For this warranty to apply, the unit must be installed and used according to its written instructions. If necessary, repairs must be performed by OSD Audio. The unit must be returned to OSD Audio at the owner's expense and with prior written permission. Accidental damage and shipping damage are not considered defects, nor is damaged resulting from abuse or from servicing performed by an agency or person not specifically authorized in writing by OSD Audio.
OSD Audio sells products only through authorized dealers and distributors to ensure that customers obtain proper support and service. Any OSD Audio product purchased from an unauthorized dealer or other source, including retailers, mail order dealers and online sellers will not be honored or serviced under existing OSD Audio warranty policy. Any sale of product by an unauthorized source or other manner not authorized by OSD Audio shall void the warranty on the applicable product.
Damage to or destruction of components due to application of excessive power voids the warranty on those parts. In these cases, repairs will be made on the basis of the retail value of the parts and labor. To return for repairs, you must email customer service at RMA@audiogeargroup.com for a Returned Merchandise Authorization (RMA) number then the unit must be shipped to OSD Audio at the owner's expense, along with a note explaining the nature of service required. Be sure to pack the product(s) in a corrugated container with at least 3 inches of resilient material to protect the unit from damage in transit.
This Warranty Does Not Cover: Damage caused by abuse, accident, misuse, negligence, or improper operation (installation) • Any products that have been altered or modified • Any product whose identifying number of decal, serial #, etc. has been altered, defaced or removed • Normal wear and maintenance.
Brand : OSD Audio
Model : MX1680 Gen2
Category : Receiver