
DS-C12A-0104H - Processor Hikvision - Free user manual and instructions
Find the device manual for free DS-C12A-0104H Hikvision in PDF.


| Product Type | Video Wall Controller |
| Brand | Hikvision |
| Model | DS-C12A-0104H |
| Input Interface | 1 × HDMI (4K@60 Hz) |
| Output Interfaces | 4 × HDMI (4K@30 Hz each) |
| Max Cascading Devices | 4 |
| Max Displays Supported | 16 |
| Display Rotation Accuracy | 0.1° |
| Special Features | Mirroring, Bezel Compensation, Pix SYNC |
| Power Supply | DC 12V/2A or PoE (IEEE 802.3at) |
| Power Consumption | ≤ 24W (estimated) |
| Dimensions (W × D × H) | Approx. 200 × 150 × 30 mm |
| Weight | Approx. 0.5 kg |
| Network Interface | 1 × 10/100/1000 Mbps RJ45 |
| Serial Interface | RS-232/485 (RJ45) |
| Audio Output | 1 × LINE OUT (3.5mm) |
| Operating Temperature | 0 °C to 45 °C |
| Humidity | 10% to 90% (non-condensing) |
| Management Software | Artistic Wall Client (Windows) |
| Package Contents | Device, Power Adapter, User Manual, CD-ROM |
| Safety Certifications | FCC Class B, CE, ICES-003 |
| Default IP Address | 192.0.0.64 |
| Default Username | admin |
| Maintenance | Keep dry, clean with soft cloth, ensure ventilation |
Frequently Asked Questions - DS-C12A-0104H Hikvision
User questions about DS-C12A-0104H Hikvision
0 question about this device. Answer the ones you know or ask your own.
Ask a new question about this device
Download the instructions for your Processor in PDF format for free! Find your manual DS-C12A-0104H - Hikvision and take your electronic device back in hand. On this page are published all the documents necessary for the use of your device. DS-C12A-0104H by Hikvision.
USER MANUAL DS-C12A-0104H Hikvision
©2020 Hangzhou Hikvision Digital Technology Co., Ltd. All rights reserved.
About this Manual
The Manual includes instructions for using and managing the Product. Pictures, charts, images and all other information hereinafter are for description and explanation only. The information contained in the Manual is subject to change, without notice, due to firmware updates or other reasons. Please find the latest version of this Manual at the Hikvision website (https://www.hikvision.com/).
Please use this Manual with the guidance and assistance of professionals trained in supporting the Product.
Trademarks
HIKVISION and other Hikvision's trademarks and logos are the properties of Hikvision in various jurisdictions.
Other trademarks and logos mentioned are the properties of their respective owners.
HDMI™
: The terms HDMI and HDMI High-Definition Multimedia Interface, and the HDMI Logo are trademarks or registered trademarks of HDMI Licensing Administrator, Inc. in the United States and other countries.
Disclaimer
TO THE MAXIMUM EXTENT PERMITTED BY APPLICABLE LAW, THIS MANUAL AND THE PRODUCT DESCRIBED, WITH ITS HARDWARE, SOFTWARE AND FIRMWARE, ARE PROVIDED "AS IS" AND "WITH ALL FAULTS AND ERRORS". HIKVISION MAKES NO WARRANTIES, EXPRESS OR IMPLIED, INCLUDING WITHOUT LIMITATION, MERCHANTABILITY, SATISFACTORY QUALITY, OR FITNESS FOR A PARTICULAR PURPOSE. THE USE OF THE PRODUCT BY YOU IS AT YOUR OWN RISK. IN NO EVENT WILL HIKVISION BE LIABLE TO YOU FOR ANY SPECIAL, CONSEQUENTIAL, INCIDENTAL, OR INDIRECT DAMAGES, INCLUDING, AMONG OTHERS, DAMAGES FOR LOSS OF BUSINESS PROFITS, BUSINESS INTERRUPTION, OR LOSS OF DATA, CORRUPTION OF SYSTEMS, OR LOSS OF DOCUMENTATION, WHETHER BASED ON BREACH OF CONTRACT, TORT (INCLUDING NEGLIGENCE), PRODUCT LIABILITY, OR OTHERWISE, IN CONNECTION WITH THE USE OF THE PRODUCT, EVEN IF HIKVISION HAS BEEN ADVISED OF THE POSSIBILITY OF SUCH DAMAGES OR LOSS.
YOU ACKNOWLEDGE THAT THE NATURE OF INTERNET PROVIDES FOR INHERENT SECURITY RISKS, AND HIKVISION SHALL NOT TAKE ANY RESPONSIBILITIES FOR ABNORMAL OPERATION, PRIVACY LEAKAGE OR OTHER DAMAGES RESULTING FROM CYBER-ATTACK, HACKER ATTACK, VIRUS INSPECTION, OR OTHER INTERNET SECURITY RISKS; HOWEVER, HIKVISION WILL PROVIDE TIMELY TECHNICAL SUPPORT IF REQUIRED.
YOU AGREE TO USE THIS PRODUCT IN COMPLIANCE WITH ALL APPLICABLE LAWS, AND YOU ARE SOLELY RESPONSIBLE FOR ENSURING THAT YOUR USE CONFORMS TO THE APPLICABLE LAW. ESPECIALLY, YOU ARE RESPONSIBLE, FOR USING THIS PRODUCT IN A MANNER THAT DOES NOT
INFRINGE ON THE RIGHTS OF THIRD PARTIES, INCLUDING WITHOUT LIMITATION, RIGHTS OF PUBLICITY, INTELLECTUAL PROPERTY RIGHTS, OR DATA PROTECTION AND OTHER PRIVACY RIGHTS. YOU SHALL NOT USE THIS PRODUCT FOR ANY PROHIBITED END-USES, INCLUDING THE DEVELOPMENT OR PRODUCTION OF WEAPONS OF MASS DESTRUCTION, THE DEVELOPMENT OR PRODUCTION OF CHEMICAL OR BIOLOGICAL WEAPONS, ANY ACTIVITIES IN THE CONTEXT RELATED TO ANY NUCLEAR EXPLOSIVE OR UNSAFE NUCLEAR FUEL-CYCLE, OR IN SUPPORT OF HUMAN RIGHTS ABUSES. IN THE EVENT OF ANY CONFLICTS BETWEEN THIS MANUAL AND THE APPLICABLE LAW, THE LATER PREVAILS.
Regulatory Information
FCC Information
Please take attention that changes or modification not expressly approved by the party responsible for compliance could void the user's authority to operate the equipment.
FCC compliance: This equipment has been tested and found to comply with the limits for a Class B digital device, pursuant to part 15 of the FCC Rules. These limits are designed to provide reasonable protection against harmful interference in a residential installation. This equipment generates, uses and can radiate radio frequency energy and, if not installed and used in accordance with the instructions, may cause harmful interference to radio communications. However, there is no guarantee that interference will not occur in a particular installation. If this equipment does cause harmful interference to radio or television reception, which can be determined by turning the equipment off and on, the user is encouraged to try to correct the interference by one or more of the following measures:
- Reorient or relocate the receiving antenna.
- Increase the separation between the equipment and receiver.
- Connect the equipment into an outlet on a circuit different from that to which the receiver is connected.
- Consult the dealer or an experienced radio/TV technician for help.
FCC Conditions
This device complies with part 15 of the FCC Rules. Operation is subject to the following two conditions:
- This device may not cause harmful interference.
- This device must accept any interference received, including interference that may cause undesired operation.
EU Conformity Statement
CE
This product and - if applicable - the supplied accessories too are marked with "CE" and comply therefore with the applicable harmonized European
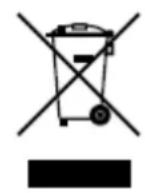
standards listed under the EMC Directive 2014/30/EU, the RoHS Directive 2011/65/EU.
2012/19/EU (WEEE directive): Products marked with this symbol cannot be disposed of as unsorted municipal waste in the European Union. For proper recycling, return this product to your local supplier upon the purchase of equivalent new equipment, or dispose of it at designated collection points. For more information see: http://www.recyclethis.info.
2006/66/EC (battery directive): This product contains a battery that cannot be disposed of as unsorted municipal waste in the European Union. See the product documentation for specific battery information. The battery is marked with this symbol, which may include lettering to indicate cadmium (Cd), lead (Pb), or mercury (Hg). For proper recycling, return the battery to your supplier or to a designated collection point. For more information see: http://www.recyclethis.info .
Industry Canada ICES-003 Compliance
This device meets the CAN ICES-3 (B)/NMB-3(B) standards requirements.
Preface
Applicable Model
This manual is applicable to video wall controllers.
About the Default
This device has the following defaults:
| Parameter Default Value | |
| User name admin | |
| IP address 192.0.0.64 |
Symbol Conventions
The symbols that may be found in this document are de- ned as follows.
| Symbol | Description |
 Danger Danger | Indicates a hazardous situa on which, if not avoided, will or could result in death or serious injury. |
 Caution Caution | Indicates a poten ally hazardous situa on which, if not avoided, could result in equipment damage, data loss, performance degrada on, or unexpected results. |
 Note Note | Provides additional informa on to emphasize or supplement important points of the main text. |
Safety Instructions

Warning
- In the use of the product, you must be in strict compliance with the electrical safety regulations of the national and region.
- Use the power adapter delivered with the device only.
- The socket-outlet shall be installed near the equipment and shall be easily accessible.
- This equipment is not suitable for use in loca ons where children are likely to be present.
- CAUTION: Risk of explosion if the battery is replaced by an incorrect type.
- Improper replacement of the battery with an incorrect type may defeat a safeguard (for example, in the case of some lithium battery types).
- Do not dispose of the battery into fire or a hot oven, or mechanically crush or cut the battery, which may result in an explosion.
- Do not leave the battery in an extremely high temperature surrounding environment, which may result in an explosion or the leakage of flammable liquid or gas.
- Do not subject the battery to extremely low air pressure, which may result in an explosion or the leakage of flammable liquid or gas.
- Dispose of used batteries according to the instructions.
- Never place the equipment in an unstable location. The equipment may fall, causing serious personal injury or death.
- If smoke, odor or noise rise from the device, turn off the power at once and unplug the power cable, and then please contact the service center.
- If the product does not work properly, please contact your dealer or the nearest service center. Never attempt to disassemble the product yourself. (We shall not assume any responsibility for problems caused by unauthorized repair or maintenance.)
- Please enhance the protection for personal information and data security as the device may be confronted with the network security problems when it is connected to the Internet. Please contact your dealer or the nearest service center once you find that there may be the network security problems.

Caution
- Do not drop the device or subject it to physical shock, and do not expose it to high electromagnetism radiation. Avoid the equipment installation on vibrations surface or places subject to shock (ignorance can cause equipment damage).
- Do not expose the device to the explosive situation.
- Keep clean and dry on the surface of the device.
- Do not touch the exposed connection points or components when the device is powered on.
- The ventilation should not be impeded by covering the ventilation openings with items, such as newspapers, table-cloths, curtains, etc. The openings shall never be blocked by placing the equipment on a bed, sofa, rug or other similar surface.
- No naked flame sources, such as lighted candles, should be placed on the equipment.
- The equipment shall not be exposed to dripping or splashing and that no objects filled with liquids, such as vases, shall be placed on the equipment.
- Keep a minimum 50 cm distance around the equipment for sufficient ventilation.
Contents
Chapter 1 Product Introduction ...... 1
1.1 Overview 1
1.2 Key Feature 1
1.3 Packing List 1
1.4 Device Appearance 2
1.4.1 Front Panel 2
1.4.2 Rear Panel 3
1.5 Client Management Software 4
1.6 Operation Process .... 5
Chapter 2 Activate and Add Devices .... 6
2.1 Activate Your Device 6
2.2 Add Your Device 6
2.2.1 Add Device by IP Address or Domain Name 7
2.2.2 Add Devices by IP Segment 8
2.3 Configure Network Parameters 9
Chapter 3 Artistic Video Wall Configuration .... 10
3.1 Configure Displays 10
3.1.1 Add Displays 10
3.1.2 Configure Display Properties 11
3.1.3 Adjust Display Positions 11
3.2 Configure an Input Source 13
3.3 Configure a Device Topology 15
3.3.1 Change a Device Topology 16
3.3.2 Check Device Topology Status 16
3.4 Layout Management 17
3.4.1 Save a Layout File 18
3.4.2 Print a Layout File 18
3.4.3 Import a Layout File 19
3.5 Configure Mirroring Display 19
Chapter 4 Device Installation and Cabling 22
4.1 Install Your Devices 22
4.2 Connect Cables 22
4.2.1 Cable Connection Requirements 22
4.2.2 Cable Connection Description 23
Chapter 5 Device Configuration and Maintenance 26
5.1 Configure the Device Name and Device No. 26
5.2 Configure Device Time 26
5.3 Reset Device Password 27
5.4 View Device Information 28
5.5 Configure Serial Parameters 28
5.6 Configure Security Parameters 29
5.7 Import and Export a Configuration File 29
5.8 Query and Back Up Logs 29
5.9 Restore Default Parameters 30
5.10 Restart a Device Remotely 30
5.11 Upgrade a Device Remotely 30
Chapter 6 User Management .... 31
Chapter 7 Operation and Maintenance .... 32
Chapter 8 Get More Information .... 33
Chapter 1 Product Introduction
1.1 Overview
The video wall controller is a pure hardware image processing device based on Field Programmable Gate Array (FPGA), which supports 4K@60 Hz signal input and random rotation and placement of displays for achieving more creative and eye-catching display effects. Due to its good compatibility, LCD, DLP, and LED screens can work together to form a larger screen, which applies to various video wall scenarios such as shopping malls, conference rooms and lecture halls.
1.2 Key Feature
- 1 × HDMI 4K input, 4 × HDMI output
- 4 device cascading, controlling up to 16-display video wall
- Accurate to 0.1^ rotation for a single display
- Various display solutions with display mirroring and replication
- Pix SYNC technology for synchronized image
- Bezel compensation technology for continuous image
- Export video wall design drawings for project deployment
- Simple and easy-to-use software
1.3 Packing List
Before using the product, check whether the following items are included in the package. If any items are found damaged or missing, please contact our technical support engineers.
Table 1-1 Packing List
| No. Item Picture Quantity | |||
| 1 Device 1 |  | ||
| 2 Power adapter 1 | 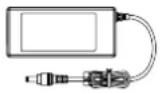 | ||
| No. Item Picture Quantity | ||||
| 3 User manual 1 | 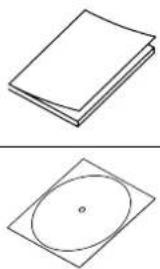 | |||
| 4 CD-ROM 1 | ||||
1.4 Device Appearance
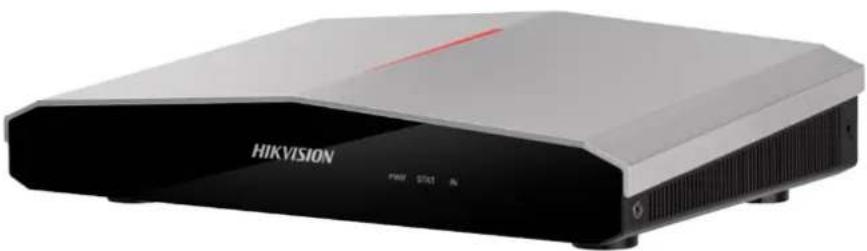
natural_image
Exterior view of a HIKVISION audio device (no visible text or symbols on body)Figure 1-1 Device Appearance
1.4.1 Front Panel
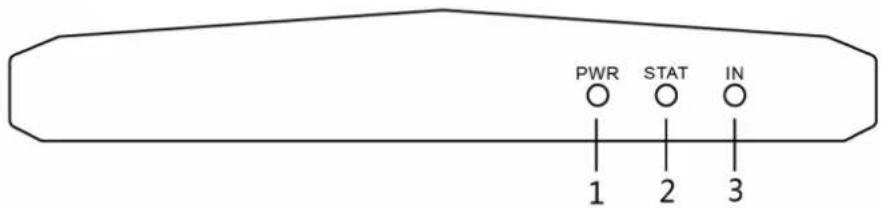
Figure 1-2 Front Panel
Table 1-2 Front Panel Interface Description
| No. Name Description | |
| 1 PWR Power indicator | Turns steady red after power-on |
| 2 STAT System status indicator | Unlit during startup or in the faulty stateTurns green after startup |
| 3 IN Indicator for the HDMI IN interface | |
| Signals are not inputting and not displayed on the video wall: unlitSignals are displayed on the video wall but not inputting: greenSignals are inputting but not displayed on the video wall: redSignals are inputting and displayed on the video wall: blinking red and green alternately |
1.4.2 Rear Panel
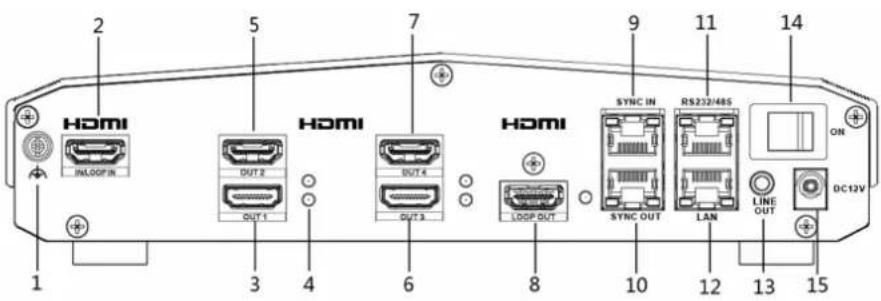
Figure 1-3 Rear Panel
Table 1-3 Rear Panel Interface Description
| No. Name Description | ||
| 1 Grounding screw Used for grounding the device | ||
| 2 HDMI IN / | LOOP IN • HDMI input | interface, up to 4K@60 Hz input• Used for loop input when multiple devices are cascaded NoteWhen devices are cascaded, you can only use the HDMI input interface of the master device to input signals. NoteWhen devices are cascaded, you can only use the HDMI input interface of the master device to input signals. |
| 3 HDMI OUT | 1 HDMI output interface | 1, up to 4K@30 Hz output |
| 4 HDMI InterfaceIndicator | Status indicator of HDMI OUT 1 interface, working similarly with the other 3 HDMI out interfaces• Connected with a cable: steady green• Disconnected with a cable: unlit | |
| 5 HDMI OUT | 2 HDMI output interface | 2, up to 4K@30 Hz output |
| 6 HDMI OUT | 3 HDMI output interface | 3, up to 4K@30 Hz output |
| 7 HDMI OUT | 4 HDMI output interface | 4, up to 4K@30 Hz output |
| 8 HDMI LOOP OUT HDMI loop output interface for device cascading, up to 4K@60 Hz output | ||
| 9 SYNC IN Sync input interface for synchronizing signals between devices | ||
| 10 SYNC OUT Sync output interface for synchronizing signals between devices | ||
| 11 RS-232/RS485 RS232 and RS485 multiplexing port only for debugging, configurable on the client | ||
| 12 LAN 10/100/1000 Mbps adaptive network interface, IEEE 802.3at PoE | ||
13 LINE OUT Audio output interface  NoteWhen devices are cascaded, you can only use the line output interface of the master device to output audio signals. NoteWhen devices are cascaded, you can only use the line output interface of the master device to output audio signals. | ||
| 14 | DC 12 V Switch | Switch of 12 V/2 A power input, alternative to the PoE power supply method |
| 15 DC 12 V IN Interface for 12 V/2 A power input, alternative to the PoE power supply method | ||
1.5 Client Management Software
Video wall controllers can be managed on the Artistic Wall Client, including activation, adding, configuration, management and maintenance. Obtain the client installation package from the CD-ROM or website, double click the package, and finish the installation.
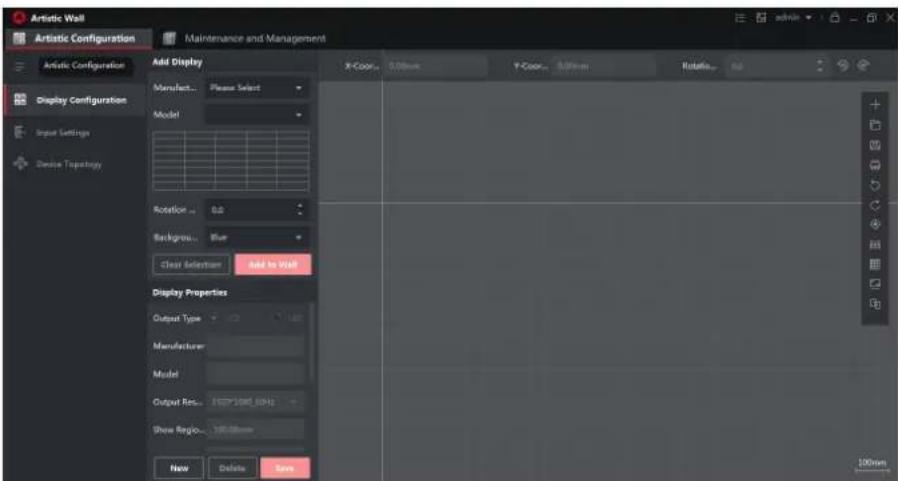
Figure 1-4 Client Management Software
1.6 Operation Process
The following figure describes the basic operation process of creating an artistic video wall.
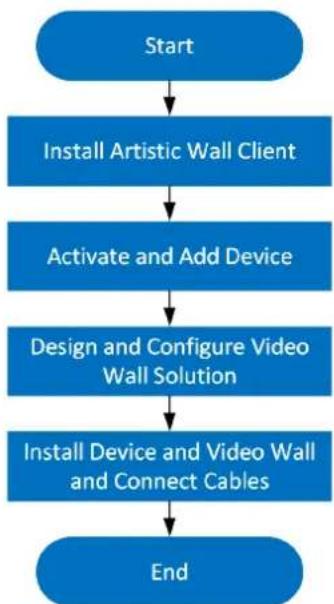
flowchart
graph TD
    A["Start"] --> B["Install Artistic Wall Client"]
    B --> C["Activate and Add Device"]
    C --> D["Design and Configure Video Wall Solution"]
    D --> E["Install Device and Video Wall and Connect Cables"]
    E --> F["End"]
Figure 1-5 Operation Process of Creating an Artistic Video Wall
Chapter 2 Activate and Add Devices
2.1 Activate Your Device
For the inactive devices, you are required to create a password to activate them before they can be added to the software and work properly.
Before You Start
Make sure the device to be activated is connected to the network and is in the same subnet with the PC running the client.
Steps
- Enter the Maintenance and Management → Device Management interface.
- Click Online Device to show the online device area at the bottom of the interface.
The searched online devices are displayed in the list.
- Check the device status (shown on Security Level column) and select an inactive device.

Figure 2-1 Online Inactive Device
- Click Activate to open the Activation box.
- Create a password in the password field, and confirm the password.

Caution
The password strength of the device can be automatically checked. We highly recommend you change the password of your own choosing (using a minimum of 8 characters, including at least three kinds of following categories: upper case letters, lower case letters, numbers, and special characters) in order to increase the security of your product. And we recommend you change your password regularly, especially in the high security system, changing the password monthly or weekly can better protect your product.
Proper configuration of all passwords and other security settings is the responsibility of the installer and/or end-user.
- Click OK to activate the device.
2.2 Add Your Device
You can add your devices by IP/domain or IP segment.
2.2.1 Add Device by IP Address or Domain Name
If you know the IP address or domain name of the device to add, you can add devices to the client by specifying the IP address (or domain name), user name, password, etc.
Steps
- Click Maintenance → Device Management.
- Click Add to open the Add window, and then select IP/Domain as the adding mode.
- Enter the required information.
Name
Create a descriptive name for the device. For example, you can use a nickname that can show the location or feature of the device.
Address
The IP address or domain name of the device.
Port
The devices to add share the same port number. The default value is 8000.
User Name
Enter the device user name. By default, the user name is admin.
Password
Enter the device password.

Caution
The password strength of the device can be automatically checked. We highly recommend you change the password of your own choosing (using a minimum of 8 characters, including at least three kinds of following categories: upper case letters, lower case letters, numbers, and special characters) in order to increase the security of your product. And we recommend you change your password regularly, especially in the high security system, changing the password monthly or weekly can better protect your product.
Proper configuration of all passwords and other security settings is the responsibility of the installer and/or end-user.
-
Check Synchronize Time to synchronize the device time with the PC running the client after adding the device to the client.
-
Finish adding the device.
-
Click Add to add the device and back to the device list page.
-
Click Add and New to save the settings and continue to add other device.
-
Optional: Perform the following operation(s).
Remote
Configuration
Click 📋 on Operation column to set remote configuration of the corresponding device.
| View Device Status | Click ☐ on Operation column to view device status, including cameras, recording status, signal status, hardware status, etc. |
| Edit Device Information | Click ☑ on Operation column to edit the device information, such as IP address, user name, and password. |
| Refresh | Click ☑ on Operation column to get the latest device information. |
| Delete Device | Select one or multiple devices and click Delete to delete the selected device(s) from the client. |
2.2.2 Add Devices by IP Segment
If the devices share the same port No., user name and password, and their IP addresses range in the same IP segment, you can add them to the client by specifying the start IP address and the end IP address, port No., user name, password, etc of the devices.
Steps
- Click Maintenance → Device Management.
- Click Add to open the Add window.
- Select IP Segment as the adding mode.
- Enter the required information.
Start IP
Enter a start IP address.
End IP
Enter an end IP address in the same network segment with the start IP.
Port
Enter the device port No. The default value is 8000.
User Name
By default, the user name is admin.
Password
Enter the device password.
The password strength of the device can be automatically checked. We highly recommend you change the password of your own choosing (using a minimum of 8 characters, including at least three kinds of following categories: upper case letters, lower case letters, numbers, and special characters) in order to increase the security of your product. And we recommend you change your password regularly, especially in the high security system, changing the password monthly or weekly can better protect your product.
Proper configuration of all passwords and other security settings is the responsibility of the installer and/or end-user.
-
Check Synchronize Time to synchronize the device time with the PC running the client after adding the device to the client.
-
Finish adding the device.
-
Click Add to add the device and back to the device list page.
- Click Add and New to save the settings and continue to add other device.
2.3 Configure Network Parameters
After your device is added to the client, you can configure network parameters of your device as needed, including the IP address, subnet mask, and gateway.
Steps
- On the Device Management interface, select the desired device in the list and click Remote Configuration on the Operation column.
- Click Network → General.
- Configure the network parameter, including the IP address, subnet mask, and gateway.
- Click Save.
Chapter 3 Artistic Video Wall Configuration
This chapter describes how to design an artistic video wall solution on the client. Designing a video wall solution includes configuring monitors, configuring input signal sources, and linking devices with the video wall. You can design your video wall in offline mode and apply the configuration to your devices.
3.1 Configure Displays
A video wall consists of multiple monitors or displays. Add displays based on the actual video wall configuration and configure the positions, angles, and properties of your displays. After finishing display configuration, you can export it as a reference for onsite deployment.
3.1.1 Add Displays
Before designing your video wall, add displays to the video wall on the client.
Steps
- Click Artistic Configuration → Display Configuration.
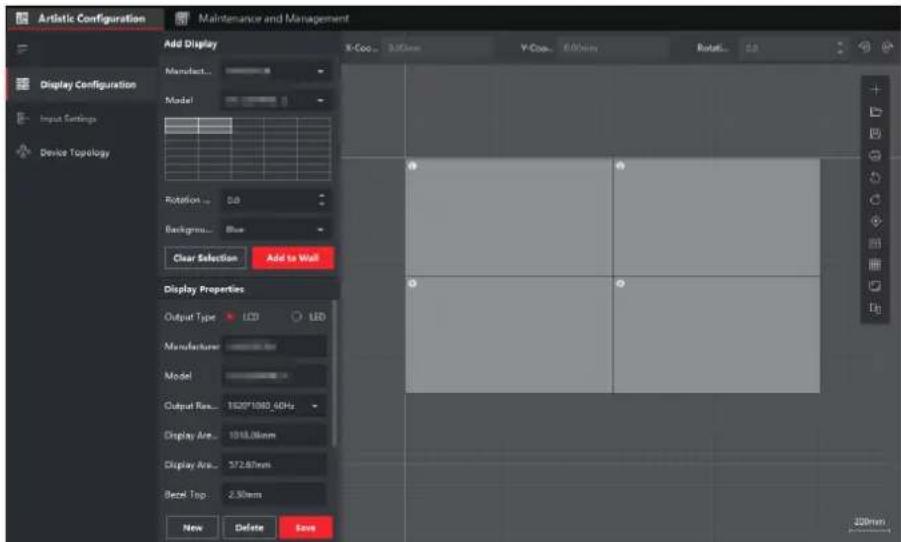
Figure 3-1 Add Display
- Select Manufacturer and Model. If the client does not show the desired manufacturer and model, click New on the bottom to add a new model and configure the properties and click Save.
- Click and select the desired video wall scale in the grid.
-
Optional: Set Rotation of your displays. Your displays can be rotated clockwise at any desired angle, accurate to 0.1 degree.
-
Optional: Set Background Color of your displays. The background color applies to all displays.
- Click Add to Wall to add the displays to the video wall canvas on the right.
3.1.2 Configure Display Properties
After adding displays to the wall, configure display properties to ensure proper displaying.
Steps
- Click Artistic Configuration → Display Configuration.
- Select a display on the wall and configure the properties.
Table 3-1 Description of Display Properties
| Property Description | |
| Output Type Output type of your display. LCD and LED types are available. | |
| Manufacturer/Model M | Manufacturer and model of your display. After the manufacturer and model are selected, the rest of the properties are automatically configured. Please check that the values are consistent with the actual values. |
| Output Resolution | Please select the proper resolution based on the actual need. |
| Display Area Width/Height | Enter the actual display area width and height of your display. The display area does not include the borders and bezels around the area. |
| Bezel Top/Bottom/Left/Right | Bezel width on the top, bottom, left, and right of the screen. The bezel width here is made up of the widths of the physical bezel and the black border. |
| LED Resolution | Only available when your display is an LED type. The resolution must be smaller than or equal to Output Resolution but greater than 288 × 288, and the width should be a multiple of two. |
- Click Save.
3.1.3 Adjust Display Positions
After adding and configuring the displays, adjust the positions to obtain an artistic video wall effect.
Steps
- Click Artistic Configuration → Display Configuration.
- Select a display on the wall, and adjust its position.

Note
Do not overlap displays when adjusting display positions. Dotted-line boxes appear around if displays are overlapped.
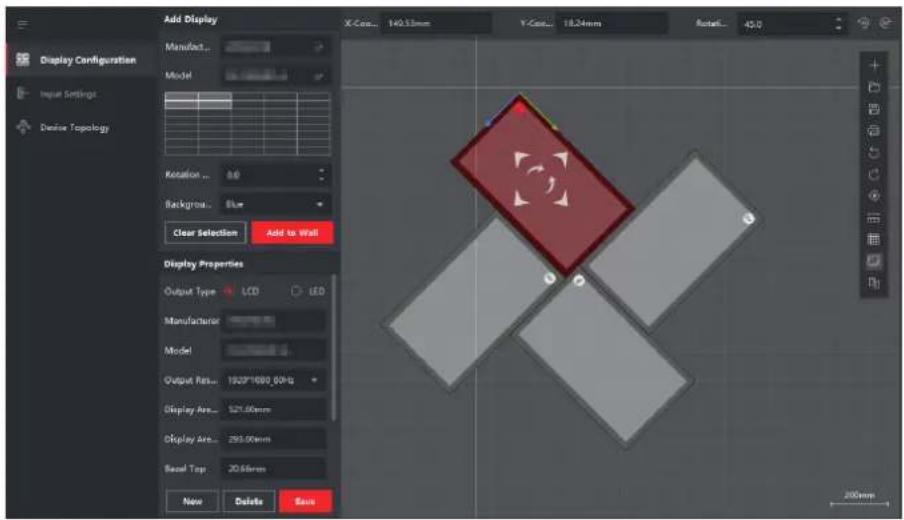
Figure 3-2 Adjust Display Positions
Table 3-2 Description of Display Position Adjustment
| FunctionDescription | |
| X-Coordinate/Y- Coordinate | Enter the X and Y coordinates of the reference point (the junction of the green line and the blue line), and the display will be moved to the corresponding position. |
| Rotation Angle | Enter the rotation angle, and the display will be rotated at the desired angle clockwise from the reference point (the junction of the green line and the blue line). |
 / /  ck the icons to ro ck the icons to ro | rotate the display at 45 degrees clockwise or anticlockwise from the reference point (the junction of the green line and the blue line). |
ck the icons to
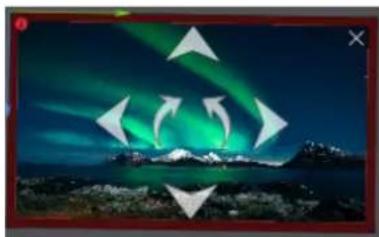
- Select a display and adjust it precisely using direction arrows appeared in the center of the display.
natural_image
Night sky with vibrant green and blue aurora borealis, snow-capped mountains in background (no text or symbols)Figure 3-3 Adjust Display Precisely
Table 3-3 Description of Precise Position Adjustment
| FunctionDescription | |
| Up/Down/Left/Right arrows | Click the arrows to move the display to the corresponding directions by 1 mm at a time. |
| Clockwise/Anticlockwise arrows | Click the arrows to rotate the display clockwise or anticlockwise by 0.1 degree at a time. Click and hold the arrows to rotate the display clockwise or anticlockwise by the desired degree. |
- Use the function icons on the toolbar to adjust the video wall layout.
Table 3-4 Description of the Function Toolbar on the Right Side
| Icon DescriptionIcon Description | ||
| + | Create a video wall canvas. Cancel the current operation. | |
| ∅ | Restore the previous operation. | Center the video wall in the canvas. |
| ### | Show the measurements of the whole video wall, a single display, and the distance between two displays. | Align to the grid in the video wall canvas when moving a display. |
| # | Align and snap to other displays when moving a display. | - |

Note
When devices are cascaded for fusion input of ultra-high resolution signals, you need to manually adjust the sizes of the signal input windows to form a rectangle shape without gaps between windows.
3.2 Configure an Input Source
After configuring the video wall layout, configure an input source for the video wall.
Steps
- Click Artistic Configuration → Input Settings.
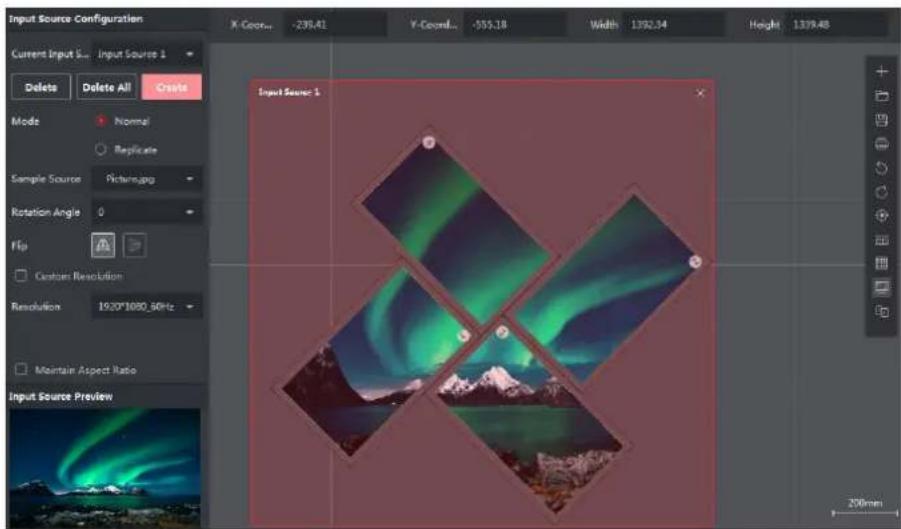
Figure 3-4 Configure an Input Source
-
Click Create to automatically create an input source for the current video wall.
-
Select a sample source file stored on the client or on your local computer to display in the window and check the display effect. Pictures and videos are supported.
-
Select the input source mode. Normal and Replicate modes are available.
Normal
The input source covers the entire display area of the video wall.

natural_image
Four-panel image showing a vibrant turquoise aurora over snow-capped mountains, with no visible text or symbols.Figure 3-5 Normal Mode
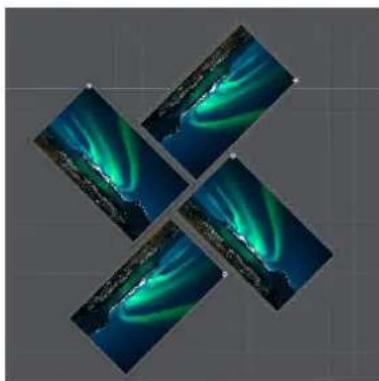
Replicate
All displays show the same image.
natural_image
Four-panel image showing a dark blue sky with vibrant green and cyan light patterns, arranged in a diamond shape (no text or symbols)Figure 3-6 Replicate Mode

Caution
In Replicate mode, the displays are adjusted to have the same output resolution, which is consistent with that of the display connected to the HDMI OUT 1 interface.
-
Optional: Select the rotation angle to rotate the image at the corresponding angle. 0^ , 90^ , 180^ , and 270^ are available.
-
Optional: In normal mode, click to flip the image horizontally or click to flip the image vertically.
-
Set the resolution of the input source. The resolution must be the same as the actual resolution of the input source. Otherwise, the image will not be displayed properly.
-
Select a standard resolution from the drop-down list.
- Click Custom Resolution to set a custom resolution. If the resolution of the input source does not match that of the on-site video wall, you can customize the resolution of the input source so that they are matched.
i Note
- The custom resolution must be a value between 1280 × 720 and 4092 × 2160 . The width must be a multiple of 4, and the height a multiple of 2.
-
When both the width is greater than 2560 and the height is greater than 1440, the frame rate 25/30/60 is available. Otherwise, only the frame rate 60 is available.
-
Optional: In normal mode, you can drag the input source border, the red dashed box, to change the size of the image in the display area. When Maintain Aspect Ratio is selected, the width and height of the image are changed simultaneously in a certain aspect ratio.
3.3 Configure a Device Topology
If your video wall has more than four screens, you can cascade multiple devices to support a larger video wall. The client automatically configures a cascading topology for you to connect physical devices according to the topology. A maximum four devices are supported in a cascading relationship.
3.3.1 Change a Device Topology
You can change the device topology as needed.
Steps
- Click Artistic Configuration → Device Topology . The client automatically configures a cascading topology for your devices, and you can connect physical devices according to the topology.
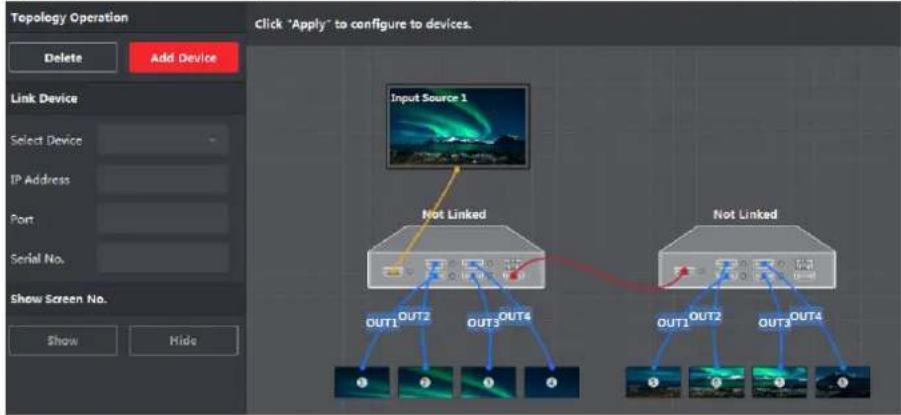
flowchart
graph TD
    A["Input Source 1"] --> B["Not Linked"]
    B --> C["OUT1"]
    B --> D["OUT2"]
    B --> E["OUT3"]
    B --> F["OUT4"]
    G["Show Screen No."] --> H["1"]
    G --> I["2"]
    G --> J["3"]
    G --> K["4"]
    L["Show"] --> M["Hide"]
Figure 3-7 Configure a Device Topology
- Change connection lines in the topology as needed.
Table 3-5 Description of Changing the Device Topology
| OperationDescription | |
| Add or delete a device | Click Create or Delete to add or delete a device. |
| Change a connection line Click | one interface, hold and move your mouse to draw a connection line to the other interface. |
| Change a loop line Click the loop | out interface of one device, hold and move your mouse to draw a connection line to the loop in interface of the other device. |

Note
- The topology relationship must be consistent with the actual device relationship.
- After the cascading topology is configured, only the HDMI input interface of the master device can be used to input signals.
3.3.2 Check Device Topology Status
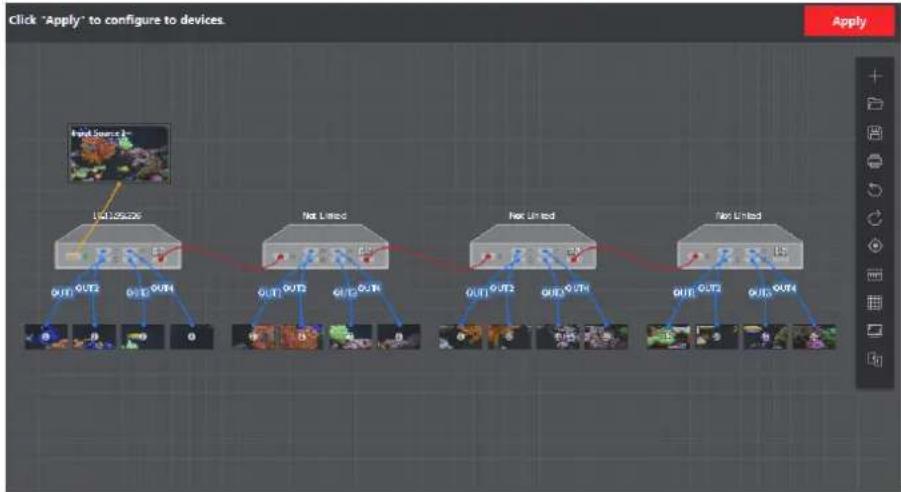
You can check device information and topology status on the client, such as the device cascading relationship, cable connection status, and status of signal input and output interfaces.
Steps
1. Click Artistic Configuration → Device Topology.
flowchart
graph TD
    A["Input Source"] --> B["I/O conversion"]
    B --> C["OUT"]
    B --> D["OUT2"]
    B --> E["OUT3"]
    B --> F["OUT4"]
    C --> G["Net Limited"]
    D --> G
    E --> G
    F --> G
    G --> H["OUT"]
    G --> I["OUT2"]
    G --> J["OUT3"]
    G --> K["OUT4"]
    H --> L["Net United"]
    I --> L
    J --> L
    K --> L
    L --> M["OUT"]
    L --> N["OUT2"]
    L --> O["OUT3"]
    L --> P["OUT4"]
    M --> Q["Net United"]
    N --> Q
    O --> Q
    P --> Q
Figure 3-8 View Topology Status
- Check the device cascading relationship, cable connection status, and status of signal input and output interfaces. The following table describes the connection lines and indicators.
Table 3-6 Description of Connection Lines and Indicators
| Name Color Description | |
| Connection line • Loop | connection line: red• Signal output connection line: blue• Signal input connection line: yellow |
| Signal input indicators (the leftmost one) | • Signals are not inputting and not displayed on the video wall: gray• Signals are displayed on the video wall but not inputting: green• Signals are inputting but not displayed on the video wall: red• Signals are inputting and displayed on the video wall: blinking red and green alternately |
| Signal output indicators (the middle four) | • Signal output interface connected with the video wall: green• Signal output interface disconnected with the video wall: gray |
| Sync interface • Sync line | connected: green• Sync line disconnected: gray |
3.4 Layout Management
The video wall layout can be saved and imported to the client as a file. You can also print the layout file as a reference for on-site deployment.
3.4.1 Save a Layout File
You can save a video wall layout as a file which can be used as a template to provide reference for other projects.
Steps
-
Click Artistic Configuration → Display Configuration.
-
Click ☐ to save the current video wall layout to the specified directory in the local computer.
3.4.2 Print a Layout File
You can print a video wall layout, containing information such as display properties, width and height, and positions, as a guide for onsite deployment.
Steps
-
Click Artistic Configuration → Display Configuration.
-
Click to print the video wall layout.
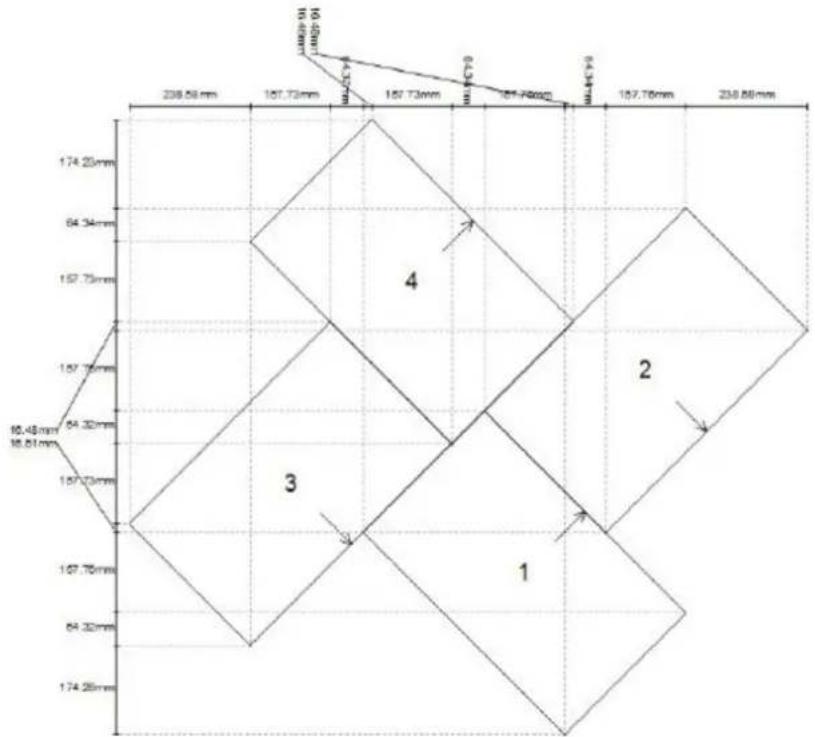
| Display | Manufacturer | Model | Width | Height | Angle | Left | Top |
| 1 | HIKVISION | DS-D5024FC-A | 560.50mm | 337.40mm | 45° | 460.71mm | 570.57mm |
| 2 | HIKVISION | DS-D5024FC-A | 560.50mm | 337.40mm | 135° | 699.28mm | 174.23mm |
| 3 | HIKVISION | DS-D5024FC-A | 560.50mm | 337.40mm | 135° | 0.00mm | 396.31mm |
| 4 | HIKVISION | DS-D5024FC-A | 560.50mm | 337.40mm | 45° | 238.61mm | 0.00mm |
3.4.3 Import a Layout File
You can import a layout file to the client for use or reference.
Steps
-
Click Artistic Configuration → Display Configuration.
-
Click 📋 to open a layout file from the local computer.
3.5 Configure Mirroring Display
You can create a mirroring effect on a video wall by cascading two devices. Configure the same signal source for the two devices, and flip the input source of one display horizontally or vertically to achieve a mirroring effect.
Steps
i Note
There are two types of mirroring: horizontal mirroring and vertical mirroring. The configuration methods are similar. This section uses an eight-display video wall as an example to describe how to configure mirroring on the video wall.
- Click Artistic Configuration → Display Configuration, and add four displays to the video wall canvas.
- Click Artistic Configuration → Input Settings, create input source 1 and configure an input source file for the input source.
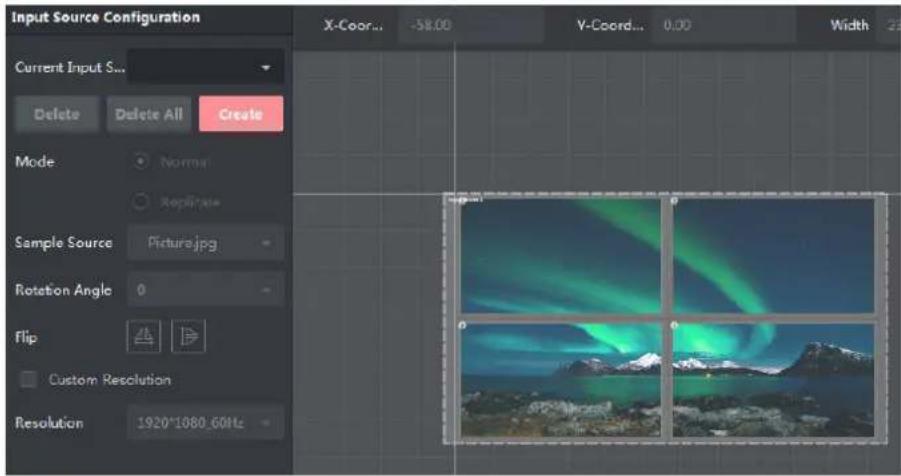
Figure 3-9 Configure Input Source 1
- Repeat steps 1 and 2 to add another four displays, create input source 2, and configure the same input source file for the input source 2.
- Click □ to flip the image of the input source 2 horizontally.
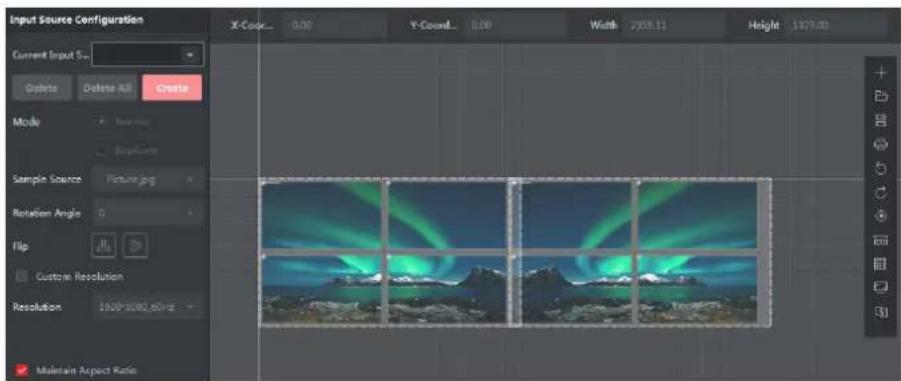
Figure 3-10 Configure Mirroring Mode
- Click Artistic Configuration → Device Topology, draw a loop connection line for the two devices. Click, hold, and drag a line from the loop out interface of the first device to the loop in interface of the second device.
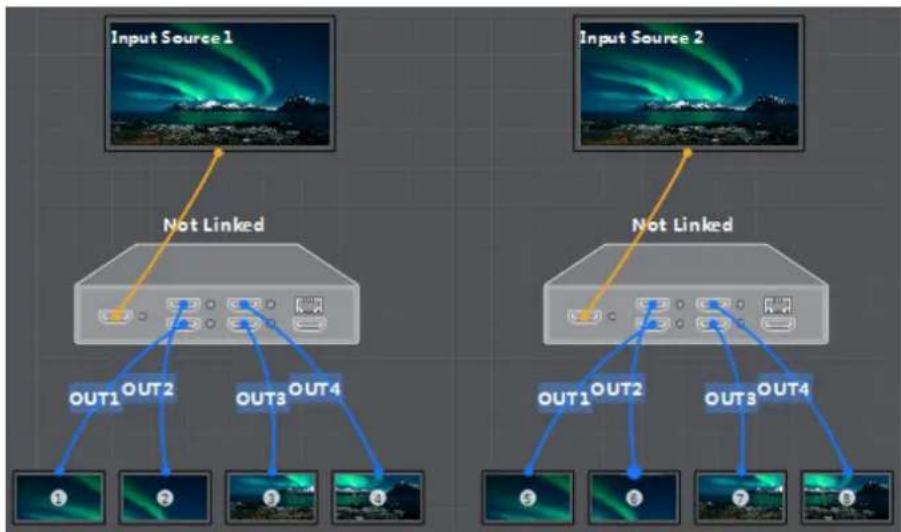
flowchart
graph TD
    A["Input Source 1"] --> B["Not Linked"]
    C["Input Source 2"] --> D["Not Linked"]
    B --> E["3"]
    B --> F["2"]
    B --> G["5"]
    B --> H["4"]
    D --> I["5"]
    D --> J["6"]
    D --> K["7"]
    D --> L["8"]
Figure 3-11 Device Topology (with Mirroring Not Configured)
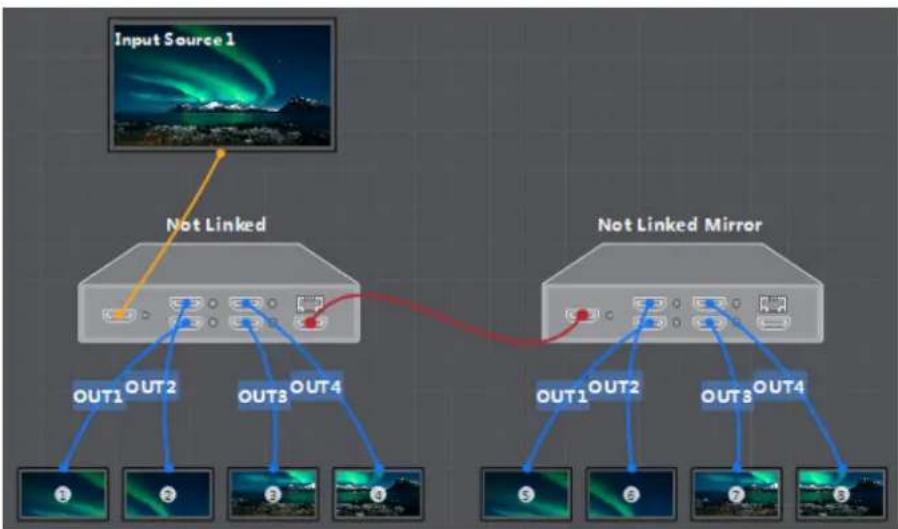
flowchart
graph TD
    A["Input Source 1"] --> B["Not Linked"]
    B --> C["OUT1"]
    B --> D["OUT2"]
    B --> E["OUT3"]
    B --> F["OUT4"]
    G["Not Linked Mirror"] --> H["OUT1"]
    G --> I["OUT2"]
    G --> J["OUT3"]
    G --> K["OUT4"]
Figure 3-12 Device Topology (with Mirroring Configured)
- After mirroring is configured, continue to finish other configurations, such as layout adjustment and device linking.
Chapter 4 Device Installation and Cabling
After finishing the design of your video wall solution on the client, you can install your devices and video wall according to the design.
4.1 Install Your Devices
Install Your Video Wall Controllers
Place your devices on flat surfaces such as a table, or on metal surfaces such as a video wall bracket or the rear of an LCD screen with the magnet feet on the bottom of your devices. Decide your installation way based on the actual scenario.
Install Your Video Wall
Install your video wall according to the video wall layout designed on the client. You can print the layout file for convenience.
4.2 Connect Cables
After installation is complete, you need to connect cables for your device, including the grounding cables, network cables, video and audio cables, serial cables, cascading cables, sync cables, and power cables.
4.2.1 Cable Connection Requirements
Different application scenarios require different cable connection. See the following table and figures for reference.
Table 4-1 Cable Connection Requirements
| No. Application Scenario Cables Required | ||
| 1 Signal splicing on video wall | • Grounding cable• Network cable• Video and audio cables• Power cable | |
| 3 Cascading splicing of a signal | • Grounding cable• Network cable• Video and audio cables• Loop cable | |
| Sync cablePower cable | ||
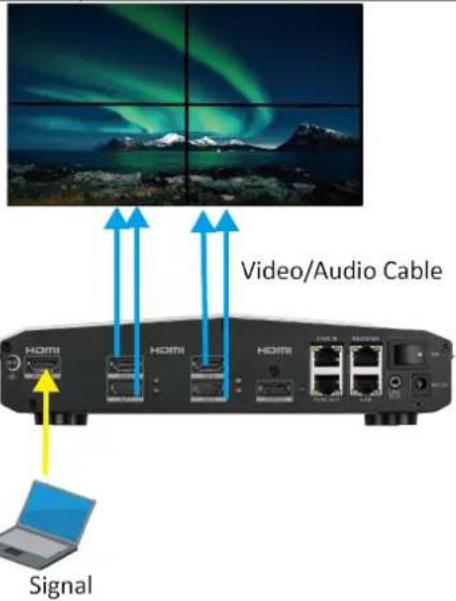
Figure 4-1 Normal Signal Splicing on Video Wall
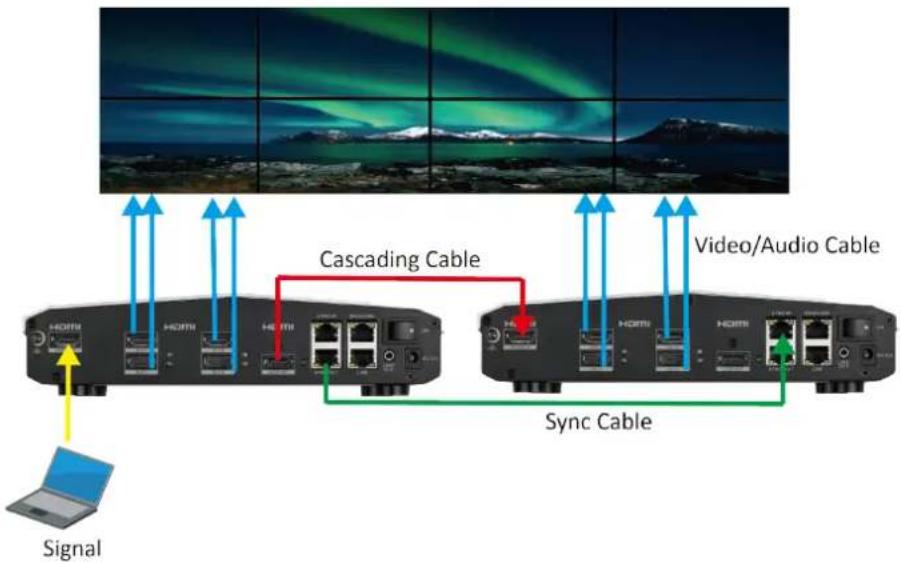
flowchart
graph LR
    A["Signal"] --> B["Adder"]
    B --> C["Cascading Cable"]
    C --> D["Adder"]
    D --> E["Sync Cable"]
    E --> F["Video/Audio Cable"]
    style A fill:#f9f,stroke:#333
    style B fill:#ccf,stroke:#333
    style C fill:#cfc,stroke:#333
    style D fill:#fcc,stroke:#333
    style E fill:#cff,stroke:#333
    style F fill:#ffc,stroke:#333
Figure 4-2 Cascading Splicing of a Signal
4.2.2 Cable Connection Description
See the following table for details about how to connect cables.

Note
All cables mentioned in the following table require you to purchase separately.
Table 4-2 Cable Connection Description
| No. Cable Connection Method | ||
| 1 Grounding | cable 1. Use a Phillips screwdriver to remove the grounding screw on your device.2. Use the Phillips screwdriver to connect one end of the grounding cable to the grounding terminal of your device and the other end to the grounding system. | |
| 2 Network cable | Connect the LAN interface of your device to the network using a network cable. | |
| 3 Video and audio cables | 1. Connect the HDMI input interfaces to input signal sources and the HDMI input interfaces to the video wall with HDMI cables.Note- Only HDMI 2.0 cables are supported.- If your site requires signal conversion cables, choose cables based on your actual needs. For the controllers, DP-HDMI cables support up to 4K@60 Hz input, DVI-HDMI cables support up to 4K@60 Hz input, and VGA-HDMI cables support up to 1080P@60 Hz.2. Connect the line out interface to the audio device such as a loudspeaker with an audio cable. | |
| 4 Loop cable | 1. Connect the loop out interface of the master device to the loop in interface of one of the slave devices with an HDMI cable.2. Connect the loop out interface of the slave device to the loop in interface of the next slave device with an HDMI cable. The rest can be done in the same manner. | |
| 5 | Sync cable | 1. Connect the sync out interface of the first device to the sync in interface of the next device with a network cable.2. Connect the sync out interface of the device to the sync in interface of the next device with a network cable. The rest can be done in the same manner. |
| No. Cable | Connection Method | |
| 6 Serial cable | iNoteThe serial port is used for debugging only.1. Determine the serial cable order of the serial interface of your devices. The RS-232/485 serial interface of the device is an RJ45 type with eight feet, and feet 2 and 3 correspond to RX and TX of an RS-232 interface, and feet 4 and 5 correspond to RS-485+ and RS-485- of an RS-485 interface.2. Connect the serial interface of your video wall controller with that of an external device. | |
| 7 Power cable | Choose either of the following ways to supply power to your device:Connect the LAN interface of your device to the network with a network cable for power supply over PoE.Turn on the power switch, and use the power adapter to connect the DC 12 V input interface to a socket. | |
Chapter 5 Device Configuration and Maintenance
You can perform device configuration and maintenance operations on the client, such as configuring device time and security services, changing the device password, searching and backing up operation logs, remotely restarting or upgrading devices, and restoring factory default settings.
5.1 Configure the Device Name and Device No.
A device name or device No. identifies a device from other devices. You can customize the name or No. as needed.
Steps
- Click Maintenance and Management → Device Management, select the desired device in the list and click Remote Configuration on the Operation column.
- Click System → General.
- Change the Device Name or Device No. as needed.
- Click Save.
5.2 Configure Device Time
If your device time is incorrect, set the time zone or manually synchronize time to correct the time.
Steps
- Click Maintenance and Management → Device Management, select the desired device in the list and click Remote Configuration on the Operation column.
- Click System → Time.
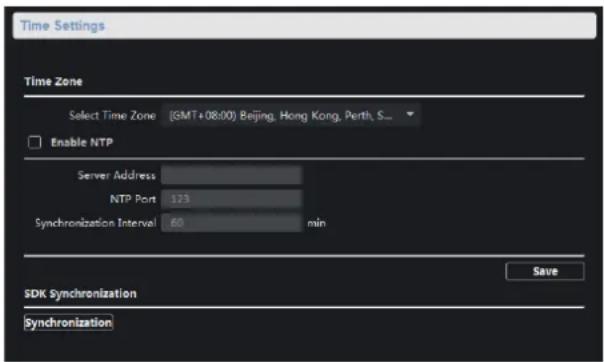
Figure 5-1 Configure Device Time
- Select a time zone where your device is located.
-
Optional: To synchronize your device with other devices on the same network, enable NTP and configure Server Address, NTP Port, and Synchronization Interval.
-
Click Save.
-
Optional: To manually synchronize time, click Synchronization.
5.3 Reset Device Password
If you forget your device password, just reset your password by exporting and importing a GUID file.
Steps
- Click Maintenance and Management → Device Management, and select the desired device from the online device list and click Reset Password.
![Restore Default Password Export File: Export Import File: Import Password: Valid password range [8-16]. You can use a combination of numbers, lowercase, uppercase and special character for your password with at least two kinds of them contained. Confirm Password: OK Cancel](/content/2026/05/993818/images/89d27b6594d220721e1cf49e4cceaee265e4023b1162eceb0e2d42b2369b91fe.jpg)
Figure 5-2 Reset Password
-
Click Export to export the GUID file in XML format to your local computer.
-
Provide the GUID file to your technical support engineer for generating a key file.
-
After receiving the key file, click Import to import the file into your device.
Your device password is cleared for you to set a new one.
- Enter a new password and confirm the password.

Caution
We highly recommend you to create a strong password of your own choosing (using a minimum of 8 characters, including at least three kinds of following categories: upper case letters, lower case letters, numbers, and special characters) in order to increase the security of your product. And we recommend you reset your password regularly, especially in the high security system, resetting the password monthly or weekly can better protect your product.
- Click OK.
5.4 View Device Information
You can view device information such as the device type, serial No., or version No. on the client.
Steps
-
Click Maintenance and Management → Device Management, select the desired device in the list and click Remote Configuration on the Operation column.
-
Click System → Device Information to view device information such as the device type, serial No., or version No.
5.5 Configure Serial Parameters
If you want to debug your device over the RS-232/485 serial port, you can configure serial parameters on the client as needed. The default serial port type is RS-232, and you can change it to RS-485 as needed.
Steps
-
Click Maintenance and Management → Device Management, select the desired device in the list and click Remote Configuration on the Operation column.
-
Click System → Serial Port Configuration.
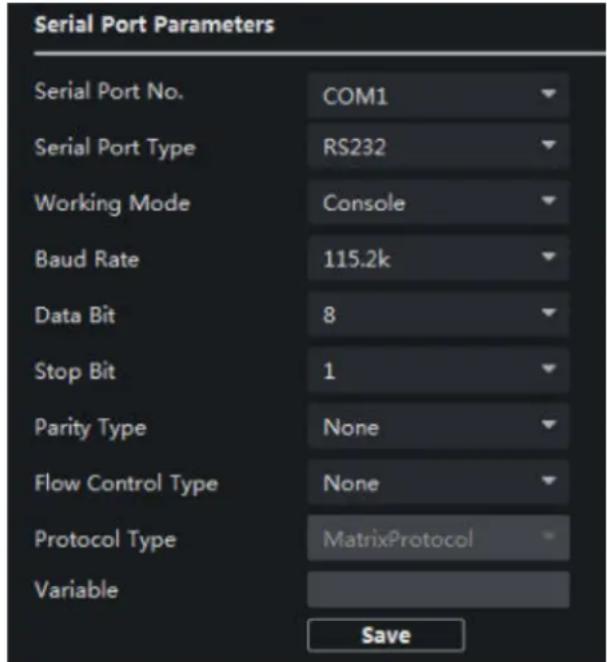
Figure 5-3 Configure Serial Parameters
-
Configure serial parameters, including Serial Port Type, Baud Rate, Data Bit, Stop Bit, Parity Type, and Flow Control Type.
-
Click Save.
5.6 Configure Security Parameters
Configure security parameters as needed.
Steps
- Click Maintenance and Management → Device Management, select the desired device in the list and click Remote Configuration on the Operation column.
- Click System → Security.
- Enable or disable SSH as required. SSH (Secure Shell) is a protocol to ensure security of remote login. SSH is disabled by default.
- Enable or disable SADP as required. When SADP is enabled, your devices can be automatically found by the client. SADP is enabled by default.
- Click Save.
5.7 Import and Export a Configuration File
If you have multiple devices on site, you can export the configuration file of a finished device and import the file to other devices to save time.
Steps
- Click Maintenance and Management → Device Management, select the desired device in the list and click Remote Configuration on the Operation column.
- Click System → System Maintenance.
- Export or import a configuration file.
- Click Import Configuration File to import a configuration file, enter the password, and click OK.
- Click Export Configuration File to export the configuration file, set a password, and click OK.

Caution
We highly recommend you to create a strong password of your own choosing (using a minimum of 8 characters, including at least three kinds of following categories: upper case letters, lower case letters, numbers, and special characters) in order to increase the security of your product. And we recommend you reset your password regularly, especially in the high security system, resetting the password monthly or weekly can better protect your product.
5.8 Query and Back Up Logs
You can query or back up exception or operation logs for troubleshooting.
Steps
-
Click Maintenance and Management → Device Management, select the desired device in the list and click Remote Configuration on the Operation column.
-
Click System → Log Query.
- Set the Search Mode. Major Type, Minor Type, Start Time, and End Time are available.
- Click Search to search logs. Click Backup to back up the logs as needed.
5.9 Restore Default Parameters
You can restore your device to factory default settings as needed, for example, when your device encounters a fault that is difficult to resolve.
Steps
- Click Maintenance and Management → Device Management, select the desired device in the list and click Remote Configuration on the Operation column.
- Click System → System Maintenance.
- Restore partial default parameters or all default parameters by clicking Restore Default Settings or Restore All.

Caution
- Clicking Restore Default Settings will restore all parameters to factory settings except IP configuration.
- Click Restore All will clear all parameters and restore the parameters to factory settings.
- You are recommended to export the configuration file first before restoring parameters.
5.10 Restart a Device Remotely
You can restart your device remotely on the client for troubleshooting.
Steps
- Click Maintenance and Management → Device Management, select the desired device in the list and click Remote Configuration on the Operation column.
- Click System → System Maintenance.
- Click Reboot.
5.11 Upgrade a Device Remotely
You can upgrade your device remotely on the client.
Steps
- Click Maintenance and Management → Device Management, select the desired device in the list and click Remote Configuration on the Operation column.
- Click System → System Maintenance.
- In the Remote Upgradearea, select and import the upgrade file and click Upgrade.
Chapter 6 User Management
The device has only one admin user. You can change the password on the client.
Before You Start
Steps
- Click Maintenance and Management → Account Management.
- Click Change Password.
- Enter the old password, new password and confirm the password.
- Click OK.

Caution
The password strength of the device can be automatically checked. We highly recommend you change the password of your own choosing (using a minimum of 8 characters, including at least three kinds of following categories: upper case letters, lower case letters, numbers, and special characters) in order to increase the security of your product. And we recommend you change your password regularly, especially in the high security system, changing the password monthly or weekly can better protect your product.
Proper configuration of all passwords and other security settings is the responsibility of the installer and/or end-user.
Chapter 7 Operation and Maintenance
You can perform maintaining operations in the menu to ensure a smooth and convenient usage of the client.
Click in the upper-right corner, and then click System/Tool to perform the following operations.
Import/Export Configuration File
You can import configuration files from local PC to the client if needed, and vice versa.
Skin
Change the skin of the client, including bright-color series and black-color series.
Batch Time Sync
Synchronize selected devices' time with your PC time.
Message Queue
After configuring email linkage, the triggered event(s) will be displayed here. Select an event and cancel sending the an email to the receiver.
Chapter 8 Get More Information
Scan the following QR code to get more information about the operation and maintenance.
See Far, Go Further

- About this Manual
- Trademarks
- Disclaimer
- Regulatory Information
- FCC Information
- FCC Conditions
- EU Conformity Statement
- Industry Canada ICES-003 Compliance
- Preface
- Applicable Model
- About the Default
- Symbol Conventions
- Safety Instructions
- Warning
- Caution
- Contents
- Chapter 1 Product Introduction ...... 1
- Chapter 2 Activate and Add Devices .... 6
- Chapter 3 Artistic Video Wall Configuration .... 10
- Chapter 4 Device Installation and Cabling 22
- Chapter 5 Device Configuration and Maintenance 26
- Chapter 6 User Management .... 31
- Chapter 7 Operation and Maintenance .... 32
- Chapter 8 Get More Information .... 33
- Chapter 1 Product Introduction
- Overview
- Key Feature
- Packing List
- Device Appearance
- Front Panel
- Rear Panel
- Client Management Software
- Operation Process
- Chapter 2 Activate and Add Devices
- Activate Your Device
- Before You Start
- Steps
- Add Your Device
- Add Device by IP Address or Domain Name
- Name
- Address
- Port
- User Name
- Password
- Remote
- Configuration
- Add Devices by IP Segment
- Configure Network Parameters
- Chapter 3 Artistic Video Wall Configuration
- Configure Displays
- Add Displays
- Configure Display Properties
- Adjust Display Positions
- Note
- Configure an Input Source
- Normal
- Replicate
- i Note
- Configure a Device Topology
- Change a Device Topology
- Check Device Topology Status
- Click Artistic Configuration → Device Topology.
- Layout Management
- Save a Layout File
- Print a Layout File
- Import a Layout File
- Configure Mirroring Display
- Chapter 4 Device Installation and Cabling
- Install Your Devices
- Install Your Video Wall Controllers
- Install Your Video Wall
- Connect Cables
- Cable Connection Requirements
- Cable Connection Description
- Chapter 5 Device Configuration and Maintenance
- Configure the Device Name and Device No.
- Configure Device Time
- Reset Device Password
- View Device Information
- Configure Serial Parameters
- Configure Security Parameters
- Import and Export a Configuration File
- Query and Back Up Logs
- Restore Default Parameters
- Restart a Device Remotely
- Upgrade a Device Remotely
- Chapter 6 User Management
- Chapter 7 Operation and Maintenance
- Import/Export Configuration File
- Skin
- Batch Time Sync
- Message Queue
- Chapter 8 Get More Information
Brand : Hikvision
Model : DS-C12A-0104H
Category : Processor