
ICS-0404-0020 - Security Camera Lanberg - Free user manual and instructions
Find the device manual for free ICS-0404-0020 Lanberg in PDF.


| Product Type | WiFi NVR Security Camera Kit |
| Brand | Lanberg |
| Model | ICS-0404-0020 |
| Camera Quantity | 4 or 8 (depending on kit) |
| NVR Power Supply | DC 12V 2A |
| Camera Power Supply | DC 12V 1A per camera |
| NVR Ports | HDMI, VGA, USB, WAN, dual WiFi antenna |
| Camera Connectivity | WiFi (2.4 GHz) to NVR |
| Hard Drive Support | 3.5" or 2.5" SATA HDD (not included) |
| Video Recording Modes | Time, Motion, Alarm |
| Remote Viewing (PC) | Internet Explorer browser via IP address |
| Mobile App | IP PRO (iOS 8.0+ / Android 4.4+) |
| Video Backup | USB flash drive (max 32GB, 1-hour segments) |
| Default Login | Username: admin, Password: (empty) |
| Operating System | Embedded Linux in NVR |
| Wireless Range Extension | Repeater function or antenna extension cord |
| Warranty | 24 months |
| Country of Origin | China |
| Maintenance | Clean dust on PCB regularly; use in ventilated area |
| Safety Precautions | No fluids on device; use included power supply |
| Spare Parts Included | Screw bags, antennas, power adapters |
| Repairability | Refer to warranty terms at www.impaks.com.pl/service.html |
Frequently Asked Questions - ICS-0404-0020 Lanberg
2. Connect a monitor via HDMI or VGA.
3. Plug in the NVR power adapter (12V 2A) and camera power adapters (12V 1A each).
4. Within seconds, camera images appear.
5. Plug the USB mouse into the NVR to navigate the interface. Default login: username admin, password empty.
User questions about ICS-0404-0020 Lanberg
0 question about this device. Answer the ones you know or ask your own.
Ask a new question about this device
Download the instructions for your Security Camera in PDF format for free! Find your manual ICS-0404-0020 - Lanberg and take your electronic device back in hand. On this page are published all the documents necessary for the use of your device. ICS-0404-0020 by Lanberg.
USER MANUAL ICS-0404-0020 Lanberg
Thank you for purchasing our product! This quick user guide will talk about main usages of the product. More information can be found on our website www.lanberg.eu and the help center. This user guide may contain inaccurate content due to hardware and software upgrade. It is subject to change without previous notice.
Safety Caution
- Please do not put any fluid container on the product.
- Please use the product in ventilated environment and prevent blocking the vents.
- Please use included power supply with the product to prevent damage to the product.
- Please use the product under its standard working temperature and humidity (advice
- Please use the product under its stand in this manual or distributor's website)
- Dust on PCB may cause short circuit.It is suggested to clean the dust on PCB timely
to make the product work properly. - Please obey the regulation and policy in your country and area during the installation of this
OF
Out Of Box Audit
After receiving the product, please check all products and accessories with information below. If any is missed or damaged, please contact the distributor.
ITEM:
QUANTITY:
WIFI NVR
1pcs
Screw bag
1pcs
DC 12V 2
1pcs
User manu
1pcs
WIFI IPCa
4/8p
DC 12V 1,
4/8p
Screw bag
4/8p
Antenna B
1/2(4CH/8CH)pcs
* quantities given in order for a 4-channel, followed by an 8-channel set (4ch/8ch).
NVR

- WIFI Antenna Ports: Double antennas to WIFI range
- WAN Port: Connect your NVR to Internet
- VGA Port: For viewing on VGA monitor
- HDMI Port: For viewing on HDTV
- USB Ports: For mouse and backup
- Power Input
IPC
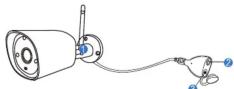
-
WIFI antenna: WiFi connection with NVR
-
DC Port: input power 12V 1A;
-
Reset button: press reset button for 10 seconds to restore factory setting
and enter into matching-code mode.
Installation Instruction Of WIFI NVR KIT
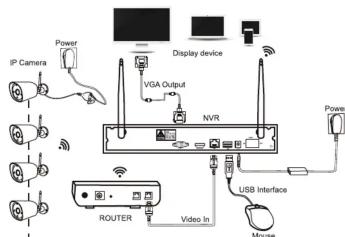
flowchart
graph TD
    A["IP Camera"] --> B["Router"]
    B --> C["Video In"]
    C --> D["USB Interface"]
    D --> E["Mouse"]
    E --> F["Display device"]
    F --> G["IP Camera"]
    H["POWER"] --> I["IP Camera"]
    J["VGA Output"] --> K["NVR"]
    L["Power"] --> M["Power"]
Note:
Wireless NVR can't be connected to WIFI router wirelessly at present. They can be only connected by network cable.
Setup The System
This system is standalone with embedded Linux Operating System in the NVR. Just like a desktop PC, need to hook a screen to the NVR to enter the OS. Any TV, monitor with VGA or HDMI input should work for it.
- Install antennas for cameras and the NVR;
- Connect a screen to the NVR via its HDMI or VGA port(HDMI and VGA cable not included):
- Plug the NVR to power(use bigger 12V 2A power adapter);
- Plug cameras to power(use smaller 12V 1A power adapters);
- Within seconds, you should see camera's images on the screen;
- Plug the mouse(included) to an USB port on back of NVR. You shall then be able to operate on the system.
In the OS you can find fullest functionalities including live view, record, playback, video backup and all settings.
Default ID: admin
Password: none (means leaving the password empty, just click login)
Tips: To protect your privacy, please set your password at earliest convenience. Right click the mouse→Go to System Setup→System Admin→User Management to set password.
HDD Install
Tips: the system may not include hard disk depending on the kit you selected. the NVR works most 3.5" SATA HDD or 2.5"SATA HDD

- Unplug your NVR from power,unscrew and remove the top cover.

- Connect the SATA power and data cables from the NVR to the corresponding ports on your HDD (as shown).

- holding the hard drive and the DVR, gently turn it over and line up the holes on the hard drive with the holes on the NVR, using a phillips screwdriver, screw the provided screws into the holes and assemble the cover.

Note: New HDD have to be formatted before recording. To get better WIFI signal, it had better place the NVR in open area and high position.
video Video Backup
Record video is very easy on camera system.
- Time Recording: Setup period of time of recording on NVR GUI .Right click mouse→System Setup→Record setup→Record Plan.Click "time"and put mouse icon on the upper left corner(for example"1"as picture shows),press and drag the mouse to the right to choose the time.The list will turn to red.
- Motion Recording: Only detect motion and then start recording.Right click mouse→System Setup→Record setup→Record Plan.Click"motion"and put mouse icon on the upper left corner(for example"1"as picture shows),press and drag the mouse to the right to choose the time. The list will turn to green.
- Alarm recording: Right click mouse→System Setup→Record setup→Record Plan.Click "Alarm" and put mouse icon on the upper left corner (for example "1" as picture shows), press and drag the mouse to the right to choose the time. The list will turn to yellow.
Note: Users can setup any period of time they want, for example 0:00:00 - 23:59:59, That's 24 hours *7 days recording. When NVR detects hard disk, the default setting will be 24 hours*7 days recording.

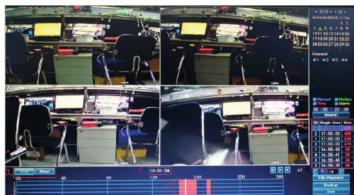
Video Playback
Steps:right clk mouse in main menu→Video playback→choose date,channel,record mode→click search→then can view playback file.
- Illustration for playback button: play, pause: fast forward*2,*4,*8;
- Play file: Choose the recording file in file list, as number*1* shown in picture. Choose one of the recording, click *play* to play to recording file;
- Video backup: Choose the recording file in file list, as number "1" shown in picture.insert the U flash disk, click "video backup" to backup the file;
- Timeline: Click "date" and "time" at left bottom to check the timeline of recording, as number "2" shown in picture;
- On the timeline with recording file, left click the mouse, the can playback the file.

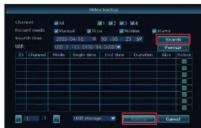
Use U disk to copy video, so easy and convenient!
1.2 USB ports: Plug U flash disk into the USB port of NVR. Right click on main menu→Video backup→choose backup channel→choose video mode→setup searching time→search→choose recording file on the list→video backup (support 32G U flash disk at max. Recording file is packed one hour per time.)
View On PC Via IE (Internet Explorer)
- When your PC is in same LAN with the NVR (normally means they are connected to the same router)
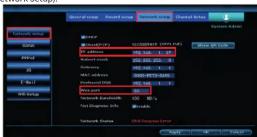
Step1.Find the IP address and port# of your NVR(IP address can be found in System Setup→Network Setup).
(1) 通过网络投票
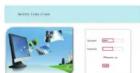
Step 2. Enter the NVR's IP address in your IE browser for example: http://192.1.1.7 (If the default WEB port 80 has been changed e.g. to 100, you'll need to add new port number when input IP address in the browser, for example: http://192.168.1.7:100).
- OPTIONAL - When your computer/laptop is out of home/local network (eg. You want to have a preview from the office). Access from the CLOUD ID to the device
Step 1. Open your browser and enter the website address in the search engine: www.noip.com - the website owner provides free DDNS services.
Step 2. Required account creation.
Enter: Hostname - the name you chose (eg Micha123) Choose a domain from the drop-down list (eg DDNS.net Click on "Sign UP" to create an account.) After completing the data, please confirm your email to activate your account. step by step just like a service provider leads you.
Step 3. NVR settings - Please enter System Options→Network→DDNS Director choose "NO-IP"→URL enter the hostname (eg Michal123) and the selected member from the drop-down list (eg ddns.net)→User enter the email given during registration→Password enter the password provided during registration. Click the TEST button. If the data is entered correctly, the tests will pass
Step 4. In the browser, enter, for example, michal123.ddns.net and then we will open a page identical to the one in the local network. You must log in with administrator data from the NVR (login and password).

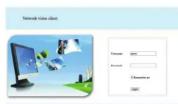
NOTE: For proper configuration, you should have public IP and port forwarding (available manual also at www.noip.com right after registration). View On Mobile
1
3
4
View On Mobile MENU-Do What Extend
- Download the APP "IP PRO"
Users can use cellphone to scan the QR code below to install the APP free of charge,or users can search "IP Pro 3.0" on APP store or Google Play then install the APP.

Note: For IOS system, it requires IOS 8.0 version or above. For android, android 4.4 or above.
- Add the NVR system to your APP device list
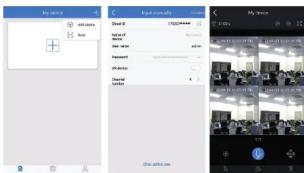
Run the APP "IP PRO", login with your account or choose Trial Click ^+ to "Add device by ID ^+ find it the NVR's Network setup, or right bottom corner on screen), Description(e.g. Home Camera), User name (default user name is "admin") and password(default is empty) Submit to get back to your device list Click the device to view the cameras.
Tips: if you've set a password on your NVR system, please update your password on APP to view.
Playback On Mobiles
In the IP PRO APP, while viewing live video of the system, click Playback, you will enter the remote playback menu. The APP automatically playback camera 1, you can switch channels the CH.
Tips: Videos in playback are HD@real time which requires very good transmission condition. We suggest to playback in LAN. Remote playback out of LAN may not 100% work due to connection & network condition.


ange
Menu bar
Click right button you can enter the main menu; click right button again you can exit the current menu or return.

Split screen: change status of live view. You can choose to view multiple cameras or any single camera. Video Manage: manage IP cameras and NVR channels. System setup: all system settings. Video playback: playback recorded videos. Video backup: backup recorded videos. Color adjust: adjust the image setting of each camera. Manual record: shortcut to change the record settings. Volume: Adjust volume of audio cameras/works only for audio cameras). Setup Wizard: step by step guide of 1st time general settings. Fast Network: shortcut to network settings. Wifi add: add IP cameras into NVR channels wirelessly. Adjust channel: adjust the order of the NVR channels. Exit System: logout, reboot, close screen output and shut down the system.
System Setup
Click right button→Choose System setup; you then shall enter the menu that enables you to do all settings related to this system.
- General setup
Language Time Display resolution HDD information
- Record setup
Record plan for each channel video detectionr All network related settings
- System admin
System version System maintenance including system upgrade User and password management Restore to default settings System log
- Network setup - All network related settings - Channel setup Manage channels and cameras
Wireless Match-code Operation Procedure
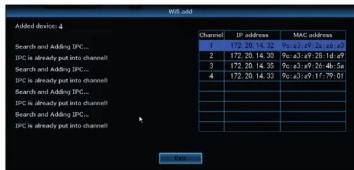
Step 1: Start NVR and IPC.Right click mouse→Wifi add→match-code interface Step 2: Press reset button on camera for 10 seconds and get match-code mode. Step 3: Click "Exit" after adding.Matching code completes.
Note: Default valid time to match code is within 10 minutes after IPC starts. If overtime, match code function will shut off. users have to press reset button on camera for 10 seconds and get match-code mode again.
1
Wireless connection is easy and convenient, but it's not universal application. Because of the character of WIFI, the WIFI signal will decrease when going through some obstacles. Some methods can be applied to bypass obstacles and extend WIFI range.
- Position The Antenna Correctly
WIFI range is like an apple and the antenna of NVR is in the center of it. WIFI signal is strong all around the WIFI range. Antenna of NVR should be put straight up, if not, WIFI signal will be weak. According to the signal transmission character of antenna, the antenna of cameras should overlap or parallel to NVR WIFI range, as pictures showed below:

CORRECT METHOD FAULT METHOD
- Use Antenna Extension Cord to prolong WIFI distance
Installation method of antenna extension cord
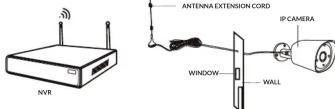
Notes: When WIFI signal is not strong enough against walls, users can take off the original antenna and substitute antenna extension cord. Drill a hole on the wall to let the extension cord go through and simply it where WIFI signal is strong.
Notes: In case you notice a decrease in the quality of neighboring wireless connections (eg, Wi-Fi router) on the 2.4 GHz band, check if your device transmits signals on the same channel as the camera recorder - channel 1. If so, try changing the broadcasting channel Your device (eg, in the router) to another usable channel - 11 or 6 (assuming the router's Wi-Fi operation at 20 MHz bandwidth).
- Set up cascading connection in a reasonable solution, extend wifi signal transfer distance
Note:
- Repeater function can't strengthen WIFI signal for wireless NVR kit, but can extend the distance by repeaters -- WIFI cameras.
- Only when the repeater cameras and repeated cameras are positioned correctly, WIFI distance will be extended.
- Repeater function and 3 meters antenna extension cord are two methods to extend WIFI range. Users can choose one according to real situation.
Repeater Setup
Step 1: Right click on NVR'S GUI, left click "video management"→ then left click repeater

Step 2: Add repeater
As picture shown below, click icon + besides channel 3, choose other channel.

flowchart
graph TD
    A["Initial Review"] --> B{Review?}
    B -->|Yes| C["Approval"]
    B -->|No| D["End"]
    C --> E["Final Approval"]
    E --> F{Approval?}
    F -->|Yes| G["Final Approval"]
    F -->|No| H["End"]
Step 3: As picture shown below, it means IPC1 is connected to NVR through IPC2 and IPC3. IPC2 is connected to NVR through IPC3. IPC3 is connected to NVR directly.
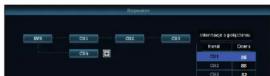
Step 4: Click "Apply" and then click "refresh" to check if the setting is successful.

flowchart
graph TD
    A["输入"] --> B["预处理"]
    B --> C{判断条件}
    C -->|是| D["执行操作"]
    C -->|否| E["结束"]
    D --> F["输出结果"]
    style A fill:#f9f,stroke:#333
    style F fill:#ccf,stroke:#333
Delete Repeater


Application Example
As picture shown above, when IPCAM1 is put somewhere is out of NVR WIFI range, and there is IPCAM2 between them with strong WIFI signal, users can put IPCAM1 close to NVR and power it, setup IPCAM1 repeated by IPCAM2, and then install IPCAM1 to the presupposed place.

Warning
In order to reset the password on the recorder, enter a random string of characters into the designated login field and confirm it to trigger the appearance of the error message. Then alternately press the buttons of the connected mouse to the recorder 6 times, starting from the left and ending with the right one (left, right, left right etc.). After doing this, you will see a message about restoring default users - press "Yes". Then a window will appear with the option of setting a new password - in this case, you do not need to provide the old one.
Notes:
Producer: Impakt S.A. ul. Stanisława Lema 16; 62-050 Mosina - Poland
Declaration of Conformity CE - www.lanberg.eu
Country of origin: China Warranty 24 months
General warranty terms available at: www.impakt.com.pl/service.html
5
6
- Safety Caution
- Out Of Box Audit
- NVR
- IPC
- Installation Instruction Of WIFI NVR KIT
- Setup The System
- HDD Install
- video Video Backup
- Video Playback
- View On PC Via IE (Internet Explorer)
- View On Mobile MENU-Do What Extend
- Playback On Mobiles
- ange
- Menu bar
- System Setup
- Wireless Match-code Operation Procedure
- 1
- Repeater Setup
- Delete Repeater
- Warning
Brand : Lanberg
Model : ICS-0404-0020
Category : Security Camera