
MJ-M176 - Blender PANASONIC - Free user manual and instructions
Find the device manual for free MJ-M176 PANASONIC in PDF.


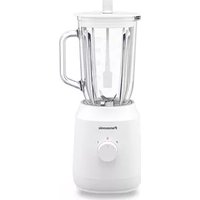
| Product Type | Juicer/Blender (Household Use) |
| Brand | Panasonic |
| Model | MJ-M176 |
| Power Supply | 220-240 V, 50-60 Hz |
| Power Consumption | 210-230 W |
| Blender Container Capacity | Maximum 1,000 ml |
| Dry Mill Capacity (Model MJ-M176P only) | Maximum 50 g |
| Juicer Dimensions (H x W x D) | Approx. 32.3 x 28.8 x 21.2 cm |
| Blender Dimensions (H x W x D) | Approx. 38.2 x 28.8 x 17.1 cm |
| Dry Mill Dimensions (H x W x D) | Approx. 26.4 x 28.8 x 17.1 cm |
| Weight (Juicer) | Approx. 3.2 kg |
| Weight (Blender) | Approx. 3.5 kg |
| Weight (Dry Mill) | Approx. 2.7 kg |
| Speed Settings | Two speeds (1, 2) and Pulse function |
| Safety Features | Safety lock, circuit breaker protection |
| Cleaning Method | Hand wash with soft sponge or brush; not dishwasher safe |
| Included Accessories | Cleaning brush, food pusher, juicer, blender, dry mill (P model) |
| Operation Rating (Juicer) | 2 min ON, 2 min OFF |
| Operation Rating (Blender) | 3 min ON, 1 min OFF |
| Operation Rating (Dry Mill) | 60 seconds at a time |
Frequently Asked Questions - MJ-M176 PANASONIC
User questions about MJ-M176 PANASONIC
0 question about this device. Answer the ones you know or ask your own.
Ask a new question about this device
Download the instructions for your Blender in PDF format for free! Find your manual MJ-M176 - PANASONIC and take your electronic device back in hand. On this page are published all the documents necessary for the use of your device. MJ-M176 by PANASONIC.
USER MANUAL MJ-M176 PANASONIC

Panasonic®
Operating Instructions
使用說明書
دستورالعمل طرز کار
تعليمات التشفيل
Juicer/Blender (Household Use)
榨汁/攪拌機(家庭用)
Parts Names and Handling Instructions....4-5
How to Use Juicer....6
How to Use Blender....7
How to Use Dry Mill 8
Circuit Breaker Protection....9
Safety Lock 9
How to Clean 10-11
Specifications back cover
Thank you for purchasing a Panasonic product.
This product is intended for household use only.
Please read these instructions carefully and follow safety precautions when using this product.
Before using this product, please give your special attention to "Precautions" (Page 2).
Please make sure the date and name of store of purchase on the Warranty and keep it with these Operating Instructions.
Table of Contents
Important Safety Precautions……2
Part Names and Handling Instructions……4-5
How to Use the Juicer……6
How to Use the Blender……7
How to Use the Dry Mill……8
Automatic Circuit Breaker……9
Protective Switch……9
Cleaning Methods……10-11
Specifications……Back Cover
- Before using this appliance, make sure the voltage and frequency indicated on the bottom surface match your local power supply.
- To protect against the risk of electric shock, do not put the motor housing, supply cord, or plug in water or other liquids.
- This appliance is not intended for use by persons (including children) with reduced physical, sensory, or mental capabilities, or lack of experience and knowledge, unless they have been given supervision or instruction concerning use of the appliance by a person responsible for their safety. Children should be supervised to ensure that they do not play with the appliance.
- Unplug this product from the wall outlet when not in use, before putting on or taking off parts, and before cleaning.
- Do not operate this appliance with a damaged cord or plug, or after the appliance malfunctions, or is dropped or damaged in any manner. Return the appliance to the nearest authorized service facility for examination, repair, or electrical or mechanical adjustment.
- If the supply cord is damaged, it must be replaced by the manufacturer, its service agent, or a similarly qualified person in order to avoid a hazard.
- Do not put your fingers or utensils such as spoons into the feeder opening or blender container during operation. If food becomes lodged in the feeder opening, use the food pusher or another piece of fruit or vegetable to push it down.
- Always operate the blender with the cover unit in place.
- Never place the container base on the motor housing without the container attached.
- Cutting blades are sharp. Handle carefully when emptying the container and during cleaning.
- Do not assemble when there is food residue left around the base of the spinner or in containers.
- Do not place hot ingredients (over 60°C) in the blender container.
- Do not use the appliance for any purpose other than its intended use.
- Do not use the juicer if the spinner is damaged.
- Discontinue using the appliance immediately and unplug it when abnormal or malfunction occurs.
1 Important Safety Instructions
2 Parts Names and Handling Instructions
Parts Names and Handling
Blender
Blender

Blender


Push cover unit up to open.
Push cover unit up to open.
Maximum amount approx. 1,000 ml
Maximum capacity
Approx. 1,000 ml
One scale approx. 200 ml
One scale approx. 200 ml
| English | 中文 | فأ رسي | عربي |
| 1 Cleaning brush2 Opening for brush3 Food pusher4 Feeder opening5 Container cover6 Spinner7 Juicer container8 Spout cover9 Cap10 Cover11 Cover unit12 Blender container13 Gasket14 Blender cutting blades15 Blender container base16 Motor housing17 Clamp18 Switch panel19 Cord*20 Plug21 Mill container22 Mill cutting blades23 Mill container base*The shape of plug may differ from illustration. | 1清潔刷2刷子用開口3壓料具4給料口5容器蓋6旋轉籃7榨汁機容器8出口蓋9罩子10蓋子11蓋子單元12攪拌機容器13襯墊14攪拌機切削刀15攪拌機容器底座16馬達機座17夾鉗18開關面板19電源線*20插頭21碾磨機容器22碾磨機切削刀23碾磨機容器底座*插頭形狀可能會與圖示有所不同。 | برس شستشوسرواخ برسفشار دهنده غذاسوراخ ورود غذادربوش ظرفدرويش 5jgrخنده5jprf آبمیوه گیردربوش مجاری خروچیکلاهکدربوشسرپوشمvcظه آسیابواشرتیغه های مخلوط کنپایه ظرف مخلوط کنمvcظه موتورگیرهصفحه کلیدسیم برقدوشاخهظرف آسیابتیغه های آسیابپایه ظفره آسیاب*شکل دوشاخه م carriers است از آچه نشان داده شده، متفAWت باشد. | 1 فرشاه التنظيف2 فتحة الفرشاه3 دافعة الطعام4 فتحة المغذی5 غطاء الوعاء6 مصفة العصر الدوارة7 وعاء العصارة8 غطاء مخرج العصر9 فلنسوة10 غطاء11 وحدة الغطاء12 وعاء الخライト13 حشوة منع التسرب14 شفرات تقطيع الخلاط15 قاعدة وعاء الخلاط16 حجرة المحرك17 مش Banks18 loحة الفاتيح19 سلك تزويد الطاقة20* قابس21 وعاء المطحنة22 شفرات تقطيع المطحنة23 قاعدة وعاء المطحنة* يمكن إن يختلف شكل القابس عن الرسم |
NOTE: When containers are not clamped or locked properly, the motor does not operate.
To assemble, follow the instructions in reverse order.
When assembling, follow the reverse order of the instructions.
2
3

1 Release clamps. Lift up the juicer container.
Release the clamps and lift up the juicer container.
2 Remove container cover. Remove spinner.
Remove the container cover. Remove the spinner.
3 Remove spout cover.
- The spout cover cannot be taken off when the container cover is on. Remove the spout cover.
- When the container cover is on, the spout cover cannot be removed.
CAUTION:
- Be sure to attach the container to the corresponding container base.
- Be sure to attach the gasket when assembling the blender container.
- Do not attach or remove the container after the container base is placed on the motor housing; the motor does not operate.
Caution:
2
3

4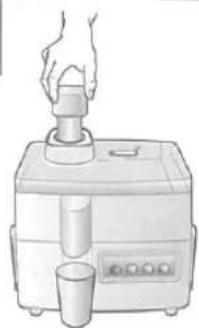
5

1 Wash and cut ingredients to fit in feeder opening.
Wash and cut ingredients to fit in feeder opening.
2 Make sure the clamps are locked in position.
Place glass or bowl under spout.
- If juicer container is not clamped correctly, motor does not operate. Make sure the clamps are locked in position. Place glass or bowl under spout.
- If juicer container is not clamped correctly, motor does not operate.
Plug in. Press button "2".
Plug in. Press button "2".
Button "1" is not suitable for juicer usage.
If button "1" is pressed, the juicer will vibrate during the initial operation.
Note:
Button "1" is not suitable for use with the juicer.
4 Push ingredients into feeder opening by using food pusher.
Use the food pusher to push ingredients into the feed opening.
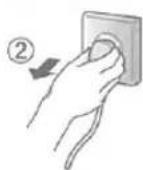
5 After use, press button "0" (off). Unplug.
- When unplugging, grip the plug and pull from the wall outlet. Never pull on the cord. After use, press the "0" button (off). Unplug.
- Ingredients not recommended: Soft fruits such as bananas, peaches, or apricots, as they produce a puree and could clog the spinner. Empty the container when food residue accumulates, as it may get into the juice or cause malfunction.
2

3


4


5


1 Attach the container and container base first and place it on the motor housing. Twist the container clockwise to lock.
2 Place ingredients in the container. Cover.
3 Plug in. Select one of the two speed buttons as required. Use the "PULSE" button for precision blending.
Plug in. Select one of the two speed buttons as required.
4 When adding ingredients or seasonings, remove the cap as shown on the left. Be sure to attach the cap again.
5 After blending, press button "0" (off). Unplug.
- When unplugging, grip the plug and pull from the wall outlet. Never pull on the cord.
5 How to Use Dry Mill
How to Use the Dry Mill
2

3

4

5


1 Place ingredients in the mill container, then attach the mill container base.
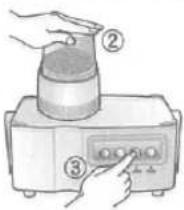
2 Place the container on the motor housing. Twist the container clockwise to lock.
4 When grinding is completed, press button "0" (off).
- Be sure to support the container until the motor stops completely.
When grinding is finished, press the "0" button (off).
• Maximum capacity: 50 g ● Prohibited ingredients: wet ingredients, liquids, or solid ingredients such as turmeric - Do not operate with the container empty. - Do not operate for more than 60 seconds at a time. - Reduce ingredients if the appliance makes abnormal sounds or vibrates during operation.
- Maximum capacity: 50 g
When the circuit breaker automatically stops the motor due to overloading, press the "0" button and follow the directions below.
Remove food residue from the container. AND/OR Cut ingredients into smaller pieces and push them into the feeder gently. Resume operation.
Reduce ingredients to less than half. Resume operation. If it still does not start, press "0" (Off) again, then resume.
The safety lock has been designed to prevent the blender or dry mill from switching on when the container is not properly in place.
Do not push the safety lock pin with any implement, stick, etc.
When the slide ring on the back of each container base is pushed during assembling, the motor does not operate.
Attach the container to the container base properly.
After setting, make sure the backside of the container base is as shown in the O illustration.
Assemble the container and container base correctly.
None of the three pins sticks out. None of the three pins should protrude.
More than one pin sticks out.
Reattach the container again.
One or more pins protrude.
Reattach the container again.
Before cleaning, unplug. Cutting blades are sharp. Handle carefully when emptying the container and during cleaning. Use cold water or lukewarm water. Do not use cleansers, steel wool pads, or other abrasive materials. Do not use benzene, thinner, alcohol, etc. These parts are not dishwasher safe. Some discoloration of the spinner, cover, or the interior of the container may occur with use.
Caution
Wash carefully with a brush under running water.
Wash carefully with a brush under running water.
Wash each part in cold or lukewarm water with a soft sponge. Rinse and dry thoroughly.

Remove food residue with a brush. Do not use water.
Remove food residue with a brush.
Do not use water.
Wash in cold or lukewarm water with a soft sponge. Rinse and dry thoroughly.
Wipe off with a damp cloth.
Wipe off with a damp cloth.
Remove food residue from spinner
2
3
4


1 Fill the bottle with water. Attach brush unit.
- Do not use the cleaning brush without water filled in the bottle.
Fill the bottle with water. Install the brush unit.
2 Place a glass or bowl under spout. Plug in. Press button "2".
3 Insert brush in cover opening, then move it back and forth while squirting water from the bottle.
- Do not switch on / off while the brush is inserted, or the spinner will be damaged.
4. After removing the brush, press button "0" (off). Unplug.
Take spinner out and rinse it. Clean the brush unit.
Wash carefully with a brush under running water.
Wash carefully with a brush under running water.
Wash each part in cold or lukewarm water, wipe off and let it dry before storing.
| Using Juicer | Using Blender | Using Dry mill (MJ-M176P only) | |
| Power supply | 220 - 240 V 50 - 60 Hz | ||
| Power consumption | 210 - 230 W | ||
| Operation rating | Continuous(Repetition 2 min. ON, 2 min. OFF) | Continuous(Repetition 3 min. ON, 1 min. OFF) | Continuous(60 seconds at a time) |
| Container capacity | — | Maximum 1,000 ml | Maximum 50 g |
| Dimensions (H x W x D) | approx. 32.3 x 28.8 x 21.2 cm | approx. 38.2 x 28.8 x 17.1cm | approx. 26.4 x 28.8 x 17.1 cm |
| Weight | approx. 3.2 kg | approx. 3.5 kg | approx. 2.7 kg |
| Attachment | Cleaning brush | ||
You can identify the date of manufacturing by production number which is marked on back side of the unit.
Production number X XX xxx
Second and third digits: month (in number) 01--January, 02--February, ...12--December First digit: year (last digit of the year in number) 0--2010, 1--2011, 2--2012
This operating instructions shall be kept as they contain important information.
In case of failure or damage
Do not operate any appliance with a damaged cord or plug, or after the appliance malfunctions, or is dropped or damaged in any manner. Return the appliance to the nearest authorized service facility for examination, repair, or electrical or mechanical adjustment.


- PANASONIC®
- OPERATING INSTRUCTIONS
- 使用說明書
- TABLE OF CONTENTS
- IMPORTANT SAFETY INSTRUCTIONS
- PARTS NAMES AND HANDLING INSTRUCTIONS
- PARTS NAMES AND HANDLING
- CAUTION
- WASH AND CUT INGREDIENTS TO FIT IN FEEDER OPENING
- MAKE SURE THE CLAMPS ARE LOCKED IN POSITION
- PLUG IN. PRESS BUTTON
- PUSH INGREDIENTS INTO FEEDER OPENING BY USING FOOD PUSHER
- AFTER USE, PRESS BUTTON "0" (OFF). UNPLUG
- HOW TO USE DRY MILL
- HOW TO USE THE DRY MILL
- PLACE INGREDIENTS IN THE MILL CONTAINER, THEN ATTACH THE MILL CONTAINER BASE
- PLACE THE CONTAINER ON THE MOTOR HOUSING. TWIST THE CONTAINER CLOCKWISE TO LOCK
- WHEN GRINDING IS COMPLETED, PRESS BUTTON "0" (OFF)
- REMOVE FOOD RESIDUE FROM SPINNER
- FILL THE BOTTLE WITH WATER. ATTACH BRUSH UNIT
- PLACE A GLASS OR BOWL UNDER SPOUT. PLUG IN. PRESS BUTTON
- INSERT BRUSH IN COVER OPENING, THEN MOVE IT BACK AND FORTH WHILE SQUIRTING WATER FROM THE BOTTLE
- AFTER REMOVING THE BRUSH, PRESS BUTTON "0" (OFF). UNPLUG
- IN CASE OF FAILURE OR DAMAGE
Brand : PANASONIC
Model : MJ-M176
Category : Blender