
CDR362 - Receiver JENSEN - Free user manual and instructions
Find the device manual for free CDR362 JENSEN in PDF.


| Product Type | Car Stereo Receiver |
| Brand | Jensen |
| Model | CDR362 |
| Dimensions (W x H x D) | 7.0 x 2.0 x 6.3 inches (178 x 50 x 160 mm) |
| Weight | 1.5 lbs (0.68 kg) |
| Power Supply | 12V DC (vehicle battery) |
| Maximum Power Output | 4 x 45 Watts |
| FM Tuner Range | 87.5 – 107.9 MHz |
| AM Tuner Range | 530 – 1710 kHz |
| CD Playback | CD, CD-R, CD-RW |
| Auxiliary Input | Front 3.5mm stereo jack |
| USB Port | Yes (MP3 playback) |
| Front Panel | Detachable, anti-theft |
| Display | LCD with white backlight |
| Controls | Rotary volume, push buttons |
| Preset Equalizer | Multiple presets (Rock, Pop, etc.) |
| Clock | 24-hour display |
| RDS | Radio Data System support |
| Maintenance | Clean with soft dry cloth; mild detergent if needed |
| Safety | Fuse protection (10A ATC), detachable face |
| Included Accessories | Mounting sleeve, trim ring, wiring harness, manual (36 pages) |
| Repairability | User-replaceable fuse; internal repair by qualified technician |
Frequently Asked Questions - CDR362 JENSEN
User questions about CDR362 JENSEN
0 question about this device. Answer the ones you know or ask your own.
Ask a new question about this device
Download the instructions for your Receiver in PDF format for free! Find your manual CDR362 - JENSEN and take your electronic device back in hand. On this page are published all the documents necessary for the use of your device. CDR362 by JENSEN.
USER MANUAL CDR362 JENSEN
CDR362
6.2" Double DIN Multimedia Receiver
AM-FM / DVD / Pandora / Bluetooth / iPhone® - iPod®/SiriusXM-Ready / USB / AV In / Rear Camera In
INSTALLATION & OWNER'S MANUAL
Preparation
Please read entire manual before installation.
Before You Start
- Disconnect negative battery terminal. Consult a qualified technician for instructions.
- Avoid installing the unit where it would be subject to high temperatures, such as from direct sunlight, or where it would be subject to dust, dirt or excessive vibration.
Getting Started
- Remove trim ring from unit.
- Remove 2 transit screws located on top of the unit.
- Insert the supplied keys into the slots as shown, and slide the unit out of the mounting sleeve.
• Install mounting sleeve into opening, bending tabs to secure. - Connect wiring harness and antenna. Consult a qualified technician if you are unsure.
- Certain vehicles may require an installation kit and/or wiring harness adapter (sold separately).
- Test for correct operation and slide into mounting sleeve to secure.
- Snap trim ring into place.
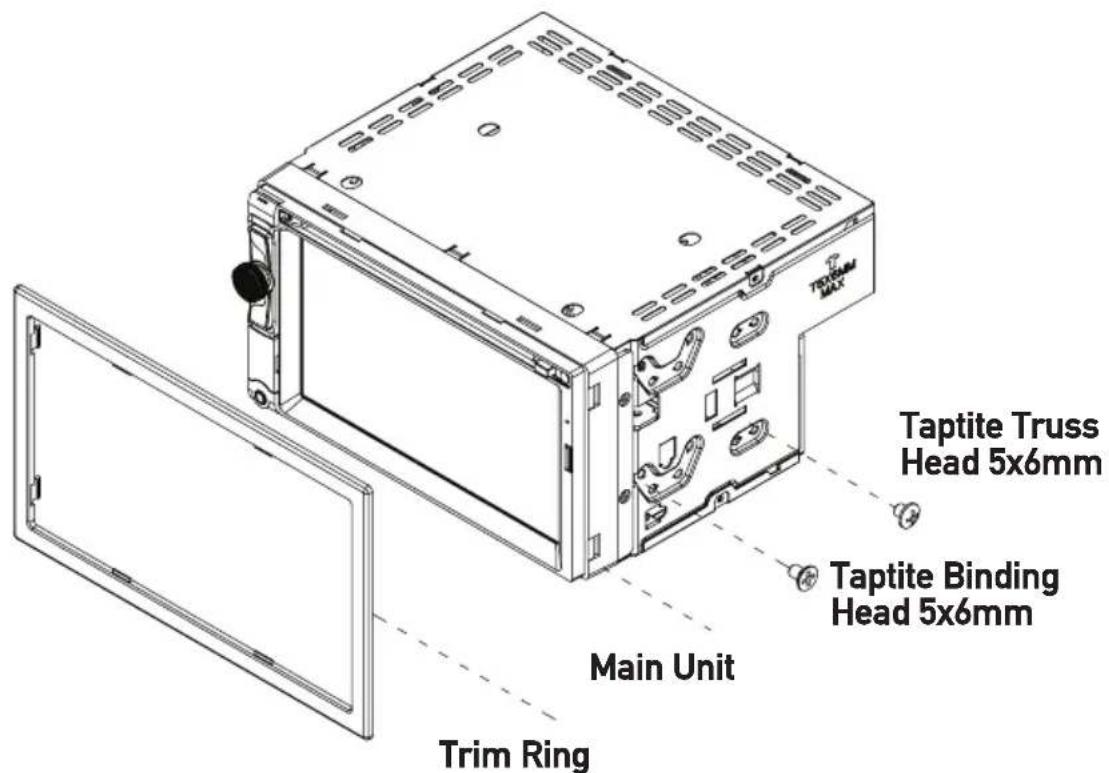
TYPICAL FRONT-LOAD DIN MOUNTING METHOD
Wiring Diagram
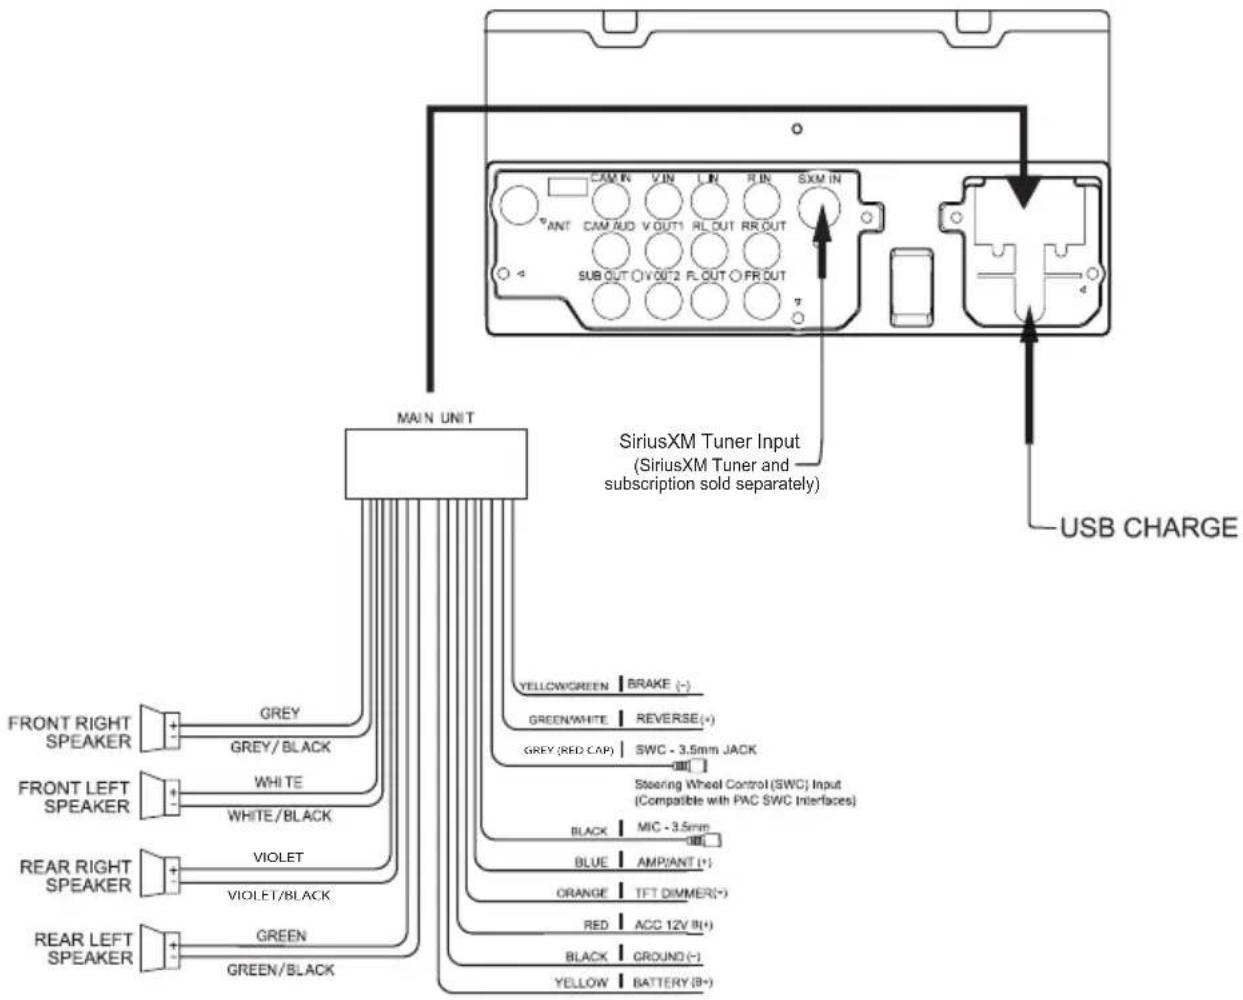
Note:
When replacing a fuse, make sure to use the correct type and amperage. Using an incorrect fuse could cause damage. The unit uses (1) 10 amp blade-type fuse located on the back of the unit.
Wiring Notes:
Rear camera input
A rear view camera (not included) can be used with the Camera input.
SiriusXM
For more information on how to install the SiriusXM Connect Vehicle tuner, consult the installation guide included with the tuner (SiriusXM connect tuner and subscription sold separately).
Control Locations
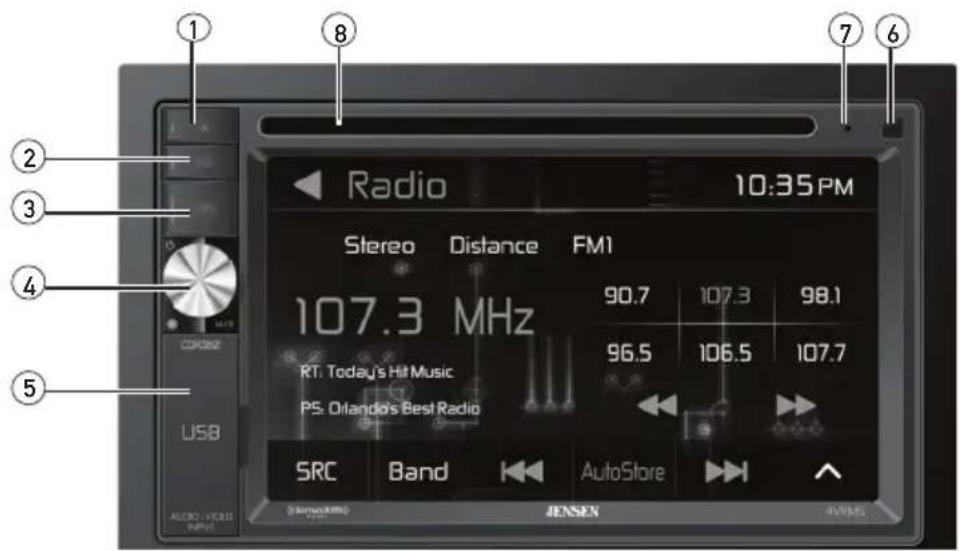
① Eject
⑤ Additional Inputs (USB, AV)
② EQ
⑥ IR Remote Sensor
③ Source
⑦ Reset Button
④ Power / Volume / Mute
⑧ Disc Slot
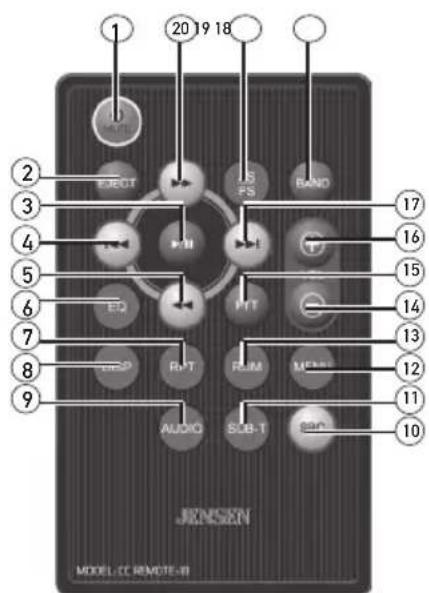
① Power / Mute
⑪ Subtitle
② Eject
⑫ Menu
③ Play / Pause
⑬ Random
④ Tune / Track Down
⑭ Volume Down
⑤ Previous
⑮ PTT
6 EQ
⑯ Volume Up
⑦ Repeat
⑰ Tune / Track Up
⑧ Display
18 Band
⑨ Audio
⑲ AS/PS
⑩ Source
20 Next
General Operation
Power On/Off
Source
Press 🔒 or any other button (except Eject) to turn the unit on. Press and hold 🔒 to turn the unit off.
Press SRC to access available input modes: Radio, Disc, Pandora, USB, Bluetooth Phone, Bluetooth Audio, SiriusXM, AV In 1, AV In 2, Camera and Settings. Disc or USB device must be connected/inserted to appear in the mode selection string.
Volume
Mute
Rotate the volume knob to increase or decrease the volume level.
Momentarily press ⏻ to silence the audio. Momentarily press ⏻ again to return to the previously selected volume. Rotating the volume knob while the muted will also cancel the mute function.
Auxiliary Input
USB Port
Connect external audio devices to the 3.5mm auxiliary input on the front panel.
Connect a USB device to the USB port on the front panel to play MP3 files or view AVI, MP4 video files or JPG photos.
Main Menu
From any operational mode, press the arrow icon in the top left corner to access the Main Menu screen. Use the right and left arrows in the bottom corners to navigate between the two Main Menu screens, and touch any icon to directly access the corresponding mode.
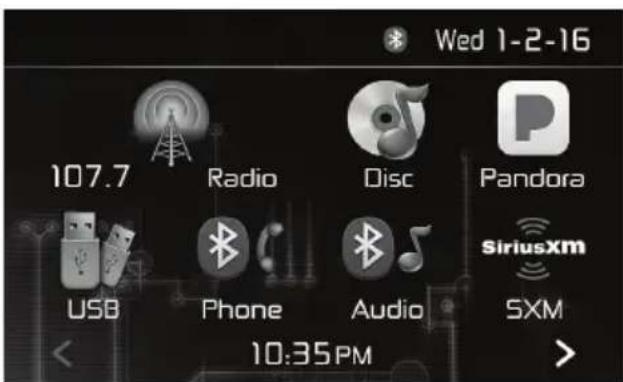
General Operation
Setup Menu
From the Main Menu screen, press Settings in the bottom right corner to access the Setup Menu and select from the following categories: General, Time, Display, Panel, Disc, Radio, General, Illumination, Wallpaper and Version.
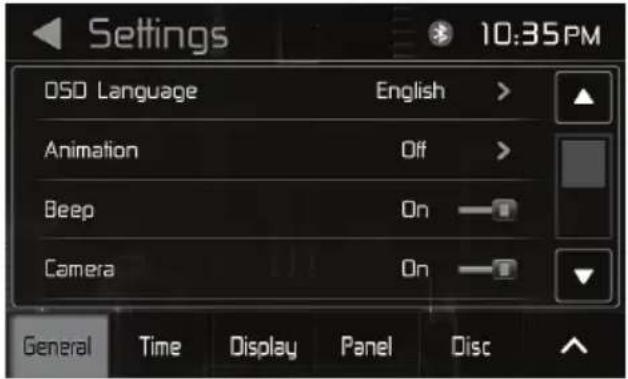
After accessing the desired category, press the up/down arrows to navigate all the category options and use the touch screen to adjust each option.
General:
- OSD Language - Select English as the language for the on-screen display.
- SRC - Select to choose the desired source for each option: SRC1, SRC2, SRC3 and SRC4.
- Beep - Select to turn the audible beep On or Off.
- Camera - Select to turn the camera On or Off.
- Parking Guideline - Select to turn parking guidelines On or Off.
Time:
- Set the year, month and day, select between a 12-hour and 24-hour clock display and set the hour and minute for the clock display.
Display:
- Adjust the following display options (-20 to 20): Brightness, Contrast, Hue, Saturation and Sharpness.
Panel:
- Dimmer - Turn the dimmer On or Off.
- Dimmer Level - Select between Level 1, Level 2 or Level 3.
- Panel Adjust - Press and follow the prompts to calibrate the touch screen.
Disc:
• Audio Language - Select desired language for audio.
- Subtitle Language - Select desired language for subtitles.
- Menu Language - Select desired language for the menus.
- Aspect Ratio - Select from the following ratios: 4:3PS, 4:3LB and 16:9.
- Change Password - Select and follow the prompts to change password.
- Rating - Select specific parental control rating, if desired.
General Operation
Setup Menu
Radio:
- Dual - Select between Stereo and Mono operation.
- Local - Select between Local and Distance tuning
- Areea - Select between Europe, USA, American1 American 2 and OIRT.
• RDS - Select On or Off.
• RDS Region - Select On or Off.
• PI - Select Sound or Mute.
• TA - Select to turn traffic announcements On or Off. - AF - Select to turn alternative frequencies On or Off.
- Radio Text - Select to turn radio text On or Off.
- Clock Sync - Select to turn clock sync On or Off.
- Traffic Volume - Select to turn traffic volume On or Off.
Bluetooth:
- Bluetooth - Turn Bluetooth On or Off.
- Auto Connect - Select On to program the unit to automatically connect to available Bluetooth devices.
- Auto Answer - Select On to program the unit to automatically answer incoming calls using Bluetooth.
• Auto Load Record - Turn auto load record On or Off. - Auto Load Phonebook - Select On to automatically load the phonebook from your phone.
- Change PIN - Select to change the PIN.
SXM:
- Change Password - Press and follow the prompts to change the unit's password.
Illumination:
- Press to adjust color settings for illumination.
Wallpaper:
- Press to select a wallpaper for the on-screen display.
Version:
- Press to display version numbers or to restore the unit to factory default settings.
Radio Operation
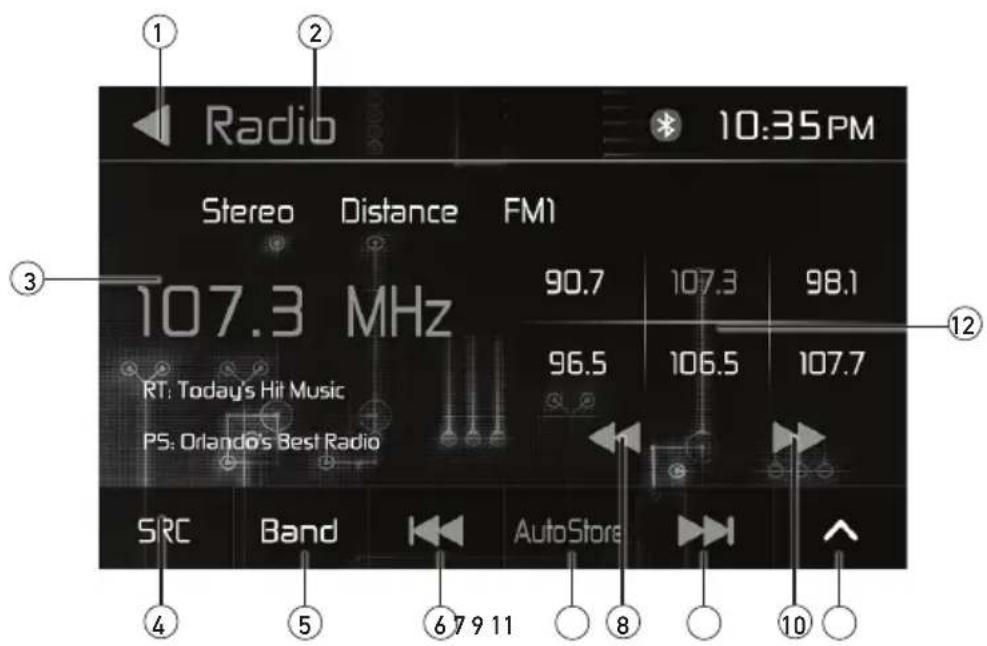
| Radio Operation | Select the Radio icon from the Main Menu screen. |
| Main Menu 1 | Press to return to Main Menu screen. |
| Current Mode Indicator 2 | Displays current mode of operation. |
| Current Frequency 3 | Displays current frequency. |
| Source 4 | Press to view and select available sources. |
| Band 5 | Press to select between 3 FM and 2 AM bands. |
| Seek Tune Down 6 | Press to tune down by seeking the next strong station. |
| Auto Store 7 | Press to automatically store the six strongest stations in the current band as presets. |
| Manually Tune Down 8 | Press momentarily to tune the unit down one step at a time. |
| Manually Tune Up 9 | Press momentarily to tune the unit up one step at a time. |
| Seek Tune Up 10 | Press to tune up by seeking the next strong station. |
| Additional Options 11 | Press to view additional options. |
| Preset Stations 12 | To store a preset station, tune unit to desired station, then press and hold the desired preset button to store the current station in that preset spot. Up to 18 FM and 12 AM stations can be stored in memory. Momentarily press any preset station to play it instantly. |
Radio Operation
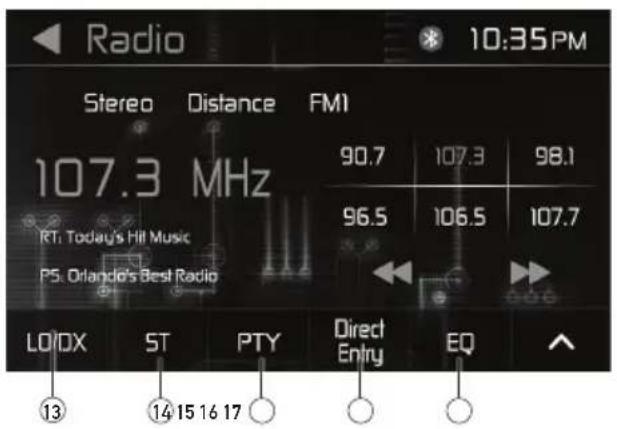
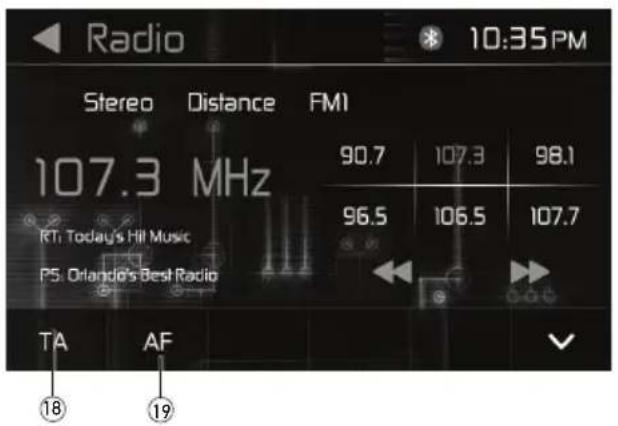
Local / Distance 13
Mono / Stereo 14
Program Type 15
Direct Entry 16
EQ 17
Press to select between Local or Distance tuning.
Press to select Stereo or Mono operation.
Press to view and select a station category, and the unit will automatically seek stations with that type of programming.
Press to directly enter the desired station number and begin playback of that station.
Press to enter the Audio Settings menu and adjust the following audio options:
- EQ - Use the touch screen to adjust equalization curvesn to suit individual listening preferences. The following equalizer frequencies are available for adjustment: 80Hz, 160Hz, 320Hz, 600Hz, 1kHz, 3kHz, 8kHz and 16kHz. An adjustment range of +16dB to -16dB is available for each frequency band.
- Fader-Balance - Use the touch screen to adjust the balance of the audio output levels throughout the vehicle. The fader adjusts levels front to back, and the balance adjust from left to right.
- Audio - Use the touch screen to adjust the following options: Subwoofer (On or Off), Subwoofer Frequency (80Hz, 120Hz or 160Hz), Loudness (On or Off) and Loudness Center Frequency (400Hz, 800Hz or 2400Hz).
- SRC Level - Adjust audio levels for each audio source (Disc. USB, etc.)
Traffic Announcements 18
Alternative Frequencies ⑲
Press to turn the Traffic Announcements feature On or Off.
Press to turn the Alternative Frequencies feature On or Off.
CD Operation
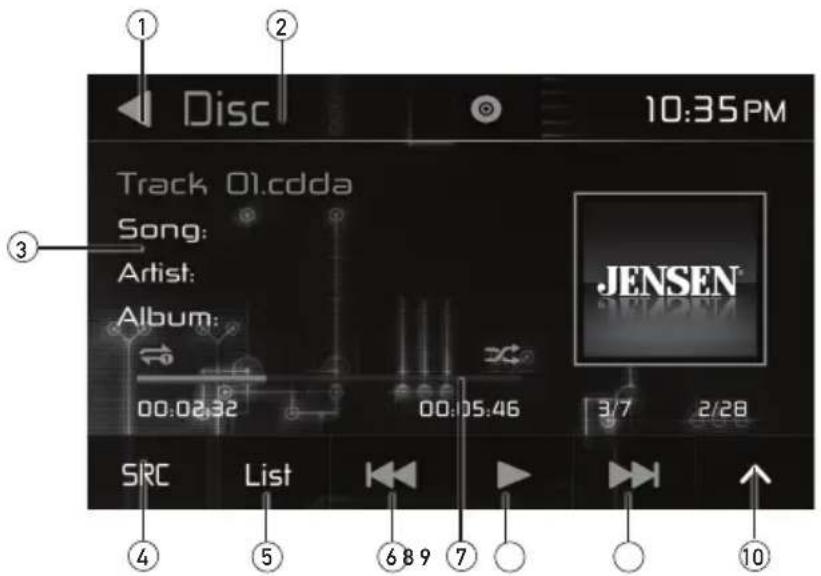
CD Operation
Insert a disc (label facing up), and playback will begin automatically. To switch to CD mode from another mode of operation when a disc is already inserted, select the Disc icon from the Main Menu screen.
Main Menu ①
Press to return to Main Menu screen.
Current Mode Indicator ②
Displays current mode of operation.
File Information ③
Displays information about the current track, including track number, song title, artist name and album name.
Source ④
Press to view and select available sources.
List ⑤
Press to view a list of files on the disc. Use the up/down arrows to scroll through the list, then press the file name twice to begin playback of that track. When searching all tracks, Order will appear on the right side of the screen. Press this button to switch to viewing tracks by Folder, then press the desired folder name twice to view only the tracks contained in that folder.
Previous Track 6
When viewing file lists, the unit will show music lists by default. To view lists of photo or video files, press the corresponding icon on the bottom of the screen.
Elapsed Time ⑦
Press to return to the previous track. Press and hold to skip to the beginning of the current track.
Play/Pause⑧
Displays the elapsed time and time remaining for the current track.
Next Track ⑨
Press to stop or restart playback.
Additional Options 10
Press to advance to the next track.
Press to display additional options.
CD Operation
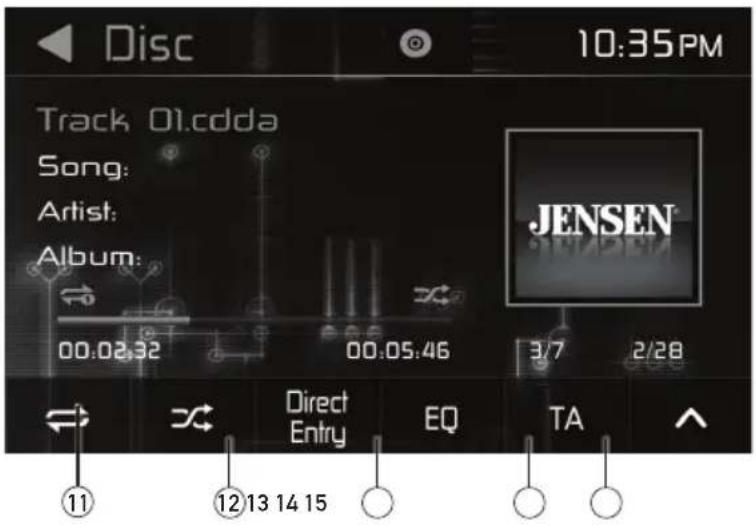
Repeat ⑪
Random 12
Direct Entry 13
EQ 14
Press to select one of the following option for Repeat play: Repeat 1, Repeat Folder, Repeat All or Repeat Off.
Press to turn Random playback On or Off.
Press to directly enter a folder (optional) and track number to begin playback of specific track.
Press to enter the Audio Settings menu and adjust the following audio options:
- EQ - Use the touch screen to adjust equalization curves to suit individual listening preferences. The following equalizer frequencies are available for adjustment: 80Hz, 160Hz, 320Hz, 600Hz, 1kHz, 3kHz, 8kHz and 16kHz. An adjustment range of +16dB to -16dB is available for each frequency band.
- Fader-Balance - Use the touch screen to adjust the balance of the audio output levels throughout the vehicle. The fader adjusts levels front to back, and the balance adjust from left to right.
- Audio - Use the touch screen to adjust the following options: Subwoofer (On or Off), Subwoofer Frequency (80Hz, 120Hz or 160Hz), Loudness (On or Off) and Loudness Center Frequency (400Hz, 800Hz or 2400Hz).
- SRC Level - Adjust audio levels for each audio source (Disc, USB, etc.)
Traffic Announcements 15
Press to turn the Traffic Announcements feature On or Off.
USB Operation
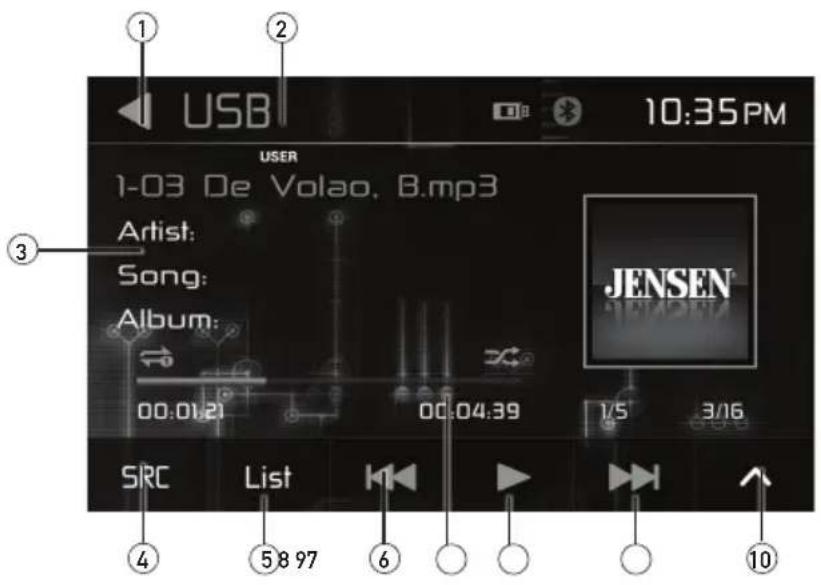
USB Operation
Connect a USB device, and playback will begin automatically. To switch to USB mode from another mode of operation when a device is already inserted, select the Disc icon from the Main Menu screen.
Main Menu ①
Press to return to Main Menu screen.
Current Mode Indicator ②
Displays current mode of operation.
File Information ③
Displays information about the current file, including file name, song title, artist name and album name.
Source ④
Press to view and select available sources.
List 5
Press to view a list of files on the device. Use the up/down arrows to scroll through the list, then press the file name twice to begin playback of that file. When searching all files, Order will appear on the right side of the screen. Press this button to switch to viewing files by Folder, then press the desired folder name twice to view only the files contained in that folder. When viewing file lists, the unit will show music lists by default. To view lists of photo or video files, press the corresponding icon on the bottom of the screen.
Previous File 6
Press to return to the previous file. Press and hold to skip to the beginning of the current file.
Elapsed Time ⑦
Displays the elapsed time and time remaining for the current file.
Play/Pause ⑧
Press to stop or restart playback.
Next File ⑨
Press to advance to the next file.
Additional Options 10
Press to display additional options.
USB Operation
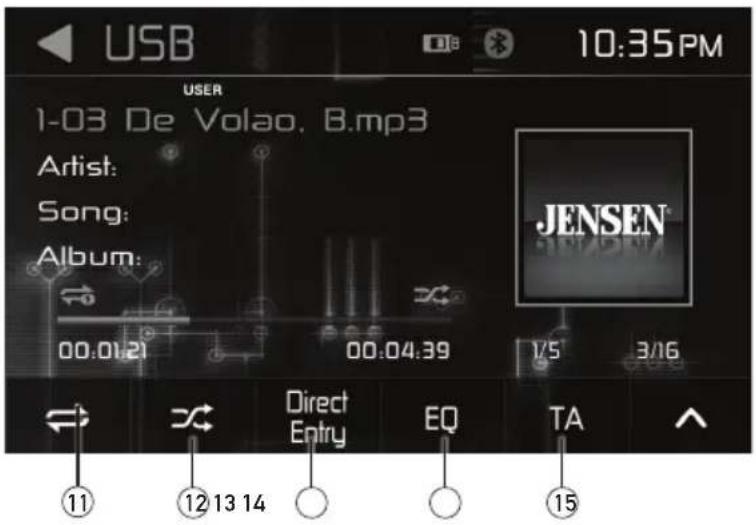
Repeat ⑪
Random 12
Direct Entry 13
EQ 14
Press to select one of the following option for Repeat play: Repeat 1, Repeat Folder, Repeat All or Repeat Off.
Press to enable or disable random playback.
Press to directly enter a folder (optional) and file number to begin playback of specific file.
Press to enter the Audio Settings menu and adjust the following audio options:
- EQ - Use the touch screen to adjust equalization curves to suit individual listening preferences. The following equalizer frequencies are available for adjustment: 80Hz, 160Hz, 320Hz, 600Hz, 1kHz, 3kHz, 8kHz and 16kHz. An adjustment range of +16dB to -16dB is available for each frequency band.
- Fader-Balance - Use the touch screen to adjust the balance of the audio output levels throughout the vehicle. The fader adjusts levels front to back, and the balance adjust from left to right.
- Audio - Use the touch screen to adjust the following options: Subwoofer (On or Off), Subwoofer Frequency (80Hz, 120Hz or 160Hz), Loudness (On or Off) and Loudness Center Frequency (400Hz, 800Hz or 2400Hz).
- SRC Level - Adjust audio levels for each audio source (Disc, USB, etc.)
Traffic Announcements 14
Press to turn the Traffic Announcements feature On or Off.
iPod Operation
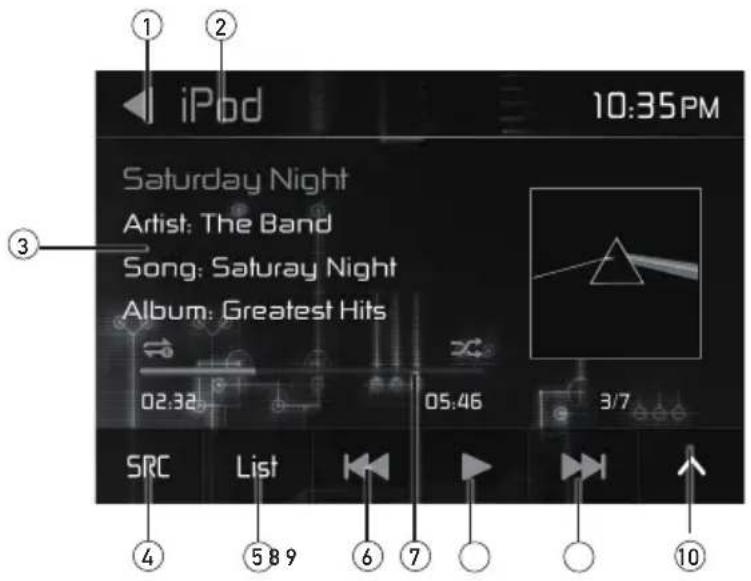
iPod Operation
The unit will automatically switch to iPod® mode when an iPod® or iPhone® is plugged into the front panel USB connector. iPod® mode can be accessed from the Main Menu by touching the iPod® icon (only available when an iPod® or iPhone® is connected).
Note: For audio playback, the iPod® / iPhone® must be connected using the iPod® / iPhone® adapter cable that came with the iPod / iPhone device (also available separately). Be sure your device has the latest Apple firmware installed to avoid connectivity issues.
Main Menu ①
Press to return to Main Menu screen.
Current Mode Indicator ②
Displays current mode of operation.
File Information ③
Displays information about the current file, including file name, song title, artist name and album name.
Source 4
Press to view and select available sources.
List 5
Press to view a list of files on the device. Use the up/down arrows to scroll through the list of categories to view files by Playlist, Artist, Album, Genres, Song, Composers or Audiobooks. Press the desired category name twice to view and select from all files in that category.
Previous File 6
Press to return to the previous file. Press and hold to skip to the beginning of the current file.
Elapsed Time ⑦
Displays the elapsed time and time remaining for the current file.
Play/Pause 8
Press to stop or restart playback.
Next File ⑨
Press to advance to the next file.
Additional Options 10
Press to display additional options.
iPod Operation
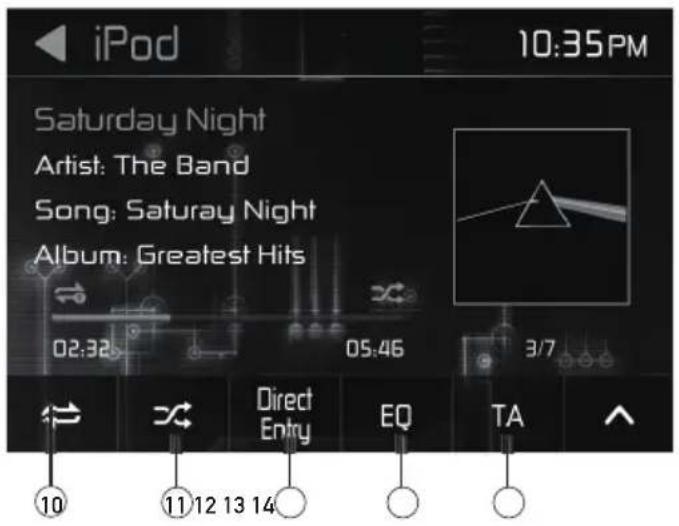
Repeat 10
Press to select one of the following option for Repeat play: Repeat 1, Repeat Folder, Repeat All or Repeat Off.
Random ⑪
Press to enable or disable random playback.
Direct Entry 12
Press to directly enter a folder (optional) and track number to begin playback of specific track.
EQ 13
Press to enter the Audio Settings menu and adjust the following audio options:
- EQ - Use the touch screen to adjust equalization curves to suit individual listening preferences. The following equalizer frequencies are available for adjustment: 80Hz, 160Hz, 320Hz, 600Hz, 1kHz, 3kHz, 8kHz and 16kHz. An adjustment range of +16dB to -16dB is available for each frequency band.
- Fader-Balance - Use the touch screen to adjust the balance of the audio output levels throughout the vehicle. The fader adjusts levels front to back, and the balance adjust from left to right.
- Audio - Use the touch screen to adjust the following options: Subwoofer (On or Off), Subwoofer Frequency (80Hz, 120Hz or 160Hz), Loudness (On or Off) and Loudness Center Frequency (400Hz, 800Hz or 2400Hz).
- SRC Level - Adjust audio levels for each audio source (Disc, USB, etc.)
Traffic Announcements 14
Press to turn the Traffic Announcements feature On or Off.
Pandora Operation
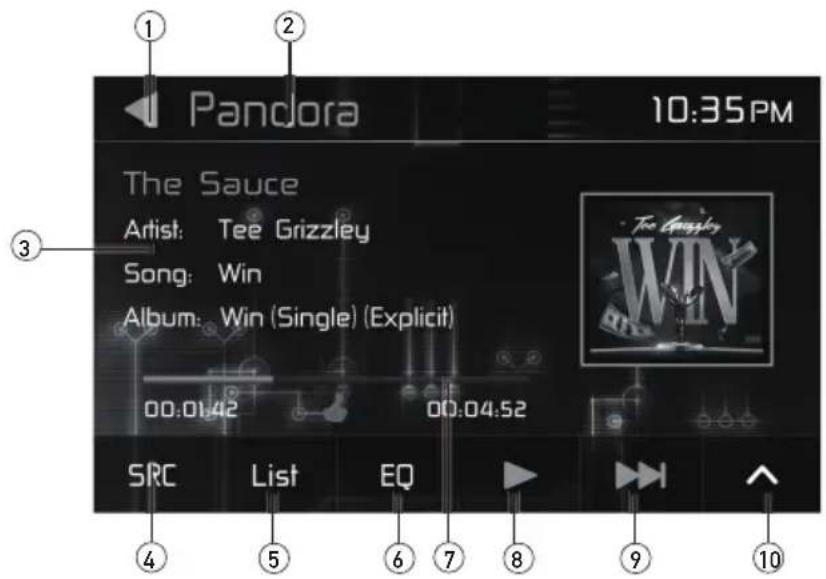
Pandora Operation
Pandora Radio is available (in the United States, Australia and New Zealand) on your iPhone® - iPod® touch via USB cable or an Android™ device via Bluetooth. Data usage may occur. Note: The Pandora Radio app must be installed on your device.
Main Menu ①
Press to return to Main Menu screen.
Current Mode Indicator ②
Displays current mode of operation.
Information Display ③
Displays information about the current song, including Station Name, Song Title, Artist Name and Album Name.
Source 4
Press to view and select available sources.
Station List⑤
Press to search for music by stations you created. Use the up/down arrows to navigate the list, then press a station name to access that station. Press Recent to see only recent stations.
EQ 6
Press to enter the Audio Settings menu and adjust the following audio options:
- EQ - Use the touch screen to adjust equalization curves to suit individual listening preferences.
- Fader-Balance - Use the touch screen to adjust the balance of the audio output levels throughout the vehicle.
- Audio - Use the touch screen to adjust the following options: Subwoofer (On or Off), Subwoofer Frequency (80Hz, 120Hz or 160Hz), Loudness (On or Off)
- SRC Level - Adjust audio for each audio source (Disc, USB, etc.)
Elapsed Time ⑦
Displays the elapsed time and time remaining for the current file.
Play / Pause ⑧
Press to pause or resume playback.
Skip ⑨
Press to skip to the next song (subject to Pandora's skip limit).
Additional Options 10
Press to view additional options.
Pandora Operation
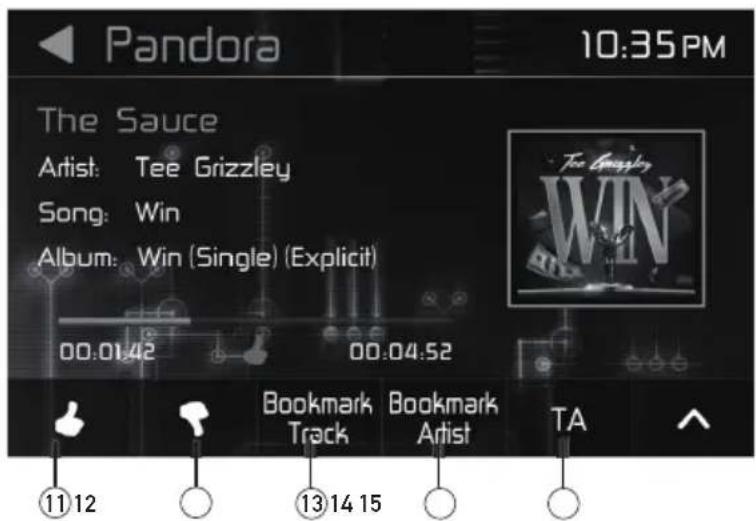
Bookmark Track ⑪
Press to tell Pandora you like the track currently playing, and Pandora will play more tracks like it.
Bookmark Artist 12
Press thumbs down to tell Pandora you do not like the track. The track will be skipped, if possible, and your feedback will be recorded.
Bookmark Track 13
Press to bookmark a track.
Bookmark Artist 14
Press to bookmark an artist.
Bookmark Artist 15
Press to turn the Traffic Announcements feature On or Off.
Bluetooth Operation
Preparation
Pairing a New Device
Connecting a Paired Device
Bluetooth Phone
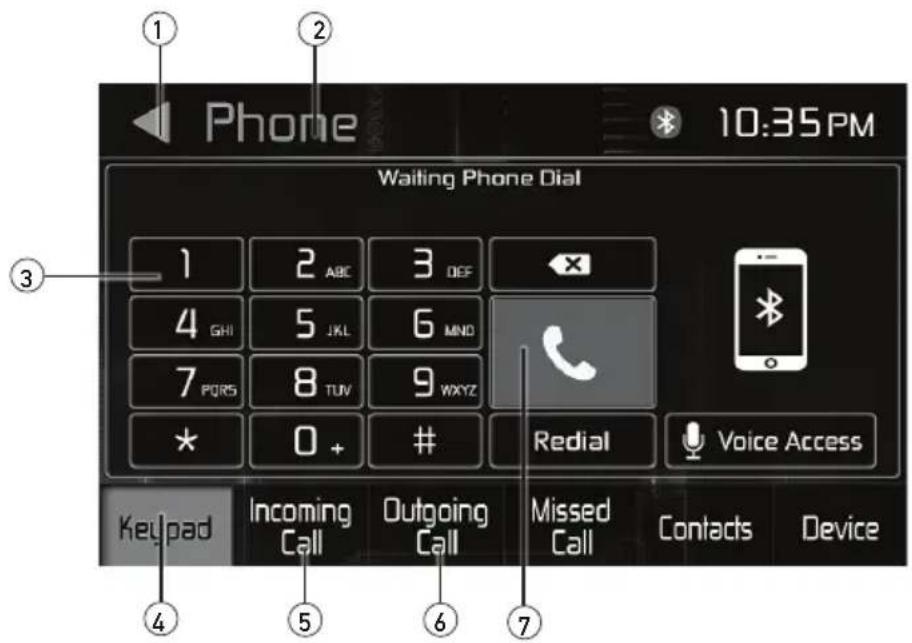
Main Menu ①
Current Mode Indicator ②
Phone Keypad ③
Keypad ④
Incoming Call ⑤
Outgoing Call 6
Connect or End Call ⑦
Before you can use a Bluetooth device, it must be paired and connected. Make sure that Bluetooth is activated on your device before you begin the pairing process.
The unit broadcasts the pairing signal constantly when no devices are currently connected. Complete the pairing sequence from your Bluetooth device. Refer to the owner's manual for your device for more details. The device name is "JENSEN". The Bluetooth passcode "5309". The unit can be in any mode of operation when pairing is performed.
Most Bluetooth devices support the auto-connect feature and will connect automatically if the device is in range when the unit is powered-on. If your device was previously paired but does not connect, enter the Bluetooth setup menu and ensure that Auto Connect is On.
To access the phone, select Bluetooth Phone from the Main Menu.
Press to return to the Main Menu screen.
Displays current mode of operation.
Use the phone keypad to dial the desired phone number. Alternately, numbers can be dialed directly from the phone.
Press to display keypad and dial a number.
Press to display a list of received calls. Use the up/down arrows to scroll through the list, and press desired number to connect a call.
Press to display a list of outing calls. Use the up/down arrows to scroll through the list, and press desired number to connect a call.
Press after dialing a number to connect a call. Press during a phone call to end the call.
Bluetooth Operation
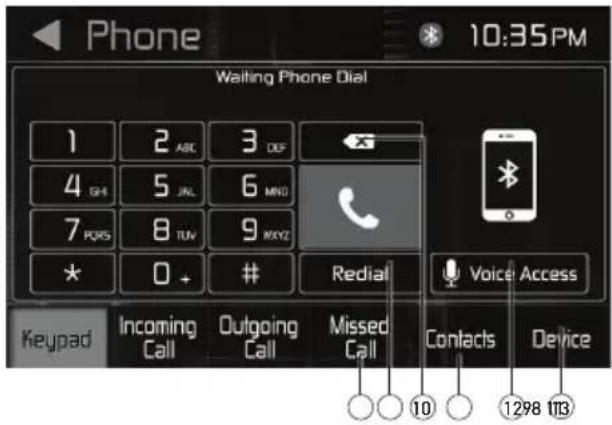
Missed Call ⑧
Redial 9
Backspace 10
Contacts 11
Press to display a list of missed calls. Use the up/down arrows to scroll through the list, and press desired number to connect a call.
Press to redial the most recently-dialed number.
When dialing the number, press to backspace when needed.
Press to display a list of stored contacts. Use the up/down arrows to scroll through the list, and press desired number to connect a call. The keypad on the left side of the screen allows direct entry of a contact name for quicker access.
Voice Access 12
Press to access Siri or Google Voice through the head unit when connected via Bluetooth. Your phone must support Siri or Google Voice in order for this feature to be supported on the head unit.
Device 13
Note: Samsung "S" Voice and other third-party apps may not be supported.
Press to display a list of available devices. Use the up/down arrows to scroll through the list, and press desired number to connect to that device. Press the red disconnect button to the right of a device name to disconnect and/or delete that device.
Bluetooth Music
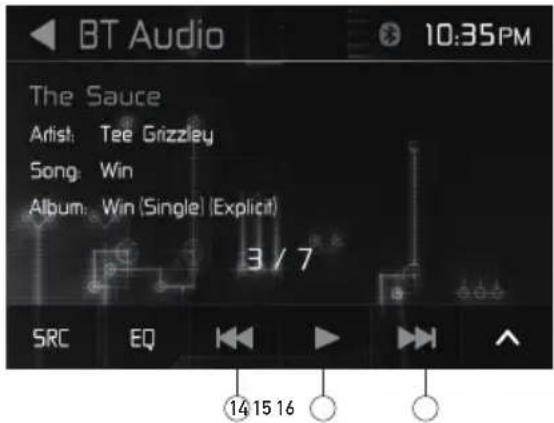
To use your Bluetooth connection to play music from your device, press #5 or select Bluetooth Music from the Main Menu.
Previous Track 14
Press to go back to the previous file or track.
Play/Pause 15
Press to pause or resume playback.
Next Track 16
Press to advance to the next file or track.
SiriusXM® Satellite Radio Operation
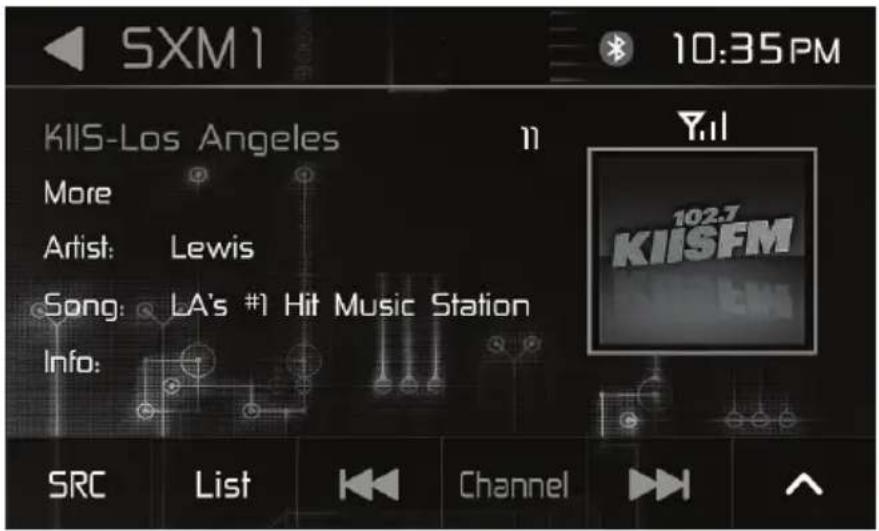
SiriusXM® Radio
Activating SiriusXM® Radio
Accessing SiriusXM® Radio
Only SiriusXM® Satellite Radio brings you more of what you love to listen to, all in one place. Get over 140 channels, including commercial-free music plus the best sports, news, talk, comedy and entertainment. Welcome to the world of satellite radio. A SiriusXM Vehicle Tuner and Subscription are required. For more information, visit www.siriusxm.com.
After installing your SiriusXM Connect Vehicle Tuner and antenna, power on your radio and select SiriusXM mode. You should be able to hear the SiriusXM preview channel on Channel 1. After you can hear the Preview channel, tune to Channel 0 to find the Radio ID of your tuner. The Radio ID is located on the bottom of the SiriusXM Connect Vehicle Tuner and its packaging.
Note: SiriusXM Radio ID does not include the letters I, O, S or F.
In the USA, activate online or by calling SiriusXM Listener care:
- Visit www.siriusxm.com/activatenow
• Call SiriusXM Listener Care at 1-866-635-2349
For Canadian Subscriptions, please contact:
- Visit www.siriusxm.ca/activatexm
- Call XM customer Care at 1-877-438-9677
Activation typically takes 10-15 minutes, but may take up to one hour. It is recommended to leave your vehicle on until the "Subscription Updated" message appears. Your radio will need to be powered on and receiving the SiriusXM signal to receive the activation message.
Once activated, you can tune to channels in your subscription plan.
From the Main Menu, touch the SiriusXM icon to access SiriusXM mode and begin operation.
SiriusXM® Satellite Radio Operation
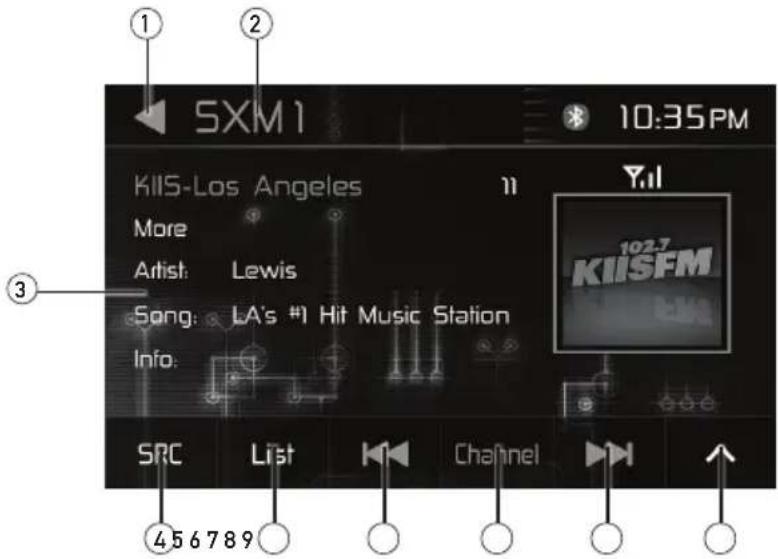
Main Menu ①
Current Mode Indicator ②
File Information ③
Information Display 4
List 5
Press to return to the Main Menu screen.
Displays current mode of operation.
Displays information about the current song, including Station Name, Song Title, Artist Name and Album Name.
Displays program information such as channel name, category, song title, artist name and any additional information available.
Press to enter search mode, then use the up/down arrows to navigate the lists. Channel list is displayed by default. Press the Channel button to view lists by song, artist, additional information or category. Press Preset to view only preset channels in the list, or press Category to view a list of categories. Once the desired option is selected, press twice to begin playback.
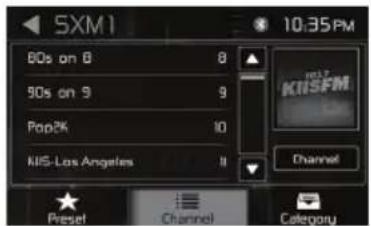
Category & Channel Search
Previous 6
Channel/Category ⑦
Next ⑧
Additional Options ⑨
Press to tune down to the previous channel or category.
Press to toggle between channel and category tuning.
Press to tune up to the next channel or category.
Press to view additional options.
SiriusXM® Satellite Radio Operation
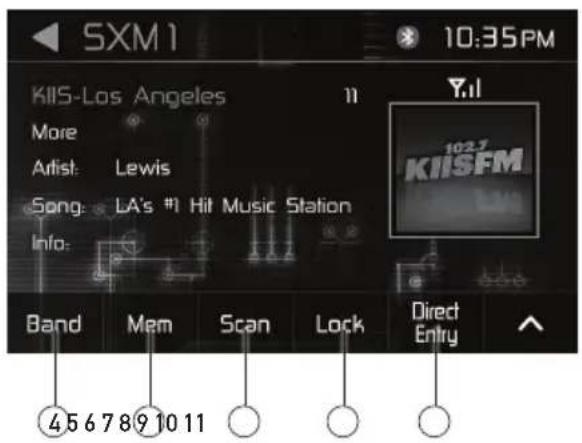
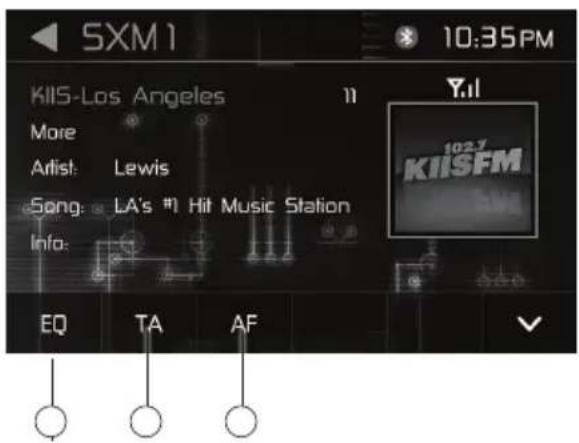
Band ④
Touch to select a band of preset channels. Three bands are available: SXM1, SXM2, and SXM3. Each band can store up to six preset channels. (Preset channels are accessed from the List icon.)
Memory 5
Press to view a list of preset channels for each channel, song, artist, info or category. Press any preset number twice to save the current station in that preset spot.
Scan ⑥
Press to scan all channels in the current band and listen five seconds at each channel. Press again to stop scan and resume playback.
Lock ⑦
Touch to display the SXM Lock Screen to set controls, if desired.
Direct Entry ⑧
Press to directly enter channel numer and begin channel playback.
EQ 9
Press to enter the Audio Settings menu and adjust the following audio options:
- EQ - Use the touch screen to adjust equalization curvesn to suit individual listening preferences. The following equalizer frequencies are available for adjustment: 80Hz, 160Hz, 320Hz, 600Hz, 1kHz, 3kHz, 8kHz and 16kHz. An adjustment range of +16dB to -16dB is available for each frequency band.
- Fader-Balance - Use the touch screen to adjust the balance of the audio output levels throughout the vehicle. The fader adjusts levels front to back, and the balance adjust from left to right.
- Audio - Use the touch screen to adjust the following options: Subwoofer (On or Off), Subwoofer Frequency (80Hz, 120Hz or 160Hz), Loudness (On or Off) and Loudness Center Frequency (400Hz, 800Hz or 2400Hz).
- SRC Level - Adjust audio levels for each audio source (Disc, USB, etc.)
Traffic Announcements 10
Press to turn the Traffic Announcements feature On or Off.
Alternative Frequencies ⑪
Press to turn the Alternative Frequencies feature On or Off.
Unlocking a Channel
To unlock an individual channel
- On the SiriusXM menu page2, touch the lock icon. The Enter password Screen appears.
- Enter your 4-digit password. The following screen appears:
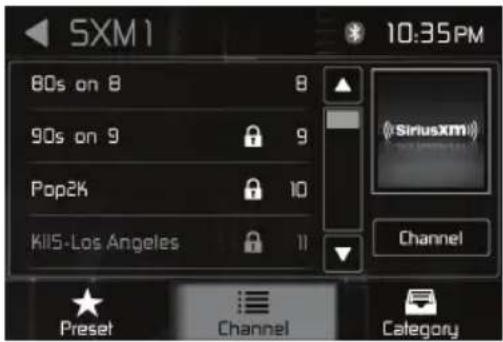
Unlock Screen
- Touch a lock(🔒) icon until icon disappear. Channel is unlocked.
- Touch Unlock All icon to unlock aii channels.
Change Lock Password
The Change Lock Password option allows you to change the password from the default or current custom password to another password.
NOTE: The default password is 0, 0, 0, 0.
To Change password:
- Enter into Settings menu. Go to SXM to change password.
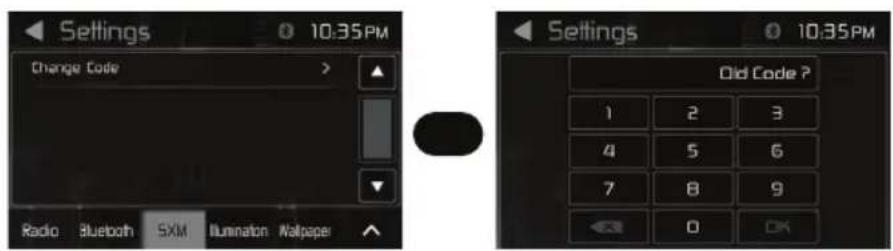
Change Password Screen Settings to
- Enter your 4-digit password and press the OK icon.
- Enter the new 4-digit password and press the OK icon. The new password is set.
Front 3.5mm Aux Input & Rear RCA A/V Input
Auxiliary Input
Connect an optional audio source into the 3.5mm (front panel) input.
Select auxiliary input from the Main Menu to listen to audio.
Adjust volume on the external audio source as needed (if connected to the headphone output of the device).
Using AV Input
Connect an optional audio/video source to the rear auxiliary input (Red/White/Yellow RCA connectors). Refer to page 6 for details.
Select AV Input from the Main Menu to listen to audio.
Engage parking brake to watch video.
Rear Camera Operation - (Optional)
Using Rear Camera
Connect an optional rear camera to the Camera Input (Black RCA connector). Refer to the wiring diagram for details.
Manual selection - Touch CAMERA icon from the Main Menu or from any operational mode (when enabled) to select camera mode. Touch the top left area on the screen to exit camera mode.
Auto Selection
Note: The manual mode is for dedicated cameras that are ALWAYS on while driving, it is not meant for cameras that are connected to the vehicle's reverse light.
The unit will automatically select camera mode when connected to the reverse lamp circuitry.
Note: The external video output is not active when using the rear camera input.
Media Compatibility - USB/SD Card
| File Type MP3 | |||
| File System | FAT | FAT 12 X | |
| FAT 16/FAT 32 | √ | ||
| File Extension | .mp3/.MP3/.Mp3/.mP3 | √ | |
| .rmp/.m4a X | |||
| MPEG Format | MPEG 1 | √ | |
| MPEG 2 | √ | ||
| MPEG 2.5 | √ | ||
| Sampling Frequency | MPEG 1 32/44.1/48kHz | ||
| MPEG 2 12/16/22.05/24kHz | |||
| MPEG 2.5 8/11.025/12kHz | |||
| Bitrate | MPEG 1 32 ~ 320kbps | ||
| MPEG 2 8 ~ 160kbps | |||
| MPEG 2.5 8 ~ 160kbps | |||
| Other Information | Directory Depth Unlimited | ||
| File Name Length 32 bytes | |||
| Total File Number 2000 files | |||
| Total Folder Number 200 folders | |||
| File Number via Folder | 2000 files | ||
| MP3 ID3 TAG | ver.1.x | √ | |
| ver.2.x | √ | ||
| Title, Artist, Album | √ | ||
Notes:
- For USB mode, it is not possible to view JPG files on the in-dash monitor while the vehicle is moving. This is a safety feature to prevent driver distraction.
- The JPG image viewer function will only operate when vehicle is in park and the parking brake is engaged.
- Due to ongoing technological advancement, some USB flash drives and/or SD cards may be incompatible with this unit.
Media Compatibility - CD/DVD
| File Type MP3 | ||||
| File System | ISO9660 | Level 1, Level 2 | √ | |
| Level 3 X | ||||
| ISO9660 Extension | JOLIET | Playback | √ | |
| Filename 32 bytes | ||||
| Other Extensions | ROMEO | Playback X | ||
| Filename X | ||||
| Apple ISO X | ||||
| File Extension | .mp3/.MP3/.Mp3/.mP3 | √ | ||
| .rmp/.m4a X | ||||
| MPEG Format | MPEG 1 | √ | ||
| MPEG 2 | √ | |||
| MPEG 2.5 | √ | |||
| Sampling Frequency | MPEG 1 32/44.1/48kHz | |||
| MPEG 2 12/16/22.05/24kHz | ||||
| MPEG 2.5 8/11.025/12kHz | ||||
| Bitrate | MPEG 1 32 ~ 320kbps | |||
| MPEG 2 8 ~ 160kbps | ||||
| MPEG 2.5 8 ~ 160kbps | ||||
| Other Information | Directory Depth Unlimited | |||
| File Name Length | 32 bytes | |||
| Total File Number | 2000 files | |||
| Total Folder Number 200 folders | ||||
| File Number via Folder | 2000 files | |||
| MP3 ID3 TAG | ver.1.x | √ | ||
| ver.2.x | √ | |||
| Title, Artist, Album | √ | |||
Notes:
- It is not possible to view JPG files on the in-dash monitor while the vehicle is moving. This is a safety feature to prevent driver distraction.
- The JPG image viewer function will only operate when vehicle is in park and the parking brake is engaged.
Media Compatibility
Media Compatibility
The following types of discs/files are compatible:
• CD-DA, CD-ROM (ISO), CD-R, CD-RW
• DVD Video, DVD+R/RW, DVD-R/RW
The following types of discs/files are not compatible:
• WMA files that are protected by DRM (Digital Rights Management)
• WMA lossless format
• Discs recorded with Track At Once or packet writing
• MP3 PRO format, MP3 playlists
- RMP format
- WAV format
- WMV format
• AAC, protected AAC, M4A format
Some recordable DVD's and CD's may be incompatible with this unit, depending on media type and recording method.
Playback Order
MP3 playback sequence begins in the root folder of the disc, USB flash drive or SD card. Any empty folders or folders that do not include MP3/JPG files are skipped.
Compatible Recording Formats
ISO9660 standards:
• Maximum nested folder depth is 8 (including the root folder).
- Valid characters for folder/file names are letters A-Z (all caps), numbers 0-9, and “_” (underscore). Some characters may not be displayed correctly, depending on the character type.
- This device can play back discs in Joliet and other standards that conform to ISO9660. MP3 written in the formats other than the above may not play and/or their file names or folder names may not be displayed properly.
Notes
Some files may not play or be displayed correctly, depending on sampling rates and bit rates.
For best results, use the following settings when ripping MP3 files:
128kbps or higher constant bit rate
44.1kHz or higher sampling frequency
WARNING
Upon installation of this Monitor/DVD player ("unit") into a vehicle, the driver of the vehicle must not operate this unit by watching videos or playing video games while driving. Failure to follow this instruction could lead to driver distraction which could result in serious injury or death to the vehicle's occupants or persons outside the vehicle and/or property damage.
Several states prohibit the installation of monitors/DVD players if the screen is visible from the driver's seat. If you reside in a jurisdiction which has enacted such a law, this unit must not be installed so that the screen is visible from the driver's seat. When installing this unit in the front console/dashboard, the unit must be positioned so that it is facing the front passenger seat only. Failure to follow this instruction could lead to driver distraction which could result in serious injury or death to the vehicle's occupants or persons outside the vehicle and/or property damage.
This unit is designed so that it may be operated only when the vehicle is in "Park" and the parking brake is fully engaged. To this end, this unit includes a parking brake lock-out feature which prohibits the unit from operating if the vehicle is not in "Park" and/or the parking brake is not fully engaged. When installing this unit, the installer must connect the parking brake detect wire to the parking brake mechanism in order to make the parking brake lock-out feature operable. DO NOT simply ground the parking brake detect wire to a metal portion of the vehicle. Failure to properly install the parking brake lock-out feature could lead to driver distraction which could result in serious injury or death to the driver's occupants or persons outside the vehicle and/or property damage.
Once the parking brake lock-out feature is installed, the owner/user must not attempt to disrupt/neutralize the parking brake lock-out feature by (a) partially engaging the parking brake and/or (b) purchasing/using any device or unit designed to send necessary brake signals to the unit. Failure to follow these instructions could lead to driver distraction which could result in serious injury or death to the driver's occupants or persons outside the vehicle and/or property damage.
When operating this unit, keep the unit's volume level low enough so that the vehicle's occupants can hear traffic-related sounds such as police and emergency vehicles. Failure to follow this instruction could lead to driver distraction which could result in serious injury or death to the vehicle's occupants or persons outside the vehicle and/or property damage.
DVD Operation
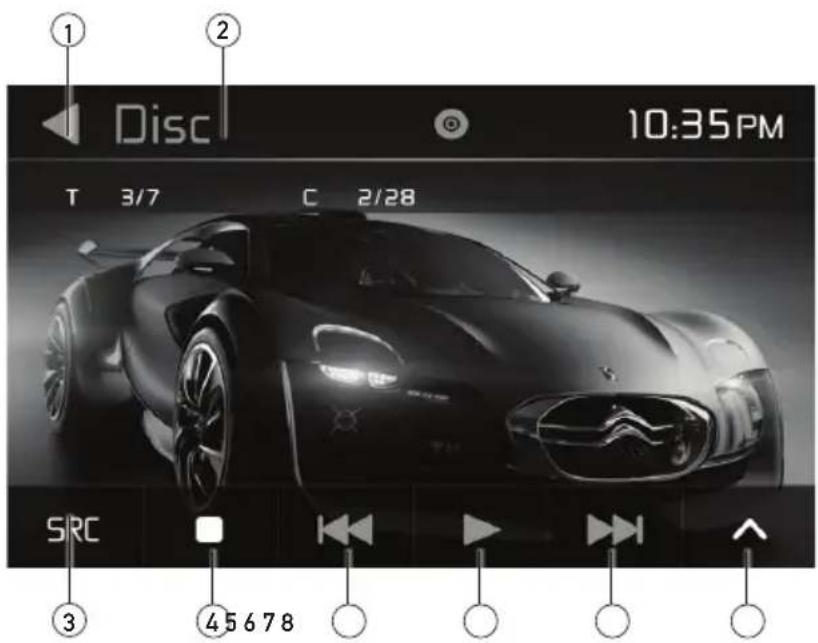
DVD Operation
Insert a disc (label facing up), and playback will begin automatically. To switch to CD mode from another mode of operation when a disc is already inserted, select the Disc icon from the Main Menu screen.
Main Menu ①
Press to return to Main Menu screen.
Current Mode Indicator ②
Displays current mode of operation.
Source ③
Press to view and select available sources.
Stop ④
Press to stop DVD playback. When playback is resumed, it will begin at the beginning of the disc.
Tune / Track Down ⑤
Press to go back to the previous chapter. Press and hold to fast reverse DVD playback.
Play / Pause ⑥
Press to pause DVD playback. When playback is resumed, it will begin at the same point it was paused. Press again to resume DVD playback.
Tune / Track Up ⑦
Press to go forward to the next chapter. Press and hold to fast forward DVD playback.
Additional Options ⑧
Press view additional options for DVD playback.
DVD Operation
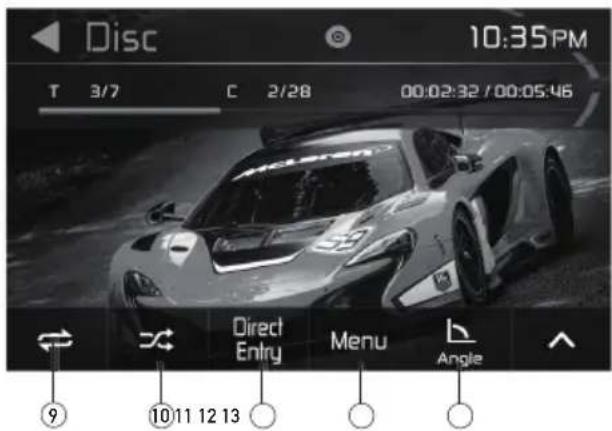
Repeat ⑨
Press to select one of the following option for Repeat play: Repeat 1, Repeat Folder, Repeat All or Repeat Off.
Random 10
Press to select one of the following option for Random play: On or Off.
Direct Entry ⑪
Press to access the keypa and directly enter title and chapter information to begin playback at a specific point.
Main Menu 12
Press to return to the Main Menu screen.
Angle 13
Press to rotate the on-screen display.
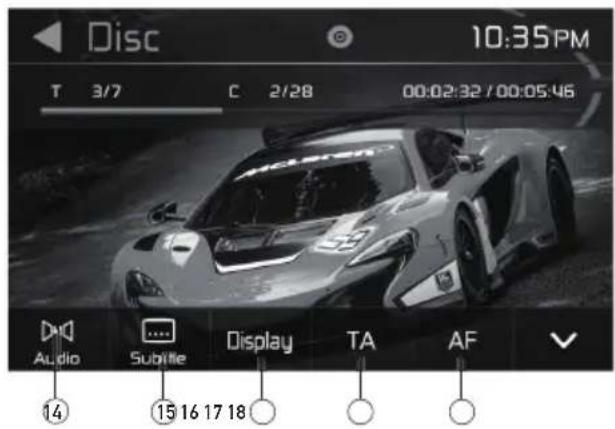
Audio 14
Press to adjust audio options.
Subtitle 15
Press to access the subtitles.
Display 16
Press to adjust the screen brightness, contrast, hue, saturation and sharpness.
Traffic Announcements 15
Press to turn the Traffic Announcements feature On or Off.
Alternative Frequencies 16
Press to turn the Alternative Frequencies feature On or Off.
SiriusXM™ Radio Advisory Messages
| SiriusXMAdvisory Message | Recommendation |
| Check Antenna | The radio has detected a fault with the SiriusXM antenna. The antenna cable may be either disconnected or damaged.Verify that the antenna cable is connected to the SiriusXM Connect Vehicle Tuner.Inspect the antenna cable for damage and kinks. Replace the antenna if the cable is damaged.SiriusXM products are available at your local car audio retailer or online at www.shop.siriusxm.com. |
| Check Tuner | The radio is having difficulty communicating with the SiriusXM Connect Vehicle Tuner. The tuner may be disconnected or damaged.Verify that the SiriusXM Connect Vehicle Tuner cable is securely connected to the radio |
| No Signal | The SiriusXM Connect Vehicle Tuner is having difficulty receiving the SiriusXM satellite signal.Verify that your vehicle is outdoors with a clear view of the sky.Verify that the SiriusXM magnetic mount antenna is mounted on a metal surface on the outside of the vehicle.Move the SiriusXM antenna away from any obstructions.Inspect the antenna cable for damages and kinks.Consult the SiriusXM Connect Vehicle tuner installation manual for more information on antenna installation. Replace the antenna if the cable is damaged. SiriusXM products are available at your local car audio retailer or online at www.shop.siriusxm.com. |
| Subscription Updated | This channel is not included in your SiriusXM® subscription plan.In the USA, visit www.siriusxm.com or call 1-866-635-2349 if you have questions about your subscription. In Canada, visit www.siriusxm.ca or call 1-877-438-9677 if you have questions about your subscription. |
| Channel Unavailable | The channel that you have requested is not a valid SiriusXM channel or the channel that you were listening to is no longer available. You may also see this message briefly when first connecting a new SiriusXM Connect Vehicle tuner. Visit www.siriusxm.com for more information about the SiriusXM channel lineup. |
| ChannelUnsubscribed | The channel that you have requested is not included in your SiriusXM subscription package or is no longer included in your SiriusXM subscription package. In the USA, visit www.siriusxm.com or call 1-866-635-2349 if you have questions about your subscription. In Canada, visit www.siriusxm.ca or call 1-877-438-9677 if you have questions about your subscription. |
| Channel Locked | The channel that you have requested is locked by the radio's Parental Control feature. Refer to the SiriusXM® Satellite Radio Operation section for more information on the Mature Channel Lock feature and how to access. |
Troubleshooting
| Problem Cause | Action | |
| Unit will not turn on (no power) | Yellow wire not connected or incorrect voltage Red wire not connected or incorrect voltage | Check connections for proper voltage (11~16VDC) |
| Black wire not connected Check connection to ground | ||
| Fuse blown Replace fuse | ||
| Unit has power (but no sound) | Speaker wires not connected Check connections at speakers | |
| One or more speaker wires touching each other or touching chassis ground | Insulate all bare speaker wires from each other and chassis ground | |
| Unit blows fuses | Yellow or red wire touching chassis ground | Check for pinched wire |
| Speaker wires touching chassis ground | Check for pinched wire | |
| Incorrect fuse rating Use fuse with correct rating | ||
| Excessive skipping | Unit is not mounted correctly or backstrap is not secure | Check mounting sleeve and backstrap support |
| Physical defect in media (CD, CD-R or CD-RW) | Check media for scratches | |
| ERR FILE appears on display | Disc read error Press eject or RESET | |
| Focus error or disc is in upside down Press eject or RESET | ||
| NO FILE appears on display | No playable MP3files found on the device | Check the device for valid MP3 files |
| Unit will not accept a disc | CD mechanism position out of alignment | Press EJECT to reset CD mechanism position |
| CD transit screws still in place | Remove 2 transit screws located on top of the unit | |
| NO SUPPORT appears on display | An invalid ID3 tag version is present | Version 1.0 to 2.0 ID3 tags are supported. |
Specifications
CD Player Frequency response: 20Hz-20kHz Channel separation @ 1kHz: >60dB D/A converter: 1 Bit
FM Tuner Tuning range: 87.5MHz-107.9MHz Usable sensitivity: 8.5dBf 50dB quieting sensitivity: 10dBf Stereo separation @ 1kHz: >30dB Frequency response: 30Hz-13kHz
AM Tuner | Tuning range: 530kHz-1710kHz Usable sensitivity: <42dBu Frequency response: 30Hz-2.2kHz
General USB Charge: 1A Speaker output impedance: 4\~8 ohms Line output voltage: 4 Volts RMS Dimensions: 7" x 7" x 4" (178 x 178 x 100 mm) Design and specifications subject to change without notice.

CEA-2006 Power Standard Specifications
(reference: 14.4VDC +/- 0.2V, 20Hz\~20kHz)
Power Output: 16 Watts RMS x 4 channels at 4 ohms and ≤ 1% THD+N Signal to Noise Ratio: 80dBA (reference: 1 watt into 4 ohms)
Limited One Year Warranty
This warranty gives you specific legal rights. You may also have other rights which vary from state to state.
Dual Electronics Corp. warrants this product to the original purchaser to be free from defects in material and workmanship for a period of one year from the date of the original purchase.
Dual Electronics Corp. agrees, at our option, during the warranty period, to repair any defect in material or workmanship or to furnish an equal new, renewed or comparable product (whichever is deemed necessary) in exchange without charges, subject to verification of the defect or malfunction and proof of the date of purchase. Subsequent replacement products are warranted for the balance of the original warranty period.
Who is covered? This warranty is extended to the original retail purchaser for products purchased from an authorized Dual dealer and used in the U.S.A.
What is covered? This warranty covers all defects in material and workmanship in this product. The following are not covered: software, installation/removal costs, damage resulting from accident, misuse, abuse, neglect, product modification, improper installation, incorrect line voltage, unauthorized repair or failure to follow instructions supplied with the product, or damage occurring during return shipment of the product. Specific license conditions and copyright notices for the software can be found via www.dualav.com.
What to do?
-
Before you call for service, check the troubleshooting guide in your owner's manual. A slight adjustment of any custom controls may save you a service call.
-
If you require service during the warranty period, you must carefully pack the product (preferably in the original package) and ship it by prepaid transportation with a copy of the original receipt from the retailer to an authorized service center.
-
Please describe your problem in writing and include your name, a return UPS shipping address (P.O. Box not acceptable), and a daytime phone number with your shipment.
-
For more information and for the location of the nearest authorized service center please contact us by one of the following methods:
• Call us toll-free at 1-888-921-4088
• E-mail us at cs@dualav.com
Exclusion of Certain Damages: This warranty is exclusive and in lieu of any and all other warranties, expressed or implied, including without limitation the implied warranties of merchantability and fitness for a particular purpose and any obligation, liability, right, claim or remedy in contract or tort, whether or not arising from the company's negligence, actual or imputed. No person or representative is authorized to assume for the company any other liability in connection with the sale of this product. In no event shall the company be liable for indirect, incidental or consequential damages.
FCC Compliance
This device complies with Part 15 of the FCC Rules. Operation is subject to the following two conditions:
(1) this device may not cause harmful interference, and
(2) this device must accept any interference received, including interference that may cause undesired operation.
Warning: Changes or modifications to this unit not expressly approved by the party responsible for compliance could void the user's authority to operate the equipment.
Note: This equipment has been tested and found to comply with the limits for a Class B digital device, pursuant to Part 15 of the FCC Rules. These limits are designed to provide reasonable protection against harmful interference in a residential installation. This equipment generates, uses and can radiate radio frequency energy and, if not installed and used in accordance with the instructions, may cause harmful interference to radio communications. However, there is no guarantee that interference will not occur in a particular installation. If this equipment does cause harmful interference to radio or television reception, which can be determined by turning the equipment off and on, the user is encouraged to try to correct the interference by one or more of the following measures:
- Reorient or relocate the receiving antenna.
- Increase the separation between the equipment and receiver.
- Connect the equipment into an outlet on a circuit different from that to which the receiver is connected.
- Consult the dealer or an experienced radio/TV technician for help.
JENSEN®
Dual Electronics Corp.
Toll Free: 888-921-4088
www.jensenmobile.com
©2019 Dual Electronics Corp. All rights reserved.
The Bluetooth® word mark and logos are owned by the Bluetooth SIG, Inc. and any use of such marks by Namsung is under license.
Other trademarks and trade names are those of their respective owners.
NSA0319-V01
- CDR362
- Preparation
- Before You Start
- Getting Started
- Wiring Diagram
- Note:
- Wiring Notes:
- Rear camera input
- SiriusXM
- Control Locations
- General Operation
- Power On/Off
- Source
- Volume
- Mute
- Auxiliary Input
- USB Port
- Main Menu
- Setup Menu
- General:
- Time:
- Display:
- Panel:
- Disc:
- Radio:
- Bluetooth:
- SXM:
- Illumination:
- Wallpaper:
- Version:
- Radio Operation
- CD Operation
- Main Menu ①
- Current Mode Indicator ②
- File Information ③
- Source ④
- List ⑤
- Previous Track 6
- Elapsed Time ⑦
- Play/Pause⑧
- Next Track ⑨
- Additional Options 10
- USB Operation
- List 5
- Previous File 6
- Play/Pause ⑧
- Next File ⑨
- iPod Operation
- Source 4
- Play/Pause 8
- Pandora Operation
- Bluetooth Operation
- Pairing a New Device
- Connecting a Paired Device
- Bluetooth Phone
- SiriusXM® Satellite Radio Operation
- SiriusXM® Radio
- Activating SiriusXM® Radio
- Accessing SiriusXM® Radio
- Unlocking a Channel
- Unlock Screen
- Front 3.5mm Aux Input & Rear RCA A/V Input
- Rear Camera Operation - (Optional)
- Notes:
- Media Compatibility
- Playback Order
- Compatible Recording Formats
- Notes
- WARNING
- DVD Operation
- Source ③
- Stop ④
- Tune / Track Down ⑤
- Play / Pause ⑥
- Tune / Track Up ⑦
- Additional Options ⑧
- Specifications
- Limited One Year Warranty
- What to do?
- FCC Compliance
- JENSEN®
Brand : JENSEN
Model : CDR362
Category : Receiver