
RP3-GM13 - Car audio interface PAC - Free user manual and instructions
Find the device manual for free RP3-GM13 PAC in PDF.


| Product Type | Radio Replacement Interface |
| Compatible Vehicles | Select General Motors vehicles with Class II radios |
| Dimensions | Approx. 2.5 x 1.5 x 0.75 inches (estimated) |
| Weight | Approx. 0.2 lbs (estimated) |
| Power Supply | 12V DC vehicle battery |
| Accessory Output Current | 10 Amps max |
| Retained Accessory Power (RAP) | Retains radio power for 10 minutes or until driver door opens |
| Output Signals | Vehicle Speed Sensor (VSS), Illumination (+), Reverse (+), Parking Brake (-) |
| Steering Wheel Control (SWC) Support | Optional via SWI-RC, SWI-PS, SWI-JACK, SWI-ECL2, or SWI-X |
| Chime Volume Adjustment | 4-position switch (1 loudest, 4 softest) |
| Firmware Update | Via PAC-UP interface updater (sold separately) |
| Wiring Harness | Includes vehicle and interface connectors with color-coded wires |
| Speaker Inputs | Front L/R, Rear L/R (high-level) |
| Antenna Input | Blue wire (Antenna On) |
| Installation Type | Plug-and-play with soldering or crimping |
| Operating Temperature | -20°C to 85°C (estimated) |
| Maintenance | No regular maintenance required; keep connectors clean |
| Safety | Ensure ignition off and driver door open before connecting |
| Spare Parts | Contact PAC Audio for replacement harness or interface |
| Repair | No user-serviceable parts; firmware updates available |
| Certifications | CE, FCC (estimated) |
| Warranty | 1 year limited (estimated) |
Frequently Asked Questions - RP3-GM13 PAC
User questions about RP3-GM13 PAC
0 question about this device. Answer the ones you know or ask your own.
Ask a new question about this device
Download the instructions for your Car audio interface in PDF format for free! Find your manual RP3-GM13 - PAC and take your electronic device back in hand. On this page are published all the documents necessary for the use of your device. RP3-GM13 by PAC.
USER MANUAL RP3-GM13 PAC
Introduction & Features
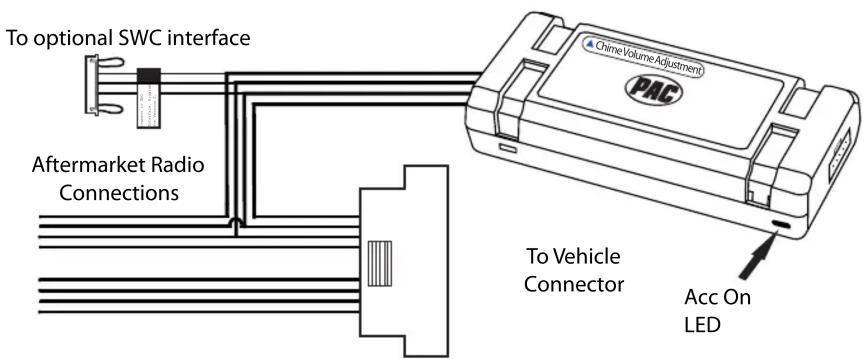
The RP3-GM13 interface allows the replacement of a factory radio in select General Motors vehicles with Class II radios. Using this interface will retain Warning Chimes when the original radio is removed. The RP3-GM13 provides data bus driven outputs such as retained accessory power (RAP), vehicle speed sensor (VSS), illumination, reverse trigger and parking brake. The RP3-GM13 also provides a secondary output for adding an optional PAC Steering Wheel Control (SWC) retention interface (SWI-RC, SWI-PS, SWI-JACK, SWI-ECL2 or SWI-X).
Important Notes
- It is extremely important to makes sure the ignition is off and the drivers door open before connecting the interface to the vehicle.
- Use the 4 position switch located on the side of the interface to select the best chime output volume for your specific installation. Setting 1 being loudest and 4 softest.
Wiring Connection Chart
Interface Connector
| Red / White Parking Brake Output (-)* | |
| Purple / White Vehicle Speed Output* | |
| Blue / White Not Used | |
| Red Accessory Output (10 amp) | |
| Orange / White Illumination Output (+)* | |
| Green Reverse Output (+)* |
*Not all radios will have these connections. Please insulate these wires when not used.
Vehicle Connector
| Yellow Battery +12v | |
| Black Ground | |
| Blue Antenna On Input | |
| White | Front L + input |
| White / Black | Front L - input |
| Grey | Front R + input |
| Grey / Black | Front R - input |
| Green | Rear L + input |
| Green / Black | Rear L - input |
| Purple | Rear R + input |
| Purple / Black | Rear R - input |
Illustration / Schematic
Installation Steps
- Make all connections as described in the chart on page 1.
- Follow the instructions below if you wish to add an optional SWC retention interface.
Steering Wheel Control Output Connector
- The RP3 provides a SWC output connector attached to the harness. For ease of installation, all necessary connections for an SWI have been made for you.
- When using this SWC output connector the radio SWC interface MUST BE PROGRAMMED FOR VERSION 2. (refer to SWC interface programming instructions for exact programming sequence).
- Both loops should remain in tact.
- During steering wheel button assignment programming the vehicle should be running and each button should be pressed and held for at least 5 seconds. Please refer to the SWI manual for button assignment order.

Testing & Verification
- Turn the ignition on. The LED on the interface will turn on & the +12v accessory wire will turn on.
- Turn on the radio & check balance & fade.
- If an optional SWC retention interface was used, verify that all SWC are functioning properly.
- Turn off vehicle & remove key. RAP will be active & keep the radio on for 10 minutes or until the drivers door is opened.
- The LED & radio will turn off when RAP turns off or the drivers door is opened.
- Use the 4 position switch located on the side of the interface to select the best chime output volume for your specific installation. Setting 1 being loudest and 4 softest.

Product Updates (Firmware)
The RP3-GM13 can be updated with new firmware as it becomes available using the PAC-UP interface updater (sold separately). Please visit www.pac-audio.com/firmware for available updates.
Brand : PAC
Model : RP3-GM13
Category : Car audio interface