
PLCD54MP - Subwoofer Pyle - Free user manual and instructions
Find the device manual for free PLCD54MP Pyle in PDF.


| Product Type | Subwoofer |
| Brand | Pyle |
| Model | PLCD54MP |
| Speaker Size | 5.25 inches |
| Impedance | 4 ohms |
| Peak Power Handling | 250 watts |
| RMS Power Handling | 100 watts |
| Frequency Response | 30 Hz - 200 Hz |
| Sensitivity | 88 dB |
| Magnet Material | Ferrite |
| Cone Material | Polypropylene |
| Surround Material | Rubber |
| Mounting Depth | 3.5 inches |
| Mounting Hole Diameter | 4.75 inches |
| Overall Dimensions (W x H x D) | 11.8 x 7.1 x 5.9 inches |
| Weight | 5.5 lbs |
| Power Supply | Passive (no built-in amplifier) |
| Enclosure Type | Sealed or ported (user choice) |
| Recommended Enclosure Volume | 0.35 - 0.50 cubic feet |
| Color | Black |
| Maintenance & Cleaning | Wipe with a dry, soft cloth. Do not use liquids or cleaners. |
| Safety Precautions | Avoid exposure to moisture and extreme temperatures. |
| Spare Parts & Repairability | Contact Pyle customer service for spare parts. Repair by qualified technician only. |
| Warranty | 1 year limited warranty |
Frequently Asked Questions - PLCD54MP Pyle
User questions about PLCD54MP Pyle
0 question about this device. Answer the ones you know or ask your own.
Ask a new question about this device
Download the instructions for your Subwoofer in PDF format for free! Find your manual PLCD54MP - Pyle and take your electronic device back in hand. On this page are published all the documents necessary for the use of your device. PLCD54MP by Pyle.
USER MANUAL PLCD54MP Pyle
AM/FM/CD/MP3/USB/AUX Stereo Receiver, Single DIN, 30 Preset Memory Stations, LCD Display with Remote Control (Black)
USER GUIDE
CONTENTS
INTRODUCTION 3
What's in the Box 3
DIMENSIONS 3
OVERVIEW OF THE COMPONENTS 5
GENERAL OPERATION 6
Power On/Off
Removing The Front Panel
Volume Up And Down
Mute On/Off
Changing The Modes
Setting The Audio/Menu
Display
Auxiliary Input Jack
Reset
RADIO OPERATION 7
Switch Between Europe/USA/Asian/Russian Frequency
Changing Bands
To Store / Recall Preset Stations
Manual Tuning
Seek Tuning
Automatic Store Preset Station
CD/USB OPERATION 7
Insert/Eject CD
USB Connection
Select Next Track Or Previous Track
Fast Forward/Reverse
Play/Pause
Introduction Scan
Repeating The Track
Playing All Tracks In Random
Folder/Track Navigation
Redial Last Dialed Number
Answer A Call
Reject A Call Or End A Call
Switch Audio Between Car Audio And Mobile Phone
Adjust Talk Volume Audio Streaming (A2DP)
APP OPERATION 11
SPECIFICATION 12
INTRODUCTION
Do keep your original invoice and purchase receipt in a safe place in case of future service and warranty claims. You may also contact your appointed service agent for any future technical support requirements.
What's in the Box:
- Stereo Receiver
- Remote Control
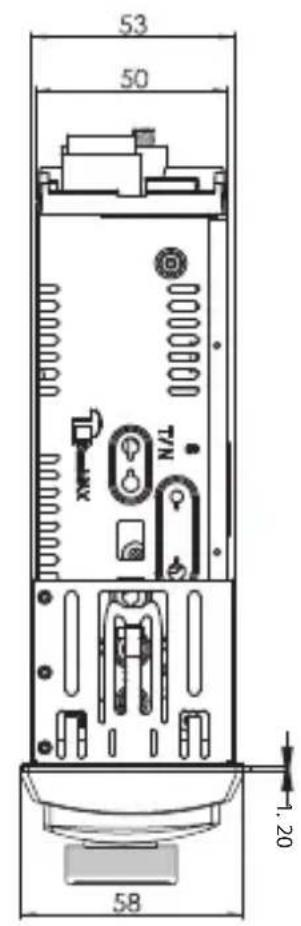
Dimensions (Unit: mm)

WIRING CONNECTIONS
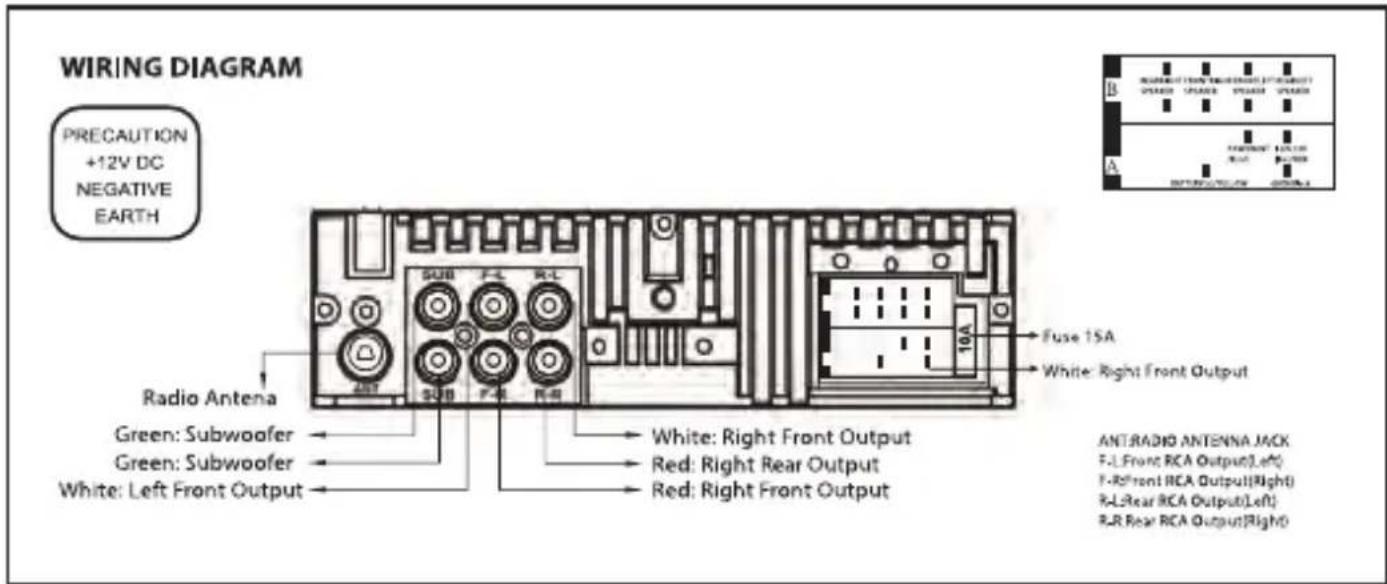
| COLOR FUNCTION | ||
| A | Red Ignition Line | |
| Black | Earth wire | |
| Blue | ANT automatic | |
| Yellow | Power supply | |
| B | GreenGreen/Black | Rear left horn (+)Rear left horn (-) |
| WhiteWhite/Black | Front left horn (+)Front left horn (-) | |
| GrayGrey/Black | Front right horn (+)Front right horn (-) | |
| VioletPurple/Black | Rear right horn (+)Rear right horn (-) | |
COMPONENTS OVERVIEW OF THE COMPONENTS
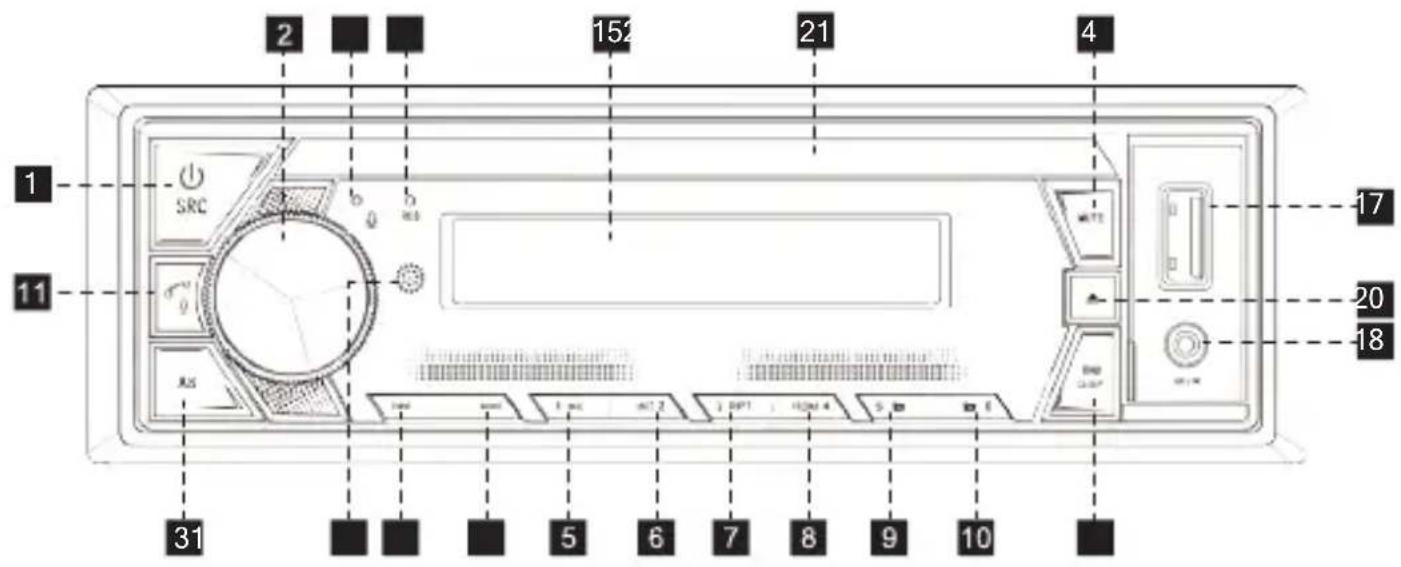
- Power on/off, Mode (Source)
- Volume knob, SEL (Push for Audio/Menu Setting)
- AS (Auto Store Preset Station)
- Mute
- Preset #1, Play/Pause
- Preset #2, Intro Scan
- Preset #3, Repeat
- Preset #4, Random
- Preset #5, Folder Down, Jump 10 Track backward
- Preset #6, Folder Up, Jump 10 Track forward
- Answer Call, End Call (press and hold)
- Tune/Track down, reverse
- Tune/Track Up, fast forward
- IR Remote Sensor
- LCD Display
- Band, Disp (Display clock time and other info)
- USB Port
- Aux Input Socket
- Hands-free Microphone
- Eject CD
- Disc Slot
- Reset
GENERAL OPERATION
Power On/Off
- Press any button to turn the unit on.
- Press and hold the ⏻/MODE button to turn the unit off.
Removing The Front Panel
Press the RELEASE button to detach the front panel.
Volume Up And Down
Rotate the Volume knob to adjust the volume level.
Mute On/Off
Briefly press the ✕ button to toggle mute on or off.
Changing The Modes
Press the ⏻/MODE to select between Radio, Disc, USB (with USB device inserted), AUX-IN (auxiliary input) and BT (Wireless BT) modes.
Sefling The Audio/Menu
- Press Volume (SEL) button momentarily to select between the audio/menu functions: BASS, TREBLE, BALANCE, FADER, EQ USER/FLAT/CLASSIC/ROCK/POP, LOUD OFF/ON, BEEP OFF/ON, CLOCK 24/12, CLOCK SETTING, BT MENU/AUTO, DISTANT/LOCAL, STEREO/MONO, AREA EU/US/AS/RU.
- Rotate the Volume knob to adjust or activate your desired function/audio.
Display
- With the unit on, press and hold DISP to display clock time.
- Press and hold DISP to toggle display between various displayed information.
Auxiliary Input Jack
Usinga 3.5mm cable to connecta external device such as MP3 players, CD players etc. to the auxiliary input jack on front panel. Then you can hear the sound of other playback devices such as MP3 players, CD players etc. through your car speakers.
Reset
Push the RESET button (behind the front panel) with a thin object with a pointed end to reset the unit back to the factory default settings 6 Second.
RADIO OPERATION
Switch Between Europe /USA/Asian/Russian frequency
In radio mode, press the Volume button momentarily to choose the "AREA EU/US/AS/RU" item, then rotate it to switch between EU(europe), US (USA), AS (Asian), RU(Russian) frequency. The system will change the frequency setting in about 3 seconds.
Change Bands
In radio mode, shortly press the BAND/DISP to select between the FM1, FM2, FM3 and AM1 (MW1), AM2 (MW2) bands.
To Store/Recoil Preset Stations
The radio can be stored 6 preset stations for each band (FM1, FM2, FM3, AM1 and AM2) for a total of 30 preset stations.
- To memorize a station: Press and hold the desired preset buttons (1-6) to save a radio station.
- To recall a preset station: Briefly press the respective station button (1-6) to recall the corresponding preset station.
Manual Tuning
In the radio mode:
Briefly press the >>|or << button to search the next or previous frequency step by step.
Seek Tuning
In radio mode:
Press and hold the >>| or << button to seek to next or previous strong station.
CD/USB OPERATION
Insert CD
With the label facing up, insert a standard size CD into the CD slot. Playback will begin automatically.
Eject CD
Press ▲ (Eject button) to eject the CD.
USB Connection
If you would like to playback files contained in a USB stick, please insert the stick into the USB port. The MP3/WMA and other music files will be played automatically.
Note: The USB port of this car radio is also designed for charging for iPhone/andriod mobile phone. The charging current consumption is 1 ampere.
Select Next Track Or Previous Track
In the CD/USB mode, briefly press the >>ior I<<button to play the next or previous track.
Fast Forward/Reverse
Press and hold the >>|or I<< button to fast forward or reverse a track.
Play/Pause
Press the ▶/Ⅲ button to interrupt the CD/USB playback (pause function).
Press this button again to continue the playback.
Introduction Scan
Press INT to play the first 10 seconds of each track on CD/USB.
Press again to cancel the INT function.
- INT ON - Plays the first 10 seconds of each track.
- INT OFF - Cancels the INT function.
Repeating The Track
Press RPT to toggle between RPT FLD, RPT ALL, and RPT ONE.
- RPT FLD - Continuously repeats all files in current folder.
• RPT ALL - Plays all tracks on CD/USB device.
• RPT ONE - Continuously repeats selected track.
Playing All Tracks In Random
Press RDM to play songs in random order, press again to cancel the RDM function.
- RDM ON - Plays all tracks in random order.
- RDM OFF - Cancels the RDM function.
Folder/Trock Navigation
- Press the ▼ or △ button to select the previous or the next folder.
Folder access is only available on devices with more than one folder.
- Press and hold the 📋 or 📌 buttons to jump 10 tracks backward or forward.
It is required that over 10 tracks be available on the storage medium.
Remote Control
Name of buttons and location
- ⏻ (Power ON/OFF) Button
- VOL +/VOL- (volume up/down)
- Band button, ⊆ (reply call)
- button: Tune down, seek down; Track down, fast reverse
- SEL (selection) button
- ▶ button: Tune up, seek up; Track up, fast forward
- Mute/DEL (Delete) button
- CLK (clock setting) ≡ button, (end call) button
- ▶II button: preset station 1 button, keypad 1
- INT (intro) button, preset station 2 button, keypad 2
- RPT (repeat) button, preset station 3 button, keypad 3
- RDM (random), preset station 4 button, keypad 4
- -10 (previous 10 tracks), preset station 5 button, keypad 5
- +10 (next 10 tracks), preset station 6 button, keypad 6
- ST (stereo) button, keypad 7
- LOUD (loudness) button, keypad 8
- AMS (automatic music search) button, keypad 9
- MODE button, keypad *
- EQ (Equalizer) button, keypad 0
- LOC (local)/DX button, keypad #

Before using the Wireless BT device as a handsfree system for a BT enabled mobile phone for the first time, you must pair and connect the two devices as follows:
- In any mode, prior to pairing and connecting, the BT logo on the LCD indicating that no device is connected. The head unit broadcasts the pairing signal constantly when no devices are connected. Activate the BT on your device before you begin with the pairing process.
- When your phone finds the car audio system, the "PYLE" name will be displayed on your phone screen.
- Choose the "PYLE" from your mobile phone list to pair and connect with the car audio system. Upon confirming, the BT logo will stop flashing.
- When pairing is complete, the mobile phone audio will automatically transfer to the car audio system whenever a call is made or received, or when the mobile phone plays music.
Note:
For more details of Wireless BT pairing, please refer to the owner's manual for your mobile phone.
Make A Call
• To make a call, dial the call directly from the paired mobile phone.
Redial Last Dialed Number
Press and hold the ↗ button to redial the last dialed phone number. Press the button to activate SIRI function.
Answer A Call
When the mobile phone is called, the incoming telephone number displays on the LCD display, press the ↗ button to answer the incoming call.
Reject Or End A Call
Press the ↗ button to reject, press and hold the ↗ to end the call.
Switch Audio Between Cor Audio And Mobile Phone
During a call, press the ↗ button to switch the audio source from the car audio system back to your mobile phone.
Adjust Call Volume
- During a call, use Volume knob or VOL+/VOL- button to adjust the call volume level.
- Use the MUTE button to mute sound.
Audio Streaming (A2DP)
The head unit supports A2DP wireless streaming audio from a Wireless BT mobile device directly to your head unit.
The following functions can be used to control the music:
- Press the >>I button to skip to the next available audio track.
- Press the << button to skip to the previous audio track.
- Press the ▶/■ button to toggle between play and pause during music playback.
APP OPERATION
Using the application from PYLE, you can wireless remote control the car audio of PLCD54MP head unit with Apple & Android devices.
Scan the QR code to download the PYLE Android/IOS App.


Android App IOS App
Connect your smartphone to PLCD54MP through BT, then tap the APP and turn on it on your smartphone.
Now you can control the audio and the RDS function (Optional) of PLCD54MP head unit by your smartphone.
SPECIFICATIONS
Features:
• AM/FM/CD/MP3/USB/AUX Stereo Receiver
- Single DIN
• LCD Display with Remote Control
• CD/MP3 Stereo Receiver System
• AM/FM Stereo Radio, 30 Station Memory
- Wireless BT Audio Ability
- USB Flash Readers
• Aux (3.5mm) Input Connector Jack
- Connect & Stream Audio from External Devices
• MP3 Digital Audio File Playback
- LCD Display Panel
- USB Reader
• Electronic Volume Control (treble, Balance, Fader)
• Memory/Repeat/Random/Intro Play
- Mute/Clock Control
• ID3 Tag Song Readout for Artist Name/Song Title
- RGB Button Control
2 pair RCA Output + 2x Subwoofer
• Equalizer (EQ) Electronic Audio Configuration
• Automatic Memory Preset Store/Scan Mode
- Repeat/Shuffle Song Functions
- Compatible With XBass, Siri Dialing, Android App, IOS App & Demo Mode
Wireless BT Streaming Connectivity:
• Built-in BT for Wireless Music Streaming
• Built-in Microphone for Hands-Free Calling
- Conveniently Reject/Answer Incoming Calls
- Compatible with All of Your Favorite BT Devices (iPhone, Androids, Smartphones, iPad, Tablets, etc.)
- Wireless BT Version: BT VERSION 4.2
Technical Specs:
- Remote Control Battery Operated, Requires (1) Coin-Type Battery
- Battery Type: 3V Lithium Bat. 240mAh Capacity
- Single DIN Universal Size Standard
• Night illumination: RGB
• MAX. Power: 4x75W (300 Watts)
• PLL Electronic Tuning Radio Tuner
• ISO with 4 Pin/8 Pin Wire Connector - Stereo/Mono Mode Selectable
• Audio Control: Treble/Fader/Balance, No Treble & Bass - Preset EQ: Flat/Pop/Rock/Class/Off
- Switchable USA/Europe Tuner Frequencies by Software
• Max. USB Support: 64GB - Power: DC 12V
• Current Consumption: 10A
• Product Dimension: 4.5" x 7.1" x 1.97" - inches
FCC WARNING
This device complies with Part 15 of the FCC Rules. Operation is subject to the following two conditions: (1) this device may not cause harmful interference, and (2) this device must accept any interference received, including interference that may cause undesired operation.
PRECAUTIONS ON POWER SUPPLY AND SPEAKER CONNECTIONS:
Do not connect the speaker leads of the power cord to the car battery; otherwise, the unit will be seriously damaged. BEFORE connecting the speaker leads of the power cord to the speakers, check the speaker wiring in your car.


PYLE
PyleUSA.com

natural_image
Illustration of a laptop with a red checkmark on screen (no text or symbols)VISIT US ONLINE:
Have a question?
Need service or repair?
Want to leave a comment?
PyleUSA.com/ContactUs

Questions? Issues?
We are here to help!
Phone: (1) 718-535-1800
Email: support@pyleusa.com
California Prop 65 Warning
! WARNING:
This product contains Nickel carbonate which is known to the state of California to cause cancer birth defects and other reproductive harm. Do not ingest.
For more info go to: www.P65warnings.ca.gov
- CONTENTS
- INTRODUCTION
- What's in the Box:
- WIRING CONNECTIONS
- COMPONENTS OVERVIEW OF THE COMPONENTS
- GENERAL OPERATION
- Power On/Off
- Removing The Front Panel
- Volume Up And Down
- Mute On/Off
- Changing The Modes
- Sefling The Audio/Menu
- Display
- Auxiliary Input Jack
- Reset
- RADIO OPERATION
- Switch Between Europe /USA/Asian/Russian frequency
- Change Bands
- To Store/Recoil Preset Stations
- Manual Tuning
- In the radio mode:
- Seek Tuning
- In radio mode:
- CD/USB OPERATION
- Insert CD
- Eject CD
- USB Connection
- Select Next Track Or Previous Track
- Fast Forward/Reverse
- Play/Pause
- Introduction Scan
- Repeating The Track
- Playing All Tracks In Random
- Folder/Trock Navigation
- Remote Control
- Name of buttons and location
- Note:
- Make A Call
- Redial Last Dialed Number
- Answer A Call
- Reject Or End A Call
- Switch Audio Between Cor Audio And Mobile Phone
- Adjust Call Volume
- Audio Streaming (A2DP)
- APP OPERATION
- SPECIFICATIONS
- Features:
- Wireless BT Streaming Connectivity:
- Technical Specs:
- FCC WARNING
- PRECAUTIONS ON POWER SUPPLY AND SPEAKER CONNECTIONS:
- PYLE
- PyleUSA.com
- Questions? Issues?
- California Prop 65 Warning
- ! WARNING:
Brand : Pyle
Model : PLCD54MP
Category : Subwoofer