KAWFLWASM8A - Washing machine Kogan - Free user manual and instructions
Find the device manual for free KAWFLWASM8A Kogan in PDF.


| Product Type | Front Load Washing Machine |
| Brand | Kogan |
| Model | KAWFLWASM8A |
| Capacity | 8 kg |
| Dimensions (H x W x D) | 850 x 600 x 530 mm |
| Weight | 72 kg |
| Power Supply | 220-240 V, 50 Hz, 10 A |
| Energy Efficiency Class | A+++ |
| Spin Speed | 1200 rpm |
| Number of Programs | 15 |
| Steam Function | Yes |
| Noise Level (Wash/Spin) | 55 dB / 78 dB |
| Water Consumption | 55 L per cycle |
| Delay Start | Up to 24 hours |
| Child Lock | Yes |
| Self-Cleaning Drum | Yes |
| Included Accessories | User manual, inlet hose, warranty card |
| Maintenance Type | Filter cleaning required after 30 washes |
| Repairability Index | 8.2 / 10 |
| Standby Power Consumption | <0.5 W |
Frequently Asked Questions - KAWFLWASM8A Kogan
User questions about KAWFLWASM8A Kogan
0 question about this device. Answer the ones you know or ask your own.
Ask a new question about this device
Download the instructions for your Washing machine in PDF format for free! Find your manual KAWFLWASM8A - Kogan and take your electronic device back in hand. On this page are published all the documents necessary for the use of your device. KAWFLWASM8A by Kogan.
USER MANUAL KAWFLWASM8A Kogan
natural_image
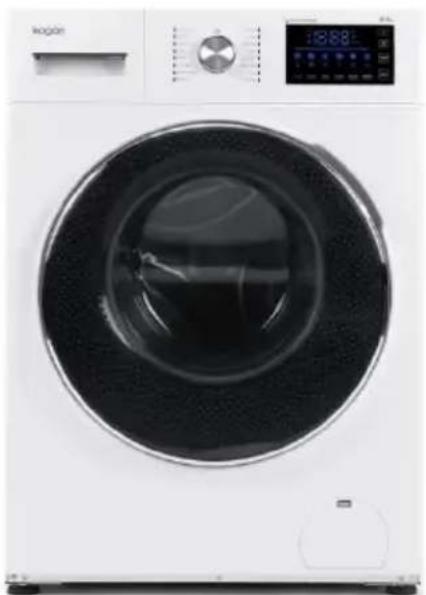
Front view of a white Kōgan washing machine with black liquid, control panel, and digital display (no visible text or symbols on the main body)8KG FRONT LOAD INVERTER WASHING MACHINE
SERIES 9
KAWFLWASM8A, KAWFLWASM8B
SAFETY & WARNINGS
- To avoid hurting people or damaging property, you must read and adhere to this manual before using the product. Failure to adhere to the manual could cause serious harm or death.
- Ensure you have read, and fully understand the contents of this manual before operating your machine.
- Dismantling, repair or alterations should only be carried out by a professional technician. Unauthorised repairs may result in electric shock, fire or injury.
- The washer should only be connected to power with a dry plug and dry hands. Otherwise, an electric shock may occur.
- Damaged or loose wires or plugs should not be used, turn off the power, cease use immediately, and contact Kogan.com support.
- Do not damage the power cable. Do not damage, alter, forcibly bend, pull, twist, or mishandle the cable. Do not place heavy items on the cable or plug.
- The machine should not come into contact with water during maintenance or repair.
- Do not put gasoline, benzene, alcohol, thinners, or fabrics with stains from these substances, into or near to the washing machine, as a fire or explosion may result.
- This washing machine is equipped with a dual-electrode grounding plug and should be used with an appropriate socket. The socket should be properly insulated.
- Use a single socket only, not an adapter, and ensure that the voltage and current matches the plug marked specifications. Sharing the same socket with other electric appliances may cause a fire or trip the power.
- Thoroughly wipe the power plug when the dirt has adhered to the prong or around the base of the prong. Do not use water to clean the prongs.
- The washing machine should not be installed in a humid place or in places exposed to wind and rain.
- The washing machine should never be used in close proximity with candles, mosquito-repellent, incense, cigarettes or other sources of open-flame.
- Do not operate the machine when there is a gas leak.
- Keep children away from the washer and do not place boxes or shelves next to the washing machine.
- This appliance is not intended for use by persons (including children) with reduced physical, sensory or mental capabilities, or lack of experience and knowledge unless they have been given supervision or instruction concerning use of the appliance by a person responsible for their safety.
- The glass door becomes hot during high-temperature washing. Do not touch the door when the machine is on, especially children.
- If you need to open the door during high-temperature washing, wait until the temperature drops to a safe level, and the door will unlock automatically.
-
Packing material may be dangerous to kids, please keep all packing material (plastic bags, foam etc) far away from kids.
-
Do not pull the wire when unplugging the device from the socket, grip the plug.
- Please unplug the unit during long periods of inactivity, such as going on holidays.
- Contact Kogan.com if the machine requires maintenance or repairs.
- If the power cord or supply cord is damaged, the manufacturer or its service agent or similarly qualified person must replace it in order to avoid a hazard.
• Water temperatures of above 50 degrees C should not be used for washing. - Do not wash, rinse or spin waterproof fabric or cloth, such as sleeping bags, raincoats, ski covers, utilities, bicycles, cars and motors. Doing so may cause abnormal vibration and damage to the washing machine, wall, floor and clothes.
- Do not stand on or put weight on the top of the unit.
- Two people are required when moving or transporting the machine.
- Keep hands and feet away from the bottom of the washing machine when it is motion.
- Check the water inlet hose connection by turning on the water before washing.
- The new hose-sets supplied with the appliance must be used, old hose-sets should not be reused.
- Do not install the washer over carpeted flooring, the carpet may block the ventilation openings on the bottom of the unit. Do not block the ventilation openings on the bottom of the washer by carpeting when the washer is installed on a carpeted floor.
• The water inlet hose should be tightly screwed to the unit. - After extended periods of use, the device may experience leakage caused by the union nut loosening. Every few months, check it and tighten it again if necessary.
- Please turn off the water tap when not using the unit, to prevent damages caused by water leakage.
COMPONENTS
natural_image
Front view of a white K appliance with black liquid, showing front panel and control panel (no visible text or symbols)Washing Machine (x1)
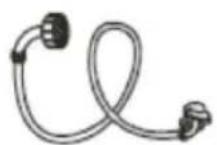
Water Inlet Hose

I transit Bolt Covers (x4)
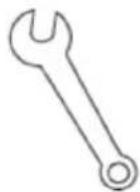
Spanner
User Guide
OVERVIEW
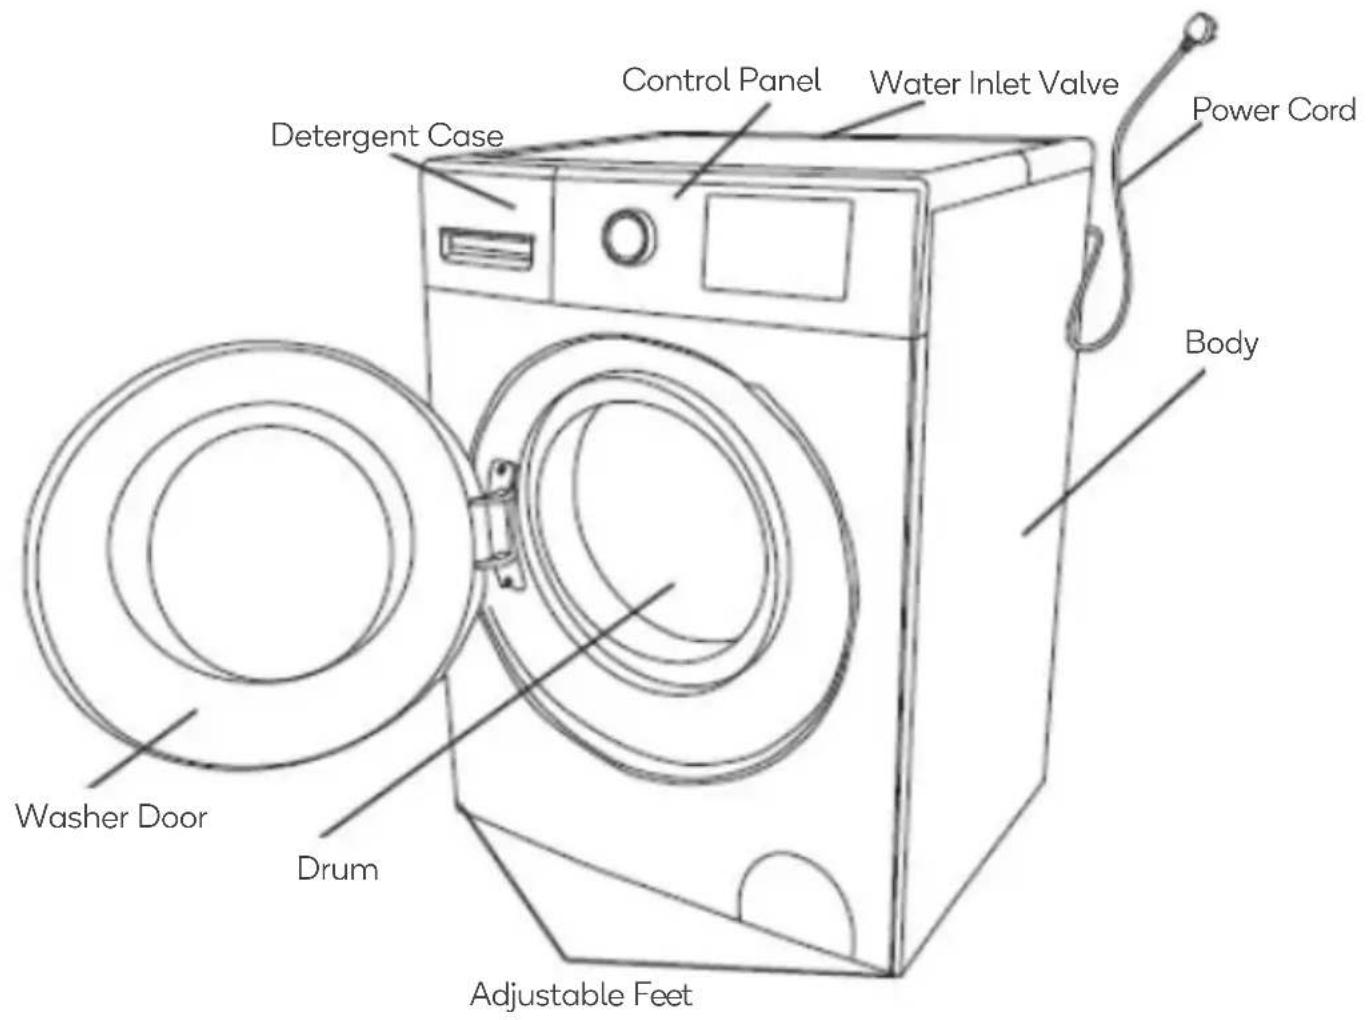
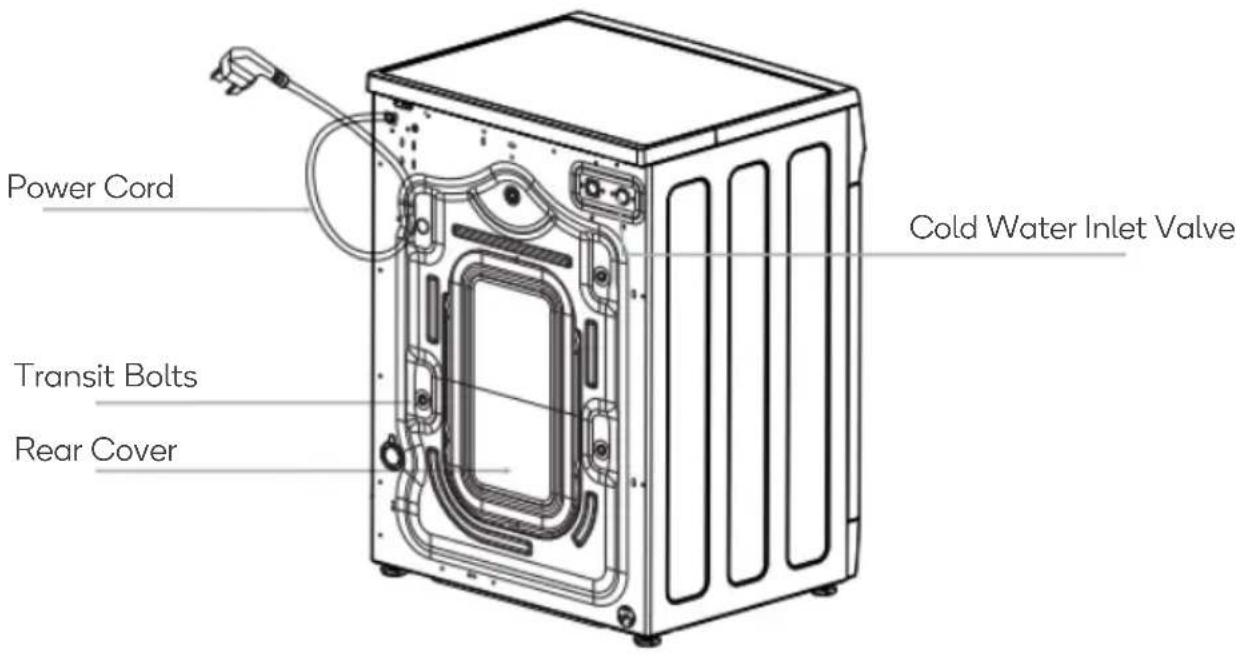
Note:
The artwork in this user guide is intended for reference only and may differ from the actual product.
INSTALLATION
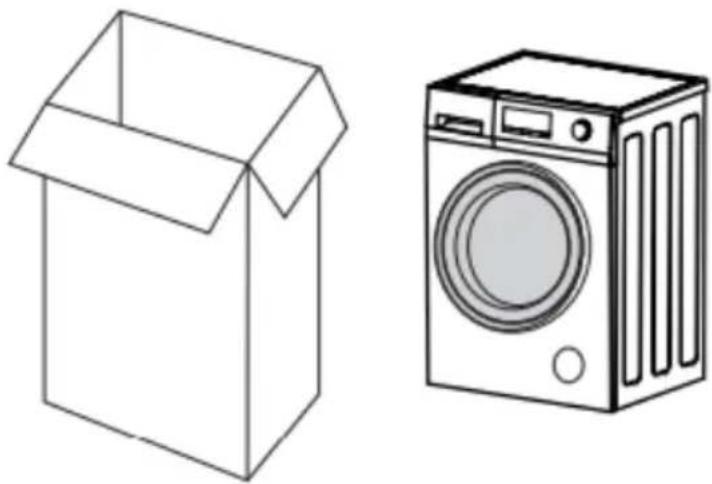
Packaging
natural_image
Line drawing of a cardboard box and a washing machine (no text or symbols)- Remove all the packaging (Including the foam base).
• Properly dispose of all the packaging and keep them out of the reach of children.
• Some condensation may appear on the packaging plastic bag and the door glass.
Transportation
Two people are required to carry the machine. One person on each side carries the machine by holding the base/adjustable feet of the machine.
Positioning the washing machine
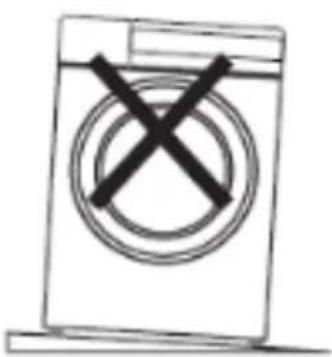
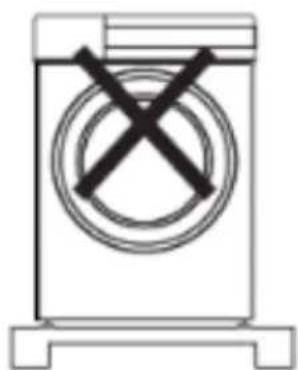
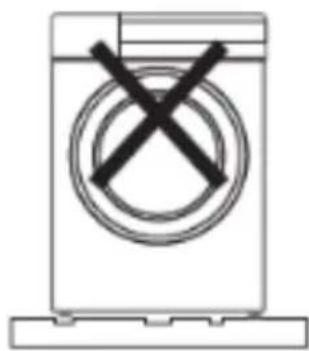
The washing machine must be installed on the ground which must be hard, flat and skid-proof. Please do not lay the washing machine on soft blankets or wooden floors. Do not lay the washing machine on a platform or bracket.
natural_image
Simple line drawing of a washing machine with a crossed-out circular symbol (no text or labels)Sloping ground
natural_image
Simple line drawing of a washing machine with a circular button and crossed X marks (no text or symbols)Platform or bracket
natural_image
Simple line drawing of a washing machine with a circular symbol and black X marks (no text or labels)Concave/convex ground
Transit Bolts
To protect the machine during transportation, there are x4 bolts inserted into the inner part of the machine. Remove these bolts before use.
If the transit bolts are left in place, there will be a strong shock, loud noise and misfunction during the spin process.
- Unscrew the bolts that are fixed before transportation by spanner (4 bolts).
- Remove the bolts horizontally.
- Fit the cover lid into the holes.
- Keep the removed transit bolts in a safe location; you will need to reinstall them if moving.
- As the picture belowshows, please be sure to confirm that the base protection device is not stuck at the bottom of the washing machine before use, otherwise, it will affect the normal use of the washing machine.
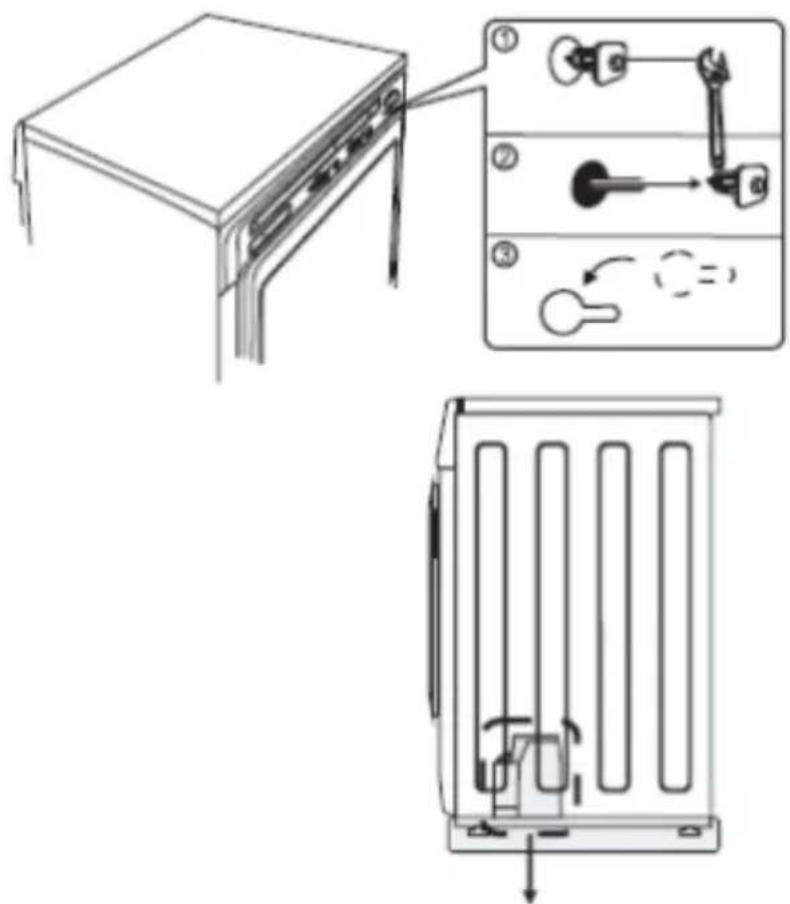
Base protection device
Level adjustments
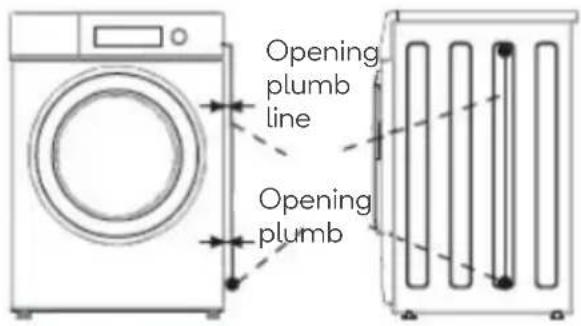
Adjust the machine horizontally
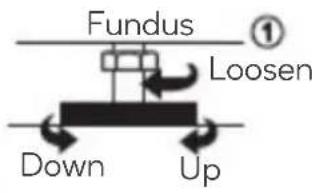
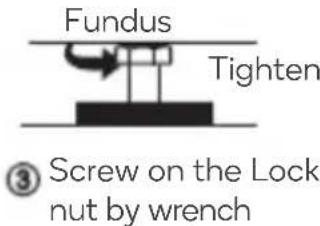
There will be a strong shock, noise and misfunction in operation if the washing machine is not installed correctly. Please adjust the front adjustable Leg.
- Check whether the washer is on a level surface using a plumb line as shown in the figure below. The washer is on the level ground floor if the Frame line of a washer is parallel with the plumb line.
- Adjust the Adjustable Leg of washer if necessary, to make the washer level as shown in the beside figure.
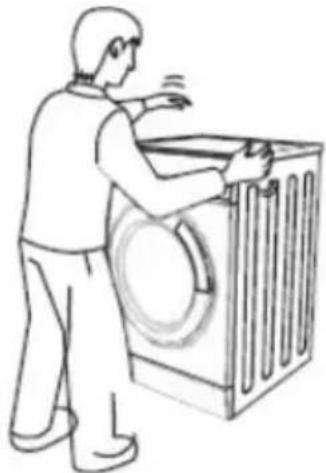
- Put your hands on the washer diagonally, press and shake the washer slightly to make sure that the washer is steady.
1.
2.
3.
natural_image
Line drawing of a person washing a large washing machine (no text or symbols)Connecting the Inlet Hose
-
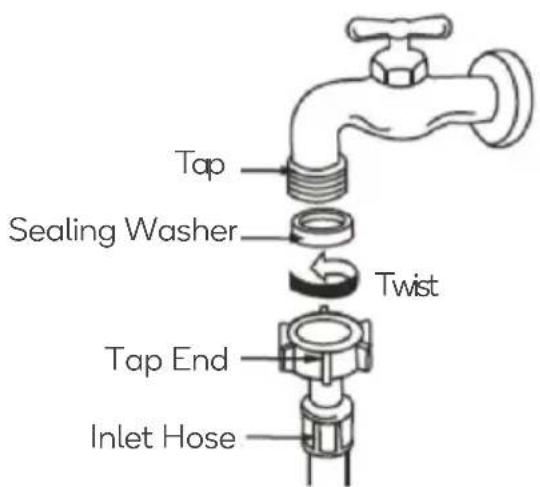
Check that the sealing washers are firmly seated.
-
Attach the curved end of the hose to the inlet valve of the washing machine. Tighten the coupling nuts securely by hand.
-
Attach straight end of the hose to the tap. Tighten the coupling nuts securely by hand.
-
Turn on the taps and check for leaks. Tighten the coupling nuts firmly if there is any leakage. If the water pressure is strong, close the water tap completely then open it slightly.
Caution:
• Do not use water which is hotter than 50°C.
• If your faucet is not suitable, please consult your plumber.
Installing Water Inlet Hose to the Washer
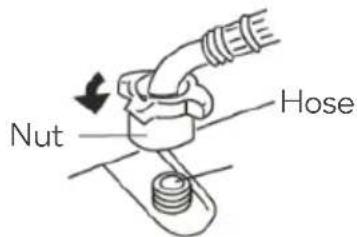
Turn the nut clockwise till the nut turned tight while holding the hose.
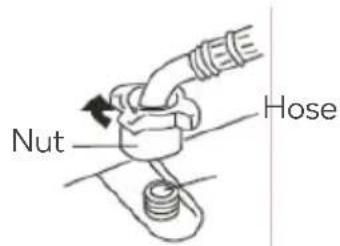
Turn the nut counter-clockwise after turning the faucet off when you want to detach the water inlet hose.
Connection of Drain Hose
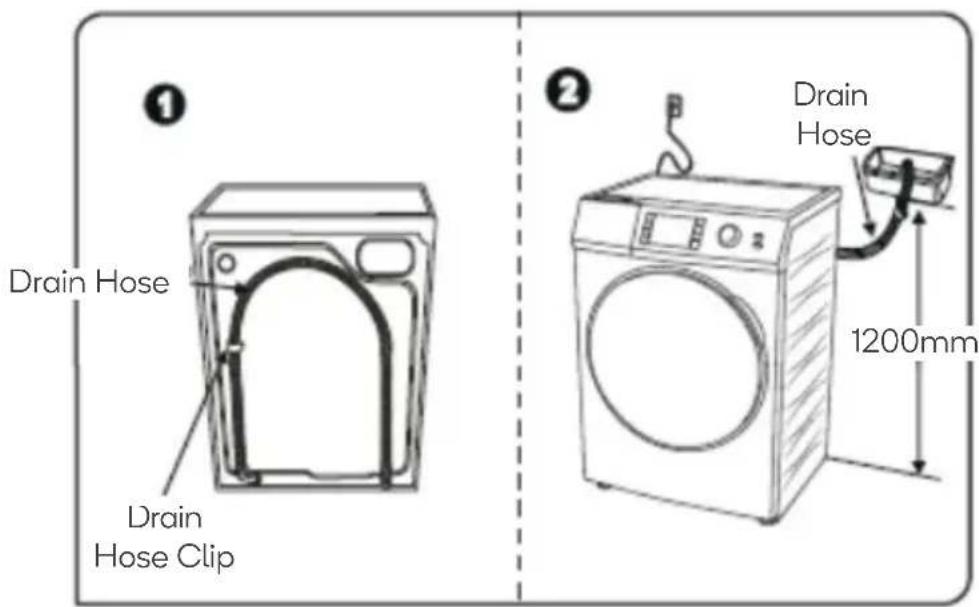
Whilst the washing machine is off, place the drain hose onto the back of the machine, as shown in figure 1 below.
Whilst the washing machine is on, place the drain hose into the drain location, as shown in figure 2. The drainpipe can go directly into your drain but ensure that the hose is not kinked and there is no sag in the hose, to avoid pooling.
To ensure that the washing machine functions normally, it is essential to clean the filter periodically.
Note:
Do not remove the drain hose holder; doing so may cause drainage problems.
Prior to first use:
- We recommend the user run the tub clean program before the first time washing. This is to remove any debris or dust from the tub, which would otherwise go onto your washing.
- Do not forget to close the water tap and take down the power plug to avoid any flood or fire disaster.
CONTROL PANEL
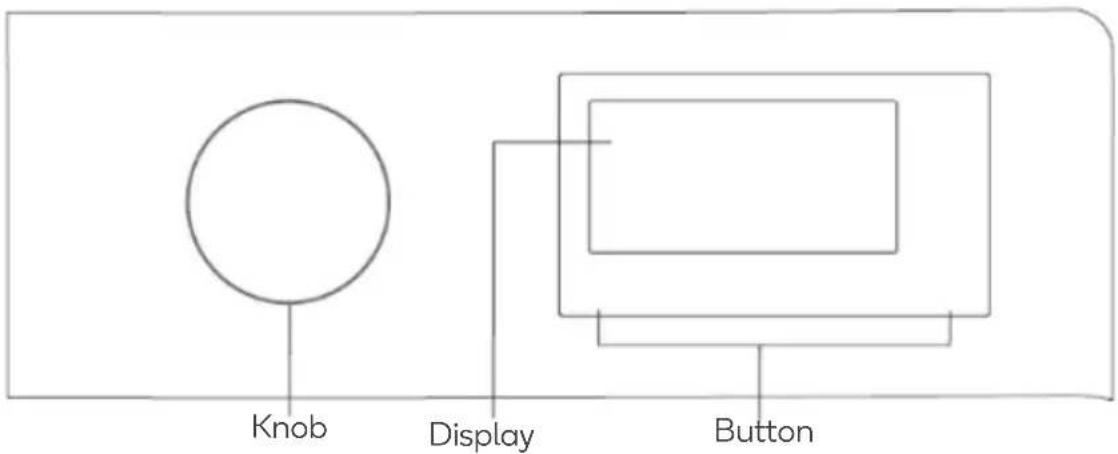
Start/Stop:

Press the button to start and press again to stop.
Power Knob:

Turn the power on or off. Please note, when a program has finished, the machine will turn off automatically.
Display window introduction:
- When the power is on, the display will show the spin speed and other information.
- When running, it will display the remaining time.
- When breakdown, it will display the error code.
Temperature button:
- Set the washing temperature according to the clothes type.
- The temperature setting range is different among programs. Some of them have a range limitation.
Speed button:
- Set the spin speed according to your requirements.
• Some programs have a spin speed limitation.
Delay button:
- Delay the start of your wash using this button.
Oxygen Fresh button:
• Used to enable the Oxygen Fresh function.
• In some pogroms, the oxygen fresh function is limited.
Rinse button:
- Set the rinse times.
• In some programs, the number or rinses that you can set is limited.
Soak button:
- Set the soak time.
• In some programs, the soak time options are limited.
Stains button:
• Used to set the stain type. Please note, this is only available for some washers.
Time wash button (+/-):
- Select the washing time.
OPERATION
Note:
Ensure transit bolts have been removed prior to operation. Failure to do so may result in damage.
Normal Clothes
Method
- Preparation
o Put the clothes in and close the door.
o Put the detergent or washing powder into the detergent box.
- Switch on the water tap, put the drain-pipe and plug in the power supply.
• Turn on the power.
- Choose a suitable program.
- Choose o suitable button.
- Press the "start/stop" button.
- When finishing washing, the buzzer will sound.
Wool
Method
• Turn on the power and choose the wool program.
Attention
- Check the washing label on the clothes before washing and confirm they are suitable for washing.
- When finishing wash, please take the clothes out immediately for airing in order to avoid clothes deformation.
• The temperature cannot be setting more than 40 degrees to avoid clothes broken.
• Using the wool detergent can improve the washing performance. - Separate light colour clothes and dark colour clothes before washing.
Backpack Wash
Method
• Turn on the power and select the backpack program.
Attention
• This mode is only designed for washing the backpack with water.
- Please take off any loose items or decorations before washing and wrap the strops tightly.
- Remove the backpack immediately to air out after washing.
- Please pull up the zipper and wash the backpack separately with other clothes.
Delayed Wash function
Method
- Turn on the power and choose a suitable wash program based on your items to be washed.
- Press the delay button to set the finish time.
- Press the start/stop button to start-up the delay wash function. The delay time is a one-hour interval and maximum is 24 hours.
Attention
- If you need to change the delay length, please press the power button and set it again.
• After setting the delay time, you can cancel by pressing the power button. - When you have selected your preferred delayed wash length, please press the delay button. The time set will display for 5 second
- The time is different for different conditions. It depends on the water pressure, drainage, clothing type and water temperature.
Add-up Function
• This function allows you to odd extra items during washing.
Method
- Press the "start/stop" button during washing until the timer light turns off. After some time, the door lock will release, and the display will show "Add". Please add washing and close the door, then press the "start/stop" button to continue washing.
- Please don't forcibly open the door, it is unsafe and will cause damage.
- When there is a lot of foam or water in the drum, please use a dry towel to prevent foam and water from spilling out after opening the door.
Cancel the buzzer
• Turn off the buzzer when the program finishes.
Set/Cancel method
- Turn on the power and press the "start/stop" button until the buzzer sounds. When releasing the button, "cancel the buzzer" function will be set and activated. If you repeat this, the setting will be cancelled.
Child protection function
- If the door is opened before the program starts, the machine will activate child protection mode.
• Firstly, the door will be opened, and the motor will be running for a while.
- And then, the door will be unlocked for a while still working again. If during the waiting time, the door is opened. The machine will be stopped.
Child lock function
- User can set child lock function in order to avoid child operate the machine when it is working. So, the door cannot be opened and the button except power button can't be handled. When this function is cancelled, the door can be opened again.
Set/Cancel method
- Turn on the power and press "temperature" button for 3 seconds till the buzzer sound. The child Lock function will be set. If you repeat this action, the child lock function will be cancelled.
DOOR LOCK
Unlocking the Automatic Door Lock
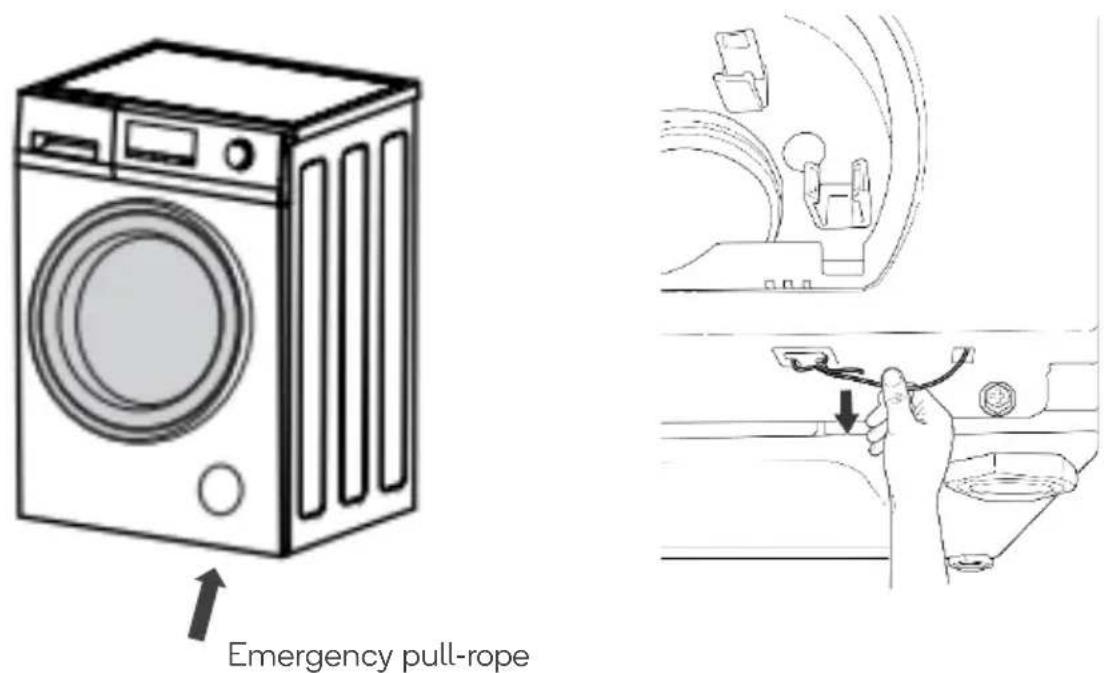
When the machine is operating, the door locks automatically. This is to prevent scalding from touching hot water before it has a chance to cool down. In normal usage, the door will not be unlocked until either the cycle is stopped, or the emergency pull-rope is activated.
When the machine is working, press the "start/stop" button. In most cases, the door can then be opened after the inner tub stops spinning. Exceptions to this are:
- If the power plug is removed when the machine is running, the door will remain locked as a safety measure.
- If the machine was running at a high working temperature, the door will remain locked as a safety measure until the temperature has reduced.
In most cases, the recommended course of action is to complete a full wash cycle and wait until the washing machine has cooled before opening.
To unlock the door in an emergency, there is a pull-rope located at the base of the washing machine. Tilt the machine up to gain access to the underside and locate the pull-rope. Pull the rope firmly until the door latch is unlocked, allowing door to be opened.
CAUTION – Water may be extremely hot and pose risk of scalding.
Note: If the door is opened whilst the machine is working, bubbles may escape. Clean the machine with a towel.
Introduction to each compartment of detergent box:
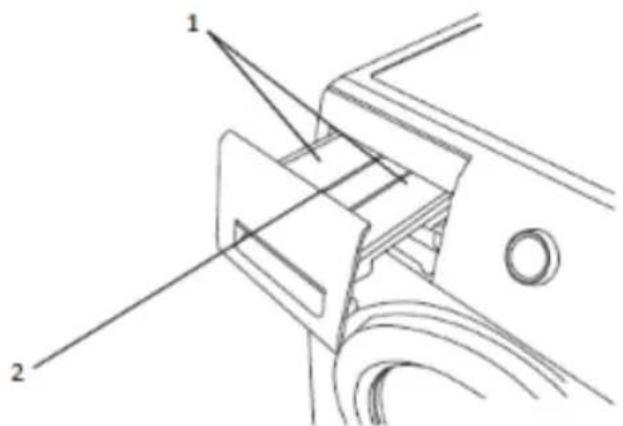
Powder Synthetic detergents

- For the undissolved detergents, for example: powder state soap, dissolve it in advance and then pour into the detergent box.
Liquid Detergent Bleach

• Use low bubble liquid synthetic detergents.
- For the concentrated liquid detergents, dilute it with water by half and then pour into the detergent box.
Softener

- Put into the detergent drawer before washing, it will be poured into the machine automatically during the last round of rinsing.
- For concentrated detergents, use a corresponding proportion of water to dilute the detergent then pour it into the detergent drawer.
• Do not exceed the full mark line.
Notes:
• High bubble washer powder or detergents are forbidden.
• Use detergents in accordance with the instruction provided by the manufacturer.
- Excessive detergents will cause too many bubbles and affect the rinse and may affect the functions of the washer.
- Choose suitable detergents in accordance with the type and colour of clothes, the water temperature and the stain.
PROGRAMS / MODES
Washing Programs (quick reference)
| Cotton Eco | Eco Cotton Wash |
| Cotton | Regular Cotton Wash |
| MixWash | Cotton and Synthetics Mixed Wash |
| Jeans | Wash Jeans |
| Wool | Wool Wash* |
| Synthetic | Synthetic Wash |
| Winter clothes | Down Jacket Wash* |
| Quick wash | Small Wash or Only Slightly Dirty |
| Colours | Wash Setting for Clothes with a Deep Colour or a Light Colour |
| UnderWear | Wash Underwear |
| Shirt | Wash Shirts |
| Kidswear | Wash Kids Wear |
| Rinse + Spin | Rinse and Spin Only |
| Spin | Spin Only |
| Drum clean | Clean the Drum Without Clothes |
| Backpack | Wash a Backpack |
* Item must be marked as machine washable on the label.
Washing Programs (detailed guide)
| Program | Cotton Eco |
| Application | Used for energy efficient washing. |
| Default time | 5:39 |
| Max. load (kg) | Rated capacity |
| Washing time (min) | Rated capacity |
| Temperature (°C) | 40°C |
| Rinse (cycles) | 3 |
| Spin time (minutes) | 14 |
| Spin speed (rpm) | 1400rpm |
| Stain | N/A |
| Program | Cotton |
| Application | Everyday cotton and linen fabrics. |
| Default time | 1:08 |
| Max. load (kg) | Rated capacity |
| Washing time (min) | 20 minutes |
| Temperature (°C) | Default 30°C |
| Rinse (cycles) | 2 (0-6) |
| Spin time (minutes) | 6 minutes(8 min @ 1200 rpm;9 min @ 1400 rpm;remaining time will be accumulated) |
| Spin speed (rpm) | Default 1000rpm(400-600-800-1000-1200-1400) |
| Stain | Oil (30min-50°C)Paint (25min-40°C)Wine (25min-40°C)Juice (25min-30°C)Coffee (35min-45°C)Stain (refer to specification) |
| Program | Mix wash |
| Application | For a mixed load of synthetic and cotton textiles. |
| Default time | 1:03 |
| Max. load (kg) | ≤6kg |
| Washing time (min) | 15 minutes |
| Temperature (°C) | Default 30°C |
| Rinse (cycles) | 2 (0-6) |
| Spin time (minutes) | 6 minutes(8 min @ 1200 rpm;remaining time will be accumulated) |
| Spin speed (rpm) | Default 1000rpm(400-600-800-1000-1200) |
| Stain | Oil (25min-40°C)Paint (20min-40°C)Wine (20min-40°C)Juice (20min-30°C)Coffee (30min-45°C)Stain (refer to specification) |
| Program | Quick wash |
| Application | For a few lightly soiled items. |
| Default time | 0:16 |
| Max. load (kg) | ≤1kg |
| Washing time (min) | 3 minutes |
| Temperature (°C) | Default Cold(Cold-10-20-30) |
| Rinse (cycles) | 1 (1-6) |
| Spin time (minutes) | 3 minutes(6 min @ 1000 rpm;8 min @ 1200 rpm;9 min @ 1400 rpm;remaining time will be accumulated) |
| Spin speed (rpm) | Default 800rpm(400-600-800-1000-1200-1400) |
| Stain | N/A |
| Program | Jeans |
| Application | For denim jeans or similar hard- wearing cotton clothing. |
| Default time | 1:08 |
| Max. load (kg) | ≤5kg |
| Washing time (min) | 20 minutes |
| Temperature (°C) | Default 30°C(Cold-10-20-30-40) |
| Rinse (cycles) | 2 (0-6) |
| Spin time (minutes) | 6 minutes(8 min when speed is 1200 rpm;remaining time will be accumulated) |
| Spin speed (rpm) | Default 1000rpm(400-600-800-1000-1200) |
| Stain | Oil (30min-40°C)Mud (25min-40°C)Wine (30min-40°C)Juice (25min-30°C)Coffee (30min-40°C) |
| Program | Wool |
| Application | For machine-washable wool or wool-blend textiles. Designed to prevent shrinkage. |
| Default time | 1:04 |
| Max. load (kg) | ≤2kg |
| Washing time (min) | 20 minutes |
| Temperature (°C) | Default Cold(Cold-10-20-30-40) |
| Rinse (cycles) | 2 (0-6) |
| Spin time (minutes) | 2 minutes(2 min @ 400 rpm;3 min @ 800 rpm) |
| Spin speed (rpm) | Default 600rpm(400-600-800) |
| Stain | N/A |
| Program | Synthetic |
| Application | For synthetic or synthetic blend textiles. |
| Default time | 1:07 |
| Max. load (kg) | ≤6kg |
| Washing time (min) | 20 minutes |
| Temperature (°C) | Default 30°C(Cold-10-20-30-40-60) |
| Rinse (cycles) | 2 (2-6) |
| Spin time (minutes) | 5 minutes(6 min @ 1000 rpm;remaining time will be accumulated) |
| Spin speed (rpm) | Default 800rpm(400-600-800-1000) |
| Stain | Oil (25min-40°C)Paint (20min-40°C)Wine (20min-40°C)Juice (20min-30°C)Coffee (30min-45°C)Stain (refer to specification) |
| Program | Winter clothes |
| Application | For heavy jackets and winter clothing. |
| Default time | 1:31 |
| Max. load (kg) | ≤2kg |
| Washing time (min) | 30 minutes |
| Temperature (°C) | Default 30°C(Cold-10-20-30-40) |
| Rinse (cycles) | 3 (0-6) |
| Spin time (minutes) | 3 minutes(6 min @ 1000 rpm;remaining time will be accumulated) |
| Spin speed (rpm) | Default 800rpm(400-600-800-1000) |
| Stain | Paint (30min-40°C)Wine (30min-40°C)Juice (30min-30°C)Coffee (40min-45°C) |
| Program | Backpack |
| Application | For washing backpacks that can be washed in water. |
| Default time | 1:51 |
| Max. load (kg) | ≤3kg |
| Washing time (min) | 50 minutes |
| Temperature (°C) | Default 40°C(Cold-10-20-30-40) |
| Rinse (cycles) | 3 (0-6) |
| Spin time (minutes) | 3 minutes |
| Spin speed (rpm) | Default 800rpm(400-600-800) |
| Stain | N/A |
| Program | Colours |
| Application | For brightly coloured items. |
| Default time | 1:00 |
| Max. load (kg) | ≤ 3 kg |
| Washing time (min) | 15 minutes |
| Temperature (°C) | Default 15°C |
| Rinse (cycles) | 2 (0-6) |
| Spin time (minutes) | 3 minutes |
| Spin speed (rpm) | Default 600rpm(400-600-800) |
| Stain | N/A |
| Program | Underwear |
| Application | Used for washing underwears. |
| Default time | 1:21 |
| Max. load (kg) | ≤3kg |
| Washing time (min) | 20 minutes |
| Temperature (°C) | Default 30°C(Cold-10-20-30-40-60) |
| Rinse (cycles) | 3 (0-6) |
| Spin time (minutes) | 3 minutes(6 min @ 1000 rpm;remaining time will be accumulated) |
| Spin speed (rpm) | Default 800rpm(400-600-800-1000) |
| Stain | Oil (25min-40°C)Paint (20min-30°C)Juice (20min-30°C)Stain (refer to specification) |
| Program | Kidswear |
| Application | For washing children's clothes. |
| Default time | 2:23 |
| Max. load (kg) | ≤4kg |
| Washing time (min) | 80 minutes |
| Temperature (°C) | 80°C |
| Rinse (cycles) | 3 (0-6) |
| Spin time (minutes) | 5 minutes(6 min @ 1000 rpm; 8 min @ 1200 rpm;9 min @ 1400 rpm; remaining time will be accumulated) |
| Spin speed (rpm) | Default 800rpm(400-600-800-1000-1200-1400) |
| Stain | N/A |
| Program | Rinse + Spin |
| Application | Separate rinse program with spin. |
| Default time | 0:21 |
| Max. load (kg) | ≤6kg |
| Washing time (min) | -- |
| Temperature (°C) | -- |
| Rinse (cycles) | 1 (0-6) |
| Spin time (minutes) | 6 minutes(8 min @ 1200 rpm; 9 min @ 1400 rpm; remaining time will be accumulated) |
| Spin speed (rpm) | Default 1000rpm(400-600-800-1000-1200-1400) |
| Stain | N/A |
| Program | Spin |
| Application | Separate spin program with selectable speed. |
| Default time | 0:12 |
| Max. load (kg) | ≤6kg |
| Washing time (min) | -- |
| Temperature (°C) | -- |
| Rinse (cycles) | -- |
| Spin time (minutes) | 6 minutes(8 min @ 1200 rpm; 9 min @ 1400 rpm; remaining time will be accumulated) |
| Spin speed (rpm) | Default 1000rpm(400-600-800-1000-1200-1400) |
| Stain | N/A |
| Program | Drum Clean |
| Application | A drum cleaning program designed for use without laundry items. |
| Default time | 2:19 |
| Max. load (kg) | -- |
| Washing time (min) | 110 minutes |
| Temperature (°C) | 80°C |
| Rinse (cycles) | 1 |
| Spin time (minutes) | 3 minutes |
| Spin speed (rpm) | 800rpm |
| Stain | N/A |
| Program | Shirt |
| Application | Cotton or mixed fibre shirts and blouses. |
| Default time | 1:05 |
| Max. load (kg) | <=3kg |
| Washing time (min) | 20 minutes |
| Temperature (°C) | Default 30°C(Cold-10-20-30-40-60) |
| Rinse (cycles) | 2(0-6) |
| Spin time (minutes) | 3 minutes(6 minutes @1000rpm; remaining time will be accumulated) |
| Spin speed (rpm) | Default 800rpm(400-600-800-1000) |
| Stain | Oil (30min-40°C) |
| Paint (30min-40°C) | |
| Wine (35min-35°C) | |
| Juice (40min-30°C) | |
| Coffee (40min-45°C) | |
| Stain (refer to specification) |
CLEANING & CARE
• To ensure the long life of the machine, perform regular cleaning and maintenance.
- Ensure the filter is emptied often.
• Always unplug the power before cleaning or performing general maintenance.
Machine Body
- Please use a soft cloth to clean the washing machine body after washing every time. If the machine is very dirty, use a small amount of detergent or soap, with a little bit of water on the cloth to clean the washer.
- Please do not use water to wash the machine directly, only use a very small amount via a damp cloth.
- Cleaning powders, diluents, petrol, and alcohol cannot be used to wash the machine.
Door Gasket
- Please use a cloth to clean the gasket after every wash. If any items blocking or stuck to the gasket, carefully remove them.
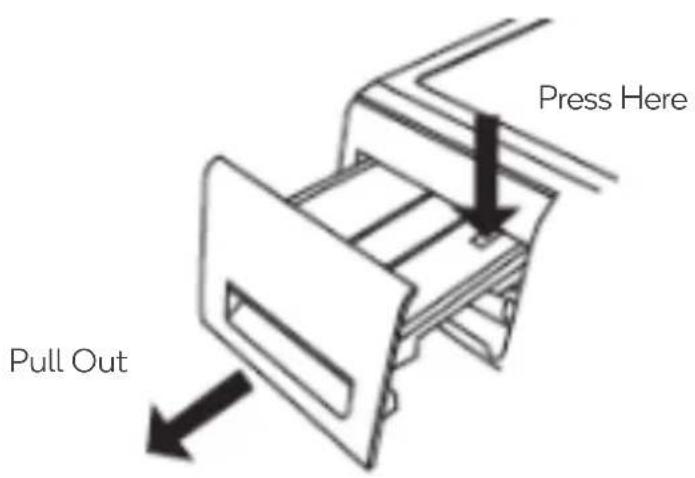
Cleaning the Detergent Box
- Please clean the detergent box regularly.
• Take out the box and clean it with water.
Cleaning the Inlet Valve
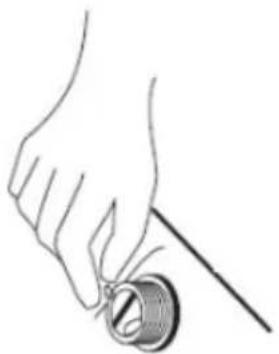
Please note, this should be completed once per year:
- Take out the inlet pipe.
- Take out the filter screen.
- Use a toothbrush to clean the filter screen and then assemble it again.
- Connect the inlet pipe after cleaning.
natural_image
Line drawing of a hand holding a small circular object with a rod (no text or symbols)Valve
Cleaning the Tub
It is recommended that this is completed once a month.
After extended use, dirt may build up in and around the tub. The tub cleaning function can clean the inner and outer tub. During this cleaning mode, there should be no clothes or detergent in the tub.
Machine Frozen
• Use a hot towel to wrap the water tap and connector.
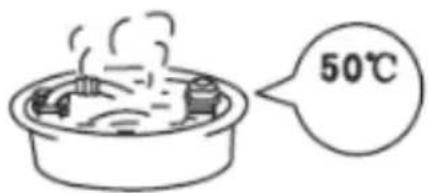
- Disassemble the inlet pipe and put it into 50-degree water. Ensure that the water is not too hot to avoid damaging your washer.
• Put 2-3 Litres of 50-degree water into the tub.
- Assemble the inlet pipe again, open the water tap and start the machine. Lastly, please check that the inlet pipe and drain pipe work normally.
1.
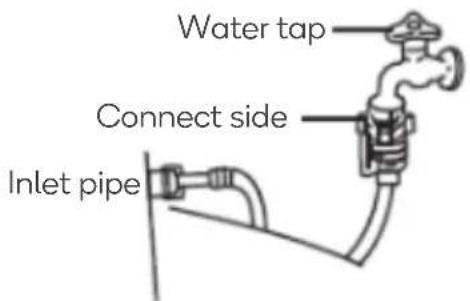
2.
Disassemble the inlet pipe and put it into 50-degree hot water.
3.
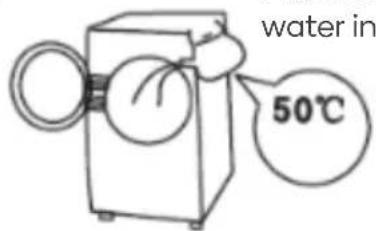
Put 2-3 litre 50 degree hot water into tub
Cleaning the Pump Filter
It is recommended that this is completed once a month.
- Insert a coin into the groove of the pump and press it. The filter cover can then be opened. If there is hot water in the machine, please wait for it to cool before opening the filter.
- Take out the filter anticlockwise.
- Wash the filter with water.
- Assemble the filter into the pump clockwise.
Notes:
- The filter should be assembled tightly to avoid water leakage.
- Do not clean the filter whilst the machine is working.
SPECIFICATIONS
| Rated wash capacity | 8.0kg |
| Rated spin capacity | 8.0kg |
| Rated dry capacity | - |
| Rated dry power | - |
| Max current | 10A |
| Rated voltage | 230-240V-50Hz |
| Rated power | 2000W |
| Energy efficiency | 4 stars |
| Water efficiency | 4 stars |
| Water consumption per wash | 79L |
| Annual energy consumption | 265kWh |
| Washing performance | 0.8 |
| Water pressure | 0.03 – 1.0 MPa |
| Product dimension | 600 x 595 x 850 |
TROUBLESHOOTING
| Fault Code | Issue | Inspection point | Solution |
 | Not Functioning | Check the power outlet has power.Check the outlet is turned on.Check if the house power has been tripped or is not on.Check the leakage protector switch.Ensure delayed start has not been activated. | Press the Start/Pause button |
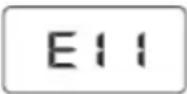 | No Water | Press the on/off button.Ensure the water pipe has not been frozen.Ensure the filter does not have a blockage.Check the washer is receiving water from the pipe. | Press the Start/Pause button |
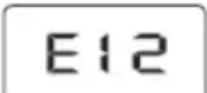 | Undrained | Ensure the drainpipe is in the right place.Check to see if the drain height is too high.Check to see if the drain-pipe has been clocked or notEnsure the drain-pipe Length is suitable. | Press the Start/Pause Button |
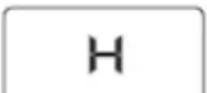 | Door Cannot Be Opened | The water temperature may be too high.Ensure the hot water has not been used. | The washer will automatically unlock once a safe temperature is reached. |
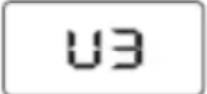 | No Spin Cycle | Ensure the washer in the right place and steady.Make sure don’t have too many clothes or very large items.Use fewer clothes.Don’t insert rolled up blankets into the machine. | Add 2 items of clothing and press the Start/pause button. |
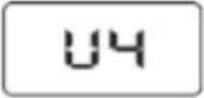 | Door Not Closed | Close the door, until the "Locked" light turns on, then press "Start/Pause" to restart. | |
| Other code Alarm | Press "Start/Pause" to proceed, if the issue persists, contact Kogan.com support. |
No-Fault Code
| Condition | Reason |
| Shaking/noisy/vibrating | The transit bolts have not been removed, view the Transit Bolts section of the manualThe machine has not been levelled, adjust the level feet. |
| The door cannot be opened | Water temperature or water level is too high or the power has been cut.Child lock function has been activated.The clothes are clamped between the door and the gasket |
| Peculiar smell | Because there are rubber components, there may be a rubber smell at the beginning. |
| Less water for washing and rinsing wash | Front-load washers only need a little water to wash. |
| No water | Ensure the tap is turned on.Ensure the water pipe is not frozen.Ensure the filter is not blocked. |
| Halfway inflow the water | If the water level drops, the systems will automatically add water. |
| Drainage when the machine is washing | Too much bubbly detergent. |
| Remaining time change | ·If the clothes are distributed unevenly, the washing machines will automatically add water to stay in balance.·The rest time is calculated based on 15L/min inflow. So according to different water pressure, the time will be longer or shorter.·The draining time will be increased if the washing machine is on angle. |
| The spinning process makes an abnormal sound | ·Is the power line connected to the cabinet?·Have the transit bolts been removed?·Is there a hairpin, coins or other foreign objects that have fallen into the drum? |
| Failure to work after power failure | ·When the power cut off, the machine will not rotate. If power is recovered and the machine will still not rotate, turn off the power and then reset the program. |
| Emergency open door | If you experience of power outage whilst using your washing machine or there is another issue that prevents the cycle from finishing, the washing machine will still be locked.If this occurs, any garments will remain locked inside the machine until the cycle can be complete.In an emergency, the lock can be overridden, however, it can be dangerous and you must wait a minimum of one hour for the water to cool.As the cycle is not complete, there is a risk of:·Burns from hot water·Water spillsTo reduce the likelihood of this occurring, the water in the washer should be allowed to cool to room temperature and the water level should be less than one bucket.Once this is confirmed, the door can be opened by pulling the rope mechanism at the bottom of the device. |
Need more information?
We hope that this user guide has given you the assistance needed for a simple set-up. For the most up-to-date guide for your product, as well as any additional assistance you may require, head online to help.kogan.com
kogan.com
- 8KG FRONT LOAD INVERTER WASHING MACHINE
- SAFETY & WARNINGS
- COMPONENTS
- OVERVIEW
- Note:
- INSTALLATION
- Packaging
- Transportation
- Positioning the washing machine
- Transit Bolts
- Level adjustments
- Adjust the machine horizontally
- Connecting the Inlet Hose
- Caution:
- Installing Water Inlet Hose to the Washer
- Connection of Drain Hose
- Prior to first use:
- CONTROL PANEL
- Start/Stop:
- Power Knob:
- Display window introduction:
- Temperature button:
- Speed button:
- Delay button:
- Oxygen Fresh button:
- Rinse button:
- Soak button:
- Stains button:
- Time wash button (+/-):
- OPERATION
- Normal Clothes
- Method
- Wool
- Attention
- Backpack Wash
- Delayed Wash function
- Add-up Function
- Cancel the buzzer
- Set/Cancel method
- Child protection function
- Child lock function
- DOOR LOCK
- Unlocking the Automatic Door Lock
- Introduction to each compartment of detergent box:
- Powder Synthetic detergents
- Liquid Detergent Bleach
- Softener
- Notes:
- PROGRAMS / MODES
- Washing Programs (detailed guide)
- CLEANING & CARE
- Machine Body
- Door Gasket
- Cleaning the Detergent Box
- Cleaning the Inlet Valve
- Cleaning the Tub
- Machine Frozen
- Cleaning the Pump Filter
- SPECIFICATIONS
- TROUBLESHOOTING
- Need more information?
Brand : Kogan
Model : KAWFLWASM8A
Category : Washing machine