
47KPB2 - Soundbar KICKER - Free user manual and instructions
Find the device manual for free 47KPB2 KICKER in PDF.


| Product Type | Soundbar |
| Model | 47KPB2 |
| Brand | KICKER |
| Dimensions (W x H x D) | Approx. 1000 x 60 x 110 mm |
| Weight | Approx. 2.5 kg |
| Power Supply | 100-240V AC, 50/60Hz |
| Power Consumption | 35W (typical) |
| Audio Channels | 2.1 (stereo + subwoofer) |
| Total Output Power | Approx. 100W RMS |
| Connectivity | HDMI ARC, Optical, Bluetooth 5.0, USB, AUX |
| Bluetooth Version | 5.0 |
| Supported Audio Formats | MP3, WAV, FLAC |
| Remote Control | Included (batteries not included) |
| Wall Mountable | Yes (bracket included) |
| Included Accessories | Remote control, optical cable, power cord, wall mount kit |
| Sound Modes | Movie, Music, Voice, Sport |
| Controls | Buttons on unit: Power, Volume, Input, Bluetooth; remote control |
| Display | LED indicators for input and status |
| Maintenance | Clean with a soft, dry cloth. Unplug before cleaning. |
| Safety | Do not expose to moisture. Do not disassemble. Use only provided power adapter. |
| Spare Parts & Repairability | Contact KICKER customer service. No user-serviceable parts. |
| General Information | Compatible with most TVs, smartphones, and tablets. Suitable for wall mounting or shelf placement. |
Frequently Asked Questions - 47KPB2 KICKER
User questions about 47KPB2 KICKER
0 question about this device. Answer the ones you know or ask your own.
Ask a new question about this device
Download the instructions for your Soundbar in PDF format for free! Find your manual 47KPB2 - KICKER and take your electronic device back in hand. On this page are published all the documents necessary for the use of your device. 47KPB2 by KICKER.
USER MANUAL 47KPB2 KICKER
natural_image
Technical line drawing of a mechanical component with internal grooves and mounting holes (no text or symbols)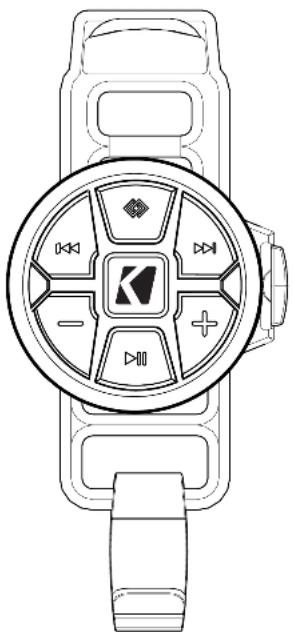
natural_image
Line drawing of a smartwatch with control panel and buttons (no text or symbols)select language seleccione el idioma choisir la langue sprache auswählen




Contents
Overview....2
Specifications....3
Installation 4
Wiring 4
Relay Install & Battery Management 5
Mounting....6
Operation....8
Status LED....8
Control Panel 9
Setting Input Source .... 10
Line Output & AUX IN ..... 10
Broadcast Mode 11
Remote Control Install......12
Remote Control Operation ... 14
Troubleshooting ..... 15
Warranty 16
IMPORTANT SAFETY WARNING
PROLONGED CONTINUOUS OPERATION OF AN AMPLIFIER, SPEAKER, OR SUBWOOFER IN A DISTORTED, CLIPPED OR OVER-POWERED MANNER CAN CAUSE YOUR AUDIO SYSTEM TO OVERHEAT, POSSIBLY CATCHING FIRE AND RESULTING IN SERIOUS DAMAGE TO YOUR COMPONENTS AND/OR VEHICLE. AMPLIFIERS REQUIRE UP TO 4 INCHES (10CM) OPEN VENTILATION. SUBWOOFERS SHOULD BE MOUNTED WITH AT LEAST 1 INCH (2.5CM) CLEARANCE BETWEEN THE FRONT OF THE SPEAKER AND ANY SURFACE. KICKER PRODUCTS ARE CAPABLE OF PRODUCING SOUND LEVELS THAT CAN PERMANENTLY DAMAGE YOUR HEARING! TURNING UP A SYSTEM TO A LEVEL THAT HAS AUDIBLE DISTORTION IS MORE DAMAGING TO YOUR EARS THAN LISTENING TO AN UNDISTORTED SYSTEM AT THE SAME VOLUME LEVEL. THE THRESHOLD OF PAIN IS ALWAYS AN INDICATOR THAT THE SOUND LEVEL IS TOO LOUD AND MAY PERMANENTLY DAMAGE YOUR HEARING. PLEASE USE COMMON SENSE WHEN CONTROLLING VOLUME.
The KICKER PowerBar-series of powered, bar-mounted Bluetooth speakers provide you with the power and clarity required for enjoying audio in any outdoor and recreational setting. Featuring an IP66 rating for weatherproof applications, the PowerBars come with an easy-to-use control panel and mountable remote control, so changing the tunes is only a touch away. KICKER's new Broadcast Mode technology allows you to sync up two or more KPB's via Bluetooth, while AUX Input and Line Output connections allow for any combination of use with other devices. Use the KPB1 or the larger KPB2 on the beach, the links, the patio, off-road, or anywhere you're missing the music.
Use the following instructions to install and operate your KPB and KPB Remote.
Specifications
Model: KPB1 KPB2
Power Output 150W 300W
@ 14.4V, <10% THD+N
Total Speakers 6 10
Height [in, mm] 4-9/16, 115 4-9/16, 115
Width [in, mm] 21, 530 34-1/2, 880
Woofer [in, mm] 3, 76
Tweeter [in, mm] 1, 25
Wiring Harness Length [ft, m] 12, 3.66
Frequency Response [Hz] 65-20,000
Signal-to-Noise Ratio >75, A-weighted
re: rated power
Tweeter Magnet Material Neodymium
Tweeter Dome Material Titanium
Tweeter Design Dome
Woofer Cone Material Polypropolene
Woofer Surround Material Santoprene
Aux Input Stereo 3.5mm Female
0–1.0 V Sensitivity
Line Output Stereo 3.5mm Female
Buffered, 2.5V
Wiring
Disconnect the vehicle's battery to avoid an electrical short. Connect the KPB's black ground wire to a paint-and-corrosion-free, solid, metal area of the vehicle's chassis, or to the negative battery terminal. Connect the KPB's red power wire to the positive battery terminal. The wire harness includes an inline 15A ATC fuse (KPB1) or 30A ATC fuse (KPB2), and 5/16" ring terminals. The ring terminals can be cut off if they're not needed, but the fuse should always be kept within 18" of the battery.
Keep the audio signal cable away from factory wiring harnesses and other power wiring. If you need to cross this wiring, cross it at a 90-degree angle.
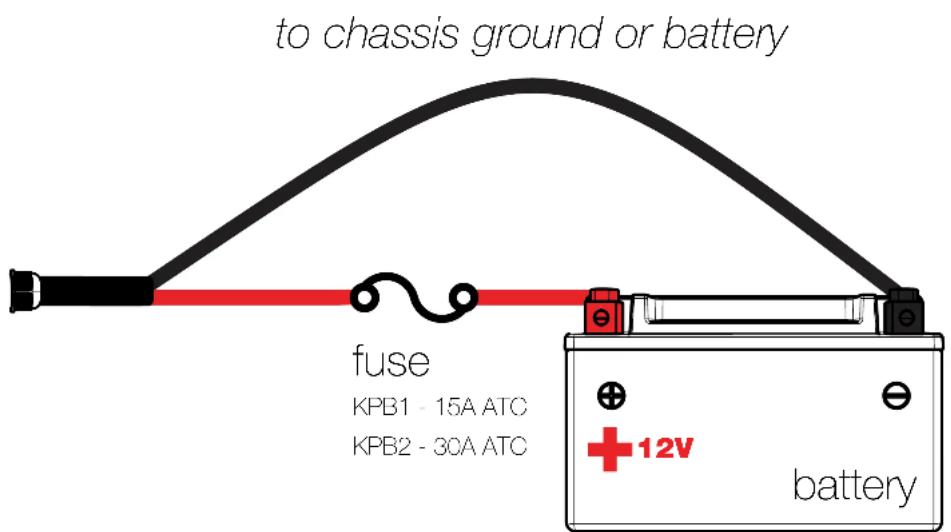
WARNING: Do not connect to +24V battery systems.
IMPORTANT: The KPB draws a small amount of power over time, even when off. If storing the vehicle for two weeks or more, take precautions to ensure the life of your vehicle's battery, such as disconnecting the fuse.
Relay Install & Battery Management
To increase battery longevity, it is good practice to use a Battery Management System (BMS) for your electric vehicles, as well as an accessory or relay switch for your KPB. Relays and BMS are optional and not included. Required current rating: 30A
SPDT Bosch Relay
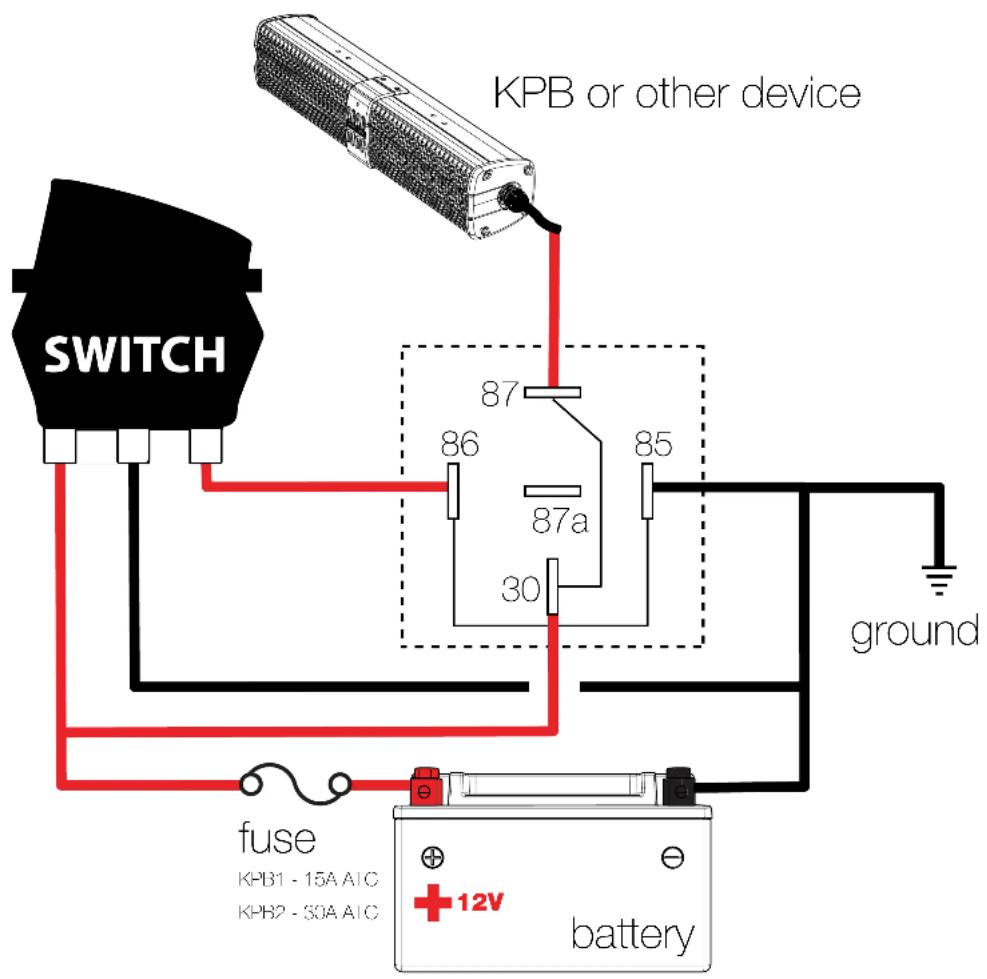
30 - Power Input
85 - Relay Ground
86 - Relay Trigger Input
87 - Power Output - Open Contact (ON)
87a - Disconnected
Mounting
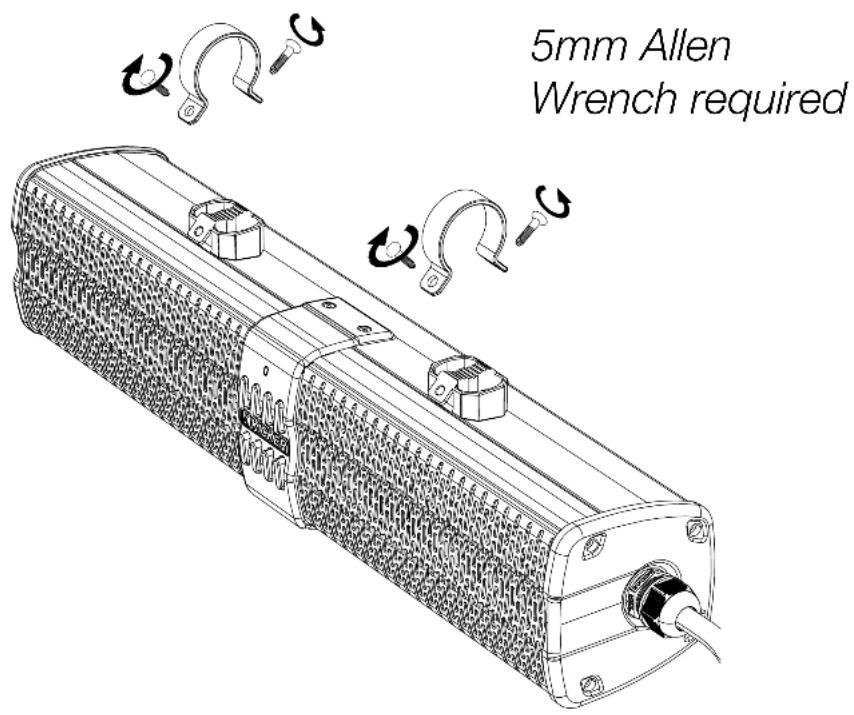
The KPB-series mounts out-of-the-box to round bars cylinders with the included 1.5", 1.75", and 2" diameter Bar Clamps. Use the KPB Square Clamps (LINK GOES HERE) - sold separately - to mount your KPB to square bars. Choose a structurally sound location to mount the KPB. The KPB may be mounted below or above bars, and the Mounting Base may be rotated ±30° to accommodate some curved bars. Make sure there are no items interfering with the route of the wiring.
Installation tools are not provided. 5mm and 6mm Allen Wrenches are required.
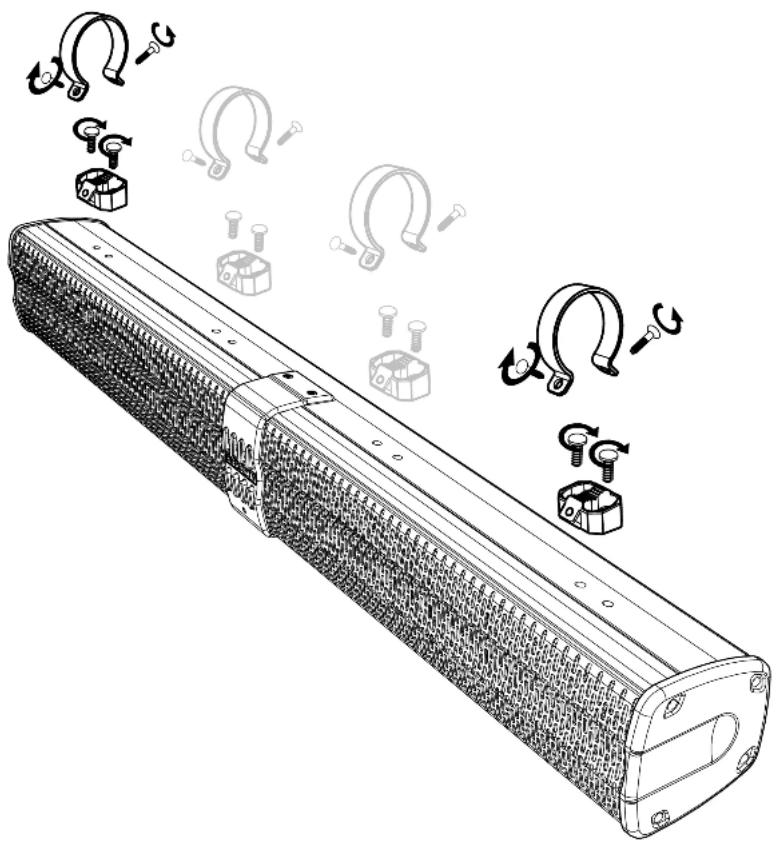
- Screw the Mounting Bases to the PowerBar using the Mounting Screws.
6mm Allen Wrench required
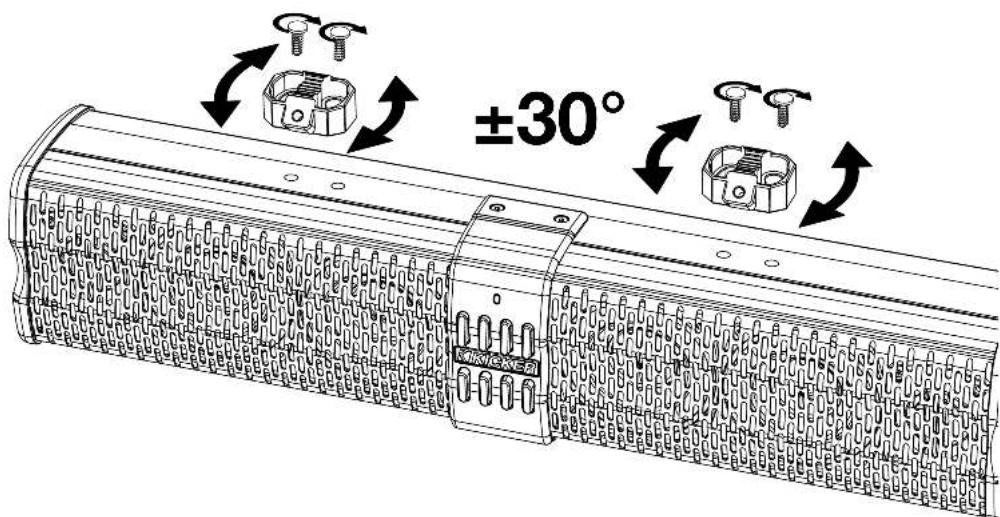
- Place the included rubber inserts in the Clamp Rings for improved vibration dampening, then install the Clamp Rings around your bar, securing them to the Mounting Bases using the Clamp Screws.
The KPB2 may be mounted with the bases and clamps in an inward, or outward configuration. KICKER does not recommend a combined inward/outward configuration.
natural_image
Technical illustration of a heat exchanger with attached clamp and screw components (no text or symbols)Status LED
The LED color displays audio source, pairing status, and warnings:
Bluetooth (Blue)
Off Power is off
Solid Bluetooth Mode
Rapid Blinking Bluetooth Pairing Mode
Alternate Red/Blue Waiting for Broadcast Mode to connect
Long Blue + Short Red Broadcast Mode
Bluetooth Transmitter Active
AUX IN (Red)
Off Power is off
Solid AUX Mode
Alternate Red/Blue Waiting for Broadcast Mode to connect
Long Red + Short Blue Broadcast Mode
AUX Transmitter Active
Other
Purple Broadcast Mode
Receiver Active
Red Rapid Blinking AMP FAULT Warning
(Overload, Undervoltage,
Overvoltage)
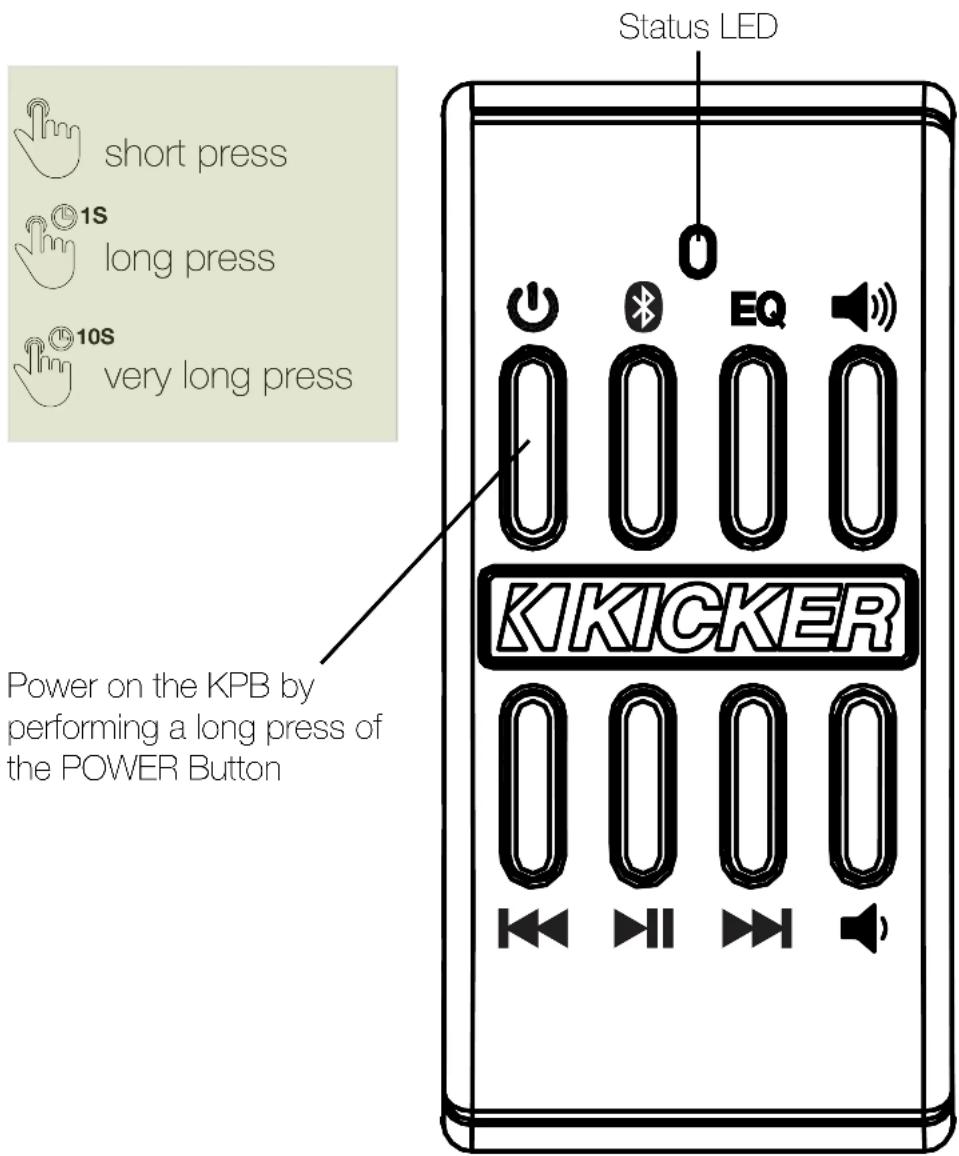
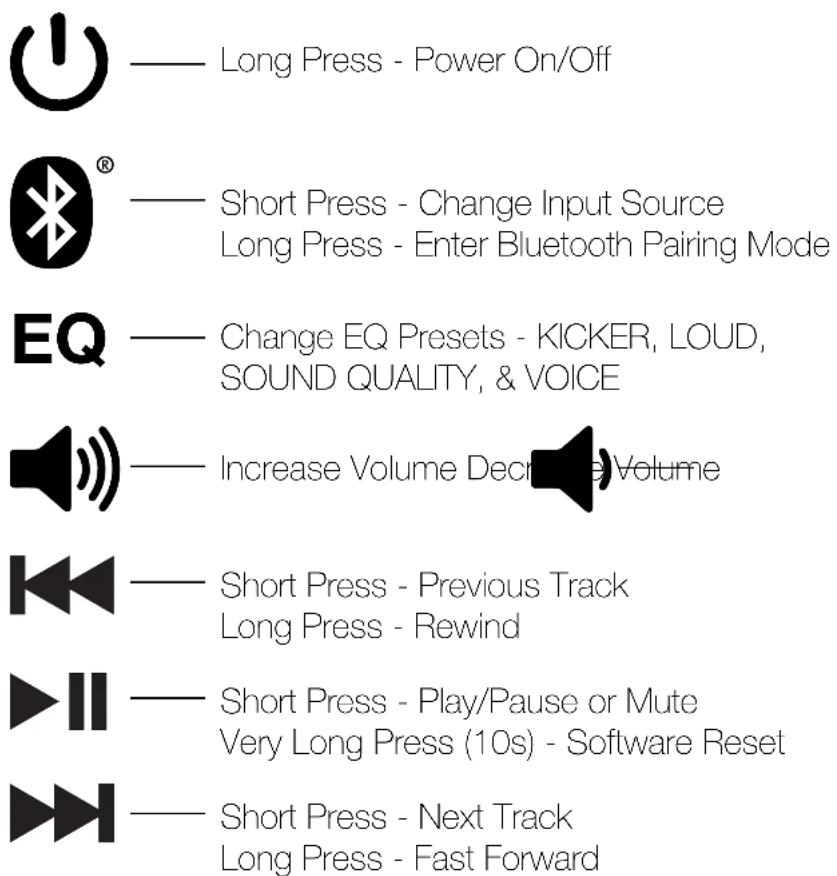
Control Panel
Setting Input Source
Short Press the SOURCE button to switch between Bluetooth (blue) and AUX IN (red) input sources.
To enter Bluetooth Pairing Mode, Long Press the SOURCE button while in Bluetooth mode. The STATUS LED will begin to flash blue. You may exit pairing mode at this stage by short pressing the SOURCE button.
To finish pairing, from your audio device select either 'KPB1 KICKER' or 'KPB2 KICKER'. When successfully connected, the STATUS LED will be solid blue. When the PowerBar powers on in, or enters, Bluetooth mode, it will automatically begin to search for and connect with the last connected device.
Line Output & AUX IN
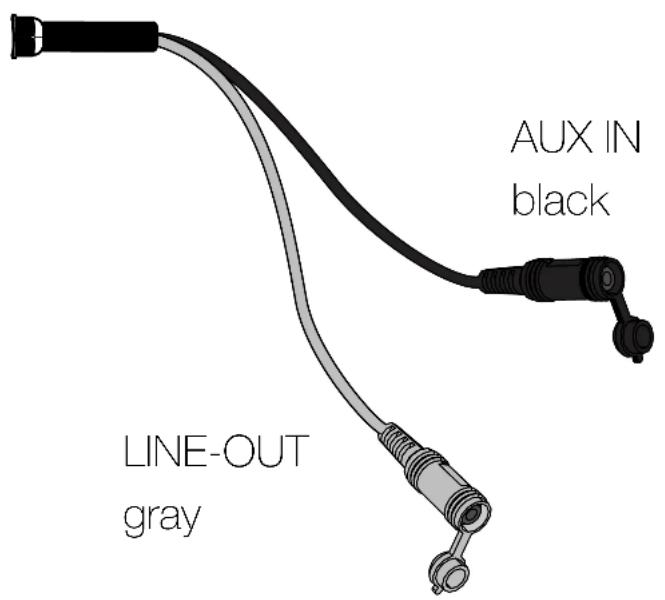
To use an external audio device as your input source, connect it to the AUX IN jack using a 1/8" (3.5mm) AUX cable, then set your input source to AUX IN.
To send a line-level signal, connect a 1/8" (3.5mm) AUX cable from the Line Output of the KPB to your external audio device's line-level input.
Broadcast Mode
Broadcast Mode allows you to play your audio through multiple KPBs. One KPB, the Broadcaster, will broadcast the audio to the Receiver(s). Broadcast Mode is compatible with both AUX and Bluetooth input sources. You may enter Broadcast Mode with the following button sequence.
- Set audio input source with the Broadcaster KPB.
- Press & Hold the PLAY/PAUSE button and the Increase Volume button on the KPB which is transmitting. The Status LED will begin alternately flashing blue and red.
- Press & Hold the PLAY/PAUSE button and the Decrease Volume button on the KPB which is receiving.
- Repeat Step 3 for all additional KPBs!
Remote Control Install
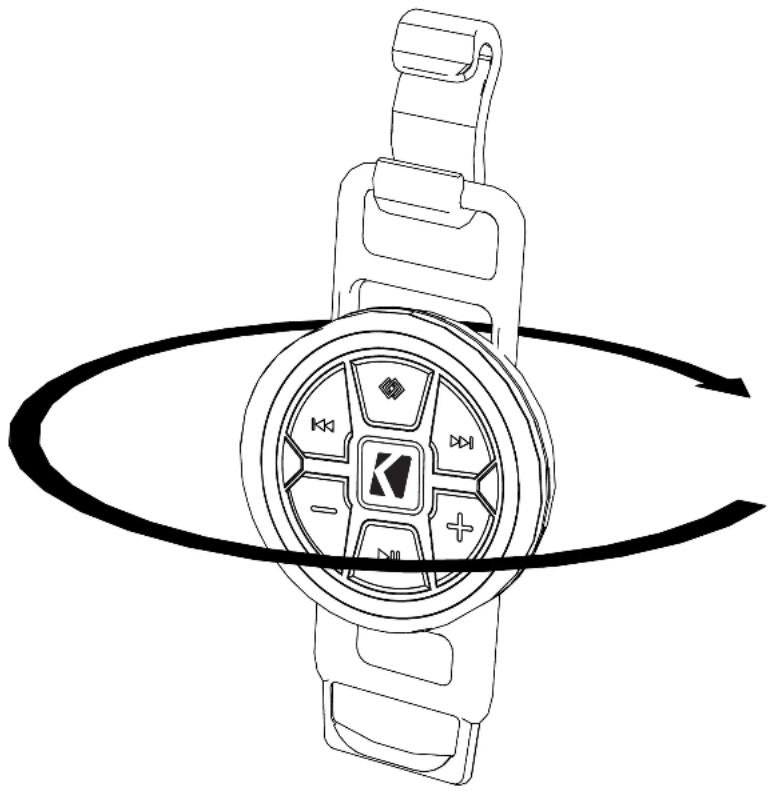
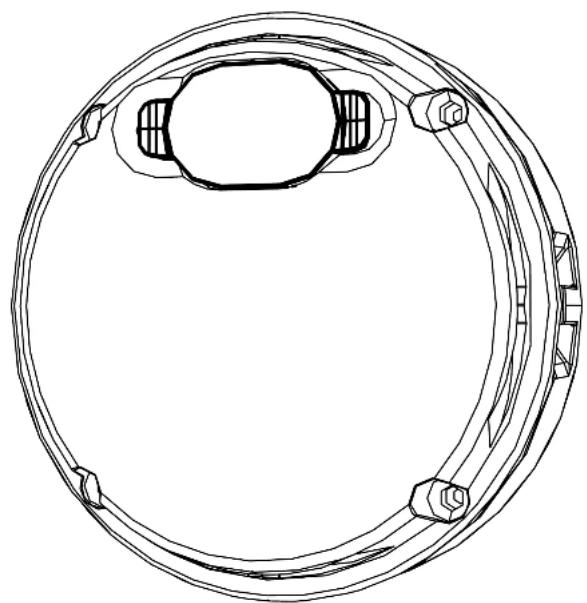
The remote control must be charged via USB micro 5V power input. Fully charge the remote for at least 3 hours before first use to maximize battery life. The LED will be red while charging, and off when complete. The KPB Remote is only water-resistant when the rear cap is in place.
natural_image
Line drawing of a smartwatch with a circular dial and wrist strap, showing motion lines around it (no text or symbols)Remove back cover to remote charge port
natural_image
Technical line drawing of a circular mechanical component with bolted ends and internal features (no text or symbols)Connect 5V USB charging source to micro USB port
Install the included remote control to your steering wheel as follows:
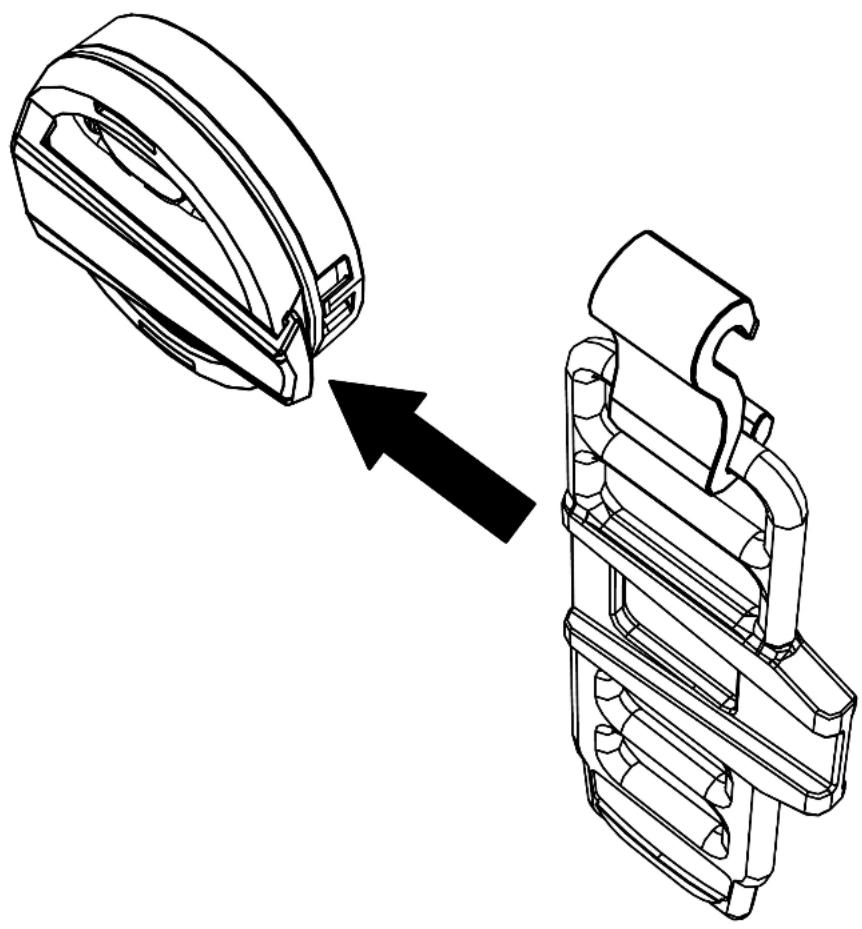
- Slightly pull out the mount tab on the back of the KPB remote and slide the remote onto the strap as shown below, firmly pushing until you feel a click. The Remote may be removed from the mounting clip and strap using a slight twisting motion.
natural_image
Technical line drawing of a mechanical component with an arrow indicating assembly or transformation (no text or symbols present)- Place the KPB onto the wheel facing the user in the position in which it will be most used. The remote may be latched to the mounting strap in 4 different configurations.
- With the latch facing the front of the remote, place the two arms of the remote control around the steering wheel.
- Pull the latch down over the open slot on the adjacent arm.
Remote Control Operation
Short Press - Previous Track
Long Press - Rewind
Double-Press - Sync to KPB
Short Press - Change Input Source
Long Press - Enter Bluetooth Pairing Mode
▶—— Short Press - Next Track
Long Press - Fast Forward
— Decrease Volume
▶II — Short Press - Play/Pause or Mute
+ — Increase Volume
Troubleshooting
If the KPB becomes frozen or stuck during algorithmic calculation, does not appear to be working, or gives an error code, check the obvious things first such as blown fuses, poor or incorrect wiring connections, incorrect setting of gain controls, etc.
No power? With a Volt Ohm Meter (VOM) check the following: ①+12 volt power terminal (should read +12V to +16V) ②Check for reversed power and ground connections ③Ground terminal, for proper conductivity. ④Check fuses.
Power on, no signal? Check the following: ① AUX In/Out connections and cables ② Test audio source signal, either with a "known good" output device or other means. ③ Audio source volume & KPB output volume are increased.
Bluetooth device will not connect? On your mobile device: ①Tum Bluetooth off, then on again. ②Remove 'KPB1/2 KICKER' from the Bluetooth menu. Then pair again (see page 10). ③Move your mobile device closer to the speaker. Avoid obstacles that may block the wireless signal. ④Perform a factory reset by pressing and holding the PLAY/PAUSE button for 10 seconds (Bluetooth devices must be re-paired after factory reset).
No or low output? ① Check the settings on the audio source. ② Check the speaker wiring, including AUX input and Line-level connections.
KPB frozen or stuck in operating procedure? ①Perform a factory reset on the KPB ②Cycle the power
Broadcast Mode will not engage? ① Follow the instructions to enter Broadcast Mode on page 11. ② Perform a factory reset on all Broadcasting and Receiving KPBs.
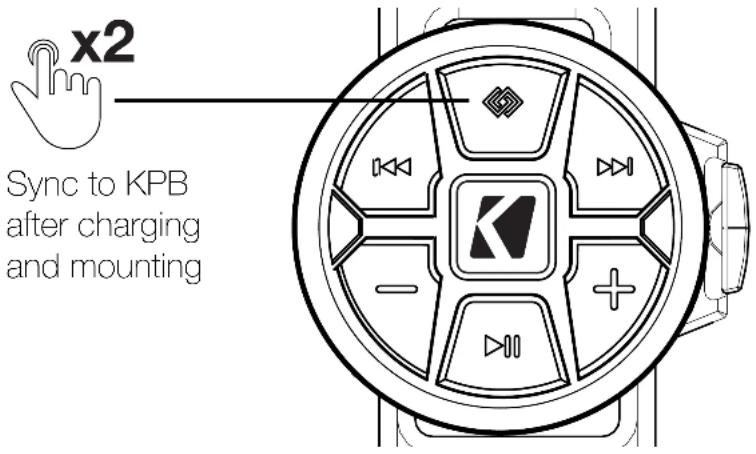
No Remote Function? ① Charge for at least 3 hours with a known-good 5V USB cable ② Double press the SOURCE button to link.
CAUTION: When jump starting the vehicle, be sure that connections made with jumper cables are correct. Improper connections can result in blown fuses as well as the failure of other critical systems in the vehicle.
If you have more questions about the installation or operation of your new KICKER product, see the Authorized KICKER Dealer where you made your purchase. For more advice on installation, click on the SUPPORT tab on the KICKER homepage, www.KICKER.com. Choose the TECHNICAL SUPPORT tab, choose the subject you are interested in, and then download or view the corresponding information. Please E-mail support@KICKER.com or call Technical Services (405) 624-8583 for unanswered or specific questions.
When purchased from an Authorized KICKER Dealer, KICKER warrants this product to be free from defects in material and workmanship under normal use for a period of TWO (2) YEARS from date of original purchase with receipt. If this product is identified as "Refurbished" or "B Goods", the warranty is limited to a period of THREE (3) MONTHS from the date of original purchase. In all cases you must have the original receipt. Should service be necessary under this warranty for any reason due to manufacturing defect or malfunction during the warranty period, KICKER will repair or replace (at its discretion) the defective merchandise with equivalent merchandise. Warranty replacements may have cosmetic scratches and blemishes. Discontinued products may be replaced with more current equivalent products. This warranty is valid only for the original purchaser and is not extended to owners of the product subsequent to the original purchaser. Any applicable implied warranties are limited in duration to a period of the express warranty as provided herein beginning with the date of the original purchase at retail, and no warranties, whether express or implied, shall apply to this product thereafter. Some states do not allow limitations on implied warranties; therefore, these exclusions may not apply to you. This warranty gives you specific legal rights; however you may have other rights that vary from state to state.
WHAT TO DO IF YOU NEED WARRANTY OR SERVICE:
Defective merchandise should be returned to your local Authorized Stillwater Designs (KICKER) Dealer for warranty service. Assistance in locating an Authorized Dealer can be found at www.KICKER.com or by contacting Stillwater Designs directly. You can confirm that a dealer is authorized by asking to see a current authorized dealer window decal.
If it becomes necessary for you to return defective merchandise directly to Stillwater Designs (KICKER), call the KICKER Customer Service Department at (405) 624-8510 for a Return Merchandise Authorization (RMA) number. Package only the defective items in a package that will prevent shipping damage, and return to:
Stillwater Designs
3100 North Husband St
Stillwater, OK 74075
The RMA number must be clearly marked on the outside of the package. Please return only defective components. The return of functioning items increases your return freight charges. Non-defective items will be returned freight-collect to you. For example, if a subwoofer is defective, only return the defective subwoofer, not the entire enclosure. Include a copy of the original receipt with the purchase date clearly visible, and a “proof-of-purchase” statement listing the Customer’s name, Dealer’s name and invoice number, and product purchased. Warranty expiration on items without proof-of-purchase will be determined from the type of sale and manufacturing date code. Freight must be prepaid; items sent freight-collect, or Cash-On-Demand, will be refused.
WHAT IS NOT COVERED?
This warranty is valid only if the product is used for the purpose for which it was designed. It does not cover:
o Damage due to improper installation
o Subsequent damage to other components
o Damage caused by exposure to moisture, excessive heat, chemical cleaners, and/or UV radiation
o Damage through negligence, misuse, accident or abuse. Repeated returns for the same damage may be considered abuse
o Any cost or expense related to the removal or reinstallation of product
o Speakers damaged due to amplifier clipping or distortion
o Items previously repaired or modified by any unauthorized repair facility
o Return shipping on non-defective items
o Products with tampered or missing barcode labels
o Products with tampered or missing serial numbers
o Products returned without a Return Merchandise Authorization (RMA) number
o Products purchased from an UNAUTHORIZED dealer
o Freight Damage
o The cost of shipping product to KICKER
o Service performed by anyone other than KICKER
HOW LONG WILL IT TAKE?
KICKER strives to maintain a goal of one week turnaround for all electronics (amplifiers, crossovers, equalizers, etc.) returns. Delays may be incurred if lack of replacement inventory or parts is encountered. Failure to follow these steps may void your warranty. Any questions can be directed to the KICKER Customer Service Department at (405) 624-8510. Contact your International KICKER dealer or distributor concerning specific procedures for your country's warranty policies.
KPB1 PowerPoint™
KICKER®
Info Card | Tarjeta de Información | Carte Info | Infokarte
Scan here for owner's manual
Thank you and congratulations on your purchase of the KICKER KPB1 PowerBar! The PowerBar-series are a bar-mount outdoor audio solution, featuring an IP66 rating for weatherproof resiliency, Bluetooth wireless connectivity, and an uncompromising amount of power at 150W. Whether you're off-road, at the beach, on the links or anywhere you're missing the music, the KPB1 is ready to brave the elements with you.
Sincerely Steve Irby President/CEO
Installation tools not provided. 5mm and 6mm Allen wrenches required. Make sure to turn off your Powerbar when not in use. If storing the vehicle, we recommend removing the Powerbar's fuse to safeguard the vehicle's battery. Device draws power even when off. See user manual for power hookup recommendations.
Make certain the power source is +12V DC. See user manual for using Broadcast Mode to connect and share music with another PowerBar. See user manual for installation and operation of the included RF remote control. See user manual for power hookup recommendations. See user manual for steps when storing the vehicle. Use short and long presses of the button panel and remote control to operate the KBB1. Some input sources do not support all functions.
MOUNTING | MONTAJE | MONTAGE
With three different sizes of clamp rings provided, it's easy to choose the Clamp Ring best suited for your bar or application. Screw the Mounting Bases to the PowerBar using the Mounting Screws. Place the Clamp Rings around your mounting bar and secure the Clamp Rings to the Mounting Bases using the Clamp Screws. The KPB1 may be mounted above or below the bars, while the Mounting Base may be rotated ± 30° to accommodate some curved bars.
Power on the PowerBar by performing a long press (1 second) of the POWER Button. Enter Pairing mode by performing a long press of the Bluetooth (SOURCE) button while the PowerBar is powered on. The STATUS LED will flash blue while in pairing mode. When in Bluetooth Pairing mode, the PowerBar will display as "KFB1 KICKER" on your Bluetooth device. You may also exit pairing mode by pressing the SOURCE button. Once a Bluetooth device is connected, the light will be solid blue. Press the SOURCE button to switch between Bluetooth and AUX input sources. The STATUS LED will be solid red when in AUX mode.
When the PowerBar powers on in, or enters, Bluetooth mode, it will automatically begin to search for and connect with the last connected device. If that device is not found, it will continue to search for the other saved connections until a connection is established. Use the EQ button to toggle between 4 EQ modes: KICKER, LOUD, SOUND QUALITY, and VOICE.
To sync the remote control, press the SOURCE button twice.
If you have a problem,
STOP
Please do not return product to the store.
KICKER Tech Support can assist you.
Call us at 800-256-KICK (5425), or contact us at support@kicker.com with any questions or problems.
Thank you for your KICKER purchase!
U.S. Customers Only
- Contents
- IMPORTANT SAFETY WARNING
- Specifications
- Wiring
- Relay Install & Battery Management
- Mounting
- Status LED
- Bluetooth (Blue)
- AUX IN (Red)
- Other
- Control Panel
- Setting Input Source
- Line Output & AUX IN
- Broadcast Mode
- Remote Control Install
- Remote Control Operation
- Troubleshooting
- WHAT TO DO IF YOU NEED WARRANTY OR SERVICE:
- WHAT IS NOT COVERED?
- HOW LONG WILL IT TAKE?
- KPB1 PowerPoint™
- KICKER®
- Info Card | Tarjeta de Información | Carte Info | Infokarte
- MOUNTING | MONTAJE | MONTAGE
- STOP
- KICKER Tech Support can assist you.
Brand : KICKER
Model : 47KPB2
Category : Soundbar