RM/368 - Blender Ramtons - Free user manual and instructions
Find the device manual for free RM/368 Ramtons in PDF.


| Product Type | Blender with multi-function attachments |
| Brand | Ramtons |
| Model | RM/368 |
| Jar Capacity | Approximately 1.5 L (max level indicated on jar) |
| Power | Estimated 400 W |
| Voltage | 220-240 V (check local supply) |
| Speed Settings | Off (O), Low (1), Normal (N), Pulse (P) |
| Pulse Function | Yes - momentary operation, auto-returns to Off |
| Blade Material | Stainless steel |
| Jar Material | Plastic (transparent) |
| Base Material | Plastic |
| Included Attachments | Chopper bowl, grinding bowl, measuring cup |
| Dishwasher Safe Parts | Jar, lid, measuring cup, seal rings (blade assembly recommended hand wash) |
| Maximum Continuous Operation | 3 minutes per cycle, then 10 minutes rest |
| Ice Crushing Capacity | Up to 6 ice cubes at a time |
| Grinding Capacity (coffee beans) | Max 35 g, run time about 30 seconds |
| Chopping Capacity (meat) | Max 150 g beef, highest speed for 40 seconds |
| Safety Features | Lid must be in place during operation; blade stops before removal |
| Cleaning Tips | Do not immerse motor unit; wipe with damp cloth |
| Environmental Disposal | Dispose at appropriate waste center per local regulations |
| Warranty | Refer to manufacturer; no user-serviceable parts inside |
Frequently Asked Questions - RM/368 Ramtons
User questions about RM/368 Ramtons
0 question about this device. Answer the ones you know or ask your own.
Ask a new question about this device
Download the instructions for your Blender in PDF format for free! Find your manual RM/368 - Ramtons and take your electronic device back in hand. On this page are published all the documents necessary for the use of your device. RM/368 by Ramtons.
USER MANUAL RM/368 Ramtons
Read this booklet thoroughly before using and save it for future reference
IMPORTANTSAFEGUARDS
When using this electrical appliance, basicsafety precautions should always be followed, including the following:
- Readallinstructions.
- Before using check that the voltage indicated on the product corresponds with the voltage of your electrical outlet.
- Donotletcordhangonhotsurfaceoroveredgeoftableor counter.
-
Donotoperateanyappliancewithadamagedcordorplugor aftertheappliancemalfunctionorhasbeendamagedinany manner.Returntheappliancetothenearestauthorizedservice facilityforexamination,repairoradjustment.
-
If the supply cord is damaged, it must be replaced by the manufacturer or its service agent or as similarly qualified person in order to avoid a hazard.
-
Closesupervisionisnecessarywhenanyapplianceisusedby ornearchildren.
-
Avoid contacting themoving parts.
-
Keep hands and utensils out of container while blending to reducetheriskofsevereinjurytopersonsordamagetothe blender. A scraper may be used but must be used only when the blenderisnotrunning.
-
The use of attachments not recommended or sold by manufacturer may cause fire, electric shockor injury.
-
Unplugfromoutletwhennotinuse, beforeputtingonor
takingoffparts, and beforecleaning. Todisconnect, turnany controlto "off", thenremoveplug from walloutlet by grasping the plug, notthecord.
- Toreducetheriskofinjury, neverplacebladeassembly on motorunitwithoutthejarproperlyattached.
- This appliance is not intended for use by persons (including children) with reduced physical, sensory or mental capabilities, or lack of experience and knowledge, unless they have been given supervision or instruction concerning use of the appliances by a person responsible for their safety.
- Children should be supervised to ensure that they don't play with the appliance.
- Donotleavethemachineonunattended.
- When removing the blender from the motor unit, wait until the blades have completely stopped.
- Always operate blender with coverin place.
- Always usetheappliance onasecure, drylevelsurface.
- Never placethis appliance on near a hot gas or an electric burner or where it could touch a heated appliance.
- Do not use outdoors.
- Do not use appliance for other than its intended use.
HOUSEHOLDUSEONLY
KNOWYOURBLEANDER

Fig.1


CHOPPER_BOWL
SPEEDKNOB

natural_image
Technical line drawing of a circular mechanical component with labeled points (P, O, 1, N) and a central pin (no text or symbols beyond labels)Fig.2
HOWTOUSE
Beforeinitialuse
-
Before first use, unpack the appliance and place all part on a horizontalsurface.
-
Thejarassembly(includingthemeasurecup, lid, sealring1, jar, sealring2, bladeassemblyandjarbase)hasalreadybeen assembledintothemotorunit.Disassembletowashalldetachable partsexceptthemotorunit.RefertothelatterchapterCAREAND CLEANING.
3.Onceallpieceshavebeencleanedanddrythoroughly,reassemble. 1)Invertthejarontoalevelsurface,holdingthejarhandle,putthethesealring2andbladeassemblyontothejarbasebottomandsecurethebladeassemblybyturningitanti-clockwiseuntiltight (SeeFig.3 )
2)Repositionthejarassemblywithitsopeningupwards.Wraptheseal ring1aroundthelidbottomandputthelidontothejarassembly.Place themeasurecupexactlyintothelidbyfittingthesmallprojectiononthe bothsidesofthecupintotheslotsofthelidandturningthecup clockwiseuntiltight. (SeeFig.4)
3)Finally, placetheassembledjarontothemotorunitbyaligning the stripontheassembledjarbottom.(SeeFig.5 )
CAUSION:Jarandjarbaseisnowsecure.Donottrytotwistthejar andjarbaseontomotorunit
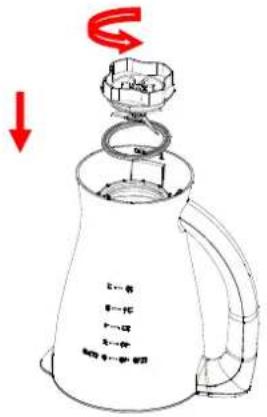
Fig.5
Howtouse
-
Peeledorcoredthefruitorvegetablesandthencutitintosmall dices.
-
Placethefoodtobeblendedintothejar (SeeFig.6). Usually,
certainamountofpurifiedwaterhastobeaddedtofacilitateth smoothrunningofappliance.Theproportionofthefoodandwateris
2:3. The amount of mixtures should not exceed them as level as indicated on the jar.
RECIPE
| FOODTYPESPECWEIGHTSPEED | |||
| Carrot (apple, pear etc.) | Cut into15mm*15mm*15mmm | Carrot: 600gWater:900g | High speed |
Note: never use boiling liquids or run the appliance empty.
-
Putthelidonthejar. Besurethemeasuringcupisinplace.
-
Plug the power cord into a standard wall outlet.
-
Turnthespeedknobtotheappropriatespeedsettingforyourtask.
-
For quick or delicate blending tasks, turn the speed knob to P position and hold for a few seconds and then release, the knob will reset to O position automatically. Operate several times until the consistenceyouwantisobtained
-
If you want to add ingredients while the blender is working, remove themeasuringcupandplacethroughthelid opening. (SeeFig.7)
-
Whencrushingiceorhardfood, keeponehandfirmlyonthelid.
-
Whentheconsistence you desire is obtained, turn the knob to O position.
Note:1)Foreachuse,theconsecutiveoperationtimeshouldnot exceed3minutes.atleast10minutesresttimemustbe maintainedbetweenwocontinuouscycles,lettheunitcoolto roomtemperaturebeforeperformingnextoperationcycle.
2) If you want to stop them machined during operation, turn the knob to Oposition anytime.

Beforeblending,add foodtobeblended intothejar.
Duringblending,addthe ingredientthroughthelid opening.
Importantoperatingtips
- Fill the grinding bowl with proper bean (such as coffee bean), then assemble the grinding blade assembly and grinding bowl together. Please see.
NOTE:
- Donotruntheapplianceformorethan3minutespertime, andonly waituntiltheunitiscooledtoroomtemperaturebeforeperforming nextoperationcycles.
- The quantity of beantobe allowed to grind by the grinding bowl is Max35g, and the finished time is about 30s.
- Then placethe prepared chopping food into the bowl. The food must be cut into small size firstly (such as 2 cm*2 cm*6 cm for beef).
- The appliance allows you to doch the maximum quantity of beef or
meatis150g.Selectthehighestspeedandoperatefor40S。
- Forbestcirculationoffoodthataretobeblendedwithsomeliquid, pourtheliquidintothejarfirst,thenaddsolids.
- Someofthetasksthatcannotbeperformedefficientlywitha blenderare:beatingeggwhites,whippingcream,mashingpotatoes, grindingmeat,mixingdough,extractingjuicefromfruitand vegetable
- The following item should never be placed in the unit as they may caused damage: bones, large pieces of solid, frozen food, ortough food such asturnips.
- Tocrushice,addupto6icecubes.Ifmoreiceisneeded,remove thecupandaddcubesonebyonethroughthelidopening.
CAREANDCLEANING
Thisproductcontainsnouserserviceableparts.Referserviceto qualifiedservicepersonnel.
- Beforecleaning, unplugtheblender.
- Alwayswashimmediatelyafteruseforeasiercleaning. Don'tletfood dryonthejarassemblyasthiswillmakecleaningdifficult.
-
PouralittlewarmsoapywaterintothejarandturntheknobtoP positionforafewseconds.Andthenemptythejar.
-
Dismantle all detachable parts. Lift the jar assembly off the motor unit, To detach the blade assembly by turning it clockwise from the jarbasebottom,andremovethesealring2andbladeassembly (see fig.8). In addition, detach the jar cover seal ring 1 from the jar
cover.

-
Rinsethemeasurecup, lid, sealring 1, jar, sealring 2 and blade assembly by handsor in adish washer and thendry. They are dishwashersafecomponents, but the temperature settings shall not exceed 70 °C.
-
Brushthebladecleanusingwarmsoapywater, thenrinse thoroughlyunderthetap. Don'ttouchthesharpblades, handle carefully. Don'timmersethebladeassemblyinwater. Leaveto dryupsidedownawayfromchildren.
-
Wipethemotorunitwithadampclothanddrythoroughly. Remove thestubbornspotsbyrubbingwithnon-abrasivecleaner. If liquids spillintothemotorunit;firstunplugtheunit,thenwipewithadamp clothanddrythoroughly.
CAUSION:
1) Donotimmersethemotorunitinliquidtopreventtheriskof electricshock.
2) Donotuseroughscouringpadsorcleansersonpartsor finish.
ENVIRONMENTFRIENDLYDISPOSAL

natural_image
Symbol of a trash bin crossed with two diagonal lines, representing no waste or discharge (no text or labels)Youcanhelpprotecttheenvironment! Pleaseremembertorespectthelocal regulations:handinthenon-working electricalequipmentstoanappropriate wastedisposalcentre.

- IMPORTANTSAFEGUARDS
- HOUSEHOLDUSEONLY
- KNOWYOURBLEANDER
- SPEEDKNOB
- HOWTOUSE
- Beforeinitialuse
- CAUSION:Jarandjarbaseisnowsecure.Donottrytotwistthejar andjarbaseontomotorunit
- Note: never use boiling liquids or run the appliance empty.
- Importantoperatingtips
- NOTE:
- CAREANDCLEANING
- Thisproductcontainsnouserserviceableparts.Referserviceto qualifiedservicepersonnel.
- CAUSION:
- ENVIRONMENTFRIENDLYDISPOSAL
Brand : Ramtons
Model : RM/368
Category : Blender