RM/259 - Blender Ramtons - Free user manual and instructions
Find the device manual for free RM/259 Ramtons in PDF.


| Type | Blender with mill/chopper attachment |
| Brand | Ramtons |
| Model | RM/259 |
| Power Supply | 220-240V, 50/60Hz (refer to product label) |
| Speed Settings | 0 (off), 1, 2, M (momentary/max) |
| Jar Capacity | Approximately 1.5 L (do not exceed max level marked on jar) |
| Max Continuous Operation (Blending) | 3 minutes; then 10 minutes rest required |
| Max Continuous Operation (Chopping) | 1 minute; then 5 minutes rest required |
| Chopper Capacity | Max 50g coffee beans |
| Safety Interlock | Top cover must be locked properly for operation; jar alignment with motor unit required |
| Blade Material | Stainless steel (sharp, handle with care) |
| Jar Material | Plastic (BPA-free) |
| Cleaning | Wipe motor unit with damp cloth; rinse jar and chopper cup with water. Not dishwasher safe. Do not immerse motor unit. |
| Included Accessories | Blender jar with top cover and center lid, chopper cup with base |
| Product Weight | Approximately 1.2 kg |
| Dimensions (H x W x D) | Approximately 38 x 15 x 15 cm |
Frequently Asked Questions - RM/259 Ramtons
User questions about RM/259 Ramtons
0 question about this device. Answer the ones you know or ask your own.
Ask a new question about this device
Download the instructions for your Blender in PDF format for free! Find your manual RM/259 - Ramtons and take your electronic device back in hand. On this page are published all the documents necessary for the use of your device. RM/259 by Ramtons.
USER MANUAL RM/259 Ramtons
BLENDER WITH MILL INSTRUCTIONS MANUAL

natural_image
Line drawing of a blender with a side view showing its top and front views (no text or symbols)Model: RM/259
Read this booklet thoroughly before using and save it for future reference
IMPORTANT SAFEGUARDS
When using any electrical appliance, below are basic safety precautions to be followed :
- Read all instructions.
- Before using the appliance, check that the voltage power corresponds to the one shown on the appliance nameplate.
- Do not let cord hang over edge of table or counter.
- Do not operate any appliance with a damaged cord or plug or after the appliance malfunction or has been damaged in any manner. Return the appliance to the nearest authorized service facility for examination, repair or adjustment.
- If the supply cord is damaged, it must be replaced by the manufacturer or its service agent or a similarly qualified person in order to avoid a hazard.
- Use by children not intended but foreseeable, but only allowed with supervision.
- Avoid contacting with moving parts.
- Blades are sharp, so handle carefully.
- The use of attachment, including jar, top cover, not recommended or sold by manufacturer may cause fire, electric shock or injury.
- The appliance can not be used for blending hard and dry substance; otherwise the blade could be blunted.
11.Switch off the appliance before approaching parts which move in use. - Do not immerse the Motor Unit into water or other liquids.
- Do not use outdoors.
- This appliance can be used by children aged from 8 years and above and persons with reduced physical, sensory or mental capabilities or lack of experience and knowledge if they have been given supervision or instruction concerning use of the appliance in a safe way and understand the hazards involved. Children shall not play with the appliance. Cleaning and user maintenance shall not be made by children without supervision.
- Save these instructions
Household use only
KNOW YOUR BLENDER
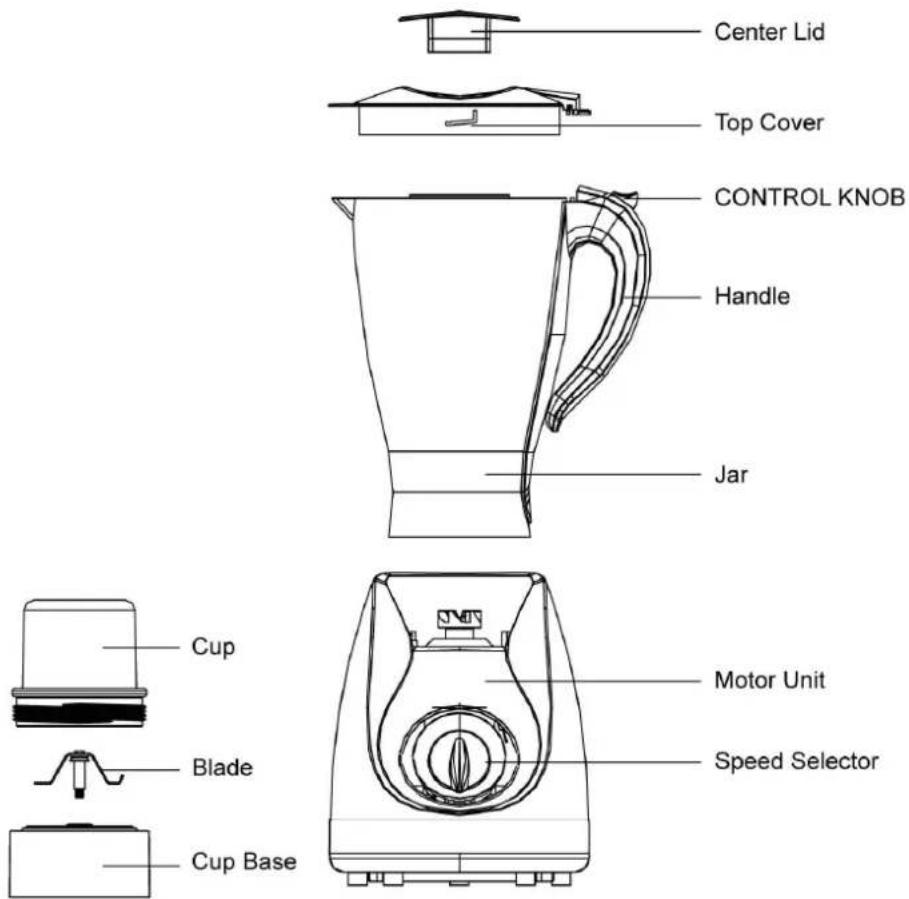
USING THE BLENDER
- Place the jar on the Motor Unit and slightly turn the jar clockwise, as the arrow on it show until the triagonal marker on Motor Unit aligns with the dot on jar. (see Fig. 1)

Fig. 1
- Put the food piece into the jar. The amount of food should not exceed the max level as indicated on the jar. Warning: never run the appliance empty!
- Replace the Top Cover on the jar, then turn clockwise until you hear an audible sound and the tab of jar in the snap of Top cover properly, so the top cover can fix with jar
securely and safety device is effective. (see Fig. 2)

natural_image
Line drawing of a kitchen appliance with a handle and arrow indicating rotation (no text or symbols)Fig. 2
-
Let the tab of Center Lid align with the groove of Top Cover then put down if necessary.
-
Connect the plug to wall outlet and set Speed Selector to your desired setting. You can turn the knob to M position if want to accelerate the process of blending. The detailed information of Speed Selector is as follows. figure 3.
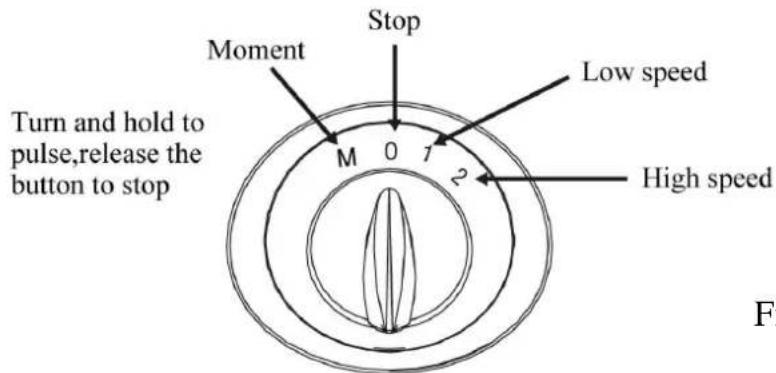
Fig. 3
- Do not run the appliance for more than 3 minutes per time. Minimum 10 minutes rest time must be maintained between two consecutive cycles
- Turn the Speed Selector to "0" Position once the mixture has been blended to your desired consistency.
- Turn the jar anticlockwise then remove.
- Press down Control Knob along surface of handle then turn Top cover anticlockwise, take down it, pour and serve.
CHOPPER OPERATION
-
Place the motor base on the flat horizontal surface and make sure it is unplugged.
-
Fill the Cup with coffee beans, the quantity of coffee beans shall not exceed 50g.
-
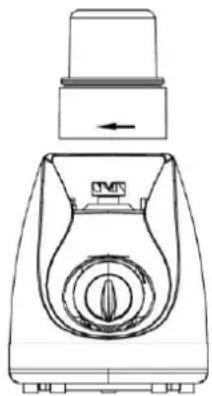
Then assemble the Cup Base by turning it in anticlockwise, until the Cup Base screwed tightly into the cup (See Fig 4); then assemble the Cup Unit assembly into the motor unit, so that the Cup base is locked into the groove of motor unit by turn the assembly in clockwise. The position is a safety interlock device. (see fig.5)
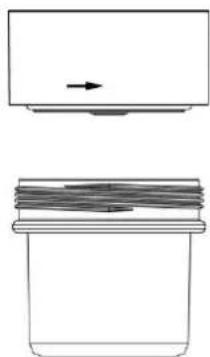
natural_image
Simple line drawing of a container with a handle and an arrow indicating direction (no text or symbols)Fig 4
- You can turn the speed selector to the desired setting or hold on the "M" position if
want to accelerate the process of blending.
Note: The appliance allows you to chop the maximum quantity of coffee beans is 50g. Do not overfill the Cup.
- Allow the blade stop running before removing the Cup Unit.
- Disconnect the supply once finished. Disassemble the Cup Unit and remove the Cup Base. Then empty the bowl and serve.
- Do not run the appliance for more than 1 minutes per time. Minimum 5 minutes rest period is required between two consecutive cycles.
WARNING:
- Never operate the appliance more than 15 seconds per time without load.
- Blades are very sharp. Handle with care.
CLEANING AND MAINTENANCE
You can clean the appliance as follows:
-Pour a little warm water into the jar and turn the Speed Selector to M position for a few seconds.
-Remove the jar and rinse under running water.
-Wipe the outer surface of Motor Unit with a damp cloth, do not use abrasive cleansers.
Warning: Never immerse Motor Unit in water for cleaning and all parts are not dishwasher safe!.
-Dry all parts and then replace them
If any problems have been encountered during use never disassemble the Motor Base by yourself. Contact only the authorized service facility for examination and repair.
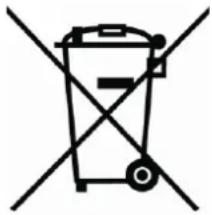
Environment friendly disposal
natural_image
Simple line drawing of a trash bin with crossed lines indicating no waste or prohibition (no text or symbols)You can help protect the environment! Please remember to respect the local regulations: hand in the non-working electrical equipments to an appropriate waste disposal center.

natural_image
Technical line drawing of a mechanical device with no visible text or symbolsFig 5
Brand : Ramtons
Model : RM/259
Category : Blender